

THE FOLLOWING COMPTIA IT FUNDAMENTALS EXAM OBJECTIVES ARE COVERED IN THIS CHAPTER:
- 3.2 Given a scenario, use security best practices
- Password management
- Password complexity
- Change default passwords
- Password confidentiality
- Password expiration
- Password reuse
- Awareness of Single Sign On
- Device hardening
- Disable unused features
- Disable Bluetooth
- Disable NFC
- Timeout / lock options
- Enable security software/features
- Software firewall
- Anti-malware
- Encryption options
- Disable unused features
- Open WiFi vs. secure WiFi
- Multifactor authentication
- Suspicious emails
- Attachments
- Hyperlinks
- Act on security software alerts
- Admin vs. user vs. guest account
- Password management
- 3.3 Given a scenario, use web-browsing best practices
- Recognize a secure connection/website
- https
- lock symbol
- Recognize invalid certificate warnings
- Recognize suspicious links
- Recognize suspicious banner ads
- Recognize adware symptoms
- Constant popups
- Home page redirection
- Search engine redirection
- Limit the use of personal information (PII)
- Update browsers and plugins
- Avoid use of legacy browsers
- Disable unneeded/suspicious browser plugins, toolbars and extensions
- Disable autofill forms/passwords
- Clear browser cache/history/cookies
- Recognize untrusted source warnings
- Risks of using public workstations
- Recognize a secure connection/website
 Chapter 8, “Security Threats,” introduced you to a wide range of attacks and threats to your computer. While it's true that you need to be vigilant when protecting your computer, the good news is that there are many steps you can take to help secure your system. Even if you follow all of the best steps to protect your computer, you can still find yourself the victim of an attack—there is no guarantee that you're safe. Your goal though is to make a would-be attacker's life as miserable as possible. The harder your computer is to get into, the more likely it is that the attacker will look for easier victims. Following the proper steps dramatically decreases the odds of an attack being successful versus having an unprotected system.
This chapter builds upon Chapter 8 by showing you steps you can take to protect your computer and your data. As part of that, you will learn how to harden your computer, manage user accounts properly, and protect yourself on a network, with particular emphasis on Internet and email safety. This chapter contains practical advice, as well as scenarios to help you understand preventive measures, what to look for in regard to suspicious activity, and what to do in case your system becomes compromised.
Computer and Network Security Best Practices
The best computer security plans are always multifaceted; there are parts of the plan to implement on the local computer as well as the network, and there are activities you should avoid doing to be safe. Odds are you wouldn't walk down a dark alley at night—this section will show you what the computerized version of that dark alley is so you can avoid it.
In this section, you will learn details on three different classifications of computer and network security. It starts off with device hardening, moves to user account management, and finishes with network security.
Device Hardening
The term device hardening has to be one of the best terms in all of computing. It sounds strong and powerful and like it will make your computer invincible. While the invincibility part is a bit of a stretch, device hardening helps protect your computer by reducing its vulnerabilities.
If you think about it, the very act of networking computers is what makes them vulnerable to attacks. An old adage in the IT industry is that “a server is totally secure until you install the network card.” The pragmatic paradox is, of course, without that network card the server can't really serve anyone. The adage holds true for all computers, and so does the paradox. Device hardening is one proactive step you can take at the local machine to reduce the likelihood of a successful attack. Here, you will learn about the following device-hardening techniques:
- Disabling unused or potentially dangerous features
- Locking the system
- Enabling encryption
- Utilizing security software and features
Disabling Unused or Dangerous Features
You've probably heard the phrase, “out of sight, out of mind.” This is the first thing I think of when it comes to unused features. Because they're not used, they are forgotten about, so you don't bother to ever monitor them to see if they were used and you didn't realize it. Unused features with potential security holes are things that hackers love. Think of a scenario where an attacker exploits a bug in an unused feature and remains undetected; this allows them to continue their tasks without deterrents. It's like being able to eat all of the cookies in the cookie jar knowing that no one will look for crumbs—almost too good to be true!
Disabling Unused Communication Methods
With the prevalence of smartphones today, hacking via wireless network or other communication methods has become quite popular. The best way to protect yourself is to disable those services.
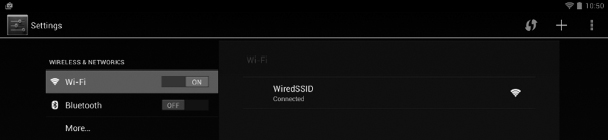
Imagine a situation where you are in a crowded public place, and you receive an unsolicited popup message on your smartphone inviting you to buy a new product. You have just been bluejacked! The message you received is probably harmless advertising, but it's not something you asked for and it could be more serious. Solve this by disabling Bluetooth. On your iPhone or Android phone, this is done in Settings. Figure 9.1 shows you the setting in iOS, and Figure 9.2 shows it to you in Android.
FIGURE 9.1 Disabled Bluetooth in iOS

FIGURE 9.2 Disabled Bluetooth in Android
Another potentially dangerous short-range communication method is near field communication (NFC). It's a convenient technology that lets you do things like hold your phone next to someone else's and transfer data, or bump your phone to a receiver at a store to pay for your purchase. That convenience can also be a door into your system, though, so if you're not actively using it, disable it!
Disabling Unused Services
Within Windows and other operating systems, various system functions are implemented as services. For example, the process of managing a print job falls to the print spooler service, and logging into a domain controller is managed by a service called Netlogon. To run these services, your operating system logs itself on temporarily as a quasi-user with elevated privileges to perform the task and then logs itself back off.
An attacker could use an exploit of a service to attempt to gain unauthorized access to your machine. Most of the time, unused services are disabled by default, so the point is to not enable services unless you know you need them. Services are found in Windows in Computer Management. Exercise 9.1 shows you how to start and stop services in Windows 7.
Starting and Stopping Services in Windows 7
- Open Computer Management by clicking Start and then right-clicking Computer and choosing Manage.
- On the left side of the Computer Management window, click Services under Services And Applications, as shown in Figure 9.3.
- You will see the Bluetooth Support Service, as highlighted in Figure 9.3. Notice that it is not started and starts up manually. The other choices for startup are Automatic and Disabled.

- To start the service, either click the green Start arrow above the Name column or right-click the service and choose Start. The status will change.
- To stop the service, click the Stop button above the Name column or right-click the service and choose Stop.
- To change the startup type for a service, right-click and choose Properties. Use the drop-down menu next to Startup Type to make your selection, as shown in Figure 9.4, and then click OK.
FIGURE 9.4 Bluetooth Support Service properties

Although disabling unused services can help harden your system, don't disable services in your operating system unless you know what they do and you know you don't need them. Disabling necessary services can cause your system to not function properly.
Disabling AutoPlay
AutoPlay is branded as a convenient feature that lets you insert media into your system and have it run automatically. Unfortunately this can also introduce a security risk.
It is never a good idea to put any media in a workstation if you do not know where it came from or what it is. The reason is that the media (CD, DVD, USB) could contain malware. Compounding matters, that malware could be referenced in the AUTORUN.INF file on the media, causing it to be summoned simply by inserting the media in the machine and requiring no other action. AUTORUN.INF can be used to start an executable, access a website, or do any of a large number of different tasks. The best way to prevent your system from falling victim to such a ploy is to disable the AutoPlay feature on the workstation.

AutoPlay may also be called Autorun on your computer.
The AutoPlay settings are located in Control Panel under Hardware And Sound. If you open Control Panel don't see it, type AutoPlay in the Search box and it will appear. Open AutoPlay, and you will see a screen similar to the one shown in Figure 9.5.

The easiest way to disable AutoPlay is to uncheck the box at the top of the page. You can also control the settings for individual media types. For example, in Figure 9.5 you can see that for software and games the system will prompt the user as to which action to take. This is far better than just running the media automatically.
Locking the System
Locking the system can mean two things. The first is physically locking the system to a desk or in a drawer so it can't be stolen. The second is to software lock the system when you leave your desk. You learned about both of these security options in Chapter 8.
As a quick reminder, a screensaver should automatically start after a short period of idle time, and a password should be required before the user can begin the session again. This method of locking the workstation adds one more level of security. Better yet, users should automatically lock their computer as soon as they leave their desk. This is done by pressing Ctrl+Alt+Del and choosing Lock Workstation. The user's password will be required to unlock the machine.

A popular phrase associated with this security step is “Control Alt Delete when you leave your seat!”
Setting NTFS Permissions and Enabling Encryption
In Chapter 6, “Network Sharing and Storage,” you learned about sharing resources over the network and the permissions used to control access to shared files. Those permissions apply only when people are connecting to the computer via the network. When different users log into the same computer locally, though, you need to employ other methods to keep their private data separate.
One way is to set certain folders to be inaccessible to other local users. To do this in Windows, use the Security tab in the folder's Properties dialog box. It contains file-sharing permission settings that apply to local access. You can also encrypt certain folders so their content is scrambled if someone tries to browse the file content, such as with a disk-editor utility. To encrypt a folder, in the folder's Properties dialog box, click the Advanced button and select the Encrypt Contents To Secure Data check box. You'll practice these skills in Exercise 9.2. Only the Professional, Enterprise, and Ultimate versions of Windows 7 support encryption; in other versions, the check box for encrypting files is unavailable.
If your operating system does not natively support file and folder encryption, you can get third-party software that encrypts data.
When you encrypt folders, as long as you're logged in as the user who did the encrypting, the files are available normally and the encryption is invisible to you. However, if you log in as some other user, the files are inaccessible. Encryption is based on security certificates stored on the hard disk for each user. There's a risk involved, though, because if the security certificate becomes corrupted or deleted, you won't be able to access files that are legitimately yours. It's therefore important to back up your certificate before you start relying on encryption to protect your files locally. A lost or damaged certificate can be recovered but not easily. Exercise 9.2 has you practice encrypting files and setting security permissions, and Exercise 9.3 provides practice in backing up a security certificate. For the exercises to work, you will need Windows 7 Professional, Ultimate, or Enterprise editions.
Securing and Encrypting Local Folders in Windows 7
- If you don't already have at least two user accounts on your PC, create one. To do so, follow these steps:
- Choose Start
 Control Panel User Accounts (or User Accounts And Family Safety, depending on your Windows version) Add Or Remove User Accounts.
 - Click Create New Account.
- Type the new account name.
- Click Create Account.
- Choose Start
- Open the Documents folder. Click New Folder, type Private as its name, and press Enter to accept the new name.
- Right-click the Private folder, and choose Properties.
- On the Security tab, click Edit. The Permissions For Private dialog box opens.
- Click Add. The Select Users Or Groups dialog box opens.
- In the Enter The Object Names To Select box, type the username for the other user on this PC that you want to use for the exercise.
- Click Check Names. The username appears, preceded by the computer name, as shown in Figure 9.6.
FIGURE 9.6 Giving a user permissions

- Click OK. Now that user appears on the Group Or User Names list in the Private Properties dialog box.
- With the user's name selected, notice the permissions in the lower pane. As Figure 9.7 shows, the Full Control and Modify check boxes aren't selected.

- Click OK.
- Click OK to close the Private Properties dialog box.
- Copy a document file into the Private folder.
- Log off your current user account, and log in as the other user.
- Attempt to open the document. Note what happens.
- Attempt to save changes to the document. Note what happens.
- Log off, and log in again using the original username.
- Open the Documents folder. Right-click the Private folder, and choose Properties.
- On the General tab, click Advanced.
- In the Advanced Attributes dialog box, select the Encrypt Contents To Secure Data check box if it's available.
Note: You must have the Professional, Ultimate, or Enterprise edition of Windows 7 to encrypt a folder's contents as detailed in step 19. On any other Windows 7 version, the check box will be grayed out.
- Click OK.
- Click OK to close the Private Properties dialog box.
- Log off your current user account, and log in as the other user.
- Attempt to access the Private folder, and note what happens. If you chose to encrypt the contents in step 19, it isn't accessible.
- Log off, and log in again using the original username. Delete the Private folder.
Backing Up a Windows Security Certificate
- In Windows, click Start, type certmgr.msc, and press Enter. The Certificate Manager utility opens.
- Click the Personal folder to expand it.
- Click Certificates.
- Click the certificate that shows Encrypting File System in the Intended Purposes column.
- Choose Action All Tasks Export. The Certificate Export Wizard runs.
- Click Next.
- Click Yes, export the private key, and then click Next.
- Make sure Personal Information Exchange is selected, and click Next.
- In the Password box, type a password of your choice. Type it again in the Type And Confirm Password box. Then click Next.
- In the File Name box, type the name you want to use to save the backup file. For example, if your username is jsmith, you might use jsmith-certbackup.
- The default storage location for the backup is your Documents folder. If you want to place it somewhere else, click Browse, change locations, and then click Save.
- Click Next. The Completing The Certificate Export Wizard screen appears.
- Click Finish.
- In the confirmation dialog box, click OK.
- Close the Certificate Manager window.
On a Mac, local encryption can't be applied to individual folders and files; you must encrypt the entire disk. You can do this via the Disk Utility, as shown in Figure 9.8, or encrypt the home folder using FileVault as shown in Figure 9.9.
FIGURE 9.8 Encrypting a disk in Mac OS X


The easiest way to encrypt files and folders on a Linux system is via the command-line interface using the openssl libraries. openssl allows encryption and decryption by selecting which cipher to use. For example, you can use des3 (Triple Data Encryption Standard) as the encryption algorithm. In Linux, you specify the cipher, followed by defining the key derivation routine, such as salt, when encrypting. Then you specify the original input file followed by the encrypted output file. An example looks like this:
openssl des3 -salt -in originalfile.txt -out encryptedfile.txt
To decrypt, the only differences are that you use the -d option (which means decrypt) and you put the encrypted filename before the unencrypted output file. An example looks like this:
openssl des3 -d -salt -in encryptedfile.txt -out unencryptedfile.txt
Using Security Software and Features
Having a system infected with malware is one of the most likely security risk scenarios you will encounter. There are four main classes of applications to help protect your system against malware and hackers:
- Antivirus software defends against viruses, worms, and Trojan horses.
- Antispyware software defends against adware and spyware.
- Antispam software reduces the amount of junk email you receive.
- Software firewalls block potentially dangerous network traffic.
There are also suites available that combine multiple security functions; for example, the Norton Security suite includes antivirus, antimalware, and antispam features, along with identity-protection tools, a software firewall, a backup tool, and a PC tune-up tool. McAfee's LiveSafe is similar. In addition, there is some overlap between the types of threats each application guards against; for example, an antivirus program may also target some types of non-virus malware.
Antivirus Software
Antivirus software attempts to identify virus infections by scanning all the files on your hard disk (or a subset of files that are most likely to contain viruses). Popular antivirus programs include Norton Security (formerly Norton Antivirus) and McAfee AntiVirus.
The website www.av-comparatives.org provides a comprehensive comparison and review of current antivirus applications. Take the time to look through this site and draw your own conclusions about what may be the best antivirus application for you.
Viruses are often concealed by a simple deception. They embed themselves inside an application, redirecting the application's commands and code around themselves while running as a separate task. One way antivirus programs detect a virus is by opening the file and scanning the code, looking for this type of redirection. Some programming languages, such as C++ and Java, generate code in a style that is sometimes wrongly accused by an antivirus program of being infected.
Another way antivirus programs work is to scan the code of each executable file looking for virus signatures. A virus's signature is an identifying snippet of its code, sometimes called a virus definition. The antivirus program maintains a database of known virus definitions; when it finds a match between its database and some code it finds in a file it scans, it signals a warning that there may be an infection. As new viruses and other threats are discovered, the company updates the virus-definition file for its antivirus program and downloads it to users as an update. Having the most up-to-date definitions is critical for effective virus protection, so you must regularly update your antivirus software (or better yet, set it to update itself automatically).
In addition, many antivirus programs create an MD5 for each application. MD5 stands for Message Digest Version 5, a math calculation that results in a unique value used to reflect the data being checked. If the MD5 changes, this may be treated as a virus attack.
Antivirus applications are normally resident, meaning they're continuously running in the background, analyzing your system and any programs when they're opened or closed as well as any files that are opened or closed. Some antivirus programs check incoming and outgoing email too, as well as web pages you visit. You can also tell your antivirus program to do a complete scan of all your files any time you like. (It will probably offer to do one right after you install the antivirus software.)
When your antivirus program finds something suspicious, a message appears, giving you the choice of deleting or quarantining the infected file(s). Deleting a file removes it from your system. Quarantining it places it in an off-limits area so it can't be run but keeps it on your system. You might quarantine a file that you wanted to share with an IT professional who was tracking virus infections on your network, for example. Exercise 9.4 gives you the steps needed to install and use an antivirus program.
If your security software pops up an alert, it's best to act upon it immediately. The alert will tell you what the suspected problem is and recommend a course of action. Unless you have a specific reason not to, follow your security software's recommended actions!
Installing and Using an Antivirus Application
- If you don't already have an antivirus application, download and install one. For Windows systems, Microsoft's Home Security Essentials program is free, and it will work well for this exercise. You can download it at windows.microsoft.com/en-us/windows/security-essentials-download. Or, if you already have an antivirus application, open it.
- Using whatever antivirus software you have installed, do the following:
- Update the virus definitions.
- Run a complete system scan.
- If any viruses are found, quarantine or delete the files that contain them.
Antispyware Software
Antispyware applications look for known spyware and adware programs and offer to disable them or remove them from your system. Like antivirus applications, antispyware programs look for definitions—that is, code snippets that identify a spyware or adware component.
Most antispyware applications also can remove lesser security and privacy threats, such as tracking cookies. Many antivirus applications include antispyware protection too, so you may not have to bother with a separate antispyware application.
Some antispyware applications run all the time in the background, like an antivirus application. Others run only when you specifically open them and initiate a scan.
Windows Defender is a free antispyware tool that comes with Windows. There are also many other free and commercial antispyware programs available, such as Spybot Search & Destroy (www.safer-networking.org).
As with antivirus applications, antispyware applications are most effective when their definitions are up to date.
Antispam Software
Spam refers to unwanted junk email. People send spam to try to sell products because doing so is economical—it costs almost nothing to send millions of emails, so even if only a very small percentage of people respond, it's still a money-making proposition. People also send spam to perpetrate fraud, either by trying to sell useless or nonexistent products or by trying to trick people into visiting phishing websites or sites where a virus or other malware will be downloaded.
Many email applications include filters and other tools to manage spam. Microsoft Outlook has its own junk-mail filter, for example. However, these built-in filters often fail to catch a lot of the spam because their algorithms for differentiating between spam and legitimate mail aren't sophisticated.
Some antivirus applications include an antispam component, and you can also buy add-on antispam programs or get them for free. For example, SpamBayes, available for free at spambayes.sourceforge.net, is an extremely sophisticated email differentiator that uses a ranking system that evaluates each message on multiple criteria to determine its spam probability. It's available for Windows, UNIX, Linux, and Mac OS X.
Diagnosing and Fixing Malware Infections
Even if you have an antimalware application installed, it's not perfect. Occasionally a virus or other malware may get around it, especially a new threat (and especially if you haven't updated your definitions lately). When a system is infected with a virus, a worm, a Trojan horse, or other malware, you may experience some of these symptoms, either immediately or on a particular day or time when the malware triggers itself:
- Your antivirus software may be disabled, and you can't re-enable it. Or, if you didn't already have antivirus software and you're just now installing it, it may not install. This is a very common side effect of virus infection, because it makes it difficult for you to remove the virus.
- Your system may run sluggishly, taking much longer than normal to open windows or applications. Many malware infections bog down a system or cripple it.
- CPU and memory usage may be high even though you aren't doing anything that would cause them to act in this manner. This can happen if the malware is hijacking your system for its own computing purposes.
- A warning or message box may appear onscreen and refuse to go away. For example, there may be a message that your system is infected with a virus and demanding that you enter a credit card to “buy” software that will fix the problem.
- Your friends may let you know that they have been receiving strange emails from you that you didn't send.
- When you use your web browser, you may be bombarded with pop-up ads.
If you start experiencing these symptoms, your own antivirus program may not be much help because a virus may have gotten around it and disabled it. If it's running—great. Do a full virus scan immediately.
If you can't use your local antivirus program, your best bet is an online virus checker. Trend Micro offers a good free one at housecall.trendmicro.com, for example. Scan your system with that, and then follow the advice the scanner recommends. If the system is infected to the point that it won't operate even to open a web browser, try booting into Safe Mode with Networking. Doing so may disable some of the virus's components temporarily. If you still can't rid of the virus, you may need to consult an IT professional at your local computer shop.
After you've removed the infection, you may need to repair or reinstall your antivirus software and download updates to it.
Software Firewalls
You learned about software firewalls in Chapter 4, “Software Applications.” If you will recall, firewalls can protect you in two ways. They protect your network resources from bad traffic generated by hackers, and they can simultaneously prevent computers on your network from accessing undesirable content on the Internet. Firewalls perform these tasks by monitoring and filtering network traffic. Windows comes with its own software, appropriately named Windows Firewall. If you want to obtain a different firewall, you can find them as stand-alone products or part of a security suite such as Norton Security. If you are unsure of what security measures are in place on your system, the Windows Action Center, shown in Figure 9.10, can show you what security measures are set on your system.
FIGURE 9.10 Windows Action Center

User Account Management
Users represent the weakest link in the security chain, whether harm comes to them in the form of malware, social engineering, or simply avoidable mistakes. Aside from some of the obvious things, like training users (or yourself) to be on the alert for social engineering, there are several tasks you can perform to decrease the security risks related to user accounts. These include proper management of user account types, password management, and authentication systems.
Managing User Account Types
All computer operating systems come with multiple levels of user accounts, each with predefined sets of permissions. While the specific names of the accounts might differ between OSs, the types of accounts generally fall into these three categories, from most to least powerful:
- Administrators
- Users
- Guests
The administrator is sometimes shortened to admin and is called root on UNIX and Linux systems. This account can essentially do anything on the computer, making it very powerful. Because of this, you want to be very careful deciding who has administrator rights.
Next on the list in Windows, Mac OS X, and Linux are standard user accounts. They can't make changes that will affect other users, whereas an administrator account can make all types of changes. This prevents people from uninstalling applications that they personally don't need but others do.
To prevent unauthorized changes to a computer, it's a good practice to have everyone use a standard account for daily operations and have an administrator account available that is used only when performing activities that require it, such as installing or removing software or updating a device driver.
Guest accounts are for very basic access, such as Internet access only or access to just one application at a public kiosk. The guest account is created by default when Windows is installed, and this represents a weakness that can be exploited by an attacker. While the account cannot do much, it can provide initial access to a system and the attacker can use that to find another account or acquire sensitive information about the system.
Some operating systems have additional classifications of user accounts, such as Power Users, which have some basic administrative rights but not total control.
To secure the system, disable all accounts that are not needed, especially the Guest account. Next, rename the accounts if you can (Microsoft won't allow you to rename some). For example, change Administrator to something more difficult to guess. If an attacker knows the username, all they have to do is crack the password. If they don't know either, their job just became that much more difficult.
Managing Passwords
Imagine this scenario: you just installed four computers on a wireless network, enabled the best Wi-Fi security (WPA2), installed antimalware and a software firewall on all computers, and then you find out that one of the users has the word password for their login password. How secure is that?
Password management is a critical security feature that tends to get overlooked. It involves proper user training and is aided by restrictions a network administrator can set on users if their computers are part of a domain.
One of the first things that users should know is to change their default passwords and make the passwords they choose complex. Also teach your users to not share their password with anyone—passwords are to remain confidential in order to protect the network.
Creating Effective Passwords
A strong password is one that is difficult for someone to guess. Strong passwords have these characteristics:
Long The longer, the better. At least eight characters are optimal.
Varied The password contains at least one capital letter and at least one number and/or symbol.
Unusual The password doesn't appear in a dictionary and isn't a proper noun.
Passwords that are easy to guess are considered weak passwords. Some of the worst passwords of all are things like qwerty, 12345, the user ID, and the word password. Only slightly better are the names of people, pets, and places. Even though a password should be difficult for others to guess, it's okay to make it easy for you to remember. To do this, try combining numbers and letters that make sense to you but won't make sense to other people. For example, suppose you have a cousin Sam who grew up in Wichita, and you used to call him a lot, so you remember that his phone number was 555-1192. An effective password might be Sam-Wich#1192. Notice that this password is long (13 characters), varied (uppercase, lowercase, numeric, and symbol characters), and unusual, yet it's fairly easy for you to remember just by thinking about your cousin.
Here are some other techniques for creating passwords that are easy to remember but difficult to guess:
Substitute Zero for the Letter O in Words For example, St0rageR00m.
Substitute Numbers for Letters To make it easier to remember, use the numeral that represents the letter of the alphabet (for example, b=2) or use the numeral that represents the position in the word (for example, take the word teacher and substitute numerals for the second and fourth digits, like this: t2a4her.
Combine Two or More Unrelated but Memorable Words For example, GroceryCandleFlowerpot.
Substitute a Symbol for a Letter That It Resembles For example, $ looks like an S, as in $ubstitution$alary; and ! looks like a capital I, as in !temized.
As tempting as it may be to reuse the same password for multiple systems or sites, you're safer using a different password for every site you access. That way, if one site is hacked, it won't affect your security on another site.
If you can't remember all the passwords in your head, one possible solution is to store them in a password-protected file on your hard drive. Yes, someone could steal that file from your hard disk and possibly even unencrypt it, but the chances of that happening are slim compared to the chances of a server being hacked where your password for a certain site is stored.
Another possible solution is to reuse the same password for sites that don't store any financial information. For example, you might use the same password for logging into message boards and chat rooms at various sites, because if your password is discovered at those sites the consequences are generally mild. Someone might log in and impersonate you, causing you some temporary embarrassment, but you haven't lost any money. On the other hand, you should use a different password for each of your important banking or other financial accounts, because a thief could cause you significant financial problems on these sites.
Password Changes
Some companies' IT policies require that you change your password at regular intervals, such as every 90 days. The rationale is that the longer you keep a password, the more likely that someone has surreptitiously seen you type it, or you've written it down somewhere, or some other security breach has occurred.
Even if a system doesn't require you to change your password on a certain timetable, you may want to take the initiative to change it yourself, especially on sites where you manage your financial affairs.
To help you remember your password in a frequently changing environment, you may want to develop a structured system of changes. For example, suppose your password is video$Furrier. When you change it, you might add the two-digit number of the month in which you changed it. For example, if you change it in February, you can make it video$02Furrier. Then, when you change it again in May, you can change it to video$05Furrier.
In addition to not reusing your password on different sites, you also shouldn't reuse passwords after being required to change it. Recycling old passwords can make it easier for hackers to guess your password and gain unauthorized access.
User Authentication
User authentication happens when the system you are logging into validates that you have proper credentials. Oftentimes, this is as simple as entering a username and password, but it could be more complex.
Multifactor Authentication
To increase security, your computer or network might require multifactor authentication, which as the name implies requires multiple pieces of information for you to log in. Generally speaking, in addition to a username, multifactor authentication requires you to provide two or more pieces of information out of these three categories: something you know, something you have, or something you are.
Something you know is generally a password. Something you have can be one of a few different things, such as a smart card or a security token.
A smart card is a plastic card, similar in dimensions to a credit card, that contains a microchip that a card reader can scan, such as on a security system. Smart cards often double as employee badges, enabling employees to access employee-only areas of a building or to use elevators that go to restricted areas, or as credit cards.
Smart cards can also be used to allow or prevent computer access. For example, a PC may have a card reader on it through which the employee has to swipe the card, or that reads the card's chip automatically when the card comes into its vicinity. Or, they're combined with PIN numbers or used as an add-on to a standard login system, to give an additional layer of security verification. For someone to gain unauthorized access, they have to not only know a user's ID and password (or PIN) but also steal their smart card. That makes it much more difficult to be a thief!
A security token, like the one shown in Figure 9.11, displays an access code that changes about every 30 seconds. When received, it's synchronized with your user account, and the algorithm that controls the code change is known by the token as well as your authentication system. When you log in, you need your username and password, along with the code on the token.

Finally, the system could require something totally unique to you to enable authentication. These characteristics are usually assessed via biometric devices, which authenticate users by scanning for one or more physical traits. Some common types include fingerprint recognition, facial recognition, and retina scanning.
Law enforcement agencies have been using fingerprint recognition for over 100 years, and no two prints have yet been found to be identical, even in genetically identical twins. That's because fingerprints develop in the womb, and they aren't preprogrammed at conception. More recently, computerized fingerprint scanners have taken the place of manual ink prints, and the technology for reading fingerprints has become so affordable that it's built into many computer systems, including consumer-level notebook PCs and smart phones. Some fingerprint scanners use a rapid laser to detect the ridges in a person's fingers; others have an electrostatically sensitive pad that detects the current formed by the small quantities of water in a fingerprint.
Facial recognition software works in conjunction with a camera (like the webcams built into some notebook computers) to scan the face of the person who is logging in. The facial scan is matched with existing previous scans of that same person stored on the computer. Some consumer-level notebook PCs now come with an option of logging into the OS via facial recognition as an alternative to typing a login password.
Retina scanning is very similar to facial recognition, but it looks specifically at your eye and the pattern of blood vessels on your retina. Apparently, your retinal blood vessel pattern is as unique as your fingerprint is.
Single Sign-On
One of the big problems that larger systems must deal with is the need for users to access multiple systems or applications. This may require a user to remember multiple accounts and passwords. The purpose of a single sign-on (SSO) is to give users access to all the applications and systems they need when they log on. This is becoming a reality in many network environments.
Single sign-on is both a blessing and a curse. It's a blessing in that once the user is authenticated, they can access all the resources on the network with less inconvenience. It's a curse in that it removes potential security doors that otherwise exist between the user and various resources.
While single sign-on is not the opposite of multifactor authentication, they are often mistakenly thought of that way. One-, two-, and three-factor authentication merely refers to the number of items a user must supply to authenticate. After factor authentication is done, then single sign-on can still apply throughout remainder of the user's session.
Network Security
As you learned in Chapter 5, “Networking Technologies and Wireless Routers,” wireless (Wi-Fi) networks can be either open (no encryption) or secured (using encryption). Encryption is set at the router, so whether or not a network has encryption on it is determined by the router settings. The router, in turn, connects its users to the Internet.
If a network is secured, you must type its encryption key (password) when connecting to it. If it's not, anyone may connect to it. However, connecting to a network may not be sufficient to gain access to all its services (such as Internet access). Additional login information may be required. When you open a web browser window, a redirect operation displays a login page in which you may need to accept a user agreement, enter a username and password (or create one), and/or provide credit-card information to buy Internet access.
If it's your network, you should always secure it by using WPA2 to protect your resources. Also be sure to guard your encryption key carefully so that it does not fall into the wrong hands.
There are security risks associated with connecting to any network but especially a free public network. Although most of your fellow users who share that network just want to use the Internet, as you do, hackers occasionally lurk about who may try to browse or even steal files from your computer via your shared network connection.
To minimize the risk associated with connecting to a specific network, you can change your file-sharing settings to more restrictive ones while you're connected to that network.
In Windows, when you connect to a new network, you're prompted to select whether it's a Home, Work, or Public network. If you choose Public, file- and printer-sharing features are disabled on that network connection. This makes it more difficult for someone to snoop or harm your computer.
Internet Security Best Practices
When surfing the Web was relatively new, most of the people who did it (or emailed regularly) were relatively computer-savvy early adopters. Over time, as the Web and email became more mainstream, less-savvy people joined in the fun, which opened up many more opportunities for hackers to prey on them. A shadow industry of charlatans and other questionable business providers grew to take advantage.
At this point, it's probably safe to say that this whole “Internet” thing isn't just a passing fad. The Internet is cemented as an integral part of most of our daily routines, and now it seems our goal is to get it on every electronic device imaginable. It's also safe to say that Internet users as a whole are savvier than ever before, either because they were a victim of a cybercrime themselves or they know someone who was. Even though the collective user awareness of potential issues has increased, there are still plenty of targets out there. And as you learned in Chapter 8, it's pretty easy for attackers to automate their bad intent.
This section covers many of the warning signs you should recognize as potential Internet or email issues, so you can both browse safely yourself and educate family, friends, and co-workers on dangerous habits they might have. It's broken into three parts: preparation and maintenance, Internet browsing, and safe emailing. Armed with this knowledge, you should be able to face potentially dangerous Internet scenarios and navigate safely.
Web Browsing Preparation and Maintenance
There's a certain amount of preparation you can take before browsing the Internet that will make your experience safer. Even if you have never done it before, it's a good idea to go and review these items on your system to see what your settings are. In addition, you should periodically perform maintenance to ensure that these settings are still correct and everything is properly updated. All of the settings you are going to learn about are managed in your Internet browser. The two most common PC-based browsers are Internet Explorer (IE) and Google Chrome.
Managing Internet Browser Versions
The first thing for you to do is to make sure that the Internet browser you are using is the most current version available. Older versions, called legacy browsers, may have security holes or fewer features that can protect you as you browse the Web. IE will update automatically if you tell it to, and Chrome automatically updates—this is a good thing. Before looking at where that setting is, though, familiarize yourself with each browser's options or settings menu. In both IE and Chrome, you click an icon in the upper-right corner. IE's looks like a gear (as shown in Figure 9.12), whereas Chrome's looks like a list (Figure 9.13).
FIGURE 9.12 Internet Explorer 11 options

FIGURE 9.13 Chrome version 41 options

Both browsers have relatively similar menus, which makes it convenient to find the option you're looking for. And if worse comes to worst, you can always click around in the browser until you find the option you need. To see what version your browser is, click the settings icon and choose About Internet Explorer or About Google Chrome. You will see IE's window in Figure 9.14 and Chrome's in Figure 9.15.
FIGURE 9.14 About Internet Explorer


In addition to making sure your browser is up to date, you should also be sure to update needed plugins. A plugin is just a piece of software that gives your browser additional functionality—think of it as a bit like a driver, except it's for software. For example, if you need to run a video that requires Flash, you need a Flash plugin. If you try to run media that requires a plugin that your browser doesn't have, your browser will give you a message and the opportunity to download the needed software. If there is a newer version available, you will get a pop-up message telling you that when you start the plugin. Again, make sure plugins are up to date as well.
Managing Plugins, Toolbars, and Extensions
Plugins, toolbars, and extensions are all software components added to your browser to give it additional functionality. When managed right, these features are convenient and enhance your Internet browsing experience. On the flip side, installing too many toolbars and extensions can slow your browser down. Even worse, some toolbars and extensions can make your system do things that you don't want it to do, such as always redirecting you to a specific site regardless of where you really want to go.
In Internet Explorer, you manage your plugins, toolbars, and extensions by clicking Settings and then Manage Add-ons; the Manage Add-ons window is shown in Figure 9.16. You can also get to the same window by clicking Settings ![]() Internet Options
Internet Options ![]() Programs
Programs ![]() Manage Add-ons.
Manage Add-ons.
FIGURE 9.16 Manage Add-ons in IE 11
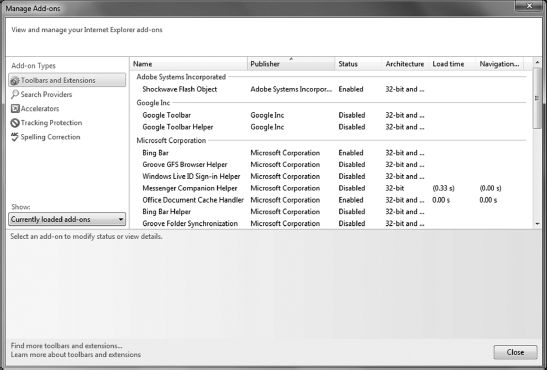
Within the Manage Add-ons window, IE doesn't really differentiate between plugins, toolbars, and extensions. For example, Shockwave Flash is a plugin, Google Toolbar is clearly a toolbar, and Windows Live ID Sign-in Helper is an extension. This non-differentiation is fine because they all pretty much just add functionality. What you see is a list of what's installed, the publisher, whether it's enabled, and some other information. To disable one of these enabled items, highlight it in the list (as shown in Figure 9.17), and click Disable. If the feature is currently disabled, the button will say Enable instead.
FIGURE 9.17 Disabling an add-on in IE 11

To get to extensions in Chrome, open Settings and click Extensions on the left side, as shown in Figure 9.18. To disable the extension (or plugin or toolbar), uncheck the Enabled box.
FIGURE 9.18 Extensions in Chrome

All plugins or extensions that affect Internet browsing should appear in the windows shown in Figure 9.17 or 9.18, so you can disable them if you want to. Some suspicious add-ons won't show up there, which makes them a little more inconvenient to remove. These items should show up in your installed programs in Control Panel. To disable (or better yet uninstall) these, to go Uninstall A Program in Control Panel.
Managing Autofill
Autofill is a feature that automatically populates fields in a form on a web page for you. For example, say you visit a website that wants your name and address. Instead of needing to type it all in, once you start typing your first name in the First Name field, the rest of the fields will automatically fill in for you. Autofill can also save and enter in credit card payment information too. While this can be incredibly convenient, it can also pose a security risk.
If you are the only one using a home computer, or maybe it's just you and trusted members of your family, enabling Autofill isn't a terrible thing to do. One could argue that you shouldn't enable it on laptops because they are easier to steal. If it's a public workstation though, definitely disable Autofill. If you are using a public workstation and it asks you anything about saving your information for Autofill, politely decline.
Internet Explorer calls this option AutoComplete. To get to it in IE, choose Settings ![]() Internet Options
Internet Options ![]() Content and click the Settings button in the AutoComplete section. The settings are shown in Figure 9.19. Letting the address bar of IE autocomplete when you are typing in website names is the least threatening of these options. For safety, disable AutoComplete in forms and for usernames and passwords.
Content and click the Settings button in the AutoComplete section. The settings are shown in Figure 9.19. Letting the address bar of IE autocomplete when you are typing in website names is the least threatening of these options. For safety, disable AutoComplete in forms and for usernames and passwords.
FIGURE 9.19 AutoComplete settings

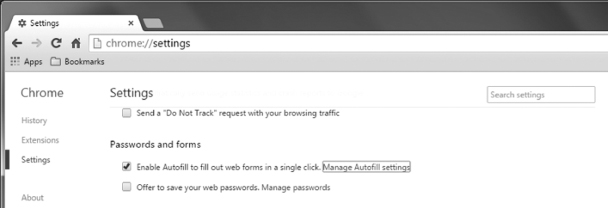
The Autofill settings in Chrome are under Settings ![]() Show Advanced Settings, as shown in Figure 9.20. By clicking Manage Autofill Settings, you can specify information you want in your Autofill (if you're using it) such as your address and credit card information.
Show Advanced Settings, as shown in Figure 9.20. By clicking Manage Autofill Settings, you can specify information you want in your Autofill (if you're using it) such as your address and credit card information.
FIGURE 9.20 Autofill in Chrome

The Risks of Using Public Workstations
Every so often, you might find yourself in a situation where you want or need to use a public workstation. Perhaps you are stuck at the auto repair shop and they have convenient computers for their guests to use. Maybe you are staying at a hotel and they have computers available in their business center. No matter the reason, you should be aware of the risks of using public workstations.
Public systems can be fine to use, but they are also highly susceptible to attacks or acts of fraud because so many people use them. Some of the more severe risks include identity theft, because a hacker or an unscrupulous owner could have installed a keylogger on the computer. Also, public computers often use unsecured Wi-Fi networks, which present a major issue because they transmit all communications without encryption. You don't want your credit card information announced to a crowd with a bullhorn. So what can you do to protect yourself? Here are a few suggestions:
- If it's on an unsecured wireless network, don't use it except for basic web news surfing or entertainment. Don't enter in any personally identifiable information (PII) or usernames or passwords.
- Don't enter in any confidential information, such as bank or credit card information.
- Make sure Autofill isn't being used and passwords are not being remembered.
- Don't save any files to the local computer.
- Delete your browsing history, cache, and cookies after you have finished.
- Always pay attention to your surroundings. Obviously, some locations are safer than others. Public places are great for shoulder surfing—don't be on the wrong side of that.
Configuring Security Settings
Using the wrong security settings in your web browser can result in a variety of security risks, such as running content on your computer that you don't want executed. Fortunately, in most browsers, you can easily set the most common security settings by accepting the defaults.
Internet Explorer lets you set security under Settings ![]() Internet Options on the Security tab, as shown in Figure 9.21. IE uses the concept of security zones, where websites can be classified into different groups that have different security settings. In Figure 9.21, the Internet zone is chosen, which by default has a Medium-High security setting. Trusted sites are Medium, and Local intranet sites Medium-Low. You can drag a slider to choose your security settings. Medium-High is the best balance between functionality and security in most cases.
Internet Options on the Security tab, as shown in Figure 9.21. IE uses the concept of security zones, where websites can be classified into different groups that have different security settings. In Figure 9.21, the Internet zone is chosen, which by default has a Medium-High security setting. Trusted sites are Medium, and Local intranet sites Medium-Low. You can drag a slider to choose your security settings. Medium-High is the best balance between functionality and security in most cases.
FIGURE 9.21 Internet security options
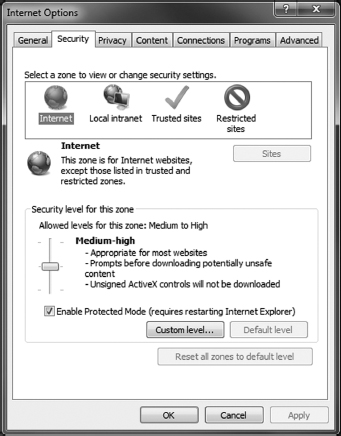
Another prudent security measure is to make sure Protected Mode is enabled for the Internet and Restricted security zones. (It's that way by default.) Protected Mode prevents many different security exploits by displaying content in a low-privileges mode.
If you attempt to download a file from a website that is not in your Trusted zone, you will get a pop-up on your screen warning you that you are about to download a file from an untrusted source. You can click OK to continue or cancel. If you initiated the download, you generally click OK. But some malicious websites will try to download materials without your knowledge, and this warning can help protect you from that content.
You may also want to enable ActiveX Filtering. Some websites use ActiveX controls to display content, but ActiveX can also be a security threat. In IE, open the Tools menu (if it's not displayed, press your Alt key and the menus will appear) and choose ActiveX Filtering. When it's checked, ActiveX controls are suppressed.
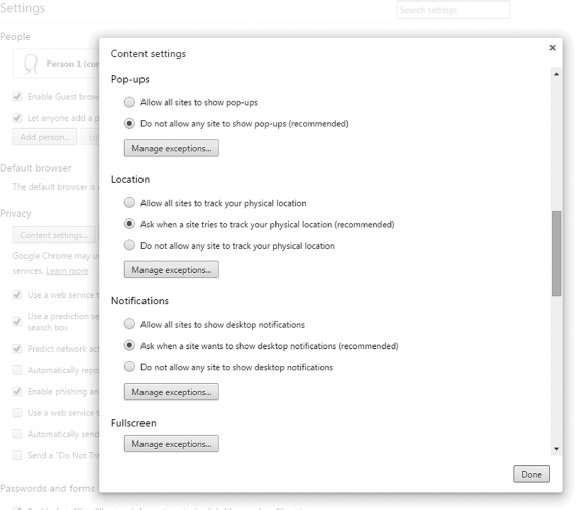
Chrome also allows you to configure security, but it does not use the zones concept like IE does—all websites are treated the same. You can configure security options under Settings ![]() Show Advanced Settings
Show Advanced Settings ![]() Privacy and clicking the Content Settings button. Some of the content settings are shown in Figure 9.22.
Privacy and clicking the Content Settings button. Some of the content settings are shown in Figure 9.22.
FIGURE 9.22 Chrome content settings

Managing Cookies
A cookie is a plain-text file that a web page (or an ad on a web page) stores on your hard disk for tracking purposes. A cookie can tell an advertiser that you've previously viewed a certain ad, for example, or can keep track of the items in your shopping cart on an e-commerce site.
Cookies are harmless 99.99 percent of the time, and they can actually perform useful functions that you want, such as remembering your preferences when you return to an oft-visited website. However, there are two risks involved with cookies. One is a privacy threat: a cookie can deliver personally identifiable information to a website. The other is a security threat: a virus or Trojan horse may copy a stored password from a cookie and deliver it to someone who can then steal your login information for a site to commit identity theft or some other type of fraud.
There are four different types of cookies. A first-party cookie is placed on your computer by a website you visit. For example, when you go to www.amazon.com, a cookie provides your name so that the site can welcome you by name. A third-party cookie is placed on your computer by an ad on a website, where the ad's parent company isn't related to the owner of the website. For example, as you browse on Facebook, a third-party cookie may record the ads you've clicked, indicating your potential interest in certain products.
A session cookie lasts only as long as your web browser is open. When you finish your web-browsing session, session cookies are deleted. A persistent cookie stays on your hard disk after you close the browser, either indefinitely or for a certain number of days.
Some legitimate websites will not let you view their content unless your browser is configured to accept cookies.
All browsers can be configured to control how your system stores each of the types of cookies. You can create rules for cookie handling, set certain sites from which you'll allow or deny cookies, and delete existing cookies. Exercise 9.5 shows how to view and delete cookies in Internet Explorer 11.
Managing Cookies in Internet Explorer 11
- Open Internet Explorer, and choose Tools Internet Options. (You may need to press the Alt key to show the Tools menu.)
- On the Privacy tab, as shown in Figure 9.23, drag the slider to Medium if it isn't already set there. Examine the information that appears describing the Medium setting.
FIGURE 9.23 Privacy tab in IE 11

- Click the Sites button. The Per Site Privacy Actions dialog box opens.
- In the Address Of Website box, type www.emcp.com, and then click Allow.
- Click OK.
- Click the Advanced button. The Advanced Privacy Settings dialog box opens.
- Select the Override Automatic Cookie Handling check box.
- Under Third-Party Cookies, click Prompt.
- Select the Always Allow Session Cookies check box.
- Click OK.
- Select the Never Allow Websites To Request Your Physical Location check box.
- Click Clear Sites.
- Click the General tab.
- Under Browsing History, click the Delete button. The Delete Browsing History dialog box opens.
- Select the Cookies And Website Data check box if it isn't already selected.
- Select the Preserve Favorites Website Data check box if it isn't already selected.
- Clear all other check boxes, and then click Delete.
- Click OK to close the Internet Options dialog box.
- Click the X on the status message that appears at the bottom of the browser window, telling you that Internet Explorer has finished deleting the selected history.
- Visit several popular websites until you find one that triggers a Privacy Alert dialog box that prompts you whether to save a certain cookie. The privacy alert will be similar to the one shown in Figure 9.24.
FIGURE 9.24 Cookie warning in Internet Explorer

- Click Block Cookie.
- Change the setting back to Allow for third-party cookies as you did in steps 6–10.
In Exercise 9.5 you deleted your browser cache and history as well. The cache is a temporary copy of settings you had configured on websites, similar to preferences on the site. The history shows the historical record of sites you have visited in that browser.
If you use Chrome and want to delete your cookies, cache, and history, open Settings ![]() Show Advanced Settings, and then under Privacy click the Clear Browsing Data box. You will get a screen similar to the one in Figure 9.25.
Show Advanced Settings, and then under Privacy click the Clear Browsing Data box. You will get a screen similar to the one in Figure 9.25.
FIGURE 9.25 Clearing browsing data in Chrome

Safe Internet Browsing
Web browsers work by downloading and displaying web pages, which are essentially programming scripts. The script is rendered as a formatted web page by your web browser on your local PC.
The trouble is, at the moment when that page is downloaded, there are numerous opportunities for a hacker to take advantage of the connection in various ways. For example, your requests for pages can be intercepted on their way to the server. This can compromise your privacy, because someone can see what pages you're requesting. More important, however, it can compromise any login information you may be sending to a financial or business site. Scripts can also contain malicious code that infects your system, making it perform unwanted activities like sending your private information to a third party or displaying countless ads. Web pages can also have embedded Flash or Java applications that can do harm in some cases.
Before getting into specific things you should recognize, here are two basic safe web-browsing tips:
Do Not Visit Questionable Sites This one might seem self-evident, right? Part of the problem might be identifying a questionable site, much like you can't always identify a “bad person” simply based on their looks. Some sites are pretty obvious, though. Sites that claim to offer free software downloads for programs you know aren't normally free, sites that offer hate-themed material, and adult websites tend to be the most notorious for providing your computer with unwanted content.
Limit the Use of Personally Identifiable Information Personally identifiable information (PII) is anything that can be used to identify an individual person on its own or in context with other information. This includes your name, address, other contact information, the names of your family members, and other details you would consider private. You should also be judicious in providing your email address to websites to avoid getting spam.
Now, on to specific tips for safe web browsing and things you should recognize.
Recognizing Secure Websites
Sometimes you might surf the Web for fun, but other times you need to do business that might include checking your email or personal banking. If you are rummaging through celebrity news gossip sites, you're probably not too worried about Internet security at that moment. But if you need to type in any secure information, such as a username and password or credit card information, security should be at the forefront of your mind. In that scenario, you need to be able to recognize a secure website.
A secure website is one that uses Secure Sockets Layer (SSL) or Transport Layer Security (TLS) to encrypt transmissions between the server and the client. It's important to know that although SSL or TLS secures the transmission, that's where its job ends. Once the data such as your credit card information is stored on the server, it needs to be secured using other means, which could be something like local encryption.

Information transmitted to an unsecure website not using SSL or TLS is transmitted in plain text, meaning that anyone snooping on the wire could easily read that information. Simply put, do not ever enter confidential information such as your username, password, or financial data unless the site is secured.
It's pretty easy to identify a secure website. First, the URL will begin with https:// rather than http://. Second, your browser will provide a few indicators, such as a lock icon in the address bar, and many browsers will turn the address bar or some text in the address bar green. Figure 9.26 shows both of these indicators.
FIGURE 9.26 A secure website will have a lock and in most cases green in the address bar.

In order for a website to use HTTPS, the owners of the site must have been granted a security certificate from a certificate authority (CA). Think of issuing authorities as the notary publics of the Internet. A security certificate contains information including a serial number, the person or organization that issued the certificate, and a range of dates it's valid to and from. If a site has a certificate, you can be reasonably assured that it's legitimate and not a fake out to steal your information. There have been a few reported cases of certificate theft, but they are rare.
Remember that HTTPS uses port 443, and HTTP uses port 80.
By clicking the lock icon in the address bar, you will get a screen similar to the one shown in Figure 9.27, which lists general information about the company that owns the certificate and the issuing authority. In the case of Apple iTunes, the CA is Symantec. By clicking the Certificate Information link, you can see additional details such as the date through which the certificate is valid and the serial number.
FIGURE 9.27 Apple iTunes security certificate information

With almost any web browser, it's easy to review and monitor what certificates have been installed, who the issuing authorities are, and what details are held within each certificate. Exercise 9.6 shows where to find security certificate information in Internet Explorer 11.
Viewing Security Certificates in Internet Explorer
- Open Internet Explorer, and choose Tools Internet Options. (You may need to press the Alt key to show the Tools menu.)
- On the Content tab, click the Certificates button. A list of security certificates appears. There are multiple tabs in the dialog box for different certificate publishers and authorities.
- Click the Trusted Root Certification Authorities tab, as shown in Figure 9.28, and browse the list. These are all companies that issue and verify certificates.
FIGURE 9.28 Root certification authorities

- Double-click one of the certificates to see its information. Then click OK to close its box.
- Click Close to close the Certificates dialog box, and then click OK to close the Internet Options dialog box.
In Chrome, you can open the same security certificates window by going to Settings ![]() Show Advanced Settings, and clicking Manage Certificates in the HTTPS/SSL section.
Show Advanced Settings, and clicking Manage Certificates in the HTTPS/SSL section.
If there is a problem with a certificate or the web server's use of a certificate (for example, it has expired or has been stolen), you will get a warning when you visit that site. While the format of the warning may differ, it should be very clear that the website is not secure. Figure 9.29 shows an example.
FIGURE 9.29 Invalid security certificate example

It's recommended that you not use that site for any purpose. If you are absolutely sure of the site's identity, you may be able to ignore the warning and continue to the site. Most browsers will color the address bar red as a persistent warning that it's not secure.
Recognizing Suspicious Sites, Links, and Ads
It would be nice if sites that intended to download malware on to your computer would just let you know. Perhaps they could have a big flashing warning informing you that they intend to steal your identity and cause you hundreds of hours of misery. Obviously, that's not the case. Creators of sites who have bad intentions do everything they can to make sure their site resembles a legitimate site as much as possible. This can include copying web page layouts and company logos to convince people to visit the site and click the links.
Creating a site that masquerades as a legitimate secure site but actually steals your information is called phishing (or spoofing). Phishing employs many tactics, which are continually evolving. One common scheme to watch out for is getting an email that claims to be from your bank, ISP, or other institution, asking you to follow a link to its site to update your details. The email looks authentic, and when you follow the link, the site looks very much like the site of the bank or ISP—except the page probably isn't secure, and some links on the page may not be operational.
When people talk about phishing, it's generally in context of suspicious email, because that's how the term originated. Hackers sent out messages hoping to get someone to take the bait. The term has evolved a bit to encompass any electronic activity designed to defraud someone, which can and often does include the use of fake websites.
So what does a suspicious site, link, or ad look like? Unfortunately that's a bit like asking what a criminal looks like. There's no one specific answer. Here are some things you can look out for though:
If Visiting a Website, Look for Signs of Security These were covered in the last section, but look for https://, the lock symbol, and green in the address bar.
Websites That Have Incorrect Spelling If someone is spoofing a website, they may try to get spelling very close to the real site, hoping that people won't look closely and click. A made-up example is something like www.micro.soft.com or www.micros0ft.com. Neither of those are the Microsoft company, but the URLs could be chosen to attempt to impersonate Microsoft.
Incorrect Spelling or Bad Grammar Big companies do not send out mass emails to their clients unless they have been professionally edited and spell checked.
Threats If you're being threatened that your account will close or your card won't work or whatever unless you enter in security information, it's probably not legitimate.
Deals That Are Too Good to Be True If it sounds too good to be true, it probably is. That's a good adage to follow in life, and it's especially true in cyberspace. The flashier or more attention-grabbing the banner ad, the more suspicious you should be of its legitimacy.
If you find yourself wondering if a link or banner ad is legitimate, just don't click it!
Your web browser can likely help defend you against some phishing attacks, because most browsers have some phishing protection built-in. That's part of the role of the different-colored background of the address bar in Internet Explorer. For example, if it's green, that indicates the phishing filter has determined the site is legitimate. A yellow background indicates caution because there is a problem with the verification, and a red background indicates that this site probably isn't what it seems to be and should be avoided.
In Internet Explorer, the phishing filter is called the SmartScreen filter, and it can be enabled or disabled. Normally you should leave it enabled, because it provides information and doesn't prevent you from doing anything. Its assessment is fairly accurate, as well. The only drawback (and it's very minor) is that if you leave automatic checking turned on, the browser checks every page you visit, resulting in slightly slower browser performance. If you seldom visit secure sites and you want to check only the specific sites about which you have a question, you can turn off this feature. Exercise 9.7 shows you how to configure the SmartScreen filter in Internet Explorer.
Configuring SmartScreen in Internet Explorer 11
- Choose Tools SmartScreen Filter Turn Off SmartScreen Filter. (To display the Tools menu, you might have to press the Alt key on your keyboard first.) A dialog box will open similar to the one in Figure 9.30, with Turn Off SmartScreen Filter already selected.
FIGURE 9.30 Turning off SmartScreen Filter

- Click OK.
- Type in the address www.paypal.com and press Enter.
- Choose Tools SmartScreen Filter Check This Website. The first time you do this, you will see a message stating that the address will be sent to Microsoft. Click OK.
- A box appears telling you that SmartScreen Filter checked this website and didn't report any threats, like the one in Figure 9.31.
FIGURE 9.31 No threats detected in this website

- Click OK.
- Choose Tools SmartScreen Filter Turn On SmartScreen Filter. A dialog box opens with Turn On SmartScreen Filter already selected. Click OK.
- Notice that in Tools SmartScreen Filter, you also have the option to report sites for suspicious behavior.
Google Chrome also has built-in phishing protection. It's enabled by going to Settings ![]() Show Advanced Settings
Show Advanced Settings ![]() Privacy and checking the Enable Phishing And Malware Protection box.
Privacy and checking the Enable Phishing And Malware Protection box.
Recognizing Adware Symptoms
Adware is an obnoxious form of malware, but it's not generally destructive. Instead, what adware attempts to get you to do is see advertisements only from companies it wants you to see or direct your Internet activity to where it wants you to go. Of course, the companies that get traffic directed to them have paid the adware producers to generate traffic. You've already learned about malware symptoms, but this section looks at three symptoms related specifically to adware.
Controlling Pop-Ups
A pop-up is an extra, usually small browser window that appears automatically when you display a certain web page or click a certain button on a page. Pop-ups can serve useful functions, such as displaying the amount of time you've been logged in at a public Wi-Fi location that charges you by the minute or displaying details for you to download a file you want. However, pop-ups are more often used to display advertisements or fake dialog boxes that trick you into doing something you really don't want to do, like branching to another company's website.
Your web browser most likely has a pop-up blocker built into it. You can enable it or disable it, and in some cases you can configure it to be more or less aggressive about blocking pop-ups. Not all browsers' pop-up blockers are very effective, though; sometimes they can miss certain pop-up types. Third-party pop-up blocker applications are also available and are often more effective than the web browser blockers. Exercise 9.8 shows you how to configure Internet Explorer's pop-up blocker.
Configuring the Internet Explorer Pop-Up Blocker
- Open Internet Explorer, and choose Tools Pop-Up Blocker Turn Off Pop-Up Blocker. (You may need to press the Alt key to show the Tools menu.)
- Choose Tools Pop-Up Blocker Pop-Up Blocker Settings. The Pop-Up Blocker Settings dialog box opens, shown in Figure 9.32.
FIGURE 9.32 Internet Explorer 11 Pop-Up Blocker settings

- Open the Blocking Level drop-down list, and click High: Block All Pop-Ups.
- In the Address Of Website To Allow box, type *.emcp.com and click Add. The asterisk is a wildcard that allows any text in that position. For example, this entry covers www.emcp.com, support.emcp.com, and so on.
- Click Close.
Chrome's pop-up blocker is easy to configure as well. It's found in Settings ![]() Show Advanced Settings
Show Advanced Settings ![]() Privacy
Privacy ![]() Content Settings. Figure 9.33 shows you what the option looks like. You can click the Manage Exceptions button to add exceptions like you did for Internet Explorer in Exercise 9.8.
Content Settings. Figure 9.33 shows you what the option looks like. You can click the Manage Exceptions button to add exceptions like you did for Internet Explorer in Exercise 9.8.
FIGURE 9.33 Chrome's pop-up blocker
Browser Redirection
A second tactic that adware might use is redirecting your browser. This could be as simple as changing your home page to the home page of its client. You can change the home page back to what you want it to be, but the next time you open your browser, the adware will take over again and change it back to the unwanted page.
A more dangerous form of browser redirection is called pharming. Pharming is a form of redirection in which traffic intended for one host is sent to another. For example, you might experience a situation where you attempt to go to a site only to be redirected to another. For example, suppose Illegitimate Company ABC creates a site to look exactly like the one for Giant Bank XYZ. The pharming tricks users trying to reach Giant Bank XYZ into going to Illegitimate Company ABC's site, which looks enough like what they are used to seeing that they give username and password data.
As soon as Giant Bank XYZ realizes that the traffic is being redirected, it will immediately move to stop it. But although Illegitimate Company ABC will be shut down, it was able to collect data for the length of time the redirection occurred, which could vary from minutes to days.
Search Engine Redirection
A third common tactic for adware is to redirect your Internet searches. No matter what you search for, you are always presented virtually the same list of websites as hits. For example, perhaps you are using Google as your search engine. You want to search for a new bowtie (who doesn't need a new bowtie), so you type in your terms. You will get a list of results, in Google's format and fonts, with sites for you to click. The only problem is Google didn't return those sites—the adware did. Some of the sites might be businesses that sell bowties, whereas others might be completely unrelated. If you search for organic produce next, you will likely get the exact same (or very similar) sites that you got with your bowtie search. Again, some might be relevant but probably not.
Resolving Adware Symptoms
If you are experiencing any of the three symptoms of adware, the best thing to do is remove the adware. One option might be to disable it if it's loaded as a plugin or an extension. You learned where to do that in the “Managing Plugins, Toolbars, and Extensions” section earlier in this chapter.
The other—and more likely—method to remove adware is to uninstall it from your list of applications in Control Panel. The adware might not call itself by an easy-to-find name, so you might have to look for it. The best way is to think back to when the problem started, and then sort your software by date of installation. Odds are that you downloaded and installed an item that came with an unexpected and unwelcome present. Remove the application and the issue should go away.
For additional information on how to remove software applications, refer to the “Uninstalling Applications” section in Chapter 4.
Browsing Undercover
If you want to protect your privacy while surfing the Internet (or perhaps feel like a super-secret spy), you can use undercover features of your browser. Internet Explorer calls it InPrivate browsing, and Chrome calls it Incognito.
Internet Explorer versions 8 and higher include InPrivate browsing mode. When you start an InPrivate session, none of the history is stored, regardless of your browser's normal history settings. No passwords and login information are stored, and no cookies or temporary Internet files are kept. This mode is very useful when you're visiting a site where safety may be questionable, because in this mode Internet Explorer won't permit the website to affect your computer in any way.
To turn on InPrivate Browsing in Internet Explorer, choose Tools ![]() InPrivate Browsing. A new Internet Explorer window opens (Figure 9.34), along with a message letting you know that InPrivate Browsing is enabled, and an indicator appears on the address bar. Close the browser window when you're finished.
InPrivate Browsing. A new Internet Explorer window opens (Figure 9.34), along with a message letting you know that InPrivate Browsing is enabled, and an indicator appears on the address bar. Close the browser window when you're finished.
FIGURE 9.34 InPrivate browsing
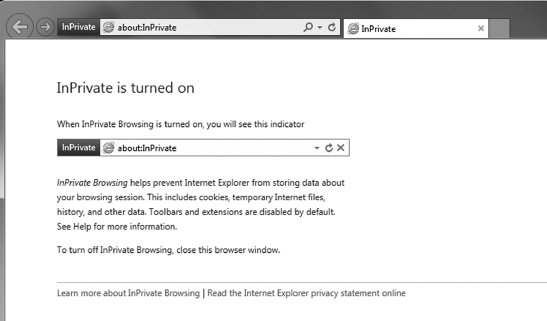
Chrome's Incognito feature functions in much the same way as InPrivate does. To open an Incognito window, open Chrome and then click Settings ![]() New Incognito Window, or press Ctrl+Shift+N. A new window will appear similar to the one in Figure 9.35. Chrome puts an icon that looks like a spy in the upper-left corner of the browser window.
New Incognito Window, or press Ctrl+Shift+N. A new window will appear similar to the one in Figure 9.35. Chrome puts an icon that looks like a spy in the upper-left corner of the browser window.
FIGURE 9.35 Incognito browsing

Using Email Safely
Most people rely on email today as a way of communication. For businesses, it may be the only way that things get done. It's so much faster and cheaper than traditional (snail) mail, there's no wondering why it's so popular.
Anything that's popular on the Internet today invites the attention of attackers, who are looking to have the biggest impact for the lowest effort and cost possible. Sending thousands or even millions of emails automatically and searching for potential victims is an efficient way. This section gives you an idea of what to look for in suspicious emails and how to use your email safely.
Provide Your Address Sparingly
The first tip is to provide your email address sparingly. This is in the same vein as PII. If you enter your email address at every website that asks for it, you will get email spam—lots and lots of email spam. Several people I know have a second email address set up that is their “public” address they enter into websites, where they don't care if they get spam, and their private address they give to only friends and family.
Dealing with Spam
While spam is not a virus or malware, it is one of the most annoying things users and network administrators contend with. Spam is defined as any unwanted, unsolicited email, and not only can the sheer volume of it be irritating, it can often open the door to larger problems. For instance, some of the sites advertised in spam may be infected with viruses, worms, and other unwanted programs. If users begin to respond to spam by visiting those sites, then viruses and other problems will surely follow.
Just as you should install good antivirus software programs, you should also consider similar measures for spam. The good news is most Internet service providers and companies take care of this for you. One of the issues to watch out for with antispam programs is false positives. Occasionally, a legitimate email will get tagged as spam and make its way into your Spam or Junk Email folders. It's a good idea to scan those folders just to make sure nothing you actually want is in there before you delete everything. In most email programs, if an email is sent to the Spam folder but it's legitimate, you can mark it as such, and the filter won't consider email from that sender malicious next time.
Recognizing Suspicious Email
It seems that on a daily basis, users get tens or even hundreds of emails that are easily identifiable as spam. Not every piece of spam is so easy to identify though. Some spammers are good at customizing the sending email address to look legitimate or changing the title of the email to make it appear customized to the recipient. Figure 9.36 shows some examples of suspicious emails. Some of these were directly placed into my Spam folder, whereas others made it into my Inbox.

There are several classic examples of things to watch out for in Figure 9.36. Here are some to recognize:
- The top two appear to come from my email provider. These spammers were at least smart enough to know that Yahoo! uses an exclamation point at the end of its name—many times it's not included.
- The one from Sterling (whoever he is) uses my username in the subject line—very clever! (Or not.)
- The email from Sterling also spells medications wrong. Sometimes you will see words with characters such as @ replacing the letter a and ! for the letter i, in an effort to get through spam filters.
- Unsolicited pharmacy emails. Just delete them, even if they do promise amazing deals.
- Threats are common. The ones supposedly from Yahoo! or the security alert team warn me that if I don't act, I will lose my email. Figure 9.37 shows the content of one of these warning emails.
The email in Figure 9.37 is pretty standard hacker fare. They did include the Yahoo! logo and even put the copyright symbol in the message title. Those are nice touches. The grammar in the email is bad, and if my limit really was 1 GB, then how did the service really let me get to 99.8 GB of usage? Fortunately, they provide me a handy link I can click to restore my email account. Even better, they are concerned with my privacy so they provide a helpful suggestion at the bottom. Admittedly, I am curious to see exactly what would happen if I clicked the link. I'm not curious enough to want to spend the next week cleaning up whatever mess that creates, though.
FIGURE 9.37 The contents of a fraudulent email
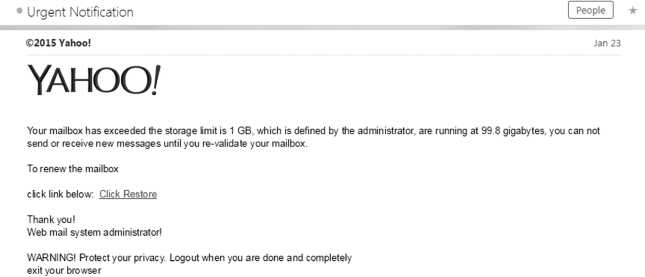
This brings me to the two cardinal rules of suspicious email:
- Never open any attachments.
- Never click any hyperlinks.
Either of those two actions will give you a direct link to acquiring malware for your computer. Even if you have the best antimalware software on the market, don't click attachments or links—don't subject your antimalware software to an obvious test.
Finally, consider the case of getting an email from what appears to be your bank or other financial institution, and you really are concerned that there could be a problem. In those situations, call them. Don't click anything in the email or use phone numbers provided in the email or suspicious site. Close your browser or email, and look up the contact information separately. If it's a legitimate problem, you can discuss it with a real representative over the phone.
Understanding Hijacked Email
One of the easiest ways to spread malware is to capture the email contacts of a user and send it as an attachment to all of those in their circle. The recipient is more likely to open the attachment because it seemingly comes from a trusted source. So instead of getting an email from a random person, you get an email from someone you know, with an attachment or link and instructions to click it because it's “amazing” or “the best thing ever.”
If you get an email like this, call or text your acquaintance and ask them if they sent it. If they really did send it and the link is amazing, then you can click it and enjoy. Otherwise, practice safe emailing and ignore the message.
Summary
In this chapter, you learned about security best practices for your computer and network as well as safely browsing the Internet and using email.
The first section was on securing your computer and network, which started with device hardening. This includes disabling features such as Bluetooth, unused services, and AutoPlay. You should also lock your system, both physically to the desk in the case of laptops (and some desktops) and by using a software lock when you are away from your computer. To protect the data on your system from theft or access by other users, you can encrypt the data on your hard drive. And one of the most important device-hardening measures is to ensure you're using antimalware programs such as antivirus and antispam software.
User accounts should be carefully managed to ensure the best security. Grant Administrator account access only to those who really need it, and even administrators should use a regular user account unless they need to perform an administrative task. Disabling the Guest account also helps protect against attacks. Passwords need to be carefully managed as well. They should be sufficiently complex, changed regularly, and not reused. You also learned about authentication and the concepts of multifactor authentication and single sign-on.
The last section in computer and network best practices was on network security. Specifically, you should never use an open or unsecured network, and always be sure to enable the strongest encryption on your own networks. And be careful of public workstations!
Next, you learned about Internet usage best practices. Before you use the Internet, you can perform some preparatory tasks to ensure a safer browsing experience. These include updating your web browsers to the latest editions; managing plugins, toolbars, and extensions; disabling Autofill; configuring browser security; and managing cookies.
While browsing the Web, you should enter confidential information only into secure websites. In addition, avoid any suspicious-looking sites, links, or advertisements. If you do have odd activity happening on your computer such as excessive pop-ups, browser redirection, or search engine redirection, it's possible you have adware and need to remove it. You also learned about browsing InPrivate or Incognito.
Finally, you learned about email safety. Specifically, you should avoid giving out your email address too often. In addition, you should be on the lookout for suspicious email, and never click a hyperlink or attachment in an email from an unknown source.
Exam Essentials
Understand the actions you can take to accomplish device hardening. Device hardening makes it more difficult for attackers to exploit. Some actions you can take include disabling unused services and communication channels such as Bluetooth or NFC and disabling AutoPlay.
Know how to lock your system. If you have a laptop or other mobile device, it should be secured to the desk with a security cable. If you leave your workstation, use Ctrl+Alt+Delete to secure your seat!
Know what encryption does. Encryption scrambles your files so no other local users can read them. Only the user who encrypted the files can decrypt them.
Know how to protect your computer against malware. The best way is to avoid malware in the first place, but this isn't always possible. To protect yourself, use antimalware software, such as antivirus, antispam, and antispyware applications.
Understand three classifications of user accounts and what they are for. The Administrator account is for system administration and should be carefully guarded. Regular user accounts are for everyday usage. Guest accounts are for temporary access and should be disabled if not in use.
Know good practices for password management. Always change default passwords. Passwords should be sufficiently complex to avoid being guessed or hacked, kept confidential, changed regularly, and not reused on other sites or in the future after they have been changed.
Understand what multifactor authentication is. Multifactor authentication requires at least two pieces of information from these three groups: what you know (such as a password), what you have (like a smart card), and what you are (such as a fingerprint).
Know the basics of how to secure your wireless network. Enable the strongest encryption (WPA2), and avoid using unsecure networks and public workstations.
Know how to configure your browser for safe Internet browsing. Update it to the latest version, including any necessary plugins, toolbars, and extensions. Disable Autofill, enable security, and manage cookies properly.
Understand how to browse the Internet safely. Avoid unscrupulous sites. If you are going to enter confidential information such as passwords or financial information, make sure the site is secure. Avoid suspicious links and ads.
Know how to tell if a website is secure. Secure websites will start with https:// instead of http:// and have a lock icon in the address bar. In addition, many browsers will color at least a portion of the address bar green.
Know what the symptoms of adware are. Symptoms include excessive pop-ups, browser redirection, and search engine redirection.
Know how to safely use email. Avoid giving out your email address unless you need to. Don't click hyperlinks or attachments in emails from people you don't know. If you get an email from a contact with an attachment or link urging you to click it, verify that the contact actually sent the email before clicking it.
Chapter 9 Lab
Chapter 9 covered a wide range of security measures you can implement on your computer, your network, and when you browse the Internet. This lab provides you with a checklist of things you can do to improve your security. It's recommended that you go through each of the tasks and understand how to perform them on your system.
Tasks you should be able to do:
- Disable Bluetooth or NFC.
- Disable unused services.
- Disable AutoPlay.
- Set up a screensaver password and engage it.
- Enable file encryption.
- Install and configure antimalware.
- Disable or enable the Guest user account.
- Create complex passwords that are easy for you to remember.
- Update your web browser to the latest version.
- Configure Autofill.
- Configure browser security.
- Manage and delete browser history and cookies.
- Recognize secure websites.
- Recognize symptoms of adware.
- Know how to browse InPrivate or Incognito.
- Recognize suspicious emails.
Review Questions
- Due to a recent string of thefts in your office, you need to harden your local system. What two actions are most appropriate for your situation? (Choose two.)
- Install a hardware lock
- Disable unused services
- Install antimalware
- Enable encryption
- What option can you configure on your workstation to increase security when you leave your desk?
- File encryption
- Multifactor authentication
- Single sign-on
- Screensaver password
- You have just landed at the airport and have an unexpected six-hour layover. You want to use your smartphone to get some work done. What should you disable as a precautionary device hardening measure to help prevent potential attacks? (Choose two.)
- Autofill
- Bluetooth
- NFC
- FFC
- Claire, a co-worker, is browsing the Internet and wants to know if it's safe to enter her credit card information into a website. What do you tell her to look for?
- HTTPS://
- HTTP://
- SSL://
- TLS://
- You enabled file encryption on your local computer. While you were on vacation, one of your co-workers managed to get on your computer and share your important files with other users. How did they do this?
- They logged on and disabled encryption.
- They used the Disk Recovery tool to access the encrypted files.
- All users logging into the system have access to encrypted files.
- They logged on with your username and password.
- Ray, a co-worker, is concerned that his computer is infected with adware. What symptoms should you tell Ray to look for to confirm his suspicions? (Choose three.)
- Excessive pop-ups
- Browser redirection
- Search engine redirection
- Multifactor login redirection
- Which type of software will help protect your computer from malicious network traffic?
- Software firewall
- Password complexity tool
- Antispyware
- Antivirus
- You are using Google Chrome and you want to browse a website but not have the website stored in your browsing history. What should you do?
- Log in as someone else to browse the site
- Configure independent browsing
- Use InPrivate
- Use Incognito
- Your manager just got a new workstation and is not part of a domain. He wants to know which user accounts he should disable to increase security. What should you tell him to disable?
- Guest
- Users
- Power Users
- Administrator
- Which of the following actions is not considered a web-browsing best practice?
- Limiting the use of PII
- Disabling Autofill
- Closing untrusted source warnings
- Updating plugins and toolbars
- The managers at your company have decided to implement stricter security policies. Which of the following login schemes will help them achieve this goal?
- Single sign-on
- Multifactor authentication
- Password confidentiality
- HTTPS
- Your coworker Rachel has recently discovered that when she starts typing her name into a field in a web browser, her whole name appears as well as her address in the appropriate boxes. What is this due to?
- Adware infection
- Single sign-on
- Suspicious hyperlinks
- Autofill
- You have been asked to give training on network security. For your section on password management, which options should you recommend to users? (Choose two.)
- Do not use complex passwords because they are easy to forget.
- Change default passwords on systems.
- Use the same password on multiple systems so they are easy to remember.
- Do not reuse the same password after you are required to change it.
- You are in a library that has free computers to use for Internet browsing. Which of the following should you possibly be concerned about?
- Shoulder surfing
- Keyloggers
- Unsecured wireless network
- A and B
- A, B, and C
- Which two of the following statements are true regarding single sign-on?
- It is convenient for users.
- It can potentially cause security issues.
- It requires the use of multifactor authentication.
- It does not work across different operating systems.
- Which of the following are considered characteristics of a strong password? (Choose two.)
- Long
- Uses patterns
- Uses symbols, numbers, and letters
- Contains PII
- You just read an article about an Internet worm recently causing problems. What type of software should you install to protect yourself from this worm?
- Software firewall
- Antispyware
- Antivirus
- Antispam
- You receive an email in your Inbox from your friend Sara. The title of the email is “This is so cool!” and inside the email is an attachment with an .exe extension. What should you do?
- Delete the email.
- Click the attachment.
- Run virus scan, then click the attachment.
- Call Sara to see if she sent you the email.
- You recently received a new workstation and need to properly secure it before browsing the Internet. Which actions should you take? (Choose two.)
- Enable Autofill.
- Enable acceptance of cookies.
- Upgrade your browser to the newest version.
- Configure browser security zones.
- Which of the following statements is true regarding web browser plugins, toolbars, and extensions?
- They should be updated to the newest versions.
- They are dangerous and should be deleted.
- They will be detected and removed by antivirus software.
- They only function in Internet Explorer.