

Integrating Render Passes
A common task of visual effects compositing is the integration of 3D renders. Although these may be delivered to the compositor as completed “beauty” renders, they may also be delivered as render passes. Render passes often split the shot content into multiple image sequences. That is, objects within a single shot may be rendered separately. At the same time, individual objects may be further split into multiple shading component passes (Figure 7.1). As such, care must be taken to recombine the passes so that the final result appears equivalent to the original render seen in the 3D program. This requires the judicious use of After Effects blending modes, layer order, masking, and channel manipulation.
This chapter includes the following critical information:
• Overview of common render passes
• Techniques for combining passes in After Effects
• Utilizing multichannel OpenEXRs
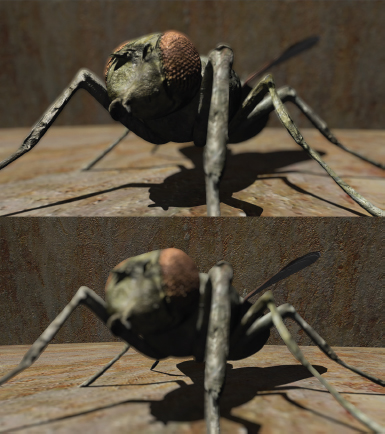
FIG 7.1 Top: The Camera Lens Blur effect and a depth render pass causes the background of a 3D render to go out of focus. Bottom: The effect is reversed so the foreground goes out of focus.
Identifying Render Passes and Blending Modes
There are two styles of render passes: object and shading. Shading render passes include a wide variety of forms that represent surface shading qualities. As such, shading render passes often require special blending modes within After Effects.
A simple form of render pass setup separates the objects within a scene. For example, character A is added to one pass, character B is added to a second pass, and the background is added to a third pass. No pass contains all the objects. Separating the objects allows the individual renders to become more efficient. Optionally, an object can be used as a static frame. For example, a single, static frame of a background can be used in conjunction with fully rendered character passes.
Every layer in After Effects is given a blending mode menu (Figure 7.2). These are set to Normal by default, which means that the upper layers occlude the lower layers unless the upper layers include transparency through an alpha channel. (If you don’t see the menu, click the Toggle Switches/Modes button at the bottom of the layer outline.)
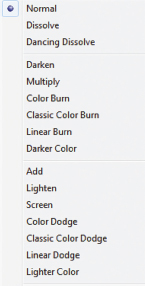
FIG 7.2 A small portion of available blending modes.
Many other blending modes are available. Each blending mode represents a mathematical formula by which a pixel of an upper layer is combined with the corresponding pixel of a lower layer or net result of lower layers. If there are more than two layers in a composition, the layers are combined in pairs, starting at the bottom of the layer outline and working upwards. It’s not necessary to remember the mathematical formula for each blending mode, but it pays to be familiar with the result of commonly used modes. For example, the Screen, Lighten, Multiply, and Darken modes are used over and over. In fact, these modes are often associated with specific render passes. The render passes and corresponding modes are described in the following section. You can see the result of other modes by simply changing the blending mode menu—the result is shown immediately in the Composition view.
Overview of Common Shading Passes
Shading render passes break the render up into to individual shading components. Shading components are associated with specific surface shading qualities, such as diffuse, specular, shadow, and so on. In 3D programs, these shading components are controlled by the properties of materials or shaders.
The following represents shading render passes that are commonly used in the visual effects industry. In addition, appropriate After Effects blending modes are listed for each pass.
Beauty
A beauty pass is one that includes all the shading components available to the 3D renderer. Beauty passes are generally produced by the renderer when no render passes are established. For example, if you test render in Autodesk Maya with the Render View window, the result is a beauty pass. Nevertheless, some batch renderers, such as mental ray, include a beauty pass in addition to any requested render passes. If you are using render passes, it’s not mandatory to use the beauty pass. Depending on the render settings, the beauty pass may or may not include motion blur (Figure 7.3).
Diffuse
The diffuse pass represents the surface color without specularity or shadows. Some diffuse pass variations include basic shading, where the surface is dark in areas of low light (Figure 7.4). Some diffuse passes do not include shading—hence, the surface appears self-illuminated or “toon” shaded. Generally, diffuse passes require no special blending mode.
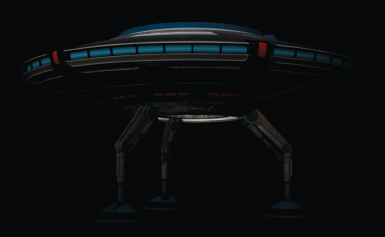
FIG 7.4 A diffuse render pass. The pass includes basic shading but ignores cast shadows, specular highlights, and reflections. The lack of specularity and reflectivity causes the surfaces to appear darker. The glass dome does not appear due to its high transparency.
Specular
This pass captures the specular component. In the real world, a specular highlight is the intense, coherent reflection of light off a surface. Specular highlights appear as “hot spots” on shiny surfaces. Specular passes render the hot spot over black.
In general, no alpha channel is present. Therefore, you can choose the Screen or Lighten blending mode to place this pass over lower passes, such as a diffuse pass (Figure 7.5). Screen differs from Lighten in that it clamps high values and prevents superwhite values (superwhite is any value that exceeds the working bit depth color range, such as 0 to 255 in 8-bit). Specular passes do not include reflectivity and may or may not take into account cast shadows.

FIG 7.5 Left: Specular render pass. Right: Specular render placed over diffuse pass with Screen blending mode.
Depth
Depth passes encode the distance from objects to the cameras as grayscale values (Figure 7.6). Depth passes are also referred to as Z-depth or Z-buffer passes. Different renderers record the values in different ways.
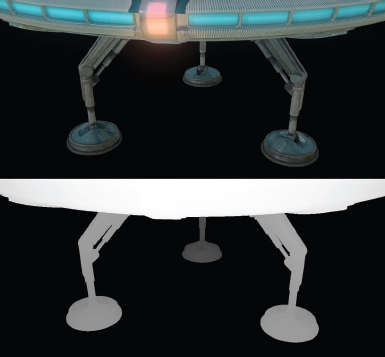
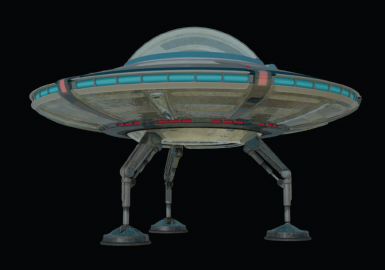
FIG 7.6 Top: Beauty pass render of ship’s landing gear. Bottom: Depth pass from the same camera.
Hence, alteration of the depth values may be necessary to make the pass useful. Depth passes are generally used to composite an element in virtual depth. For example, you can add an artificial depth of field to a shot with this pass. This technique is demonstrated in the “Z-Buffer Depth of Field Mini-Tutorial” later in this chapter. You can also composite a virtual fog or atmosphere into a shot using a similar technique.
Matte
This pass, also called a holdout, assigns white pixels to opaque objects and black pixels to empty space (Figure 7.7). Although matte passes look similar to alpha channels, the matte passes store the information in RGB. Matte passes are useful for lending transparency information to layers that lack alpha. For example, you can use the Track Matte tool to borrow alpha information from a matte layer. This is demonstrated in the “Supplying Alpha to Nonalpha Passes” section later in this chapter.

FIG 7.7 A matte pass.
Reflection
Reflection passes isolate their namesake (Figure 7.8). The reflections may include nearby 3D objects or surrounding environmental textures. Due to the lack of alpha, these passes require the use of the Screen or Lighten blending mode, additional rotoscoping, or the use of a matte pass.
Ambient Occlusion
Ambient occlusion passes, also known as AO passes, capture shadow information (Figure 7.9). In particular, the passes capture the soft shadows that appear where surfaces are in close approximation or where a surface has many intricate convolutions that prevent light from returning to the viewer. AO passes appear white or gray with soft gray or black shadows. You can place an AO pass over lower layers with the Multiply or Darken blending mode. You may need to adjust the brightness and contrast of the pass to make the nonshadow areas white.
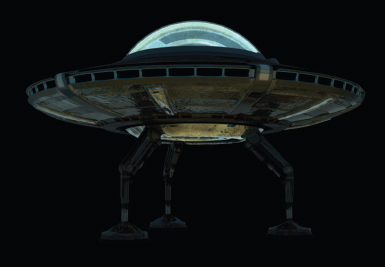
FIG 7.8 A reflection pass.
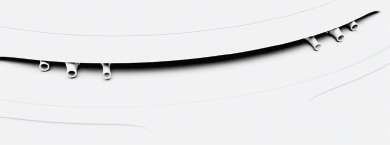
FIG 7.9 Close-up of an ambient occlusion pass showing that soft shadows render where surfaces are close together or surfaces have small grooves and ridges.
Incandescence and Glow
With many 3D materials, it’s possible to create incandescence, which creates the illusion that the surface is a light source. Incandescent passes isolate this shading information. In a similar fashion, glow passes separate post-process glows, which are bright, blurry halos created by the render. You can combine incandescent and glow passes using the Lighten or Screen blending modes. For an example of an incandescence pass, see the “Common Render Pass Combination Mini-Tutorial” later in the chapter.
Shadow
A shadow pass isolates the shadow. Shadow passes may capture an opaque shadow within an alpha channel. You can place this type of pass over lower layers without a special blending mode. If the resulting shadow is too dark, you are free to lower the shadow layer’s Opacity. Another variation of the shadow pass captures the shadow shape in the RGB channels (Figure 7.10). The application of this pass is demonstrated in the following tutorial.
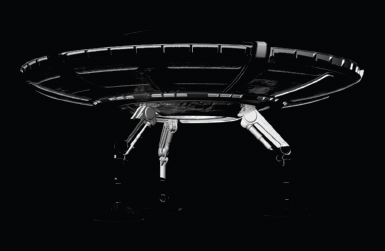
FIG 7.10 A shadow pass that captures the shadow shape in RGB. Where the pixels are the brightest, the shadow is the darkest in the associated beauty pass render.
Common render pass combination mini-tutorial
In this tutorial, we’ll recombine common render passes to create a result similar to the corresponding beauty pass. You can follow these steps:
1. Create a new project. Import the following image sequences, all of which are located in the ProjectFilesRenders directory:
Diffusediffuse.##.tif
Specularspec.##.tif
Reflection ef.##.tif
Shadowshadow.##.tif
Incandesenceincan.##.tif
Any sequence that carries an alpha channel causes After Effects to open the Interpret Footage window. When it does, select the Premultiplied radio button. This ensures that the alpha is correctly interpreted. Autodesk Maya, which was used to create these renders, premultiplies the RGB values by the alpha values when rendering. If the alpha interpretation is left at the default Straight, a grayish line will be trapped at the alpha edge (this is created when the black background is trapped along the semitransparent matte edge).
2. Create a new composition that is 1280x720, 24 fps, and 10 frames in duration. LMB-drag the diffuse sequence into the composition. LMB-drag the spec (specular) sequence into the composition, placing it on top. Change the specular layer’s blending mode menu to Screen. (If you don’t see the menu, click the Toggle Switches/Modes button at the bottom of the layer outline.) The specular render appears over the diffuse layer without occluding it.
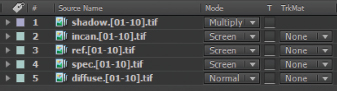
FIG 7.11 The final layer arrangement used to reconstruct the spaceship with render passes.
3. Place the ref (reflection) pass on top of the layer outline (see Figure 7.11 for the final layer arrangement). Change its blending mode to Screen. Place the incan (incandescence) sequence on top of the layer outline. Change its blending mode to Screen.
4. Place the shadow pass on top of the layer outline. A white shadow over black appears. With the layer selected, choose Effect > Channel > Invert. The layer is inverted so the shadow becomes black. Change the layer’s blending mode to Multiply. The values of the shadow layer are multiplied by the values of the layers below it. This causes the shadow layer to darken the ship in the shadow areas.
5. The composite now looks similar to the associated beauty pass render (Figure 7.12). (A beauty pass render is included in the ProjectFilesRenders directory for reference.) Nevertheless, you are free to adjust any of the layers to improve the final quality of the composition. For example, add a Glow effect (in the Effect > Stylize menu) to the incandescence layer to make the ship’s lights softer and more intense. Add a Curves or Brightness & Contrast effect (in the Effect > Color Correction menu) to the specular layer to increase the intensity of the specularity.
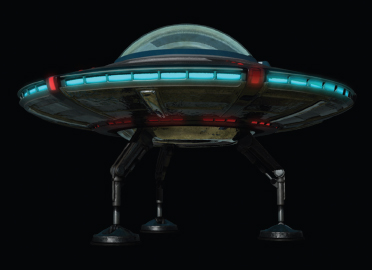
FIG 7.12 The recombined render passes.
At this point, the alpha channel of the composite is completely opaque. This is due to the solid alpha given to some render passes, such as the specular pass. There are several methods by which you can recreate an appropriate alpha channel. These methods are discussed in the “Supplying Alpha to Nonalpha Layers” section later in this chapter. A sample project file is included as mini_passes_combine.aep in the ProjectFilesaeFilesChapter7 tutorial directory.
Applying Advanced Shading Passes
Several additional render passes require special manipulation in After Effects. These are described in this section.
Motion Vector
Motion vector passes encode the XY motion of 3D objects in RGB as red and green values (Figure 7.13). The magnitude of the motion is encoded in the blue channel. You can use this pass to create motion blur in the composite, which is potentially more time-efficient than rendering the motion blur as part of a beauty pass. Motion vector application is demonstrated in the “Motion Vector Blur Mini-Tutorial” later in this chapter.
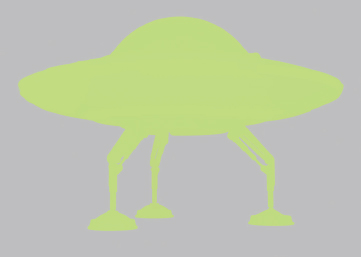
FIG 7.13 A motion vector pass.
UV passes encode the UV texture values of surface points in RGB. UV passes appear various shades of red and green, which corresponds with the UV texture values in the U and V directions. You can use UV passes to re-texture an object in the compositing program, although this requires a complex process. You can also use a UV pass to distort a background. For example, in Figure 7.14, a UV pass of the spaceship distorts video of a landscape. The Displacement Map effect is added to the landscape layer with its Displacement Map Layer menu set to the hidden UV pass layer. The brighter the pixels in the UV pass, the farther the pixels are pushed in the landscape. The distortion is divided between the vertical and horizontal directions. You can drive each direction with a different channel of the UV pass. For example, you can set Use For Horizontal Displacement to the red channel and the Use For Vertical Displacement menu to the green channel. An example project using this technique is included as uv_distort.aep in the ProjectFilesaeFilesChapter7 directory. You can find the Displacement Map effect in the Effect > Distort menu.
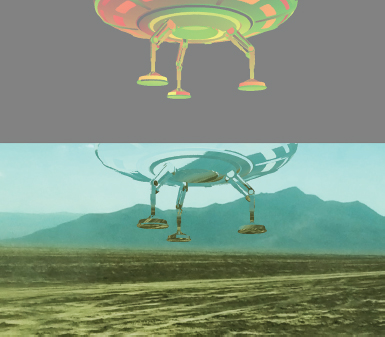
FIG 7.14 Top: UV pass. Bottom: Landscape distorted with the UV pass using the Displacement Map effect.
Normal
A normal pass encodes the geometry surface angle vectors in the RGB channels. The encoding may occur in one of several 3D coordinate spaces, such as object, world, or camera space. You can use a normal pass to affect a particular portion of a render based on the surface angle. For example, in Figure 7.15, a world-space normal pass renders the spaceship so that the polygon faces facing to the right (towards positive X in the 3D program) are rendered more intensely red. Polygon faces facing up (towards positive Y in the 3D program) are rendered more intensely green. Polygon faces facing the camera (towards positive Z in the 3D program) are rendered more intensely blue. To access this axis color information, you can shift the colors within the render pass. For example, if you apply the Shift Channels effect to the normal pass and set the Take Red From, Take Green From, and Take Blue From menus to Green, a grayscale image is produced with the brightest area of the ship along the top where they face the positive Y axis. You can find Shift Channels in the Effect > Channel menu.
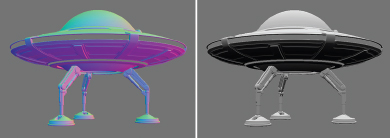
FIG 7.15 Left: Normal pass. Right: Normal pass with RGB sourced from its green channel using the Shift Channels effect.
You can use the normal passes with shifted channels as a source for a luma matte operation. Alternatively, you can place the adjusted normal pass over a lower beauty layer with the Multiply blending mode and thereby darken the underside of the ship (Figure 7.16). An example project using this technique is included as normal_vector.aep in the ProjectFilesaeFilesChapter7 directory. Note that the empty space of the normal pass is mid-gray; you may need to brighten this area or cut it out with a Track Matte or luma matte operation so that it doesn’t interfere with lower layers.
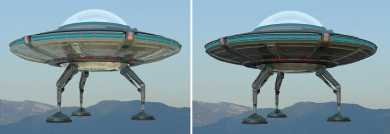
FIG 7.16 Left: Beauty pass and reflection pass placed over background. Right: Normal pass placed on top with the Multiply blending mode darkening the underside of the ship.
Supplying Alpha to Nonalpha Passes
Some render passes may not carry an alpha channel. In this situation, the pass occludes lower layers unless you use a blending mode such as Screen or Multiply. Nevertheless, there are several methods in After Effects you can use to borrow alpha information from a matte pass, another layer, or a different channel.
For example, you can use the TrkMat menu of the layer to take alpha information from a matte pass. Place the matte pass one layer higher and set the TrkMat menu to Luma Matte (Figure 7.17). The RGB information of the matte pass is transferred to the alpha channel of the TrkMat layer and transparency is achieved. You’re free to add a new background as the lowest layer in the composition.
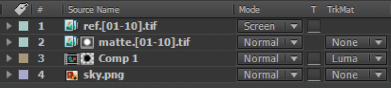
FIG 7.17 A matte pass cuts out a nested composition through the TrkMat menu. The nested composition carries the recombined ship. To restore the transparent but reflective dome, a reflection pass is placed on top of the layer outline.
Note that matte passes recognize transparency. Hence, the matte pass render of the ship used in Figure 7.17 is missing the dome because the dome’s material is 100 percent transparent. You can restore the dome, however, by placing a reflection pass at the top of the layer outline and choosing the Screen blending mode. To prevent the reflection from appearing over the entire ship, you can draw a mask to limit the reflection layer to the dome area (Figure 7.18). A sample project is saved as passes_matte.aep in the ProjectFilesaeFilesChapter7 directory.
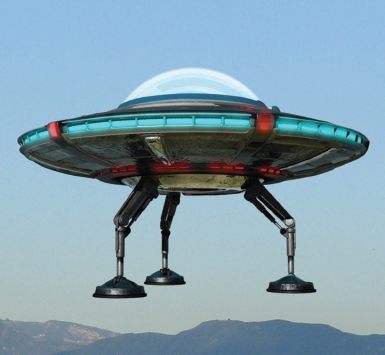
FIG 7.18 Alpha is restored to the ship with a matte pass and the TrkMat tool so that a lower sky layer shows behind the ship.
You can also use the Set Matte effect to borrow alpha information from a different layer and/or a particular channel. To use Set Matte, follow these guidelines:
1. Select the layer that lacks alpha and choose Effect > Channel > Set Matte.
2. In the Effect Controls panel, change the Take Matte From Layer menu to the layer that contains the matte pass. The matte pass may be at a lower layer or higher layer. The matte pass layer should remain hidden.
3. Set the effect’s Use For Matte menu to Luminance. In this way, Set Matte functions like the Track Matte tool.
4. You also have the option to generate alpha based on the values of RGB channels. For example, if you set Use For Matte to Red Channel, the red values are converted to alpha values. The layer you choose for the Take Matte From Layer need not contain the matte pass but can be any layer that contains video footage, still footage, or artwork. However, unless the chosen layer contains solid colors, otherwise opaque alpha areas will become semitransparent.
A better solution for generating alpha information from a nonmatte layer is to use a layer that carries serviceable alpha. For example, set the Take Matte From Layer to a beauty pass layer and set the Use For Matte to Alpha Channel (Figure 7.19). A beauty pass may not be desirable for its look in RGB, but it generally contains a usable alpha channel that you can transfer to a render pass layer that has no alpha information.
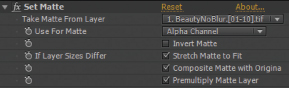
FIG 7.19 The Set Matte effect borrows alpha information from a beauty pass layer.
Note that you can also set the TrkMat menu to Alpha Matte to borrow the alpha values from the above layer if it has an alpha channel.
Working with Multichannel Image Formats
A few image formats, such as OpenEXR, RLA, and Maya IFF, are able to carry custom channels in addition to standard RGB and alpha. In fact, all the renders passes required for a shot can be carried by a single OpenEXR sequence. To access these channels in After Effects, you must transfer them to RGB using the EXtractoR plug-in. For example, to retrieve a matte pass from an OpenEXR sequence, you can follow these steps:
1. Import the sequence and place it on a new layer. With the layer selected, choose Effect > 3D Channel > EXtractoR.
2. Open the effect’s properties. Click one of the channel names, such as Blue. A dialog window opens. Click the Blue menu. The available passes and associated channels are listed (Figure 7.20). The rendering program assigns the channel names. For example, the matte pass rendered in Maya with mental ray is named MATTE:matte.camera with R, G, and B suffixes that represent the red, green, and blue channels of the matte pass. An example sequence following this naming convention is included as ship.##.exr in the ProjectFilesRendersEXR directory.
3. You can skip the channel menus and choose the pass name from the Layers menu, which automatically selects the correct channel names for red, green, and blue. Click the OK button to close the window. The channels are transferred and the grayscale matte pass becomes visible in the Composition view. Note that the ship rises up into the frame in the ship.##.exr image sequence.
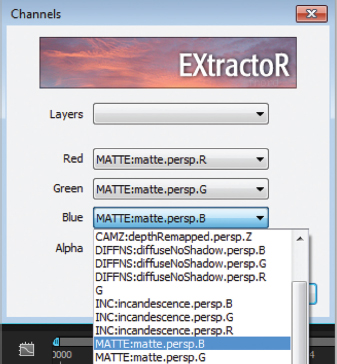
FIG 7.20 EXtractoR plug-in window with partial list of passes and channels carried by an OpenEXR sequence.
If you wish to extract an additional pass, you must create a new layer with the sequence, add a new EXtractoR effect to that layer, and set the Layers menu to the desired pass name. Some render passes, such as the depth pass, may only have one channel in the OpenEXR. In such a situation, you can set the Red, Green, and Blue menus to the same channel. A sample project that retrieves a matte pass is saved as exr_matte.aep in the ProjectFilesaeFilesChapter7 directory.
Creating Motion Blur in the Composite
You can add motion blur during the compositing phase if you have a nonblurred version of the animation and a motion vector render pass. However, you must use a third-party plug-in to read the motion vectors in After Effects. For example, you can use the RE:Vision Effects ReelSmart Motion Blur plug-in. The following tutorial explains the process.
ReelSmart motion blur mini-tutorial
To apply motion blur using an OpenEXR sequence and a normalized motion vector render pass created in Autodesk Maya, follow these steps:
1. Create a new project. Import Lemons.###.exr from the ProjectFilesRendersLemons directory. LMB-drag the image sequence to the timeline to create a new composition. Play back the timeline. The sequence features a large number of falling 3D lemons. At this point, there is no motion blur.
2. With the layer selected, choose Effects > 3D Channel > EXtractoR. In the Effect Controls panel, click a channel name, such as Red. The EXtractoR window opens. Set the Layers menu to MV2N:mv2DNormRemap.persp. Click the OK button to close the window. The motion vector pass becomes visible. Yellow-green colors appear within the lemons (Figure 7.21).
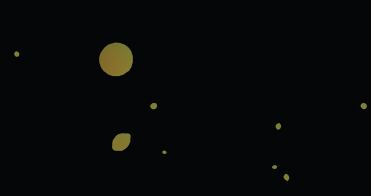
FIG 7.21 Motion vector pass, made visible with the EXtractoR plug-in and cut out with TrkMat and a matte pass.
3. These channels were created with a mental ray normalized motion vector pass. The normalization keeps the contained values within a predictable range (0 to 1.0). With this type of motion vector pass, the X object motion is stored in the MX (red) channel and the Y object motion is stored in the MY (green) channel. The blue channel is not used and is empty. Note that the OpenEXR sequence is in 32-bit floating point; a high bit-depth is critical for storing accurate motion blur vectors.
4. To make the motion vector layer useful, it must be cut out by a matte pass. Duplicate the current layer upwards by choosing Edit > Duplicate. Open the EXtractoR window for the top layer. Change the Layers menu to MATTE:matte.persp. Hide the matte layer by turning off the layer eye icon. Change the TrkMat menu for the lower motion vector layer to Luma Matte. The motion vector pass is cut out by the matte pass. This prevents values within the empty 3D space (which carry no RGB values) from interfering with the motion vector interpretation.
5. Create a new composition. LMB-drag the first composition into the new composition. Hide the nested layer. LMB-drag a new copy of the lemon.##.exr sequence into the new composition and place it at the bottom of the layer outline. By default, if no channels are chosen within the OpenEXR files, the default RGB channels are used. To ensure that the correct RGB channels are used, add a new EXtractoR effect to the lower layer. Set the EXtractoR Layers menu to BEAUTY.beauty.persp.
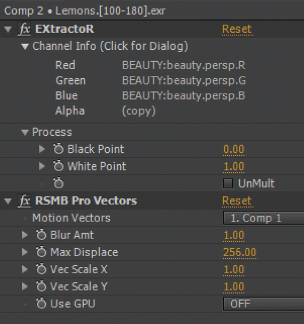
FIG 7.22 EXtractoR and RSMB Pro Vectors effects settings for the motion blurred layer.
6. With the lower layer selected, choose Effect > RE:Vision Plug-ins > RSMB Pro Vectors. This is the ReelSmart Motion Blur motion vector tool. Open the effect in the Effect Controls panel. Change the Motion Vectors menu to the nested comp layer (1. Comp 1). Change the Max Displace to 256 (see Figure 7.22). 256 matches the maximum displacement setting carried by the normalized motion vector render pass in mental ray. The motion blur appears. Play back the timeline. Note that the blur takes into account spinning, as well as differences in foreground and background motion blur streak lengths (Figure 7.23).
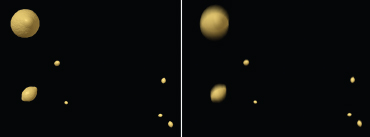
FIG 7.23 Left: Lemons with no blur. Right: Lemons with blur created by RSMB Pro Vectors. The Blur Amt property is set to 1.0.
7. You can adjust the length of the blur streaks by adjusting the Blur Amt value. 0.5 is equivalent to common camera exposures. Higher Blur Amt values lengthen the blur trails.
A finished project is saved as mini_motion_vector.aep in the ProjectFilesaeFilesChapter7 directory. For more information on ReelSmart Motion Blur, visit www.revisioneffects.com.
Chapter Tutorial: Using OpenEXR Depth Channels for Depth of Field
You can add a narrow depth of field, where parts of the screen are out of focus, to a render as part of the compositing process. This requires a depth pass and the use of the Camera Lens Blur Effect. To add depth of field to an OpenEXR image, follow these steps:
1. Create a new project. Import the fly.exr render from the ProjectFilesRendersEXR directory. It is a single frame and not a sequence.
2. Create a new composition that’s 1280x720, 24 fps, and 24 frames in duration. LMB-drag fly.exr into the new composition. Although the render is a single frame, the frame is repeated the entire duration of the timeline. The render features a fly sitting on a surface.
3. With the new layer selected, choose Effect > 3D Channel > EXtractoR. Open the effect in the Effect Controls panel and click on one of the channel names, such as Red. The EXtractoR window opens. Set the Red, Green, and Blue menus to CAMZ:depthRemapped.persp.Z. The depth channel appears as a grayscale image in the Composition view (Figure 7.24).
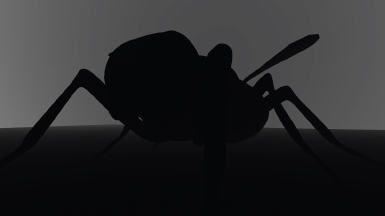
FIG 7.24 The depth pass revealed with the EXtractoR plug-in.
4. With this depth channel, the far wall is brighter gray while the close parts of the fly are darker. Overall, the contrast is low. You can increase the contrast by remapping the range of values with the Black Point and White Point properties. Go to the Info panel at the top right of the program window and click the panel’s upper-right menu arrow. Switch the menu from 8-bpc (0–255) to Decimal (0.0–1.0). This causes the Info panel to display RGBA values in decimal form (Figure 7.25). This matches the 0–1.0 values contained in the depth pass. This particular style of depth pass normalizes the values, forcing the values to stay between 0 and 1.0. (Other depth pass variations create extremely large values.) Place the mouse over the head of the fly and note the value of the red channel (the RGB channels are identical). The value is roughly 0.01. Place the mouse over the background wall and note the value. The value is roughly 0.04.
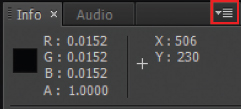
FIG 7.25 The Info panel with the RGBA readout when the mouse is placed over the head of the fly. The readout is set to Decimal. The menu that sets the readout style is indicated by the red box.
5. Enter 0.02 into the EXtractoR effect’s Black Point field. This forces values between 0 and 0.02 to be remapped to 0. The contrast increases slightly. Enter 0.04 into the White Point field. Values between 0.4 and 1.0 are forced up to 1.0. The depth image gains contrast (Figure 7.26).

FIG 7.26 The depth pass gains contrast by adjusting the Black Point and White Point values.
6. Create a new composition with the same resolution, frame rate, and duration as the first composition. LMB-drag the first composition into the new composition. Hide the nested composition layer by turning off the eye icon.
7. LMB-drag fly.exr into the new composition and place it at the bottom of the layer outline. With the new fly layer selected, go to Effect > 3D Channel > EXtractoR. Open the effect in the Effect Controls panel and click on one of the channel names, such as Red. The EXtractoR window opens. Set the Layers menu to BEAUTY.beauty.persp. With this OpenEXR render, a separate beauty render pass was added in addition to the default RGB render. Click the OK button to close the window.
8. Select the fly layer, and choose Effect > Blur & Sharpen > Camera Lens Blur. In the Effect Controls panel, expand the blur effect’s Blur Map section. Change the Layer menu to the nested comp layer (1.Comp 1). Increase the Blur Radius to 10. The background wall, the back of the floor plane, and the back of the fly become out of focus (see Figure 7.1 at the start of this chapter). You can adjust the intensity of the “out-of-focusness” by altering the Blur Radius value. To reverse the depth so that the foreground is out of focus, select the Invert Blur Map radio button in the Blur Map section.
9. To make the area that’s in focus more narrow, return to the first composition and lower the White Point value. To increase the in-focus range, raise the White Point value. The part of the depth pass that is white receives the maximum amount of blurriness. The part that is black receives no blurriness.
A finished version of this project is saved as depth_blur.aep in the ProjectFilesaeFilesChapter7 directory.