
3. Light

Light Is the Key Element in Image Making!
Without light, there would be no photographs. In fact, the word photography means “drawing with light.” Light has quality, quantity, color, and direction, which provide shape, texture, and character to your images. There is a reason that I get up at 0’dark thirty while most people in the world are still tucked snugly in their warm beds. I drive in the predawn hours to arrive at a location that is cloaked in darkness. I set up my camera in the dark, using a flashlight to make sure my ISO and aperture are adjusted to my liking as I prepare to make my first image of the day. It’s up to me to choose the best settings to enhance the quality of light.
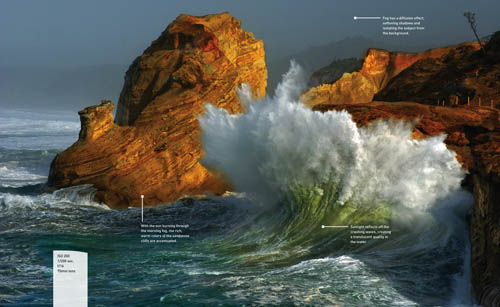
Poring Over the Picture
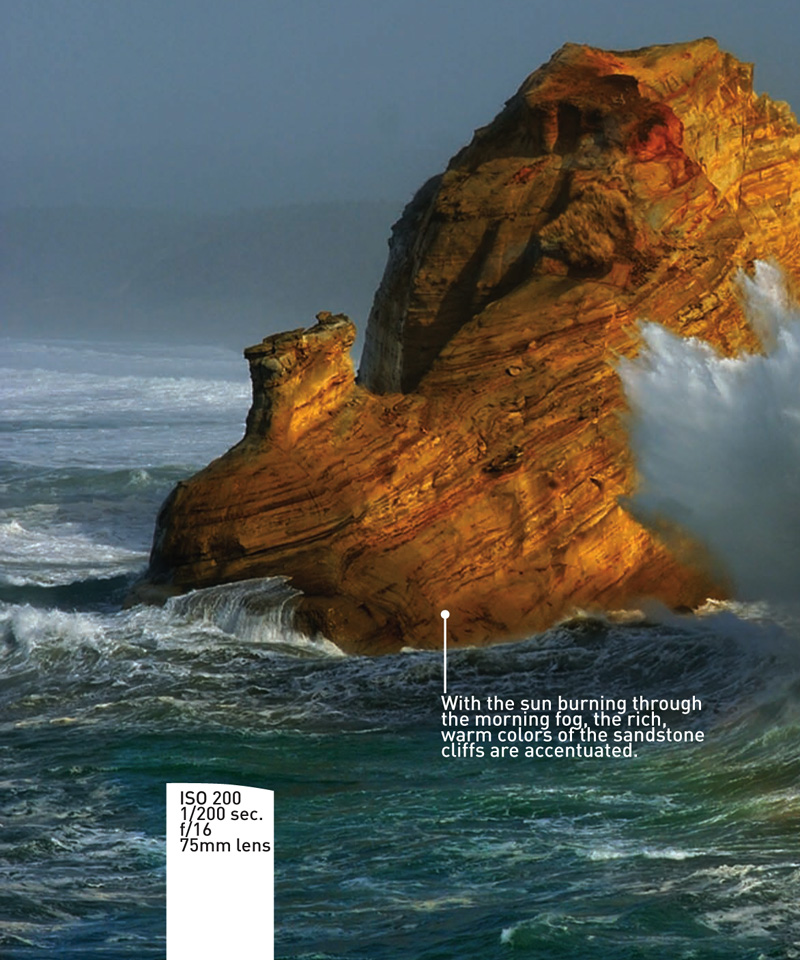
Crashing waves on the Oregon coast had me heading up the dunes in hopes the morning fog would lift. As the sun burned through the fog and washed over the sandstone cliffs, there was plenty of light. So, I was able to keep my ISO at a low setting and still have enough depth of field and a fast enough shutter speed to render the image that I saw in my mind’s eye.

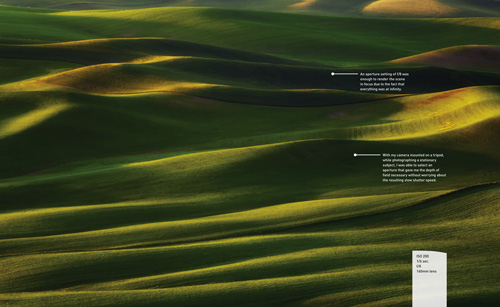
Poring Over the Picture
Late afternoon light skims across the wheat fields in Palouse, Washington, creating a painterly effect of shadow and light in lovely shades of green. Sidelight adds contrast and texture to the undulating hills, adding visual depth to the scene. Within a few short minutes of setting up my camera, the sun dropped below the horizon, leaving the fields in shadow. Knowing my camera and settings as well as I do enabled me to capture the moment before it was gone.


The Quality and Quantity of Light
Photography is all about chasing the light. The light you chase has quality and quantity. It’s the quality and quantity of light that I look for in my photographs. The rich, warm tones of sunrise or sunset, the deep blue of twilight, the diffused colors of an overcast day, or the harsh shadows of midday all play a big part in the end result of my images. Understanding light will make you a better photographer.
Sunrise and Sunset: the Golden Hours
It’s anticipation of the quality of light a beautiful sunrise bestows upon the landscape that pulls me from my warm bed, or the quality of light at sunset that keeps me out shooting during the dinner hour. While the sun is low on the horizon, bathing the world in its warm glow, the exposure is well within the five-stop range that my sensor needs to capture detail in both the shadows and highlights (Figure 3.1). If I turn 180 degrees, I can photograph into the sun using the bright, colorful light as a background for an interesting silhouette (Figure 3.2). During the first hours of daylight, the light is low, necessitating the need for a tripod for stability or to increase the ISO enough to achieve a shutter speed fast enough to hand hold the camera. The choice is yours—greater detail versus greater noise.
Figure 3.1. Sunrise at Highland Lighthouse, Cape Cod. Mounting my camera on a tripod allowed me to select an aperture that would yield enough depth of field to render the lighthouse in sharp focus without my worrying about the resulting slow shutter speed.
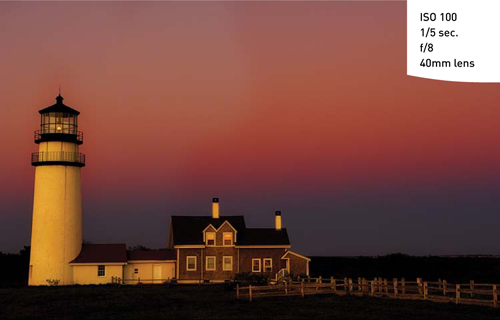
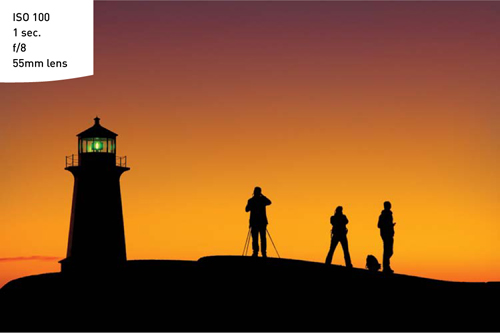
Figure 3.2. Facing towards the sunrise, Peggy’s Cove Lighthouse becomes a silhouette. Dialing in –1 exposure compensation darkened the lighthouse and people to black and increased the saturation of the sunset colors. Using a tripod helped to stabilize my camera with its slow shutter speed. I had to wait for the people to hold still to capture them without any movement.
Quality of light is fleeting. Every February in Yosemite National Park, there is a phenomenon that lasts for about two weeks. The conditions have to be just right, with no clouds to block the sun and enough water flowing over Horsetail Falls. As the sun begins to set, the angle of light throws the canyon wall into darkness and light hits the falls, lighting them as if they were on fire (Figure 3.3). Talk about quality of light!
Figure 3.3. The setting sun casts its light towards Horsetail Falls, illuminating it as if it were on fire. Shooting wide open to keep a faster shutter speed was necessary because I was hand-holding my camera. A –1 stop of light darkened the rock wall, enhancing the light on the falls.

Midday
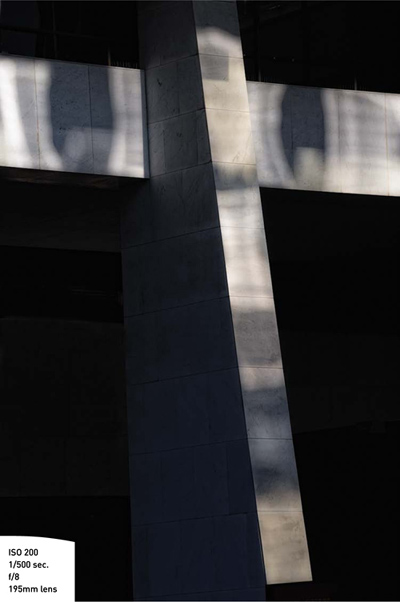
As the sun rises higher in the sky, the quantity of light increases, the warmth of first light fades away, and the contrast between shadow and light becomes greater. The brighter light, as the sun moves higher in the sky, means that I can shoot at a faster shutter speed or a smaller aperture without the need to increase my ISO (see “Understanding the Exposure Triangle,” in Chapter 2). As the light gets brighter and the contrast between shadow and light increases, rather than putting away my camera, I look to the shadows as backdrops for graphic elements (Figure 3.4).
Figure 3.4. Midday light, with its hard shadows, turns objects into graphic elements. The sun acts like a point source of light on sunny days, throwing shadows into the mix for added drama. I tend to dial in minus exposure compensation to darken the shadows, making them a deep black that makes a nice contrast against a lit subject. Minus exposure compensation darkened the shadows, making the column stand out.
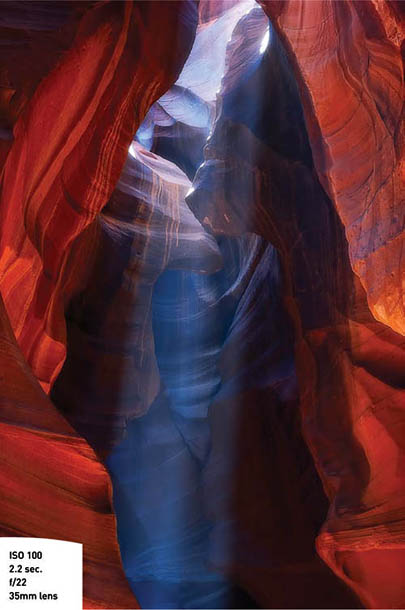
Slot canyons are best photographed at midday, when the sun is high in the sky. The light works its way into the canyon through a slim opening, bouncing from one red wall to the other, bringing out the colors of the sandstone (Figure 3.5).
Figure 3.5. Midday light, Upper Antelope Canyon, Arizona. With the sun directly overhead, light penetrates into the deep canyon, bouncing off the walls and turning them to a rich, warm color. Dust falls from above into the slot canyons, and the light bounces off the dust creating God beams. Minus exposure compensation increased the visibility of the shaft of light against the saturated colors of the canyon walls.
Diffused, Overcast Light
Overcast days light the landscape as if there was a giant softbox in the sky. Without shadows and contrast, the light is flat, with more detail visible. I like overcast days when photographing mammals, birds, people, flowers, and water (Figure 3.6).
Figure 3.6. Diffused light brings out the details in mammals’ fur. Adding a 1.4X teleconverter to my 600mm lens enabled me to fill the frame with the pronghorn’s head. A tripod allowed me to shoot wide open at 1/125 of a second, with my ISO set to 200 to avoid noise.

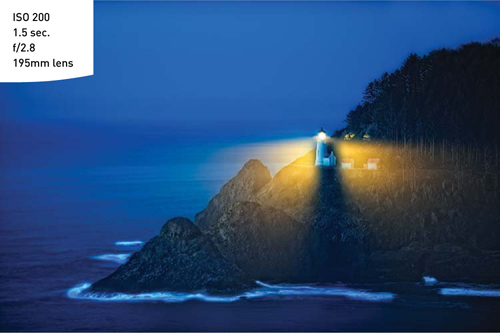
As the day wears on, the sun begins its descent and the shadows grow long once again; it’s the light that keeps me out shooting until the last rays of sun are gone. And if I’m lucky and the photo gods cooperate, I’ll keep shooting, capturing the blue cast of twilight (Figure 3.7).
Figure 3.7. Twilight at Heceta Head Lighthouse, Oregon. Long after the sun has set, the sea fog begins to roll in, making the light more prominent in the dark.
Changing Light
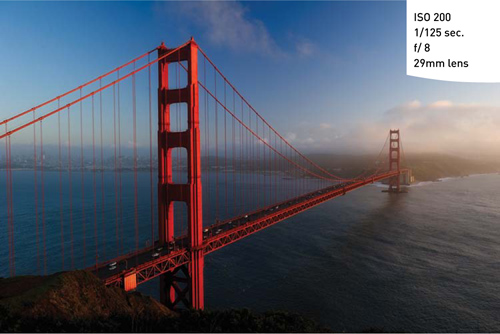
Light is constantly changing. Different times of the day reveal different elements in a subject. The late afternoon light shines on the Golden Gate Bridge, bringing attention to the famous red structure (Figure 3.8).
Figure 3.8. Late afternoon light illuminates the Golden Gate Bridge. With the camera mounted on a tripod, I was able to photograph the same subject at different times of the day, into the evening, illustrating the difference in light over a few hours time.
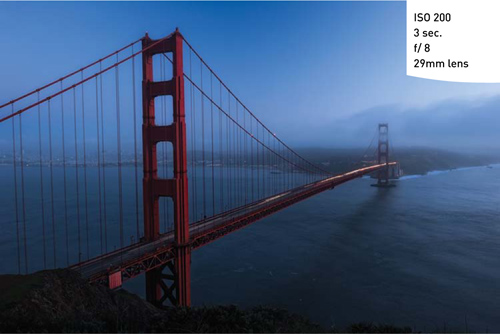
As the sun drops below the horizon, the light disappears from the bridge. The image takes on the cool colors of evening (Figure 3.9).
Figure 3.9. The sun drops below the horizon, plunging the Golden Gate Bridge into darkness.
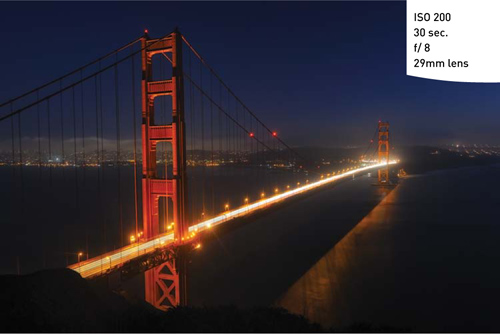
In the evening, artificial lights illuminate the Golden Gate once again, brightening the red of the bridge. A long exposure with moving cars on the bridge added light streaks, which produced the feeling of motion (Figure 3.10).
Figure 3.10. Evening approaches and the bridge is lit once again, causing the bright red to stand out against the dark blue sky.
Direction of Light
Light has three directions in relationship to the camera. The way light falls on my subject determines how I will set my exposure. Front-lit subjects are easy to expose. With no contrast or shadows to deal with, the exposure is well within the range the sensor can handle, so I simply compose and click. Backlight is the opposite of front light, with the light coming from behind the subject, casting it into silhouette. Sidelight adds drama, texture, and shape to an image.
Front Light
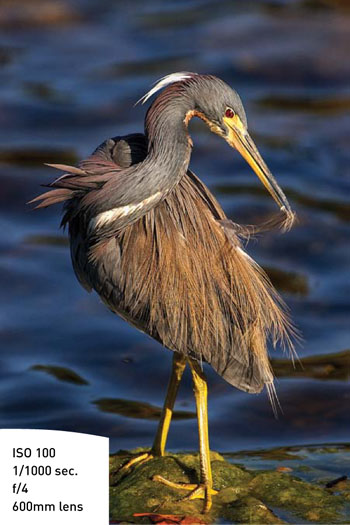
Front light lacks shadows. Consequently, it lacks the texture, shape, or dimension of sidelight or backlight. It is, however, a very easy exposure to make. Simply meter your scene, and choose the best exposure combination to suit your subject. With a simple click, you have a nice image. Using a fisheye to photograph Emerald Pool in Yellowstone National Park with front light reveals a glimpse into the depth of the pool (Figure 3.11). The lack of shadows reveals the detail in the feathers of a tricolored heron pausing to preen (Figure 3.12). Selecting a wide aperture renders the heron in sharp focus and softens the background, making the subject pop.
Figure 3.11. Emerald Pool, Yellowstone National Park.
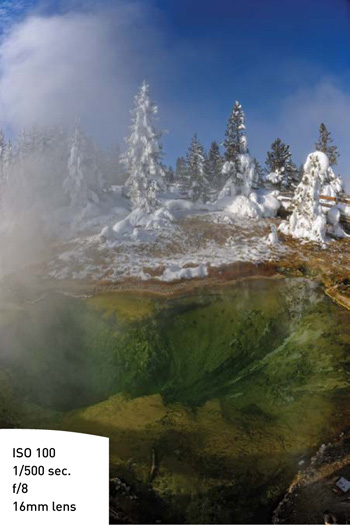
Figure 3.12. Tricolored heron preening, with front light showing the details in its feathers.
Backlight
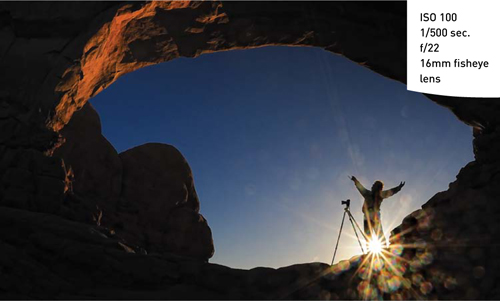
Backlighting (shooting towards the light source) turns your subject into a silhouette. Images that have an interesting shape and form make great subjects when I’m photographing into the sun. The mood of a backlit scene varies depending on how I handle the exposure. Because my camera can’t handle the exposure range between shadow and light in a backlit scene, I use the shadows to accentuate the shape of a familiar landmark, the Mittens in Monument Valley. By positioning myself so the sun was partially blocked by the formation, and closing down my aperture to its smallest setting of f/22, I was able to add a creative starburst to the pinpoint of sunlight (Figure 3.13). With the knowledge that I would get a starburst effect from shooting into the sun with a small aperture, I took creative license with my fisheye lens to capture a person for scale (more on scale in Chapter 6), backlit against the North Window in Arches National Park (Figure 3.14). The scatter of light added creative lens flare (which normally is something I try to avoid).
Figure 3.13. The rising sun backlights the Mittens, in Monument Valley, Arizona.
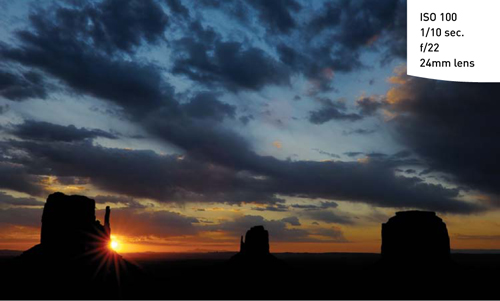
Figure 3.14. Backlit photographer with creative lens flare.
Sidelight
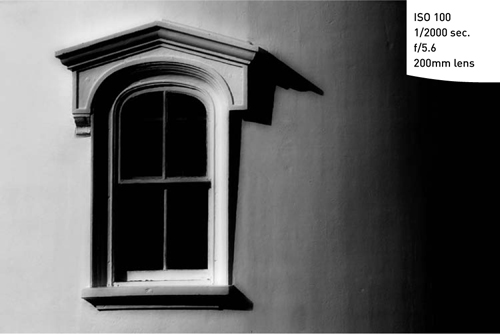
Sidelight occurs when you are positioned at a right angle to the light source, working the shadows to define shape, form, and texture. The contrast of shadow and light adds a three-dimensional feeling to a two-dimensional image. The simplicity and lack of color in the image of a lighthouse window made for a very high-contrast, graphic look (Figure 3.15).
Figure 3.15. Sidelight adds shape, form, and texture to the lighthouse window.
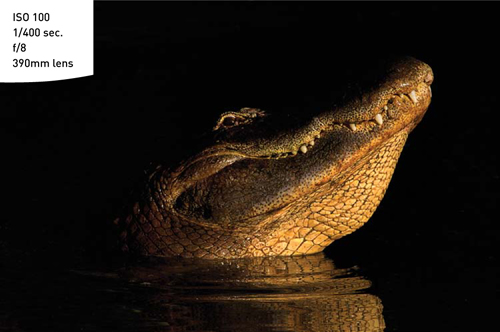
Using sidelight for dramatic effect, I turned my lens on an alligator as it lifted its head out of the water. With only a moment to capture this image before the alligator dropped back into the depths of the lake, I had to act quickly. Knowing how my camera would react to the light, I was able to make a split-second exposure decision and capture the fleeting moment. The water acted as a reflector, bouncing light up into the alligator’s face (Figure 3.16). The exposure range was too great to capture detail in the shadows, emphasizing the alligator’s teeth and eye, which is where I want the viewer’s eye to travel within the frame. Just like the lens you select decides what you include as much as what you exclude in your frame, shadow and light further enhance this effect. By excluding part of the alligator’s face, the sense of drama and mystery is increased.
Figure 3.16. Water acts as a natural reflector, bouncing light up into the alligator’s face.
Exposure Compensation
Exposure compensation gives me creative control of my exposure. I rely on my camera’s meter to give me the best overall exposure for a given scene. Once I have my base exposure, I need to decide on the mood I am trying to capture. I choose among several aperture, shutter speed, and ISO settings. I also have the ability to take control of my exposure and override the camera for dramatic effect.
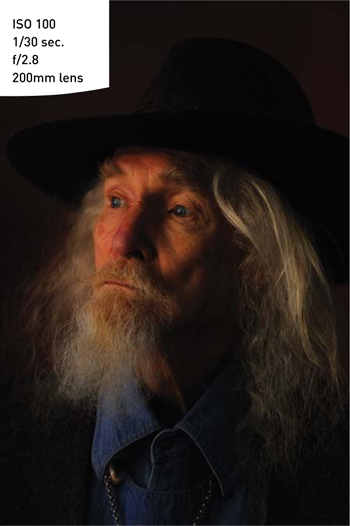
Window light is a wonderful source of light. In Figure 3.17 I asked Donald to stand at an angle to the window, controlling the direction the light traveled across his face. Shadow and light gave Donald’s face shape and form that front light would have eliminated. By dialing in –1 ½ exposure compensation, I increased the shadows, which in turn accentuated the character in Donald’s face. Donald, a seasoned model, was able to hold very still, which gave me the ability to keep my ISO low to avoid noise and still shoot hand-held at 1/30 sec. with my lens wide open. With a very shallow depth of field, it was essential that Donald’s eye remain in sharp focus. Using my 200mm lens, I composed a tight head-and-shoulders portrait of Donald.
Figure 3.17. Using window light and having Donald turn at an angle to the window enhanced the character of his wonderful face.
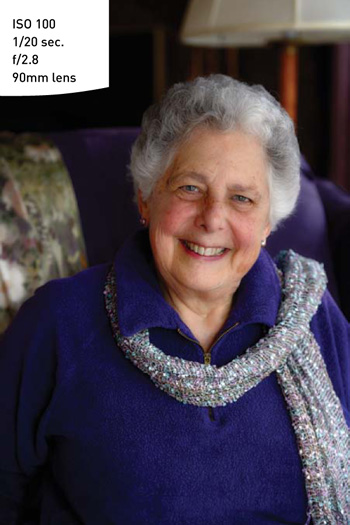
Donald’s face lent itself to the dramatic lighting, whereas the same effect would not flatter a lovely woman. Knowing light and what works best with different subjects enabled me to capture two distinctly different looks. In Figure 3.18 I used the window light again. But this time the window was a wall of glass, which increased the size of the light source and created a much softer, brighter, more airy feeling to the portrait of my friend Leila. In this case I dialed in + ½ exposure compensation to add to the bright feel. Wanting to show Leila in her home environment, I used a 90mm focal length to include more of her surroundings.
Figure 3.18. Using a larger source of light added to the bright airy feeling.
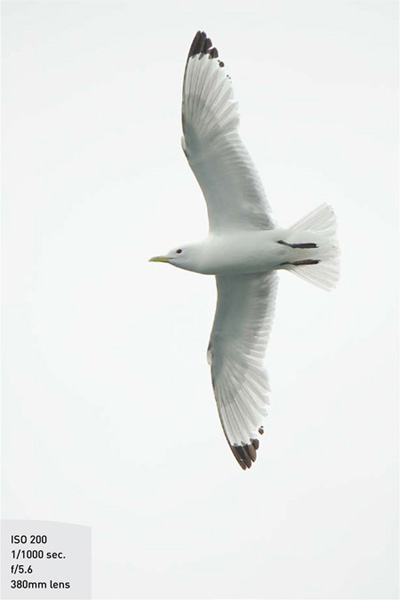
Knowing how my meter will react to a given light situation, I dialed in +1 exposure compensation on this kittiwake against a white sky to achieve a high-key look (Figure 3.19). Had I gone with the reading my camera gave me, I would have ended up with an image that was darker and moodier, with less detail on the bird. Using my camera’s Highlight Warning (see “My Top Ten Basic Camera Settings,” in Chapter 1), I could see that the sky was blown out without detail. In this case I chose to accept the blown-out sky to create the effect I was after.
Figure 3.19. Dialing in plus exposure compensation gave this kittiwake image a high key look.
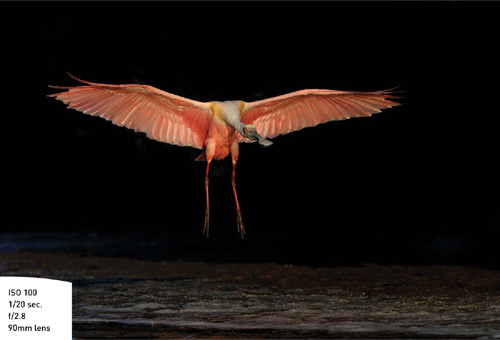
Photographing roseate spoonbills in Tampa Bay with front light against the darker mangrove trees caused my Highlight Warnings to blink, warning me of overexposure with no detail on the bird. I dialed in –1 exposure compensation to capture the detail in the spoonbill, which in turn darkened the background to nearly black, causing the spoonbill to stand out dramatically (Figure 3.20).
Figure 3.20. Dialing in minus exposure compensation gave me a proper exposure of the roseate spoonbill.
Chapter 3 Assignments
With a greater understanding of light, you will have much more control over the outcome of your images. Remember that light is the single most important element in your photographs. How you work with the light and your exposures directly relates to whether your images will look the way you visualize them.
Quality and Quantity of Light
Find a subject close to your home that you can revisit over the course of several days at different times. Photograph the subject under different light conditions to see the effects light has on the mood and character of your subject. Shoot at sunrise, sunset, midday, twilight, and on an overcast day. Then compare the images to see the effects the light has on the subject. Review your exposures and study the EXIF data to see how your settings changed at different times of day based on the quantity of light.
Direction of Light
Once again, you will need to stretch this assignment over a few days to be able to see the change in the direction of light. Select a few subjects that you can photograph from several angles so you can compare the direction of light and how it affects your subject. Begin with front lighting. Move around so the light is behind your subject and take another photograph. Then shoot your subject with the light coming from the side. Compare the results to see what effect the direction of light has on your subject.
Exposure Compensation
If you have a bracket setting on your camera, you can use it for this assignment. With your camera mounted on a tripod, shoot a sequence of at least five photographs beginning with the metered value followed by a shot at –1 exposure compensation and then –2 exposure compensation. Then dial in +1 and +2, and shoot at each exposure setting. Compare the results to see the effect of darkening the image and adding drama or lightening the subject to make it feel brighter.
Share your results with the book’s Flickr group!
Join the group here: flickr.com/groups/composition_fromsnapshotstogreatshots