Chapter 9: Billing
Billing is the one of the most important process in a sales cycle. In this step, customers are invoiced for the services rendered or goods supplied. If there are any corrections in the billed amount or if the customer has returned the goods for any reason, the difference is settled by issuing credit or a debit memo or a credit for returns. All these documents are termed billing documents in SAP.
During the process of billing, you can choose to carry out a final repricing for some or all the pricing conditions before the invoice is created. The billing documents are then released to accounting. The determination of the accounts, the accounting document type, and other information is initiated during the billing process.
In this chapter, we will cover the billing process, explain some of the important scenarios, and show you the configuration settings.
A sales document becomes due for billing once a product has been delivered or a service has been rendered. Actions such as posting goods issue (or a confirmation of service) in a delivery can make the document due for billing. Order-related billing is another scenario.
As covered in Chapter 7, “Sales,” when you define item categories, you choose the options for billing relevance such as order-related billing, delivery-related billing, and so on. These settings govern the items that show up in the billings-due list.
Another factor that determines items due for billing is the Billing Date field in the sales document. The item cannot be billed until the billing date is reached.
Billing Document Creation
In SAP, a billing document can be created as an individual document or in batch mode by running periodic jobs. The following sections cover the ways to create a billing document.
Creating an Individual Billing Document
To access this transaction, the menu path is as follows: SAP Menu Logistics Sales And Distribution Billing Billing Document Create (VF01).
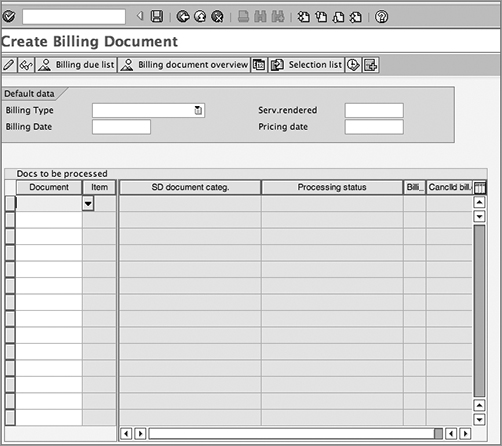
This will lead you to a screen similar to Figure 9-1. Enter one or more documents due for billing. These can be sales documents (in the case of order-related billing and credit/debit memos) or delivery documents. The billing type can be entered manually or determined automatically, based on the customization settings. The Execute function creates a billing document.
Figure 9-1: Creating a billing document using VF01
Creating Individual Billing Document from the Sales Order Screen (VA01 or VA02)
From the sales order screen, you can use the menu Sales Document Billing to create a billing document in the case of order-related billing.
This option is available if the user is authorized for sales order and billing document creation.
Collective Processing of Documents Due for Billing
When the volume of sales transaction is high, it is not always feasible to create individual billing documents. Collective processing of billing documents enables you to create documents in batches. The path is SAP Menu Logistics Sales And Distribution Billing Billing Document Process Billing Due List (VF04).
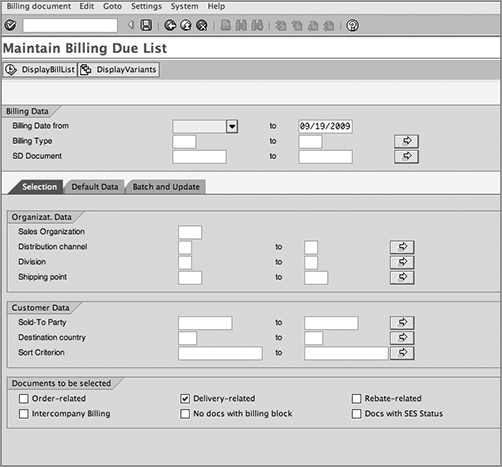
The selection screen allows you to control the parameters for which the list can be executed. As shown in Figure 9-2, you can use criteria such as billing data (with options like billing type and billing dates), organizational data (such as sales organization), and/or customer-specific data (such as the sold-to party number). You can further limit the documents to be selected by choosing scenarios such as order-related billing, delivery-related billing, and so on.
Figure 9-2: Billings-due list
Some Important Billing Types
In SAP, several types of billing documents exist to fulfill different business processes. The billing type determines the kind of billing document that is created in the process. We’ll now discuss some of the major document types and the business scenarios where they are used; after that, we’ll discuss the customization settings.
Customer Invoice
You can invoice the customer for services rendered or items delivered by using regular invoices. Depending on the reference document, billing type F1 is defined for order-related billing; F2 is defined for delivery-related billing.
As discussed in Chapter 7, when you define a sales document (VOV8), you specify the billing type to be used in the case of order-related and delivery-related billing scenarios.
Credit and Debit Memos
You can make any corrections to the invoices amount or give any refunds to the customer using credit memos (G2) and debit memos (L2). These documents are usually created with reference to a credit (or debit) memo request. In that case, it is an order-related billing. However, credit and debit memos can be created with reference to invoices as well.
You can also issue a credit to a customer in the event of a return. In this case, you can use a special billing type, RE. This is usually created with reference to a return order and/or returned delivery.
Pro-forma Invoice
A pro-forma invoice is used as documentation to accompany shipments. It has details about the shipment contents and value. A pro-forma invoice has no impact on financial accounting. You can print out any number of pro-forma invoices at any stage of the sales cycle.
You can create a pro-forma invoice with reference to a sales order (billing type F5) or a delivery (billing type F8).
Intercompany Invoice
In an intercompany sales scenario, the delivering plant in a sales order belongs to a different company code than the sales organization. In this case, the plant delivers the shipment to the customer and bills the ordering company code for the goods or services provided. This internal document is called intercompany invoice. The billing type in this case is IV.
We will discuss this process later in this chapter.
Invoice List
Some customers prefer to receive a periodic statement that lists the details of all the billing documents created in a certain period. This document is called an invoice list. You can combine one or more billing documents in an invoice list. In the case of a large group of companies, there can be several sold-to parties but a common payer. In such cases, it is common to issue a periodic invoice list to the payer, who will make the payment on behalf of the entire group. The group payer internally collects the amount from each sold-to party within the group. In some cases, the payer is given a discount (called a factoring discount) for these services.
To create an invoice list, proceed through the SAP Easy Access menu via the menu path Logistics Sales And Distribution Billing Invoice List Create (VF21).
The transaction is similar to VF01 but used exclusively for an invoice list. You can combine one or more invoices and debit notes in a common invoice list. SAP offers the billing type LR. Credit memos are combined into a separate invoice list, called LG.
The billing documents to be included in an invoice list should already have been posted to accounting.
Invoice Cancellation Documents
If any invoice that has been posted to accounting has to be deleted, you can create another billing document called a cancellation document to offset the effect. The cancellation document is also posted to the accounting and offsets entries there.
At this time, the reference document (order or billing) once again becomes due for billing. S1, S2, LRS, and LGS are examples of cancellation billing types.
To create a cancellation document, follow the menu path SAP Menu Logistics Sales And Distribution Billing Billing Document Cancel (VF11). Enter the billing document to be cancelled, and execute the transaction. The transaction is similar to VF01.
Table 9-1 summarizes the important billing types used in SAP.
Table 9-1: Billing Types
| Billing Type | Description |
| F1 | Order-related billing |
| F2 | Delivery-related billing |
| L2 | Debit memo |
| G2 | Credit memo |
| RE | Credit for returns |
| F5 | Pro-forma for order |
| F8 | Pro-forma for delivery |
| IV | Intercompany billing |
| LR | Invoice list |
| LG | Invoice list for credit memos |
| S1 | Cancellation document |
Customizing Billing Documents
We’ll now cover the important settings required to configure a billing document and control the data flow in it.
Setting Up a Billing Type
The first step in the configuration is to set up a billing document. The path in IMG to configure delivery types is IMG Sales And Distribution Billing Billing Documents Define Billing Types (VOFA).
You can select from the existing list of billing documents or define a custom document here. It is helpful to copy with reference to an existing document type. Choose a two-character alphanumeric code and a meaningful description. Refer to Figure 9-3.
Figure 9-3: Define billing types, general controls
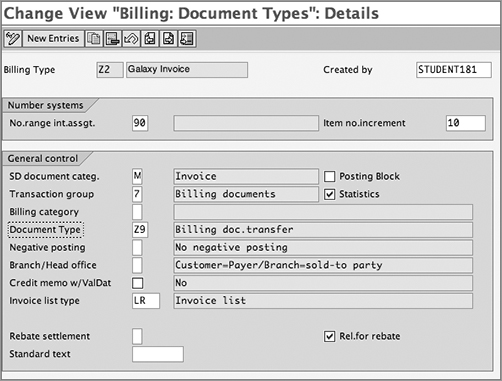
Some of the important fields in this screen are as follows:
Number Range: Internal Number Assignment
SD Document Category The code in the field SD Document Categ. signifies the type of billing document you’re configuring. In this book’s earlier chapters, we showed you how to maintain the document category for sales and delivery documents. For billing documents, some of the major document categories are as follows:
- M: Invoice
- O: Credit memo
- P: Debit memo
- 3: Invoice list
- U: Pro-forma invoice
Posting Block If you select this check box, the billing document is blocked from posting to accounting. The document has to be released manually.
Transaction Group This field is used for document control in SAP. For billing documents, the transaction group is 7. For pro-forma invoices, it is 8.
Document Type You can specify an accounting document type that will be linked to this billing type.
Negative Posting This field is used to control whether negative values are permitted in the document.
Branch/Head Office This field allows you to control which partner function is forwarded to accounting, if the payer and sold-to party are different in the sales order. The default setting passes the payer to financial accounting.
Invoice List Type If this billing type is going to be used in invoice lists, you can specify the type of invoice list document that can be created.
Rebate Settlement If this billing type is going to be used for settlement of rebates, you have to specify the type of settlement in this field. For example, billing type B1 is a rebate credit memo used in final rebate settlements (option A). The other options here are rebate correction document (B), partial settlement (C), and manual accruals (D). Leave this field blank if the billing type is not used for rebate settlements.
Relevant For Rebate If you flag the Rel. For Rebate check box, the billing document is considered relevant for rebates. The value of the billing document will be added to the total sales for the customer and will contribute to the rebate calculated for the customer. For example, regular invoices (such as F1 and F2) are relevant for rebates, whereas pro-forma documents (such as F5 and F8) are not.
We will discuss the rebates functionality later in the chapter.
Let’s look at the other important fields shown in Figure 9-4.
Figure 9-4: Defining billing types, other settings
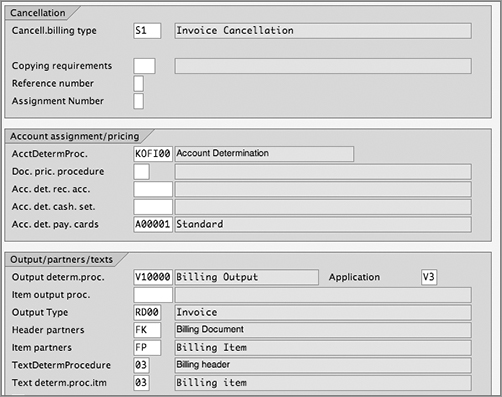
Cancellation The settings on this tab control the process of cancellation of invoices. In the Cancell. Billing Type field, specify the document type to be used for cancellation of this document.
Reference and Assignment numbers When a billing document is posted to accounting, you can forward document numbers as reference for the financial accounting team. In the Reference Number field, you can choose whether, for example, the sales order number or the delivery number is to be passed to accounting for reference. You can choose another reference document in the Assignment Number field.
The other settings on the Account Assignment/Pricing tab (see Figure 9-4) will be covered in Chapter 10, “Account Assignment and Revenue Recognition.” We covered the settings on the Output/Partners/Texts tab in Chapter 4, “Partner, Text, and Output Determination.”
NOTE When a billing document is released, it creates an accounting document. It is a common requirement that the billing and accounting document numbers be the same for easy cross-reference.
To achieve this, there are some settings in the FI application area . You need to set up identical number range intervals for the billing type and the corresponding accounting document type. Make sure that for the accounting document type, the number range is specified as External. This ensures that the billing document and the accounting document number have the same number.
For example, as seen in Figure 9-3, we have linked the billing type Z2 with the accounting document type Z9. To synchronize the numbers, we have assigned the same number range interval (0900000000 to 0999999999) for both and ensured that we have flagged External number range for Z9.
Copy Controls in Billing
A billing document can be created with reference to a sales document, a delivery document, or another billing document. You can set up copy controls between the documents based on what is relevant for you. You can set up the copy controls as follows: IMG Sales And Distribution Billing Billing Documents Maintain Copy Controls For Billing Documents.
Then choose the reference document (sales order, delivery or billing) to copy from.
On the next screen, select the source and target document types. The copy control settings are at the header and item levels.
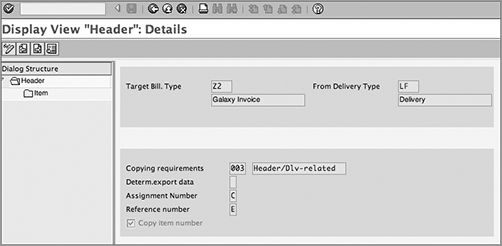
Figure 9-5 shows the copy control settings at the document header level when copying data from a delivery (LF) to a billing document (Z2). We’ll discuss some of the key fields on this screen.
Copying Requirements At the header level, there is a provision to attach a requirements routine that checks that some prerequisites are met before a billing document is created.
Reference Number and Assignment Number These are additional reference fields used to forward information from SD to FI when the accounting document is created. For example, you can choose the delivery number be passed to accounting as a reference number. You can decide which document types are set in the Assignment Number and Reference Number fields in consultation with your FI team.
Copy Item Number The Copy Item Number check box indicates whether the system copies the item numbers from the source document into the target document. If this box is not selected, the system does not copy the item numbers from the source document, and the item numbers in the target document are regenerated to avoid gaps in the numbering.
Figure 9-5: Copy controls at the header level
At the item level, the controls are at the item category level, as shown in Figure 9-6. It shows the copy control settings at the item category (TAN) level from a delivery (LF) to a billing document (Z2). The following are the key fields in this screen.
Figure 9-6: Copy controls at the item level
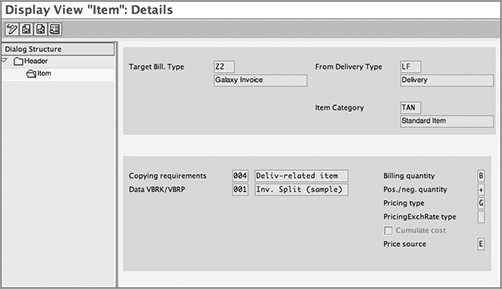
Copying Requirements You can attach an item-level copy control routine, which checks for certain prerequisite conditions before a document can be copied into a billing document.
Data VBRK/VBRP routine In this field, you can specify a routine that can carry out additional checks before data is copied into the billing tables. This routine governs the combination and splitting criteria in the creation of billing documents. Thus, based on the routine here, it is possible that multiple deliveries/orders can be billed together in one invoice. On the other hand, a single delivery may result in a split invoice if certain combination criteria are not met. You can use this routine to specify the fields that should be checked as criteria for splitting data into multiple billing documents.
Billing Quantity This controls the quantities due for billing that are carried into the billing document. For example, for invoicing a customer, you can choose option B (the delivery quantity less the invoiced quantity). This ensures that the customer is billed for the right quantity. For pro-forma invoices, there is no such restriction. You can create pro-forma invoices for the complete quantity. Hence, you can select D.
Positive/Negative Quantity The setting in the field Pos./Neg. Quantity controls whether the quantity in the billing document will have a positive, negative, or neutral impact on the open quantity in the source document.
Pricing Type At the time of copying, you may require repricing or redetermination of some of the pricing conditions. You can specify the rule in this field. We already discussed this in Chapter 5, “Pricing and Tax Determination.”
Pricing Exchange Rate Type The field PricingExchRate Type controls the source of exchange rate, in case the document currency is different. For example, you can pick up the rate valid on the pricing date or the date of billing.
Cumulate Cost This check box enables you to control whether the costs of subitems are to be copied to the parent item. It is useful in the case of products with a main item and several subitems. If the subitems are not relevant to billing, you still need to capture their cost and add it up to the cost of the parent item. The parent alone will appear in the billing document.
Price Source This field controls the reference documents (such as sales order or delivery) from which pricing conditions are copied to the billing document.
Invoice List
An invoice list is a collection of one or more billing documents. The configuration of the billing type used for an invoice list is same as any standard billing type. The copy controls are set up between billing documents. The following are some of the configuration and master data steps before you can create an invoice list:
1. Define a billing document for the invoice list (using VOFA). You can use LR and LG as the reference document.
2. Using transaction VTFF, maintain Copy Controls: Billing Document To Billing Document. Set up copy control settings between your billing document type (such as F1 and F2) and the invoice list document type (LR and LG). The standard invoice list in SAP is LR for billing documents and debit memos and LG for credit memos. These will be the target documents in the copy control.
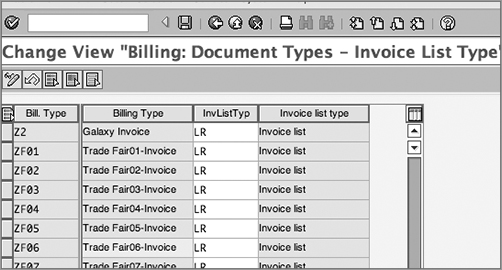
3. Assign the invoice list type to each billing type. The menu path is IMG Sales And Distribution Billing Billing Documents Invoice Lists Assign Invoice List Type To Each Billing Type (OVV7).
As shown in Figure 9-7, assign the invoice list type to each billing type.
Figure 9-7: Assigning an invoice list type to a billing document type
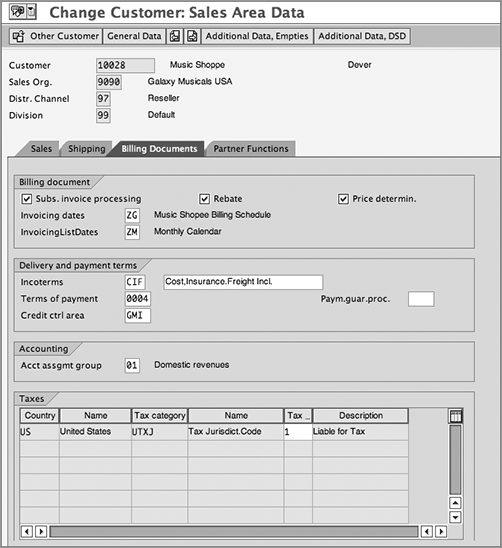
4. Besides these steps in the configuration, there is also an important field in the customer master that controls the invoice list. In Figure 9-8, note the InvoicingListDates field appearing on the Billing Documents tab in the Sales Data section of customer master. Attach a customer calendar showing the invoice list schedule. Based on the dates selected as workdays in this calendar, the invoice list will be run for the payer.
Figure 9-8: Invoice list date calendar in the customer master
You can maintain output and pricing for invoice lists. The output condition types normally used for the invoice list are LR00 and RD01. Maintain records for these condition types, or create custom condition types using them as reference.
In some business scenarios, a factoring discount is offered to the payer of the invoice list. If your business scenario requires a factoring discount, use condition type RL00 as a reference. There is also the factoring discount tax condition type MW15, if required. These condition types must be added to the pricing procedure. The condition type RL00 has condition category R, which defines this condition type as used for invoice lists. SAP delivers the condition type RL00 with an exclusion indicator A.
Figure 9-9 shows a pricing procedure with condition RL00. As shown in the figure, when you use this condition type, it should always be flagged as statistical, with requirement routine 23 (which invokes this condition only in billing documents) and with base type routine 2 (to apply the discount to base value). A pop-up message from SAP prompts you to make these settings when you add RL00. Condition records should be maintained for RL00 using transaction VK11.
Figure 9-9: Adding RL00 to a pricing procedure
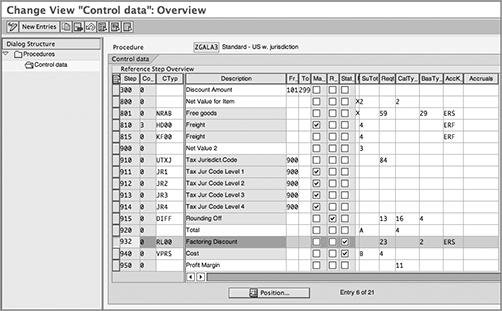
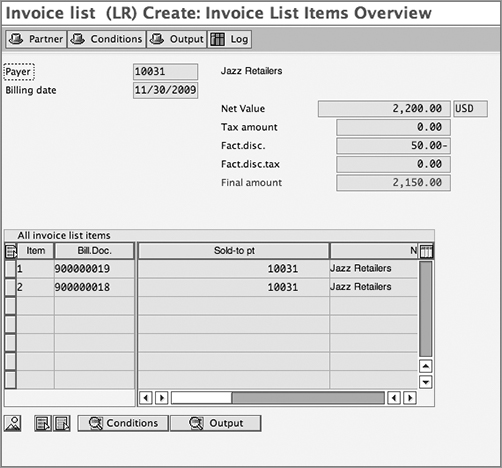
Figure 9-10 shows an invoice list with a factoring discount. On the overview screen, you can see that the net value is reduced by the factoring discount to arrive at the final amount.
Figure 9-10: Invoice list with factoring discount
Billing Blocks
Billing blocks are sometimes required to stop or hold a document from being billed to the customer. For example, you may want to scrutinize all documents for a particular customer. You can achieve this by setting up an automatic billing block at the customer level.
There are two steps in configuration of billing blocks: defining the blocks and assigning them to billing documents.
Defining Billing Blocks
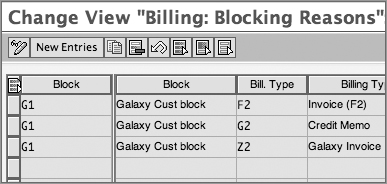
The first step is to define a billing block. The path in customization is as follows: IMG Sales And Distribution Billing Billing Documents Define Blocking Reasons For Billing Billing: Blocking Reasons.
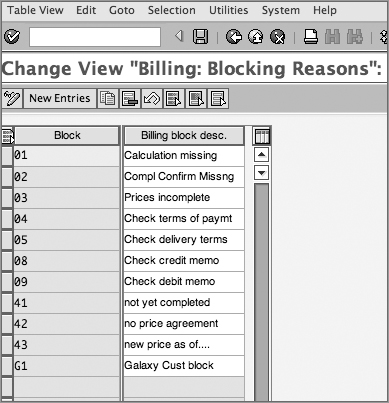
Create a new billing block, and add a meaningful description (see Figure 9-11, where we have added a billing block G1 to the list of standard blocks).
Figure 9-11: Defining billing blocks
Assigning Billing Blocks to Billing Type
The purpose of this step is to specify the billing document types that should not be allowed if a sales document has a billing block in it.
Follow this menu path: IMG Sales And Distribution Billing Billing Documents Define Blocking Reasons For Billing Assign Blocking Reasons To Billing Types.
In this setting, you assign the billing block to the billing type that has to be blocked. As shown in Figure 9-12, we have assigned the billing block G1 to billing types (such as Z2). Now when a user applies a block G1 in the sales order, you cannot create a billing document of type Z2 with reference to the order, unless the block is removed.
Figure 9-12: Assigning billing blocks to a billing type
You can use the billing block in the following ways:
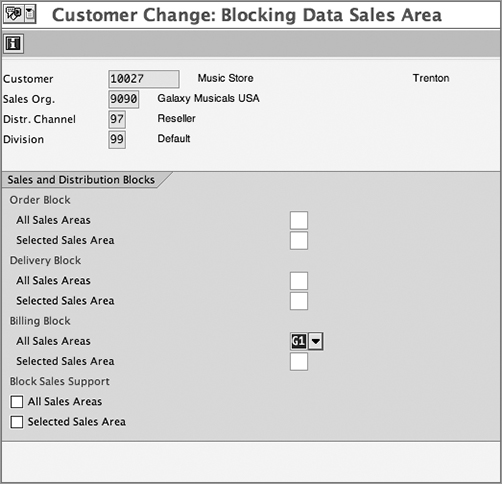
Customer level In the customer master record, you can specify a billing block. From the transaction Change Customer Master (VD02), use the menu path Extras Blocking Data, and add a billing block for a particular sales area or for all sales areas. An alternative transaction for setting blocks is VD05 (discussed in Chapter 3, “Master Data in SD”). The billing blocks will be applicable for all relevant documents for this customer. In Figure 9-13, billing block G1 has been applied in the customer master record in the blocking data.
Figure 9-13: Billing block in customer master
Item category level You can define a custom billing block in the configuration of item categories (VOV7). We discussed this setting in Chapter 7. This selectively blocks items in a sales document from billing.
Document level In the individual sales document, you can manually insert a billing block (using VA02) if the document is to be blocked individually.
The transaction V23 will give you a list of all sales documents blocked for billing.
Complaints Processing
Complaints management is one of the most critical business processes. As soon as you receive a complaint from a customer, you may have to initiate several actions such as create a return order, issue replacement items, and so on.
The complaints processing functionality enables a user to trigger actions based on a complaint received from a customer. You can set up an action profile and define what subsequent documents are to be initiated based on the reason for the complaint. To carry out this setting, follow this menu path: IMG Sales And Distribution Billing Billing Documents Define Reasons For Complaint.
Click New Entries to define a new reason for complaint. Enter a brief code for the reason in the Abb. field, as shown in Figure 9-14.
Figure 9-14: Customizing complaints reason

For each reason, you can specify the sales document type (Sal), the item category (Ite.), and/or the billing document (BillT) that has to be created automatically, when the complaint reason is entered.
If the Changeable field is selected, the user is allowed to make changes manually during transaction processing.
The Check Qts field checks whether the quantity referenced in the complaint exceeds the billed quantity, and it issues a message.
In the Reason For Complaint field at the end, add a meaningful description of the reason. (You’ll have to scroll to the right to see this field.) This reason will be displayed in document processing.
To use the complaints workbench, use the following menu path: SAP Menu Logistics Sales And Distribution Billing Billing Document Complaints Processing (CMP_PROCESSING).
On this screen, enter or search for a reference document for which the complaint is to be entered.
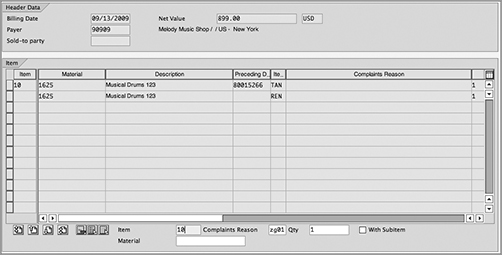
The header data and item data are both displayed for the document. On the lower portion of the screen (as shown in Figure 9-15), you can identify the items and quantity for which you have to register a complaint. Specify the complaints reason for the selected item(s).
Figure 9-15: Complaints processing
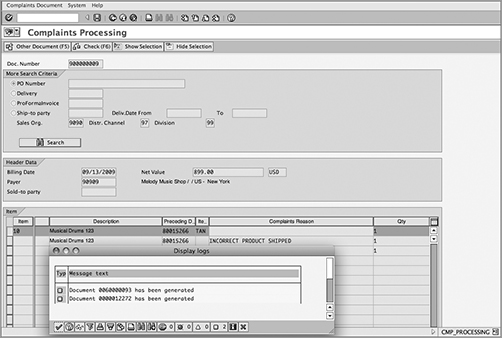
Upon saving, the system processes the document as per the configuration. The processing log is then displayed on the screen for your reference (as shown in Figure 9-16).
Figure 9-16: Complaints processing log
CASE STUDY—Galaxy Musical Instruments: Complaints Processing Setup
Customer satisfaction is of great importance to Galaxy. One of the important policies is efficient handling of complaints.
For a certain category of complaints, Galaxy wanted to initiate a return order (RE) and a subsequent delivery free of charge (document type SDF). We used the complaints processing functionality of SAP.
As shown in Figure 9-14, we have defined a reason for complaints as ZG01 (Incorrect Product Shipped). For such complaints, Galaxy immediately issues a replacement order with the correct product to the customer. Galaxy also wants to initiate a returns order to receive the incorrectly shipped item, back in the plant. Hence, we have specified the SDF (Subsequent Delivery, Free Of Charge) order type and the RE (Returns) order type to be created.
When a billing document number is entered as a reference for the complaint, along with the reason for complaints, the system processes the document, as per the action profile. As shown in Figure 9-16, the RE and SDF documents are created in the background.
Intercompany Billing
Intercompany billing is an important business scenario. We will now discuss the four key steps in configuration of intercompany billing. They are defining order types relevant to intercompany process, assigning organizational units to plants, defining internal customer numbers by sales organizations, and defining pricing conditions for intercompany billing.
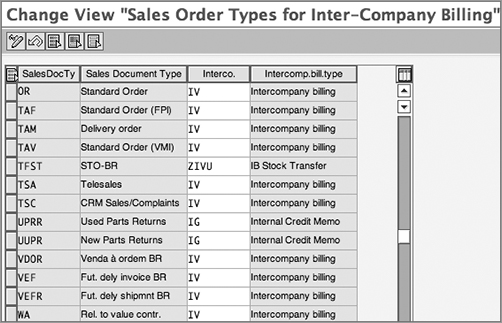
Step 1: Define order types relevant for intercompany process Use menu path IMG Sales And Distribution Billing Intercompany Billing Define Order Types For Intercompany Billing.
For this setting, select the order type, and assign an intercompany billing document type to it. The standard SAP document for intercompany billing is IV. With this setting, you can activate intercompany billing for the chosen sales document types. Refer Figure 9-17 for this setting.
Figure 9-17: Sales documents relevant for intercompany scenario
Step 2: Assign organizational units to plants To identify that a sales transaction includes an intercompany transaction, you have to first clearly identify the sales area to which each plant belongs. This enables the system to check the delivering plant in the sales order and determine whether it belongs to the same or different sales area.
To carry out this setting, follow this path: IMG Sales And Distribution Billing Intercompany Billing Assign Organizational Units By Plant.
Refer to Figure 9-18. In our case, we have assigned the U.S. plant and the Mexico plant to their respective sales areas.
Figure 9-18: Assigning sales area to plant

Step 3: Define internal customer numbers by sales organizations Having defined the sales areas for each plant, you can now set up the sales organizations as customers for each other. To enable the system to create an intercompany invoice, you require a customer number to be billed. This customer number will then be used in the creation of an intercompany invoice.
The menu path is as follows: IMG Sales And Distribution Billing Intercompany Billing Define Internal Customer Number By Sales Organization.
Before making this assignment, you have to create customer master records for each sales organization participating in intercompany sales. You can then assign these customer numbers to the sales organizations (see Figure 9-19). For this example, we have created a customer master using the account group 0120 (a branch with intercompany billing) that uses an external number range.
Figure 9-19: Assigning internal customer numbers to sales organizations

TIP This is a rare instance in SAP where the master data is part of a customization setting! As shown in Figure 9-19, the intercompany customer GALAXY US is assigned to sales organization 9090. Before you transport this configuration to other systems (such as the quality assurance or production system), remember to create a customer master record with the same number (such as GALAXY US) in every system. Using an account group with an external number range allows you to control the customer number.
Step 4: Define pricing conditions for intercompany billing This step is applicable only if the intercompany billing is to be carried out at a transfer price. To determine this price, standard SAP offers the pricing conditions PI01 (quantity based price) and PI02 (transfer price as a percentage). Based on your requirements, you can add these pricing conditions to the pricing procedure used in the intercompany scenario. Refer to the steps in pricing procedure set up in Chapter 5.
If these conditions are used, the commercial invoice (to the customer) will be at sales price, whereas the intercompany invoice will be at transfer price.
CASE STUDY—Galaxy Musical Instruments: Intercompany Billing
Galaxy serves customers in the United States and Mexico. Sales organization 9001 is set up in the United States, and 9091 is set up for Mexico.
However, sometimes the product has to be shipped from the U.S.-based distribution center in Los Angeles (plant 9001) to the customer in Mexico. This plant belongs to the U.S. company code. The sales order has been created by Mexico sales organization, and the delivering plant is from the United States. This is a typical intercompany scenario. To set up intercompany scenario, we assign each plant to its sales area. Thus, plant 9001 is assigned to the U.S. sales area (9001, 97, 99).
We have defined internal customer records GALAXY US and GALAXY MX and assigned them to the sales organizations 9090 and 9091, respectively. This makes them “customers” of each other.
We have checked that the customer master records have been extended to the correct sales areas. A sales order is created for a customer in Mexico City. However, the product is not locally available and has to be delivered from the U.S. plant 9001. In such cases, after the customer receives delivery from the U.S.-based plant, there are two billing documents created:
- A regular invoice from the selling organization (9091) to its local customer. This document would have the selling price for the customer.
- An intercompany billing document from the United States (9001) to Mexico (9091) for the supplied products. This document could have an intercompany transfer price, instead of the selling price.
The system carries out checks based on the configuration and executes the intercompany billing process.
Billing Schedule
As mentioned, the Billing Date field in the sales order controls the date on which the item becomes due for billing. If you want to execute the billing transaction for a customer only on particular dates, you can control it by setting up a billing schedule.
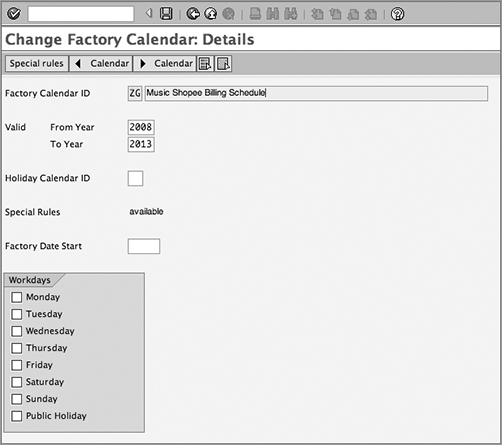
A billing schedule is similar to a factory calendar and accessed using the same transaction. However, you can define a specific schedule (calendar) containing the dates (workdays) on which billing is permitted. Later, you assign the calendar to the customer master record.
To define a billing schedule, use the path SAP Menu Logistics Sales And Distribution Master Data Others Billing Schedule (SCAL).
Define a factory calendar, and assign a two-digit identification code and description (see Figure 9-20). The fields here are self-explanatory.
Figure 9-20: Defining a billing schedule
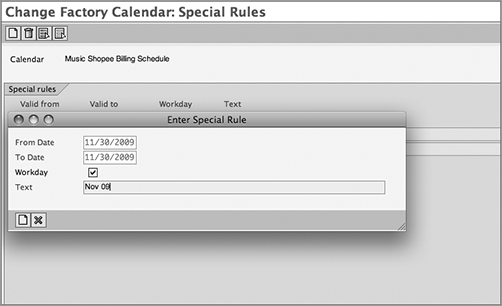
If you want to set up billing schedule on certain dates of the month, click the Special Rules option.
Create new rule and in the From Date and To Date fields add the specific date required. For example, in Figure 9-21, November 30 is the “from” date as well as the “to” date. Flag it as a Workday, and save it with a meaningful name. Similarly, set up rules for all the other days on which you want to schedule billing and save them in the calendar.
Figure 9-21: Defining special rules in the billing schedule
The billing schedule calendar is to be assigned in the customer master in the sales data on the Billing Documents tab. Refer to Figure 9-8 shown earlier. On the same screen, you can use the field Invoicing Dates to attach a custom billing calendar.
When a sales document is created, system checks the next workday from the calendar and copies it in the Billing Date field. Thus, the document becomes due for billing when the billing date is reached.
Billing Plans
Billing plans are useful when the customer is to be billed over a period of time or in installments. A billing plan is a schedule for billing the customer. It specifies how much is to be billed and when.
There are two types of billing plans. Each is based on a different business scenario.
Periodic Billing
In this scenario, the customer is to be billed a fixed amount regularly over a period of time. An example is a lease under which the same rent is charged at the beginning of every month.
Milestone Billing
The customer is charged a portion of the total price when certain milestones are achieved. For example, during execution of a project, a certain percentage of the total project value is billed on completion of each project phase.
When a sales document is created, the item category determines whether it is relevant for a billing plan. Based on the settings, the amount to be billed is determined along with the date.
We’ll now discuss the major steps in customization for the two different types of billing plans. The first step is to set up the controls for the billing plan type. Use the menu path IMG Sales And Distribution Billing Billing Plan Define Billing Plan Types. From the activity node, choose Periodic or Milestone Billing Plan.
Defining Periodic Billing (transaction OVBI)
You can create a new billing plan type by specifying a two-character code and description.
The following are some of the fields relevant to periodic billing. Refer to Figure 9-22 for each field mentioned here.
Under Origin Of General Data, you’ll find these settings:
Start Date and End Date You can select rules to govern the start and end date of the plan. For example, the date could be today’s date (rule 01), the contract start date (rule 02), or something else.
Horizon This specifies the rule used to determine the last planned billing date. This rule generally specifies a baseline date and a duration. For example, rule 10 would specify today’s date + 1 year (as would be the case for an annual lease contract).
Figure 9-22: Maintaining the billing plan type for a periodic billing
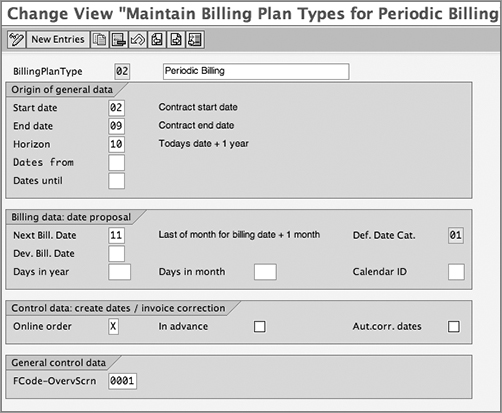
The next section, Billing Data: Date Proposal, deals with proposing the next date for billing:
Next Bill. Date This rule controls how the next date is proposed by the system. For example, the next date could be determined by rule 50, which is monthly, so it would fall at the end of the month.
Dev. Bill. Date This rule accommodates deviations and additional rules needed to determine the next billing date. For example, if you want to bill the customer three days before the end of the month, then you can specify a custom rule that subtracts three days from the end of month and determines the date. You can leave this field blank if it is not applicable.
Calendar ID You can attach your custom calendar so the system can use it to determine the working schedule for the year.
The Control Data section provides these boxes:
Online Order If you want the system to determine the billing plan dates automatically, at the time of document creation you can select this box.
In Advance If you select this box, it means that the customer is to be billed in advance. If you leave it blank, the default rule is to bill in arrears. For example, if you want to charge monthly rent at the beginning of the month, you should select this box.
Defining Milestone Billing (Transaction Code OVBO)
Since the billing dates are determined by events and milestones, there are no rules to determine dates, as was the case in periodic billing. Hence, some of the fields that you saw in the periodic billing setup do not appear here (as shown in Figure 9-23).
Figure 9-23: Maintaining the billing plan type for milestone billing
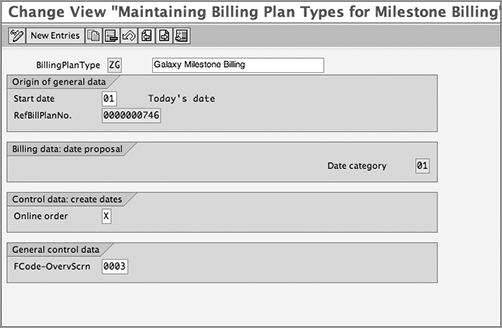
The important difference in milestone billing setup is the reference billing plan number (in the field RefBillPlanNo). It contains the detailed schedule of the milestone billing. In the next step, we will maintain the details in the reference billing plan, such as the exact dates and the amount (either as a percentage value or as an exact amount) to be billed.
Maintain Date Proposals for Billing Plan Type
This step is applicable only if you are setting up milestone billing plans.
Use menu path IMG Sales And Distribution Billing Billing Plan Maintain Date Proposals For Billing Plan Types (OVBM).
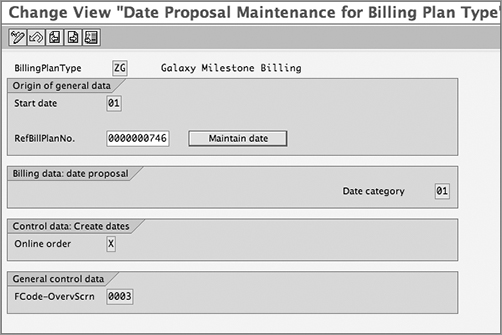
This transaction leads you to a screen similar to the milestone billing definition screen (OVBO). The difference is the Maintain Date button next to the reference billing plan number, as shown in Figure 9-24.
Figure 9-24: Maintaining the date proposal for the billing plan type
Clicking the Maintain Date button leads you to the date proposal maintenance screen (Figure 9-25). You can specify the billing dates for each milestone. The BR (rule in billing plan) field controls the billing amount (in the field Bill. Value) as either a percentage or an exact amount. It also explains if it is a down payment, regular milestone charge, closing amount, and so on. Based on your requirement, select from the options provided for this field. For example, we have selected BR as 2 (milestone billing on value basis). Here we have specified the amounts in USD so that on October 1, 2009, the amount to be billed is $10,000, and so on.
Figure 9-25: Maintaining the date proposal
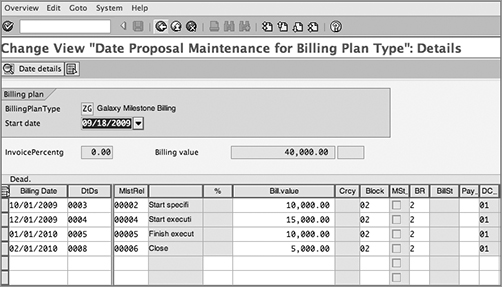
After entering all the dates, use the back arrow key to go to the main screen, where you can save your changes.
Date Categories
The Date Category field gives more information about the date appearing in the billing plans. For this setting, you define date categories for the billing plan. You can assign rules and add blocks to stop any billing before a milestone is reached. Use the menu path IMG Sales And Distribution Billing Billing Plan Define And Assign Date Categories Maintain Date Category For Billing Plan Type (OVBJ).
On this screen, you can specify the categories of dates that you plan to use in each billing plan type, as shown in Figure 9-26.
Figure 9-26: Maintaining date category for billing plan type
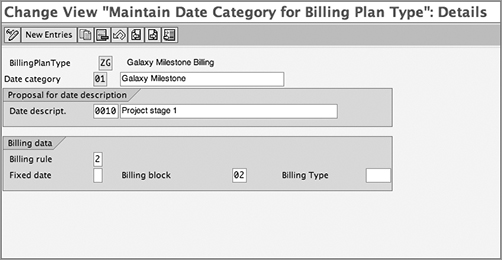
In the proposal for the date description, you can select the date description (such as the monthly rent in the periodic billing) or contract sign date, assembly completion, or other project milestone dates. In the Billing Data section, the Billing Rule field controls whether the billing will be on a percentage basis or a value basis. The Billing Block field specifies the block applied against billing date in the plan.
Since there can be several date categories assigned to a billing plan type, you assign a default date category in the next step. Follow the path IMG Sales And Distribution Billing Billing Plan Define And Assign Date Categories Allocate Date Category.
Assign a default date category for your billing plan type.
Maintain Rules for Date Determination
In the definition of billing types, we used several rules for defining start and end dates, horizon, and so on. If you need to set up custom date rules, you can use this setting: IMG Sales And Distribution Billing Billing Plan Define Rules For Determining Dates (OVBS).
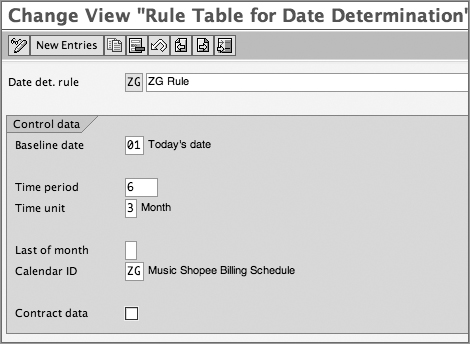
Create a new entry or copy from an existing rule. As shown in Figure 9-27, in the field Baseline Date, you have to specify a rule for determining the baseline date. Use the Time Period and Time Unit fields to specify whether the time is to be added or subtracted from the baseline to arrive at the billing date. You can specify the unit of time in days, weeks, months, or years. In the Calendar ID field, you can also assign a calendar to this rule. For example, if the rule ZG is used, it will propose the start date as the current date, and the end date will be six months from now. The calendar ID ZG will be used to determine the working days and holidays during this six-month period.
Figure 9-27: Maintaining rules for date determination
At this stage, you have completed the definition of the billing plan. The next step is to assign the billing plan to sales documents and item categories.
Assignment of Billing Plan Types
Two settings are involved in assignments. You assign the billing plan type at both the sales document level and the item category level.
Use the menu path IMG Sales And Distribution Billing Billing Plan Assign Billing Plan Types To Sales Document Types (OVBP).
For this setting, you can select the sales document types that are relevant for your billing plan type and make the assignment, as shown in Figure 9-28.
Figure 9-28: Assigning the billing plan type to a sales document type

Now follow the menu path IMG Sales And Distribution Billing Billing Plan Assign Billing Plan Types To Item Categories (OVBR).
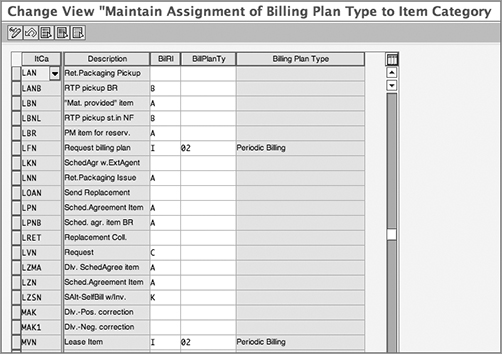
Assign the billing plan type (in the BillPlanTy field) to the item categories, as shown in Figure 9-29. The billing relevance (the BilRl field, also discussed in Chapter 7 in transaction VOV7) can also be maintained here. In this case, you set it to I(Order–Relevant Billing– Billing Plan).
Figure 9-29: Assigning the billing plan type to an item category
A rebate is a sales promotion technique that a seller applies to improve sales volume. It is generally a time-bound, after-sale discount that is based on a volume of sales made to a particular customer and has either a prospective or retrospective effect. For example, a customer might be entitled to a 2 percent discount as a rebate for total purchases of more than $100,000 in the next six months. Another example can be a $1 discount on every piece eligible for the rebate, if a customer buys 5,000 pieces of a particular product over a period of four months, including one month in the past and three months in the future. Rebates can also be independent of sales volume. An example is performance rebates.
To provide rebates, the seller generally signs an agreement with the customer that includes all the necessary details such as the agreed sales targets, the time period in which these targets are to be completed, and the discount conditions such as percentage rate, dollars per piece, or lump sum. The seller then tracks the volume of sales made to the customer for the rebate-eligible products and periodically accounts for the rebate accruals as per the organization’s accounting policies. When the targets are successfully achieved, the seller pays the rebate amount to the customer. This step is called rebate settlement.
In SAP, rebates are handled by the rebate processing component of the billing application. Here you can provide rebates based on both sales volume and performance. Performance rebates are manually accrued, whereas sales volume dependent rebates can either accrue manually or be set up for automatic accrual by SAP. The settlement can be made via check or credit memo to the customer. You can also process either partial or full settlements pursuant to a rebate agreement. The partial settlements can be manually processed or automated to run on a periodic basis.
The Rebate Process
In SAP, the rebate process consists of three main processing steps. You initiate the process by creating a rebate agreement followed by the automatic or manual posting of accruals, and you complete the process by running rebate settlements. A detailed explanation of these process steps follows.
Creating a Rebate Agreement
A rebate agreement stores the rebate-related data and controls the overall rebate processing. The pricing condition records for rebate processing are also stored within the rebate agreement. You can create a rebate agreement for a particular customer by using following menu path: SAP Menu Logistics Sales And Distribution Master Data Agreements Rebate Agreement Create (VBO1).
In the initial screen that appears, you provide the rebate agreement type and the organizational data for which you want to create a rebate agreement. Standard SAP provides five types of rebate agreements to choose from:
Agreement type 0001 (Group Rebate) This agreement type allows condition records to be created for a combination of customer/material or a customer/rebate group. The rebate group is a field on the material master Sales Org.2 view. Additional rebate groups may be created through customizing. The customer is the payer, and the rebate is specified in terms of a percentage. If the rebate agreement is not material-specific (as would be the case if you use a customer/rebate group as a criteria), you have to specify a rebate material that will be used in the payment documents, such as credit memos. Typically you have to set up a material master record for a dummy material and then use it in the settlement documents. The delivering plant in the material master record will default into the payment documents for use in determining business areas if needed.
Agreement type 0002 (Material Rebate) This agreement type allows condition records for a customer/material and uses a quantity-dependent calculation. The customer is the payer.
Agreement type 0003 (Customer Rebate) This agreement type allows condition records based solely on the customer and uses a percentage for the calculation. The customer is the payer. As with 0001, a rebate material must be specified.
Agreement type 0004 (Hierarchy Rebate) This agreement type allows condition records for a customer hierarchy node/material or by hierarchy alone. The calculation is based on a percentage. The hierarchy nodes must be established in customer hierarchy maintenance before using this type of rebate agreement.
Agreement type 0005 (Independent of Sales Volume) This agreement type allows a lump-sum payment to a customer. Because it is independent of sales volume, no accruals will be automatically generated. Typically a manual accrual is generated for the amount of the agreement, and payments are made over the life of the agreement until final settlement is carried out.
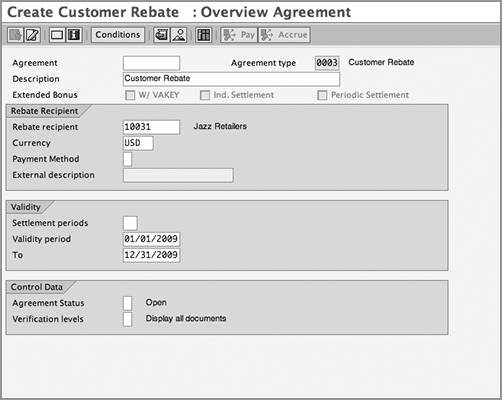
The next screen is the rebate agreement overview screen (Figure 9-30). Here you provide all the information related to a rebate agreement. A rebate recipient is a customer who is supposed to receive the rebate and whose sales are to be tracked for rebate processing. Validity period represents the validity of the rebate, and verification level represents the level at which you would review a report on sales volume for this rebate agreement.
Figure 9-30: Creating a rebate agreement, overview
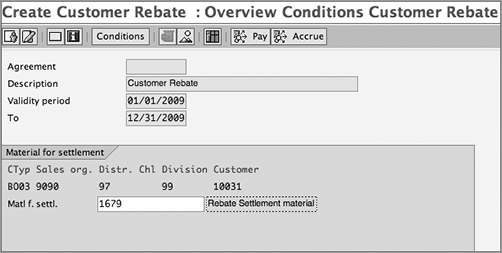
Click the Conditions button to reach the condition maintenance screen (Figure 9-31). This screen looks similar to the transaction VK11, used for pricing condition records discussed in Chapter 5. You can enter the rebate condition record on this screen. You can use the Goto menu at the top to navigate to other screens in the agreement. If the agreement type is not material-specific (as in the case of 0001 and 0003), you have to specify a dummy settlement material on the Material For Settlement screen shown in Figure 9-32.
Figure 9-31: Creating condition records in a rebate agreement
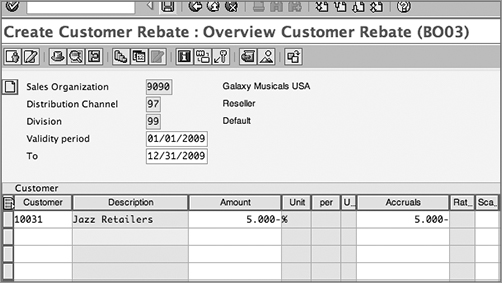
Figure 9-32: Maintaining the material for settlement in a rebate agreement
Posting Accruals
Manual accruals may be used in any of the agreement types where the configuration of the agreement type allows them. Most often, manual accruals are used in agreements that are independent of sales volume. The agreed-upon payment may be accrued up front and then be reduced with each payment.
To create a manual accrual, use the Change Material Rebate transaction VBO2. From the overview screen, select Extras Manual Accrual. On this screen, which looks like Figure 9-33, you can manually enter the amount to be accrued. When you save the agreement, a rebate credit memo request is created. You can then create a credit memo with reference to the credit memo request. The accrual amount is then posted to accounting.
From the manual accrual screen (Figure 9-33), you can follow the path Goto Payment Data, which will lead you to an overview screen displays cumulative accrual and payment information for this rebate agreement.
Once the billing documents relevant for rebates are processed, you can check the sales volumes from the VBO2 screen; just follow the menu Rebate Payment Sales Volume. The level at which the details will be shown to you depends upon what verification level you set up.
Carrying Out Settlements
At the end of the rebate agreements, you can carry out the final settlement before closing the agreement. You can also carry partial settlements manually at any time. These are limited to the cumulative accrued amount.
Figure 9-33: Manual accrual process

To carry out the final settlement from the Rebate Agreement screen (change mode VBO2), click Execute Settlement. This allows you to manually check and verify the amount for settlement before a credit memo request is created. If you do not want to verify or change the amount, choose the Create Final Settlement option, which automatically creates a credit memo request in the background.
Before an agreement can be settled, the system will prompt you to update the status of the agreement to B (released for settlement), based on the configuration. This makes sure that you do not accidentally settle and close an agreement.
You can carry out the final settlement in batch mode using the menu path SAP Menu Logistics Sales And Distribution Billing Rebate Rebate Settlement [VB(7].
Sometimes, when you set up a rebate agreement, the system displays a message that the sales volume is not current. This may happen after changes have been made to the rebate conditions. When this happens, you have to execute the report SDBONT06 (from the transaction SE38) to carry out the proper updates.
Rebate Configuration
We’ll now discuss the major steps in rebate configuration.
Activating Rebates
Rebates are deactivated in standard SAP by default. You have to activate the functionality at three levels: the sales organizations, the billing types, and the customer level. You can activate the rebates at the first two levels—the sales organization and billing type—in customization. The menu path is as follows: IMG Sales And Distribution Billing Rebate Processing Activate Rebate Processing.
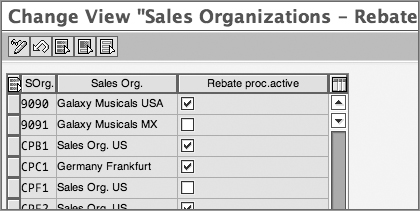
You have two actions to perform here. In the first step, you select the billing documents that are relevant for rebates. In the second step, you activate rebates for your sales organizations.
As shown in Figure 9-34, we have selected billing type Z2 for rebates. In Figure 9-35, we have ensured that sales organization 9090 is ready for rebate processing.
The third step is done through master data maintenance. You have to activate rebates for a customer in the customer master record.
On the Billing Documents tab of the customer master, there is a check box for activating rebates. (Figure 9-8 shows the Rebate check box) of the sales. Make sure this has been selected for your customers in the payer role.
Figure 9-34: Activating rebates for billing types
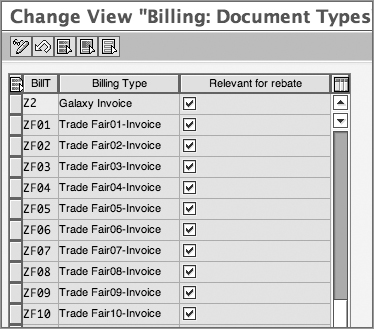
Figure 9-35: Activating rebates for sales organizations
Defining Rebate Agreements
To set up a rebate agreement, the path is as follows: IMG Sales And Distribution Billing Rebate Processing Rebate Agreements Define Agreement Types Define Agreement Types [VB(2 ].
You can check the existing rebate agreement types or define a new one. The following are some of the important fields in the details screen, as shown in Figure 9-36.
Figure 9-36: Defining rebate agreement types
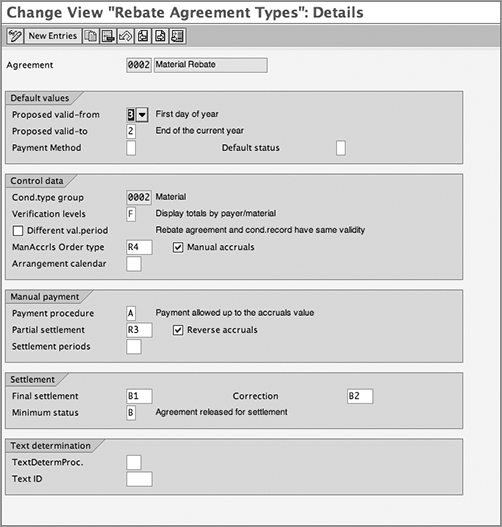
Proposal Valid-From Here you set up a default proposal for the validity start date for your rebate agreement. You can choose the start date as today’s date, the start of the week, the start of the month, or the start of the year, or you can even leave the field blank if you don’t want SAP to propose any start date.
Proposal Valid-To Here you set up a default proposal for the validity end date for your rebate agreement. Available proposal options include the end of the month, the end of the year, a fixed date of 12/31/9999, a proposal as per settlement calendar, today’s date, and no proposal.
Payment Method Here you set up a default proposal for the payment method that will be used by SAP for the settlement of your rebate agreement. For example, if you leave this field blank, SAP will use credit notes that you can apply against the customer’s outstanding receivables as the method to settle the rebate agreements. If you choose C here, SAP will still create a credit note, but the credit note will post to accounting with a payment method indicator of C. This means that the credit note cannot be applied against the customer receivables and can be settled only via a check to the customer for the credit note amount.
Default Status Here you set up a default status at the time of creation of the agreement. The default value here is blank, which means that the agreement is in open status.
Verification Levels This field controls the level of detail you want to see in the report when you review the rebate-relevant invoices for a rebate agreement. For example, you can either choose to display each document separately or choose to display totals using grouping criteria such as sold-to party, payer, materials, and so on.
Different Validity Period You select the Different Val.Period check box if you want to allow the rebate agreement and the underlying condition record to have different validity periods. An example of a business scenario where you may want to select this check box is seasonal rebates. You may agree to give an additional 0.5 percent rebate to your customer for purchases they make during Thanksgiving week. If this check box was already selected in customizing, you would be able to create another condition record in your rebate agreement for the Thanksgiving season with a validity of one week. SAP will be able to track and provide additional 0.5 percent rebates on the sale during that period.
You should leave this check box deselected if you want the agreement and condition records to always have the same validity.
Manual Accruals Order Type In the ManAccrls Order Type field, you define the default order type for any manual accruals such as accruals for performance rebates or accruals for retroactive rebates. When you process the manual accrual for a rebate agreement, SAP uses this sales document type to create the credit memo request for manual rebate accrual.
Manual Accruals This check box controls whether manual accruals should be allowed for a particular agreement type. In standard SAP, agreement types 0002 and 0005 are set up for manual accruals.
Arrangement Calendar An arrangement calendar defines the end of the validity period for a rebate agreement and also helps in extending the rebate agreement to the next period. SAP provides report RV15C005 for extending rebate agreements to the next periods. You can access it using transaction code VB(D.
TIP You can only extend a rebate agreement to the next period if the agreement type had an arrangement calendar defined in customizing.
Payment Procedure The value in this field controls the upper limit for making manual payments against a rebate agreement. Here, you can choose A to allow the manual payments up to the accruals value, B to allow the manual payments up to the value of pro-forma settlement, or C for no limits, or you can leave the field blank, in which case SAP will not allow the manual payments.
Partial Settlement This field tells what order document type SAP should use when partial settlement needs to be made for a rebate agreement. When you execute the partial settlement process, SAP will use this document type to create a credit memo request for the partial settlement value.
Reverse Accruals This check box controls whether you want SAP to reverse the accruals when a manual payment is made.
Settlement Periods If you want to make periodic partial settlements, you can attach a calendar here with the required settlement dates. If you schedule a batch job for settlements (VB(7, discussed earlier in the chapter), the rebate agreement will come up for partial settlement on the dates in the calendar.
Final Settlement and Correction In these fields you can specify the document types that will be used for final settlement or corrections, respectively.
Minimum Status This field specifies the minimum status that is required before you can process a rebate agreement for settlement. For example, if you enter B here, the agreement needs to be in this status (or higher) before settlement can be carried out.
Configuring Rebate-Related Pricing Conditions
The rebate functionality requires some special pricing condition types. The basic concept and settings are similar to standard pricing using condition techniques (discussed in Chapter 5). You must add the rebate-related pricing conditions to your pricing procedure.
These conditions are called during pricing, only in billing documents.
To define these settings, the path in customization is IMG Sales And Distribution Billing Rebate Processing Condition Technique For Rebate Processing.
We’ll now discuss the major points to be noted in rebates configuration. Note that the steps here are similar to the pricing configuration menu discussed in Chapter 5.
Setting up rebate condition types SAP offers the standard condition types BO01 to BO06 for use with rebates. The setting that differentiates the rebate condition types from other pricing condition types is condition class. For rebate condition types, the condition class is C. Fewer fields are required to be filled up for such conditions. It is this value in condition class that makes sure that the condition type for a rebate cannot be processed via any of the pricing maintenance transactions such as VK11 and VK12. Table 9-2 summarizes the pricing conditions, access sequences, and condition tables used in rebates.
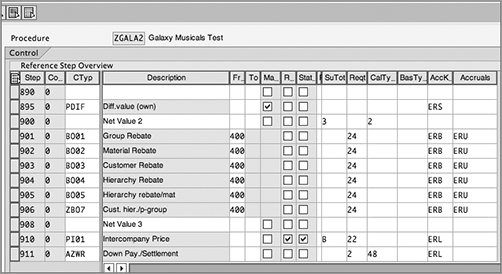
Setting the pricing procedure In standard SAP, rebate condition types BO01 to BO06 are assigned to the pricing procedure, as shown in Figure 9-37.
If you are setting up your own rebate conditions, make sure that you have attached requirement routine 24. This ensures that the conditions are called up in billing documents only. Also note that account keys ERB and ERU must be assigned to the conditions. We will discuss the account assignment aspects later in this chapter.
Table 9-2: Condition Types in Rebates
| Condition type | Access sequence | Condition table(s) |
| BO01—Group Rebate (% based) | BO01—Material Rebate/Rebate Group |
001—Customer/Material
002—Customer/Rebate Group |
| BO02—Material Rebate (Qty based) | BO02—Material Rebate | 001—Customer/Material |
| BO03—Customer Rebate (% based) | BO03—Customer Rebate | 003—Customer |
| BO04—Hierarchy Rebate (% based) | BO04—Rebate Hierarchy | 004—Customer Hierarchy |
| BO05—Hierarchy Rebate/Material (% based) | BO05—Rebate Hierarchy/Material | 005—Customer Hierarchy/Material |
| BO06—Sales Independent Rebate (fixed amount) | BO03—Customer Rebate | 003—Customer |
Figure 9-37: Pricing procedure with rebate conditions
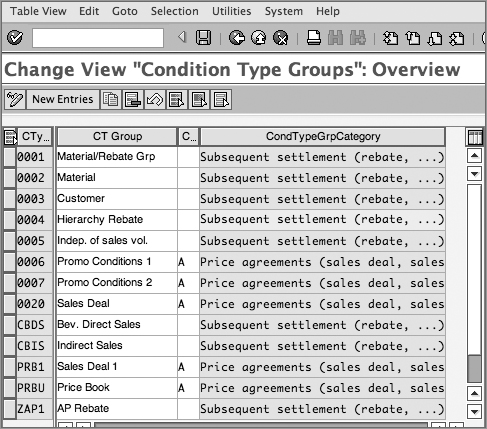
Defining condition type groups The next step in customization is to assign one or more rebate conditions to a condition type group. Then, you attach this group to the rebate agreement type. This way, you can create the rebate agreement and the associated rebate conditions using the same transaction.
To define the condition type groups, the path is IMG Sales And Distribution Billing Rebate Processing Rebate Agreements Condition Type Groups Define Condition Type Groups.
Here you can define a condition type group and assign it to a condition type group category, as shown in Figure 9-38.
Figure 9-38: Defining the condition type group
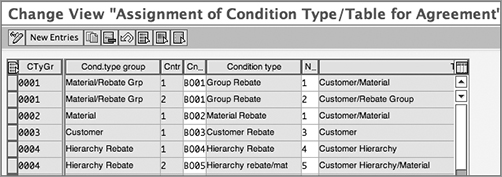
Assigning rebate conditions to the group Follow the menu path IMG Sales And Distribution Billing Rebate Processing Rebate Agreements Condition Type Groups Assign Condition Types/Tables To Condition Type Groups.
The screen is shown in Figure 9-39. Here you assign the rebate condition types and the underlying condition tables to a condition type group. For example, consider the condition type group 0001. The condition type BO01 is assigned to this group. You can maintain condition records for BO01 either for the customer/material (in condition table 1) or for the customer/rebate group (in table 2). Hence, there are two records for condition type group 0001 in Figure 9-39.
Figure 9-39: Assigning condition types to condition type groups
Attaching the group to rebate agreement types To perform the last step in the assignment process, follow the menu path IMG Sales And Distribution Billing Rebate Processing Rebate Agreements Condition Type Groups Assign Condition Type Groups To Rebate Agreement Types (see Figure 9-40).
Figure 9-40: Assigning condition types group to rebate agreement types
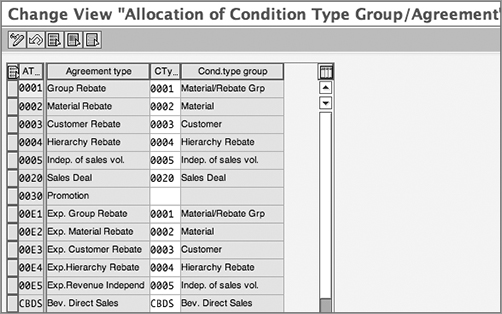
Select the rebate agreement type that you plan to use, and assign a condition type group to it.
Thus, in our example, agreement type 0001 has condition type group 0001 linked to it. Further, the group is linked to condition type BO01 with two condition tables, 1 and 2, thus completing the assignment.
Configuring Account Assignment for Rebates
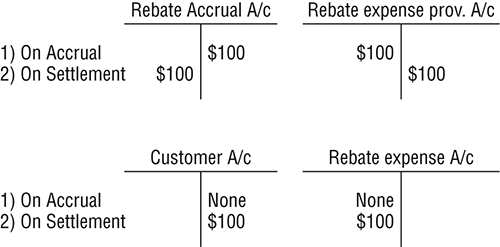
Account determination for rebates consists of two account keys: account key ERU for posting the accruals and account key ERB for posting the actual rebate expenses. We have attached these keys in the pricing procedure illustrated in Figure 9-37. The account key ERU points to two accounts: an accrual G/L account and a rebate expense provisional account. Account key ERB points to the actual rebate expense G/L account. Between accrual and settlement, having two separate GL accounts helps in tracking the rebate expenses separately. However, you can use the same G/L account. Please consult your FI/CO team before making these settings.
When SAP posts an accrual (either automatic or manual), the G/L account for posting the accruals into accounting is taken from the ERU account key, and the accounting entry is posted by debiting the rebate expense provisional account and crediting the rebate accrual account. When you run the rebate settlement, SAP takes the G/L account from ERU and reverses the previously posted accruals and the G/L account from ERB to post the entry into customer receivables and rebate expense account.
We will discuss account assignment in detail in Chapter 10. However, at this stage, we will cover how accounts are maintained for rebates processing by using the menu path IMG Sales And Distribution Billing Rebate Processing Account Determination For Rebates Assign G/L Accounts (VKOA).
In Figure 9-41, we have assigned G/L accounts for the posting keys ERB and ERU, as discussed earlier. Figure 9-42 depicts the impact of accrual and settlement transactions on the G/L account posting.
Figure 9-41: Account assignment for rebates

Figure 9-42: Accounting postings
One of the increasingly popular and convenient means to pay is using payment cards. You can specify the basic settings for entering payment card information in sales documents and set up an interface with an external clearinghouse to authorize and settle the card charges. The interface details vary depending on the external partner and are not in the scope of this book. However, in this section, we will discuss the setup and functioning of payment cards in SAP.
The payment card functionality allows you to store customer card information in the customer master records. You can enter the details in the Payment Transactions tab in General Data section, (which you can access using XD01 or XD02) from where the details get copied into sales documents. You can also enter payment card information manually during sales order processing. There is a separate tab in the order header for payment cards.
The Payment Card Process
You can create a sales order with a payment card in the usual way, using VA01. There is no change in the process, except that an additional screen for payment card data comes into play at the header level.
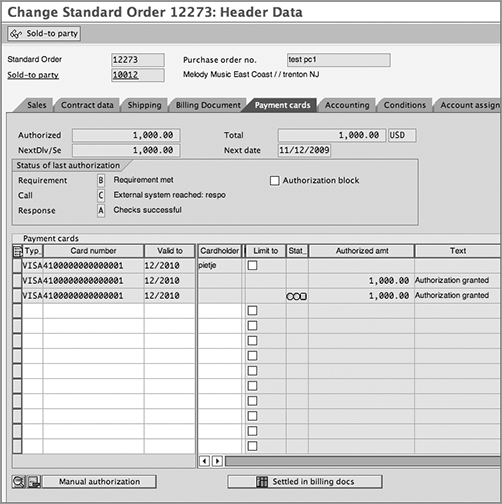
On this screen, you enter the payment card details, such as card type, number, expiration, cardholder’s name, and so on. It is possible to enter more than one payment card to cover the sales order. The Limit To field is used to limit the amount that may be charged on a particular card.
At the time of saving the sales order, the system carries out an authorization check using the interface. Depending on the settings, the system gets authorization for an amount required to cover any immediate delivery (see Figure 9-43). The authorization is valid for a limited time. Hence, at the time of delivery creation, the system will check to ensure that the authorization is still valid, before it permits a delivery.
The Manual Authorization button (at the bottom of Figure 9-43) allows a user to manually trigger authorization during sales order processing.
When the order is fulfilled and a billing document is created, the payment card details are copied into the invoice. Once the billing document is posted to accounting, the payment card clearinghouse assumes the liability for the amount.
Going back to the Payment Cards tab in the sales order, you will notice another button: Settled In Billing Docs. After the invoice has been created against the sales order, you can use this button to show the corresponding billing document(s) in which this card was used and settled.
Figure 9-43: Payment Cards tab in sales orders
During the subsequent settlement run (again using the interface), the invoice amount is settled with the clearinghouse.
In cases where a return order is created with reference to a payment card order or invoice, the system will not automatically copy over the card details. Instead, you will get a message warning you that the original order was a payment card order. You then must manually key in the card details that are valid at that time. Remember that if you do not enter card details, a regular credit memo will be issued to the customer.
You can also schedule a background job to carry out authorizations in batch mode (use transaction code S_ALR_87014369). The underlying program RV21A010 checks all the open sales documents for which fresh authorization or reauthorization is required and processes them in a batch mode.
The transaction code VCC1 provides a useful worklist of all sales documents containing payment cards.
Payment Card Configuration
We’ll now discuss some of the major settings for configuring payment cards in SAP. They can be grouped into two major steps:
- Payment card definition settings
- Authorization- and settlement-related settings
Defining the Payment Card Type
The first step is to define the types of payment cards that you plan to use. Use the menu path IMG Sales And Distribution Billing Payment Cards Maintain Card Types.
On this screen, you can maintain a four-character name and description for the payment card (see Figure 9-44). In the Check field, you can define a program to carry out preliminary checks on the card details entered. For example, you can run a check to verify if the leading digit is correct under the rules of the payment card company.
Figure 9-44: Defining a payment card type
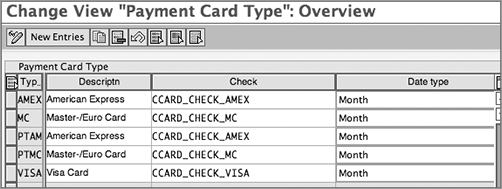
The date type controls the date format (for example MM/YYYY) of the validity dates on the payment card.
Standard SAP has Visa, MasterCard, American Express, and other major cards predefined.
Defining and Assigning Card Categories
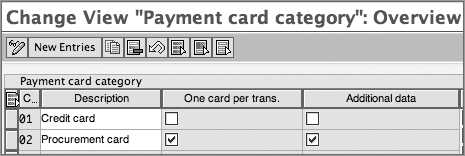
The next step is to categorize the cards as credit cards, procurement cards, or any other user-defined category.
Follow the menu path IMG Sales And Distribution Billing Payment Cards Maintain Card Categories Define Card Categories.
On the screen shown in Figure 9-45, define the card type. You can also set a limit of one card per transaction for a card category.
Figure 9-45: Defining card categories
On the same menu, the Determine Card Categories setting allows you to assign the card category to each card type. For example, in Figure 9-46, SAP has identified American Express and Visa as credit cards by assigning them to card category 01.
Figure 9-46: Assigning card category to payment card types

In this step, you also define the number range for the cards. When a payment card number is entered in a sales transaction, the system will identify the card category based on this setting and check whether the number entered is within the range specified here.
Linking Payment Cards to Sales Documents
Having defined the cards, you now will link them to the sales documents where these cards will be used. The menu path is IMG Sales And Distribution Billing Payment Cards Maintain Payment Card Plan Types.
A payment card plan controls how the sales document will be settled for payment. Standard SAP uses plan 03. You may never need to define any custom plans, in which case you can use the standard one for all scenarios.
It is important to assign your payment card plan type to all the sales document types where you plan to use this functionality, as shown in Figure 9-47.
Figure 9-47: Assigning payment card plan type to sales documents
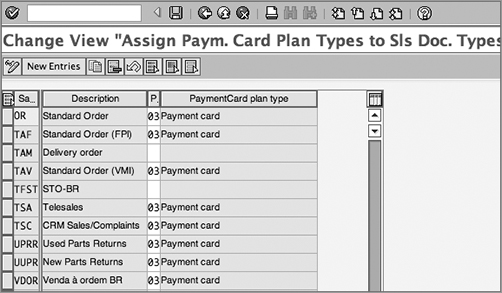
In the sales documents, this setting activates the Payment Cards tab in the header data. So, if you are unable to see the Payment Cards tab in a particular sales document type, you would have probably failed to perform this step.
Assigning a Payment Guarantee Procedure
Just like a pricing procedure, you have to set up and assign a payment guarantee procedure, which determines which form of payment guarantee is valid for a particular document and customer. In this section, we will cover how to define and assign payment guarantee procedures to sales documents using the condition technique. The menu path is IMG Sales And Distribution Billing Payment Cards Authorization And Settlement Risk Management For Payment Cards Maintain Payment Guarantee Procedures. We’ll now discuss the steps in this menu.
Define a Payment Guarantee Schema
Standard SAP offers schema 000002 for payment cards. The payment guarantee form assigned to it is 02. Although you may never need to define a custom payment guarantee schema, you will still need to carry out the assignment settings.
As you did with the pricing procedure determination, you will use a document determination schema and a customer determination schema (optional) as keys to the determination of payment guarantee procedure. In the next steps, we will define customer and document determination schemas and then define rules for determination.
Define a Customer Determination Schema
You should make this setting only if you want to set up different payment guarantee procedures for different groups of customers. You can define a four-character customer determination schema using the customer payment guarantee procedure 0002 as a reference.
In the customer master record, you have to specify the customer determination schema in the Payment Guarantee Procedure field in the Billing Documents tab in the sales data section
You can choose to skip this step and the master data maintenance altogether.
Define a Document Determination Schema
You can use the standard option 01 or create a copy. The document payment guarantee procedure has to be assigned to the sales document types in the next step.
Assign the Document Schema to Order Types
In this step, select the sales document types that you plan to use, and assign a document payment guarantee procedure.
In Figure 9-48, you can see we have used the standard document payment guarantee procedure 01 and assigned it to sales document types.
Figure 9-48: Assigning document schema to sales documents
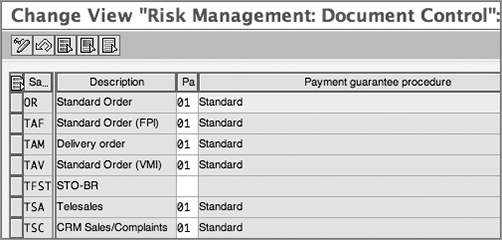
Define Payment Guarantee Schema Determination
In this step, you can specify the rules for the determination of the payment guarantee procedure. For a combination of customer determination schema and document determination schema, you will assign a payment guarantee procedure. You can also choose not to use the customer determination schema and leave this field blank. This way, the rule applies to all customers. As shown in Figure 9-49, the document payment guarantee procedure (Pa) 01 points to payment guarantee procedure 000002, irrespective of the customer procedure (CusP), which is left blank.
You can add other rules based on your requirements.
Figure 9-49: Payment guarantee schema determination
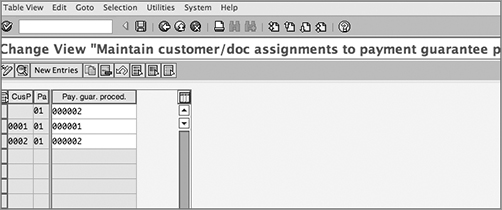
Maintaining Checking Groups
Checking groups control how SAP checks card data before authorization. You can define custom routine checks, authorization horizons, and validity at the checking group level. In this step, you will first define checking groups and then assign them to the appropriate sales document types.
Setting Up a Checking Group
The path is IMG Sales And Distribution Billing Payment Cards Authorization And Settlement Maintain Checking Groups. On the Define Checking Groups screen, you’ll start by setting up a checking group. Refer to Figure 9-50. You can define a two-character checking group (in the CkGroup field) and add a description.
Figure 9-50: Defining a checking group

The AuthReq field allows you to add a custom routine to check whether certain prerequisites are met before authorization is carried out. For example, standard routine 1 checks whether the sales document is complete before authorization can be done.
When a sales order is created with payment card data, it is not authorized for the entire amount. The system takes into account the material availability date or billing date. In the case of partial delivery, only that portion of the total amount that is required to cover the immediate delivery is authorized. You can control how many days in advance the system should start authorization. This is known as an authorization horizon. You can specify the number of days in the AHorizn field.
If the entire sales order is beyond the horizon (that is, if there are no confirmed schedule lines within the horizon), then you can opt for a preauthorization by selecting the Preau. box. In this case, you get authorization for a nominal amount (usually a dollar), just to make sure that the card credentials are correct.
At this stage, it is also important to check the card expiry date. It should remain valid for a certain number of days after the sales order has been created. This is to make sure that at the time the order is delivered and billed, the card will still be valid. You can specify the number of days in the Valid field.
Assigning the Checking Group to a Sales Document Type
The next step is to assign the checking group to a sales document type. You can make this assignment using the menu path IMG Sales And Distribution Billing Payment Cards Authorization And Settlement Maintain Checking Groups Assign Checking Groups.
Figure 9-51 illustrates this simple assignment step.
Figure 9-51: Assigning checking groups
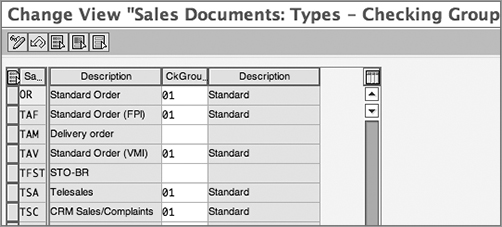
This completes our discussion of the assignment of checking groups to sales documents.
Maintaining Authorization Validity Period
For each payment card type, you can define a period in days for which the authorization will remain valid. Go to IMG Sales And Distribution Billing Payment Cards Authorization And Settlement Specify Authorization Validity Periods.
Add the number of days for which the authorization is to remain valid. At the end of this period, the authorized amount will expire, and you will have to carry out a fresh authorization check for the sales order.
The batch job for authorization that we discussed earlier is very useful in reauthorization without manual intervention.
Maintaining Settings for a Clearinghouse
In this section, you set up the interface with the clearinghouse. You also have to assign reconciliation and clearance accounts for authorization and settlement transactions.
These steps involve setting up accounts in FI to post the various transactions to. Please make these settings in consultation with your finance team, taking their requirements into account.
Assigning Reconciliation Accounts
In this step, you need to assign a receivables account for each card type. You may choose to have separate accounts for, say, MasterCard and Visa. Use the following path to set this up: IMG Sales And Distribution Billing Payment Cards Authorization And Settlement Maintain Clearing House Account Determination Assign G/L Accounts (OV87).
As shown in Figure 9-52, we have assigned a receivables account for each card type.
Figure 9-52: Receivables account assignment

The clearinghouse assigns each enterprise a merchant ID to uniquely identify it in each payment card transaction. You can also define this merchant ID in SAP and assign it to each receivables account.
TIP We will discuss the other concepts in account determination using condition techniques in Chapter 10. At this stage, you can assume that you will have to assign G/L accounts to proceed with other settings
Setting Up Controls for Authorization and Settlement
In this step, you make two important settings. First, you link each receivables account to a clearing account. Second, you specify the routines used in the external interface to the clearinghouse.
To do this, use the menu path IMG Sales And Distribution Billing Payment Cards Authorization And Settlement Maintain Clearing House Set Authorization/Settlement Control Per Account. As shown in Figure 9-53, you can specify a clearing account corresponding to the receivables account in your chart of accounts.
Figure 9-53: Maintaining clearing account and external interface
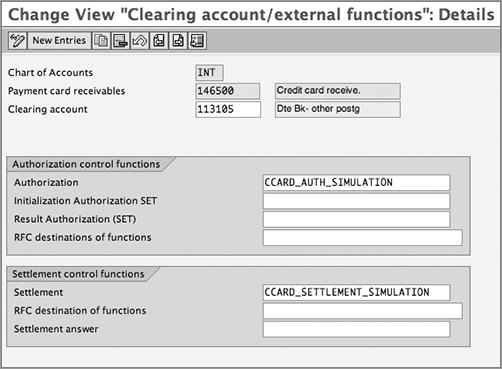
On the Details tab, specify the authorization and settlement control functions.
In the Authorization and Settlement fields (Figure 9-53), assign your custom function modules per your requirements. Standard SAP offers simulation codes for authorization (CCARD_AUTH_SIMULATION) and settlement (CCARD_SETTLEMENT_SIMULATION) so that you can test the concepts before establishing a real connection to the clearinghouse.
NOTE Each payment card contains a three-digit credit verification value (CVV) code to increase the security of the card transactions. SAP Service Marketplace note 914147 contains some FAQs on the use of this functionality. It also points to other notes that explain how to activate CVV in your version of SAP.
For security reasons, payment card numbers must now be stored in an encrypted format. The display to users should be in a masked format with only the last few digits appearing on the screen.
To implement these security features, refer to SAP Service Marketplace note 1029819, which guides you through the steps and notes that you have to follow for encrypting and masking payment card data.
In this chapter, we covered the process of creating different billing documents and the steps in configuration. We also discussed rebate functionality and the payment card interface.
Billing is the last step in the sales cycle. Before a billing document is released to accounting, you have to configure account assignment. We will discuss this in the next chapter.
