Chapter 4: Partner, Text, and Output Determination
Partner, text, and output determination are three of the important basic functions in the SAP SD application. You use partner determination to control the determination of parties involved in a sales transaction such as the sold-to party, ship-to party, forwarding agent, and so on; you use text determination to control text involved in a sales transaction such as terms of sales, special packaging or delivery instructions, and so on; and you use output determination to control the determination of any output forms involved in a sales transaction such as the invoice, packing list, and so on. In this chapter, we will discuss these three basic functions in detail, including how to customize them.
The terms partners and business partners in the SAP SD application refer to the parties that are involved in a sales transaction. Each business partner has a specified role and can be identified based on the role or function they play in the processing of a sales cycle. Examples of business partners include a sold-to party ordering the goods, a forwarding agent delivering the goods, an employee responsible for processing the sales transaction, a customer contact person seeking regular updates about the delivery progress, a ship-to party location where the goods are to be shipped, a bill-to party who will receive the invoices, and a payer who will pay the bills. You set up these partners and their corresponding functions in SAP SD using a search technique called partner determination. The technique controls what partners are allowed, what roles they will play, and how they can be determined at the required stages (such as during sales document processing, delivery processing, transportation processing, and so on) in the processing of a sales cycle.
The customization of a partner determination procedure is a three-step process that we will discuss in more detail in the following sections:
1. Define partner functions.
2. Group partner functions into a partner determination procedure.
3. Assign the partner determination procedure to respective partner objects.
Define partner functions
Group partner functions into a partner determination procedure In this step, you group the newly created or modified partner functions from step 1 into a two-character identifier key called the partner determination procedure. The customization settings in this step hold the determination logics for what, how, and when a partner function is determined.
Assign the partner determination procedure to respective partner objects In this step, you assign the partner determination procedures to the respective partner objects. This assignment completes the process of setting up the partner determination procedure. A customer partner determination procedure is assigned to a customer account group; a sales document header–related partner determination procedure is assigned to a sales document type; a sales document item–related partner determination procedure is assigned to an item category type; and so on. Table 4-1 represents this relationship.
Table 4-1: Partner Objects: Assignment Logic
| Partner Determination Procedure | Assign To |
| Customer | Account group |
| Sales document header | Sales document type |
| Sales document Item | Item category type |
| Delivery header | Delivery document type |
| Shipment header | Shipment document type |
| Billing header | Billing document type |
| Billing item | Billing item category type |
| Contact | Contact type |
Deciding the Scope of Customization
Before you set up a partner determination in SAP, it is always advisable to identify the scope of customization required. Specifically, you need to know how many partner functions are required and how to configure the determination logic. Answering the following questions may help to a great extent:
- How many partner functions are required per partner object? This means figuring out how many partner functions are required for the customer master, how many are required for the sales document header, how many are required for the sales document items, how many are required for the delivery document header, and so on.
- Can the existing partner functions be used as is or with some modification, or do you really need the new ones? For instance, if you can use the existing partner functions but need a new procedure, then your customization will only entail combining the partner functions into a new partner procedure and assigning the newly defined partner procedure to the respective partner object.
- Can existing partner functions can be reutilized by other partner objects? Reusing a partner function across objects helps reduce the unnecessary customization duplication in your SAP instance.
- Does the partner function require some sort of hierarchical setup? For instance, imagine a corporate head office signing a rate contract (the parent customer), after which various branch offices use the rates in the contract to place orders (the child customers). In such a case, you may need to set up determination logic involving a customer hierarchy. Please refer to Chapter 3, “Master Data in SD,” for more details on customer hierarchy.
- What are the specific details of the partner determination logic? Answering this question will involve asking other questions:
- Do you want to copy the partner function value from the customer master to the sales order and further down to delivery, and so on, in the sales cycle?
- Do you want the partner function to be determined from an alternate master record, such as the ship-to party master, when it is missing from the sold-to party master record?
For this chapter’s purposes, we will show the customization step by creating a new partner function and assigning it to a new partner determination procedure ZAG.
CASE STUDY—Galaxy Musical Instruments Configuration Analysis: Partner Determination and Scope Finalization
The sales structure for Galaxy Musicals Instruments is divided into multiple sales regions, and each sales region is further divided into sales territories. Each sales territory is owned exclusively by a sales representative. Since sales commissions are a major part of a sales representative’s remuneration, the SAP system must properly record the sales orders per sales representative. To achieve this, Galaxy decided to create a new partner function, Z9–Sales Representative, and assign the function’s determination to a sold-to party master record. This way, Galaxy was able to assign a customer record exclusively to one sales representative.
Customizing Partner Determination
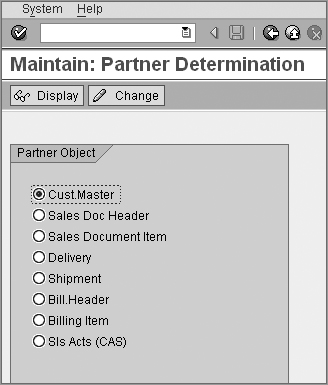
To call the customization screen for partner determination (Figure 4-1), use transaction code VOPAN or follow menu path IMG Sales And Distribution Basic Functions Partner Determination. As you can see, the customization screen has eight radio buttons. These radio buttons represent various stages in a sales cycle, called partner objects. You can define a partner determination for all the partner objects shown on this screen.
Figure 4-1: Partner determination, initial overview screen
We’ll first show how to set up the partner determination for the partner object Customer Master.
Setting Up Partner Determination for the Customer Master
The chronological order of activities is as follows:
1. Define a partner function.
2. Add the partner function to a partner determination procedure.
3. Assign the partner determination procedure.
Let’s proceed with these activities one by one.
Define the Partner Function
To create your own partner function, select the Customer Master button on the VOPAN screen (shown earlier in Figure 4-1), and click the Change button to call up the partner determination customization screen. You will be presented with a customization screen divided into two parts, with a Dialog Structure pane on the left and the customization details of the partner functions on the right. Double-click the Partner Functions node in the Dialog Structure pane shown on the left to display the detailed list of available partner functions on the right, as shown in Figure 4-2.
As you can see in Figure 4-2, a large variety of partner functions are provided in SAP out of the box. You can either use these or create new ones if required. Before you define a new partner procedure, it’s good practice to check whether you can use the existing partner functions to meet the needs of your business scenario.
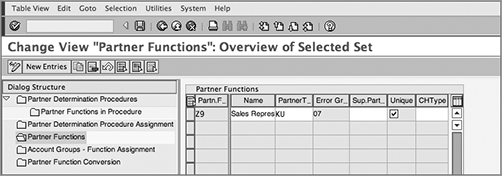
Now click the New Entries button to call up the customization screen for defining new partner functions. To define a new partner function, provide a two-character identifying key, provide a meaningful description, and select the proper values for the rest of the fields (as described next). To bring more clarity, Figure 4-3 shows an example of partner function Z9 set up for Galaxy. Save your entry, and click the Back button to return to the screen shown in Figure 4-2. You will find your custom partner function successfully created in the list of partner functions on the right.
Figure 4-2: Partner determination customization screen for partner object, customer master
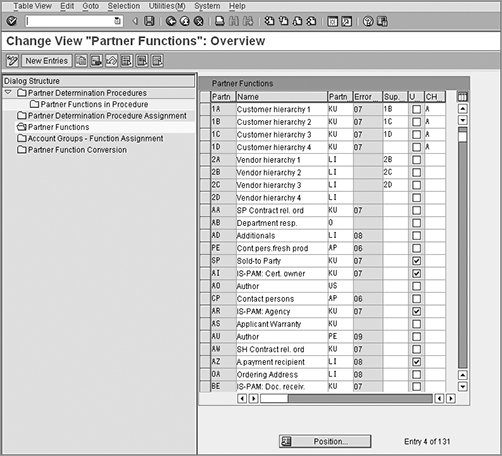
Figure 4-3: Partner function customization screen
These are the fields on the partner function customization screen:
Partner Function The first column on the screen, Partn.F., presents the partner function. Here you provide a two-character unique identifier (starting with a Y or a Z) for each partner function.
Name In the column Name, maintain a meaningful description for this partner function. For Galaxy, we defined partner function Z9 as Sales Representative.
Partner Type The column Partner T. presents the partner type. A partner type helps distinguish one partner function from another. It tells whether the partner function is for a customer (KU), a vendor (LI), a contact person (AP), and so on. SAP provides these partner types, and you cannot create your own partner type. You can use these partner types to define your own partner functions. For example, all four partner functions for a customer—in other words, SP, SH, PY, and BP—are of partner type KU, a forwarding agent (FA) is of partner type LI, and a customer contact person (CP) is of partner type AP. For Galaxy, we created partner function Z9 of type KU (customer).
Error Group The column Error Gr is where you provide the two-character code for the partner incompletion procedure that you want to assign to your partner function. The incompletion procedure plays a vital role in controlling the further processing of the sales cycle when a required entry is missing. So if your partner function is missing in the sales document, whether the sales document can be delivered or not depends entirely upon the customization for the incompletion procedure that you assigned to your partner function in this Error Group field. In standard SAP, incompletion procedure 07 is available for partner type Customers, 08 is available for partner type Vendors, and 06 is available for partner type Contact Persons.
Superior Partner Function The next column is Sup.Part. This is used to present a higher-level partner function for this partner function. The higher-level partner function is used in relation to customer hierarchies. For more information on customer hierarchies, please refer to Chapter 3.
Unique Select the check box in the column Unique if you want your partner function to appear only once on the partners function screen of the customer master record. For Z9, we wanted only one sale representative per sold-to party account and therefore selected the Unique check box. This way, you will be able to assign only one sales representative on the Partner Function tab of the sold-to party account of the customer.
Customer Hierarchy Type The column CHType specifies the type of customer hierarchy to be used for this partner function. If you are maintaining a hierarchy, enter the hierarchy type in this column.
TIP Before you define a new partner procedure, it’s good practice to check whether you can use the existing partner functions to meet the needs of your business scenario.
CASE STUDY—Galaxy: Partner Function
Galaxy created partner function Z9 with partner type KU. The partner is set up as unique in the customer master because one customer can have only one sales representative assigned to it. There is no customer hierarchy involved, and therefore the hierarchy fields are blank.
TIP Always use a Y or Z prefix for your custom-defined partner functions so as to separate them from the standard partner functions provided by SAP. This way you can ensure that SAP doesn’t overwrite your customization during the next patch or upgrade.
Add the Partner Function to a Partner Determination Procedure
Once you define a partner function, the next step is to add this partner function to its respective partner determination procedure. While you are still on the screen shown in Figure 4-3, double-click the Partner Determination Procedures node to reach the customization screen for partner determination procedures (Figure 4-4).
Figure 4-4: Partner determination procedure customization, overview screen
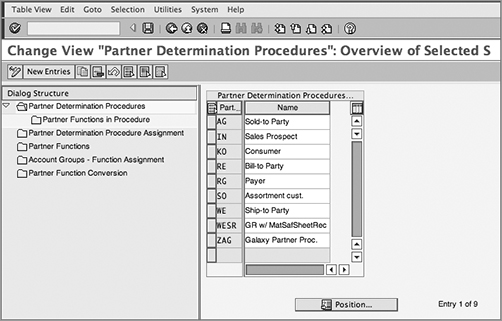
In SAP, the partner procedure AG is provided for the sold-to party, RE is provided for the bill-to party, RG is for the payer, and WE is for the ship-to party business partners. You can create your own Z partner procedure by clicking the New Entries button and providing a two-character identification key with a meaningful description for your custom partner procedure. For Galaxy, we created partner determination procedure ZAG as a copy of AG.
Now select the newly created partner procedure (in our case it is ZAG), as shown in Figure 4-4, and double-click the Partner Functions In Procedure node on the left screen to call up the next customization screen (Figure 4-5), which shows the partner functions allowed for partner procedure ZAG. Since ZAG was copied over from AG, you will find a long list of partner functions appearing in ZAG. Delete the unwanted ones, and keep only the ones you need as per your business requirement. For Galaxy, we required only four basic partner functions: SP, BP, PY, and SH. Now click the New Entries button to maintain the entry for the partner functions that you want to include in partner procedure ZAG (in our case it is Z9), and click the Save button to save your entry.
Figure 4-5: Partner functions on the procedure customization screen
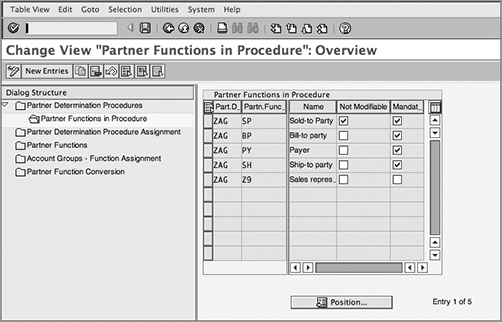
The following are the fields on the partner functions in procedure customization screen:
Partner Determination The Part.D field denotes the partner determination procedure name. In this example, ZAG represents the partner procedure for partner object Customer Master, subobject Sold-To Party.
Partner Function In the column Partn. Func., enter the two-character partner function that you want to include in the partner determination procedure. For Galaxy, we maintained the partner functions Z9, SP, BP, PY, and SH in this field.
Name SAP automatically fills in the Name field with the description of the partner function once you enter the partner function.
Not Modifiable If the check box Not Modifiable is selected, the partner function cannot be changed on the customer master maintenance screen.
Mandatory Function Select the check box under the column Mandat. Funct. if you want to ensure that this partner function is mandatory for this partner procedure.
Notice that both the check boxes are selected for partner function SP, whereas only the Mandat. Funct. check box is selected for partner functions BP, PY, and SH. It is because of the settings of these two checkboxes in the partner determination customization for ZAG that when you are in the Sales Area Data Partner Function screen in a sold-to customer master record, you see all four partner functions—SP, SH, PY, and BP—appearing as mandatory, and that partner function SP is not modifiable.
CASE STUDY—Galaxy Configuration Analysis: Partner Determination Procedure
Partner function Z9 for Galaxy Musical Instruments was added to partner procedure ZAG. The Not Modifiable check box was not selected because Galaxy wanted the flexibility to modify the sales representative number assigned to the sold-to party master record in the event of a change in sales representative for a particular territory or for a particular customer in the sales territory. The Mandatory Function check box was not selected either, because Galaxy wanted the flexibility to maintain the sales representative name only when the customer account is active. For customers who are no longer dealing with Galaxy or new customers whose credit applications are still pending, Galaxy does not maintain sales representative information.
Assign the Partner Determination Procedure
Once the partner function is grouped under a partner determination procedure, the next step is to assign the determination procedure. For the customer master, partner function, and partner determination procedure, both are required to be assigned to a customer account group. (Yes, this is the same account group that you use for creating the customer master record in an XD01 or VD01 transaction.)
While you are still on the screen shown in Figure 4-5, double-click the Partner Determination Procedure Assignment node on the left to call up the assignment screen shown in Figure 4-6.
Figure 4-6: Customization screen for partner determination procedure assignment
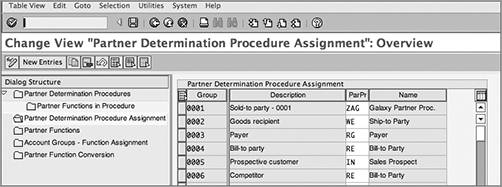
For Galaxy, we created partner determination procedure ZAG and will assign the same partner determination procedure to its respective account group, in other words, 0001. Since ZAG is assigned to 0001, you can only maintain those partner functions for a sold-to customer created under account group 0001 that are allowed under the partner procedure ZAG. Any partner function that is not available in the partner procedure will not even appear on the partner function screen for the sold-to party master record.
Now double-click the Account Groups – Function Assignment node to call up the customization screen for assigning the partner function to its respective account groups. Once you are on the customization screen and can see the entries showing the assignments between account groups and partner functions, click the New Entries button to call up the New Entries: Overview Of Added Entries screen. Now create the entry for your custom partner function, and click the Save button. Figure 4-7 shows the entry for partner function Z9 for Galaxy.
Figure 4-7: Customization screen for partner function assignment to account groups
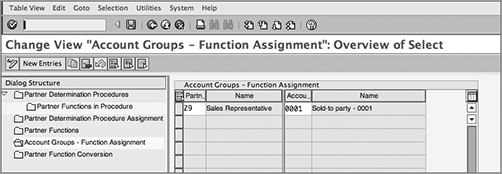
You have now configured your first customized partner function Z9.
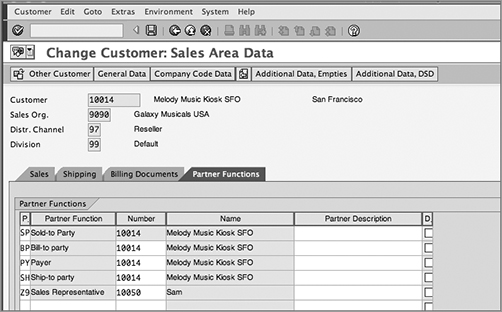
To use this partner, you need to set up the master record for this newly created partner, i.e. a sales representative, and then assign this sales representative to all the customer accounts for which this sales representative is responsible. Since we created Z9 with partner type KU and assigned it to account group 0001, we use customer master maintenance transactions (XD*, VD*) to set up the master data account for the sales representative. For Galaxy, we created sales representative 10050 (Sam) and then assigned it to customer account 10014 with partner function Z9, as shown in Figure 4-8.
Figure 4-8: Example showing partner function Z9 assignment to customer master
Until now we have been discussing partner determination for customer master records. Partner determination is a bit different for sales headers and other partner objects such as sales item, delivery, shipment, and so on. The difference exists in the partner determination procedure setup. We’ll now explore these differences by covering the partner determination customization settings for partner object Sales Document Header. For this chapter’s purposes, we’ll use standard SAP-provided partner procedure TA.
Setting Up Partner Determination for the Sales Document
To call up the customization screen for setting up the partner determination procedure for the Sales Document Header partner object, follow the same steps that you did for partner object Customer Master, but this time choose the Sales Document Header partner object. To get started, let’s return to a couple of the screens we discussed earlier in the chapter. Call up the Maintain: Partner Determination screen (Figure 4-1), and select Sales Doc Header from the panel at left. You will be presented with a screen similar to Figure 4-2. On that screen, double-click the Partner Determination Procedures node to reach the customization screen for the partner determination procedure setup of the Sales Document – Header partner object. Select partner determination procedure TA, and double-click the Partner Functions In Procedure subnode to call up the customization screen (Figure 4-9).
This screen is similar to the Figure 4-5 with a few additional columns. The columns Part.Det.Proc. to Mandat. Func. have the same meaning as in Figure 4-5. The point to remember is that here the reference is to the sales document and not the customer master record.
The additional columns are as follows:
Source The Source field acts as an alternative source for determining the sold-to party partner in the sales document. Standard SAP determines the partner functions from the sold-to party record of the customer. When you assign a partner function in this field, for example, SH for partner function Z9, and when you create a sales document, SAP will determine the sold-to party using the partner function Z9 assigned to the ship-to party record.
Origin (Table) The Origin (Table) field defines the table from which the partner function should be determined during order processing. Here is an explanation of the available table origin values and when to select them:
Figure 4-9: Partner determination procedure customization, sales document header
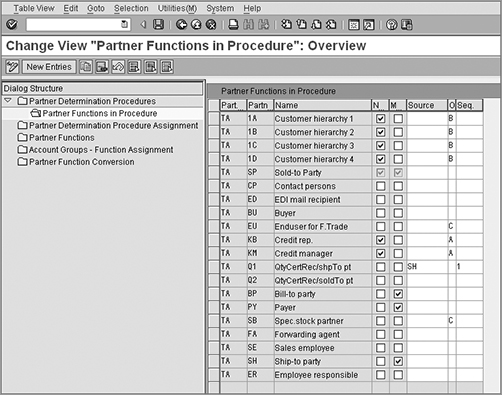
[Blank] Leave the Origin field blank when your partner functions are of partner type KU or you want to determine the partner from the partner functions maintained in the sold-to party customer master (table KNVP). If the system cannot determine all functions, it enters the number of the sold-to party (SP) for the remaining partner functions of the partner type customer (KU).
A Use A for your credit management partner functions (for example, KB and KM), because those functions should be taken directly from the credit representative table (T024P). The credit representative or credit manager is an internal employee of your organization and therefore should not be created as a customer master record. Instead, this has to flow from the HR personnel records. These settings are made in credit management where you link partner functions such as KB and KM to the HR personnel number.
B Use B if your partner functions should be taken from a customer hierarchy.
C Use C when you want the partner function to determine exclusively from the partner screen entries in the customer master. So if you set up C for partner function ER (employee responsible) and the same is not maintained on the partner screen for the SP customer master record, it will not be determined in the concerned sales document. If you have defined an alternative source partner function such as SH along with C, then SAP will look at the Partner tab of the customer master record of the ship-to party for determining the partner number for the ER function and return that value in the sales document.
D Use D when the personnel number of the system user should be used as the function, such as for sales executives.
E Use E when the partner function should be replaced with a contact person from the contact person screen for the corresponding partner (table KNVK).
F Use F when you want to determine the contact partners not only from the contact person screen but also from the partner screen of the partner with the current source partner function. In such a case, if the partner function is not available at the contact person screen, it will be determined from the partner screen.
X, Y, and Z These refer to user-defined origins. You can define your own origins for partner determination by adding a code to the function exit EXIT_SAPLV09A_003.
Sequence The column Seq. is used to define the priority in which the partner will be determined during document processing.
Table 4-2 shows an example of these features.
Table 4-2: Example Setup Showing Use of Partner Determination Procedure Fields

Here, since Source is blank for SH, SH will be determined first from the sold-to party master records, and then CP is determined from the customer master record of partner function SH. Since the table of origin is E (table KNVK), the contact person will be picked from the contact person screen of the ship-to party record.
A sequence field value is required only if you are using an alternate source partner function for partner determination. When you use an alternative source for partner function determination, SAP needs to know the priority in which the records need to be determined. If you have specified a source partner function, then enter a figure in this field that is higher than the figure for the source partner function. So, value 1 in the sequence field in our example tells SAP to determine the partner for the AP function only after the ship-to party partner record is found. Once the SH partner is found, SAP will go into the contact person screen of that SH partner master data and determine the partner number for partner function AP. That’s the kind of hierarchy you can maintain for the determination process if you use an alternative source partner function for partner determination.
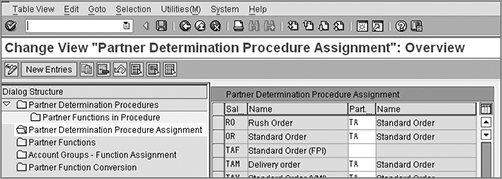
As the final step in the customization of the partner determination procedure for partner object Sales Document Header, you assign the partner determination procedure to the respective sales document types, as shown in Figure 4-10.
Figure 4-10: Partner determination procedure assignment, sales document header
With this we’ve completed our discussion on partner determination setup. Our next topic of discussion is text determination in SAP SD.
Parties to a sales transaction often exchange various instructions and information during the course of the sales process. This information could be in the form of shipping instructions, packing instructions, delivery terms, explanatory notes, remarks maintained by the partner’s agent, and so on. In SAP SD, you maintain all this information as text.
Text forms an important part of the SAP SD cycle processing. You maintain text in SAP to store and carry the important instructions throughout the sales cycle. You can maintain text in the customer master records and also in the sales documents at the header and item levels. For example, if the delivery text or shipping instructions are common for all the orders from the same customer, you maintain that in the customer master sales text, but if the instruction is specific to a sales transaction, you maintain that directly in the sales order. Further, you can copy text over to the subsequent process steps. This means that the delivery instructions maintained on a customer master Sales Area Data tab can be copied to the respective sales orders of that customer and can flow down the chain to the delivery and shipping documents. The information is available at the right time to the person processing the delivery in the warehouse, who can then read this additionally maintained information or instructions and proceed accordingly. You can even print the text associated with a sales transaction in document outputs such as invoices, order confirmations, or delivery notes.
TIP It’s always advisable to maintain repetitive text in the customer master record for a customer. This way you don’t have to reenter the text in every sales order, and text automatically flows from the customer master to the sales document.
Maintaining Text in Customer Master Records
In a customer master record, you can maintain text at all three screen levels: General Data, Sales Area Data, and Company Code Data. To maintain text in a customer master record, call up the customer master maintenance screen in change mode (XD02). Once you are on the customer master maintenance screen, follow the menu path Extras Text to maintain the text for the respective screens.
- For maintaining central text, remain on the General Data screen, and then choose the menu path Extras Text.
- For maintaining contact person text, go to the Contact Person tab under the General Data screen. Select the contact person for whom you want to maintain the text by keeping the cursor on the respective contact person line, and then choose the menu path Extras Text.
- For maintaining sales text, go to the Sales Area Data screen, and then choose the menu path Extras Text. The text maintained at the sales area data level can be copied over for processing the sales transactions.
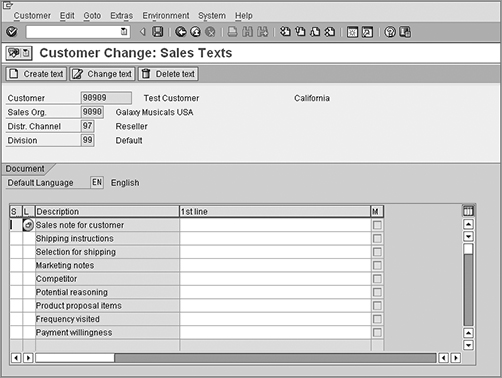
You can also maintain the text using transaction code XD01 (Create Customer Master). Figure 4-11 shows a text maintenance screen from the customer sales text.
Although this discussion covered maintaining text only in the customer master record, all the fields that we mentioned earlier in this section, such as marketing notes and shipping instructions, are likewise configurable in SAP. In other words, you can define them in customizing. Let’s move forward and see how to define these text fields using SAP text determination customizing.
Figure 4-11: Customer master sales text maintenance screen
Setting Up Text Determination in SD
You set up the text determination procedure in customizing via transaction code VOTXN or menu path IMG Sales And Distribution Basic Functions Text Control. Figure 4-12 shows the customization screen for text determination.
As you can see in Figure 4-12, the customization screen has many selection options. These selection options represent various stages in a sales cycle for which you can define a text determination. Each stage is called a text object. You can broadly categorize these text objects into two categories:
Related to master data This category covers the Customer, Info Req, and Pricing Conds options on the customization screen shown in Figure 4-12. Using these text objects, you can define the text determination related to the master data, such as the customer master, customer–material info master, and pricing master.
Related to sales documents This category covers the remaining five text objects from the customization screen shown in Figure 4-12: Sales Document, Delivery, Billing Doc, SalesAct, and Shipment. Using these text objects, you can define the text determination for these types of sales documents.
Figure 4-12: Customizing screen for text determination setup
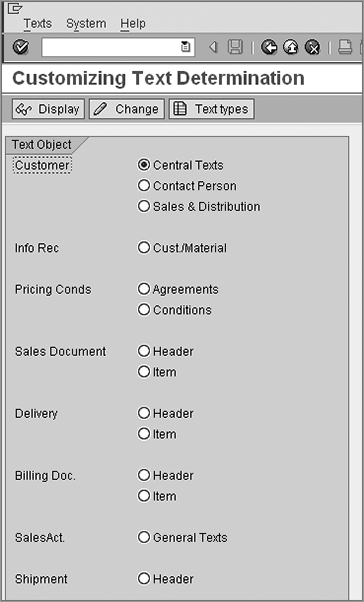
Customizing text determination involves three activities: setting up a text type, setting up the determination procedure, and assigning the determination procedure to the respective text object. For example, when you set up the text determination procedure for a customer master, you need to assign it to a customer account group; when you set up a text determination for a sales document, you need to assign it to sales document type; and so on. We will cover these three activities in detail shortly, but before we move forward, let’s first decide on the scope of customization.
Deciding the Scope of Customization
Before you set up a text determination in SAP, it is always advisable to identify the scope of customization required as per the business requirements. Answering the following questions may provide you with some guidance:
- How many text types are required per text object? This means figuring out how many text types are required for the customer master, how many are required for the sales document header, how many are required for the sales document items, how many are required for the delivery document header, and so on.
- Can you use the existing sample text types available in SAP, or do you need to create new text types?
- If new ones are required, should the text be maintained manually in the transaction, or should it be determined automatically by SAP based on the source for text determination defined in the customizing?
- Can the text be referenced or duplicated?
The answer to these questions helps you in identifying the number of text types that are required for the sales processing and also the scope of customization. For instance, if you can use the existing text types, then your customization only revolves around combining the text types into a text procedure and assigning the text procedure to the respective text object.
For this chapter’s purposes, we will show how to create a new text type, assign it to a new text procedure, and discuss all three customization activities in detail. Note that the setup of text determination is a bit different between the customer master and sales documents. Therefore, we’ll cover the text determination setup for both the customer master and the sales document header. We’ll start with setting up the text determination for a customer master.
CASE STUDY—Galaxy Configuration Analysis: Text Determination and Scope Finalization
Galaxy Musical Instruments decided to go with a new text type called Internal Sales Note to capture various information/instructions that sales representatives want to capture while generating a new customer account or while making changes to an existing customer account. This new text type should be available in all four partners accounts: sold-to party, ship-to party, bill to party, and payer. Further, Galaxy wanted any Internal Sales Note to be automatically copied to the sales documents so as to provide this specific information about the customer to the departments processing the order. The sole purpose of the text is for internal use only and need not be printed on any customer communications such as order confirmations, invoices, and delivery printouts.
Setting Up Text Determination for the Customer Master
The activities here comprise three steps:
1. Defining the text type
2. Setting up a text procedure
3. Assigning the procedure to the customer account group
We’ll cover these activities one by one.
Define Text Types
Creating a text type is the first step in configuring the text determination. To define a text type, select a text object from the customization screen shown in Figure 4-12, and then click the Text Types button. On the customization screen that appears next (shown in Figure 4-13), click the New Entries button, and create your text type by giving it a four-character identification key along with a meaningful description that explains and differentiates your text from other text. Figure 4-13 shows the customization screen for the Sales & Distribution text object for Galaxy.
Figure 4-13 Maintaining text types for the customer master, sales text
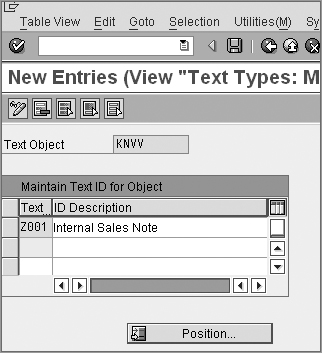
Now click the Save button to save your entry, and click the Back button to come back to the main screen (shown earlier in Figure 4-12). Congratulations, you have successfully defined the text type!
Set Up a Text Procedure
A text procedure is a grouping of different text types. You group all the required text types for a text object into a text procedure. To reach the customization screen for the text procedure setup, select the option for Sales & Distribution, and click the Change button on the Customizing Text Determination screen (shown earlier in Figure 4-12). You will be presented with a text procedure customization screen, as shown in Figure 4-14. You can define the text procedure using the New Entries button or using the Copy button. For Galaxy, we will define a new text determination procedure called Z1 and assign the text type Z001 – Internal Sales Note to this newly defined text procedure. We will also assign a few already existing text types that we want to include on the text maintenance screen for Galaxy’s customer master–sales text.
Figure 4-14: Define text procedure for customer master–sales text overview screen
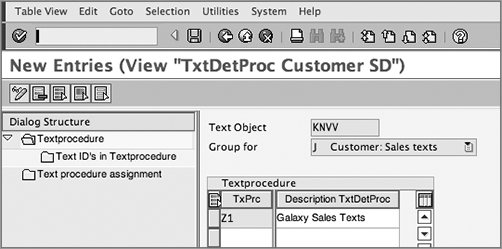
Now click the New Entries button, and provide a two-character identifier for your text procedure along with a meaningful description. For Galaxy, we created Z1. Now select your text procedure entry, and double-click the Text ID’s In Textprocedure node on the left. You will be presented with the screen shown in Figure 4-15, which shows the customization setup for Galaxy. Now click the New Entries button, and create the entry by providing a sequence number and a text ID (which is the same as the text type, in other words, Z001). The text description will populate automatically. Click the Save button to save your entry.
Figure 4-15: Defining the text procedure for the customer master–sales text detail screen
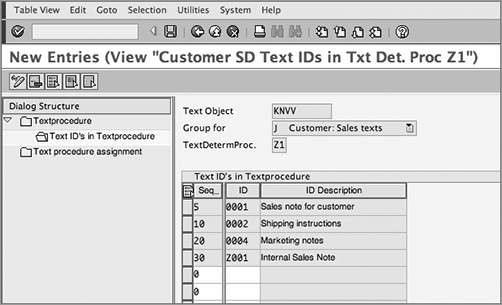
Assign the Text Procedure to Account Groups
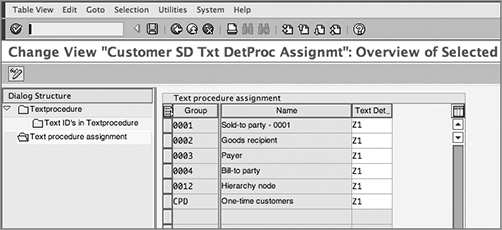
The last step in the customization of a text determination procedure is to assign the text procedure to its respective text object. For the customer master, the respective text object is the customer account group. If you double-click the Text Procedure Assignment node on the left of Figure 4-15, it will open the customization screen for text procedure assignment. Enter your procedure number in the Text Det. column corresponding to the account group to which you want to assign your text procedure just like we assigned Z1, as shown in Figure 4-16.
Figure 4-16: Assigning the text procedure to an account group
Click the Back button to return to the Customizing Text Determination screen. To verify whether the newly defined text type Internal Sales Note is appearing in the customer master, go to the SD screen for the customer master using transaction code XD02 and use menu path Extras Text to open the text maintenance screen. You will find that your newly defined text now appears on the customer master text maintenance screen (which is the screen you saw in Figure 4-11) but with the text that you just assigned to procedure Z1.
For all other text objects that you saw in the master data category, the customization is similar. The only exceptions are Customer/Material Info Records and Contact Person text objects where the only configuration you need is to create the text type. Table 4-3 shows the customization for all these text objects.
Table 4-3: Text Determination Setup for Other Text Objects in Master Data Category
| Text Object | Required Customization Steps | Procedure Assignment To |
| Agreement | All | Agreement type |
| Conditions | All | Condition type |
| Central Text | All | Customer account group |
| Customer/ Material Info Records | Define text type only | - |
| Contact Person | Define text type only | - |
Setting Up Text Determination for the Sales Document
Now that we have successfully defined the text determination procedure for the customer master, let’s move to the next step for Galaxy. That step is text customization and setup of the determination procedure for the sales document header with text Internal Sales Note automatically populated from the customer master to the sales document header. The setup for a sales document is a bit different than for a customer master. It includes an additional element for setup, called an access sequence. The steps are as follows:
1. Defining a text type
2. Setting up an access sequence
3. Setting up a text procedure
4. Assigning the procedure to the correct document type
We’ll cover these activities one by one.
Define Text Types
The process for defining the text type is the same as for the customer master. On the Customizing Text Determination screen (shown earlier in Figure 4-12), select the Sales Document – Header radio button, and click the Text Types button. On the customization screen that appears next (Figure 4-17), click the New Entries button to call up the customization screen to create the entry for your new text type. Since you want this text to be copied over from the customer master to the sales document, keep the text ID the same as defined before, in other words, Z001 – Internal Sales Note. Click the Back button to return to the main screen (Figure 4-12). Figure 4-17 shows the customization setup performed for the sales document header text for Galaxy.
Figure 4-17: Defining text types for a sales document header
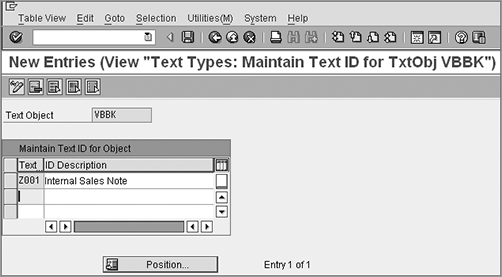
NOTE To copy the text between the customer master and the sales document, you need to keep the text ID the same between the two, or the copying won’t happen.
Define an Access Sequence
The next step in customization is to set up an access sequence. An access sequence in text determination setup refers to the search strategy you define in customization. SAP uses it to determine the required text value. It consists of various sources from where the text value can be obtained. For example, you can define that the internal sales note needs to be sourced from the text maintained on the customer master’s Sales Area Data tab.
To reach the customization screen for access sequence setup, select the Sales Document – Header radio button, and click Change button on the VOTXN customization screen (shown earlier in Figure 4-12). On the next screen that appears (Figure 4-18), double-click the Access Sequences option shown in the left part of the screen. Now click the New Entries button, and provide a two-digit numeric key for your access sequence followed by a meaningful description, similar to what we did in Figure 4-18 for Galaxy (99 – Internal Sales Note). Save your entry.
Figure 4-18: Defining access sequence, overview screen
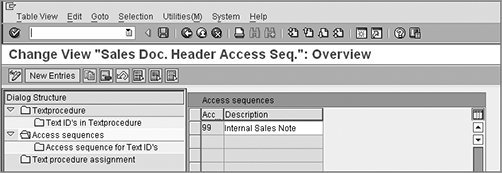
Now select your newly created access sequence, and double-click the access sequence for the Text ID’s option shown in the left pane. You will be presented with a screen like the one in Figure 4-19.
Figure 4-19: Defining access sequence, detail screen
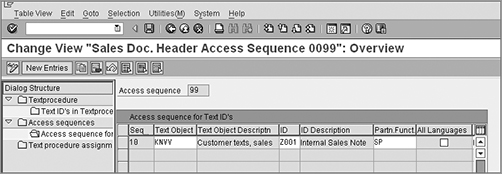
Before proceeding, let’s discuss the important fields on the customization screen that are a must for defining an access sequence:
Sequence No. Here you define the sequence in which you want SAP to search for the text from the source. For example, you may want the text to be sourced first from the sold-to party partner and then from the ship-to party partner.
Text Object This refers to the actual source. In Figure 4-19, the text object KNVV tells you that the source for the text is the text maintained in the Sales Area Data table of the customer master.
Text ID This is the text ID for the source. This is the same text ID that we defined in Figure 4-17.
Partner Function This represents the partner function whose value needs to be copied.
Click the New Entries button to maintain entries for Sequence No., Text Object, Text ID, and Partner Function, as shown in Figure 4-19. Now, if you analyze the complete entry from Figure 4-19, you will see that we have defined the source value as the value maintained in text ID Z001 for a sold-to party record that is maintained in the KNVV table.
Save your entry.
Congratulations, you have successfully created the access sequence for use with your text determination procedure!
TIP Before you create any new access sequence, always make sure to check whether the existing access sequence serves the purpose. Create a new access sequence only if the existing access sequence doesn’t meet your needs.
Set Up a Text Procedure
The next step in customization is to set up a text procedure. We are already on the customization screen for text procedure setup. The customization screen shown in Figure 4-19 is used for defining an access sequence, defining a text procedure, and assigning the text procedure. Now double-click the Text Procedure option on the left to call up the text procedure creation screen. You can create your own Z text procedure by clicking the New Entries button and providing a two-character identification key with a meaningful description for your custom partner procedure. For Galaxy, we created text determination procedure Z1 as a copy of 01.
Now select the newly created text procedure (in our case it is Z1), and double-click the node Text ID’s In Textprocedure on the left screen to call up the next customization screen (Figure 4-20). This screen shows the text types allowed in text procedure Z1. Since Z1 was copied over from 01, you will find a long list of text types appearing in Z1. Delete the unwanted ones, and keep only the ones you need as per your business requirements. Now click the New Entries button to maintain the entry for the text type that you want to include in the text procedure Z1 (in our case it is Z001), and click the Save button to save your entry.
Figure 4-20: Defining a text procedure for a sales document
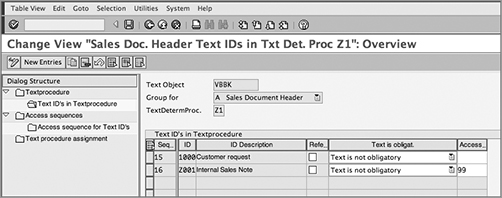
If you compare Figures 4-15 and 4-20, you will notice that Figure 4-20 has some additional elements that are not present in Figure 4-15. This is because text in documents has a greater role to play. Depending upon the scenario, you need to define whether the text will be copied or will be referenced only. You need to define whether the text will be copied from the master record to the sales document, will be copied from the preceding sales document, or will need a sequence of various sources to decide the determination. Before we proceed, we’ll discuss these additional fields in detail:
Reference/Duplication Indicator For Copying Text When this box in the column Refer/Duplicate is selected, the text value is referenced, and when it is left blank, the text value is duplicated from the source to the subsequent target object. For example, say you customized the text determination to copy text from the customer master to the sales document. If this check box is selected when you are customizing for your text type in the text procedure, any change in the original value maintained in the customer master will be reflected in all the existing sales documents for that customer. If the field is not selected, the text will be duplicated each time it gets copied from the master to the documents, and any change in the original is not going to change the text value in the existing documents.
Text Is Obligatory This column controls whether it is mandatory to maintain the text value in the document. It’s a kind of incompletion control for the text in a document. When you select the text as obligatory and do not maintain the value in the text in the document, the text field appears as part of the incompletion log. Leave this field blank if you do not want the text to be mandatory.
Access Sequence In the column Access Seq., input the access sequence number that you want to apply to your text types.
Assign the Determination Procedure to Document Types
Now you are at the last step in customizing the text determination type for a sales document. In this step, you need to assign the text determination procedure to the sales document types. Figure 4-21 shows the assignment for Galaxy.
Figure 4-21: Assigning the determination procedure to sales document types
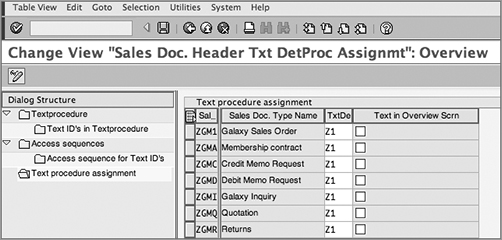
Table 4-4 represents various text objects for which you can define the text determination procedures and the corresponding document types/item types to which the procedures should be assigned in each case.
Table 4-4: Assignments for Other Text Objects in Sales Document Category
| Text Object | Text Determination Procedure is Assigned to |
| Sales Document Item | Item categories |
| Delivery Header | Delivery document type |
| Delivery Item | Delivery item category |
| Billing Document Header | Billing document type |
| Billing Document Item | Billing item category |
| Sales Activity | Sales activity type |
A sales transaction involves various stages such as presales, order, delivery, pick/pack, shipment, and billing. Each stage involves the generation of various documents specific to that stage. Sometimes these documents are required because of legal or commercial reasons, and sometimes they act as a milestone marking the completion of the stage. For example, an order acknowledgment that confirms the seller’s acceptance of the order marks the completion of the order stage; an invoice sent by the seller to the buyer is a confirmation of the completion of the sales transaction; and so on. Processing and generating these documents in a sales transaction often involves a lot of conditional permutations too. They can have different formats and may be communicated using various communication media such as printed copies or using electronic media such as Electronic Data Interchange (EDI) email, fax, and so on. A customer may be satisfied with receiving fax copies of order acknowledgments but may want invoices sent via email, for instance. In SAP SD, all these documents (order acknowledgment, delivery note, pick/pack list, shipping order, invoice, etc.) are called outputs, and their processing is controlled using the output determination technique provided by SAP.
In SAP SD, you can define an output determination for the following stages of a sales cycle:
- Sales activities
- Sales documents such as quotation confirmations, order confirmations, and scheduling agreements
- Shipping and transportation–related documents such as delivery notes, packing lists, and handling units
- Billing-related documents such as invoices, credit notes, debit notes, and invoice lists
The process of setting up the output determination for the various stages mentioned here is fairly standard. Therefore, we will practice the customization using one sample only, namely, output determination for a sales document. Let’s start the journey with scope definition for the customization.
TIP Refer to Appendix A for the list of customization-related menu paths and transaction codes for defining output determination for various stages of a sales cycle, such as sales activities, sales documents, shipping and transportation, and billing.
Deciding the Scope of Customization
Before we move forward, let’s identify the scope of customization required. Answering the following questions may provide you some guidance:
- How many output types are required per output object? This means how many output types are required for sales documents, delivery documents, billing documents, and so on. Sometimes a change in the format of the output also impacts the number of output types. For example, for Galaxy, if the formats for order confirmation for the United States and Mexico are entirely different, we may have to create two output types.
- Can you use the existing sample output types (RD00, BA00, RD04, and so on) available in SAP, or do you need to create new output? If you can use the existing output types, then your customization revolves around making cosmetic changes such as changing the output script/smart form.
- If new output types are required, should they be entered manually in the transaction, or should they be accessed automatically by SAP using the output condition records? The answer to this question decides whether you need to have an access sequence. In the former case, it does not need an access sequence, whereas in the latter case, it does.
- What communication media is the output to be configured for? In other words, is it a print output, an email output, a fax output, and so on?
- Is the processing for output type manual via the application’s own processing transactions provided by SAP (such as VF31 for processing billing outputs), or is it required to be processed using scheduled background jobs running at a particular interval?
For better understanding of these concepts, let’s go through the customization scope for Galaxy.
CASE STUDY—Galaxy Configuration Analysis: Customization Scope For Output Determination
In Galaxy Musical Instruments, the output processing for a sales document is generally controlled by the combination of the sales organization and distribution channels in which the order is created. In the case of the Direct Sale distribution channel where a customer orders directly from the Galaxy website, the website is capable enough to generate the order confirmations and mail them to customers. Still, as an exception for a few corporate customers, Galaxy requires SAP to generate the outputs. Order type also plays a vital role in the output determination because not all order types need an order confirmation generated. For example, order types for debit/credit note requests, quotations, inquiries, contracts, and so on, do not need an order confirmation.
Galaxy analyzed the existing output determinations available in SAP but could not find one that exactly fits its requirement. The nearest one Galaxy could find was SAP standard BA00, so the company decided to create a new one as ZBA9 by copying it from BA00 and making the necessary modifications to fit the company’s needs. The access sequence for ZBA9 is also ZBA9, and it contains two condition tables: the first one with key combination Order Type/Customer and the second one with key combination Sales Organization/Distribution Channel/Order Type. The new determination procedure is Z0001 and is assigned to the relevant sales document types.
Setting Up Output Determination for Sales Documents
Output determination is a search technique based on the famous condition technique of SAP. Customization of an output determination, therefore, involves the following five steps:
1. Create the output condition tables.
2. Define the access sequences and arrange condition tables into the access sequence.
3. Maintain the output type and assign the access sequence to the output type.
4. Group output types into an output determination procedure.
5. Assign the output determination procedure to its respective output object.
Creating the Output Condition Tables
This is the first step in the customization of an output determination process. Here you define the key combinations/condition tables that are required for storing your output condition records. To create a condition table for the sales document output determination process, follow the menu path IMG Sales And Distribution Basic Functions Output Control Output Determination Output Determination Using The Condition Technique Maintain Output Determination For Sales Documents Maintain Condition Tables. You will be first presented with a Choose Activity dialog box, as shown in Figure 4-22.
Figure 4-22: Choose Activity dialog box
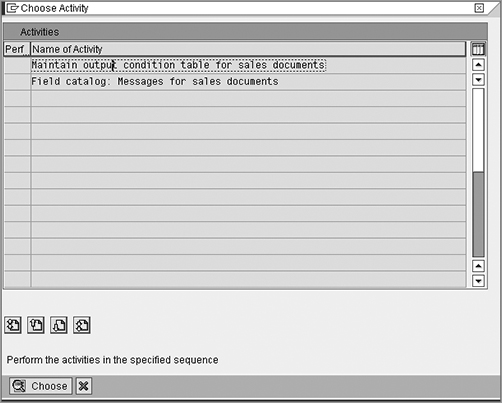
Choose the activity Maintain Output Condition Table For Sales Documents from the dialog box, and click the ![]() button to call up the customization overview screen. You will be presented with the customization screen for changing the condition tables. Now use menu path Condition Create to call up the Create Condition Table screen (Figure 4-23). Alternatively, you can use transaction code V/56 to directly reach this customization screen.
button to call up the customization overview screen. You will be presented with the customization screen for changing the condition tables. Now use menu path Condition Create to call up the Create Condition Table screen (Figure 4-23). Alternatively, you can use transaction code V/56 to directly reach this customization screen.
In SAP, condition table numbers greater than 500 are reserved for the customer name space. You can create your condition table by copying from some existing condition table or by creating it from scratch. To copy it from an existing table, provide the source table number in the Copy From Condition Table field while creating your condition table. To create your own condition table from start, select a number greater than 500 for your condition table, and press Enter to call up the detail customization screen (Figure 4-24). You can also leave this table number field empty, and SAP will automatically assign a number to your condition table upon its successful generation.
Figure 4-23: Create Condition Table (overview screen)
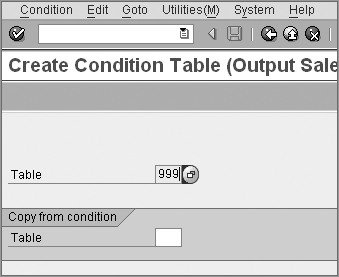
Figure 4-24: Create Condition Table (detail screen)
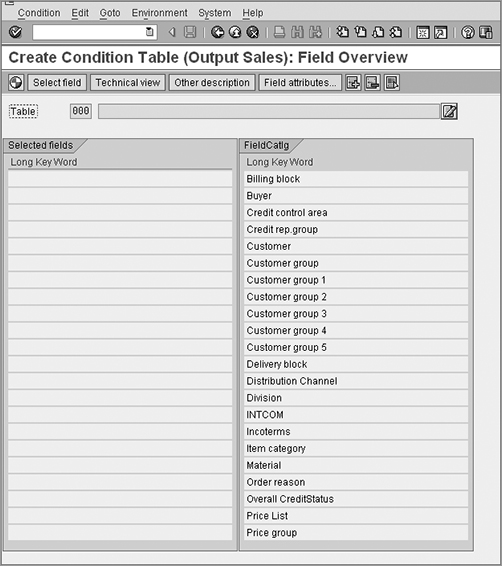
As you can see in Figure 4-24, the screen is divided into two columns: Selected Fields and Field Catalog. The Field Catalog column contains all the fields that you can choose from for creating your own condition table. The selected fields column shows all the fields that you selected for your condition table.
For Galaxy, we are creating two condition tables: condition table 999 and condition table 998. The example you see in Figure 4-24 is for condition table 999.
Now double-click the desired fields in the Field Catalog column on the right. The fields will be copied to the Selected Fields column on the left. You can also move fields from right to left by putting your cursor on the field on the right and clicking the Select Field button on the menu. Follow either of these directions until you get all the required fields to define your condition tables on the left. Figure 4-25 shows the customization settings for condition table 999 created for Galaxy. You will notice that SAP automatically proposed the condition table description using the sequence in which you selected the fields from the right. If needed, you can edit this description by using the ![]() button.
button.
Figure 4-25: Creating a condition table (Galaxy example)
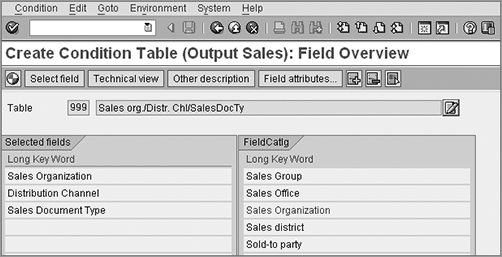
You can also insert a blank row before and after a field in the left window using the ![]() button. For example, suppose while configuring table 999 in Figure 4-25 you selected Distribution Channel first and then wanted to make space to insert Sales Organization just before Distribution Channel. No worries, because you can do so using the
button. For example, suppose while configuring table 999 in Figure 4-25 you selected Distribution Channel first and then wanted to make space to insert Sales Organization just before Distribution Channel. No worries, because you can do so using the ![]() button on the menu. Similarly, use the
button on the menu. Similarly, use the ![]() button to remove/deselect a field from the left window. Now, generate your condition table using the
button to remove/deselect a field from the left window. Now, generate your condition table using the ![]() button on the menu.
button on the menu.
At this point, you should see a Create Object Directory Entry dialog box asking for package information to store the object directory entry for your condition table. Provide a proper development class if you want to transport the condition table to the next SAP client in the landscape or use F7 to save locally. Next, you will be presented with another dialog box, called Prompt For Workbench Request. The purpose of this dialog box is to capture your customization setup into a transport request so that you can move your changes to other SAP clients on the landscape. Now either capture your customization table entry into the development/workbench transport request that appears in this dialog box or create a new one using the ![]() button for your customization.
button for your customization.
With condition table generation, SAP also generates a log file that automatically pops up on the screen with the completion of the condition table generation process. Always make sure to check the log entries to find out any errors that arose while generating your condition table. Once the generation process completes without errors, your condition table becomes active and is ready for use with step 2 of the output determination process, that is, grouping condition tables into an access sequence.
CASE STUDY—Galaxy Configuration Analysis: Maintain Condition Tables
Galaxy Musical Instruments named condition table 998 Order Type/Customer and named condition table 999 Sales Organization/Distribution Channel/Order Type.
Defining Access Sequences and Arranging Condition Tables into the Access Sequence
SAP uses access sequences as the search criteria to find the valid condition record during an output determination run. In this step, you define this access sequence and arrange the condition tables created in step 1 in the sequence in which you want SAP to access condition records. One rule of thumb is to arrange the tables in the most specific to most generic order.
To define an access sequence for the sales document output determination process, call the access sequence customization screen (Figure 4-26) using transaction code V/48 or following menu path IMG Sales And Distribution Basic Functions Output Control Output Determination Output Determination Using The Condition Technique Maintain Output Determination For Sales Documents Maintain Access Sequences.
Figure 4-26: Access sequence customization screen
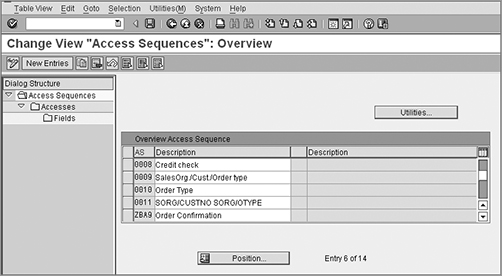
To define your own access sequence (which is what we did here for Galaxy), click the New Entry button, provide a four-character identification key starting with Y or Z, and provide a meaningful text description. In Figure 4-26, the last access sequence, ZBA9 – Order Confirmation, represents the access sequence we created for Galaxy.
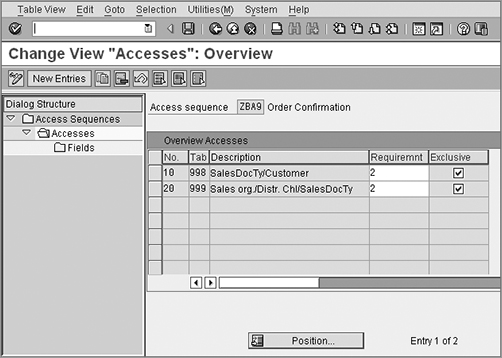
Once you have defined your access sequence, select your entry, and double-click the Accesses node in the left window to call up the next customization screen. On this customization screen, click the New Entries button, and enter your condition tables in the sequence in which you would like SAP to perform the search. Once done, save your entry using the Save button. Figure 4-27 shows the customization performed for Galaxy access sequence ZBA9.
The following fields appear on the customization screen:
No. The column No. indicates the number of the access within the access sequence.
Tab. In the column Tab., enter the output condition table number.
Using these two fields, you set up the logical order in which you want SAP to read the records stored in condition tables.
In the current sequence shown in Figure 4-27, SAP will first read records from table 998; if nothing is found here, it will move to read records from the next table, 999.
Description SAP automatically populates the field Description with the description of the condition table created in the previous step.
Requirement A requirement is a piece of ABAP code that tells SAP when to read the records from a condition table in an access sequence and when not. If a requirement fails, the condition table is not accessed. For example, requirement 2 in Figure 4-27 tells SAP to process output type ZBA9 only if the sales document is complete and does not have a credit block or a delivery block. You can create requirements with the help of an ABAP person using transaction code VOFM. Again, like tables, the 900 series is available as the customer name space for naming your customized requirements. The requirement thus created is assigned in the column Requirement against the particular access.
Exclusive Selecting the Exclusive check box tells SAP to stop searching further for a condition record once a valid condition record is found in the current access step. This also helps in improving the system performance because it avoids accessing further records if a valid record is found. In Figure 4-27, if Exclusive is not selected for any table, SAP will always perform the search until access step number 20, even though it found a valid record within step 10 and will always return the value from step 20 as a valid record value. If Exclusive is selected, as shown in Figure 4-27, SAP will move to the next step only if a valid record is not found in the previous step. So, if the valid record is found for the Sales Doc Type/Customer table, SAP will take that as valid record and stop performing the search.
Figure 4-27: Assigning condition tables to an access sequence
Now select line 10, and double-click the Fields node in the left window to call up the customization screen for fields assignment (Figure 4-28). Here you assign the fields of the condition table to the fields of the output communication structure so that the value flows from the source fields (condition tables) to the target fields (output communication structure) during various stages of sales cycle processing.
Figure 4-28: Populating fields for condition tables into the access sequence
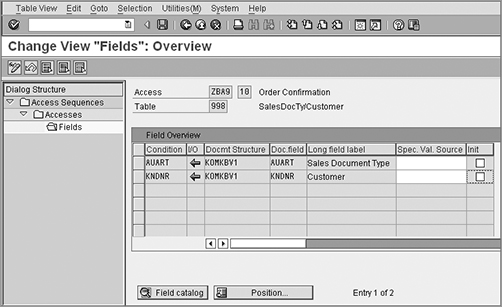
TIP When you double-click the Fields node, you may receive a warning message stating “The Field assignment has not yet been made.” Just press Enter, and SAP will automatically assign the source and target fields to each other and take you to the next screen, as shown in Figure 4-28. When SAP is not able to find a suitable proposal for the source field, you need to provide one. In that case, click the Field Catalog button at the bottom of the screen to select the source field. You can also change SAP-proposed assignments for source fields using the Field Catalog button.
Now repeat the previous steps to perform field assignment for all other lines that you entered into the Accesses node for your access sequence. For Galaxy, we need to repeat the field assignment step, for line item 20. When you are done, save your entry using the Save button.
Once your entry is saved, double-click the Access Sequence node on the left to reach the customization screen shown in Figure 4-26. Now click the Utilities button to call up the Generate Access Sequences screen shown in Figure 4-29. Provide the value for your access sequence (ZBA9 for Galaxy), and press F8 or click the Execute button to activate your access sequence.
Figure 4-29: Activating your access sequence
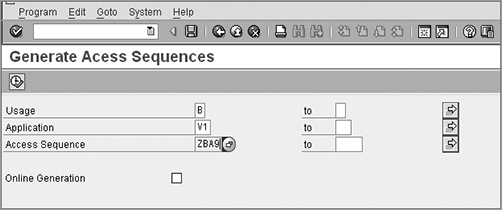
NOTE Remember that a condition table and an access sequence are client-independent configurations. Once set up, they will be available across all the clients on one SAP instance.
NOTE Always make sure to generate/activate after you create or make any changes to a condition table or an access sequence.
CASE STUDY—Galaxy Configuration Analysis: Set up Access Sequence
Galaxy Musical Instruments named its access sequence ZBA9 and arranged the two condition tables 998 and 999 in sequence so that 998 is accessed first. 999 is then accessed if there is no record found in 998. Further, Galaxy maintained a requirement type 2 to these condition tables to allow processing only when the sales document is complete.
Maintaining the Output Type and Assigning the Access Sequence to an Output Type
Here you set up an output type and assign the access sequence created in step 2 to it. An output type is a controlling element of the output determination process. An output type controls what output media (mail, print, fax) to use for sending output, which print script and print program to use, whether the output is to print manually or through a batch job, and so on. Further, you can set up an output type to be assigned manually to a sales document or to be determined automatically. If you want it to be determined automatically, you need to assign an access sequence.
Figure 4-30 shows the customization overview screen for defining an output type. You can call this customization screen using transaction code V/30 or via menu path IMG Sales And Distribution Basic Functions Output Control Output Determination Output Determination Using The Condition Technique Maintain Output Determination For Sales Documents Maintain Output Types. As in the previous examples, you can either use the New Entries button to create the new output type from scratch or use the Copy button to create the output type via the copy with reference function to an already existing output type. For Galaxy, we created the output type ZBA9 using the copy method and source output type BA00. For this chapter’s purpose, we will cover the customization settings for an output type using our newly created output type ZBA9.
Figure 4-30: Output types overview screen
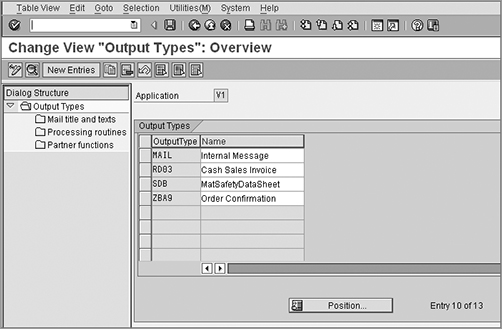
Double-click the output type ZBA9 shown on the right window in Figure 4-30 to call up the general data customization screen for output type ZBA9, as shown in Figure 4-31.
Figure 4-31: Defining the output type, general data
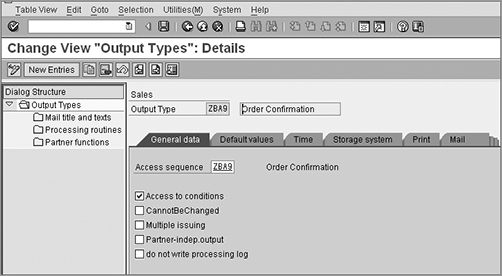
The screen is divided into two parts, which is a format that should be familiar by now. The left window (Dialog Structure) shows expandable customization options for the output type. The right window contains the customization screen divided into various tabs. These are the four major customization tabs:
General Data tab This tab controls the general behavior of an output type. Here are the various customization fields shown in Figure 4-31, starting at the top left:
Output Type This field represents the output type and its description. Here output type is ZBA9, and its description is Order Confirmation.
Access Sequence This field represents the access sequence that is assigned to the output type for automatic output determination. Here the assigned access is ZBA9 that we created in step 2.
Access to conditions This check box controls whether an output type should perform access to condition records. When selected, it means Yes; when it’s unselected, it means No.
Cannot Be Changed This check box controls whether SAP should allow the manual change of an output type in the documents, once it is successfully determined.
Multiple Issuing This check box controls whether SAP should allow for repeat processing/multiple outputs for the same output type or whether the output type should be used only once in the document.
Partner-Indep. Output This check box controls whether the output should depend upon the partner or should be partner independent.
Do Not Write Processing Log This check box controls whether to write the processing log for the output type.
Default Values tab The Default Values tab, as shown in Figure 4-32, is used for setting up the default values for the output processing–related customization.
Figure 4-32: Defining the output type, default values
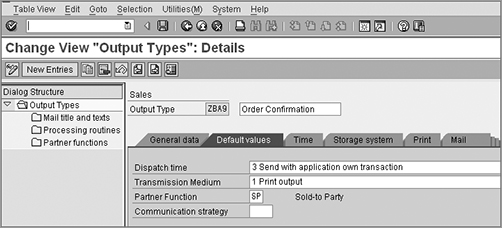
Here are the explanations for the fields in Figure 4-32:
- Dispatch Time This specifies when and how to dispatch the output type. The available options are as follows:
- 1: When you select 1, your output type is dispatched with a scheduled job (RSNAST00 program scheduled with a SM37 job).
- 2: Option 2 acts like option 1 but with an earliest processing date and requested processing time. When you select 2, the program RSNAST00 processes the output message only when the processing date is reached.
- 3: Select 3 to manually use the application’s own transaction (in other words, VF31 for billing, VL71 for delivery, and VT70 for shipping).
- 4: Select 4 for automatic dispatch once the document is saved.
Transmission Medium This specifies what medium to use for dispatch, such as print, email, or fax.
Partner Function This specifies which partner function to use for dispatch, such as BP for billing-related outputs, SP for sales-related outputs, SH for delivery-related outputs.
Communication Strategy Here you specify the communication strategy that defines the sequence of communication methods that can be used while sending output messages externally.
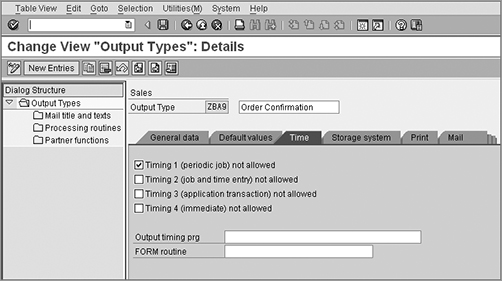
Time With the Time customization tab (Figure 4-33), you can restrict the output type from using a particular dispatch value, such as no processing by a job or no processing by an application’s own transaction. For example, the selection for Timing 1 (Periodic Job) Not Allowed tells SAP that output type ZBA9 cannot be processed using a periodic batch job.
Figure 4-33: Defining the output type, time
Storage System The next tab, Storage System, helps you take control of whether the output type is to be used for printing only, for archiving only, or for both printing and archiving.
Once you have defined the general settings for an output type using all the various tabs that we’ve discussed, the next step is to customize the mail title and text, processing routines, and assignment of the output type to partner functions. These options are shown on the left side of the output maintenance screen (Figure 4-34).
Figure 4-34: Defining the output type, mail title, and text
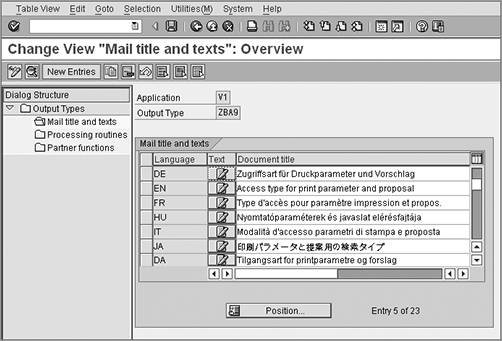
Mail Title And Text Double-click the Mail Title And Text node, and SAP will provide you with the screen shown in Figure 4-34. Here you can maintain the title text for your output type in various languages. When you send the output via email, SAP uses this title text to generate the subject line for the email in the correct language. So, if you have maintained the output in the condition record or in the transaction document with the language as EN, the English title will be picked up, and when it is FR, the title text maintained in French will be picked up to generate the subject line.
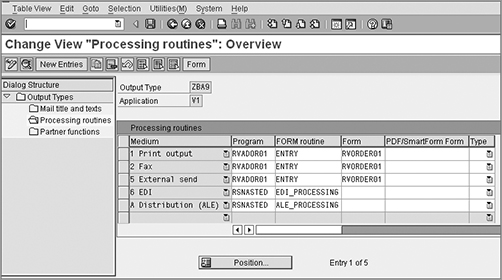
Processing Routines Now double-click the Processing Routines node, and you will be presented with a screen that looks like Figure 4-35. Here you define the processing programs and corresponding forms or form routines for your output type. Suppose you want to print the order confirmation document. You assign the print program and corresponding print form (order confirmation document template) to the print medium output on this screen. So in our example, a print program will pull the data from the order document and provide it to the order confirmation template, which is then processed as per the processing settings we maintained on the detail customization screen for the output type (Figures 4.31 to 4.33). Similarly, you can also define the processing parameters for another output medium, such as an EDI program with a form routine for EDI output.
Figure 4-35: Defining the output type, processing routines
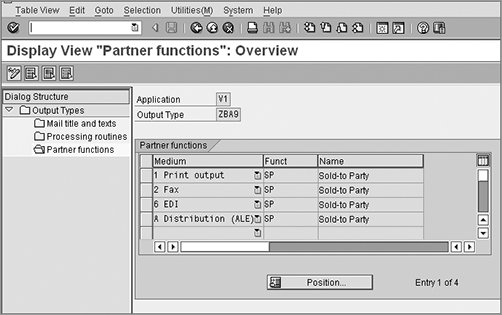
Partner Functions Next, you can define the partners relevant for output processing as shown in Figure 4-36. The output for a billing document is assigned to the bill-to party, the output for shipping documents is assigned to the ship-to party, and the output for sales documents are assigned to the sold-to party partner function in customizing.
Figure 4-36: Defining the output type, partner functions
CASE STUDY—Galaxy Configuration Analysis: Define Output Type
With output type BA00 being the closest match, Galaxy Musical Instruments used the copy with reference method to create the output type ZBA9 with BA00 as the source output type. Access sequence ZBA9 was assigned to output type ZBA9 with the Access To Condition check box selected to allow automatic determination using the output determination technique. Default values from the Dispatch and Time tabs set the manual triggering for output type ZBA9 to printer, avoiding using any batch job for triggering the output to a printer. Print form RVORDER01 along with print program RVADOR01 constitute the actual print program and order confirmation template assignment to the output type ZBA9.
Grouping Output Types into an Output Determination Procedure
Once the output type is defined, the next step is to group the output type into an output determination procedure. An output determination procedure contains all the relevant output types arranged in a procedural sequence in which SAP will access them during output processing for a business transaction. Figure 4-37 shows the customization overview screen for the output determination procedure. You can call this customization screen using transaction code V/32 or menu path IMG Sales And Distribution Basic Functions Output Control Output Determination Output Determination Using The Condition Technique Maintain Output Determination For Sales Documents Maintain Output Determination Procedure. As usual, use the New Entries button to create the new output procedure from scratch or the Copy button to create the output procedure with reference to an existing one. With determination procedure V10000 being the closest match, Galaxy Musical Instruments used the copy with reference method to created the output type Z10000, with V10000 as the source procedure.
Now double-click the output procedure Z10000 shown in the right window in Figure 4-37 to call up the detailed customization screen, as shown in Figure 4-38. As in our other examples, you can use the New Entries or Copy button to maintain your entry.
Figure 4-37: Maintaining the output determination, procedures overview screen
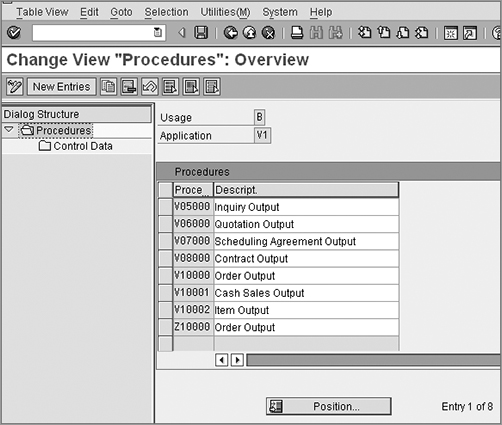
Figure 4-38: Maintaining the output determination, detail screen
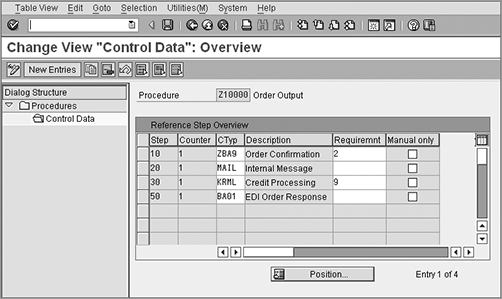
The following are the various fields on this customization screen:
Step Use the field Step to set up the sequence in which the output types need to be arranged in the determination procedure.
Counter Use the field Counter to set up the subsequence in which the output types need to be arranged in the determination procedure.
Condition Type Here you enter the output type that you created earlier.
Description This field shows the description of the output type.
Requirement The field Requirement allows you to specify the specific requirements that you want SAP to look into before accessing the output type. If the requirement fails, SAP will not access the output type.
Manual only This check box, when selected, forces an output type to be processed manually only.
CASE STUDY—Galaxy Configuration Analysis: Maintain Output Determination Procedure
Sending order acknowledgments to customers for incomplete/blocked/unconfirmed orders can be troublesome and has potential to create confusion. To avoid this, Galaxy wanted to stop the determination of output type ZBA9 in a sales order if the order is incomplete or blocked. To achieve this, Galaxy assigned a requirement type 2 to output ZBA9 in the output procedure Z10000.
Assigning the Output Determination Procedure to Its Respective Output Object
Finally, assign the output determination to its respective business object that needs output control such as the sales document, delivery, and billing, as the case may be. For Galaxy’s example, we configured ZBA9 to generate an output message for order confirmation. Because order confirmation happens for a sales document, we will assign the output determination procedure Z10000 to the sales document header level, in other words, to the sales document type. You can call up the customization screen using transaction code V/43 or menu path IMG Sales And Distribution Basic Functions Output Control Output Determination Output Determination Using The Condition Technique Maintain Output Determination For Sales Documents Assign Output Determination Procedure. Figure 4-39 shows the customization screen for assigning the output determination procedure to a sales document type.
Figure 4-39: Assigning the output determination to a sales document type
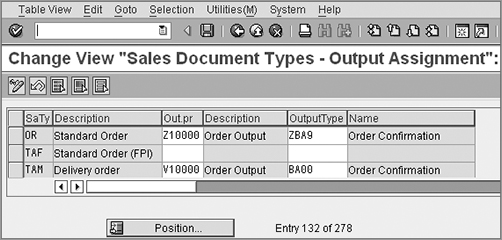
Unlike Galaxy’s example where we configured the output for the sales document header level, if your output type is relevant for the sales document item level, you need to assign the output determination procedure to the sales document item category. You can call up the customization screen (Figure 4-40) using transaction code V/69. It shows a blank assignment because we have not configured any output procedure for use with sales documents at the item level.
Figure 4-40: Assigning the output determination to an item category
In this chapter, we covered how to set up the partner determination, text determination, and output determination in the SAP SD module. In the next chapter, we will cover customization and setup for pricing determination and tax determination.
