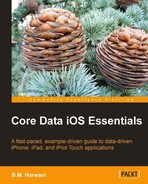
Let's take a look at how the application works. When the program is started, the initial view will appear, as shown in the following given image (a). The top of the view holds a navigation bar with two bar button items: Edit and +. At the bottom of the view is a toolbar holding a bar button item called Master Product Information. The title in the navigation bar, Customers List, tells us that the two bar button items (Edit and +) are concerned with editing and adding customer information, respectively. The bar button item, Master Product Information, is used to store product data: name, price, quantity, and the product image.
We begin by entering the product data, Master Product Information, which will include product name, price, quantity on hand, and a product photo. The product quantity is automatically adjusted after a sale.
When Master Product Information is selected, the view appears as shown in preceding image (b). The view contains a toolbar with three bar button item controls—Customers List, Edit, and Add.
The functions of the three bar button item controls are as follows:
- Customers List: This button will take us back to the main view of the application where we can add or edit customer information.
- Edit: This button allows us to edit master product information. However, the button will work only when there actually are products in the database. Assuming at least one master product exists; the Edit button will show a deletion icon on the left of the master product. When the deletion icon on any master product is selected, a Delete button appears on the right for confirmation. When clicked, the master product is removed from the list.
- Add: This button lets us add new master products to the list. It displays a view as shown in the preceding image (c). We have three text fields to fill: Product Name, Price, and Quantity. Below the text fields is a button to add a product photo. When we click on a text field, a keyboard for data entry appears. The keyboard covers the bottom half of the view, and covers the Select Product Image button. So, a method is added to the application that makes the keyboard disappear if the user presses the Return key after entering value in the Quantity text field. After the keyboard has disappeared, our view will appear, as shown in the subsequent image (a).
When the Select Product Image button is tapped, the Image Picker view displays the Photo Albums, as shown in the next image (b). The category Saved Photos is created by us to contain the master product photos. We'll talk about the steps for creating our own photo category later. When the Saved Photos category is selected, we are shown all of the images that we have copied into this category as shown in the next image (c).
Let's select the image that represents a sample product, as shown in the subsequent image (d). We can now save the product information by tapping the Save button in the navigation bar. The Cancel button at the top is used to stop the product addition process.

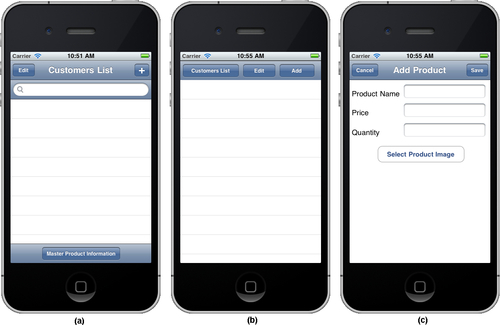
After the product data has been saved, we are returned to the Master Product list view. We'll now see the product Milk in the table view, as shown in the next image (a). The black> sign is used to navigate to the product's information page, as shown in image (b). Here, we can modify the information of the chosen master product by selecting the Edit button from the navigation bar. Additionally, we can change the product's image by clicking on the Change Product Image button.
Let's add three more products: Chocolate shown in the next given image (a); Eggs shown in image (b); and Bread shown in image (c). And, to keep things simple, let's use 100 as the beginning inventory quantity.

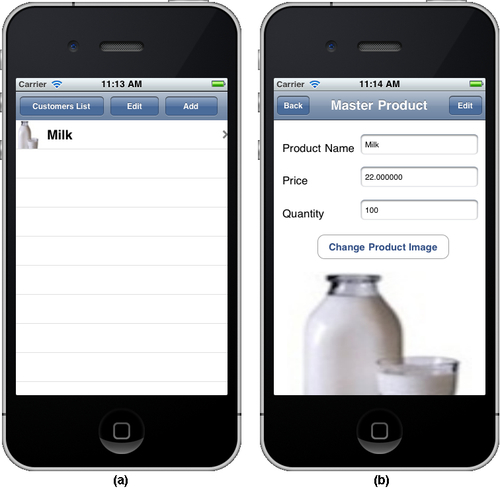
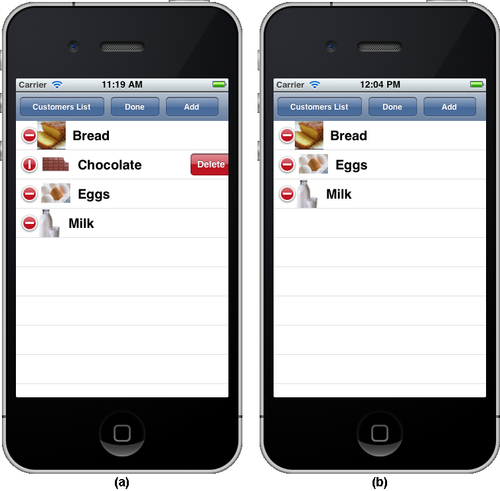
After adding four master products, our table view will look like the subsequent image (a). The master products are automatically sorted in alphabetical order.
The black> indicates that selecting a product item will take us to the product editing view, as shown in the next image (b). All the text fields showing master product information are in disabled mode; we cannot modify their content until we select the Edit button from the navigation bar. Once the Edit button is clicked, the button text changes to Save, the text fields are enabled, and we can modify the field data. After updating the master product's information, we save the changes by clicking on the Save button. After tapping the Save button, we will be returned to the view displaying the entire Master Products list, shown in the image (a).
The Edit button in the navigation bar shown in the next image (a) is used to remove an existing Master Product. When the Edit button is selected, a deletion icon appears to the left of each master product, as shown in image (c). Note that the Edit button's text changes to Done, which we'll use once we have finished with the deletion(s).
Selecting the deletion icon on any master product displays a Delete button to reconfirm that we really, really want to remove the item. For example, let's say we want to remove the product named Chocolate from the list. We tap on its deletion icon, which brings up a Delete button, as shown in the following image (a). If we tap this button, Chocolate disappears from the list, as shown in the subsequent image (b). The deletion icon will disappear when the Done button is pressed.
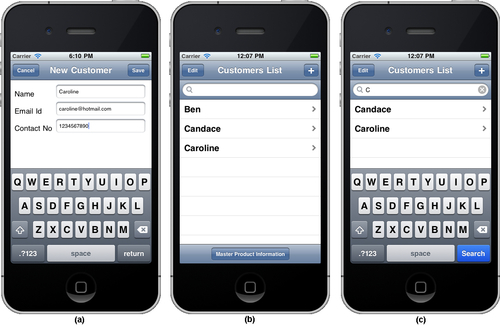
If we press the + button in the main view—the first view of the application—we'll see a view to enter customer information—name, e-mail address, and phone number—as shown in the next image (a). The information is saved by selecting the Save button from the navigation bar. The Cancel button discards the new entry. After entering information for three customers, the table view will appear as shown in the next image (b). We can see that the customers' names are automatically sorted in alphabetical order. The search bar in the navigation bar can be used to search the desired customer. For example, entering a character C in the search bar will display only those customer names that contain character C as shown in the next given image (c).
The black> to the right of each customer can be used for two purposes:
- To modify a customer's information
- To enter the selected customer's purchases
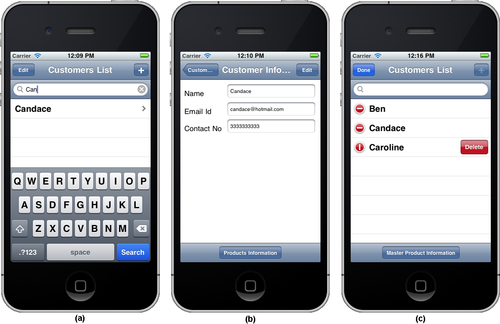
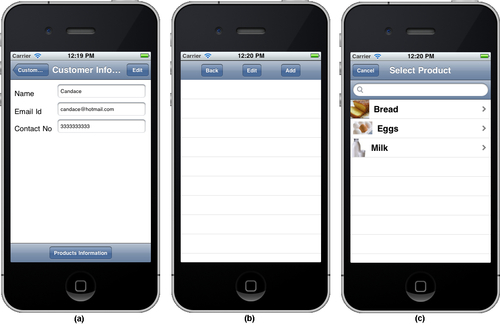
The next given image (a) displays a more specific search on entering more characters in the search bar. We can see that on entering characters Can in the search bar, we get the list of customer names that contain characters Can. We can select the customer name from the table view to edit information or enter the details of purchased products. For example, if we select a customer, say Candace, we'll see her information in the view, as shown in the next image (b). In this view, there are two bar button items—Edit (at the top) and Products Information at the bottom. The Edit button is used to modify customer information and the Products Information button is used to display the view for adding or editing the customer's purchasing data. The Customers List button returns us to the table view displaying the complete list of customers.
If the Edit button in the Customers List view is tapped, a deletion icon appears to the left of the customer's name. The Edit button changes to Done when we are finished editing the data. Tapping the deletion icon of any customer displays a Delete button for confirmation, as shown in the next given image (c). If that button is pressed, the information of the selected customer will be deleted, and pressing Done (from the navigation bar), returns us to the Customer List.
The search bar at the top of the view can be used to search for a particular customer. For example, to search for customer names that contain the character C, we enter C in the search bar. The customer list in the table view will be filtered and only customer names containing C will be displayed. We can make the search more precise by entering more characters in the search bar. For example, if we enter Can, we'll see the customer name(s) containing that set of characters, as shown in the preceding image (a).
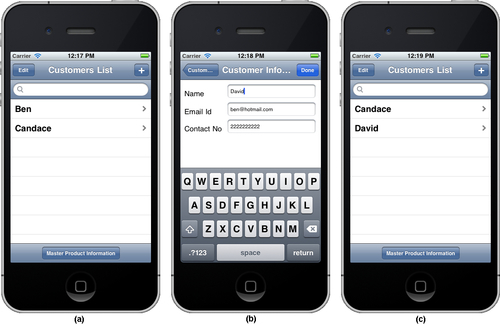
To modify customer information, we first select a customer. The next view displays the customer's data, as shown in the given image (b). The text fields are initially in disabled mode. To enable the text fields, click on the Edit button from the navigation bar. The Edit button changes to Done, as shown in image (b). Let's change Ben to David and save it by selecting the Done button. The customer names are alphabetically sorted, so we'll now see that David (previously Ben), appears after Candace, as shown in the given image (c).
Let's enter information about products sold to Candace. On selecting her name, we'll see her information being displayed in the view, as shown in the next image (a). At the bottom of the view is the Products Information button, used to add and edit information about the products sold to the selected customer. When we tap this button, we'll see a view with three buttons—Back, Edit, and Add, as shown in the next image (b).
- Back returns us to the view displaying the customer's information (as shown in image(a)).
- Edit is used to delete an entry. This view shows deletion icons to the left of the products sold.
- Add takes us to a view that displays the list of products available for sale, as shown in image (c).
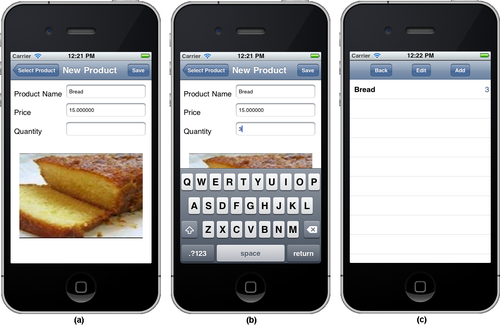
The search bar at the top of the view can be used to search for the desired product. Typing text in the search bar will filter the products and display only those containing the characters typed into the search bar. After a product is selected, its name, price, and image will appear and we will be asked to enter the quantity of the selected product sold to the customer. For example, if we select Bread from the list, we'll be asked to enter its quantity as shown in image (a). Let's suppose that Candace bought three loaves of bread, so we enter 3 in the Quantity text field as shown in image (b), then select the Save button from the navigation bar. We will be returned to the table view, which is shown in image (c). Note that the value 3 is displayed to the right of Bread, which tells us that the quantity of the bread sold to Candace was three.
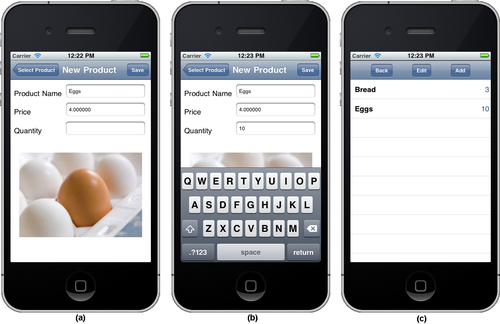
We can again select the Add button to add additional products sold to the customer. The next given image (a) displays the view when Eggs is selected from the available products list. The next given image (b) shows how the name, price, and product image automatically appear, asking the user to fill in the quantity sold.
The Edit button shown in the preceding image (c) is used to delete a product entry sold to the customer. When the Edit button is tapped, we'll see a deletion icon to the left of the items as shown in the next image (a). Note that if we delete a customer, the list of products sold is automatically deleted as well.