
To add more names to the table view, we need to add a View Controller class that displays a navigation bar with two items: Save and Cancel. This View Controller class also displays a View that prompts the user to enter a name to be added. We also need to add code to the RootView controller implementation file, so that when the user selects the Save button after entering the new name, it's added to the Table View for display.
The sequence is as follows:
- Add a View Controller class called
AddNameController. - Define a protocol, outlets, and action methods in the
AddNameController.hheader file. - Define the View of the
AddNameControllerclass and the connecting controls. - Add code to the
AddNameController.mimplementation file to invoke delegate methods. - Invoke the newly added AddNameController View and implement the protocol methods.
- Place a Bar Button Item Control in the RootViewController and connect it.
View controllers are used for managing a view. The class used for controlling the views is called UIViewController and is provided by UIKit. To manage the view, we'll create a UIViewController subclass:
- Right-click on the Classes group in the Xcode Project window.
- Select the Add | New File option. Select the UIViewController subclass as the new file template.
- Select the With XIB for user interface checkbox, because the XIB file will be used to create the View that prompts the user to enter a new name.
- Click the Next button.
- We'll see a dialog box asking for the name of the View Controller. Let's use
AddNameController.m. - Select the Also create "AddNameController.h" checkbox, as shown the following screenshot, and click the Finish button:

AddNameController.h, AddNameController.m, and an.xibfile are created and added to our project. The files will be placed in the default location, the application folder'sClassessubfolder.- Let's select the
AddNameViewController.xibfile in the Classes folder and drag it to the Resources folder, the default location of Interface Builder files.
We're going to define a delegate protocol in the header file of the new View Controller class AddNameController.h. A delegate protocol must declare several methods, and the classes conforming to a delegate protocol must implement the methods declared in it. The classes that conform to a delegate protocol are known as delegates. The delegates are the classes responsible for implementing the methods of the confirming protocol. Let's go ahead and define the delegate protocol.
A protocol is defined using the @protocol compiler directive combined with an @end directive. Between the two directives, we declare the protocol methods. The following shows the code that we will write in the View controller class header file, AddNameController.h:
// AddNameController.h
// demotable
#import <UIKit/UIKit.h>
@protocol AddNameControllerDelegate;
@interface AddNameController : UIViewController {
id <AddNameControllerDelegate> delegate;
IBOutlet UIBarButtonItem *cancelbutton;
IBOutlet UIBarButtonItem *savebutton;
IBOutlet UITextField *newname;
}
@property(nonatomic, retain) id <AddNameControllerDelegate>
delegate;
@property(nonatomic, retain) IBOutlet UIBarButtonItem *cancelbutton;
@property(nonatomic, retain) IBOutlet UIBarButtonItem *savebutton;
@property(nonatomic, retain) UITextField *newname;
-(IBAction) cancel:(id) sender;
-(IBAction) save:(id)sender;
@end
@protocol AddNameControllerDelegate
-(void) addnameController:(AddNameController *)controller
selectedsave:(BOOL) save name:(NSString *) newname;
@end
We can see that an AddNameControllerDelegate protocol is defined, called delegate. The method declared in the AddNameControllerDelegate is addnameController. A class conforming to this protocol must implement this method.
Besides defining a delegate protocol, we also define three outlets: cancelbutton, savebutton, and newname. The two outlets, cancelbutton and savebutton, will be connected to the two Bar Button Items that we will soon drag-and-drop onto the View. The outlets will be titled Save and Cancel respectively. The newname outlet will be connected to the Text Field control of the View in which the user enters the new name to be added to the Table View.
The header file includes two action methods, cancel and save, which will be connected to the Cancel and Save Bar Button Items.
The next step is to add two Bar Button Item controls to the AddNameController's View and connecting them with the outlets and action methods defined in the preceding header file.
The steps for adding Bar Button Item controls to the view and for connecting them with the respective outlet and action methods are given as follows:
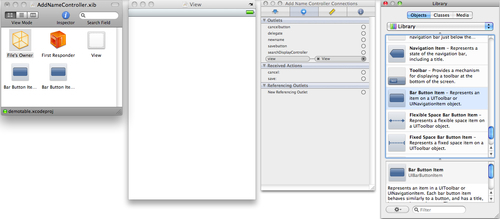
- Let's open the AddNameController.xib file in the Interface Builder.
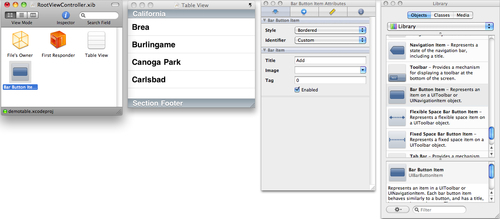
- Drag two Bar Button Item controls from the Windows, Views & Bars category and drop them into the Documents window, as shown in the following screenshot:
- Select the two Bar Button Item controls one by one in the Documents window and with the help of the Attributes Inspector, set the Titles to Save and Cancel.
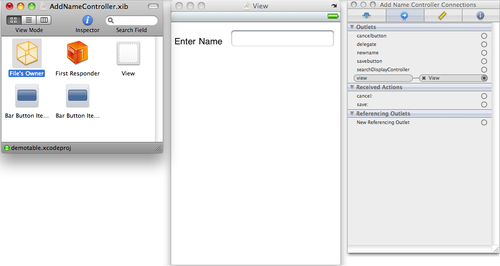
- Drag-and-drop a Label and a Text Field control onto the View.
- Double-click the Label control and change its text to Enter Name, as shown in the following screenshot:
To connect the cancelbutton and savebutton outlets defined in the header file with the Bar Button Item controls in the Documents window, follow these steps:
- Select the File's Owner icon in the Documents window and open the Connections Inspector window. The outlets and action methods defined in the header file will be visible in the Connections Inspector window under the headings Outlets and Received Actions.
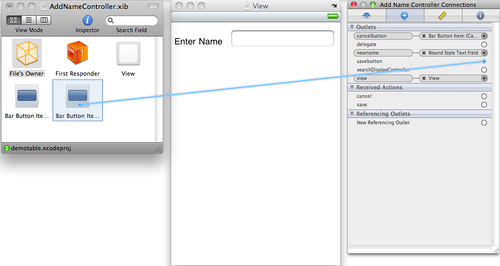
- Select the circle to the right of the savebutton outlet and drag it to the Bar Button Item control in the Documents window, as shown in the following screenshot.
- Repeat the procedure to connect the cancelbutton outlet with the other Bar Button Item control.
To connect the save and cancel action methods with the Bar Button Item controls, follow these steps:
- Select a Bar Button Item control in the Documents window and open the Connections Inspector window.
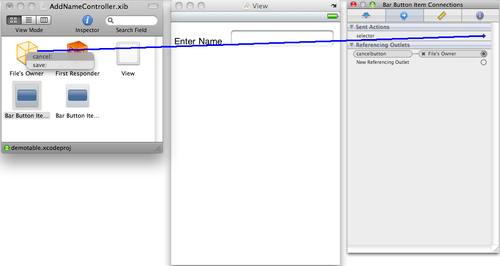
- In the Connections Inspector window, select the circle to the right of the selector under the Sent Actions heading and keeping the mouse button pressed, drag it to the File's Owner icon in Documents window.
- Two action methods will pop up. Select the one to be connected to this Bar Button Item control.
The following screenshot shows the process for cancelbutton. When we select the Bar Button Item control in the View window, the cancel method code we will be writing in the implementation file—will be executed.
Repeat this procedure to connect save to the other Bar Button Item control. These Bar Button Item controls will be useless if they don't result in some action when clicked. So, let's make ground for these Bar Button Item controls to initiate action.
We need to write code in the AddNameController.m implementation file to invoke the delegate methods when Bar Button Item controls are pressed. The following code fragment also includes code that places the Bar Button items on the left and right side of the navigation bar. The following is the code that we write in the implementation file:
// AddNameController.m
// demotable
#import "AddNameController.h"
@implementation AddNameController
@synthesize savebutton;
@synthesize cancelbutton;
@synthesize delegate;
@synthesize newname;
-(IBAction) cancel:(id) sender
{
[delegate addnameController: self selectedsave:NO
name:newname.text];
}
-(IBAction) save:(id)sender{
[delegate addnameController: self selectedsave:YES
name:newname.text];
}
// Implement viewDidLoad to do additional setup after loading the view, typically from a nib.
- (void)viewDidLoad {
[super viewDidLoad];
self.title=@"New Name";
self.navigationItem.rightBarButtonItem=savebutton;
self.navigationItem.leftBarButtonItem=cancelbutton;
}
- (void)didReceiveMemoryWarning {
// Releases the view if it doesn't have a superview.
[super didReceiveMemoryWarning];
// Release any cached data, images, etc. that aren't in use.
}
Table Viewdelegate methods, invoking in AddNameController.m implementation file- (void)viewDidUnload {
[super viewDidUnload];
// Release any retained subviews of the main view.
// e.g. self.myOutlet = nil;
}
- (void)dealloc {
[savebutton release];
[cancelbutton release];
[newname release];
[super dealloc];
}
@end
The sequence of events is as follows:
First we synthesize the IBOutlets savebutton, cancelbutton, delegate, and newname, so we can generate their accessor and mutator methods.
In the cancel action method, invoke the addnameController method and set the value of selectedsave to NO.
- The value of the name parameter is set to the name entered in the Text Field control. Recall that the Text Field placed on the View is connected to the newname outlet.
- Similarly, in the
saveaction method, we invoke theaddnameControllermethod and set the value ofselectedsavetoYESandnameto the name entered in the Text Field control by the user. - In the
viewDidLoadmethod, we set the Navigation Item's title to New name and its right bar button item to savebutton—an instance variable of the Save Bar Button Item. - The navigation bar's left button is set to cancelbutton—an instance variable of the Cancel Bar Button Item control.
- Finally, through dealloc method, we release the reference to the Outlets.
So far, we've defined a View that prompts the user to enter the name to be added to the Table View. The next task is to write code for invoking the AddNameController view from the main page of the application, that is, from the RootViewController view. Also we need to write code for displaying the entered name in the Table View. Let's go ahead and do that now.
We need to invoke this AddNameController View from the Root View Controller and implement the AddNameController delegate protocol methods. The RootView Controller class will be the class conforming to the AddNameControllerDelegate delegate protocol defined in the AddNameController.h header. Thus, the following shows the code that we will write in the RootViewController class:
// RootViewController.h
// demotable
#import <UIKit/UIKit.h>
#import <CoreData/CoreData.h>
#import "AddNameController.h"
@interface RootViewController : UITableViewController <NSFetchedResultsControllerDelegate, AddNameControllerDelegate> {
NSMutableArray *nameslist;
IBOutlet UIBarButtonItem *addbutton;
@private
NSFetchedResultsController *fetchedResultsController_;
NSManagedObjectContext *managedObjectContext_;
}
@property (nonatomic, retain) NSManagedObjectContext *managedObjectContext;
@property (nonatomic, retain) NSFetchedResultsController *fetchedResultsController;
@property(nonatomic, retain) NSMutableArray *nameslist;
@property(nonatomic, retain) IBOutlet UIBarButtonItem *addbutton;
-(IBAction)addname:(id)sender;
@end
To make the RootViewController class adopt the delegate protocol so that it implements the methods declared in the protocol we first add the protocol's name. We can see AddNameControllerDelegate in angle brackets, which declares that the RootViewController class conforms to the AddNameControllerDelegate protocol and guarantees that the class implements the methods declared in the protocol. We also add an addbutton IBOutlet, called UIBarButtonItem, which will be connected to the Bar Button Item control. When this control is selected, the addname action method is invoked. In turn, this action method invokes the View of the AddNameController class that prompts the user to enter the name to be added to the Table View. The next step is to add a Bar Button Item controller to the view of the RootViewController class and connect it with the outlet and action method defined in the preceding header file. So, let's do it.
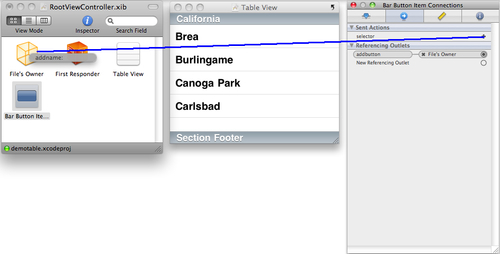
Let's open the RootViewController.xib file in Interface Builder and drag a Bar Button Item control from the Windows, Views & Bars category of the Library window and drop it into the Documents window, as shown in the following screenshot. With the help of the Attributes Inspector, set the Title property of the Bar Button Item control to Add.
Then follow this series of steps:
- Select the File's Owner control in the Documents window and open the Connections Inspector.
- Under the heading Outlets, select the circle to the right of the addbutton outlet, and, keeping the mouse button pressed, drag it to the Bar Button Item control in the Documents window.
- To connect the Bar Button Item control to the addname action method, select the Bar Button Item control in the Documents window and open the Connections Inspector.
- Select the circle to the right of the selector under the Sent Actions heading and, keeping the mouse button pressed, drag it to the File's Owner icon in the Documents window. The action method addname pops up.
- Select the addname action to connect it with the Bar Button Item control, as shown in the following screenshot:
Now we need to write the code in the Root View Controller implementation file to invoke the AddNameController View and implement the addnameController method declared by AddNameControllerDelegate. The following shows the code that we will write in the RootViewController.m file:
// RootViewController.m
// demotable
#import "RootViewController.h"
@implementation RootViewController
@synthesize fetchedResultsController=fetchedResultsController_, managedObjectContext=managedObjectContext_;
@synthesize nameslist;
@synthesize addbutton;
- (void)viewDidLoad {
[super viewDidLoad];
nameslist=[[NSMutableArray alloc] initWithObjects: @"Brian",
@"David",@"Charles", @"Mike", nil];
[self setTitle:@"Names List"];
self.navigationItem.rightBarButtonItem=addbutton;
}
-(IBAction)addname:(id)sender
{
AddNameController *addnameController=[[AddNameController alloc]
initWithNibName:@"AddNameController" bundle:nil];
addnameController.delegate=self;
UINavigationController *navController=[[UINavigationController
alloc] initWithRootViewController:addnameController];
[self.navigationController
presentModalViewController:navController animated:YES];
[addnameController release];
[navController release];
}
-(void) addnameController:(AddNameController *)controller
selectedsave:(BOOL) save name:(NSString *)newnme{
if(save)
{
[nameslist addObject:newnme];
[self.tableView reloadData];
}
[self dismissModalViewControllerAnimated:YES];
}
#pragma mark Table view methods
- (NSInteger)numberOfSectionsInTableView:(UITableView *)tableView {
return 1;
}
// Customize the number of rows in the table view.
- (NSInteger)tableView:(UITableView *)tableView
numberOfRowsInSection:(NSInteger)section {
return [nameslist count];
}
// Customize the appearance of table view cells.
- (UITableViewCell *)tableView:(UITableView *)tableView
cellForRowAtIndexPath:(NSIndexPath *)indexPath {
static NSString *CellIdentifier = @"Cell";
UITableViewCell *cell = [tableView
dequeueReusableCellWithIdentifier:CellIdentifier];
if (cell == nil) {
cell = [[[UITableViewCell alloc]
initWithStyle:UITableViewCellStyleDefault
reuseIdentifier:CellIdentifier] autorelease];
}
cell.textLabel.text=[nameslist objectAtIndex:indexPath.row];
return cell;
}
- (void)dealloc {
[nameslist release];
[addbutton release];
[super dealloc];
}
@end
Here's what's happening in the code:
- In the
viewDidLoadmethod, we create the Add Bar Button Item control. The Button will appear on the right side of the Navigation bar. - When the Add Bar Button Item is selected, it will invoke the
addnameaction method. The addname action method contains the code to initialize and create the instance ofaddnameController, which displays the user-input view. - The
RootViewControllerclass is set to act as a delegate of theAddNameControllerclass. - The
addnameControllermethod is implemented inAddNameController. - The
saveparameter will contain a BooleanYes/Novalue, depending on whether the Save or Cancel button is selected in the View. - The
newnameparameter contains the new name entered by the user in the input field. If the parameterSavecontains the valueYES, that is, if the Save button is selected in the View, then the new name is added to thenameslistarray and the table view is refreshed to display the newly added name. - Let's select Build and Run to run the application. Initially, we get the Table View containing the contents of the
nameslistarray, as shown in the following given image (a):
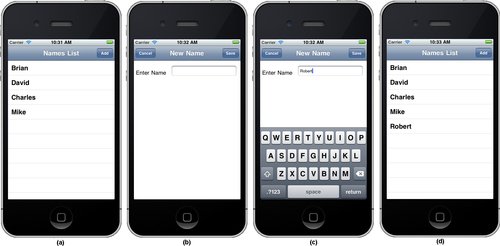
When the Add button is selected, the AddNameController View appears, as shown in the preceding image (b), which prompts the user to enter a new name. When the user enters a name and selects the Save button (shown in the preceding image (c)), the new name will appear in the Table View, as shown in preceding image (d).