Chapter 6. Web stack application example
This chapter covers
- Deploying a multitier web application to a CoreOS cluster
- Applying autodiscovery systems in application logic and service unit files
- Testing failover of discrete layers
In this chapter, you’ll begin fleshing out a full application stack on CoreOS. This isn’t an application development book, so the example is a bit contrived, but it’s similar to any complex stack you might see that contains a number of different services with different purposes. This example will develop the information you’ve already learned about CoreOS into a more real-world scenario. The application you’ll build and deploy will be iterated on throughout the rest of the book, just as you’d expect in the real world.
6.1. Scope of the example
This example will cover the setup of a full-stack web application with the following components:
- Node.js back end (app.js) running
- Express HTTP server
- Socket.IO WebSocket server
- Node.js worker process for data acquisition (worker.js)
- Memcached for the express-session store
- Couchbase as the persistent database
- React for front-end view composition
By the end of this chapter, your infrastructure on CoreOS will look like figure 6.1. You’ll have an instance of your web application (app.js) and a memcached service running on all three machines, as well as one Couchbase instance and one instance of your data-acquisition program (worker.js).
Figure 6.1. Infrastructure of the example

This is intentionally a fairly complex application to set up, and it’s worth going into a little detail about why I chose these components. First, avoiding what are known as full-stack MVC frameworks like Ruby on Rails, MEAN.io, Meteor, and so on was a conscious choice—not because I think they’re bad in any way, but because there are quite a few well-written and scripted guides for getting those frameworks running in CoreOS. This is fantastic, but it leaves how the components interact with each other via CoreOS a black box. The purpose of this book is to give you the tools to be successful in operating anything in CoreOS, because even if you’re using a popular stack with a community of people forming best practices for deploying to CoreOS, you don’t want to get stuck when someone adds a new component that doesn’t fit in. As I’m sure you know, in the real world, components are added or changed for different features.
A small caveat about Couchbase: this chapter won’t cover a high-availability (HA), fault-tolerant deployment for Couchbase. You’ll deploy it in such a way that it won’t cause downtime for this application, but you won’t persist the data after the application is shut down. In chapter 7, you’ll expand on your knowledge from this chapter and build out the Couchbase cluster for HA and fault tolerance when you extend the example to cover a Big Data application example.
In college, I took an anthropology course in linguistics. In this course, we had to learn a system called the International Phonetic Alphabet (IPA), which is a system of symbols that represent all the sounds made by people’s mouths. The exams involved the professor reciting a speech and us transcribing it in IPA. But the professor never gave these exams in English, because it’s more difficult to transcribe into IPA a language you already know: you end up parsing the information and not listening to the sounds.
The same concept applies here: these components aren’t part of any well-known full-stack system as a whole, even though they may be well known individually. The focus is on how the building blocks connect, not on how to move an entire building.
6.1.1. What does this app do?
The purpose of this application is to aggregate some information from Meetup.com’s public WebSocket API, store it in Couchbase asynchronously, and serve it back up with a high-availability web service via WebSockets. You’re also going to store sessions with memcached. In short, the app collects, stores, and displays data, all while taking advantage of CoreOS’s features for scalability and availability. You’ll need the following:
- Memcached instances you can scale horizontally
- A Couchbase node to store your critical data
- A single worker process to store data from Meetup.com
- The Express and Socket.IO Node.js app that you can scale horizontally
The express-connect sessions don’t serve any functional purpose in the example other than adding a common component that relies on an ephemeral state mechanism (memcached). Everything else is functionally designed to build this application stack, which looks like any kind of web application designed to aggregate and display information for a user. The example uses Meetup.com’s stream because it’s a convenient, publicly available WebSocket API that has a lot of chatter so you can see it working. You can read more about it at http://mng.bz/pEai, but those details aren’t particularly important to this example.
Everything that’s custom in this app is written in JavaScript. I’ve chosen this for a few reasons:
- JS is arguably the most popular language right now, and most readers probably have some familiarity with it.
- The syntax is terse enough that I don’t have to make you read/copy pages of code.
- There’s a ton of boilerplate you won’t have to write.
- There’s a high likelihood that you’ll encounter a requirement to deploy a Node.js application in the real world.
- I know JS pretty well.
All that being said, JavaScript knowledge isn’t a prerequisite for readers of this book, and you’ll see annotations throughout this example that explain what’s important as takeaways for the applications in the context of CoreOS deployment, and also what isn’t important. One thing that is important is what this architecture looks like, so you understand what you’re deploying.
6.1.2. App architecture overview
Figure 6.2 shows how this application is put together. It should be simple enough to understand what’s going on between all the components, but complex enough to be an interesting exercise in deployment that covers a lot of common patterns.
Figure 6.2. Example application architecture

The memcached “cluster”
Memcached doesn’t really “cluster” in any sense other than that you’ll be running a bunch of memcached processes. The nodes don’t need to know about each other, and the processes don’t write to disk. The connect-memcached back-end library for express-connect (the session library) just needs to know where all the memcached nodes are. The library uses an internal hash to know where to find data (you don’t have to worry about any of that). You’ll know express-connect is working if you get a cookie when you visit the app in a browser.
The Couchbase server
Couchbase is a little more involved in the setup. As I mentioned earlier, you won’t be persisting the data (yet), but you’ll have to do some setup automation so that you can connect to your Couchbase server easily. Couchbase is a document store with robust clustering capabilities; we’ll spend a lot more time in chapter 7 focusing on a custom data-system deployment that uses it. For now, accept this HA “hole” in this deployment for the sake of staying focused. Couchbase is overkill for this application, but it’s a good example to get started with, and its API is fairly easy to use.
The worker
Many applications rely on an asynchronous worker to perform some task: in this case, data aggregation. Like many APIs, Meetup’s RSVP WebSocket will rate-limit you if you try to make too many connections to it. Assuming your network is behind some kind of NAT, this means you’ll need no more than one worker to gather this data; the API allows only one connection from an IP. Because it’s a WebSocket, you don’t gain anything from having multiple workers gathering that data anyway. This is a great use case for CoreOS, because once you get your service running, you don’t care which node it’s running on; and it should require no state other than how to connect to Couchbase, so it can be completely ephemeral.
The web app
You’ll be using a combination of Express.js (a popular Node.js web framework) and Socket.IO (a popular WebSocket implementation in Node.js) to serve your application. Express will handle the session with memcached as its session store and will serve up the index.html file. In index.html is some very basic JavaScript to listen to the socket.io WebSocket and update the page when a message is sent.
The app contains an interval loop that fetches a view from Couchbase and sends a message via Socket.IO to any clients listening. Socket.IO has the ability to react to WebSocket events on the same port on which Express is serving HTTP, so you only need to worry about one port being exposed.
6.1.3. The target environment
Not surprisingly, you’ll use a Vagrant cluster of three nodes to go through this example. We’ll approach each of these components individually, but we’ll start with Couchbase because it may require some low-level changes to your Vagrant development cluster.
This architecture is a fairly common kind of layered web application you’ve likely seen before. When you’re building out a system in CoreOS, these are the kinds of details you’ll need to gather about the application in order to deploy it effectively. Jumping into persistence layers next, you’ll see how to begin applying the architecture.
6.2. Setting up persistence layers
You have two persistence layers (see figure 6.3) that represent state in the application: Couchbase and memcached. As explained, in this example, both of these are somewhat ephemeral, but you’ll use Couchbase as if it weren’t.
Figure 6.3. Persistence layers

When building out complex application stacks, especially in development, it’s a good plan of attack to start with the persistence layer, because it’s usually the only component you can’t wipe completely if you mess up. The other reason you’re starting with Couchbase is that you may have to rebuild your Vagrant cluster if you didn’t provision your instances with at least 1.5 GB of RAM. If you didn’t make this modification in chapter 2, you can go back and look at how to change the RAM for your VMs, but the quick version is as follows (config.rb in your vagrant directory):

Note
If you’re using fleetctl from your host workstation with the SSH tunnel, creating new VMs creates a new SSH host key, so you’ll have to delete the one in $HOME/.fleetctl/known_hosts.
Once you’re back up, you can move on to getting Couchbase initialized and running.
6.2.1. Couchbase setup
Now that your Vagrant cluster is ready, it’s time to set up Couchbase. First, you need to create a new service-unit template.
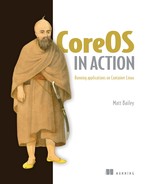
Listing 6.1. code/ch6/[email protected]

Notice that you do quite a bit of initialization with magic numbers and strings. Later in this chapter, we’ll talk about adding more configuration abstraction to the project as a whole. Next, here’s the sidekick for the service.
Listing 6.2. code/ch6/[email protected]

This mostly looks like previous sidekick units you’ve seen, with one difference: you use logic to either update or set the etcd key. This distinction is important, and the logic works like this: if you’re refreshing the key so it doesn’t expire, you want to fire an update event; but if this is a new location for the node, you want to fire a set event. Later in this chapter, when we look at the application, you’ll see that you restart the web service on set but not on update, so you’re not restarting the app every 5 seconds.
Now let’s get Couchbase and the sidekick running:
$ fleetctl start code/ch6/[email protected] code/ch6/[email protected]
After waiting a few seconds, you should be able to look at the Couchbase admin console on http://172.17.8.101:8091 and log in with “Administrator” and “Password1”. Notice that you start only one instance of Couchbase with the template. (You didn’t have to make this a template, but you’ll build on this example in the following chapter when you take this install and make it high availability.) Next, let’s move on to the other piece of state: memcached.
Note
Couchbase may start on a different machine, so you can either check with fleetctl list-units or try http://172.17.8.102:8091 or http://172.17.8.103:8091.
6.2.2. Setting up memcached
Setting up memcached is simple and follows a pattern similar to Couchbase, except that you don’t need to deal with any bootstrapping or login information. As with Couchbase, you also need a main unit template (listing 6.3) and a sidekick (listing 6.4). Unlike Couchbase, you can (and should) start more than one instance.
Listing 6.3. code/ch6/[email protected]

This should look pretty familiar by now: it’s a simple service template that also cleans up after itself. Now you’ll make an equally familiar sidekick.
Listing 6.4. code/ch6/[email protected]
[Unit]
Description=Register memcached %i
BindsTo=memcached@%i.service
After=memcached@%i.service

[Service]
TimeoutStartSec=0
RestartSec=1
Restart=always
ExecStartPre=-/usr/bin/etcdctl rm /services/memcached/%i
ExecStart=/usr/bin/bash -c '
  while true; do
    sleep 5;
    FLANNELIP=`docker inspect memcached-%i | jq -r .[].NetworkSettings.IPAddress`;
    etcdctl update --ttl 8 /services/memcached/%i $FLANNELIP ||
    etcdctl set --ttl 8 /services/memcached/%i $FLANNELIP;
  done'
ExecStop=-/usr/bin/etcdctl rm /services/memcached/%i'

[X-Fleet]
MachineOf=memcached@%i.service
Much like the Couchbase sidekick, you grab the flannel IP, update or set it to a key in etcd with a TTL of 8 seconds, and attach it to the memcached unit. You can run as many of these as you want.
Notice that you did not give a Conflicts= line for memcached. Because you’re using flannel, you can run multiple instances of memcached without having to step on ports, because the instances will be running on their own IPs within the flannel network. Go ahead and start the memcached cluster and sidekick:
$ fleetctl start
    code/ch6/memcached@{1..3}.service
    code/ch6/memcached-sidekick@{1..3}.service
...
With all these systems running, you can verify that things look good with fleetctl list-units as usual, and check your etcd keys to make sure everything was set correctly:
$ fleetctl list-units
UNIT                MACHINE                ACTIVE    SUB
[email protected]    72476ea6.../172.17.8.101    active    running
[email protected]        72476ea6.../172.17.8.101    active    running
[email protected]    ac6b3188.../172.17.8.101    active    running
[email protected]    b598f557.../172.17.8.102    active    running
[email protected]    ac6b3188.../172.17.8.103    active    running
[email protected]        ac6b3188.../172.17.8.101    active    running
[email protected]        b598f557.../172.17.8.102    active    running
[email protected]        ac6b3188.../172.17.8.103    active    running
$ etcdctl ls --recursive /services
/services/couchbase
/services/couchbase/1
/services/memcached
/services/memcached/3
/services/memcached/1
/services/memcached/2
$ etcdctl get /services/memcached/1
10.1.35.2
$ etcdctl get /services/couchbase/1
10.1.1.2
Next, let’s move on to setting up the custom software application.
6.3. Application layer
The application for this example has two parts (see figure 6.4):
- A worker you’ll run only one of, which will watch the Meetup WebSocket for any changes and write them to the Couchbase document store
- A cluster of many web servers running the custom back-end HTTP service with Express
Figure 6.4. Application layers

You’ll follow a single-process model for the web service, so each container will spawn only one Node.js process. It’s possible to spawn multiple Node.js processes, but that’s beyond the scope of this book. You do have the ability to spawn many within the same container, or you can spawn one per container and add another load-balancer layer (for example, with HAProxy) on each machine.
Earlier in the book, I mentioned that you have a choice when it comes to interacting with etcd: you can do most of the interactions from your unit file; or your application can communicate with etcd, which opens up a little more programmability for what you’re trying to accomplish that might be painful in Bash. Because you’re deploying custom software here, this example provides an opportunity to show that approach; so your unit files will be simple, and the complexity of interacting with etcd will be built into the application.
6.3.1. The worker
The worker pattern is common in software development today, especially in any system that either processes or aggregates data in quantity. Anything that isn’t needed for real-time consumption by a user and that you can do asynchronously can use a worker.
By the end of this section, you’ll see your data start to populate the Couchbase server you’ve set up (see figure 6.5). In this case, the worker gathers data from a WebSocket that emits RSVPs provided by Meetup.com and dumps the data into Couchbase. You might want to do this because you can’t query Meetup.com’s historical RSVPs and can only consume them in real time; so this is essentially archiving that stream as it emits events. Let’s begin with the service unit file, because it’s extremely simple.
Figure 6.5. Couchbase with data

Listing 6.5. code/ch6/worker/worker.service

The Dockerfile for the worker is also simple and is almost the same as the helloworld example, except you don’t even have to expose a port.
Listing 6.6. code/ch6/worker/Dockerfile
FROM library/node:onbuild
Also, create the package.json file for the worker, with a few dependencies.
Listing 6.7. code/ch6/worker/package.json

That’s similar to the helloworld app as well, but with the new dependencies. Now, let’s look at the worker.
Listing 6.8. code/ch6/worker/worker.js


If this looks a little daunting, or you have little or no JavaScript experience, that’s okay; we’ll go through the code step by step. There’s a lot here that isn’t important for this book: to remove that from your cognitive load, the require() statements at the top import libraries, and many of the unannotated lines at the end get set up to write to the Couchbase server. I’ve used a lot of shorthand for the sake of page length, but this is what you should take away as the program’s step-by-step process:
- Determines its own IP address in flannel (only so you can figure out the etcd IP); for example, 10.1.1.3
- Figures out the etcd IP; for example, 10.1.1.1
- Sets up a watch on the etcd keys for Couchbase
- Exits the program if there are any new keys in /services/couchbase/
- Puts together a connection string from etcd keys in /services/couchbase/ (for example, couchbase://10.1.1.2)
- Listens to the RSVP socket, and writes its messages to Couchbase
You’ll notice that most of this program deals with the context of the CoreOS environment. The functional worker part is only the last five lines. Of course, this is a simple example; but you can see how sometimes, putting this kind of contextual logic outside of a unit file can make it a little easier to do complex logic for services based on the cluster state.
Now, you can get your worker service running! But be warned: you’re connecting a live service that will immediately start writing a stream to your database. This stream is pretty slow—maybe four events per second—but if you forget to stop the worker, you’ll fill up your VM’s hard drive. Also, be sure you’re going to run only one worker. Fleet should prevent you from running multiple workers, but if you manage to do so, Meetup.com will probably eventually blacklist your IP address for an unknown amount of time. With that in mind, fire it up and begin looking at your log:

If you opened the web admin port for Couchbase when you started it, you can now go visit it (http://172.17.8.101:8091/) and see data coming in. It should look something like figure 6.5 at the beginning of this section: the main admin page should show one bucket active, with a nice graph showing activity in operations per second.
Congratulations! You now have a full data-aggregation system! This is the kind of pattern you can follow for any worker-type program that you want to deploy on CoreOS. Things like aggregators, crawlers, and scientific computing workers all fit well in this model. Next, let’s move on to the web app, so you can look at some of the data.
6.3.2. The web application
Much like the worker, you’re going to do most of the complex context configuration in the application logic, so the service unit is equally simple. The only difference is that you’ll run multiple instances, so you need to make a template, shown in the next listing. This is a simple app that just displays some data to prove that everything you’ve set up is working properly; at the end of this chapter, you’ll have a site that looks something like figure 6.6.
Figure 6.6. Exciting killer app

Listing 6.9. code/ch6/webapp/[email protected]

Like the mattbailey/ch6-worker image, I’ll leave this on the Docker Hub in case you don’t want to build it from the Dockerfile yourself—which brings us to the simple Dockerfile (it’s the same as the one from the helloworld examples).
Listing 6.10. code/ch6/webapp/Dockerfile
FROM library/node:onbuild
EXPOSE 3000
The package.json file is also similar.
Listing 6.11. code/ch6/webapp/package.json
{
  "name": "ch6-web",
  "version": "1.0.0",
  "description": "Example Web App",
  "main": "app.js",
  "scripts": { "start" : "node app.js" },
  "dependencies": {
    "connect-memcached": "^0.2.0",
    "couchbase": "^2.1.6",
    "express": "^4.13.4",
    "express-session": "^1.13.0",
    "node-etcd": "^4.2.1",
    "socket.io": "^1.4.6"
  },
  "author": "[email protected]",
  "license": "ISC"
}
This pulls in a few more libraries for Express, memcached, and Socket.IO. Before we get into the back-end application, let’s look at the single index.html file you’ll serve a user (see listing 6.11). This is essentially a single-page application, meaning the server isn’t serving up any HTML in a dynamic way: it’s serving up a single document, and the rest of the elements are dynamically created by JavaScript (well, JSX, to be specific) within the page. This JavaScript only runs in the browser, and it also watches the socket.io WebSocket for messages so it can update the page without requiring any navigation. I’m using a UI framework called React for this, mostly because it’s currently popular and, again, terse enough that it doesn’t take up too much room in the text.
Listing 6.12. code/ch6/webapp/index.html


If you don’t have much experience with client-side JavaScript programming, don’t worry; most of this serves to build a dynamic element. Fundamentally, this code is similar to the code in the worker! It listens to a WebSocket and updates the page when it gets a new message, the same way the worker listens to a WebSocket and updates Couchbase. Ultimately, this is just a view, and it’s not important for you to know about it in depth for this example; but it’s the simplest way to show that your web app is working, and it will absolutely be part of any complete web application.
How do you serve this HTML and JavaScript? With more JavaScript, of course! The following listing shows the application server.
Listing 6.13. code/ch6/webapp/app.js


This looks like a lot to take in, especially if you’re unfamiliar with Node.js. If you didn’t read the section about the worker (section 6.3.1), be sure go to back, because a lot of things are duplicated here.
Libraries are imported at the top, and then you have a lot of the same contextual logic as in the worker, to generate a connection to memcached and Couchbase and exit the program if they change. The only difference here is that you do it for both memcached and Couchbase; you only had Couchbase to worry about in the worker.
Once you get down into the (again, relatively small, compared to the context code) application logic, a few more things are going on:
- You set up a view in Couchbase. It’s not important how this functions, just that you need one to query data from Couchbase. You can think of it as a stored procedure, if you’re used to SQL.
- You set up a session that sets a cookie in the browser. It’s backed by your memcached cluster but not used for anything.
- You serve up the single index.html file at /.
- For every connection to the WebSocket, you begin sending queried data back to the client every 5 seconds.
- For clarity, both the WebSocket and HTTP data are served over port 3000.
That’s it! Now you can deploy the client-facing web service. Start up three web units with fleet, and (optionally) watch the journal output:
$ fleetctl start code/ch6/webapp/web@{1..3}.service
...
$ fleetctl journal -f web@1
...
May 27 23:29:12 core-02 systemd[1]:
  Started Express and Socket.io Web Service 1.
...
May 27 23:29:13 core-02 docker[10696]:
  current config: { couchbase: 'couchbase://10.1.1.2',
May 27 23:29:13 core-02 docker[10696]:
  memcached: [ '10.1.35.2:11211', '10.1.57.2:11211', '10.1.35.3:11211' ] }
Started Express and Socket.io Web Service 1.
...
May 27 23:29:13 core-02 docker[10696]:
current config: { couchbase: 'couchbase://10.1.1.2',
May 27 23:29:13 core-02 docker[10696]:
memcached: [ '10.1.35.2:11211', '10.1.57.2:11211', '10.1.35.3:11211' ] }
The web application started up successfully. Let’s look at all the services running now.
Listing 6.14. All units
UNIT                MACHINE                ACTIVE    SUB
[email protected]    72476ea6.../172.17.8.101    active    running
[email protected]        72476ea6.../172.17.8.101    active    running
[email protected]    ac6b3188.../172.17.8.103    active    running
[email protected]    b598f557.../172.17.8.102    active    running
[email protected]    ac6b3188.../172.17.8.103    active    running
[email protected]        ac6b3188.../172.17.8.103    active    running
[email protected]        b598f557.../172.17.8.102    active    running
[email protected]        ac6b3188.../172.17.8.103    active    running
[email protected]            72476ea6.../172.17.8.101    active    running
[email protected]            b598f557.../172.17.8.102    active    running
[email protected]            ac6b3188.../172.17.8.103    active    running
worker.service            72476ea6.../172.17.8.101    active    running
You should be able to visit any of those hosts on port 3000 (for example, http://172.17.8.103:3000) and see your fantastic new web app! The page should update itself every 5 seconds from the socket.io event and show new data. You’ve successfully deployed your first custom, full-stack application to a CoreOS cluster, but there’s still more work to do.
6.4. Where to from here?
Now that you’ve built out your application stack on CoreOS, how do you test for failure, and what does the next iteration look like? This section works through both of these items and leads into the next chapter. By the end of this section, you should be able to test the resilience of your application and have an idea of how to improve what you’ve started. I talk a lot about fault tolerance in this book, so let’s begin with an outage.
6.4.1. Responding to failure
As with any complex deployed application, you want to be able to test failures in your systems. With the caveat that data loss in the Couchbase database will happen (in this chapter) if the machine the Couchbase server is running on goes down, your entire application stack should survive the failure of one machine pretty gracefully. Remember, though, that in a three-machine cluster, etcd can’t re-achieve quorum with a single node. In a real-world deployment, you’d always provision enough machines because you’d expect cluster partitioning to occur, as previously discussed in section 4.3.
To see what’s going on, you’ll need to open two terminals: one to run the commands to break a machine, and one to follow the log of a machine you’re not breaking to see how the services respond. The maximum failure would be to kill the node that Couchbase is running on. You know that will cause data loss, but the service should still migrate to another machine in the cluster.
In one terminal, check to find a machine that Couchbase isn’t running on, and follow the journal of the web service running on that machine:

Now, you’re following the log for web@1. You can see the output of its log from the initial configuration, connecting to your three memcached instances and Couchbase. In a new terminal, kill core-02, where Couchbase and one memcached instance are running (first, make sure you’re in the directory where your Vagrantfile is located):
$ vagrant halt core-02
==> core-02: Attempting graceful shutdown of VM...
Note that you always use vagrant halt in these scenarios rather than the more forceful vagrant destroy. The behavior would be the same for the cluster when it goes down (you can try it yourself if you want: it’s more like pulling the power cord).
What’s different with vagrant destroy is that you can’t have that node rejoin the cluster with vagrant up—not because it isn’t possible in CoreOS, but because the Vagrant scripts do a number of bootstrapping things to brand-new nodes that they don’t do to a node that’s just stopped, so you end up with a node all by itself. In the real world, you wouldn’t do the bootstrapping things that Vagrant does, so you can remove and add nodes at will.
Let’s look back at the terminal where you were following the journal of web@1:

6.4.2. What’s missing?
A few things are missing from this example. First is the reliability of the data store, which we’ll address in the next chapter.
Second, you now have three servers running your edge service (the web app). At some point, you’ll need to put a load balancer in front of them, and that may mean adding some new sidekicks to your web services or extending the application to provide a health-check endpoint. How that’s implemented is up to you. Optionally, you could also do some clever round-robin DNS setup; for example, AWS Route 53 has health checks built in that can change the DNS, as long as you’re comfortable with a downtime the length of the DNS TTL for some clients if one goes down.
Finally, there are a lot of magic numbers in the application configuration of ports, timeouts, and so on. Optimally, in a production environment, you’ll want to abstract all these into etcd and use it as your central source of truth, so you can configure these items when you need to.
6.5. Summary
- Have a plan of attack in applying complex architectures to CoreOS.
- Figure out how to test each part of your stack in isolation.
- Determine which parts of your stack need to be redundant.
- Understand the order of events when parts fail.
- Try to identify the shortcomings of your implementations (in this case, data loss if the Couchbase machine fails).