5
LANDSCAPES AND SKIES

Who doesn’t like looking up and seeing a beautiful clear blue sky with drifting clouds? Or sitting on a beach, watching a magnificent orange sunset with a nice drink in hand? Just as looking at these beautiful scenes can make you feel peaceful and calm, painting landscapes and skies also lends a sense of serenity. Painting these vistas is like creating a piece of heaven on a canvas that I can look back on when life gets a little too noisy. I’ll take you through the process of recreating panoramas such as a cloudy blue sky and an orange sunset using a variety of enjoyable and easy techniques.
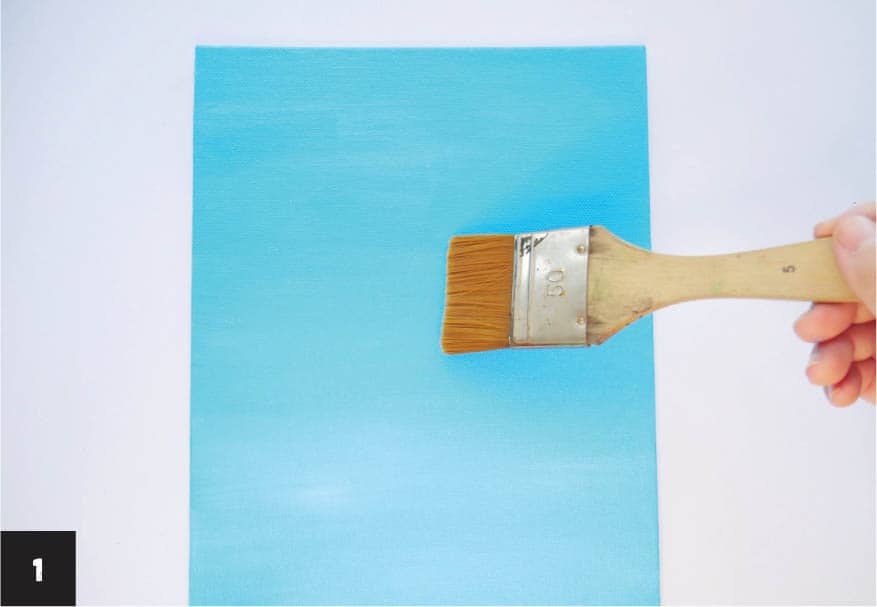
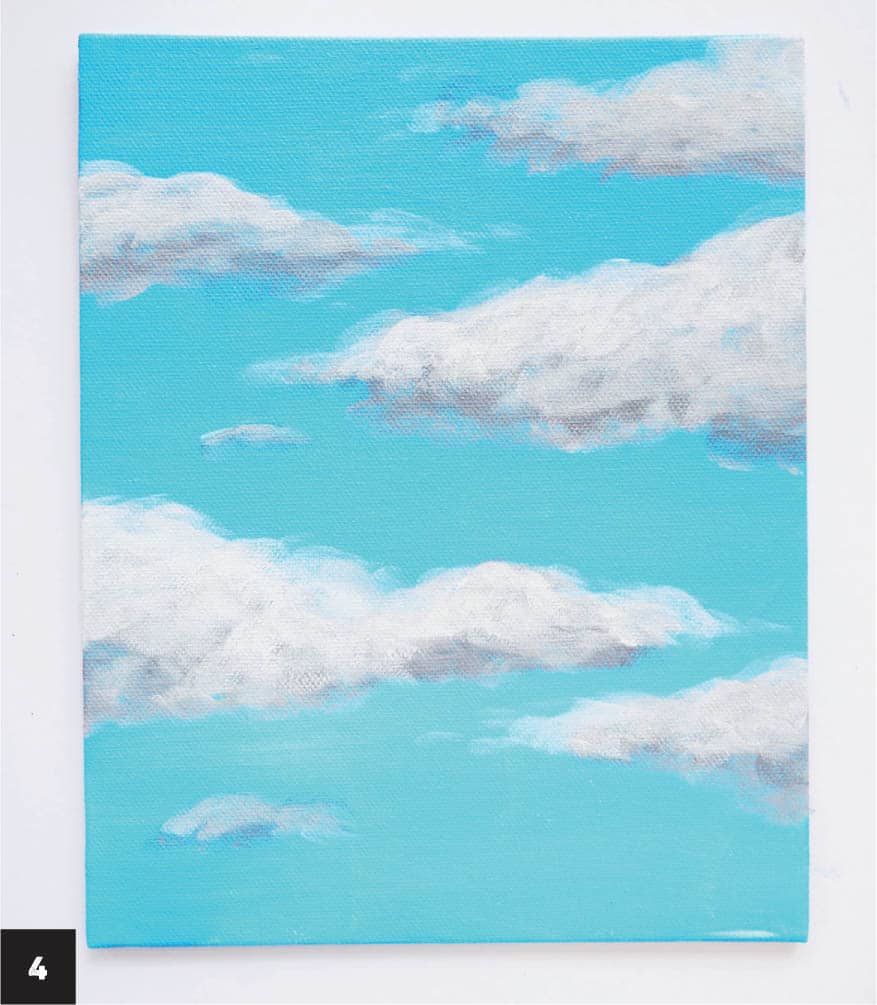
For me, painting clouds is therapeutic. In this exercise, we’ll keep the sky simple and focus more on the creation of big, white fluffy clouds. The key to achieving this kind of airy effect is how you blend, so let’s get right to it! 1 Mix blue and white to create a sky-blue color, adjusting the amount of blue or white in the mixture to suit your tastes. The size of your substrate will determine how much of the paint to use; make sure you have enough paint to cover the entire surface, as the color may be uneven if you have to mix more paint.
2 Block the entire canvas with the paint, using the size 8 flat brush. Then using the size 10 flat brush with no paint, lightly brush the area with quick sweeping motions, as if you’re dusting. The paint should be slightly wet as you do this to achieve the effect of softening and smoothing the background color, blending the hard edges and colors seamlessly. Repeat this dry brushing motion until you get a nice well-blended sky. Allow the paint to dry before moving to the next step.
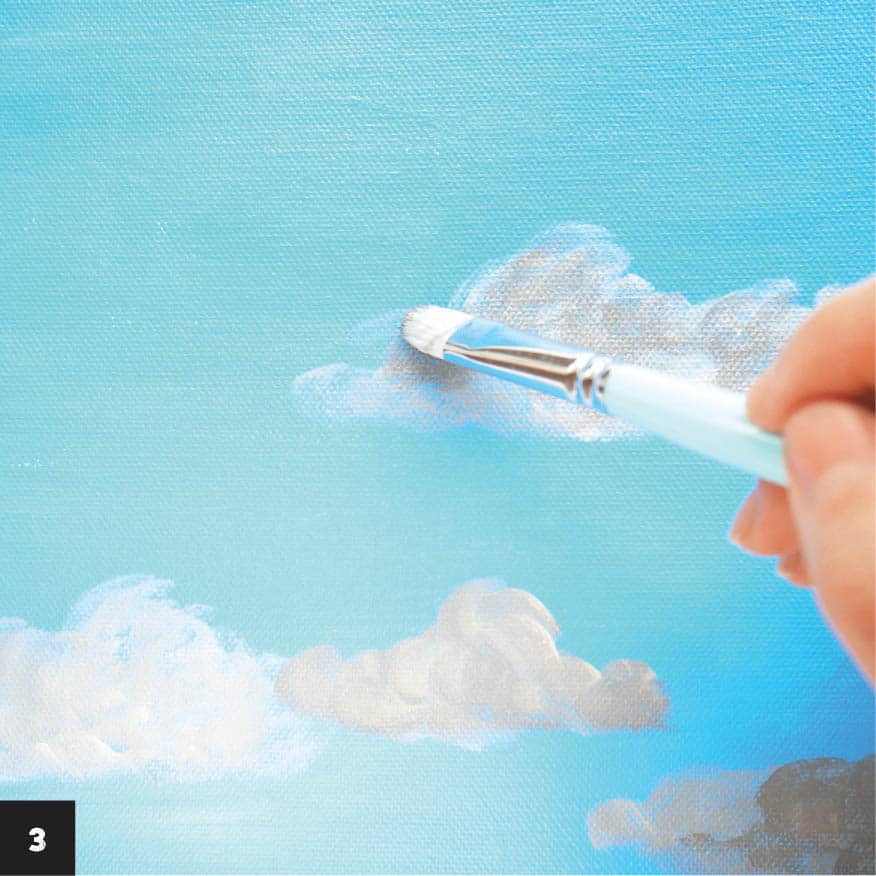
3 Add some white acrylic paint and a dab of black to the palette. Create light gray by mixing a bit of black with a lot of white, using the size 8 Filbert brush—this will be the cloud color. Lightly paint a cloud using short, quick circular motions with the Filbert brush. Try not to add too much paint to the paper. This allows you to make subtle strokes that make the clouds appear fluffy. While painting the clouds, remember that they come in different shapes and sizes. I added larger clouds on top and wispier clouds at the bottom of the blue sky.
4 Once you’re happy with the placement of the light gray clouds, add more white to the gray mixture and paint on top of the gray clouds, using circular motions. This circular blending creates a more airy effect for the clouds as opposed to a horizontal blending. Remember that the paint must be wet in order to make the blending effective, so use quick, short strokes.
5 To paint the edge of the cloud, remove any excess paint on the brush by dipping it in water and wiping it off with a paper towel. Then lightly brush the edge of the cloud as it fades into the blue sky.
6 Add wispier white clouds in other parts of the sky with the size 4 Filbert brush to create the look of drifting clouds. To do this, use just a touch of white paint mixed with a tiny bit of water and make small circular motions as you move the brush lightly across the background. Wipe off any excess paint on the brush to blend the cloud into the sky as you did in step 5. Pick up some of the light gray paint and use it to add shadows under the larger clouds, giving them a more solid shape.
7 Create some tiny birds soaring through the sky and clouds. Add a short dash with a dip in the center near one of the larger clouds, using the round brush and white paint. This forms the silhouette of a bird flying. Add another bird slightly lower so it looks as though the two birds are flying together. To complete the painting, add some tiny scattered white dots in the sky.SKY AND CLOUDS


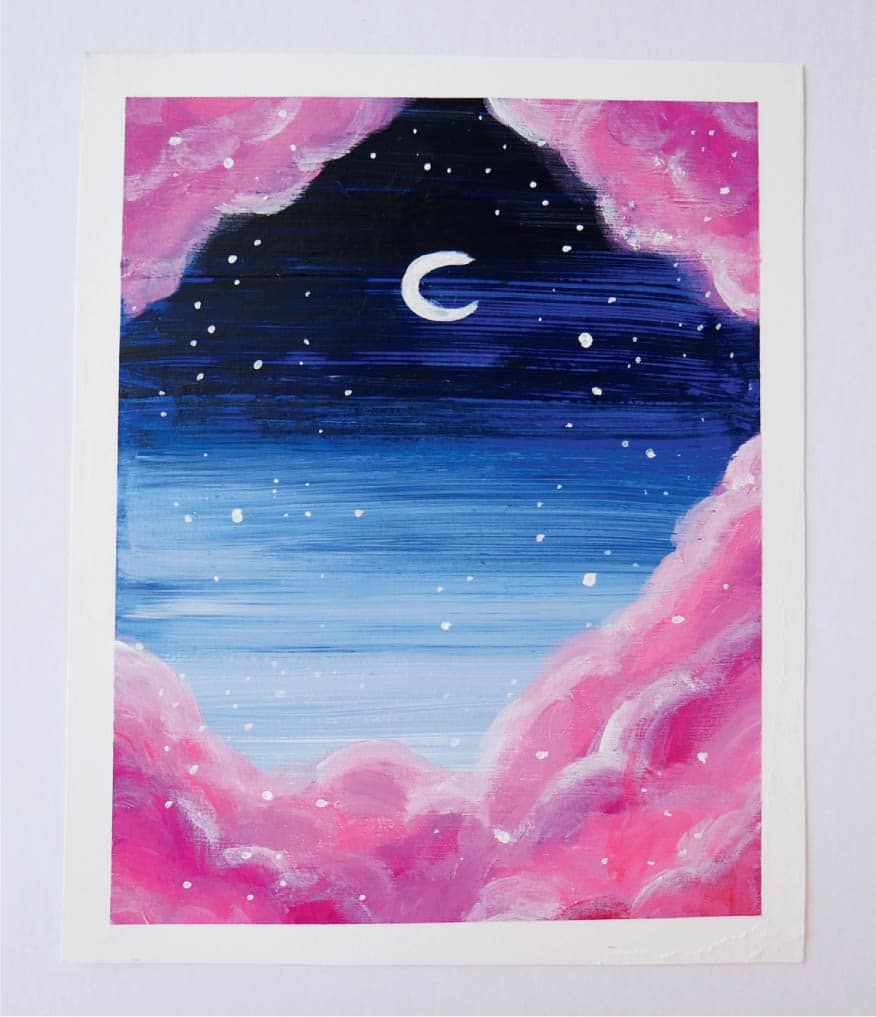
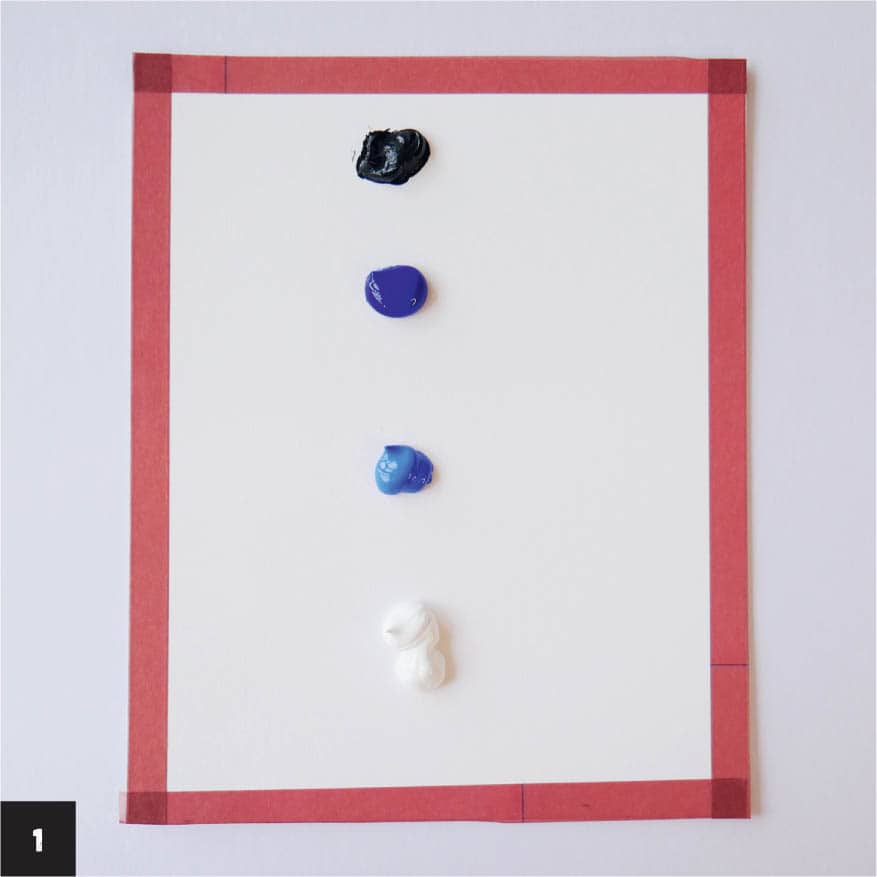
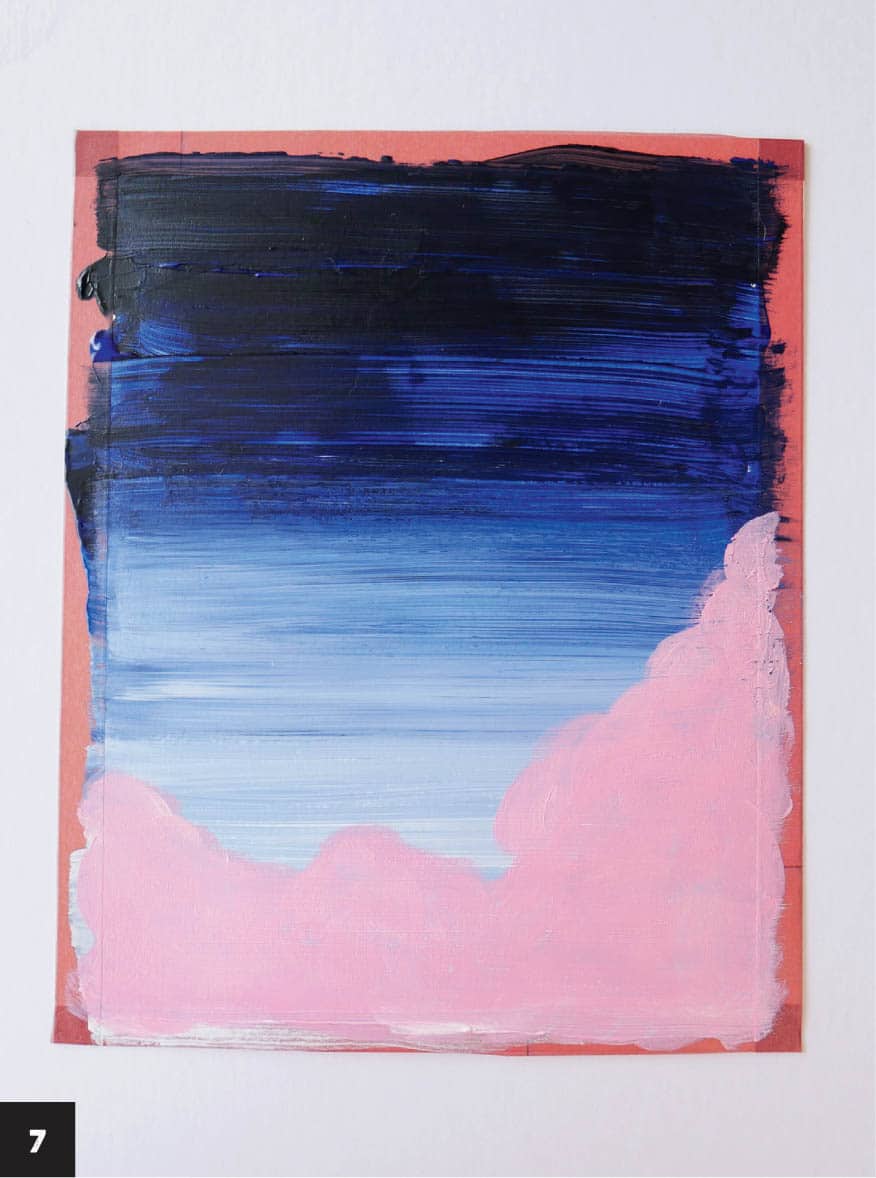
Now that you’ve learned how to paint fluffy clouds, let your imagination run wild and create an evening sky filled with pastel-colored clouds. To blend the colors of the evening sky, you’ll use a fun tool: the palette knife. Let’s start painting! 1 Apply paint directly to the paper. Starting at the middle top and referencing the photo, squeeze out an ample amount of Payne’s gray, add ultramarine blue 2 inches (5 cm) below that, sky blue 2 inches (5 cm) below that, and white acrylic paint at the bottom. There should be enough paint to cover the entire canvas, and it’s fine if there is excess paint.
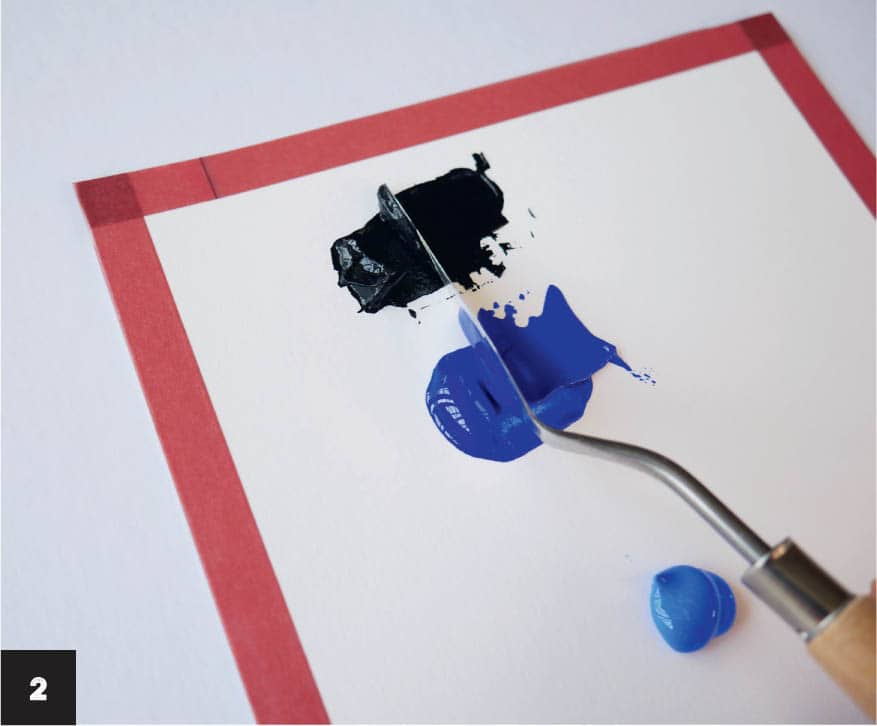
2 Instead of using a brush to spread the paint, use a palette knife. Starting at the top with Payne’s gray, spread the color using a back-and-forth motion to move the paint, covering the paper all the way to the sides.
3 Spread the remainder of the paint on the paper. When you reach the ultramarine blue, don’t be afraid to mix the residual Payne’s gray into it, but be sure to spread the blue so that it also covers the left and right sides of the paper. As you do this, you’ll notice the Payne’s gray gradually mixing with the ultramarine layer.
4 Continue to use the palette knife to spread each layer of paint except for the white—that area should be fairly pristine, so a flat brush will be used later.
5 Once the gray and blues have been spread out, and while the paint is still wet, switch out the knife for the size 10 flat brush. Without adding more paint, sweep the paint back and forth with the brush. This helps remove any excess paint and evenly mixes the sky background. You should have a nice gradient blend of Payne’s gray and darker and lighter blues.
6 Continue to work while the paint is still wet. Clean the flat brush and use it to spread the white paint at the bottom of the paper, making sure to blend it with the blue above it to create a transition for the sky. As the sky blue is still a bit wet, the white paint will incorporate a light touch of it as you blend it all the way to the bottom of the paper. Allow the paint to dry.
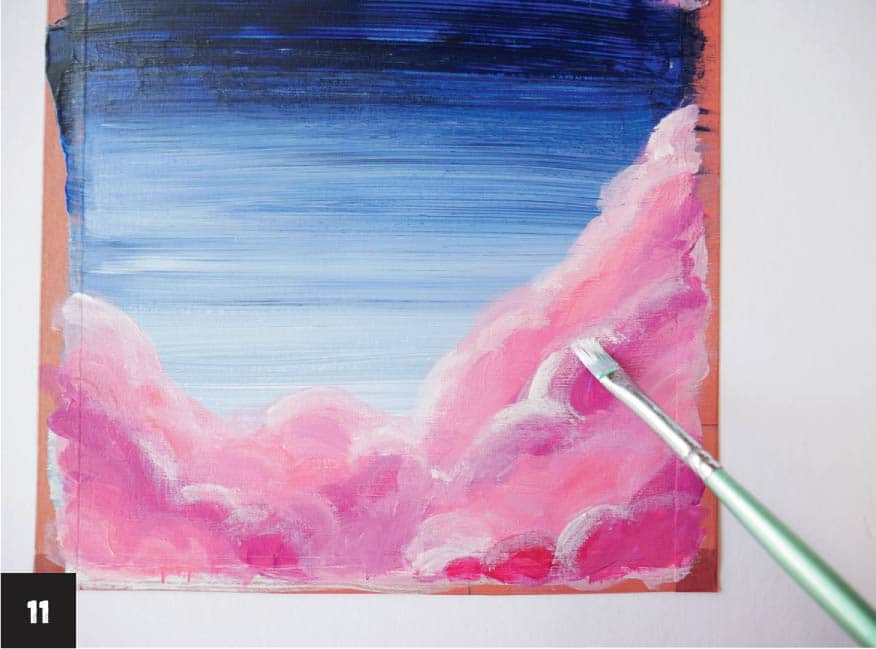
7 To paint the clouds, mix a little red paint with a lot of white to create a medium pink shade. Paint the outline of the clouds with the size 4 Filbert brush, using short strokes. Begin applying the pink at one side of the paper in the middle and angle the brush downward toward the opposite corner. The bottom clouds should be larger than the ones at the top corners. Apply the paint using small circular motions to make the clouds appear fluffy. Painting the clouds with an uneven edge makes them look more natural.
8 Paint more clouds peeking in at the top corners. This layer doesn’t need to be opaque as you’ll continue to layer other colors. Allow the paint to dry.
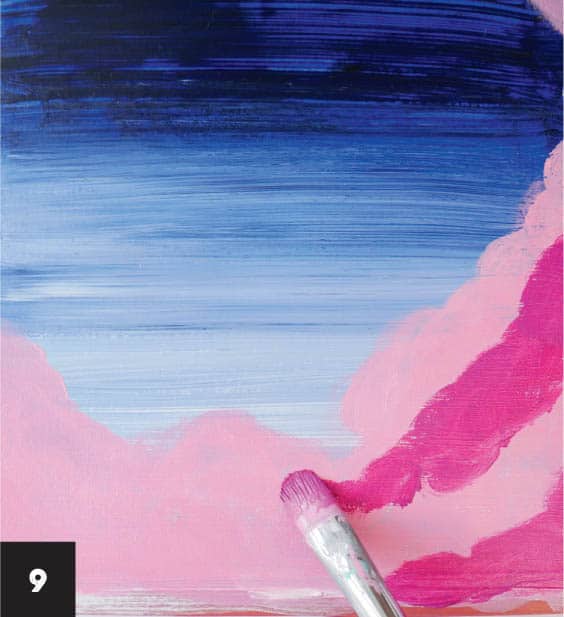
9 Mix red, violet, and white on the palette to create a medium magenta shade for the darker portions of the pastel pink clouds. Begin painting about an inch (2.5 cm) below where you started painting the first pink cloud, using the size 8 Filbert brush. Apply the paint with small circular motions; this provides depth to the clouds and the purple shade works well with the pink. Create an uneven edge, as you did in step 7, keeping in mind that the pink clouds should be more dominant than the purple.
10 Create the medium transition color for the clouds by adding a bit of red to the pink shade. Use this color to blend the lighter pink and dark purple together. Apply this medium pink between the two other shades using the size 4 Filbert brush. Using light, short strokes, gently blend this transition color with the light pink on top, the medium shade in the middle, and the dark purple at the bottom. If the brush has too much paint, wipe off the excess on a paper towel or cloth and continue blending until the clouds look airy and fluffy. Repeat steps 9 and 10 for the clouds in the top corners.
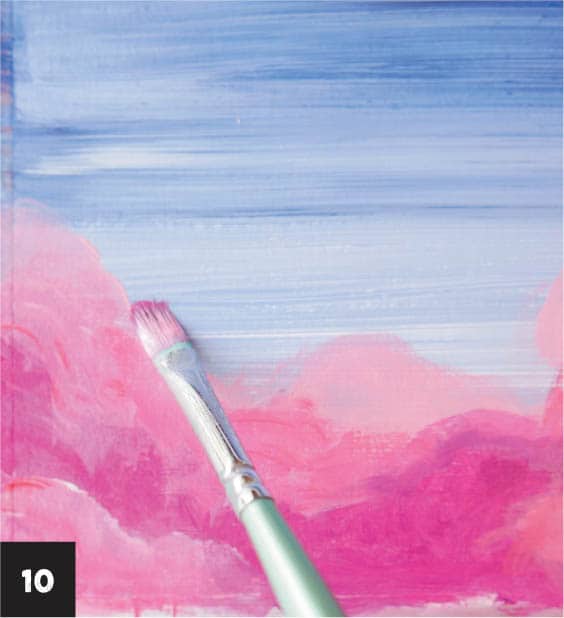
11 Add highlights to the top part of the clouds using white paint and a clean size 4 Filbert brush. Blend the edges of the clouds so the outline looks less defined and sharp. Continue blending until the clouds are to your liking. Allow the paint to dry.
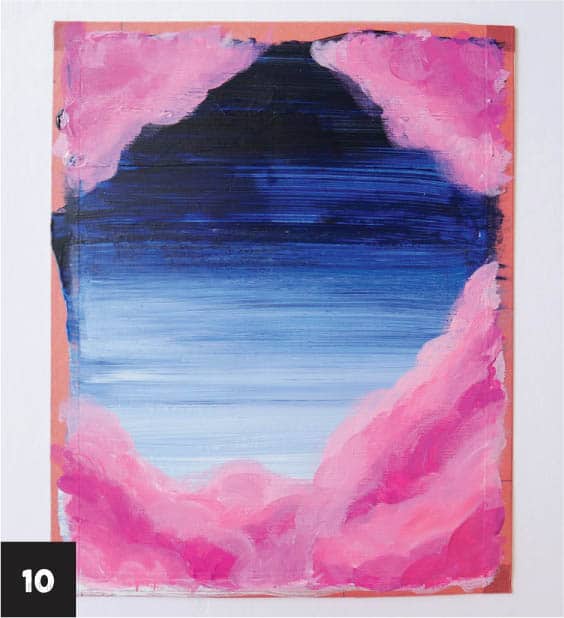
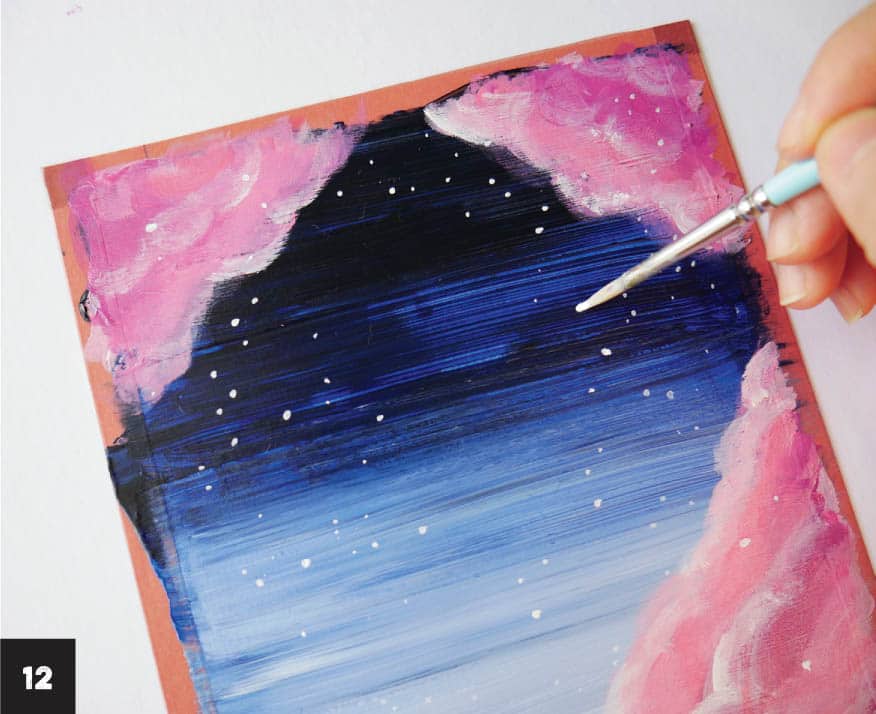
12 Paint tiny white dots around the canvas to represent stars, using the size 2 round brush. Create a crescent shape in the center of the sky for the beautiful moon that graces your evening pastel sky (see finished image, here).PASTEL EVENING SKY


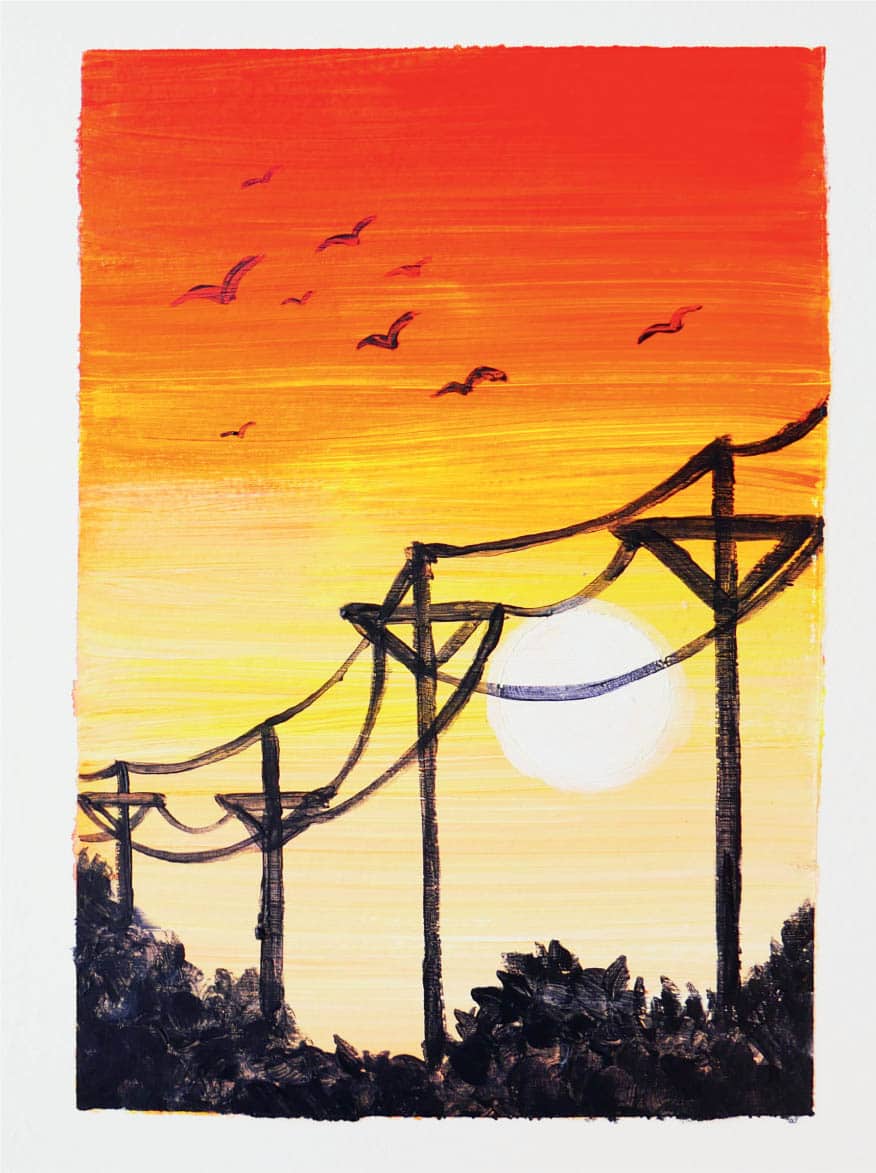
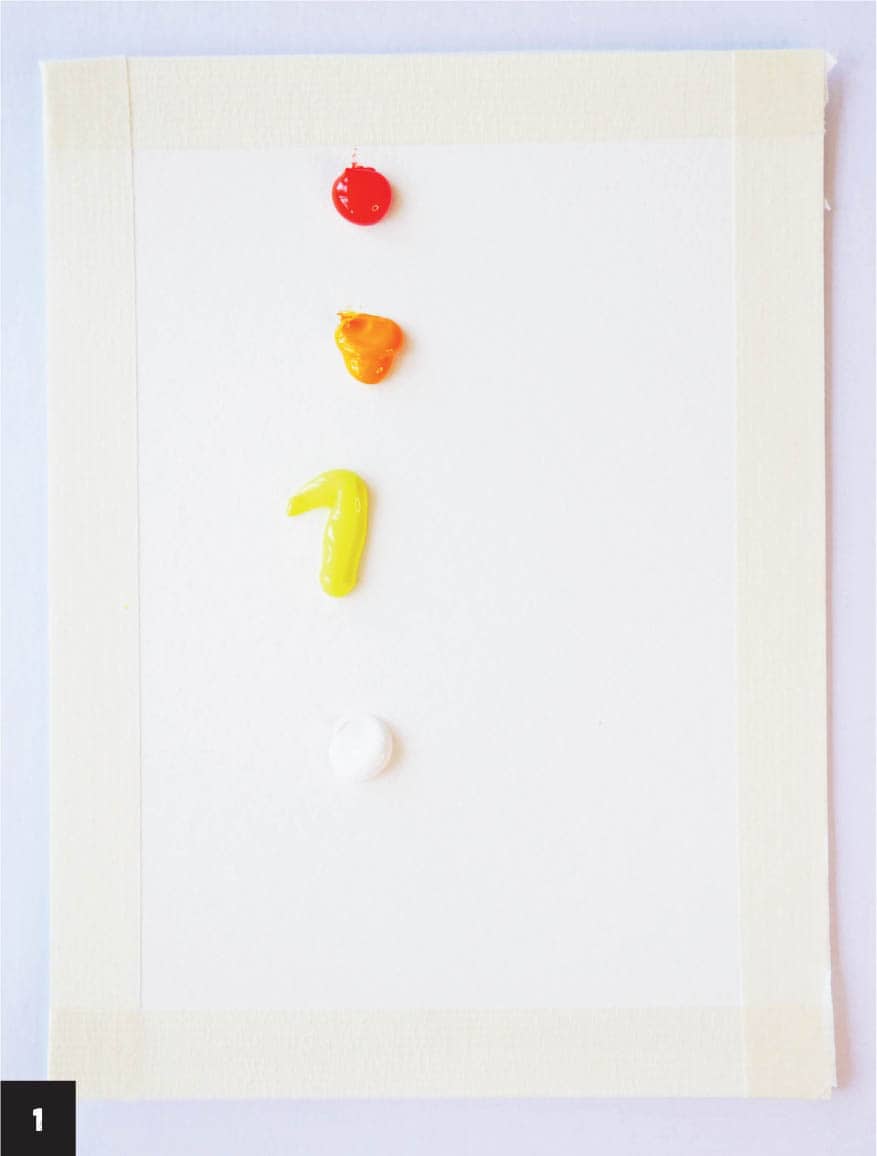
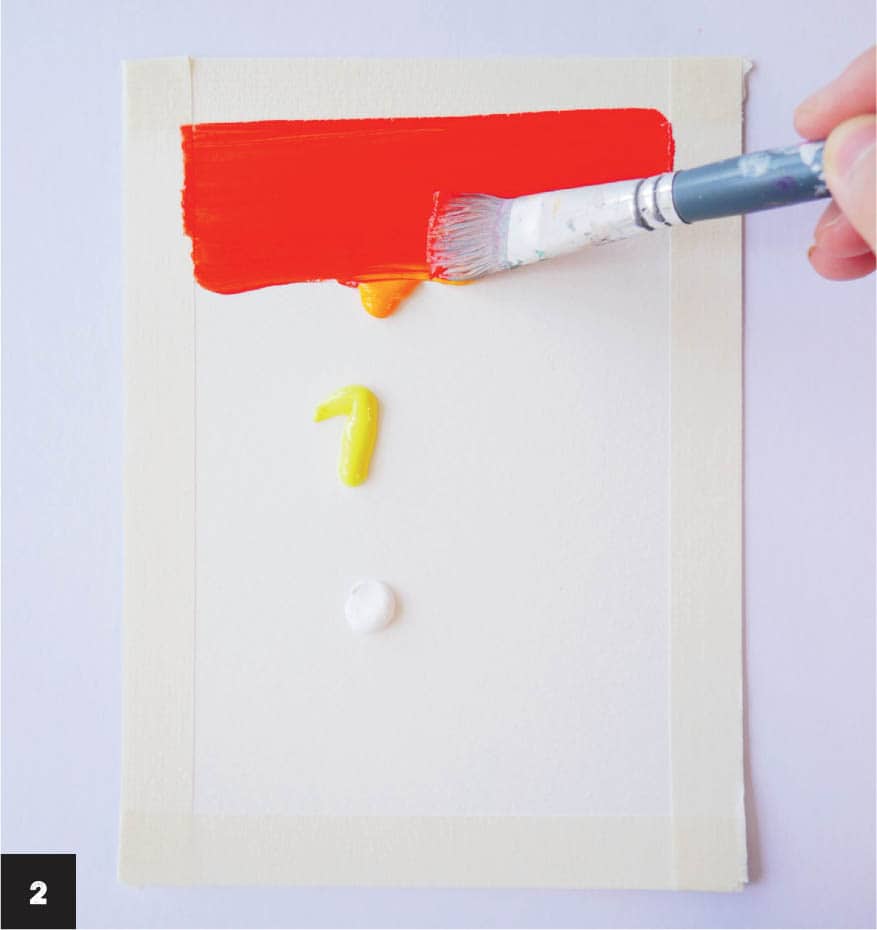
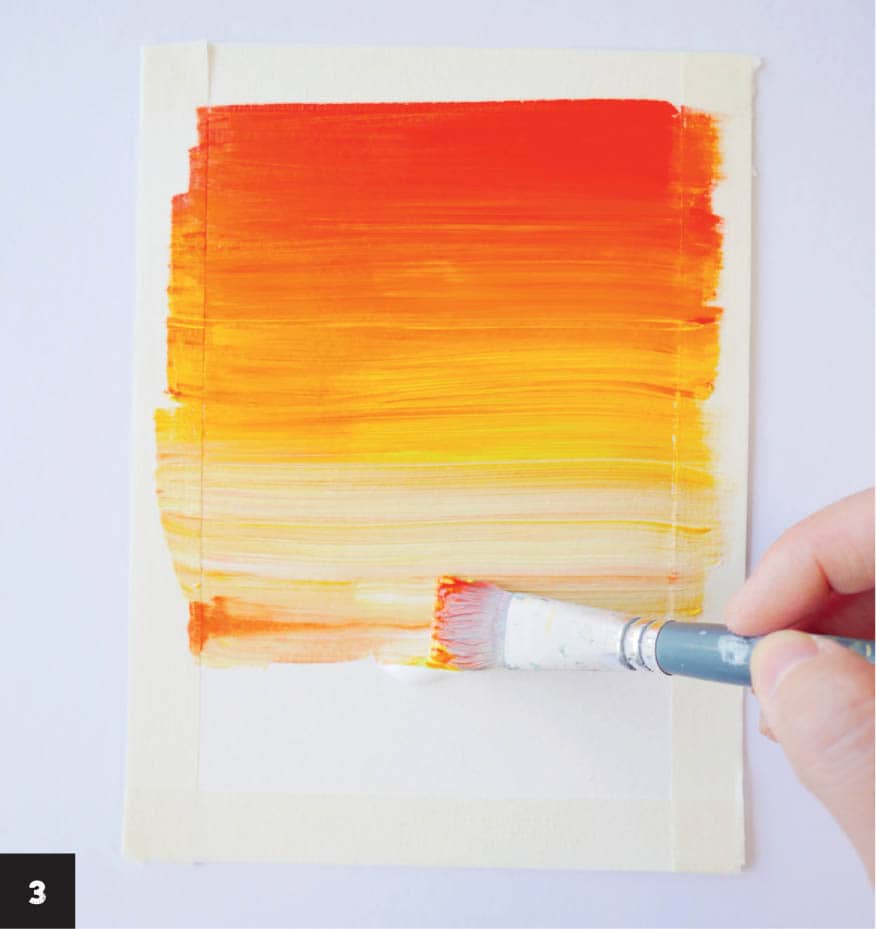
Sunsets are one of nature’s most beautiful phenomena. We love watching the skies go from red to orange to yellow until the mighty sun sinks beneath the horizon and the evening begins. In this lesson, you’ll paint a gradient with the colors of the setting sun and depict a cityscape with some guidance on perspective. 1 Apply a pea-size amount of several paint colors in descending order on your canvas, making sure they’re equally spaced: red, orange, yellow (with a bit of white), and white at the bottom.
2 Starting at the top with red, sweep the paint from side to side, using the size 10 flat brush.
3 Continue this technique, working your way down the canvas, blending the colors as you move and not cleaning the brush between colors. By the time you reach the bottom of the canvas, you will have created a gradient of the colors. Allow the paint to dry.
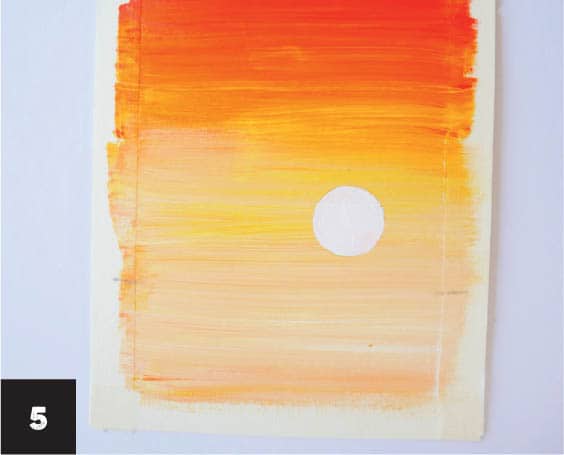
4 Lightly draw a light horizontal line an inch (2.5 cm) from the bottom of the paper for the horizon line, where the sky meets the land. This will be your guide for painting the setting sun.
5 Draw a circle about the size of a dime right above the horizon line with a pencil to represent the sun. Make it slightly off-center, toward the right, and paint it an extremely pale yellow—almost white.
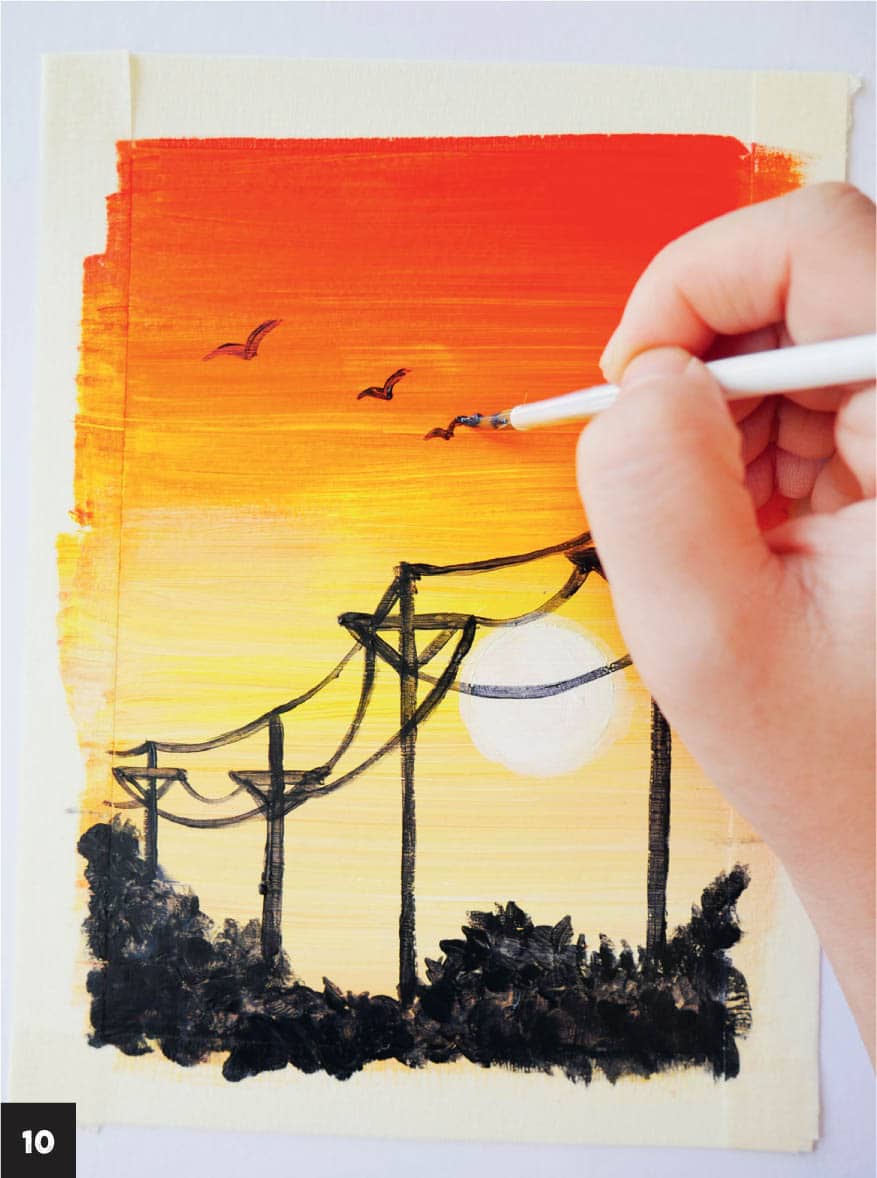
6 Create some treetops a little below the horizon. Paint a silhouette of rolling hills with Payne’s gray; this will be a row of trees. Use the edge of the size 8 flat brush to make short, thin strokes at the top of the trees to create leaves. Allow the paint to dry.
7 As noted in “Getting Some Perspective,” opposite, the vanishing point is where the outermost object in my perspective disappears, so that power pole will be very small. To create the pole, paint a vertical line at the left of the canvas, almost at the border, and then paint a short horizontal line near the top.
8 As you move back from the vanishing point, paint another pole slightly larger than the first one. Notice that this second pole is spaced a bit farther apart than the first, using the invisible parallel lines of the vanishing point as a guide. Paint two more electric poles, making sure they are bigger and farther apart than the previous two. The last pole is the largest one, as it is closest to the viewer. Paint a V under the horizontal line of each pole.
9 Using the round brush and Payne’s gray, add a thin swag connecting each power pole all the way to the vanishing point. Make sure that the line becomes thinner as you move toward the vanishing point.
10 Paint some small birds in the sky, creating a curved V with the round brush and Payne’s gray.SUNSET CITYSCAPE


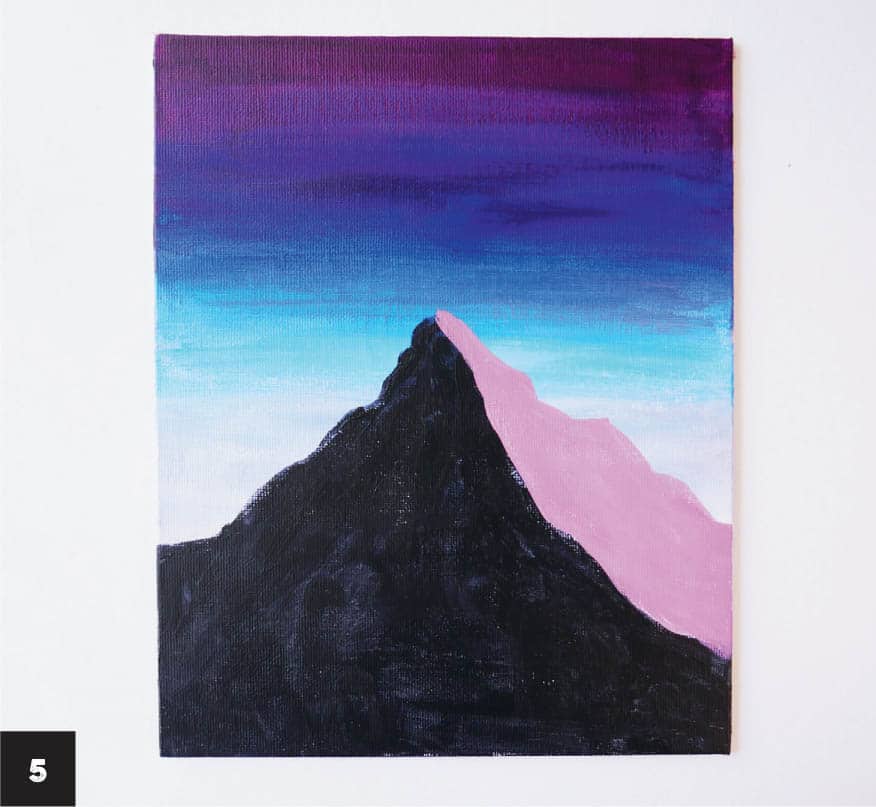
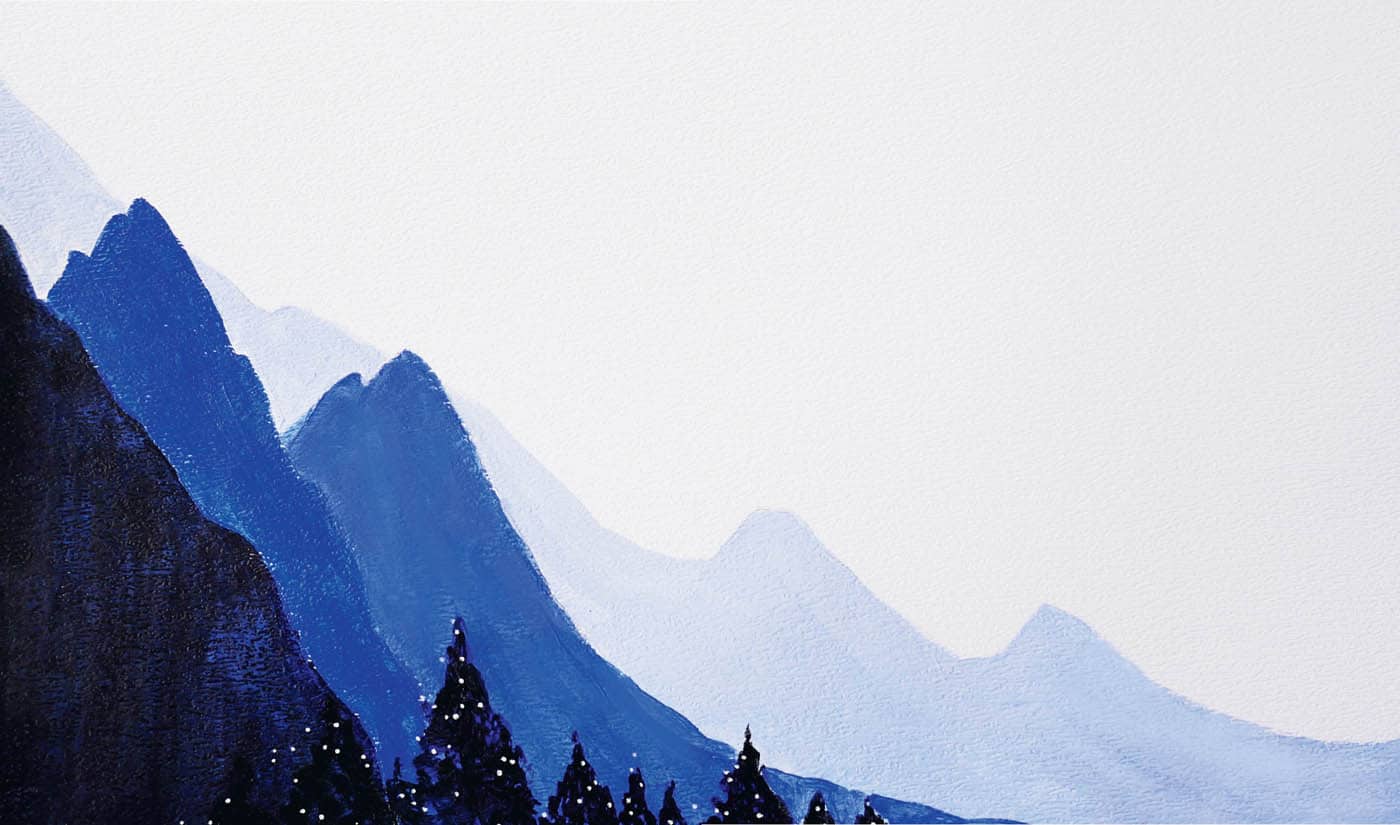
For this lesson, you’ll combine the techniques you’ve learned from painting skies to create this beautiful snowy mountain range. You’ll add to your palette knife skills by using the tool to create a snowy mountain cap. 1 Prepare the paint for creating a gradient of the sky by adding these paint colors to the canvas, in order from the top: violet, blue, light blue (mix blue and white), and white. Using the flat brush, spread the paint across the canvas, starting with violet and gradually mixing each succeeding color until you’ve reached light blue. Clean the brush and spread the white paint until the bottom part of the canvas is covered. Brush back and forth with the flat brush to soften the gradient on the painting. Allow the paint to dry.
2 Paint the outline of the mountain. Add Payne’s gray to the palette and load it on to the Filbert brush. Begin by painting the highest peak in the center of the canvas, which gives a nice focus for the viewer. To paint the outline of the mountain, move the brush in a jagged motion, at an angle, giving the outline a rough-edge feel.
3 Continue painting the outline, moving the brush downward and adding a smaller peak before reaching the edge of the canvas. Once the outline is complete, block in the bottom part with Payne’s gray.
4 Use a brighter color to add contrast on the mountain’s right side. Mix violet and a little white to create a soft purple color. Begin painting the tip of the mountain, using the round brush.
5 Sweep the brush down the slope to about an inch (2.5 cm) above the dark area you painted in step 3. Allow the paint to dry.
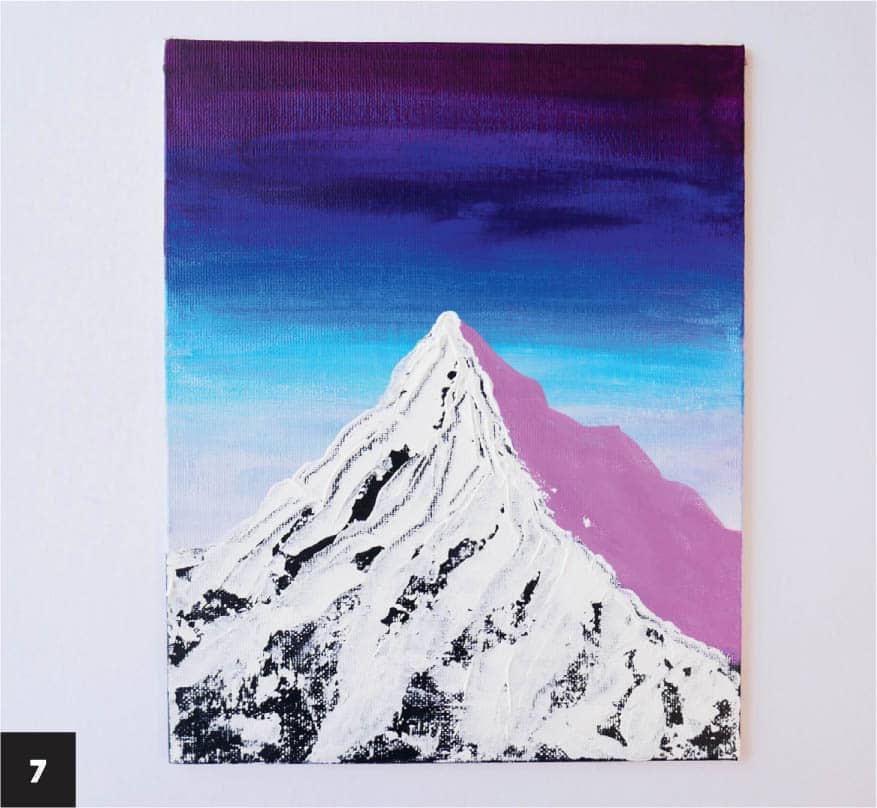
6 Add white paint to the palette and, using the palette knife, pick up a substantial amount of paint with the back of the knife. Starting at the mountain peak, gently move the edge of the knife in a zigzag motion to the left, bringing the paint down to the left edge of the painting.
7 Apply another layer; pick up more paint from the palette and start at the top of the outline, gradually pulling down the paint. In the image, you can see that I’ve moved the white paint to the left using the palette knife, while leaving the right side of the mountain bare. Using the palette knife lends a ragged snowy effect to the mountain.
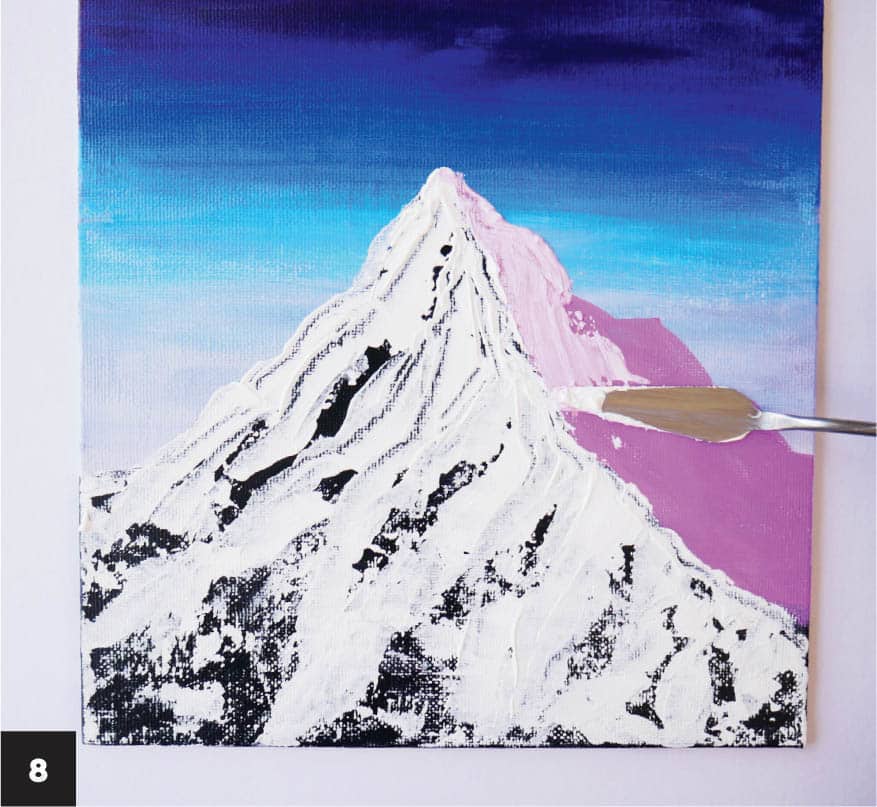
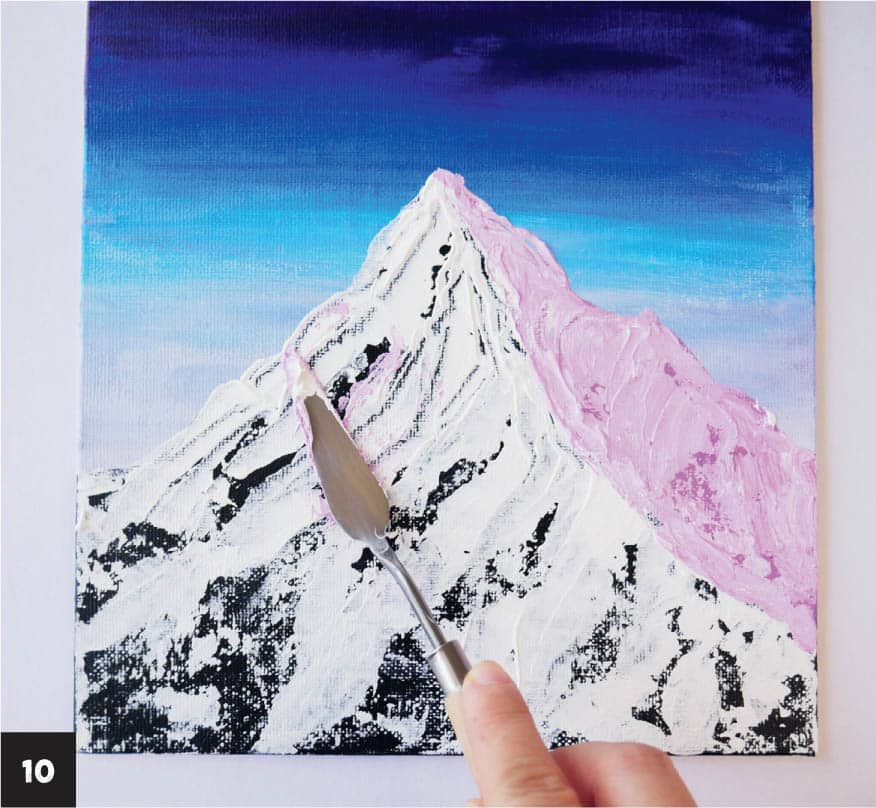
8 Add more white paint to the light purple mix to create a snowy effect on the right side of the mountain. Using the same method as in step 6, pick up some of the light purple paint using the back of the palette knife and, starting at the top of the mountain, move the knife in a zigzag motion to the right until you reach the edge. It should feel as though you’re spreading butter on toast.
9 Add more paint to the edge of the palette knife and lightly drag the edge of the knife from the tip of the mountain to the bottom, following the line where the black and purple shades meet. Allow the paint to dry.
10 Create more contrast on the snow on the left side of the mountain. Pick up some of the purple mixed in step 8 with the palette knife. Employing the same technique you used to create the snowy texture in step 6, gently run the knife through the paint diagonally. Dip the round brush in white paint and add tiny dots in the sky to represent snow falling over the mountaintop (see the finished image, here).SNOWY MOUNTAINS