3
STILL LIFE

The very first subject I painted as a kid was a huge watermelon on an equally huge canvas. During that painting session, I focused solely on making the fruit appear somewhat realistic. The fact that it was essentially a solid round shape on canvas made it less difficult to paint. This helped train my mind to look at real-life objects as they appear and try my best to capture them in a painting. Still life paintings can be made of different inanimate objects in various compositions. You can work from a photo or set up your own array of still life subjects at home. In this chapter, I’ll walk you through how to make simple objects come alive using the concepts of light and shadow.
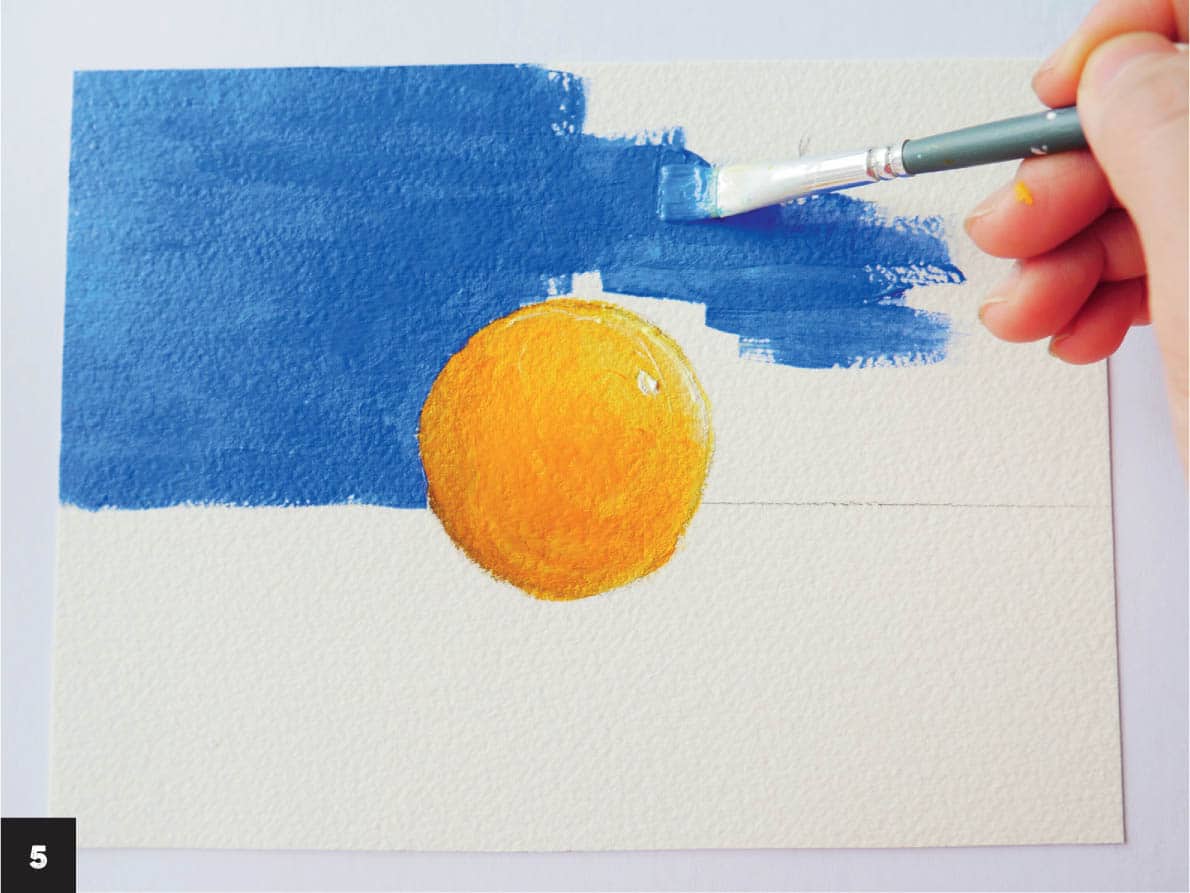
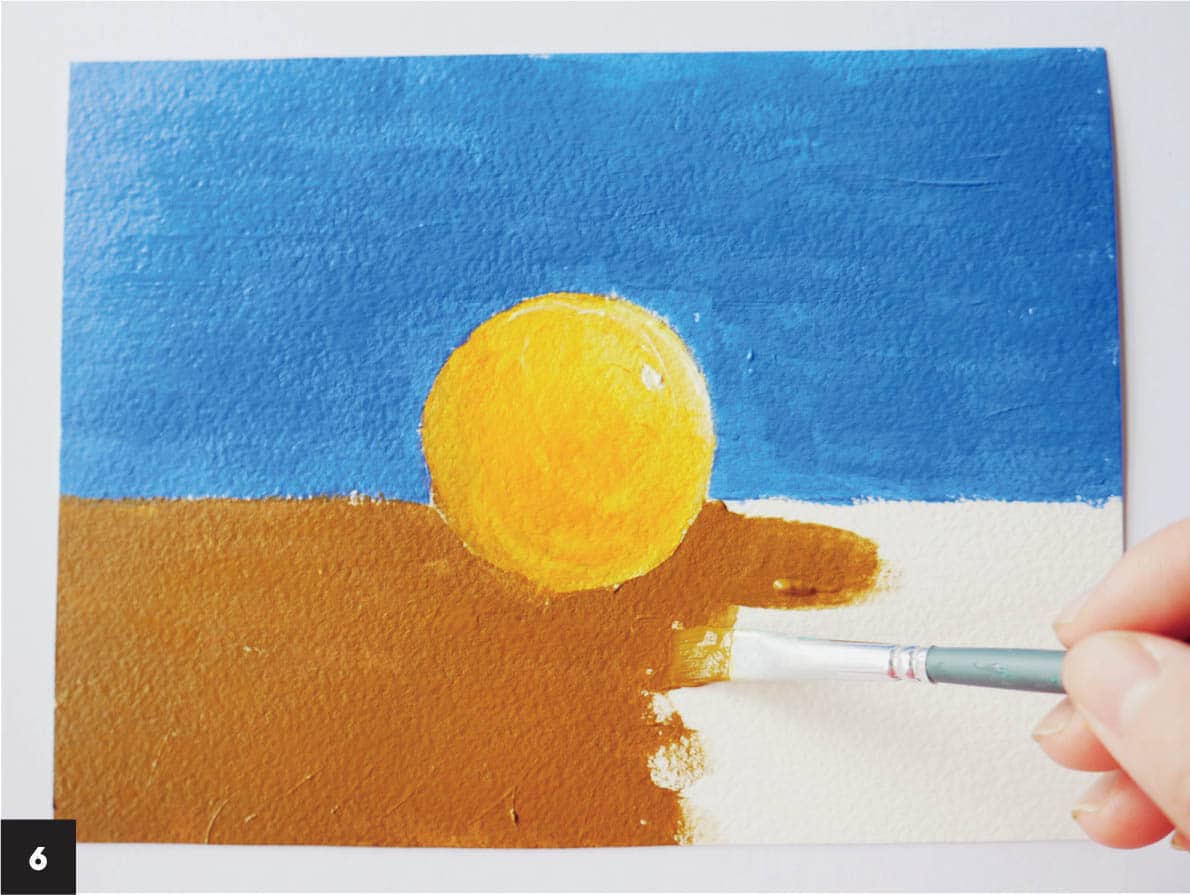
In this lesson, you’ll learn how to paint a simple subject—an orange—with a foreground and background to give it dimension. You’ll build the depth of the painting gradually with these easy steps. 1 Sketch a horizontal line on the paper with a pencil to act as a guide for where to place the orange. I created a line a little less than halfway up the page. As a reference, you can use a real orange or a photo or conjure up an orange with your imagination. 2 Sketch a circle in the center of the paper; this will be your orange. 3 Block out the colors of the painting, beginning with the orange. Blocking is painting the initial colors in areas of the painting. Paint the circle with orange and allow it to dry. 4 Now that the base color of the subject has been established, move on to adding values. Values are the lights and darks of a painting, and they’re important because they create a focal point as well as a dimensional effect. Make sure your paintings have a variation of light and dark tones. 5 Imagine a light source; I placed it at the top right of the painting. Add a lighter orange or yellow paint to the side of the orange facing the light. Dab a bit of white paint where the light would directly hit, making it the lightest part of the subject. Mix a small amount of brown paint with orange and apply it opposite the light source, to the underside of the orange, to create a shadow. Paint the background blue. Adding this darker color will make the warmer one—orange—look brighter. 6 Paint the foreground. I chose brown. By adding color to the foreground and background you can assess what the painting may lack or what can be enhanced. 7 Add darker colors beneath the orange to create a shadow—this should be opposite the light source, where light is at a minimum. Mixing two complementary colors (in this case blue and orange) produces a dark neutral color that works well when creating shadows. You can also opt to use black or Payne’s gray. Add a touch of white to the top part of the orange to show how the fruit reflects the light. I also added a tiny bit of white to the shadow underneath. A hint of reflected light often appears at the top of a shadow. 8 Add some tiny dots to the orange with the tip of a paintbrush. I added bits of brown and white to simulate the texture of the fruit.A SIMPLE ORANGE


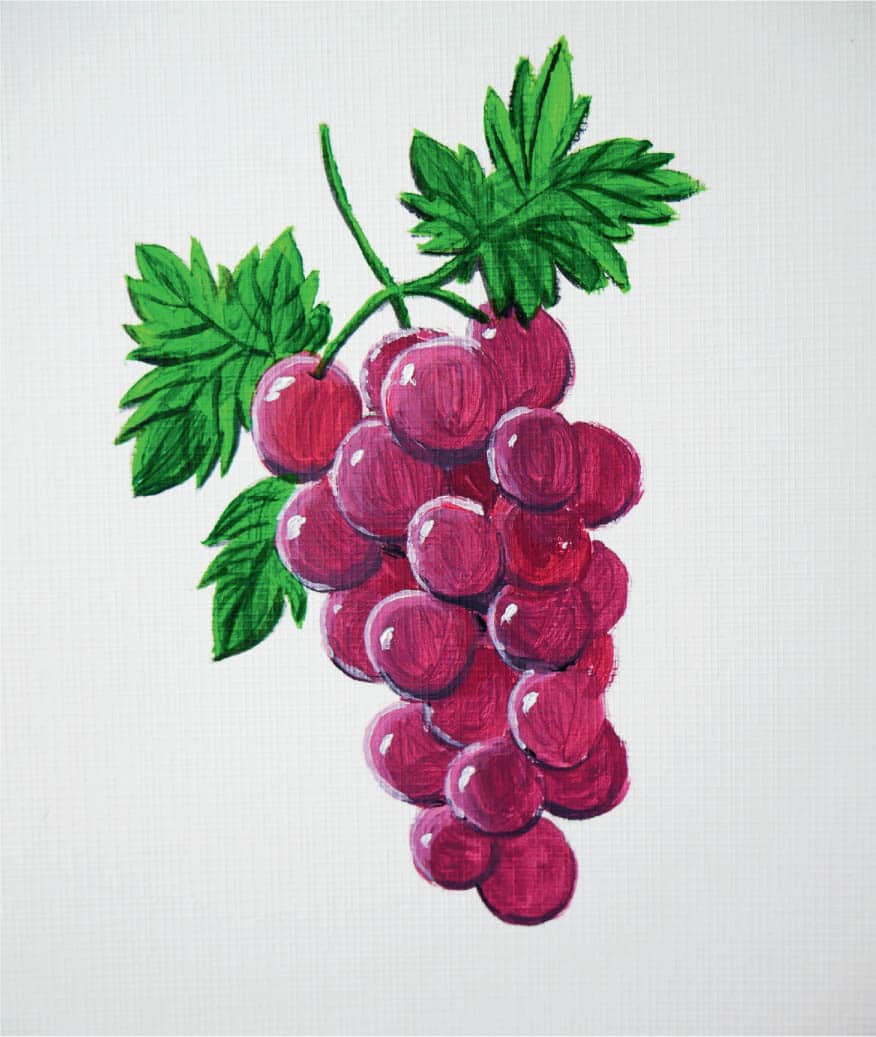
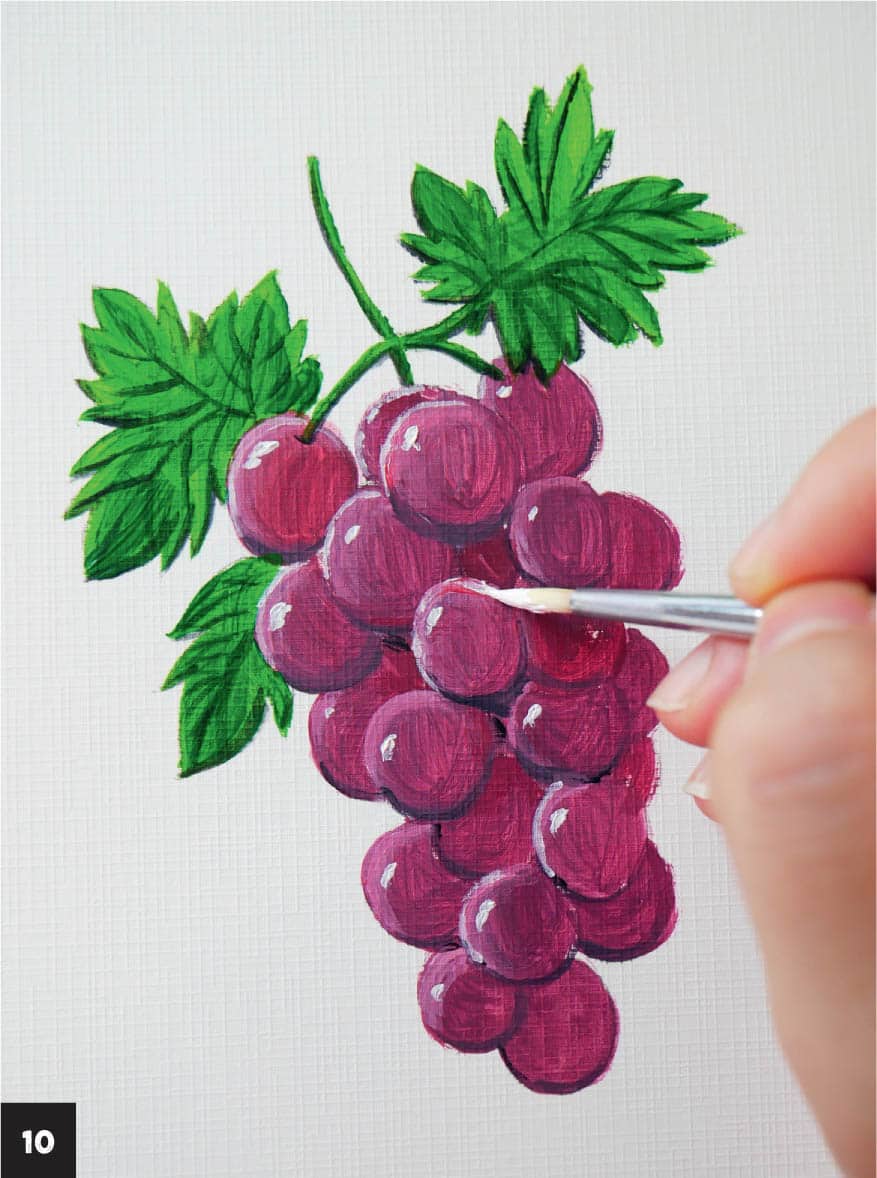
Now that you’ve painted one simple shape to create an orange, try painting a more complex subject. In this exercise, you’ll paint a cluster of grapes, learning how to convey lightness and darkness with several shapes arranged closely together.
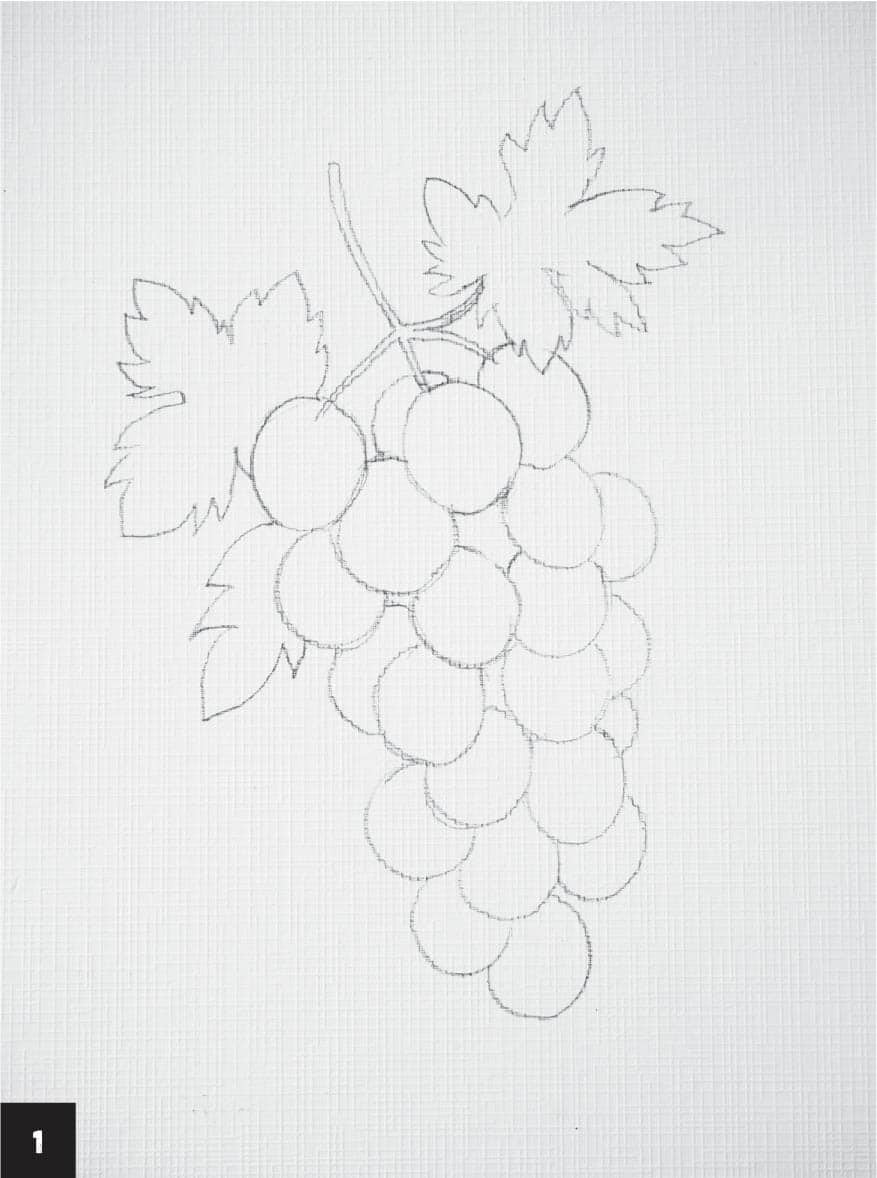
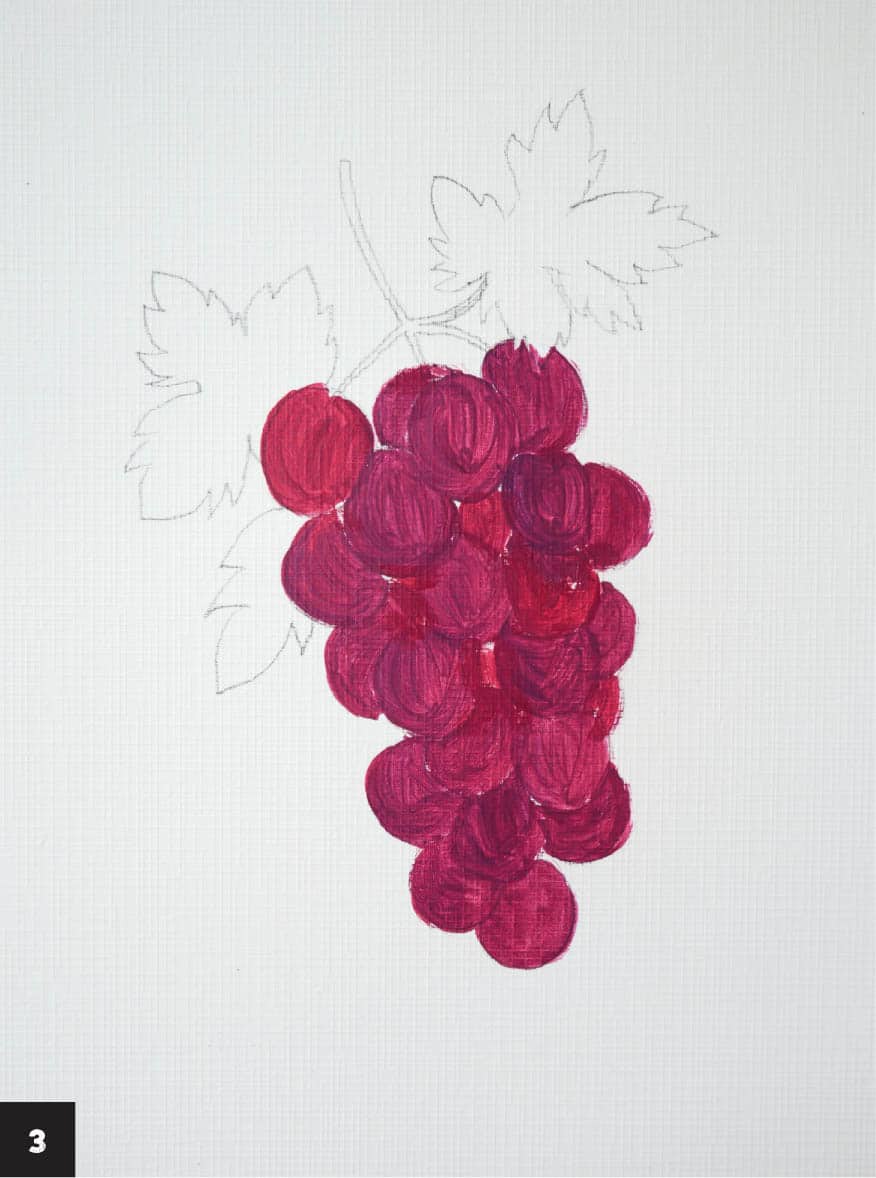
1 Use the template or sketch an oblong cluster of grapes. The general shape is like an inverted triangle, so draw more packed circles at the top and then gradually make them more spread out as you move toward the bottom, overlapping the individual grapes. I added a stem on top and star-shaped leaves.
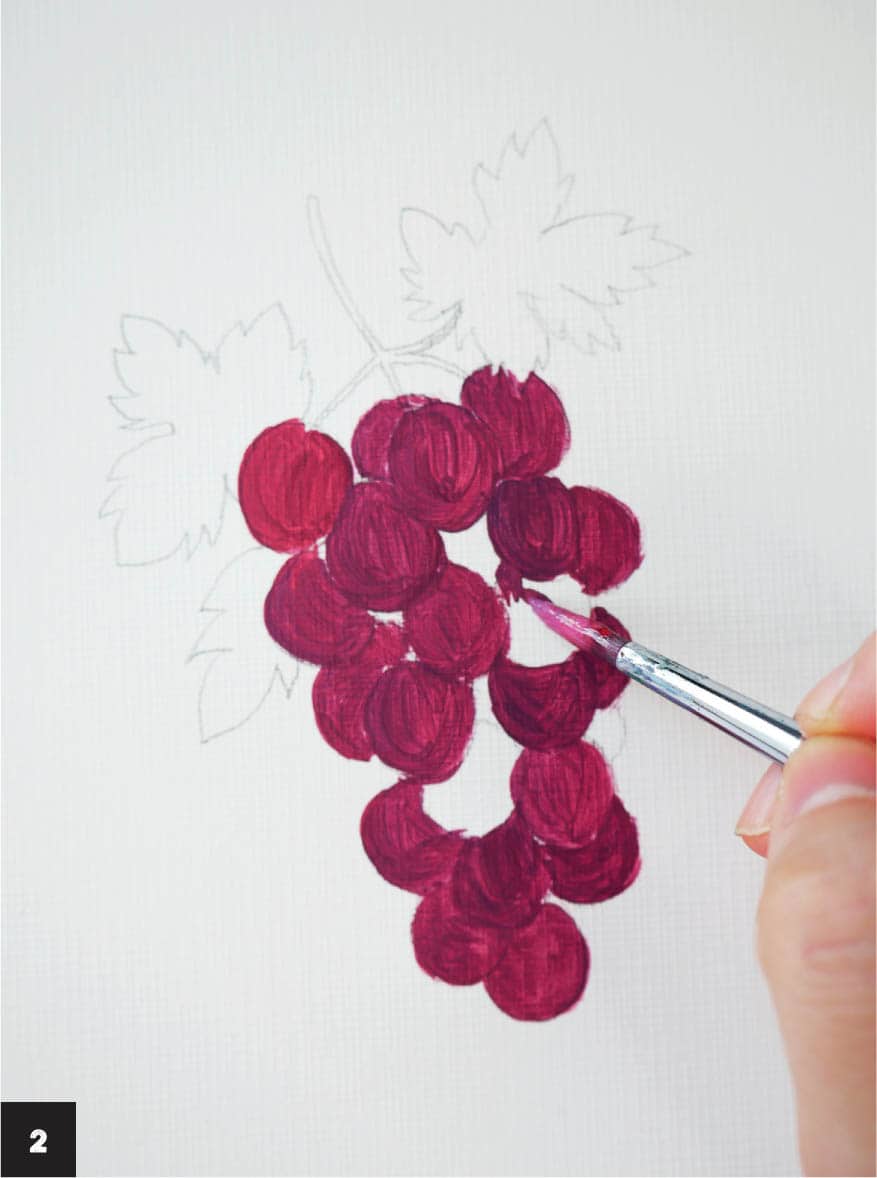
2 Using the size 6 round brush, fill in the individual grapes with purple acrylic paint, or mix blue and red to create violet. You can make the violet shade redder by adding more red to the mix.
3 Use the paint you mixed in step 2 to paint each circle individually so that each grape stands out; this will be important in the next steps. Allow the paint to dry.
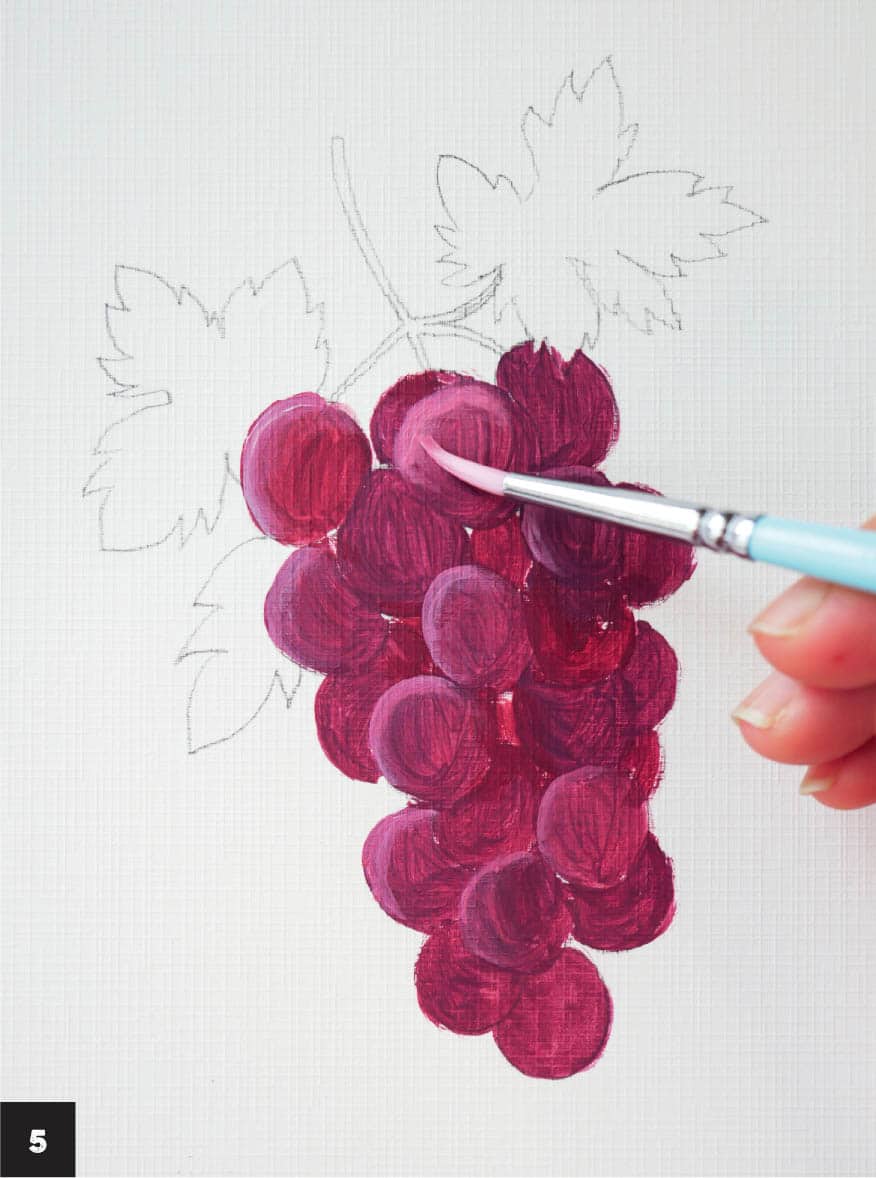
4 Add a bit of white to the purple paint to produce a light purple/pink color to highlight the grapes. Imagine where the light may be coming from and apply this light purple color with the size 2 round brush on the top part of one grape, where the light would be hitting it. Paint the highlight by making an arc on top of the circle.
5 Quickly wash the brush, and while the highlight is still wet, gently soften the edge of the light purple color so it blends with the purple grape. The top of the grape should look lighter than the rest of it. Repeat this step for the topmost grapes that are not hidden by other grapes.
6 Paint a thin dark arc at the bottom of each grape using a bit of black or Payne’s gray and the size 2 round brush. This further emphasizes the shadows underneath the fruit.
7 For grapes nested behind other grapes, add a little of the dark color to the gaps in between. Those dark areas help emphasize the roundness of each grape, giving life to the cluster of grapes.
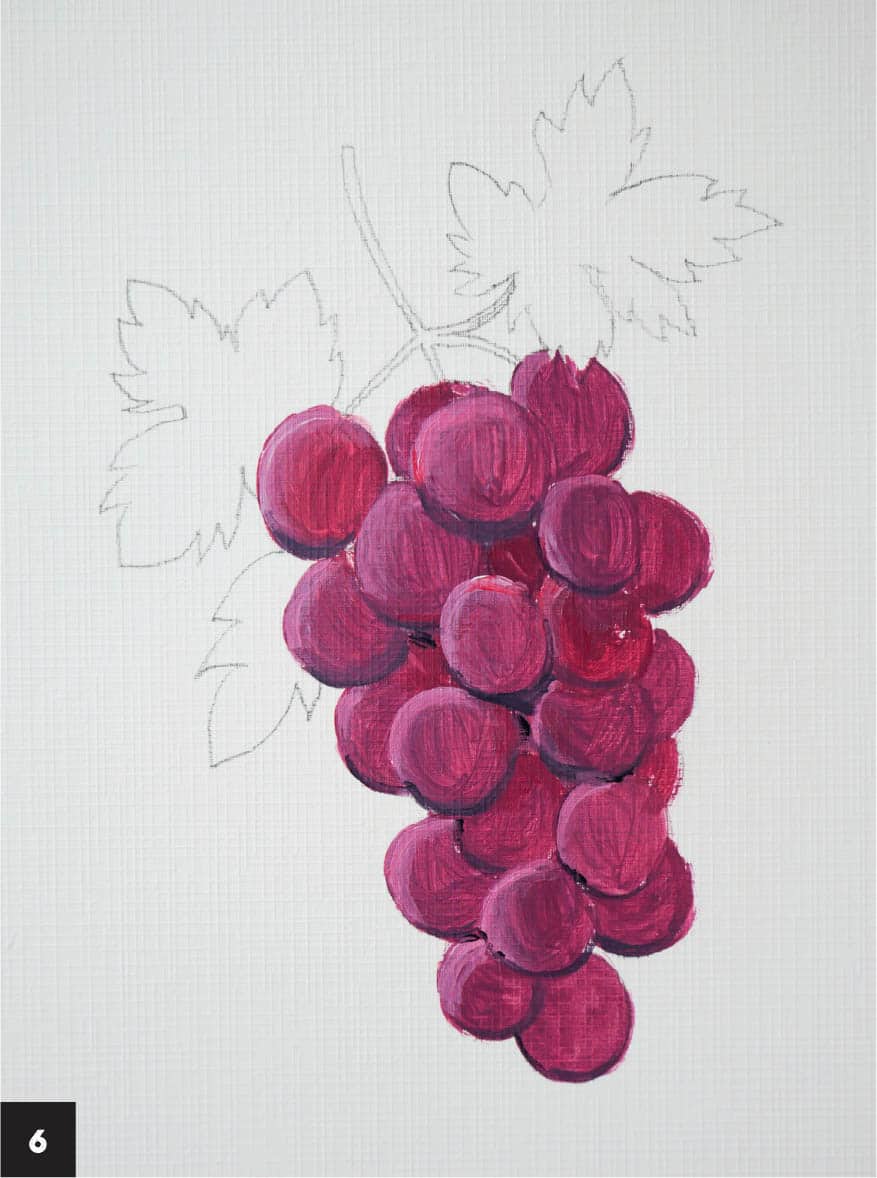
8 Combine green and yellow paint to create a bright shade for the leaves and stem and paint them using the size 6 round brush. Allow the paint to dry.
9 Add the leaf veins with a bit of black paint and the size 2 round brush. Creating veins is easy: Paint a thin line at the tip of the leaf and continue until you reach the stem. Add evenly spaced diagonal lines starting from the center line to the edge of each leaf.
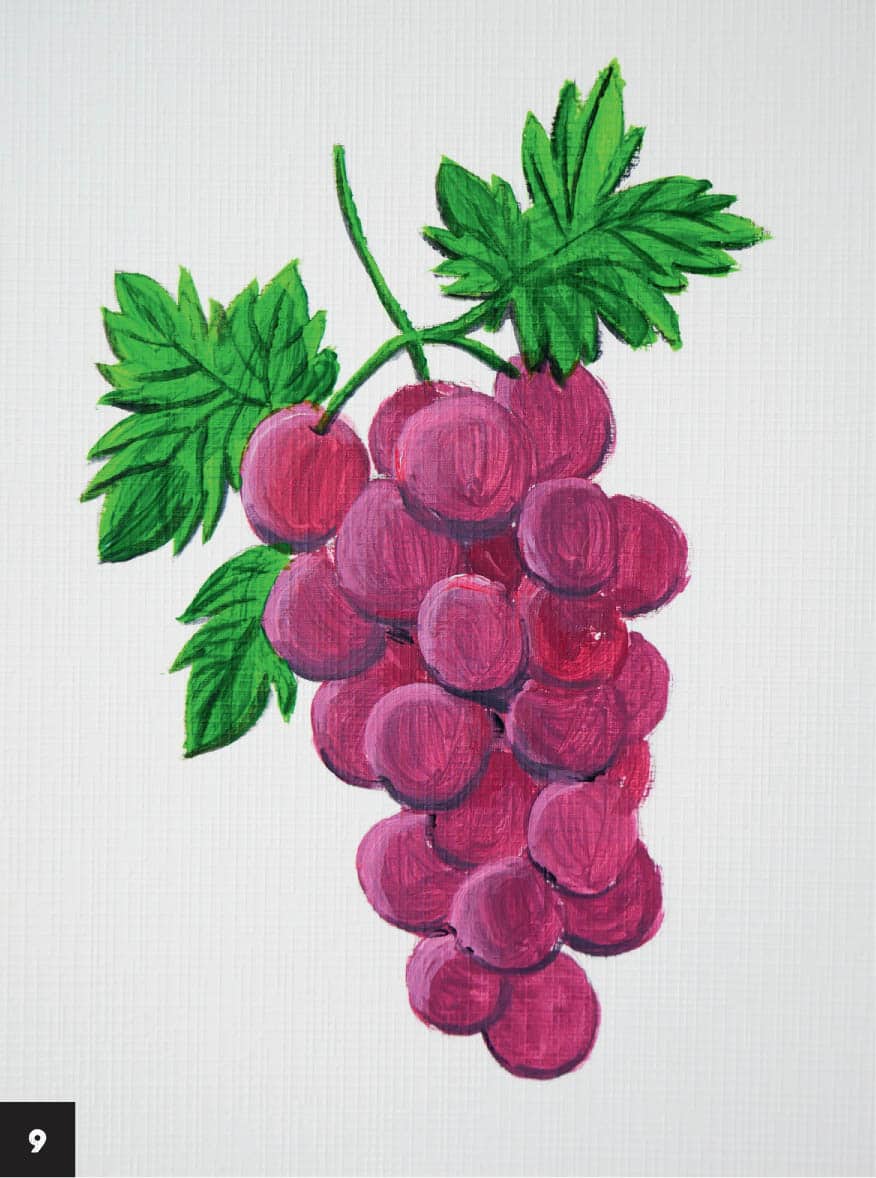
10 Use the size 2 brush to add a small dot of white to some of the more prominent grapes and skip the grapes that are covered or hidden by the others. Add the white highlight near the corner where you applied the light purple arc in step 4. You can also add a thin white line to that same light purple arc, but this time don’t blend it with the purple; this will make it more prominent.PURPLE GRAPES


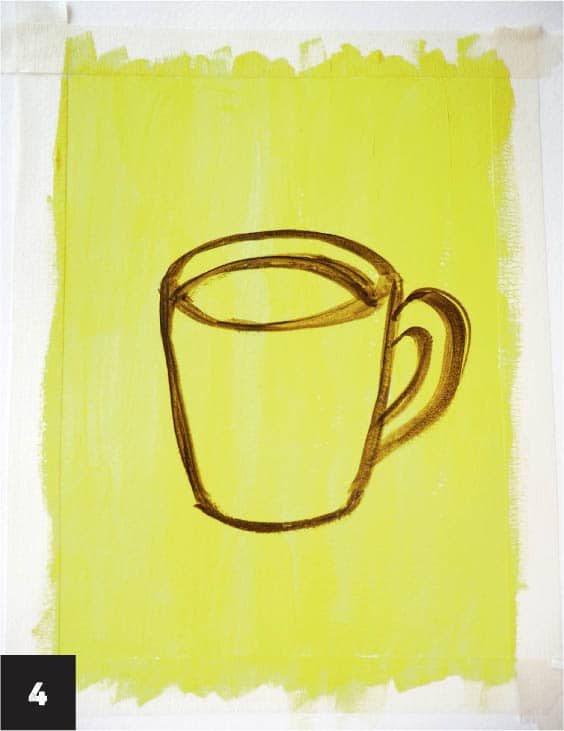
Everyday objects are a convenient source of inspiration for painting. By learning to paint different objects we quickly train our brain where to add the lightest and darkest colors, understand what kind of shapes these items produce, and become more comfortable with acrylic paints. In this exercise, you’ll paint a common household object—a mug—without doing an initial sketch. Instead, you’ll allow your imagination to guide your painting, allowing you to use more loose and expressive brushstrokes. Painting items around your home is a wonderful exercise. I encourage you to find more items that inspire you to paint. 1 Follow the directions to “Create Clean Borders” on this page.
2 Paint the entire background with a yellow wash using the flat brush (to create a wash, see here). Add a brushful of water to the yellow to make it easier to spread across the paper. This light color will give the subsequent layers of color a brighter appearance. Allow the paint to dry. Imagine your favorite mug, or place one in front of you for you for inspiration. (Avoid accidentally setting your paintbrush in your mug like I did!) Using the flat brush and brown paint, lightly paint an oval in the center of the paper. This will be the rim of the mug and the starting point of the painting.
3 Paint a concave line on each side of the oval and a smaller arc at the bottom to complete the shape of the mug.
4 Paint another arc inside the rim of the mug; this will become the coffee or tea or whatever drink you have in mind. Lightly paint two arcs on one side of the mug for the handle. The painting doesn’t have to perfectly represent a mug, it just has to loosely resemble one. You’ll continue to build up the image in the next steps.
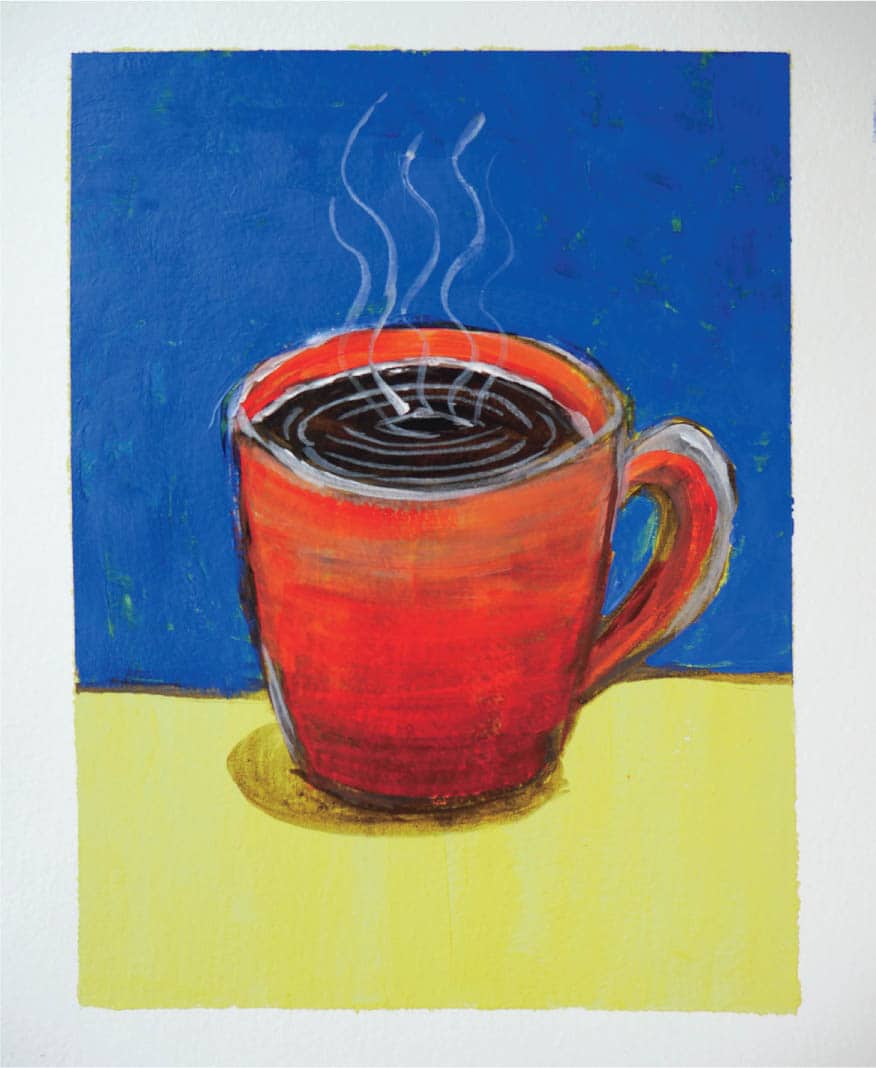
5 Now that the painted sketch is complete, lay down the light and dark tones of the mug to serve as a guide in the next steps. Mix a bit of white into the brown paint and apply this to the top part of the mug. Add more brown to the mix and continue to paint the mug, making it darker toward the bottom. At the very bottom, use even more brown to emphasize the shadows. Color the liquid inside the mug; I used brown paint. Seeing the yellow color peek through is fine, as this adds warmth and brightness to the painting. Allow the paint to dry. Using the same flat brush and a bit of brown paint, draw a thin horizontal line behind the mug, a little below its center, but be careful not to paint a line over the mug. This indicates where our mug is resting (below the line) and provides a background (above the line). Clean the brush for the next step.
6 Choose another color of paint for the mug and mix it with a little water to thin it (I used red) (A). Using the clean flat brush, apply this wash to the mug except for the center, where the contents will be. Notice how some of the browns and whites added in the previous steps can be seen, accentuating the light and dark values (B). Clean your brush.
7 Finish painting the liquid in the mug. I chose a dark brown color for my drink of choice, my homemade cappuccino. Block out the area inside the mug with the flat brush. Using the tip of the brush and white paint, add a highlight along the rim of the mug, the top of the handle, and a bit on one side of the mug where the light source would be. Also add white around the liquid in the mug. Adding subtle highlights such as these adds interest.
8 Another way to maintain interest is by adding a complementary background color. I used a bright blue. The color doesn’t have to completely cover the yellow; the brushstrokes underneath can show through, allowing the painting to be more of an expression rather than perfectly finished.
9 Use the round brush and white paint to add little swirls in the liquid (A) and steam rising (B). Steam can be drawn as a thin, continuous S shape that begins on the surface of the drink and floats up. This detail adds that realistic feel of a nice, hot drink.COFFEE MUG


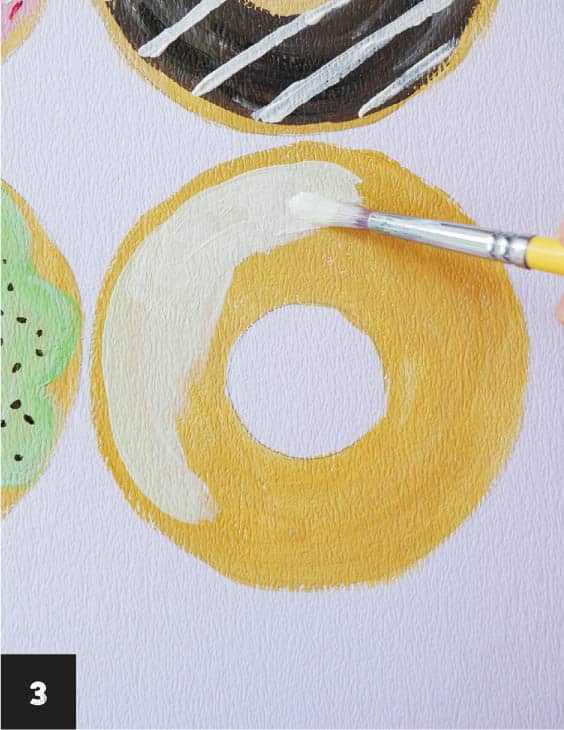
Would you care for some donuts? In this lesson, you’ll paint multiple objects, each with its own unique details, in a single painting. You’ll incorporate what you’ve learned about light and shadow to paint delicious donuts that appear so real you’ll want to grab one and eat it!
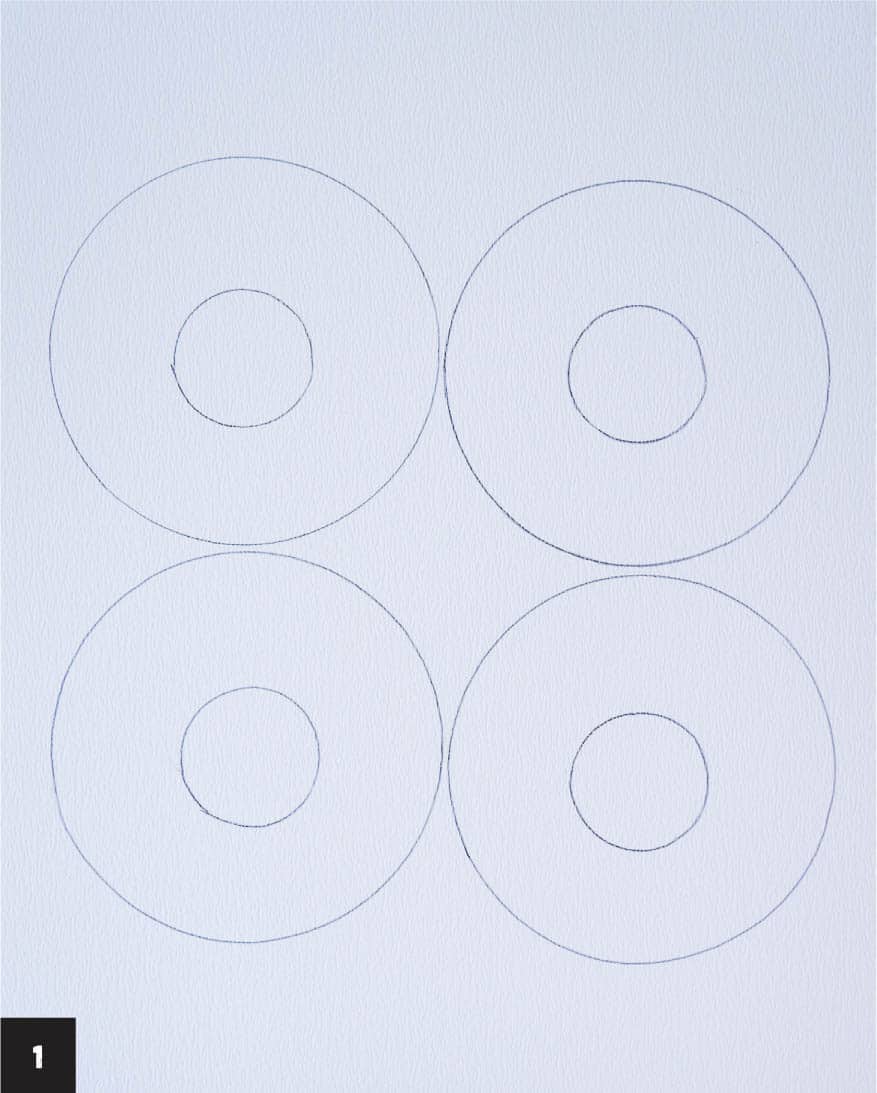
1 Sketch the circles to create the donuts. Trace two circles each in two rows using the larger circular object and a pencil for a total of four donuts. In the center of each of the larger circles, trace the donut hole using the smaller circular template.
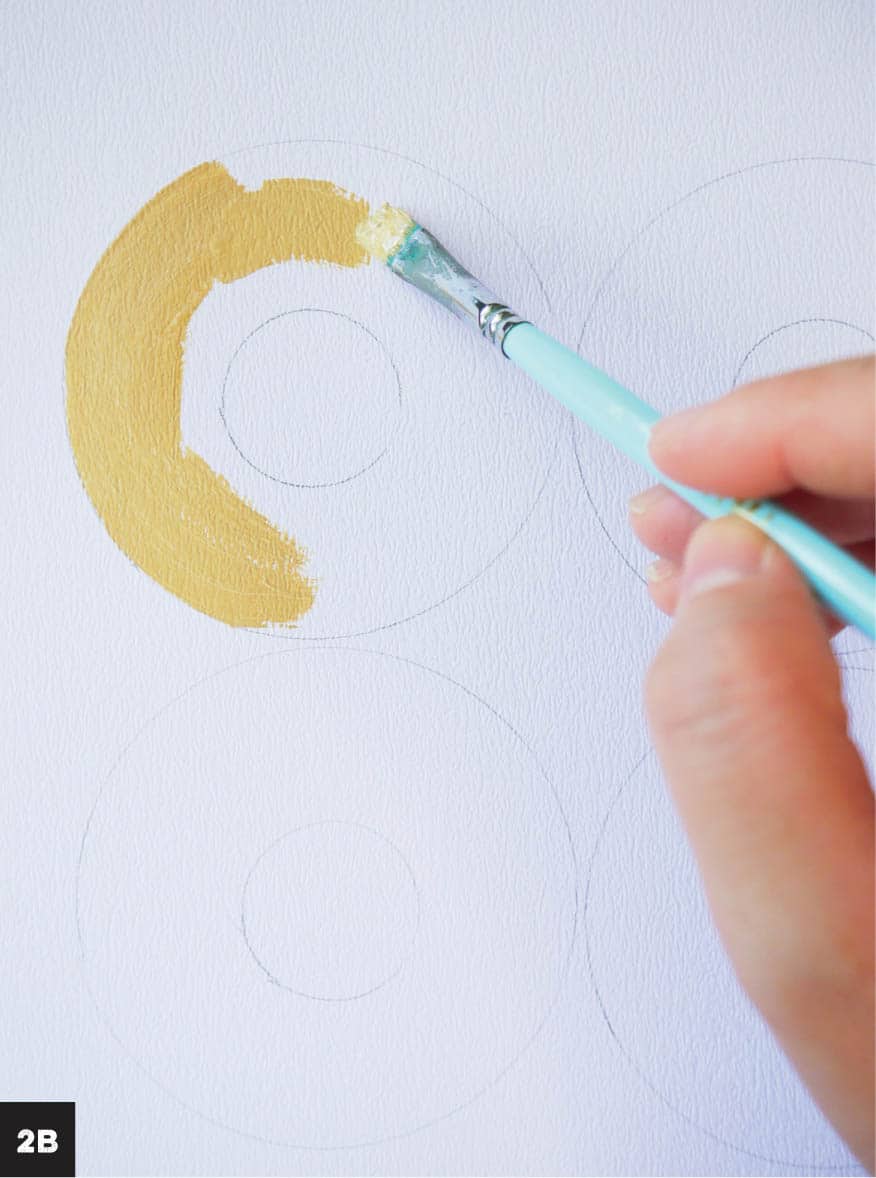
2 Mix yellow ocher and a bit of brown on the palette to create a nice bread-like color for the donuts (A). Add a dab of white to lighten the color and then load the flat brush with this mixture and paint the donuts (B). Allow the paint to dry before adding the toppings (C). You can create several different types of donut toppings with acrylic paint. Let’s start with the top left donut and paint sprinkles. 3 Mix a little red with white acrylic paint to make pink, which will be the donut glaze. Using the flat brush, paint the glaze on the top left donut, leaving a small border on the sides and taking care not to paint over the hole. Let this pink glaze dry.
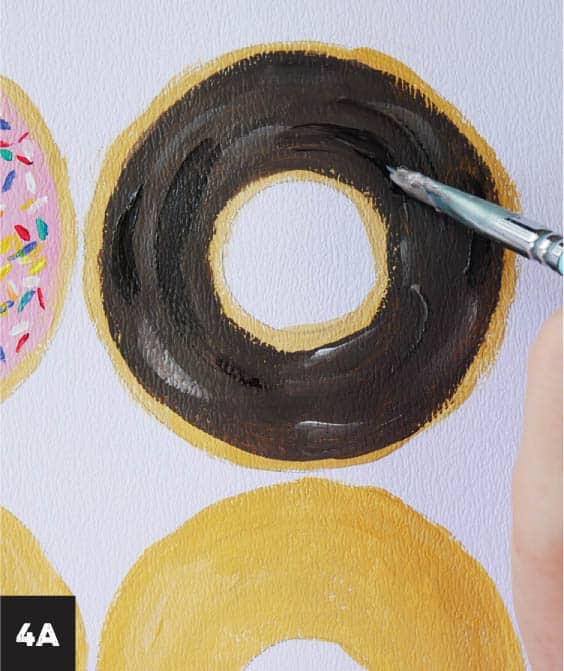
4 Add bits of red, green, yellow, blue, white, and orange paint to the palette for the sprinkles (A). Paint thin, short strokes using each of the colors all over the pink glaze (B). 3 Mix brown with a bit of white to achieve a deep, chocolatey brown shade for the glaze. Paint the donut as you did the sprinkle version, using the flat brush.
4 Add some dimension to the donut using the flat brush and brown paint straight from the tube. Make small arcs of brown paint with the brush, leaving a nice thick texture that looks like chocolate syrup (A). Clean the brush, wipe it dry, and dip it in white paint and make similar arcs to create highlights. After adding the white paint, blend it into the brown to create the appearance of a highlight on the glaze (B).
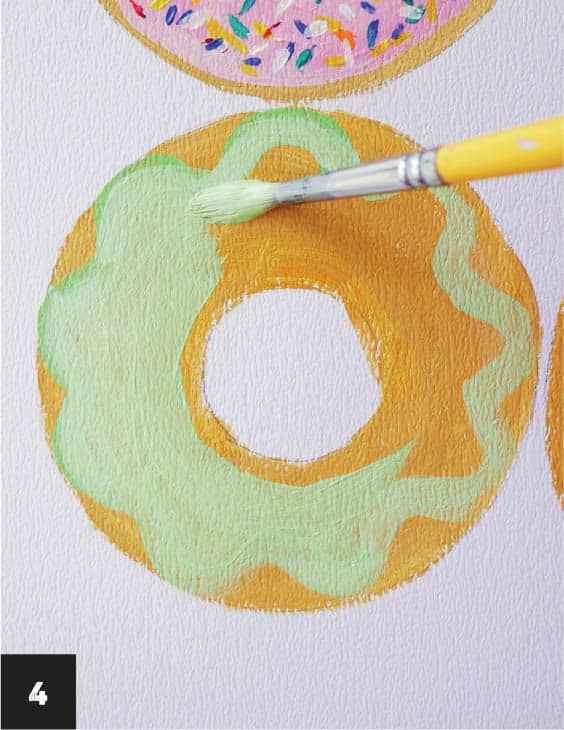
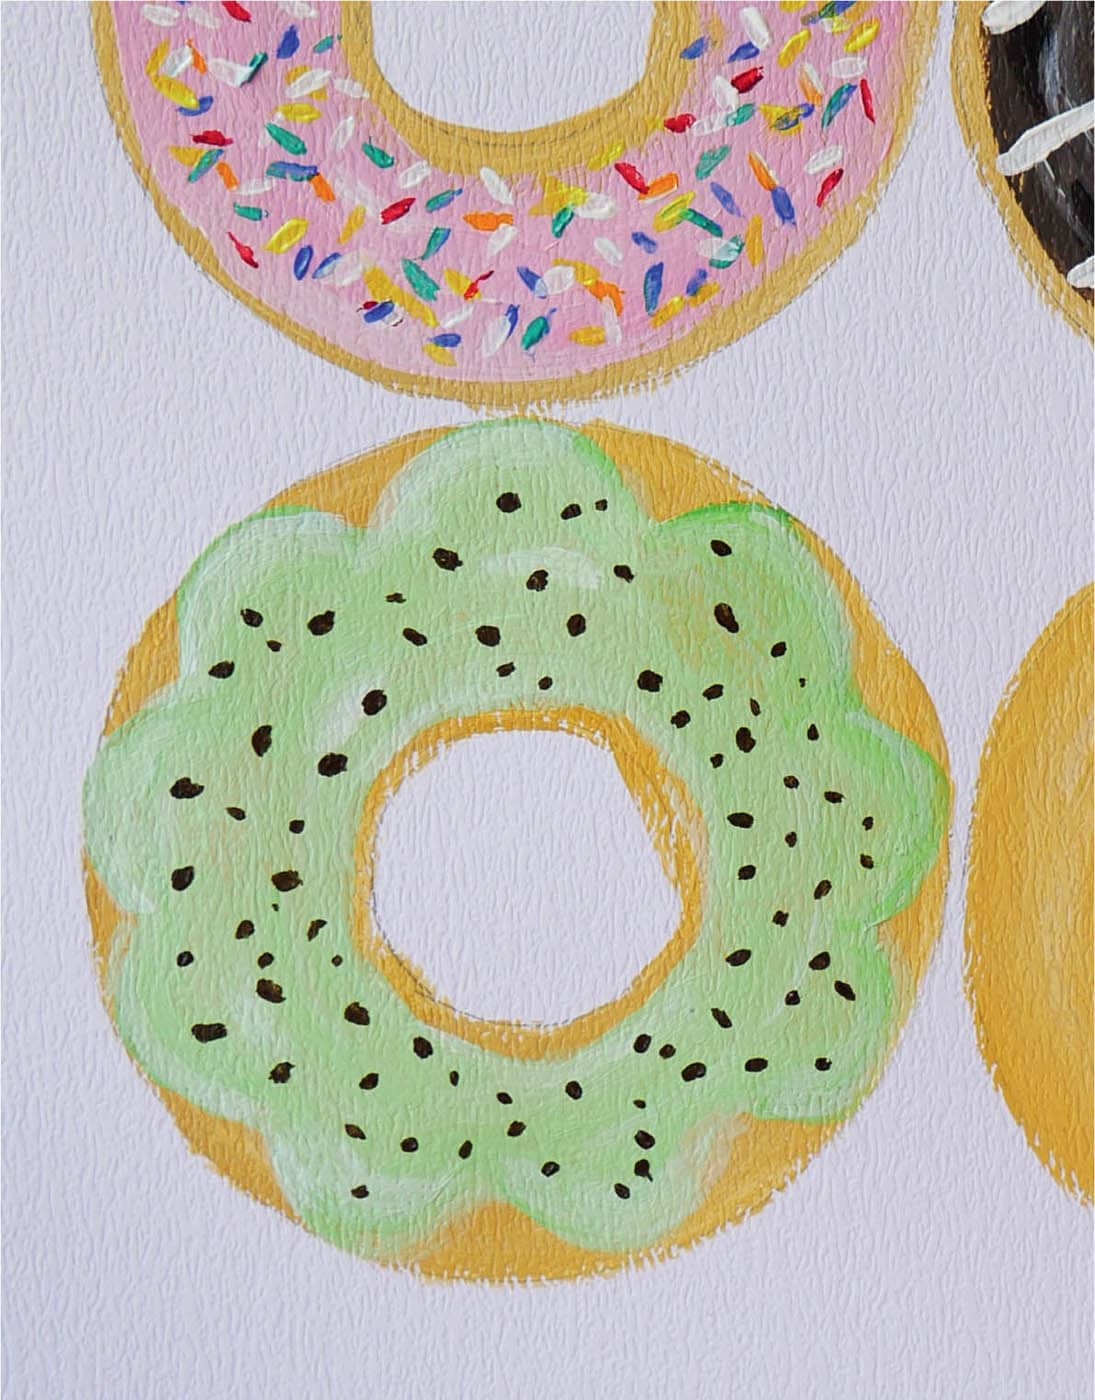
5 Make a thin zigzag pattern over the glaze using the size 2 round brush and white paint. 3 Create a green tea glaze by mixing a small amount of green with white acrylic paint. Trace a flower-shaped outline on the donut using the size 6 round brush.
4 Block in the outline with the green-colored paint. Add subtle highlights on the curves and center of the glaze with white paint. Be sure to blend the white into the green.
5 To create the chocolate sprinkles, add short, thin lines over the green glaze, working in short strokes of brown paint with the size 2 round brush. 3 Create a white glaze by mixing white paint with a tiny hint of yellow ocher and then paint it on the donut, remembering to leave a border on the sides. Add some texture to the glaze with white paint straight from the tube, using the size 6 round brush to make small arcs of thick white paint on the donut.
4 Mix water and a small amount of brown paint to create a wash. Paint the wash on the top and bottom part of the glaze to make it look more lifelike. Paint a flower-shaped outline over the white glaze, using the size 2 round brush and yellow ocher paint (A). Paint thick lines to make it look like icing on the donut (B). ADDING SHADOWS AND HIGHLIGHTS Now that the donuts are decorated, move on to painting the shadows and highlights that will make them look extra delicious. Imagine a light source at the top of the painting and create a shadow underneath the bottom of each donut with a wash consisting of a little Payne’s gray and water. This gives the illusion that the donuts are sitting on the foreground. Add the wash under the top of the inner donut hole, which also has a shadow. Using white acrylic paint and the size 2 round brush, add highlights on the glazes along the top ridge of the donuts, where the light would hit them.COLORFUL DONUTS
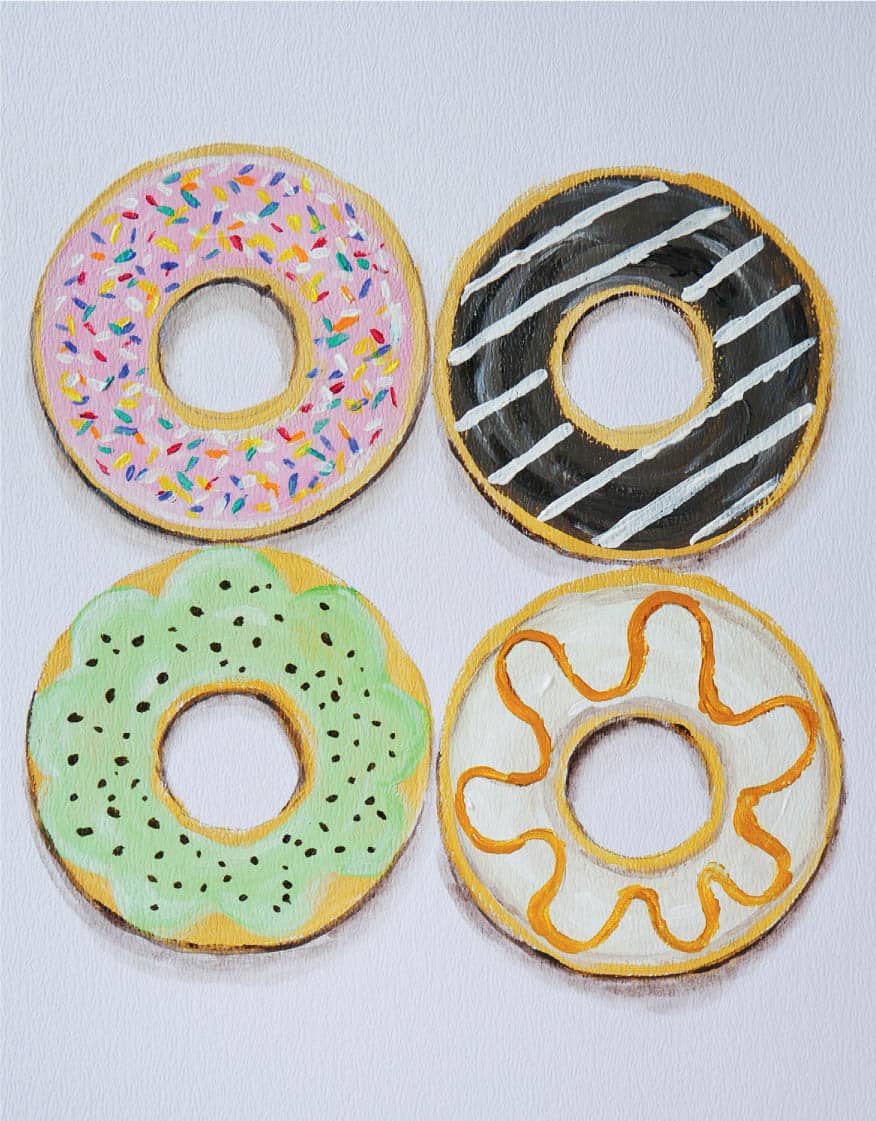


Sprinkle Donut


Chocolate Glazed Donut


Green Tea Glazed Donut


Iced Donut