Whether your passion is golf, woodworking, gardening, sewing, or bicycling, there's one piece of advice that stands above all others. Get a good set of tools. For you, that means a good camera. Yes, it's a bit like telling a jockey to get a good mount or a NASCAR driver to get a good car, but without a camera capable of providing you high quality, well-exposed photos. your time and effort could be wasted.
When you're shopping for a digital camera, it's easy to bury yourself in hundreds of specs without really understanding what's relevant Most people start off the selection process with a camera's resolution in megapixels, That's not a bad place to begin, but if photographing a variety of active subjects with a variety of techniques intrigues you, then you'll likely want to consider some of the features and accessories discussed in the next few pages.
As you know, equipment can make a big difference in results and it's tough to evaluate a camera model on your own. Before buying, 1 urge you to visit camera review websites, such as www.dcviews.com, www.dpreview.com, www.stevesdigicams.com, and other sites to get expert, in-depth analysis of the newest digital cameras.
To maximize your ability to capture light and motion, you need a dSLR (digital single-lens-reflex) camera as opposed to a snapshot camera.
Because I'm a value seeker (okay, cheapskate) and want to stretch my hard-earned money, I tend to get a high-end prosumer dSLR camera. Typically it costs about half or less of the comparable professional model from which it is descended while offering most of the same features. One of the main differences is that the amateur and prosumer versions are often housed in a less rugged body. Another difference is that these lower-end models typically come to market six months to a year after the introduction of the pricier parent professional models.
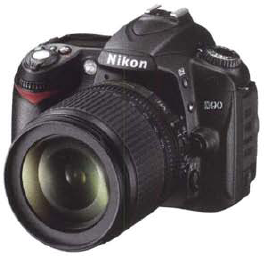
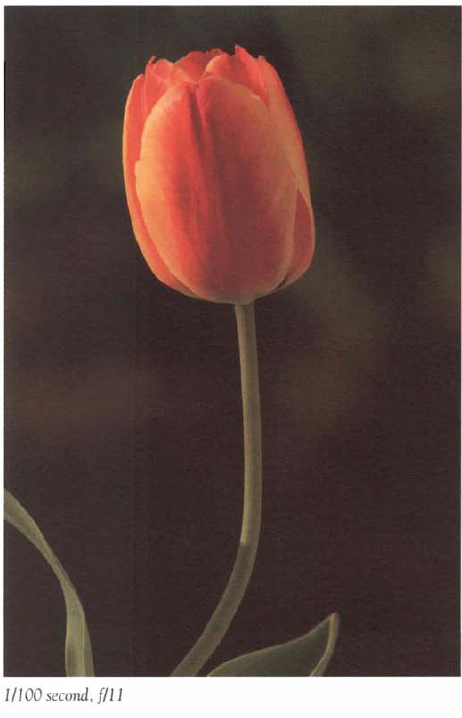
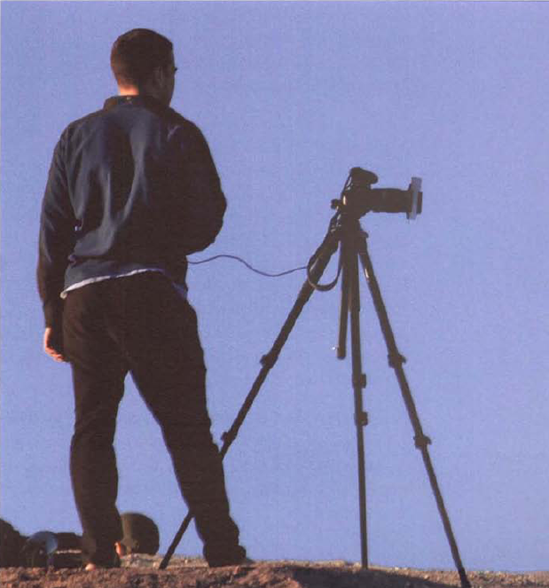
Figure 4.1. A digital single-lens-reflex (dSLR) camera offers superior image quality even at high ISQs and fast responsiveness that makes it ideal for action photography.
As a motion shooter, you need a camera with a top shutter speed of at least 1/2000 second, preferably 1/4000 second, and ideally 1/8000 second. But 1/4000 second can meet 99% of your needs. The Longest shutter speed setting you'll likely need is about thirty seconds. Although nearly all cameras offer a "Bulb" setting that keeps the shutter open as long as you want it to stay open, make sure the model you choose includes it. A top flash synch speed of 1/250 second adds a bit of versatility, but 1/160 or 1/125 second suffices.
For creative effects—so you can achieve fast shutter speeds even in dim light and ultra-fast shutter speeds in bright light—look for a camera that delivers high quality (low noise) images at high ISOs like 800 and 1200. Most cameras made since 2007 offer good high ISO image quality, so this shouldn't be a problem.
What else should you look for from the perspective of photographing motion? Highly desirable is a very responsive camera. Fast response comes from quick and reliable focusing, a good burst rate (six or more images per second at full resolution), and ergonomics that let you interact quickly with the camera. Good ergonomics are somewhat subjective but with them you can easily and quickly make the camera settings you need without constantly resorting to the camera manual. A poorly- designed camera will not only frustrate the beck out of you but cause you to miss many good photo opportunities.
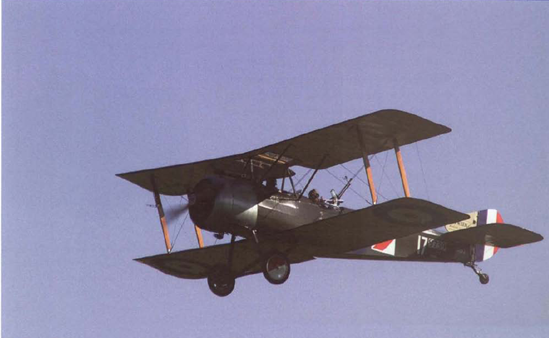
Figure 4.2. For fast-moving subjects you need a dSLR for its responsiveness, It can focus quickly and accurately, and take a large number of pictures rapidly. Exposure at l/500 second, f/11.
Is there a particular brand or model you should consider? It's hard to go wrong with the longtime leaders—Canon and Nikon. Olympus and Pen tax have also been around for quite a while. Sony is the new guy on the block (taking over what was once the Minolta brand but sufficiently changing things—except lens mounts—to be considered a brand unto their own). Most of the newest dSLR cameras—regardless of brand—offer exceptional quality and capability. Perhaps the biggest advantage of going with a Canon or Nikon is the number of accessories available for them. In summary, before you choose a camera, research the camera review websites and then go to a store and handle the one or two models you prefer before buying the camera.
Compared to a good dSLR, even the best digital snapshot camera falls short in many areas. This is especially true when photographing action, when you especially need fast response. To begin with, most snapshot cameras have motorized zoom lenses and these are woefully slow to change focal lengths. Most have modest minimum-to-maximum aperture settings that significantly reduce available shutter speed range for creative effects. Most focus much slower than dSLRs and, relatively speaking, can't keep up as well with high-speed subjects. Most give poor image quality above ISO 400 (too much noise). And many cannot match the rapid-fire shooting of a dSLR.
Having just listed the many disadvantages of a snapshot camera you may wonder why J use one as a backup. Simple—it can take excellent photos and offers much versatility, starting with extreme portability that lets you slip it into a roomy pocket so it's handy and available wherever you go. Although mine has a modest 5X zoom lens, the lens is sharp and produces superb photos. Other prosumer snapshot cameras offer zoom ranges up to 24X—that's a lot of telephoto power. Most also feature image stabilization, easy-to-use controls, and a video mode (now becoming more common on dSLRs).
So while a snapshot camera may not match the capability of my dSLR, it can produce excellent photos. And its compactness and convenience makes it the ideal traveling companion.

Like a door swinging open and shut, the camera shutter seems to operate independently. But that's not so. Few camera functions work in isolation. Just as the shin bone is connected to the knee bone and the knee bone is connected to the. Well, you get the idea—the same principle applies to your camera. And unlike your body which only has 206 bones, your camera is crammed with a multitude of external controls and software-driven menus that connect hundreds of selections, giving you a bead-spinning and brain-numbing number of choices and combinations that impact how you use shutter speed.
There will be many times when you can simply sec the shutter speed and be about your business. But when photography moves to the fringes of light and speed, your choices become critical.
Before 1 drag you into the swamp of functions bere's a preview of what awaits you. The functions most important to creative motion capture include exposure modes, ISO settings, exposure compensation, bracketing mode, focus controls, rapid picture-taking controls, file format, mirror lockup and exposure delay.
By the way, different camera models implement these controls differently. They may even give them different names. So read your manual to make sure you know how to use them with your camera.
By setting the exposure-mode control you can tell the camera how to prioritize the shutter speed-aperture combination. There are four basic exposure modes: Manual, Aperture-Priority, Shutter-Priority, and Program. Some cameras also offer scene modes, sometimes a dozen or more that are supposed to simplify picture taking. Typical scene modes are named after the situations they're designed for: portrait, party, scenic, action, night, beach, snow, backlight, and so forth. Although handy for casual photography, scene modes don't let you choose specific aperture or shutter speed settings.
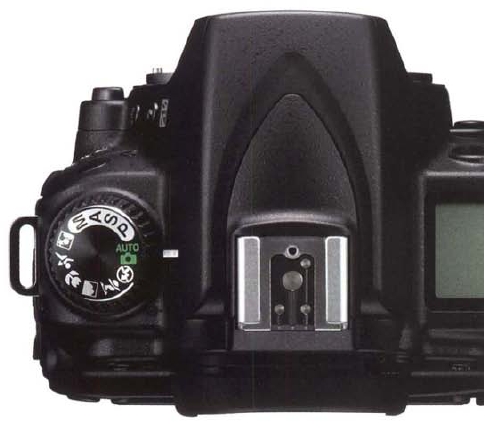
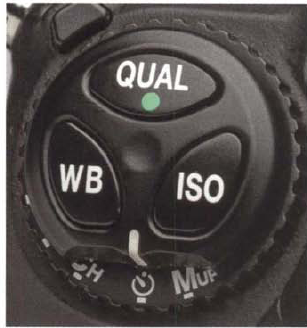
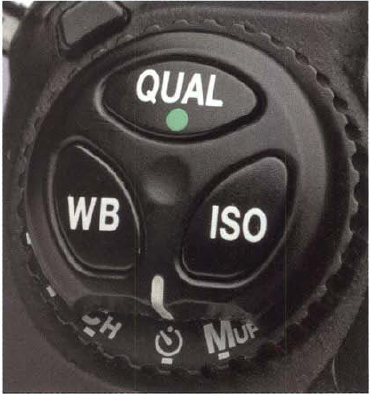
Figure 4.6. A single dial lets you quickly choose the exposure mode (marked in letters) or scene mode (indicated by icons) you want for the subject before you.
The Shutter-Priority mode (sometimes called Tv for "time value") stands out because it lets you choose the shutter speed you deem appropriate and it then sets the aperture for a correct exposure. This gives you the power and discretion to execute whatever creative vision you intend. Do you want to pan? Choose a shutter speed of 1/30 second. Do you want to freeze your kid jumping into the pool? Choose a shutter speed of 1/500 second.
Of course, there's one caveat. You still need to monitor the aperture chosen by the camera to make sure it fits your needs. Sometimes you may select a shutter speed that is beyond the camera's capability to give a correct exposure (meaning there's no aperture that can work with the shutter speed selected to give a correct exposure).
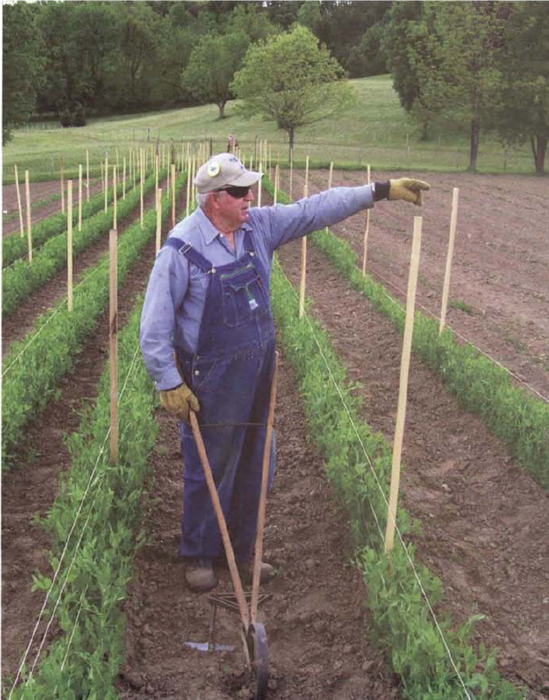
Figure 4.7. The Program mode excels for casual photography where the subject demands neither a specific aperture or shutter speed. I drove by the fields of my/farmers' market friend, Ron, and saw be was weeding his snap peas. So I grabbed a few quick snapshots of him at work. The exposure was J/125 second, f/5.6.
If the aperture doesn't meet your creative or correct exposure needs, your primary option is to change the ISO setting, increasing it if you want a smaller aperture (larger f-number), decreasing it if you want a larger aperture (smaller f-number}. Alternatively, you may need to change the shutter speed to obtain a correct exposure. For example, you may set a shutter speed of 1/8 second on a sunny day only to find there's not an aperture small enough to give correct exposure. Then you would need to set a higher shutter speed, such as 1/30 second, to achieve correct exposure.
The Aperture-Priority (Av) mode Lets you set the aperture you want, the camera then sets the shutter speed. Choose the Aperture-Priority mode when setting the correct aperture is critical to a successful picture. One common situation would be when you want to use a large aperture (such as f/2.8) to create shallow depth of field so the subject appears sharp against a very out-of-focus background. (This technique is called selective focus.) Another time when aperture selection would be critical is when you need a small aperture (f/16 or f/22) to achieve the great depth of field needed to show a scene sharp from the foreground to the background.
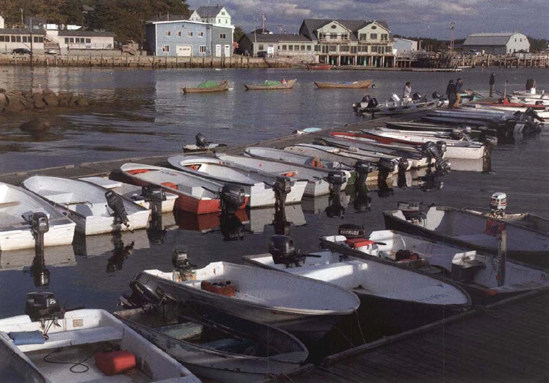
Figure 4.8. Use the Aperture-Priority mode when you want to set a specific aperture to either show the entire image sharply or just a very limited area. I set the aperture to/18 (shutter speed 1/125 second) no I could show both the foreground boats and the background buildings sharp.
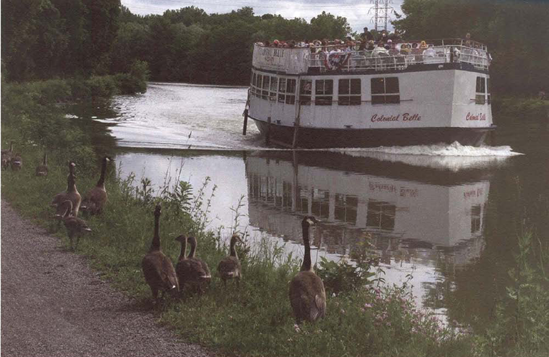
Figure 4.9. Choose the Shutter-Priority mode when you need a specific shutter speed to achieve the effect you want. Both the geese and the tour boat were moving. I didn't need a fast shutter speed, but I did want to show them sharp, so I set the shutter speed to 1/500 second (aperture f/8).
The Program mode sets both the aperture and the shutter speed, usually trying for intermediate (or middle of the road) choices on both. It tries to set a shutter speed fast enough to stop moderate action and an aperture small enough to give you a moderate amount of depth of field so most of the picture is sharp. Typically, you would use the Program mode when you are taking snapshots and aren't overly concerned about getting the perfect picture (that's not to say you won't still get some great shots).
With the Manual mode, you set both the shutter speed and the aperture. You also have to check the exposure meter readout to make sure the settings you choose will yield a correct exposure. Use the Manual mode when you face tricky lighting that can easily fool the meter into giving you a bad exposure.
This simple and perhaps most fundamental control determines the light sensitivity of the camera's sensor. Settings typically range from ISO 100 all the way to 12,000. A few cameras even offer ISO 25,000 but such a high setting is virtually unusable because of the excessive noise it creates. Each doubling of the ISO number represents a doubling of light sensitivity. Looked at another way, every time you double the ISO, you can double your shutter speed. Good to know when you're shooting fast moving subjects in dim light.
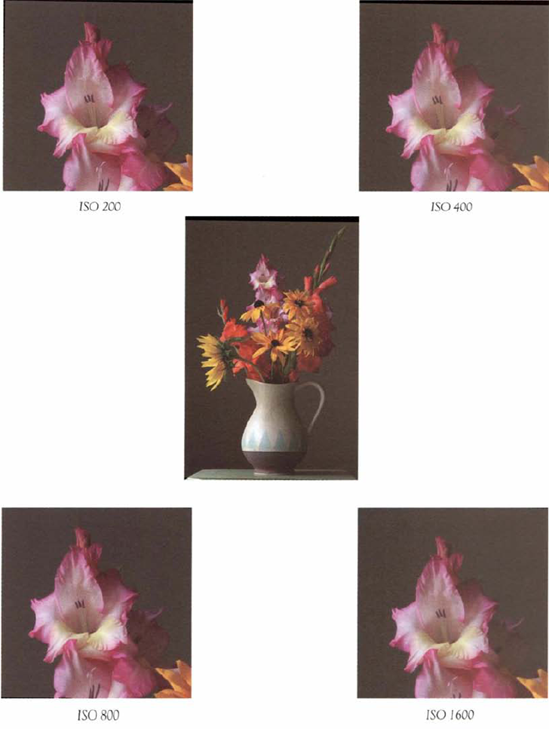
In general, for a given camera, the Lower the ISO setting, the better the image quality. However, in the past few years camera manufacturers have worked hard to improve the image quality offered by higher ISOs. The result is that newer dSLRs give excellent results at ISOs up to 1200. The reason higher ISOs reduce image quality is because at each higher ISO setting the camera increasingly amplifies the signal from the sensor, which also amplifies the noise (stray colored pixels) that's part of the signal.
When image quality comes first, use a lower ISO. But for stop-action photography where freezing subject motion is imperative, expect to regularly use ISOs of 400 and 800 and occasionally higher.
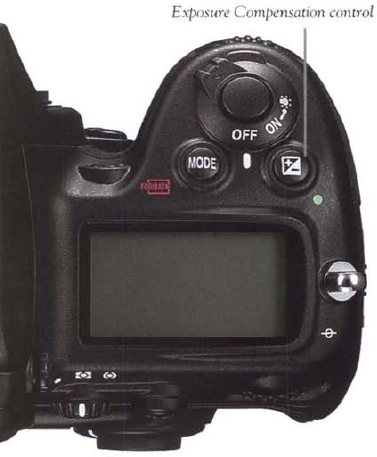
This is a control you may use often. How do you know when to use it? Use the Exposure Compensation control when the histogram for a picture indicates the exposure is slightly off.
Once set, the Exposure Compensation control automatically adjusts exposure when you are shooting in automatic exposure modes, such as Shutter-Priority or Aperture-Priority mode. If you're in the Shutter-Priority mode, it will most likely shift the aperture setting and maintain the shutter speed you chose.
The amount this control changes exposure depends on how you set it. You set the incremental change you prefer using the camera menus. Available exposure increments are typically 1/3, 1/2, or even a full stop. 1 normally use a 1/2 stop exposure change. To increase exposure, you choose a value with a plus (+) sign in front of it. To decrease exposure, choose a value with a minus (-) sign in front of it. For example, +1 increases exposure by one stop and −1 decreases it by one stop.
Why do you need this control? Because your camera's exposure system isn't perfect. There are thousands, indeed millions, of different scenes out there in the world. Each consists of a different mix of colors, shadows, and light areas. Sooner or later (trust me, sooner), one of these scenes will trick your camera into giving a poor exposure (too bright or too dark). So when the histogram indicates the exposure is incorrect, you need to step in and alter the settings. If the exposure is too dark (much of the histogram is on the left side of the graph), set the exposure compensation control to +1/2 or to + 1 and retake the picture—again checking the histogram. If the histogram indicates the picture is too bright (much of the histogram is jammed up against the far right side of the graph), set the exposure compensation control to −1/2 or to −1 and retake the picture (again checking the histogram).
Most dSLR cameras offer two forms of bracketing—one for optimizing exposure, the other for optimizing creative results.
With the Exposure Bracketing mode you can automatically create a series of three to seven photos (you decide how many) in which you both increase and decrease the exposure at pre-determined values. You end up with pictures ranging from overexposed to underexposed; from the series you choose the image you prefer. The term "bracketing" is used because the best exposure typically falls inside of the extreme exposures—in other words, it's bracketed by them.
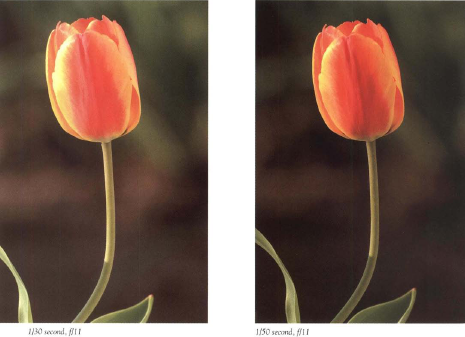
Figure 4.14. The Exposure Bracketing mode lets you automate the process of taking a variety of exposures of the same scene.
To activate the exposure-bracketing function, you usually need to press a button or two on the camera. However, to set the increments used in bracketing (typically 1/3 or 1/2 stop), you may need to dig into the camera's menu system just as you do for exposure compensation. Normally a three-picture (three-exposure) bracket will suffice, but your system likely offers you up to a seven-picture exposure series.
You can also set the camera to create a bracketed series of shutter speeds for creative purposes. Say you're panning a cross country runner and want to try using 1/10, 1/20, and 1/30 second shutter speeds to see which gives the best results. You can do that with a shutter-speed bracket series. The difference bere is that an equivalent exposure is used so alt the pictures will have the same brightness. The advantage is that you can quickly take several pictures at different shutter speeds without having to fumble with controls.
Focus controls may seem to have little to do with exposure. They certainly don't influence how bright or dark a picture is. But—in the spirit of the knee bone connected to the thigh bone—consider focus to be connected to the exposure bone. Put simply, the act of focusing needs to be coordinated with (and accomplished before) the opening of the shutter. 1 think there's little question that you want your picture to be in focus by the time the shutter opens. Admittedly, it's an expectation you probably take for granted. But as we all have learned the hard way, taking things for granted can Leave you shaking your bead at your own (well, mine anyhow) stupidity. So especially when dealing with the hyper-speed processes involved in photographing action, don't take focusing for granted.
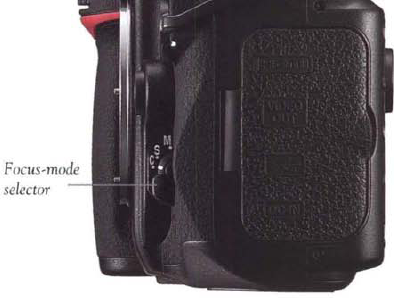
Figure 4.15. Learn che location and setting of your camera's focus controls so :;ou can quickly set them to march the situation you are photographing.
Achieving fast, accurate focus is one of the biggest challenges facing a camera. Camera manufacturers know this and have provided you a variety of choices, probably too many, to accommodate the full range of situations you'll encounter. Some options your camera likely offers include where it prioritizes focus in the viewfinder (allowing you to move the focus brackets to almost any position in the viewfinder), how it focuses, how it predicts focus based on the path of a moving subject, and when it decides to stop focusing as you take the picture. This all sounds very complicated. Fortunately, it isn't. Most of the time you simply set one or two controls and you're ready for focusing on fast-action subjects.
The focus mode is the most important of the focusing controls. It typically offers you three settings: Single Servo focus, Continuous Servo Focus, and Manual focus.
Single Servo and Continuous Servo focus modes are the opposite ends of the same function. With Single Servo focus you press the shutter button and the camera locks focus on the subject beneath the viewfinder's focus target (or on the camera LCD) and won't refocus unless you release the shutter button. If the subject was moving at the time you pressed the shutter release, the camera may also engage predictive focus that would again adjust focus—this time to where it thought the subject was beaded. You might see a problem. If your dog is dashing after a Frisbee, predictive focus might work because the Frisbee's path is fairly predictable. However if the dog is chasing a cat, and the cat swerves and doubles back, predictive focus won't work. This is because ir makes its focus decision when you first press the shutter button and doesn't change it even if the subject keeps moving.
Unpredictability is why the continuous servo focus mode is best for action photography. Once you lightly press and hold down the shutter button, the camera continuously focuses on the moving subject until you take the picture. If the subject was still when you first touched the shutter button but starts moving before you fully press the shutter button, continuous servo focus detects that movement and readjusts the focus. As long as you lightly depress the shutter button, continuous servo focus keeps adjusting focus on the subject. Once in this mode, most cameras predict the direction of movement and slightly alter the focus to account for the subject's slight movement between the time you press the shutter button and the shutter opens.
What is the manual focus mode and why would you use it? Manual focus is when you turn a focusing ring on the lens to change where the lens focuses. Obviously it's a somewhat slower process than automatic focusing, so why use it? Well sometimes the camera has trouble focusing on a scene, particularly low-contrast scenes, such as a foggy seacoast or in very dim light. In such situations, you can often bear the focus motor repeatedly turning on and off as it tries to find the correct focus point—and if you're looking through the viewfinder (or at the LCD if yours offers a live view) you may see the scene going in and out of focus. Other times (particularly in close-up photos) you may want to be sure the focus is very precise, so it may be easier to take over the focus from the camera.
I don't manually focus a lot, but I do like to have it as an option.
Trap focus is aptly named. When a subject enters the trap—in this case a focus area you have chosen—trap focus tells the camera to take the picture. You turn on the trap focus mode, prefocus on the area where you expect the action to take place, and await the arrival of the subject. When the subject enters the predetermined focus area, it "trips" the camera, which takes a picture. It works best when you know where a specific action will take place—say a high jumper leaping over a bar, a sprinter stretching out to cross the finish line, or a bird landing on a feeder perch.
You can get some great action shots using this special focus mode, but since it fires the moment the subject hits the "trap" location, it prevents you from timing a picture for a specific pose or posture.
As with all these functions, carefully read your manual for any nuances (and new advances) that your camera model may offer.
When the action flies faster than the cards zipping out of the hands of a Vegas dealer, your reaction time has to be dead on. You also need to set your camera to machine gun picture-taking that can keep up with the action.
Fortunately, there's just such a mode: the Continuous Shooting mode (sometimes referred to as rapid or high speed mode). When you set the camera's shooting mode to continuous, you can hold down the shutter button and it will keep taking pictures until it fills the camera's buffer. How fast and how many pictures can you take? That depends on your camera model, the settings you're using, and the speed of your memory card. However, a typical dSLR could take five pictures per second (technically called frames per second—fps) for ten seconds for a total of fifty pictures. One of the limitations is the camera's built-in memory buffer used for storing and processing pictures before the camera transfers them to the memory card. With some high-end cameras, you can keep taking pictures until the memory card is filled—in other words you could hold down the shutter button, start your breakfast, and take hundreds, possibly thousands, of pictures without stopping.
In the normal picture-taking (single-shot) mode, you press the shutter button and the camera takes a picture. To take another picture, you need to fully press the shutter button again. In the continuous or rapid mode, you just hold down the shutter button and it keeps firing until you either release the button or the camera fills the memory buffer. When the buffer fills up, the camera stops taking pictures until it can transfer the pictures to the memory card.
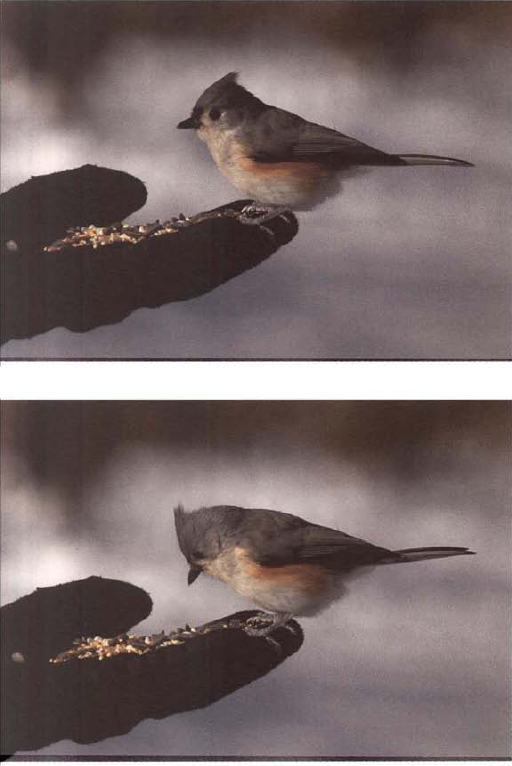
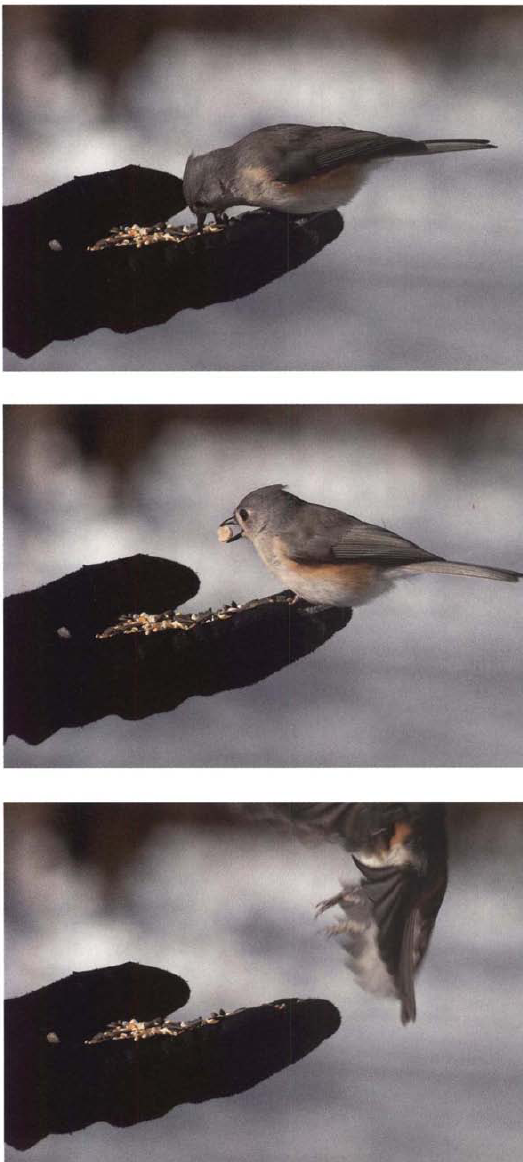
Figure 4.17. With your camera set up properly, you can easily take a series of pictures to show a sequence of action. I picked this sequence of pictures from a series of ten photos that I took in about two seconds as the bird landed, grabbed a seed, and flew away.
The main factor affecting the rate and quantity of pictures you can take continuously is file size. Large file sizes, such as those created when you use the RAW file format, slow down the rate of rapid picture-taking and reduce the total number you can make during a continuous shooting sequence. Medium and lower quality JPEG settings create relatively small files, enabling you to take more pictures faster.
By using both the continuous focus and continuous shooting modes, you can keep up with almost any moving subject.
At first glance you may think file format is unrelated to shutter speed. And largely it is. But (there's always a "but" in photography), there are a few subtle and a few not so subtle advantages to choosing certain file formats and file format settings. One file format, set up correctly, can be a bit tike pouring an energy drink into your camera. The other file format offers you the ability to use a magician's wand to transform your picture after you take it.
Before I tell you which is which (and I'll pretend you don't already know), let me back up a second. Most cameras offer two file formats for storing your pictures: JPEG and RAW. JPEG, short for Joint Photographic Experts Group, compresses files so they don't take up much room on your memory card. If you've been setting it on your camera you probably already know that the amount of compression is variable, which gives you a pretty good clue of the advantages of the JPEG format. That variable compression is typically expressed in terms of photo quality: fine (only a little compression), normal (moderate compression), and basic (a lot of compression). In short, the more you compress an image the more you reduce its file size and its quality. If you think in terms of baking, then taking a picture using the JPEG file format is like taking a baked chocolate chip cookie out of the oven—it's done and whether it's just right, a bit underdone, or a bit burnt, there's nothing you can do about it (okay, you can mess around with it in Photoshop, but if it was poorly exposed, you'll nor realize its full potential). Fortunately, most of the time your pictures turn out fine.
When you think you may want to remix and "rebake" your picture is when you choose the RAW file format. It preserves the original image data in the final picture file (think of the cookie's dry ingredients not yet mixed or baked) so that you can later (in Photoshop or other image-editing software) change the recipe somewhat. Since the RAW file format preserves most of the ingredients, its compression is limited, and it creates a fairly large file, one that can be ten times bigger than a JPEG file of the same picture.
Still with me? JPEG files are small, which means the camera can process and store them quickly (like filling a glass versus a gallon milk jug). RAW file formats preserve the ingredients so you can later change the picture recipe but they're large and it takes longer for the camera to process them.
So if you want to take a lot of pictures quickly, you choose the JPEG format. And if you really want to take a lot of pictures quickly, you choose a JPEG compression level of normal or basic. Conversely, if your top priority is to take a lot of pictures quickly, you would not choose the RAW file format, because its large file size slows down the camera, which has to store each picture you take.
I've left one question unanswered: When would you choose the RAW file format for action photography? The answer is when your top priority is to get a high quality picture under somewhat tricky lighting conditions. The RAW format accommodates those tricky exposure situations where the camera may under- or overexpose the picture or give poor color quality because of mixed light sources, such as mercury vapor lamps in the ceiling combined with window lighting. With the RAW file format, you can adjust the color balance in Photoshop (or other software) to your liking by changing the original "ingredients" (image data) without reducing quality. Similarly you can brighten or darken the picture and change the contrast without reducing quality. This ability to change a picture's brightness and contrast and maintain quality after taking the picture lets you underexpose the picture when taking it.

Figure 4.18. The RAW file format lets you alter apparent exposure a couple of stops but its large file size limits how many pictures you can take in a rapid sequence Here the picture on the right was opened up almost two stops by adjusting the Exposure slider in Photoshop RAW.
Why underexpose? Usually you shouldn't, bur if poor lighting prevents you from setting a fast shutter speed, you can underexpose up to about two stops and use a shutter speed four times as fast. The camera histogram will show the picture as too dark, but because you used the RAW file format, you can adjust it to the proper brightness in your image-editing software.
Let me repeat this. You can underexpose up to two stops when shooting RAW images, which means you can, in effect, trade those two stops of underexposure for a shutter speed two stops faster. For example, if you're shooting at 1/250 second, and you want a faster shutter speed, if you underexpose by two stops your new shutter speed will be 1/1000 second. It's not a good idea, however, to habitually underexpose while shooting RAW because you may go too far and lose image quality.
In summary: when you are trying to take as many pictures as quickly as possible, use a JPEG file format. When you are trying to boost the shutter speed, use the RAW file format and underexpose the picture a stop or two. When you are faced with tricky lighting conditions and need an excellent quality photo, use the RAW file format, and later adjust the color balance of the picture in image-editing software.
Why lock up the mirror? Why delay exposure? Vibration, that's why. If vibration can knock down bridges and loosen bolts on cars, then it certainly can shake up a picture now and then. Here's what can happen. When you greatly magnify an image by using a big telephoto or a strong macro lens with the camera mounted on a tripod and use a shutter speed between 1 second and 1/15 second, you risk picture blur from camera shake caused by vibration.
Where does this vibration come from? From a mirror that springs up and hits its housing when you take a picture. When you press the shutter button, the mirror (roughly the size of a postage stamp) that's built into a dSLR flips up to let light from the lens reach the sensor. When it flips up, it hits the top of its housing and lightly vibrates the camera. At moderate and fast shutter speeds (anything above 1/30 second), the vibration has minimal to no impact on picture quality. At slower shutter speeds, the vibration can lightly shake the camera and slightly blur the picture. The vibration is most noticeable when you're using a telephoto or close-up lens at longer shutter speeds. The vibration effect is somewhat dependent on camera model and your tripod setup.
To reduce (and hopefully eliminate) picture blur from this vibration, you have two choices. You can compose the picture and then lock up the mirror it can't bounce and vibrate the camera when you take the picture. Or you can (on most cameras) set the camera to delay the shutter from opening until a second or two after the mirror flips up (so vibrations die down). Or, your third choice, you can do both. Of course, you should not take the picture by pressing the shutter button with your finger. Instead you should use the self timer or a remore release.
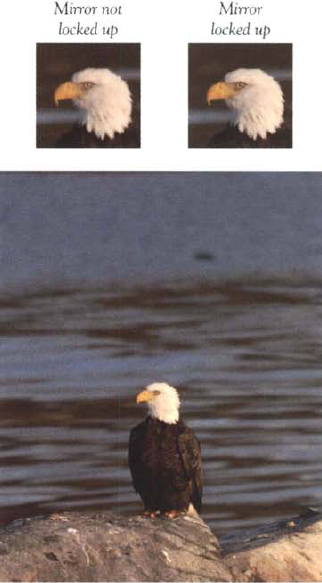
Figure 4.19. Here the difference is subtle, but locking up the mirror in eliminate blur caused by camera vibration can be a useful technique when using a long telephoto lens at a moderate or slow shutter speed (1/30 second and slower). I used a 600mm telephoto lens to photograph an eagle sitting on a breakwall in Maine.
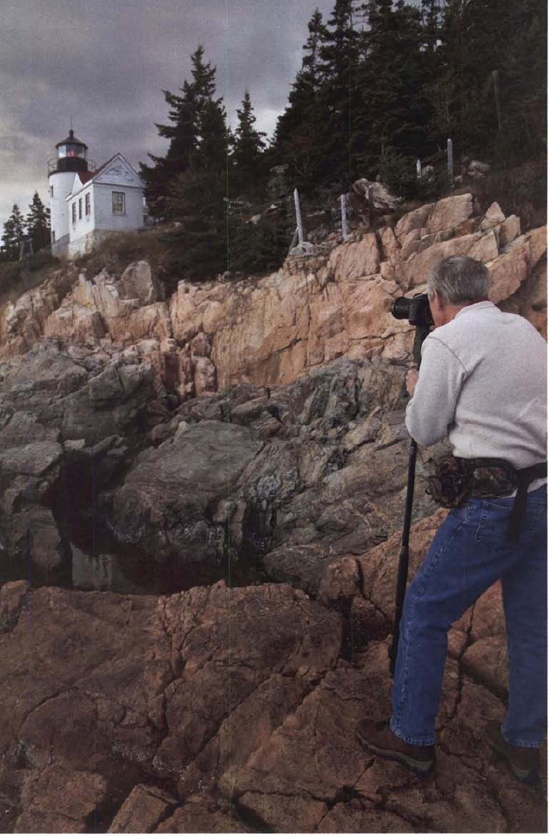
Trying to take pictures at either very slow shutter speeds or extremely fast shutter speeds with your camera and normal lens can become difficult. That's where accessories can belp. With the right accessories—lenses, filters, and supports—you can greatly extend your range of shutter speeds and the variety of techniques you use to create even better photos.
Here's your most important accessory: a good lens. Make that two good lenses so you can cover a full range of focal lengths from wide angle to telephoto. With two good lenses and a good camera, how else could you take anything hut good pictures? Admittedly, I've proven it's still possible, but—once you're well-equipped—your path to success depends only on you. Like choosing a camera, choosing a good lens requires some belp via websites that review lenses: www.dpreview.com, www.popphoto.com, and www.sirgear.com are three that offer solid technical reviews.
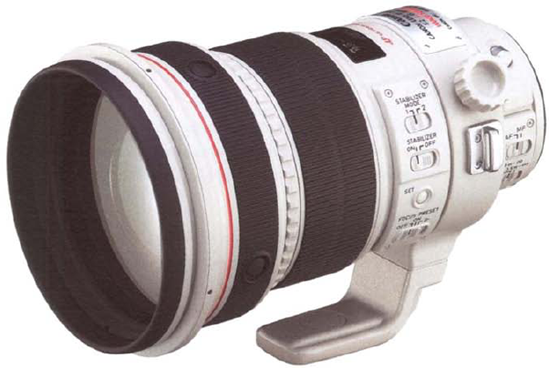
Figure 4.20. A lens with a large maximum aperture lets in more light so you can use a faster shutter speed in any situation. This 200mm lens has a maximum aperture off/2.8. Notice the large diameter of the front glass element.
So what's a good lens? The first requirement of a good lens is to deliver a sharp image with minimal distortion. Let's assume you have a fairly sharp lens. What else is important, especially for motion photography? Four things come to mind: a large maximum aperture, fast focusing, image stabilization, and a zoom with a focal length range appropriate for your type of photography.
A large maximum aperture lens has a maximum f-stop from f/2.8 to f/4. The advantage of a large maximum aperture is that it lets in more light so you can use faster shutter speeds in both bright and dim light. A large maximum aperture also lets you throw the background far out of focus so you can emphasize the subject. Be aware that because depth of field is significantly reduced with selective focus, accurate focusing becomes critical.
The two disadvantages of a large maximum aperture lens are cost and weight. To achieve a large maximum aperture, all of the glass in the lens must have a bigger diameter which can only be achieved by making the glass bigger. All that extra glass makes the lens a lot beavier to haul around. For example, a Nikon 300mm, f/2.8 lens weighs nearly six and a half pounds, while a 70-300mm, f/4.5-f/5.6 zoom lens weighs just under a pound. Quite a difference. All that extra glass also costs more, sometimes ten times more than a conventional lens. And since a large diameter lens requires extra-large filters you'll pay more for those, too.
A fast-focusing lens can greatly improve your yield of sharply-focused action shots. Most of the so-called sport lenses offer a superior focusing mechanism that focuses both faster and more accurately. Compared to a normal lens, the sport lens can easily keep up with rapidly moving action.
If you specialize in one or two sports, consider using a single-focal-length telephoto lens with a magnification appropriate for the subject distances you will encounter. I'll assume (and suggest) you need a telephoto lens for a variety of subjects. Therefore, we're going to assume you want a telephoto zoom lens. The most popular zoom focal lengths include 70-200mm and 70-300mm. But there are longer zooms, such as 80-400mm, 100-500mm, and 400-600mm.
Choose the lens with a range that best fits your photography. I feel the need to confess that despite often writing against this practice, I find myself using an 18-200mm zoom lens for amateur field sports, such as lacrosse and soccer. Its versatility to cover action at near and mid distances lets me get more action shots because I don't have to change lenses very often. Its shortcomings include a fairly small maximum aperture and reduced image sharpness compared to lenses with a shorter focal length range. One note: you will find that top-notch, long-focal-length lenses can cost as much as a six-year-old used car.
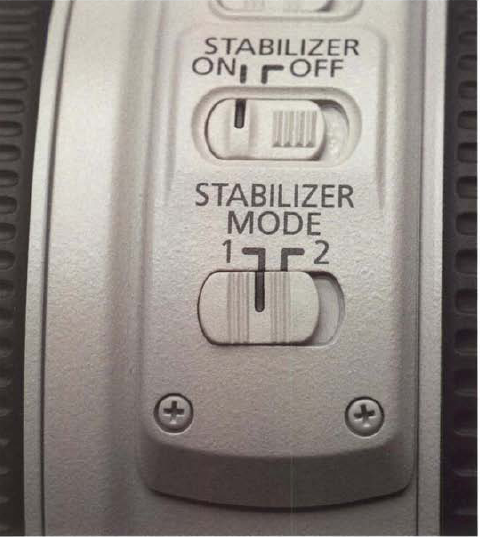
Whether your camera manual calls it image or optical stabilization or vibration reduction (the terminology varies among manufacturers), this technology lets you use slower shutter speeds for handheld photography and still get sharp pictures. With image stabilization, you may be able to use a shutter speed two, three, or even four times slower than what is recommended for handholding. While this is of benefit for any lens, the effect is particularly enhancing for telephoto shooting. Keep in mind, however, while image-stabilized lenses let you handhold at slower shutter speeds, you still need to use a shutter speed fast enough to stop the action before you.
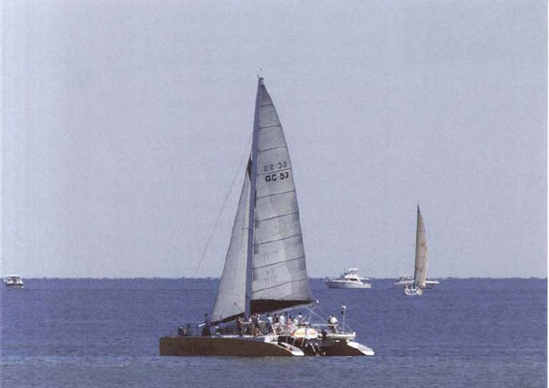
Figure 4.21. Image-stabilized lenses lei you take sharp pictures by reducing the blur from camera shake that occurs while handholding the camera at slower shutter speeds.
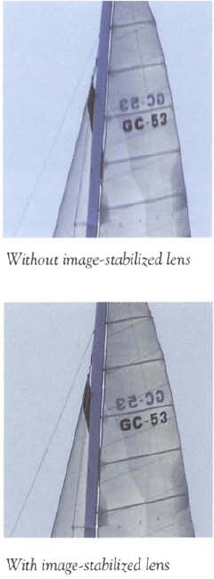
Image stabilization works by incorporating a movable glass element that optically offsets camera movement. When you're handholding the camera and you zig (a very slight zig I might add), the lens element zags, so the net effect of camera movement is near zero.
Although no substitute for a tripod, image stabilization is a highly worthwhile technology. Camera giants Nikon and Canon and third party lens manufacturers such as Sigma and Tamron build image stabilization into select lenses. But it's not exclusive to lenses: some cameras, mainly from Sony, use an image-stabilized sensor. The advantage there, of course, is that you don't have to buy an image-stabilized lens, since sensor stabilization works with any lens you attach to the camera.
To activate image-stabilized lenses, you need to turn on a switch on the lens. With the early models you may also need to turn off the feature when using a tripod or when panning. But many of the latest image-stabilized lenses recognize when you're panning or have your camera attached to a tripod and adjust themselves accordingly. Read the lens manual to see if you to have change image stabilization settings to accommodate different shooting situations.
I Love sunny days. But as a devotee of the slow shutter speed, 1 find it nearly impossible to obtain slow shutter speeds on sunny days, when too much of a good thing prevents getting good exposures using slow shutter speeds—at least without a little assistance. No matter how low an ISO and small an aperture I set, I still need a fairly fast shutter speed (1/60 second, f/22 at ISO 100) to create an exposure of the proper brightness.
So the same sunny days that bring out the wind surfers, cyclists, and other action sports you love to photograph also make it difficult to achieve the slow shutter speeds that create motion blur so appropriate to these fast-moving subjects. There's just too much brightness to get a correct exposure with a slow shutter speed like 1/8 second. Thwarted and frustrated, you could take your camera and go home and mow the grass.
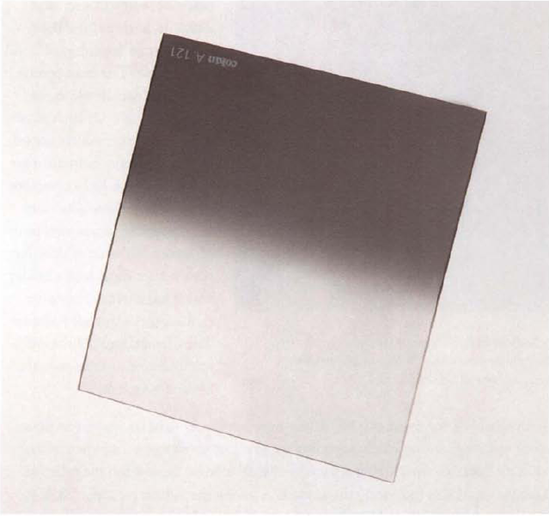
Figure 4.23. A graduated neutral density filter gets increasingly darker from the filters midpoint to its top. Its most often used for blocking the bright light of a sunset or sunrise so you can let more light in from the foreground.
Or you could grab a couple of neutraldensity filters and start shooting away at 1/15, 1/8,1/4, even 1/2 second. Like sunglasses, neutral density filters have extra density that blocks some of the light passing through them. The trick is to block enough light with a filter or filters to obtain a slower shutter speed that gives you a correct exposure and meets your creative goals.
Neutral density (also known as ND) filters are gray in appearance, come in a series of different densities, and they don't change the colors of your picture. The most practical neutral density filters are those made as 2 1/4-inch plastic squares as part of a filter system. Cokin, the major manufacturer of filter systems, has a complete range of ND filters. They can easily adapt to lenses with front accessory diameters of different sizes: a filter slides into a holder which has a circular opening that accepts a threaded adapter. The adapter, available in different diameters, screws onto the front of your lens.
Figure 4.24. A neutral density filter blocks light letting you use a slower shutter speed—especially useful on sunny days for photographing parades and other activities. Exposure at 1/6 second, fl16.
You probably want to get two ND filters: one that blocks light equivalent to three stops and another that blocks it equivalent to about seven stops. Two systems that indicate light-blocking ability are used—one is based on logarithms, the other on a simple multiplier indicating the amount by which the light is reduced. Thus, a three-stop light-blocking ND filter could be designated by either the number 0.9 or 8x; a nearly seven-stop filter is indicated by either the number 2.0 or l00x.
ND filters also come in graduated versions: density is full on the top of the filter, and then gradually diminishes until it disappears at the mid point of the filter. Can you figure out why? Graduated neutral density filters are mainly used for reducing the brightness of the sky, particularly at sunsets and sunrises, so you can let in more light from the land to reveal detail in the foreground.
The primary purpose of a polarizing filter is to darken blue skies and intensify colors in the scene you are photographing. Light bouncing off shiny leaves and other reflective surfaces, even non-shiny ones, can be like a veil masking color. Eliminating the sheen reveals deeper, richer colors. The polarizing filter is the original super saturator for colors, called upon for its capabilities long before Photoshop hit the scene.
A polarizing filter can also reduce reflections from water. Lakes, ponds, and rain-drenched surfaces all exhibit mirror-like qualities that reflect light and surroundings—often distractingly so. With the polarizing filter you can reduce the reflections, often darkening them and minimizing distractions reflected from within.
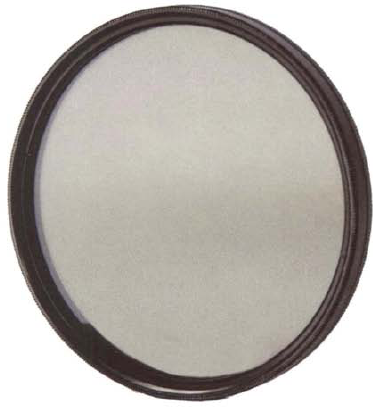
Figure 4.25. Most polarizing filters screw onto the front of the lens and let you darken blue skies and reduce distracting reflections from a variety of subjects.
You likely know that once you attach a polarizing filter, you have to rotate it while looking through the viewfinder to determine its effect. You may want the maximum effect but sometimes a midway effect works well, too.
Since the polarizing filter reduces the brightness of the incoming light by almost 2 stops (1 2/3 to be precise), you can use it like a neutral density filter Two stops isn't much.
But when you're outdoors on a sunny day photographing a race and you want to pan the athletes, that two-stop reduction may be enough to get you down to a shutter speed of 1/30 or even 1/15 second. Either of these is a good shutter speed for panning most human and animal subjects.
Should you need to buy a polarizing filter, be sure to ask for a circular polarizing filter. That's almost the only kind sold nowadays, but just to be safe ask for it. It's the type that won't cause your exposure system to give false readings.
When the action flies you need a memory card that can fly, too. A high-speed memory card boosts how fast and how many pictures you can take in a series. As the memory card manufacturers like to remind you, high-speed memory cards—because of their superior transmission rates—can also save time later when you transfer pictures to the computer.
Memory cards are rated against an old data transfer standard so that's why even low-level ones now have "speeds" expressed in the hundreds. To boost burst performance in high-speed action photography, you probably should use a card with a rating of 200x or higher. Needless to say, such a card will cost more. On the other hand, using a cheaper, lower-rated card won't be disastrous and, when you are photographing slow to moderate action and everyday scenes, it will serve you well.
Read your camera manual to determine if your camera is compatible with the latest ultra-fast cards. If not, you won't be able to utilize the card's fastest speeds.
Let's not spend a lot of time bere. You know what they are. Many photographers use a monopod as much as a relief from carrying a beavy lens around their neck as they do for sharper pictures. Most monopods (one leg support device) let you reduce shutter speed a couple of stops from what you'd use when handholding and still avoid blur from camera shake. A monopod is lightweight and easy to carry around; if one meets your needs, by all means use it.
But when you're shooting at slow shutter speeds (1/15 second and lower), a tripod is the answer. My advice bere is simple. Buy a sturdy, medium-sized tripod whose weight and size is such that you will frequently use it. Don't buy a beavy-weight tripod you're not willing to lug around. At the other extreme, don't buy a super lightweight tripod that's flimsy and results in blurry pictures because the camera's unstable on it.
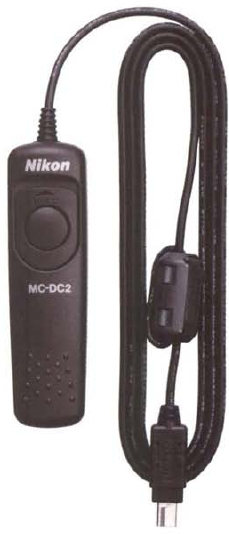
The main purpose for remore shutter controls and electronic shutter cables is to avoid the camera shake that occurs when you press the camera's shutter button with your finger. But these devices (especially the remore) also let you stand back from the camera, a feature of particular importance to wildlife photographers who want to remain concealed—or even indoors—while operating their camera setup outdoors. As discussed earlier, you can also use the camera's self timer to take a picture without pressing the shutter button—but it's impractical if the few seconds it takes for the self timer to count down may mean missing the picture.
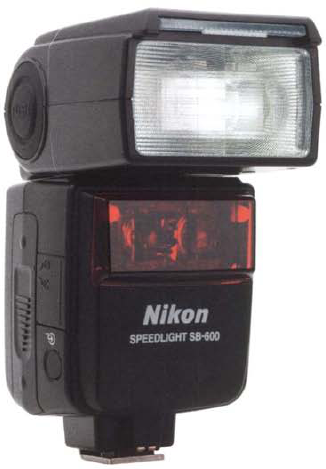
Although digital cameras come with a built-in flash, the more versatile flash units are portable accessory flash units—the kind you attach to the hot shoe, either directly or via a cord or even a wireless connection. Not only are accessory flash units more powerful than your built-in flash, they can be positioned away from the camera, and several can be used simultaneously for creative lighting effects.
For motion photography, the greatest value of accessory flash is simple: its short duration of light acts like an ultra-fast shutter speed—faster than any shutter speed offered by the camera. By firing an accessory flash unit within a couple of feet of your subject in a dark environment, you can in effect achieve a "shutter speed" as fast as 1/50,000 second, sometimes even faster. To achieve such a short duration of light, you would need either a very powerful unit or one placed quite close to the subject so it needs only a minimum amount of light for a correct exposure.
The flash may not completely overwhelm bright sunlight. So if you're using high speed flash outdoors, a moving subject may show a slight ghosting because part of it records during the flash sync shutter speed (typically 1/250 second) while the rest may be razor sharp as it's stopped by the short duration of the flash. On cloudy days or with exceptionally powerful flash units positioned very close to the subject, you may be able to overwhelm the daylight to achieve an exposure taken almost solely by the light of the flash, which stops the moving subject without a ghosting effect.
Many creative photographers combine action-stopping flash with slow-shutter speed blur techniques to create compelling sharp-blur photo combinations. Most cameras offer a feature called rear-curtain sync that fires the flash at the end of the exposure (instead of the beginning) so that the subject appears logically sharp at the end of its motion trail.
1 should just say "Photoshop" and end the discussion right there. Although there are a variety of other software programs that let you adjust your photos, the widespread adoption of Photoshop means there are many books, classes, online tips, and advice available from fellow photographers to assist you in adjusting your photos. That's not to say you shouldn't use other less-complicated software, or software specialized for your purposes. But choosing Photoshop as your main image-editing program means belp will always be available.
Photoshop comes in two flavors. The high-end, quite expensive, and extremely complex but extremely capable version is Photoshop CS. The latest version as of this writing is CS4, but a new version tends to come out every two or three years, If you're a professional photographer, very advanced amateur, or someone who gets great enjoyment digging into the software trenches, this is your program.
However, make a look at the much more reasonably-priced Photoshop Elements 7 (Elements 7 is the latest version as of this writing). Photoshop Elements can do all the important things that Photoshop CS can do when it comes to adjusting your photos and making inkjet prints. But it lacks the advanced features required by professional designers and photographers whose livelihoods involve large sums of money to provide photos customized to the special needs of newspapers and magazines.

Figure 4.32. This screen capture of menus from Photoshop Elements shows just a few of the hundreds of menus offering you seemingly unlimited potential to alter your image.

