If "take control of your life" is the mantra for self-help gurus around the world, let's add a twist to it and say "take control of your shutter speed" should be the mantra for self-help, do-it-yourself photographers.
Let's face it, taking control of your life can be difficult and complex; taking control of your shutter speed isn't. This chapter will prove that In about the time it takes you to call and get through to a live person at your health care provider, you can read this chapter and be well down the path of taking control of your shutter speed.
I'll introduce you to the important camera controls and settings that interact and influence exposure and shutter speed and ultimately affect the appearance of your photos. You probably are already familiar with many of the controls essential for basic picture taking, such as exposure and focus modes, aperture settings, the exposure compensation control, and ISO settings. As well, you likely understand the fundamentals of not only what a good exposure looks like but its value. In both areas, you'll learn in more detail how to coordinate these controls, settings, and concepts and use them to achieve the shutter speeds you need to make expressive, well-exposed pictures.
To gain control of your life you must deal with bosses, spouses, creditors, aging parents, your health and finances, and a variety of bureaucrats and customer service reps whose primary goal is to put you on hold until you finally give up (and hang up). By comparison, taking control of your shutter speed is rewarding and pleasurable—and you have only your camera to deal with,
So bere's my challenge. Before you continue reading, place that call to your health care provider and let's see if you finish this chapter before a live person gets to you.
Like the automatic door at the grocery store, your shutter is an electro-mechanical device that opens and closes when an electrical signal triggers it. That electrical signal is initiated when you press the shutter button.
How long it stays open depends on the shutter speed you or the camera selects. Shutter speeds are designated by seconds and fractions of seconds, such as 1/250 second, 1/125 second, 1/2 second, and 1 second. The marked increments of shutter speed settings have traditionally been a doubling (or halving) of each adjacent step, thus 1 second, 1/2 second, 1/4 second, 1/8 second, 1/15 second {rounded slightly), 1/30 second, and so forth. This doubling/halving series harks back to the mechanical beritage of the shutter. Now that electronics play such a big role in photography, you'll see many more steps in the total range of shutter speeds, such as 1/13 second, 1/25 second, 1/640 second, and so forth. In most dSLR cameras, you can set the incremental jumps of shutter speeds to change by 1/3 or 1/2 stop or even 1 stop. (A 1/3-stop increment would be from 1/250 second to 1/320, a 1/2-stop increment would result in the value changing from 1/250 second to 1/375 second, and a 1-scop change would be from 1/250 second to 1/500 second.) This lets you customize your choices of aperture and shutter speed settings.
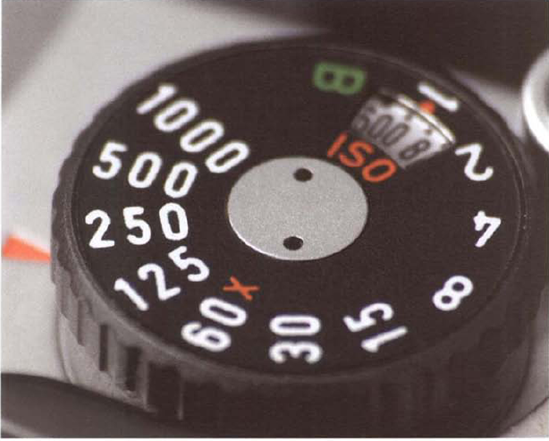
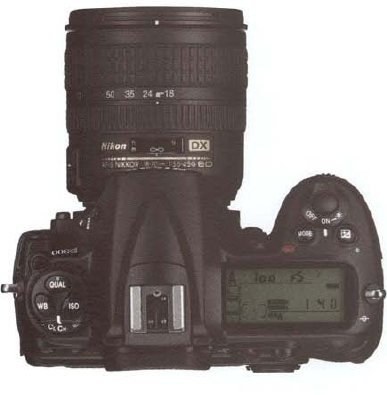
Figure 2.1. The old-fashioned shutter speed dial functioned as both a ready reminder of your many shutter speed options and as a one-step dial to setting the shutter speed.
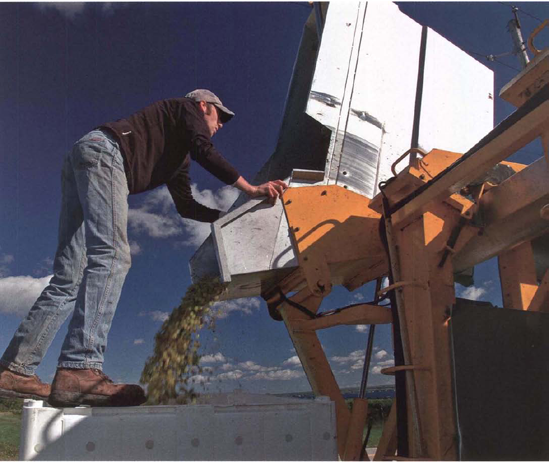
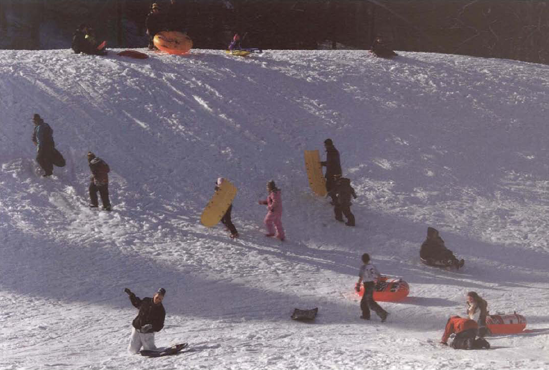
Figure 2.2. From portraits to still lifes to action, choosing, the right shutter speed can be critical to obtaining a good picture. Exposure at 1/320 second, f/11.
At slower shutter speeds, the shutter fully opens like a door or window and completely uncovers the opening in front of the sensor. But at faster shutter speeds, such as 1/500 second, the shutter resorts to trickery, because its mechanical components cannot operate fast enough to fully open and close in such a short time. Instead of fully uncovering the sensor (as it does at slower shutter speeds), the shutter mechanism forms a narrow slit; as the shutter speed increases, the slit becomes narrower. The slit then travels across the sensor area, painting it with light—almost like using a roller when you paint a wall.
Until the middle 1800s, "film" materials were not very sensitive to light. In contrast to the instantaneous exposures made on today's digital sensors, exposures in those early days were made on coated photographic plates and could last several minutes, sometimes an hour or more, even on a sunny day. With such long and imprecise exposure times, shutter mechanisms weren't even required. To regulate light coming into the camera, a photographer simply removed the lens cap, patiently gazed at his pocket watch until be judged an appropriate time had passed, then—in no great hurry—completed the process by restoring his lens cap. With experience and a bit of luck, enough light had been admitted for a satisfactory exposure.
Increasingly light-sensitive coatings and films were developed over the next few decades and photographers began to make shorter and shorter exposures shrinking from minutes, to several seconds, to fractions of a second. This shortening of exposure times had an enormous impact on popularizing photography and created more interest in experimenting with photo subjects far beyond studio portraits and static landscapes.
As photographers began to imagine what they could capture with these shorter exposure times, the evolution of a second camera property—smaller size—also belped to ensure many more creative and physical freedoms for photographers. Flexible film joined the parade of improvements, replacing unwieldy and easily-shattered glass plates. And soon after that introduction—with George Eastman of Kodak fame offering to do the complicated business of processing film and printing pictures—everybody wanted a camera.
With portable cameras and faster exposure times, photographers liberated their cameras from tripods and wandered the world taking pictures simply by handholding them. Armed with a camera, even a novice could at long last begin to capture the majesty of a king's coronation or the magic of an everyday life: picnics at the seashore, children rolling hoops, and horses cantering down country lanes joined the old, stiffly-posed studio portraits in family photo albums. By the 1900s, photojournalism was born as pictures of soldiers thrusting bayonets, politicians barnstorming from trains, fires ravaging orphanages, earthquakes shaking apart cities, and many other contemporary events made their way into newspapers and magazines. Reasonably fast exposure speeds were part of a great technological breakthrough that enabled many activities of the world to be photographically documented for display, analysis, and discussion.
So even 100 years ago, the best answer to the question "What is the primary value of shutter speed?" was not simply: "To admit light into a camera." By providing a specific amount of light for the sensor and belping to regulate when light is allowed to enter the camera, shutter speed is also an indispensable tool photographers use to creatively interpret their world.
Unless you're one of those people who enjoys learning how things like small engines and large intestines work, you probably won't want to dig too far into the inner machinations and computations of your camera as it creates a picture. But you do want to dig far enough so that you understand the basics of exposure.
Exposure—which is the amount of light your camera uses to make a picture—is the very foundation of photography. Without a doubt, if your goal is to create an outstanding photo, you need to begin with a good exposure. I'll repeat—and raise the bar: to create an outstanding picture, you need to create an excellent exposure. Take a bad exposure and you might as well haul your photo to the curb for recycling.
And yet, essential as it is, even an excellent exposure cannot create an outstanding picture in and of itself. Think about it. You still need, for example, that human talent for decision-making, for composition and scene and subject choices.
Let's quickly review how your digital camera creates a picture. You aim the lens of your camera at a scene. Light reflected from the scene enters the lens, which, like your eye, forms the light into an image of the scene. And just as your eye transmits that image onto the retina, the camera lens transmits it onto the sensor to create a picture.
The sensor consists of millions of pixels—tiny individual light-capturing buckets. The amount of light captured by each pixel is converted into a corresponding amount of electrical voltage (virtually no voltage for black areas in the scene, nearly the maximum amount for white areas). A converter then changes the voltage coming from each pixel into a corresponding digital signal that becomes the basis of the digital image.
The most important thing to know about the sensor is that it requires a specific amount of light (the "correct" exposure) to make a good picture. It's not like winning the lottery where getting a lot is always better than getting a little. Correct exposure is more like paying your bills, where paying the exact amount on the bill is the best practice. So your goal is to give your camera's sensor only the amount of light it's owed.
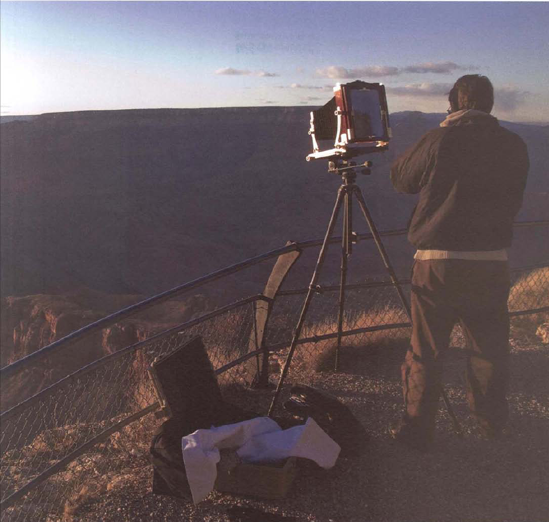
Figure 2.3. Photographers have long relied on tripods to provide the extra image sharpness that results when the camera is beld immobile. Exposure at 1/90 second, f/9.
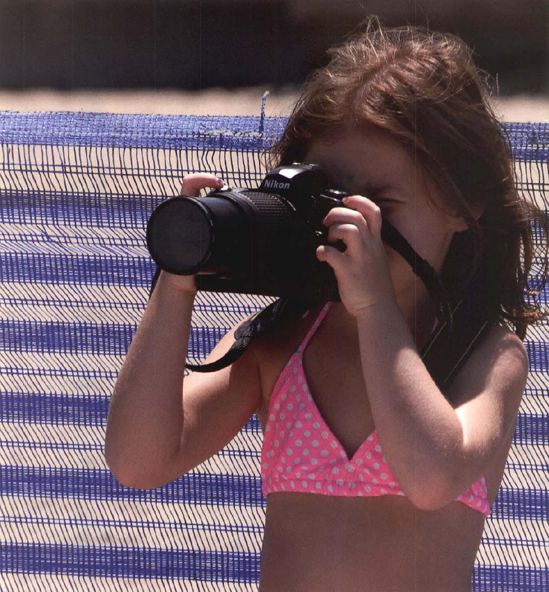
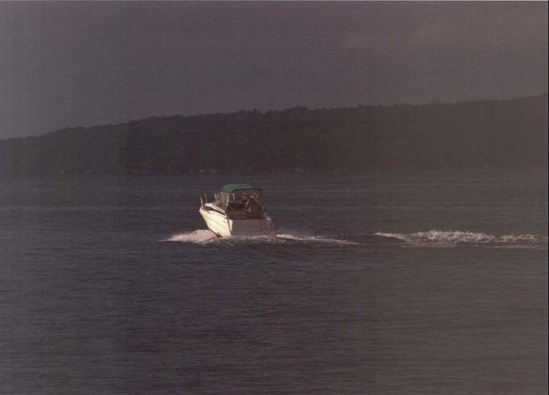
Figure 2.4. Most photographers love the convenience of handholding the camera. Historically, photographers could not handhold the camera until light sensitive materials were developed that allowed fast shutter speeds and smaller cameras. Exposure at 1/200 second, f/9.
If your camera lets too much light reach the sensor, the picture will be overexposed (too bright), so much so that light areas and highlights can be bleached out altogether. And conversely, if the camera delivers too little light to the sensor, the picture will be underexposed (too dark). Details can be lost this way, too, by disappearing into blackened areas and shadows that are far darker in the photographic image than they were in the original scene.
A good exposure nicely replicates the appearance of your subject, and the good news bere is that getting a properly exposed, great-looking picture is pretty easy. Even though your camera can, in fact, do this automatically much of the time, you should know how to do it, too, because controls for exposure affect more than just the brightness of your picture.
The two controls regulating the amount of light reaching the sensor are the shutter and the aperture (lens opening). Both are adjustable, electro-mechanical devices. The lens aperture determines how much light passes through the lens. The shutter determines how long the light passing through the lens is allowed to strike the sensor.
The best place to understand how shutter speed and aperture settings regulate light to create a good exposure is your kitchen sink. Imagine that you've placed a coffee mug beneath the faucet and filled it with water. Notice that you beld the faucet handle open for a specific amount of time to let the water flow and completely fill the mug. Similarly, the camera's shutter lets light flow for a specific amount of time to "fill" the camera sensor.
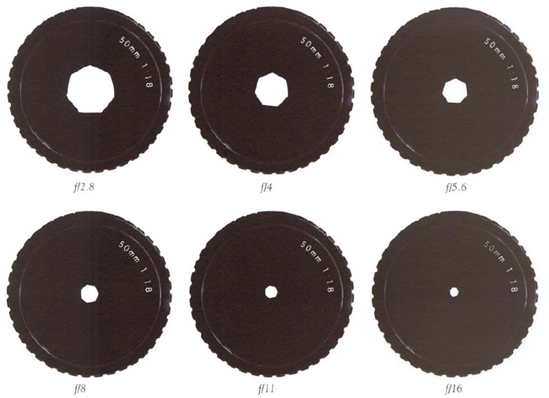
But in both examples-faucet and camera-the amount of flow is also regulated by a second important control. One of the internal workings of a faucet is a valve with a variable size opening; when you turn the handle, you change the size of that valve opening and that determines whether a thin stream of water trickles out or a thick stream gushes out. Inside your camera lens is a similar control. In this case, a diaphragm of variable size adjusts the lens opening (the aperture) to determine the diameter of the "stream" of light that passes through the lens and strikes the sensor. You can let a trickle of light pass through the lens by setting a very small aperture, f/16, for example, which is about the size of a popcorn kernel on a 50mm lens. Or let it gush through by setting a large aperture, like f/2.8, which is about the size of a penny.
Returning once more to the faucet analogy, the end result you want is to fill that mug only to its top. For the camera sensor, of course, the equivalent of a fully-filled mug of light is a correct exposure. This you can achieve by choosing an appropriate combination of shutter and aperture settings. Depending on what effect you want, you might pair a slow shutter speed and a small aperture setting (a trickle of light), or go for a fast shutter speed and a large aperture opening (a gush that fills the sensor almost instantly).
There's a simplistic but true statement about exposure—that it's good when it makes your picture look good. Fortunately, as you learn in the following pages, you can use your camera's histogram display to objectively analyze exposure. But for now, let's just try to understand what makes a good exposure and what makes a bad exposure.
Keep in mind that the problem with a truly bad exposure is that you cannot adjust it in Photoshop to make the picture good. A good exposure gives you the option of making all sorts of Photoshop adjustments and improvements that can make your picture sing.
This picture just looks good. Like the actual scene, the photo has nice dark shadows.
Something looks wrong. In this example, the photo is too dark and dull. It's lifeless.
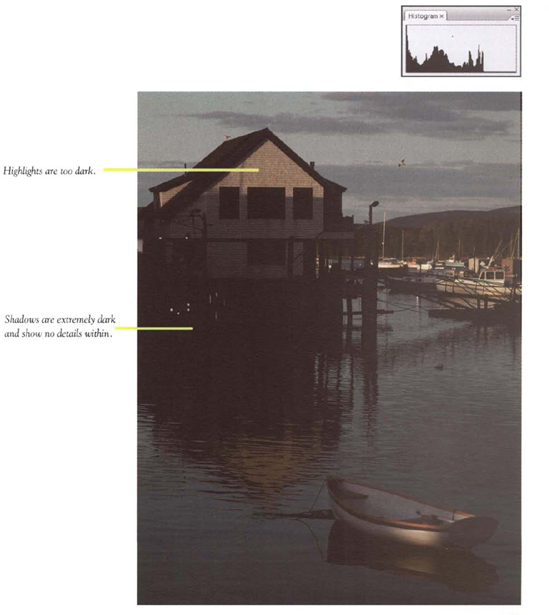
Figure 2.7. Histogram: This picture is underexposed as indicated by the tone "mountain" jammed against the extreme left edge of the histogram.
Think about what happens when you photograph a rapidly moving subject, a gymnast doing somersaults, for instance. When the shutter opens for 1/500 second, it admits light for that length of time. If the gymnast is spinning in mid-ait when the shutter opens for 1/500 second, the image of the spinning gymnast coming through the lens lasts only for 1/500 second. The sensor records the position she is in at the time you press the shutter button and also any distance she moves across while the shutter is open for that 1/500 second.
If the gymnast is spinning at 30 mph, she moves only 1 inch during the 1/500 second the shutter is open. That explains why a fast shutter speed can freeze motion. If the shutter remained open for 1/30 second, however, she would have moved about 1.5 feet through the air during that time and ber recorded image would be somewhat blurred.
Keeping in mind that 1 can barely balance a checkbook, let's do some more math. Let's start with the fact that there are 5280 feet in a mile. At 30 mph, the distance coveted in one hour is 158,400 feet. The distance covered in one minute would be 2640 feet (158,400 feet divided by 60 minutes). To find how far the subject moving at 30 mph travels in one second, divide 2640 feet by 60 seconds. That's 44 feet per second. To find how far the subject travels during a shutter speed exposure of i/500 second, divide 44 feet by 500. That's 0.088 feet, or less than one-tenth of a foot, or a tad over one inch. So a subject moving at 30 mph travels only about an inch in 1/500 second.
If you really want to get into calculations of rendering an image sharp in a photo, the next step would be to determine how far the subject moves across the sensor But let's leave that to the math whizzes, shall we? For now, I think you get the idea of how a fast shutter speed freezes a moving subject and why a slow shutter speed blurs a moving subject.
Now you know two facts about how the sensor gathers light to make your picture: it needs a specific amount of light for a good exposure, and various combinations of the correct shutter and aperture settings let you deliver the required amount of light to the camera sensor.
However, you can actually change the amount of light the sensor needs by adjusting the ISO control. Choose a higher ISO number and the sensor needs less light to make a good exposure. Choose a lower number and it needs more light. Each doubling of the ISO speed halves the amount of light required by the sensor to make a good exposure (a picture of the proper brightness). Our faucet analogy should make this clear. If instead of placing a mug beneath the faucet, you place a shot glass or a quart bottle, you would change how much water is required to fill the container, Increasing the ISO number is like setting a smaller container under the faucet. Decreasing it is like setting a larger container under the faucet.
By changing the ISO setting you vary the sensitivity of the sensor to require more or less light. Typical ISO settings you would use range from 100 to 3200. Although the ISO settings may stretch as high as 25,000 on some cameras, ISOs of 6000 and higher create so much digital noise that image quality becomes quite poor.
Can you see the advantage of this control? On a sunny day, you would likely use an ISO of 100 to 400 simply because there's so much light. But in a dark room or at twilight you can set your camera to a high ISO, such as ISO 1600, so the sensor needs only a little bit of light to make a picture. By using a high ISO in dim light, you can use a shutter speed fast enough to let you hold the camera by hand and still get a sharp picture. By manipulating the ISO setting you can greatly expand your choice of shutter speed and aperture. ISO speed is your secret weapon in gaining control over your exposure settings.
The downside is that higher ISO settings (those above 1200 in dSLRs, and above 400 in snapshot cameras) reduce the image quality by adding more image noise to a picture—digital noise appears as random, confetti-like colored pixels.
This little summary about achieving correct exposure is just that—a little summary. If you really want to learn all about the important task of achieving correct exposure, read Exposure Photo Workshop, an excellent book written by Jeff Wignall.
If you lack the time to read an entire book on exposure, there's still good news for you: achieving good exposure is easy. Your camera is a computer that's programmed to take well-exposed pictures and most of the time, under most conditions, it delivers. The bad news? There is none. But there is a caveat: sometimes, in order to get the best possible exposure, you need to intervene and guide your camera manually.
This very often occurs when you photograph subjects of extremely high or low reflectance (scenes that are nearly white, like snow and Caribbean beaches, or nearly black subjects, tike coal and Halloween cats). You may also want to choose your own shutter speed and aperture settings when your subjects are very contrasty scenes with lots of very light and dark areas.
Programmed into your camera's metering/exposure system are shutter speed and aperture values and combinations for hundreds of possible photo scenes. When you start to take a picture, the camera instantly analyzes the scene before it and compares it to the scenes programmed into it and adjusts exposure accordingly. That works surprisingly well, especially if one of the programmed scenes is similar to what you are photographing. But the system is not perfect. When you photograph a scene that departs far from a typical or average scene, the exposure may be considerably off.
One solution for covering yourself in such tricky scenes is to use the RAW file format. It lets you adjust exposure in Photoshop (or whatever software you're using) to get a nearly perfect picture ninety-nine percent of the time while maintaining optimum image quality. It's almost a do-over without a downside.
But there is a slight downside for motion shooters—that's the large size of the RAW file format. They are very big. Often three to five times the size of JPEG files, RAW files can quickly slow down your camera as you're trying to shoot continuous action and eventually bloat your computer's storage capacity.
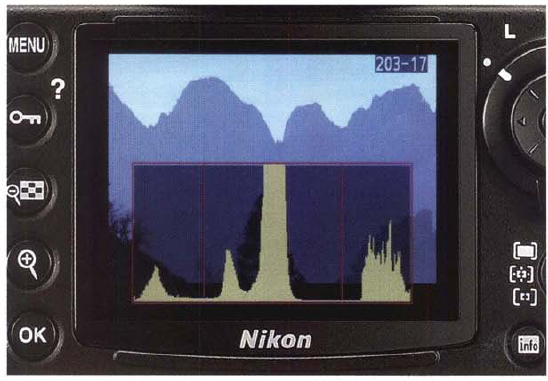
And, of course, you can immediately determine the exposure accuracy of the picture you just took by reviewing the histogram display on your camera. (See more about that in the section of this chapter, "Evaluating Technical Exposure with the Histogram," page 73). Although in the beat of the photographic moment you may not have time to pause and check the histogram, you can plan ahead. Before the action starts, take a few test pictures representative of what you'll be photographing, check our the histograms for the test shots, and then, if necessary, adjust exposure settings.
Whether it's a gas meter, electric meter, water meter, or speedometer, the main purpose of a metering device is to measure. For your camera meter, it's never happier and more fulfilled than when it's measuring light for an ideal exposure.
Once you (or the camera) know how much light is reflected from a scene and passing through the lens, you (or the camera's automatic exposure system) can adjust the aperture opening (f-stop) and shutter speed to give the sensor the exact amount of light it needs for a correct exposure.
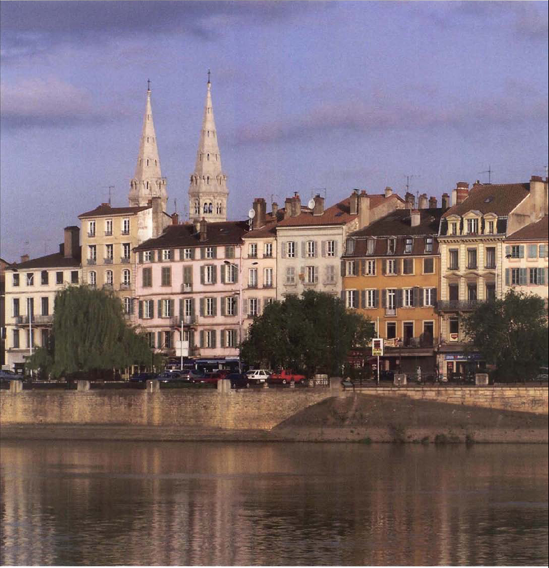
Figure 2.10. Set your meter to die averaging mode when all areas of the scene are similar in brightness and equally important. Exposure at 1/250 second, f/ 11.
The makeup of the world and the scenes you photograph vary enormously, especially in how different parts of them reflect light. Your dSLR is designed to accommodate that variability and offers different metering modes within the camera. Let me briefly elaborate on the variations of scenes and Light reflected from them. If I look out my front window in December, I see a brilliant field of snow and deep green pines illuminated by sunshine. If I'm in my kitchen, 1 see a dim room but with one exception—a can of tomato soup on the counter is being spotlighted by a sun beam. At the summer street fair, I see a mixture of tents shadowing the crafts inside and bright sunlight shining down on the marching band. And one week from now at twilight, the full moon will rise above the hill. All of these scenes offer widely varying amounts of bright light, highlights, dim light, and dark shadows. And all have detailed areas, each needing more or less light, that must be skillfully preserved to make a good picture.
Your camera's different metering modes are designed to take we11-exposed pictures of the widely varying world you are photographing. It's for that reason that most cameras offer the following metering modes: center-weight, averaging, matrix, and spot.
This exposure system gives most emphasis to light coming from the center of the viewfinder or LCD display because many photographers very naturally put the main subject in the center of the picture and are primarily concerned that it looks good in a picture. Center-weight metering is particularly useful for people photography, including action shots, because these subjects so often end up in or near the center of the picture.
The averaging mode gives equal emphasis to light coming from all areas of the picture, averages them into one measurement, and then sets the shutter speed and aperture accordingly. Averaging works well for outdoor scenes with fairly uniform lighting, and it's great for most scenics.
The matrix system divides the scene into an unequal grid and gives different emphasis to different areas. After it compares the light coming from these areas to its programmed knowledge, it sets an exposure. Matrix metering works best when a scene offers a wide variation of Light and dark areas, such as that summer fair with a lot of tents. It's my favorite mode for its versatility.
It measures the light only from a small area—usually in the center of the scene—and ignores the rest of the scene. Use it when you photograph a small but important subject that is significantly brighter or darker than the rest of a scene, such as a distant white cat sitting in a barn door, spotlighted by a beam of sunlight.
Checking on an image in your camera's LCD is like looking in the mirror before you leave home for the big social event of the year. Just as the mirror lets you confirm that you've wiped the toothpaste off your chin or that your curls are fluffed to perfection, the LCD lets you confirm that your photo is up to par.
There are a couple of big differences between a mirror and the camera LCD. There's that seven years of bad luck for breaking the one, of course. And that mirror is big. That makes it easy to see flaws. Even though LCD manufacturers may exclaim that your model has a "huge" .3-inch LCD, that LCD is not big. It's small, small enough to make it difficult to see toothpaste on a lip—or a slight blur from unsteady holding of a telephoto lens.
The real power of the LCD is like the magical mirror in Snow White and the Seven Dwarfs: it can tell you things. Instead of being deceptive, the things your LCD will tell you are true and belpful—if you use it correctly.
Use the photograph displayed on the camera LCD to look at picture qualities such as composition and image sharpness. Don't, however, use the LCD photo to evaluate exposure. Oh, you can glance at it and quickly see if the exposure is in the ballpark, but that's all. The light around you (be you outdoors on a sunny day or inside in the dim living room) affects your perception of the LCD image too much to make it reliable for exposure evaluation. Use only the histogram to evaluate exposure.
Do use the camera LCD to judge the composition of your picture. Just look at the image displayed and see if it's to your liking. You'll see the LCD display better when you stand in the shade, or shade the screen from harsh sunlight by blocking the sunlight with your body. Since many camera viewfinders don't quite display the full area being photographed, review the edges of the picture area on the LCD to make sure nothing unexpected (and unwanted) has been included.
Evaluating the picture for sharpness is a bit tougher. Use your reading glasses if you need them, or magnify the image several times using the appropriate image review functions. Look at critical areas. For people, check their eyes and hands. Are the eyes open and sharp? For landscapes, check tree branches, rocks, and other features that need absolute sharpness to convey image quality.
Figure 2.13. just looking at the photo on the camera LCD is an unreliable way to judge exposure as ambient light can greatly affect the photo's appearance. In bright outdoors light, the linage display may appear light and washed out — even if it's a good exposure. Use the histogram to analyze exposure.
Figure 2.14. In the light of an indoor setting, photos displayed on the camera LCD may appear brighter than they actually are. Use the histogram to evaluate exposure.
With the photo still magnified, continue to move around the image. But now look for flaws such as discarded Styrofoam cups in the foreground of a landscape or distractingly large wrinkles in a blouse, crooked eyeglasses, or a hit of broccoli in a toothy grin.
The histogram. You either love it or hate it. I love it. In fact, I love it as much as when the daily stock market graph shows my Tootsie Roll stock jumped 10%, Like any graph, it shows data with dispassion. It is what it is. Lacking the bright colors and raving emotions of the photo display, you are left to react objectively to a boring graph.
The histogram graphs the tonal values (all the light and dark areas) in the scene you photographed; by evaluating it, you can determine if your exposure is correct. You can look at the histogram on the camera (and you definitely should) and you can look at it again when in Photoshop (again, you definitely should).
The problem with the histogram is that you have to interpret it. The histogram doesn't make a judgment as to whether the image is underexposed or overexposed, it just graphs the image data in your picture and shows it on a scale running from deep black (value of 0) up to pure white (value of 255). It's up to you to figure out whether the picture you took represents a good exposure.
What does the histogram of a good exposure look like? Well, that depends. And it mainly depends on the subject you are photographing. Because a histogram represents the tonal (brightness) values of the scene photographed, its appearance is determined by the content of the scene. To belp you understand what you see when you look at a histogram, I've provided a bunch of correctly exposed photos and their accompanying histograms. As you'll see, the histograms look different because the tones (bright, medium, and dark areas) in each picture are different.
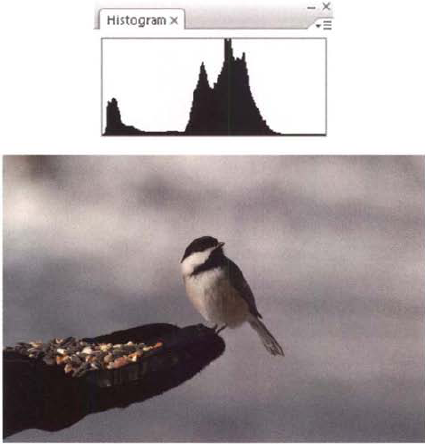
Figure 2.15. As this series of photos and accompanying histograms shows, the histogram that represents a good exposure depends on the subject.
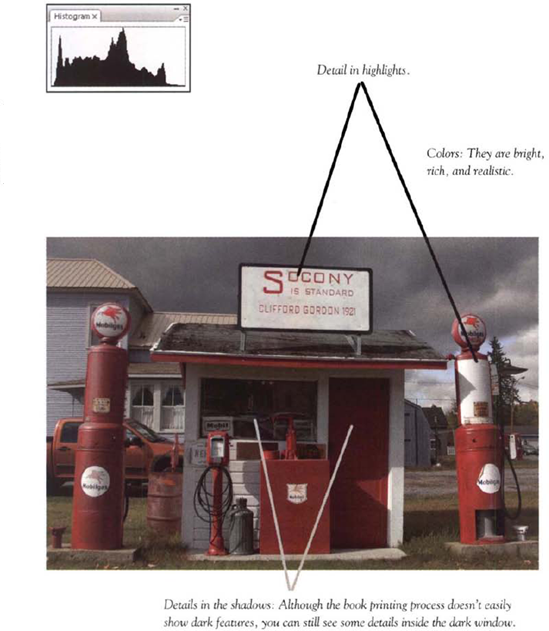
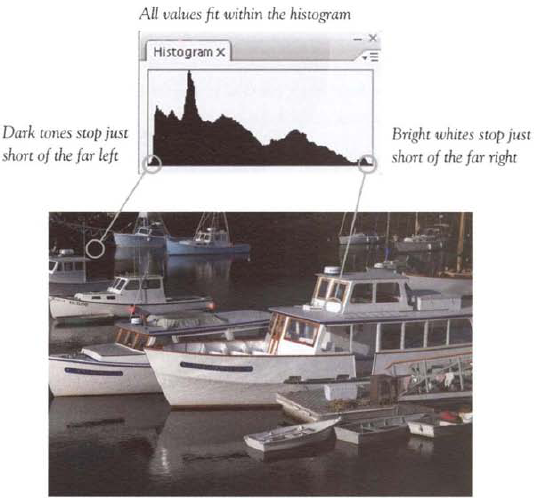
Overview of u good histogram This histogram represents a correctly exposed picture of a scene with a full range of tones. I know the scene was correctly exposed because the histogram easily contains all the tonal values and the values are in the correct locations within the histogram. Most importantly, the histogram shows that the dark tones and light tones have been exposed correctly. The bright whites of the boat decks show up on the far right side of the histogram (where they belong) but don't jam up against the right side. The black shadows in the background appear on the far left side of the histogram where dark tones belong, but again, aren't jammed against the edge.
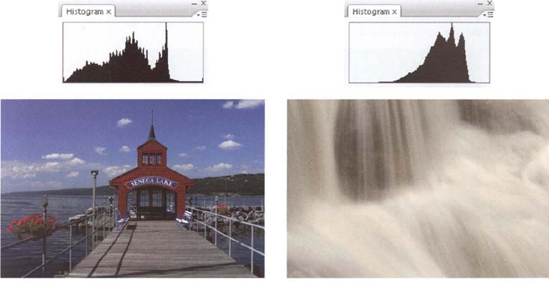
But they all share one thing in common: they each closely correlate to the brightness values of the subjects photographed. A histogram for white clouds peaks on the right side of the graph (without jamming against the far right) because the clouds are white. A histogram for a black cat falls to the far left where the dark values live, but again without jamming against the left border or wall of the histogram.
Jamming against either the right or left border is a definite sin in the world of exposure. It means you've exposed incorrectly and lost both subject details and the tonal values used to represent them.
A great exposure maximizes the tonal values—and therefore the subject detail— of any given scene.
To complement the histogram, most cameras offer an overexposure (too bright) warning. When you are reviewing the picture (not the histogram), the overexposure warning flashes (typically in red) on the areas that have been overexposed. Some cameras have an underexposure warning that flashes in the dark areas when the picture is underexposed. Both warnings are a quick visual reference that you should adjust your camera settings to let in less light (if overexposed) or more light (if underexposed) and take another picture. However, it doesn't give you any idea of how badly you've overexposed, whereas to the experienced eye, the histogram does.
If you're good with money, one of those people who can create a budget, adhere to it, and come to the end of the month with enough money to pay the bills, well, then, you won't have a problem balancing shutter speed and aperture selection.
The concept of correct exposure remains consistent throughout all combinations of shutter speed and aperture settings. Whatever the combination, whatever the shooting situation, you need to deliver a specific amount of light to the sensor to create a picture that looks good.
Like a pair of sibling teenagers, aperture and shutter speed controls vie for your attention. What combination of shutter speed and aperture settings will work for that seashore scenic, the ideal one with waves crashing on the black rocks in the foreground and a freshly whitewashed lighthouse in the background? You want enough depth of field to reveal both the rocks and lighthouse sharply, you want details in the rocks and on the lighthouse, and you're determined to freeze the frothy waves in mid air. Is 1/250 second at f/11 good enough to achieve all three goals? Or should you use a faster shutter speed?
Similarly, thirty bicyclists round the bend as a large group: What shutter speed and aperture combination do you need to freeze the group's motion, while showing at least the leaders of the race sharply? A shutter speed-aperture combination of 1/2000 second at f/8 would likely achieve that result.
Artistically, you may be forced to make tradeoffs in choosing your shutter speed-aperture combinations. Just like balancing your budget, you may need to decide whether you can afford that new big screen TV, or if you need to take care of that rattling noise in the car. Life is full of tradeoffs, right?
However, much of this book is devoted to belping you avoid making tradeoffs. By learning the important settings and accessories that affect the exposure settings you make, you can often achieve the shutter speed-aperture combinations that fit your creative needs.
The discussion of combinations of shutter speed and aperture settings leads nicely into the technical concept of equivalent exposures.
The central principle is that a variety of aperture-shutter speed combinations can let in the same amount of light to give a correct exposure, or an equivalent exposure. If you use a shutter speed one stop faster (from 1/125 to 1/250, for instance), then you cut in half the length of rime the light is admitted, and thus you cut in half the amount of light reaching the sensor. But since you (or your camera) wants a correct exposure, the f-stop for the aperture will be opened by one stop (from f/16 to f/11, for instance), so that twice as much light is let in. The end result is that you have delivered the same amount of light to the sensor.
So why would you want to change aperture and shutter speed settings? Well, I'm sure you already know the answer to that question. The reason is usually for creative effect—and often for the sharpness provided by a faster shutter speed's ability to eliminate blur from camera shake.
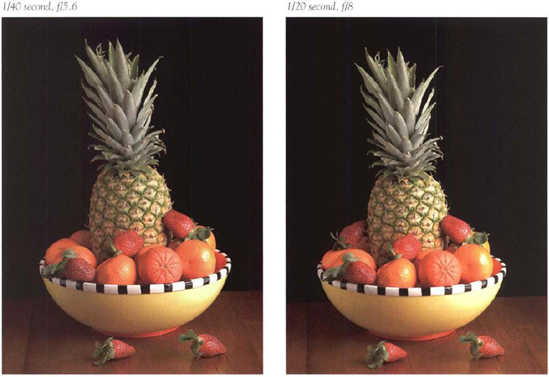
Figure 2.18. As this series shows, an equivalent amount of light can be delivered by many different combinations of shutter speed and aperture settings.
Again, the goal for using equivalent exposure settings is to admit an identical amount of light to the camera to correctly expose the picture. If you change the shutter speed, you must also change the f-stop of the aperture in the opposite direction. And vice versa.
Here's a series of equivalent exposure settings (Table 2-1). For a given lighting situation, such as a sunny day, they'd all let in the same amount of light for the sensor.
Table 2.1. Equivalent Exposure Settings
Shutter Speed | Lens Aperture |
|---|---|
1/125 | f/16 |
1/250 | f/11 |
1/500 | f/8 |
1/1000 | f/5.6 |
1/2000 | f/4 |
1/4000 | f/2.8 |
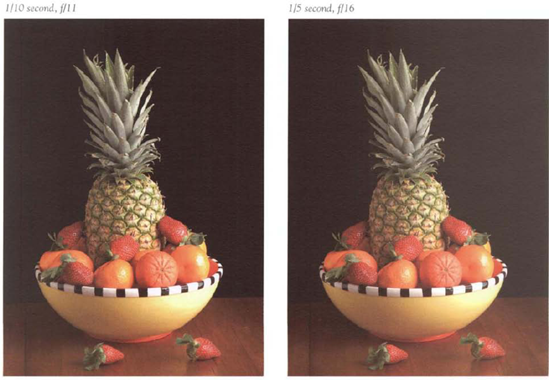
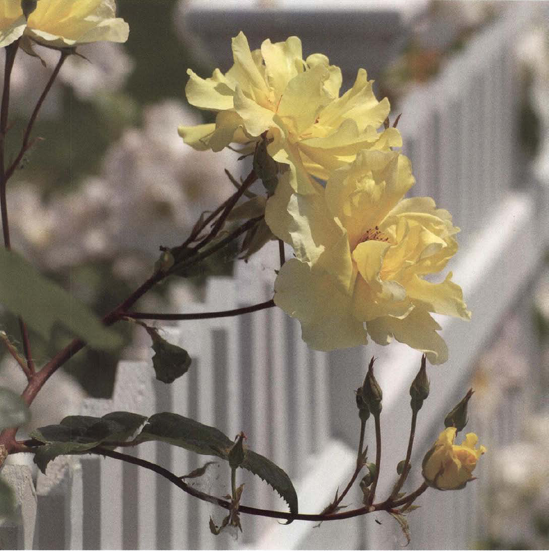
Figure 2.19. By learning how the many exposure controls interact, you can more easily manipulate them to obtain the shutter speed or aperture that you want for specific, creative goals. Here I wanted to use a large aperture so the rose would appear sharp and stand out against an out-of'-focus background. Exposure at 1/1500 second. f/5.6.
As you strive to set a shutter speed that meets your vision, keep one thing in mind. The principle of correct exposure stands firm. (Well, not always. There's an exception to most rules, and below we'll see one way to bend that rule). Your camera meter measures the light reflected from the scene and indicates the amount required for correct exposure; then you adjust—or your camera adjusts—the shutter speed and aperture opening to deliver the correct amount of light to the sensor.
So what happens if the amount of Light required for correct exposure prevents you from setting the shutter speed you want to use? You have several options. All but one work with the principle of exposure, so that means if you want to use a slower shutter speed, you must reduce the amount of light teaching the sensor. Of if you want a faster shutter speed, you must reduce the amount of light required by the sensor—or, more difficult—increase the amount of light reaching the sensor.
Start by setting the shutter speed you want to use (that means you should be using the Shutter-Priority mode). Now point your camera at the scene and take a meter reading to see if your camera chooses an aperture that gives correct exposure. If it doesn't—but is only two or three stops away from achieving correct exposure—you're probably okay. (Remember that many cameras will signal exposure problems with a flashing red light.) You have several options to adjust settings to achieve a good exposure, and sometimes you may need to combine these options in order to maximize your ability to achieve that (desired) shutter speed.
Your first course of action is to adjust the ISO setting, to change the sensor's sensitivity to light. Raise the ISO speed if your meter indicates you are underexposing the scene, which would be common in dimly lit scenes or when using extremely fast shutter speeds. Lower it if you are overexposing the scene, which would be common when you are trying to use a very slow shutter speed on a sunny day.
Another option is to choose another lens, one with a smaller aperture if you are trying to set a slower shutter speed, or one with a larger aperture if you ate trying to set a faster shutter speed.
Or if the light is too bright, you can reduce it by using a polarizing filter (1 2/3 stops) or by using a neutral density filter.
If the light is too dim, you can increase it. If you're shooting outdoors, you can wait for clouds to pass or supplement it with flash. If you're taking pictures indoors, you can use flash if you're willing to sacrifice the naturalistic appearance you might want.
But what if you've tried all the options and still can't get the correct exposure for the shutter speed you want? Well, you've got one more trick up your sleeve, and it's a good one, hut perhaps used as a last resort. If—after trying several of the above options—you're still a stop or two away from achieving correct exposure, ser your camera to use the RAW file format. Take the picture at your preferred shutter speed and then adjust for exposure problems in Adobe Camera Raw.
If you've exhausted all these alternatives and still can't achieve a good exposure with the shutter speed you want, then you might just have to adjust your creative strategy. In other words, plain and simple: you just can't use your preferred shutter setting, not this time. To get a good exposure, you're stuck: you'll have to choose a different shutter speed. Sigh.
Sometimes, the photographic gods of perfect exposure just aren't with us. But then again, maybe they are. Although you can't use the shutter speed you want, fate—if you'll only accept it—may be offering you an unexpected treasure. This is the kind of serendipity that's been my experience more often than not.
The white balance setting does two things for your photos. It adjusts an image to compensate for scene lighting that might be unusually or unnaturally tinted, so that subject colors appear normal and natural in a wide variety of lighting. And it also attempts to keep white objects looking white, even if the scene illumination changes and casts color onto them. Imagine a bride resplendent in wedding dress standing under fluorescent lights. You take a picture and ber dress appears a sickly green color because the white balance setting was incorrect or ineffective.
More importantly, she probably looked lovely to you because you didn't even perceive the greenish light coming from the fluorescent lights. That's because your visual system automatically and easily adjusts colors to appear normal in a wide variety of lighting. If everything appears normal to you, shouldn't your camera see it the same way? Unfortunately, it doesn't. Your camera captures any slight tint from existing or added Light, and it renders colors pleasing only if the white balance setting is correct.

Figure 2.20. Many photographers love the warm golden rays accompanying sunrise and sunset and rather than neutralizing it with white balance settings instead seek to preserve it. Exposure at 1/125 second, f/11.
Reflect a moment on what it is that you actually see. Your eyes see light reflected from objects. The source of light might be the sun, a tungsten lamp, a flickering candle, a campfire, a floodlight, fluorescent lights, or another kind of light source. Each of these lights has its own color cast or tint which is imparted to any subject reflecting that light.
Still not convinced? Let's start by considering the colors of sunlight. What color is the sun at sunrise and sunset? Of course, setting and rising suns are a deep orange, sometimes almost red. And at midday? Well, at noon the sun appears almost colorless, or what we would call "white," as white light is composed of equal parts of the color spectrum. Subjects illuminated by midday sun appear quite normal in photographs. The closer the sun is to the horizon, however, the more yellow and then orange light becomes as the sun's rays travel through more atmosphere. It's that longer journey at sunrise and sunset that filters out the bluish light, leaving behind red, orange, and yellow tones.
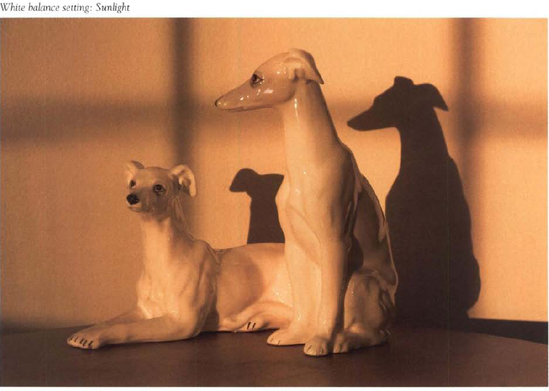
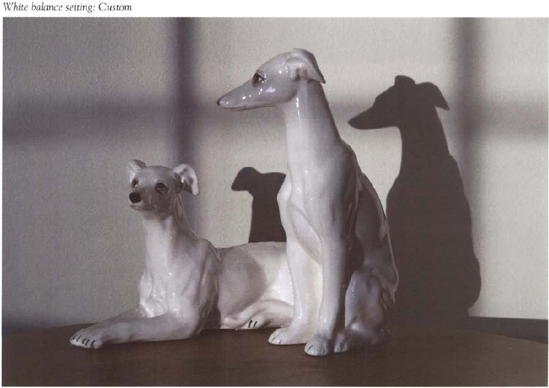
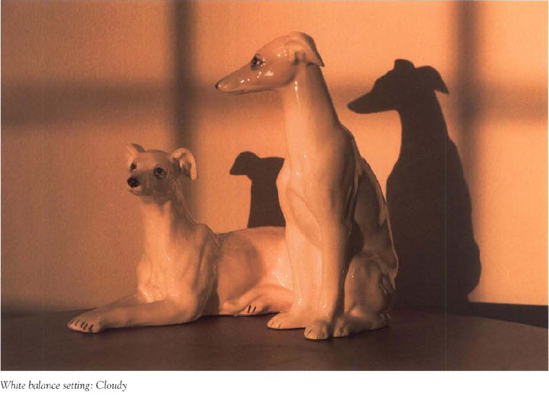
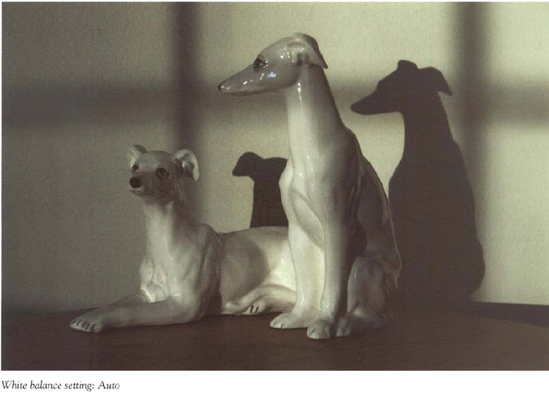
Figure 2.21. The orange rising sun illuminated these white ceramic greyhounds placed on a table opposite my open front door. The "Sunlight" white balance setting of the picture below most closely renders (he scene as it actually appeared. You can see hue different white balance settings affects the photo's appearance.
Not surprisingly, when subjects are bathed by the rich orange lighting coming from a setting sun, they pick up some of that orange coloration. This is quite obvious if you've photographed a snowdrift, white sand dune, lighthouse or a pale face illuminated by the setting sun.
Artificial lights add their own colors casts. Tungsten household bulbs give pictures a distinct orangish cast; fluorescent lights can add a touch of green or greenish blue—and give faces an almost sickly color.
Weather, too, affects the quality of lighting. Cloudy days are a bit bluish, and shady areas illuminated by a cloudless blue sky are even bluer. Some color casts, particularly from a setting sun, can be pleasant. Some others aren't, and you may want to reduce or eliminate the undesirable ones. To ward off the excessive and depressive blue from cloudy days and deep shade, you may want to achieve a more neutral color balance that reveals more of the bright colors that viewers expect.
To allow you to both counteract color casts and achieve neutral colors, your camera provides a White Balance control. It typically offers eight settings: midday sunlight, cloudy, shade, tungsten, fluorescent, flash, automatic, and custom. Each situational name—flash, tungsten, cloudy and so forth—is designed to give neutral or best color results for the lighting situation it's named after. The problem is you need to remember to change the setting when the light changes. Therefore, many photographers—the self-confessed absent-minded ones, anyway—simply set the camera to the automatic white balance setting and let it work its wonders under all types of light.
However, the automatic setting usually isn't quite as efficient as a situational setting. And for best results in critical conditions, you'll want to use the "custom" white balance setting. Following your camera manual's instructions, set the camera to the custom setting. Point the camera at a white card in the same light as your subject, position it so it fills the picture area, and take a reading. The camera adjusts its internal color settings to render the image of the card white, and when you take your picture the colors in the scene will be neutral—as if they were being lit by the midday sun.
The most flexible method of all is to simply use the RAW file format. When you open the RAW file, it lets you adjust the color balance either by clicking on a white or gray object in the scene, or by adjusting a color temperature slider. I use the RAW file format when I'm concerned about achieving accurate colors.
The plain fact is that you may not always want a neutral white balance. Sometimes, you may call upon the white balance to warm up pictures. Many photographers, especially people photographers, regularly use the "cloudy" white balance setting even on sunny days because it adds a touch of extra yellow—giving people a slight tan that seems healthy. And color casts can also wash a picture with emotion. The warm orange of a campfire reflected by laughing campers toasting marshmallows and the cold blue of a cloudless winter sky caught in the shadows of a snow drift—these and other color shifts can reinforce the mood of a picture. Indeed, even the dreary tint of a cloudy day can make one long desperately for sunshine.
I have to admit something. I don't entirely trust the meter on my camera as my exposures sometimes seem inconsistent. Admittedly, I could have inconsistent shutter speeds or a less then reliable aperture diaphragm that doesn't open and close smoothly. But, right or wrong, I blame the meter.
To that end, I sometimes switch to the Manual mode and set both the f-stop and shutter speed based on exposure guidelines for the lighting in the scene and the ISO I'm using. This technique is reliable when the subjects or areas you are photographing all reside in similar lighting. This practice is less reliable, however, when one part of the picture is in a sunlit area and another in the shade.
Nonetheless, it's good to memorize these guidelines as a way to quickly double check that your exposure settings are approximately correct.
The guidelines all revolve around the "Sunny 16" rule. The 16 in this case stands for f/16. The rule then is that on a sunny day your exposure should be 1/ISO at f/16. The shutter speed should be the same as the ISO setting. So if you set the ISO to 200, then to get a correct exposure on a sunny day set the shutter speed to 1/200 second (1/ISO) and the aperture to f/16. Or you could use an equivalent exposure because it would let in the same amount of light. Equivalent exposures would include, 1/400 second, f/11; 1/800 second, f/8; 1/1600 second, f/5.6, and so on.
This exposure is remarkably accurate for typical scenes. If there's lots of snow or light-colored sand, use f/22 as your starring point.
Now the tricky part is when clouds start to cover the sky. For each denser type of cloud cover, you would have to open up one stop. For instance, with a light overcast in which the sun seems to be covered by a veil, you would open up one stop: 1/ISO, f/11. For a moderate overcast in which you can't see the sun's disk at all, open up two stops: 1/ISO, f/8. For a beavy overcast, open up 3 stops. In full shade, say the west side of the house in early morning, open 4 stops.
Because evaluating cloud cover is somewhat subjective, these guidelines are less reliable than when you have the constant and reliable illumination of the full sun. But they're still good enough to use for comparison with your actual meter reading.
If the meter reading varies by one or more stops from the rule of thumb, you may want to bracket your exposures.
If you're a golfer, you know that once you get onto the green, you need to be able to read any slope that could send your putt off course. Likewise, when you are about to take a picture, you need to read the scene to see if there are any unusual lighting conditions that could throw your exposure off course.
Light meters work best with ordinary subjects and scenes in average lighting, such as a sunny day at the soccer field or the backyard pool, or an overcast day at the park. Such scenes consist of uniform lighting, meaning there's not a big mix of light and dark patches. As the mixture of light and dark areas in a scene grows or becomes more complex, exposure problems can arise. The main problem is when extra-dark areas appear and the subject is quite bright or vice versa—when the subject is quire dark but surrounded by extra-bright areas. Those very dark areas may result simply from dark subjects or from shadows created by the lighting. Although built-in computer programs compensate for a variety of situations, they aren't perfect.
Perhaps the easiest way to make sure you get a good picture in tricky lighting conditions is to take pictures using the RAW file format. It gives you a range of almost 4 stops (from+2 to-2) of exposure adjustment range in Photoshop to address exposure problems.
But an even better practice is to adjust your exposure to accommodate for the lighting in a scene. That way you can produce a well-exposed picture nearly all the time and not have to rely on the RAW file format to bail you out. The following section deals with entirely predictable exposure adjustment situations based on lighting direction.
Most tricky lighting conditions result from scenes with a mixture of unusually bright or dark areas. Some situations are entirely predictable, for instance, certain directions of light or certain types of subjects like snow. If you recognize these conditions, you can usually achieve a good exposure by using standard exposure compensation. Let's first look at lighting direction and then extra bright or dark subjects in a scene.
Figure 2.23. Because front lighting minimizes dark shadows, you usually don't need to adjust exposure to get optimum result-I. EX/Josure at 1/500 second, fill.
The sun is behind you. The subject in front of you is fully lit and shows few large shadows. Lucky you. With front light, you've got a dead-on straight putt so there's usually no need to adjust the exposure—just shoot away and enjoy the results.
When the sun shines on your subject from the left or right side, it usually creates some deep shadows. Shadows on the unlit side of a subject are dark and may hide pleasant or even critical details. To better show those details, you should let a bit more light into the camera to lighten the shadows. Typically, you would set the exposure compensation control to +1/2 stop. Check the picture's histogram to verify that the exposure adjustment you made has lightened the shadows enough to preserve important details.
Here the sun is shining into your face, and more importantly, into your camera. In addition to exposure errors, direct sunlight can cause flare, which can be like car beadlights shining blindingly at you. Because the sun is behind the subject, the part of the subject facing you is in complete shadow—you may need to increase exposure up to a full stop. This lighting condition is tricky, so bracketing may be called for.
Increase exposure compensation 1/2 to 1 stop to let in more light and brighten the picture. Letting in more light for extra-bright subjects may seem counterintuitive but, as you'll see, it's the right move. These are actually subjects of extraordinary light reflectance that fill one-third or more of the picture area. They would include fields of snow, white buildings, large white clouds—really almost anything that is light gray or white.

The metering system tries to make these subjects "average" in brightness, like the meter reading for a grassy field or blue lake, so it will try to make them appear darker than they actually ate. You compensate for this by forcing the camera to let in more light than it wants to.
For very dark subjects, decrease exposure by 1/2 to 1 stop to let in less light and darken the picture. These are subjects that reflect little light: black, deep gray, and other darkly-co bred subjects such as buildings, storm clouds, lava fields, and black rocks.
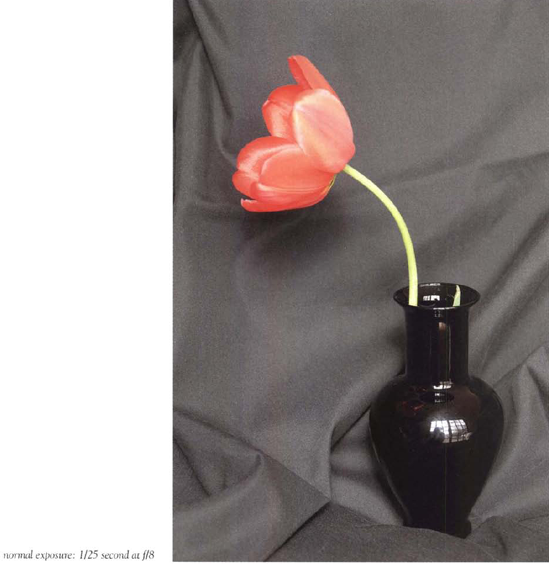
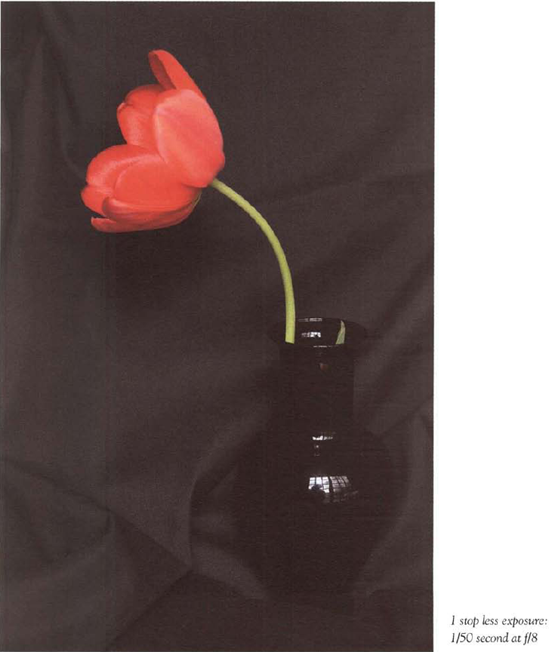
Figure 2.28. The camera meter tries to make dark subjects average in brightness, which means it makes them lighter than they really are. Here I set the exposure compensation control. I stop to darken the black vase and black cloth.:nonnal exposure: 1/25 second at f/8
Again, the camera meter tries to make them average, which means it will try to show them lighter. Exposure compensation forces the camera to let in less light than it normally would.