
Figure 9.1. Lilies, classic cyanotype toned with tannic acid, 7″ × 9.5″ © Joanna Janisiewicz, Akademia Anima Mundi 2018. Joanna Janisiewicz, originally from Poland, is a teacher at Akademia Anima Mundi, an arts organization basing its work on Plato’s Academy principles, with its core interest being the idea of Beauty. The art of photography (in the analog and digital darkroom) is taught along with aesthetics, elements of criticism and interpretation, history of art, drawing, calligraphy and graphic arts. For more information visit www.animamundi.com.pl.

Figure 9.2. Shrouded Blockship, Orkney, cyanotype toned with lead acetate, 238 × 188 cm, image from a scanned 6 × 9 cm film negative © Mike Ware 2005
Toning a cyanotype is fairly simple. There are two components, an alkali (a substance with a pH over 7) and an acid (a substance with a pH under 7). First an alkali such as ammonia or sodium carbonate is used to bleach the print. Then an acid such as tannic or gallic acid is used to tone the print. This order is sometimes reversed or doubled back and forth; nothing is cut in stone. There are also one-bath toners that use only one or the other, acid or alkali, and one-bath toners made from a combination of the acid and alkali.
In 1900, author George Brown penned these cranky words: “Many of these [toners] do not come within the sphere of practical photography, for they merely enable a tone to be obtained which is very frequently only a sorry apology for one which can be obtained much more readily by some other process…it is a mistaken policy to torture the blue ferro-prussiate image with chemical reagents, with the object of imitating these other processes.”1
What Brown didn’t take into account was how much fun toning cyanotype can be! This chapter has been designed to take out the complexities of toning, by simplifying formulas and providing equivalent teaspoon measures for those who prefer the “kitchen” approach. Only the formulas I have tested have been included, and though step wedges are certainly less exciting than an actual print, they do a good job of illustrating the very subtle color differences from deepest shadows to highest highlights that result from the different toners.2
Choice of alkalis, called “bleaches”
Most people have alkalis around the house because they are commonly part of laundry detergents or cleaning products. The easiest to use and the least caustic alkalis are:
• Ammonia
• Sodium bicarbonate (baking soda)
• Sodium carbonate (washing soda)
• Borax (e.g. 20 Mule Team brand)
• Trisodium phosphate (TSP)
Sodium or potassium hydroxide have also been used in toning, but these chemicals are very caustic—think drain cleaner—and overkill. If you’ve ever gotten a drop of them on your skin, you’ll see what I mean; they burn. Ammonia is a bit smelly, and if that bothers you, sodium carbonate is an acceptable substitute and a very rigorous alkali besides, although ammonia does give good purples.
Choice of acids, called “toners”
Toners can range from simple household ingredients to stuff you buy online for winemaking, basket dyeing, or from a chemistry store. No need to get chemical reagent quality. They are:
• Tannic acid powder
• Gallic acid powder
• Pyrogallic acid powder
• Catechu powder
• Strong brewed tea
• Strong brewed coffee
• Water from boiled walnut husks
Tip: buy a pound of sodium carbonate and a pound of tannic acid and you’ll have the two chemicals that are easy to mix, don’t outgas, and with a teaspoon of each to a liter, you will have enough to tone prints for the foreseeable future.
Cyanotype toning is as simple as a teaspoon of this and a teaspoon of that in tap water. No need for distilled water or any exact measures such as “up to” formulas. Just weigh or measure out the ingredient and add it to a liter of water. These volume-to-weight measures are the “kitchen” approach to toning. The weights are for a level, not heaping, teaspoon, and the grams are rounded up, no problem if using these minute amounts. If you are using larger amounts of chemistry, measuring out lots of teaspoons so being off half a gram per teaspoon matters, use a gram scale.
• 1 teaspoon sodium bicarbonate (baking soda) = 5 g
• 1 teaspoon sodium carbonate = 5 g
• 1 teaspoon borax = 5 g
• 1 teaspoon trisodium phosphate = 5 g
• 1 teaspoon tannic acid = 2.5 g
• 1 teaspoon gallic acid = 2 g
• 1 teaspoon pyrogallic acid = 3.5 g
• 1 teaspoon catechu = 3 g
Staining, or coloring, of the highlights is a common problem with cyanotype toning. There are a number of possible causes and solutions. Here are ways to minimize or prevent stain.
• All the iron has not been removed from the print.
Do a thorough 15-minute rinse of the print before toning, making sure to remove all unexposed sensitizer and residual iron.
• The paper when it goes into the toner is still alkaline from the bleach bath. With some toners you can use an intermediate acidified water bath (a teaspoon of citric acid or 60 ml/4 tablespoons/a glug of white vinegar per liter of water) for a few minutes between bleaching and toning to neutralize the alkali left in the paper before it enters the toning bath. However, often the alkalinity is useful to speed up the toning process.
• The toner is mixed too strong. Use as weak a bleaching and toning bath as possible. Some formulas in the literature call for 5% solutions which is a lot of chemistry, when a 0.5% will do.

Figures 9.3 and 9.4. Left to right, Anonymous Woman #2 and Anonymous Woman #3, from daguerreotypes, two coats of traditional cyanotype toned with pyrogallic acid and tea, colored pencil, on Arches Aquarelle, 8″ × 8″ © Susan Davens 2016. Susan Davens is a Maine based photographer working in 19th century photographic processes combined with digital technology. To see more of her work visit susandavens.com.
• The toner is contaminated by being used for too many prints. Use toners “one shot,” e.g. mix the whole liter of toner, but only use 200 ml of it to tone one print at a time, and then discard the 200 ml and use another 200 ml for the next print.
• Some papers stain more than others. Stick to 100% cotton papers recommended in the Papers for Cyanotype chapter. Cellulose papers may stain more than cotton papers so if staining is a problem, see if switching papers helps.3
• Paper stain may actually be exposure. Sometimes there is very slight Prussian blue in the highlights, and when toned, it tones, too. Thus the very highest highlights are actually not stain. You can see this by looking at the back of the paper, which is probably paper white. Make sure to determine the correct exposure time for each paper before toning, and watch out for highlight fogging which will also tone.
• Make two step wedge prints, tone one and keep an untoned version for comparison.
• Toning can be done on an old print or on a freshly made print straight from the wash water, even though some say that the print should oxidize and age for a day or two before toning. Hydrogen peroxide in the water wash will oxidize a print sufficiently.
• Some of the powdered acids are not very water soluble, gallic acid especially. It’s like mixing talcum powder and water! At time of use, mix volume to volume with rubbing alcohol before adding it to the water, e.g. 1 teaspoon gallic acid powder to 1 teaspoon rubbing alcohol.
• When presoaking a print before toning to evenly wet it, don’t leave it in the water too long or the print will wash all out!
• Toning is one way to salvage overexposed cyanotypes. If you bleach a print briefly in an alkali you can restore the blue tone by soaking it in a vinegar bath, but all of the original density will not come back.
• Try selective bleaching or toning with a paintbrush dipped in dilute alkali or dilute tannic or gallic acid. With a print that has been alkali-toned only, brushing on tannic or gallic acid will immediately create brown marks; this has some creative possibilities.
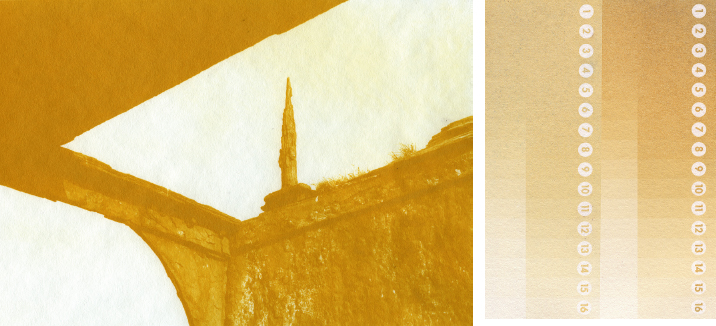
Figures 9.5 and 9.6. Left, Stele, South Ronaldsay, cyanotype toned with trisodium phosphate, 238 × 166 cm, image from a scanned 6 × 9 cm film negative © Mike Ware 2005. Right, a cut and paste of two step wedges, the left a full bleach in trisodium phosphate, the right a full bleach in sodium carbonate. They are similar in color but sodium carbonate tends to be slightly oranger. To get a deep orange like Ware’s image, overexpose.
• Caution: tannic, gallic, and pyrogallic, but especially gallic and pyrogallic, are intense stainers, and if a grain of it gets on your countertop it will color the countertop. Be very cleanly and cautious with these powders.
• Use the empty liter hydrogen peroxide brown bottles to store toners so you can have tannic, gallic, catechu, and pyrogallic acid on hand at all times.
There are a few one-bath toners in the literature. Often it is a dip in an alkali like borax, to change the tones to violet or yellow. Sometimes it is a dip in an acid like tannic to mute the blue to a browner blue. Then there are combination alkali-acid baths like sodium carbonate and tannic acid mixed into one solution.
I’m somewhat cautious with one-bath alkali toners. I wonder if the alkali merely creates a fading alkaline environment in the print, which we always try to avoid—think buffering. Besides, if you place a print back in acidified water the blue returns. A number of books mention that toners are not stable, permanent, or archival4 or that the prints will yellow or fade within weeks.5 A dry alkali-bleached print will actually tone quickly to brown when put in a tannic or gallic acid bath weeks later, sort of like bleaching a gelatin silver print in the darkroom and not sepia toning it until down the road. Play is always good, but forewarned is forearmed.
This tones the print a very pale chamois yellow and the resulting iron phosphate is stable.6 If desiring a split tone look, just use a pinch and watch the print carefully, pulling it just before it looks perfect as the action will continue in the wash water. You can also put it in an acid bath and some of the tones will revert to blue if toning is not carried to completion.
5 g trisodium phosphate (1 teaspoon)
1000 ml water
1. Add the trisodium phosphate to the water and stir until dissolved.
2. Soak a dried print in plain water for a minute or two until it is evenly wet throughout.
3. Immerse the print in the trisodium phosphate solution until the color desired is reached.
4. Wash the print for 10 minutes. Hang to dry.

Figures 9.7 and 9.8. On the left is a one-bath tea toner, on the right is a one-bath coffee toner. The top step wedge for each has been toned 20 minutes and the bottom for 5 minutes. Note that a mere 5 minutes in the tea or coffee produces a more evocative color and preserves the blues in the shadows.
This tones a similar but deeper yellow-orange than TSP. It can be used for just a few seconds to get a nice split tone with yellow highlights and blue shadows. It is a handy toner to clear up fog in the highlights. Note that the print will show a color change toward lavender before it changes to yellow.
5 g sodium carbonate (1 teaspoon)
1000 ml water
1. Add the sodium carbonate to the water and stir until dissolved.
2. Soak a dried print in plain water for a minute or two until it is evenly wet throughout.
3. Immerse the print in the carbonate solution until the color desired is reached.
4. Pull the print just before it looks good if wanting a split tone effect, because the action will continue somewhat in the wash water, and wash the print for 10 minutes. Hang to dry.
Variation: Substitute sodium bicarbonate or baking soda. It is useful as a mild bleach to clear the highlights and give them a faint yellow to gray-blue color. After bleaching you can return the print to an acidified water bath (a teaspoon of citric acid or 60 ml/4 tablespoons vinegar) to shift it back to blue, but all of the density will not return.
This is often included as a purple toner in cyanotype kits, and borax does produce a very beautiful lilac blue color in the first few seconds of immersion but then continues to bleach to pale yellow. Same with ammonia. Both will revert to blue if placed in an acid water bath.
5 g borax (1 teaspoon) or 5–50 ml ammonia (1 teaspoon to several tablespoons)
1000 ml water
1. Add the borax or ammonia to the water and stir until dissolved.
2. Soak a dried print in plain water for a minute or two until it is evenly wet throughout.
3. Place the print in the borax or ammonia solution and tone until the desired color is reached. If lavender is the desired color, it will happen quickly so watch it closely.
4. Wash the print for 10 minutes and hang to dry.
I love tea toner for the evocative colors it produces. Using tea is similar to using tannic acid because it has tannic acid in it. Making your own from tea bags is easy. If you tone for a shorter time—e.g. 2–5 minutes—you’ll get a split tone effect with the shadows deep blue and the highlights lavender brown.
5 tea bags
1000 ml water
1. Place the tea bags in the water and bring to a boil—remember, you’re not making tea to drink here, so feel free to make a bitter, boiled brew. Let the tea boil for a few minutes and then steep after that to make a very strong tea.
2. Soak a dried print in plain water for a minute or two until it is evenly wet throughout.
3. Immerse the print in the strong tea until the color desired is reached, keeping an eye on the highlights and the back of the paper to watch for staining.

Figure 9.9. One-bath tannic-sodium carbonate toner. The top step wedge was toned for 5 minutes, the bottom for 1 minute. This is a very active toner, and to preserve the Dmax, tone briefly.
4. Wash the print for 10 minutes, and hang to dry. Variation: strong coffee is also a toner. If you have leftover cold coffee from breakfast, substitute it for the tea, above. This toner tones slowly and is a more yellow-brown than a red-brown. I do prefer tea.
One-bath tannic-sodium carbonate toner
This toner proceeds very quickly when mixed in warm water, and is a very handy one-bath toner, easy to mix, and uses very little chemistry.7 I suggest mixing up a liter and using 200 ml of it one-shot, discarding after each print. Weights are immaterial; it’s really a kitchen teaspoon recipe.
1.25 g tannic acid (½ teaspoon)
2.5 g sodium carbonate (½ teaspoon)
1000 ml water
1. Add the tannic acid to the water and stir until dissolved.
2. Add the sodium carbonate to the water and stir until dissolved.
3. Soak a dried print in plain water for a minute or two until it is evenly wet throughout.
4. Immerse the print in the toner until the color desired is reached. You will notice the highlights pink up immediately within seconds and by about a minute or so it is nicely split toned pinkish-brown and blue. If you tone longer, it will get more monochrome brown.
5. Wash the print for 10 minutes, and hang to dry.

Figure 9.10. Untoned step wedge (top); 2 minute lead acetate toned step wedge (middle) versus 20 minute lead acetate toned step wedge (bottom). Note that longer lead acetate toning is not better.
Variation: use less sodium carbonate; ½ teaspoon in the liter makes this formula quite alkaline.
Variation: place the toned print in an acid bath to return the print to an acid state. The highlights will go to more of a neutral gray tone, the midtones will preserve some greenish blue, and the shadows will be back to blue, almost like a tricolor split effect.
I hesitate to include this toner in this chapter because lead is toxic. It has to be handled with greater care than other chemicals because of the lead content, and disposed of in a manner required according to the area you live in. However, apparently lead acetate is an ingredient in hair dyes, the type that turn your hair darker over time, so go figure! The one good thing is that lead acetate toning helps with the print’s tendency to fade in light, and for something so toxic, it is a one-bath toner and produces a beautiful purple.8 Take all chemical precautions necessary when mixing this toner. The toner is often recommended to be used at a 5% solution9 which this is. I mix a small amount, not a liter, at time of use.
12 g lead acetate (2 scant teaspoons)
250 ml water
3 ml 10% strength janitorial ammonia
1. Add the lead acetate to water and stir until dissolved.
2. Add the ammonia to the solution and adjust the pH to 7–8 by adding a ml of it at a time.
3. Tone a dry print for 2 or so minutes. Longer doesn’t necessarily get better.
4. Wash for 10 minutes and dry.

Figure 9.11. Daffodil, 30 × 45 cm © Guido Ceuppens 2018. The print was made with 20/8 classic cyanotype on Canson C A Grain 180 gsm paper and toned with tannic acid and sodium carbonate. Exposure was under a bank of UV tubes for 2.5 minutes. Development was in 2 changes of water for a total of 30 minutes. The print was then put in a solution of tannic acid (1 teaspoon in 1000 ml water) for 2 minutes, washed for 1 minute and briefly immersed in a solution of sodium carbonate (2 teaspoons in 1000 ml water) and again washed for 1 minute. The print was then transferred back into the tannic acid bath until the color was right. A final wash of 30 minutes followed.
Most often cyanotype toning proceeds with a two-bath process. An alkali is used to bleach the print and an acid is used to tone the print. Toning cyanotype is much less complicated than the literature would have you believe. Following is a generic toning formula that many two-bath toners follow. Once you have used this approach and understand how toning works, feel free to lessen or increase these generic amounts, lessen or increase time in the alkali bath for split toning and full toning effects, switch up the process to tone first and bleach second, or bleach-tone-bleach, or tone-bleach-tone—these three baths can be used in a multitude of ways. A few generic rules that beg for exceptions:
• As far as color, the toner of choice tends to trump all with tannic a bit more red-brown and gallic a bit more purple-brown
• As far as alkalis, ammonia and borax tend toward purple and the others toward yellow
• The stronger the alkali, the faster the bleaching proceeds
• The stronger the acid/toner, the faster the toning proceeds
• The stronger the alkali or longer the alkali bath, the more the acid colors the print
• Full bleaching can result in a dull print with a large loss of Dmax. Bleach less and tone longer
• A print always dries down darker and duller than it is in the water so it may benefit from a varnish to give it some gloss and depth.

Figures 9.12–9.15. Clockwise from top left: Waiting Series 1, Waiting Series 2, Waiting Series 3, and Waiting Series 5, green tea toned cyanotypes printed on drafting vellum, 18″ × 24″ © Holly Veenis 2018. “My husband, having attention deficit disorder, becomes so extremely focused on a given task that he loses track of time which often causes him to be late. I, on the other hand, easily become anxious about being late and tend to arrive everywhere fifteen minutes early. The disparity of these two mentalities results in my spending a lot of time waiting on my husband. The Waiting Series is an exploration of patience that utilizes long-exposure self-portraits that are printed in processes that need an extended amount of time compared to modern day digital printing.” The work of Holly Veenis is self-exploratory and typically utilizes the handmade, such as alternative processes and books, and has been exhibited nationally and internationally. She received a BA from Bridgewater College and an MFA from The Pennsylvania State University. To see more of her work, visit veenisphotography.com.
Generic two-bath alkali-acid toner
Solution A 0.5% alkali:
5 g sodium bicarbonate or sodium carbonate or borax or trisodium phosphate (1 teaspoon) or 5–50 ml ammonia
1000 ml tap water
Add the alkali to 1000 ml water and stir until dissolved. Borax and trisodium phosphate take a bit of stirring to go into solution. The others readily dissolve.
Solution B, optional:
60 ml plain white vinegar (4 tablespoons) or 5 g citric acid (1 teaspoon)
1000 ml tap water
Add the vinegar or citric acid to 1000 ml water and stir until dissolved.
Solution C 0.25–0.35% acid:
2.5–3.5 g tannic acid or gallic acid or catechu or pyrogallic acid (1 teaspoon)
1000 ml tap water
Add the acid to water and stir until dissolved. Tannic acid is fairly water soluble (and foamy) but gallic acid does not go into solution easily, so add a teaspoon or two of rubbing alcohol to the powder first, mix it into a paste, and then add it to the water. Give it a stir to keep it suspended in solution.

Figure 9.16. A comparison of an untoned step wedge, top, a step wedge bleached in ammonia and toned in tea, middle, and a step wedge toned in lead acetate, bottom. If lilac tones are desired, ammonia bleaching and tannic, gallic, and pyrogallic acid will lean towards violet browns but lead acetate is quite clearly violet.
1. Pour the alkali solution into one tray, the acidified water solution into another, and the acid solution into a third tray.
2. Soak a dried print in plain water for a minute or two until it is evenly wet throughout.
3. Immerse the print in the alkali bath either briefly or fully—if brief, split tones will result; if full, a monochrome print will result.
4. Optional: rinse in an acidified water bath for several minutes to remove the alkali. This helps prevent staining in the toner and keeps the alkali from contaminating the toner. Many do not do this, and, in fact, the alkalinity of the print can speed up the toning action, but staining can result.
5. Tone in the chosen acid for as long as it takes, pulling it just before it looks perfect because the toning action continues slightly in the water wash.
6. Water wash for 10 minutes to remove any acids and alkalis remaining in the paper and to bring the paper back to neutral pH.
7. Hang the print to dry. Some toners will cause the darks to bloom and bleed into the highlights if laid flat, so hanging to dry minimizes this as does the 10-minute water wash. Note that a print will dry down darker and duller than it looks when wet.
Variation: combine gallic and pyrogallic together, or tannic and pyrogallic, or gallic and tannic, for subtle color variations. Tannic is more red brown, gallic and pyrogallic more purple-brown.

Figure 9.17. These step wedges show the colors available with toning, compared to the untoned step wedge on the left. Various shades result from purple brown to red brown to the deep chocolate brown of pyrogallic in conjunction with hydrogen peroxide. Brief or partial bleaching works well because the darks of the original print are preserved. Brief toning tends to produce the more purple browns and longer toning the more red to chocolate browns, as does stronger toners. However, it’s not an exact science by any means, which is what can be so much fun!
Pyrogallic-hydrogen peroxide toner
This is a lovely toner.10 There is no bleach involved, because both hydrogen peroxide and pyrogallic acid are acidic. It is a fairly strong toner, and proceeds quickly, especially when the toned print is put in the hydrogen peroxide bath where deep, dusky chocolate browns occur. As with all toners, it can be done partially or fully to achieve different effects from split to full toning.
Solution A:
60 ml drug store hydrogen peroxide (4 tablespoons/¼ cup)
1000 ml water
At time of use add the peroxide to the water and stir.
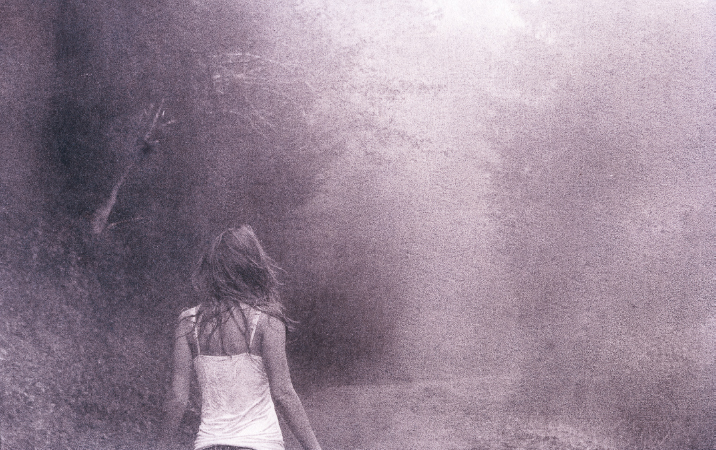
Figure 9.18. Unattached, classic cyanotype toned with tannic and gallic acid, 8″ × 10″ © Jessica Hays 2017. Jessica Hays’ work focuses on human relationships and issues of mental health, trauma, and loss. In addition, Hays explores places of healing in the landscape and their place in contemporary culture. Hays grew up in Montana, and is currently pursuing degrees in Photography and Environmental Studies. Her work has been shown both regionally and nationally, and she has presented at conferences and events dealing with issues in art and mental health. To see more of her work, visit jessicahaysart.com.
Solution B:
12 g pyrogallic acid (3 teaspoons)
1000 ml water
Add the pyrogallic acid to the water and stir until dissolved. Pyrogallic acid is between tannic and gallic as far as solubility goes so it does require some stirring.
1. Soak a dried print in plain water for a minute or two until it is evenly wet throughout.
2. Immerse the print in the pyrogallic acid toner for 1–5 minutes. Start out with the lesser time because you can always return the print to the toner.
3. Drain the print and immerse it in the hydrogen peroxide bath. You will notice the print proceeding to tone darker, and the bath will turn brown.
4. Wash the print for 10 minutes, and hang to dry.
Endnotes
1. Brown, George E. Ferric and Heliographic Processes: A Handbook for Photographers, Draughtsmen, and Sun Printers. New York: Tennant & Ward, 1900 [First edition 1900, reprinted 1905, this edition n.d.), p. 13.
2. Step wedges were all printed at the same time, the same paper, the same formula: Platine paper, new cyanotype, and an overexposure of 10 minutes. You will note that on some of the step wedges the reversal of overexposure is visible in the darkest steps.
3. Said years ago on the alt list by Gilbert van Reenen.
4. Webb, Randall and Martin Reed. Alternative Photographic Processes, A Working Guide for Imagemakers. New York: Silver Pixel Press, 2000, p. 72.
5. Barnier, John. Coming Into Focus, a Step-by-Step Guide to Alternative Photographic Printing Processes. San Francisco: Chronicle Books, 2000, p. 46; Arnold, Brian. Alternate Processes in Photography: Technique, History, and Creative Potential. New York: Oxford University Press, 2017, p. 59; Hirsch, Robert. Photographic Possibilities, 3rd ed. Boston: Focal Press, 2009, p. 201.
6. Ware, Mike. New Cyanotype, Siderotype Workshop Notes. Buxton: self-published, 2009, p. 11. http://www.mikeware.co.uk/mikeware/downloads.html
7. Van Keuren, Sarah. A Non Silver Manual. Cyanotype, Brownprint, Palladium, and Gum Bichromate with instructions for making light-resists including pinhole photography, 3rd ed. Woodlyn, Pennsylvania: Munro Printing, 2005, p. 8.
8. Ware, p. 11.
9. Brown, p. 16; Crawford, William. Keepers of Light. New York: Morgan and Morgan, 1979, p. 166; Barnier, p. 46.
10. Enfield, Jill. Photo-Imaging, A Complete Guide to Alternative Processes. New York: Amphoto Books, 2002, p. 88.
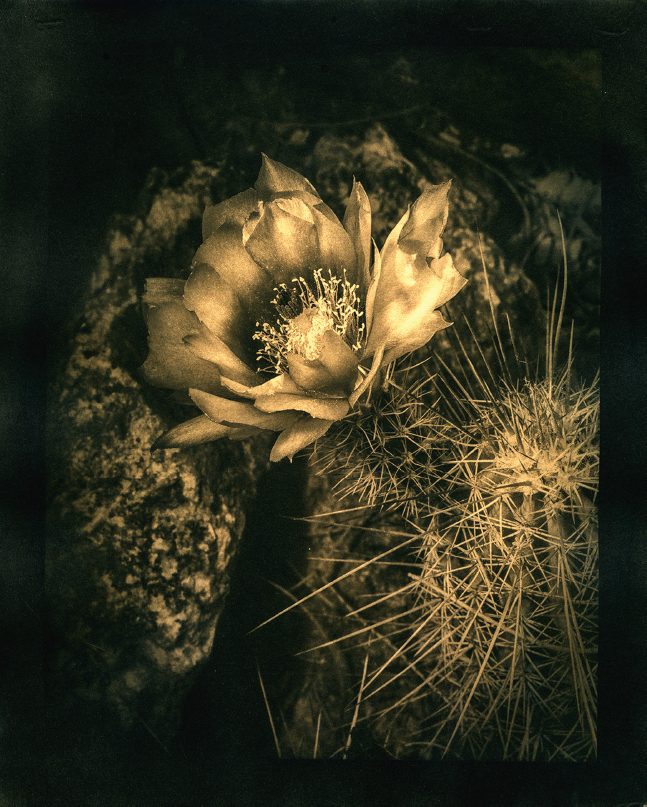
Figure 9.19. Blooming Cactus, tea-toned, sodium carbonate-bleached cyanotype © Eugene Starobinskiy 2017. “I first started with cyanotype because of the ease and relatively low cost of chemistry used in the process, and later on, discovered an entire universe of color/toner combinations available, and have not stopped printing in Prussian blue since. I like Hahnemühle Platinum Rag, Stonehenge and Somerset papers, but my best looking prints are on Canson XL Watercolor. I make my negatives according to Dan Burkholder’s system and also adjust my image intuitively. I use the classic cyanotype formula, and tone with natural, organic toners like coffee and tea.” Eugene Starobinskiy grew up in Kiev, Ukraine. His education is in the field of medical engineering. He moved to Arizona in 2002, where in 2007 he began his interest in photography. Influenced by his classes at Pima Community College and his mentor Ann Simmons-Meyers, Starobinskiy’s work focuses on exploring the world around him in historic photographic processes and documenting the beauty of it by means of chemistry and light.