Apache is arguably the most significant web server; the September 2018 Netcraft survey1 reports that Apache runs 34% of the top million busiest sites, with Nginx reporting 25% and Microsoft 10%.
This chapter shows how to install and configure Apache on a range of Linux systems. Apache is a modular system; for example, one module controls how Apache reports its status, which can be done through the command line or provided to visitors of the web site. Apache has another module that when enabled allows each user on the system to build their own web site within their home directory. Apache can provide dynamic content through CGI scripts; these are programs that run on the web server to create the content that is served to the client. Apache has a robust logging system, including an error log that describes the state of the server and customizable access logs that record the requests made by clients. A single Apache server can use virtual hosts to serve multiple web sites. These virtual hosts can be distinguished by running on different ports; a server with multiple IP addresses can also differentiate them by address. One common use for virtual hosts is to allow Apache to serve both HTTP and HTTPS traffic. The chapter shows how to select SSL/TLS protocols, choose ciphers, and create a self-signed certificate. These certificates can be signed by a signing server. Basic authentication can be used to require clients to provide a valid username and password before being granted access to protected content.
ModSecurity is a web application firewall that can be used to protect web servers and web applications. It can be configured with publicly available rules from the OWASP ModSecurity Common Rule Set.
Apache Installation
From 2011 through 2017, there were two primary versions of Apache: the 2.2 series (initially released in 2005) and the 2.4 series (initially released in 2012). Version 2.2 released its end of life at the start of 2018. Although most configuration directives are common to both versions, there are some differences that will be noted.
Installing Apache on CentOS
Apache may be included as part of the installation process for CentOS systems. If it is not already installed, it can be added with the command
[root@tsih ~]# yum install httpd
On CentOS, Apache is installed with the following settings:
Active: active (running) since Sat 2018-03-03 13:57:02 EST; 1s ago
Docs: man:httpd(8)
man:apachectl(8)
Main PID: 5941 (httpd)
Status: "Processing requests..."
CGroup: /system.slice/httpd.service
├─5941 /usr/sbin/httpd -DFOREGROUND
├─5949 /usr/sbin/httpd -DFOREGROUND
├─5950 /usr/sbin/httpd -DFOREGROUND
├─5951 /usr/sbin/httpd -DFOREGROUND
├─5952 /usr/sbin/httpd -DFOREGROUND
└─5953 /usr/sbin/httpd -DFOREGROUND
Mar 03 13:57:02 tsih.stars.example systemd[1]: Starting The Apache HTTP Serv....
Mar 03 13:57:02 tsih.stars.example systemd[1]: Started The Apache HTTP Server.
Hint: Some lines were ellipsized, use -l to show in full.
The firewall must be configured to allow traffic to the server. The CentOS firewall configuration tool for CentOS 5 and CentOS 6 has two different entries in the list of trusted services to allow traffic to the web server, one for “WWW (HTTP)” and one for “Secure WWW (HTTPS).” On CentOS 7, there are separate services, one for http and one for https.
Installing Apache on OpenSuSE
Apache is installed on OpenSuSE from the command line with the command
dschubba:~ # zypper install apache2
On OpenSuSE systems, Apache is installed with the following settings:
Service name: apache2
Application name: /usr/sbin/httpd-prefork
On OpenSuSE up through 13.2, /usr/sbin/httpd2 is a symlink to this application; beginning with OpenSuSE 42.1, /usr/sbin/httpd is a symlink to this application.
On OpenSuSE 42.1 and later, the control program is /usr/sbin/apachectl and /usr/sbin/apache2ctl is a symlink to it.
Once installed, Apache can be configured to start on boot using chkconfig (OpenSuSE 11.4) or systemctl (OpenSuSE 12.1 and later). This is the same as the procedure outlined for CentOS systems, save for the name of the service; on OpenSuSE, the service is named apache2 rather than httpd. These changes can also be made via YaST; navigate System ➤ Services Manager. Apache can be controlled from the command line using service (OpenSuSE 11.4) or systemctl (OpenSuSE 12.1 or later).
YaST can be used to open the proper ports in the firewall. The tool contains two entries under allowed services: one is named “HTTP Server” and the other is named “HTTPS Server.”
Installing Apache on Ubuntu and Mint
To install Apache on a Mint or an Ubuntu system, run the command
cgauss@california:~$ sudo apt-get install apache2
This installs Apache and configures it to start on boot with the following values:
Document root: Varies by the distribution; for Ubuntu 13.10 and earlier or Mint 16 and earlier, it is /var/www. For Ubuntu 14.04 and later and for Mint 17 and later it is /var/www/html.
Log file directory: /var/log/apache2
Control program: /usr/sbin/apache2ctl
There is a symlink from /usr/sbin/apachectl to /usr/sbin/apache2ctl, so either name can be used.
Apache can be controlled from the command line using service (Ubuntu 14.10 and earlier; Mint 17.3 and earlier) or systemctl (Ubuntu 15.04 and later; Mint 18 and later) in the same fashion as a CentOS system using the service name apache2 instead of httpd.
Mint and Ubuntu do not include a firewall as part of their default installation.
A user can check the installed version by running Apache with the -v flag. For example, on an Ubuntu 15.10 system, the user can run the following.
jmaxwell@prokne:~$ apache2 -v
Server version: Apache/2.4.12 (Ubuntu)
Server built: Jul 24 2015 15:59:00
Apache is structured around a series of modules, which can either be compiled into the program or added dynamically. The set of compiled modules varies slightly between distributions and releases. To see the compiled modules, run the application with the -l switch, seen here on Ubuntu 15.10.
jmaxwell@prokne:~$ apache2 -l
Compiled in modules:
core.c
mod_so.c
mod_watchdog.c
http_core.c
mod_log_config.c
mod_logio.c
mod_version.c
mod_unixd.c
Most modules are loaded dynamically and determined by the Apache configuration. To see the currently loaded set, the user can run the Apache control program
jmaxwell@prokne:~$ apachectl -D DUMP_MODULES
Loaded Modules:
core_module (static)
so_module (static)
watchdog_module (static)
http_module (static)
log_config_module (static)
logio_module (static)
... Ouput Deleted ...
setenvif_module (shared)
status_module (shared)
Basic Apache Configuration
Each distribution provides mechanisms to start and stop Apache as a service using the service command or the systemctl command. The Apache control program can also be used to start and stop Apache; for example, on CentOS 7.1, an administrator can start or stop Apache with the following commands.
[root@girtab ~]# apachectl start
[root@girtab ~]# apachectl stop
The starting point for the configuration of Apache is the primary configuration file, located in the configuration directory. An administrator can check the syntax of the configuration using the Apache control program with the -t switch. Here is an OpenSuSE 12.3 system where the Apache control program has the name apache2ctl.
menkent:~ # apache2ctl -t
Syntax OK
Any errors must be corrected before Apache can start.
Configuring Apache on CentOS
On CentOS systems, the primary configuration file is /etc/httpd/conf/httpd.conf. CentOS sets ServerRoot to /etc/httpd so that file locations in the Apache configuration are specified relative to this directory.
ServerName and ServerAdmin Directives
The name of the server is specified by the ServerName variable in the main configuration file; if the server is named ankaa.stars.example and the server is running on TCP/80, then a reasonable value for this variable is
ServerName ankaa.stars.example:80
The email address of the server administrator is set by the variable ServerAdmin, which in its default state has the value root@localhost.
Once the server is started, a user can verify that Apache is serving pages by visiting it with a web browser. An Apache test page should appear.
DocumentRoot Directive
The primary location for files served by Apache is DocumentRoot, which has the value /var/www/html on a CentOS system. Files in DocumentRoot are served at the root of the web page; if a user requests http://server.example/page.html, then CentOS Apache would return the page /var/www/html/page.html if it exists.
DirectoryIndex Directive
If a user requests a directory, say http://server.example/directory, then Apache checks the value of DirectoryIndex for the name of a file to serve. On CentOS it is set to index.html, so if the user visits the URL http://server.example/directory, then Apache serves /var/www/html/directory/index.html if it exists.
Configuring Apache on OpenSuSE
On OpenSuSE systems, the primary configuration file is /etc/apache2/httpd.conf. This loads more than a dozen individual configuration files that control portions of the server’s function.
OpenSuSE does not specify a value for the variable ServerRoot, so file locations in an OpenSuSE configuration of Apache are specified with their full absolute path.
The default server is configured in the file /etc/apache2/default-server.conf. It does not specify either the ServerName or ServerAdmin variables. These can be specified in this file or in the file /etc/sysconfig/apache2.
OpenSuSE does not include a test page; if it is started without a default document, then attempts to access the web site return an Error 403 / Access Forbidden.
OpenSuSE sets DocumentRoot in the file etc/apache2/default-server.conf to /srv/www/htdocs. The DirectoryIndex directive is specified in /etc/apache2/httpd.conf as the following.
DirectoryIndex index.html index.html.var
OpenSuSE 13.1 uses Apache 2.4.6, but the default files retain some configuration directives from Apache 2.2. For example, the main configuration file /etc/apache2/httpd.conf has a DefaultType directive that is deprecated in Apache 2.4. This leaves errors in the log file /var/log/apache2_error_log.
Configuring Apache on Ubuntu and Mint
On Ubuntu or Mint systems, the primary configuration file /etc/apache2/apache2.conf contains global settings. Modules, sites, and additional configurations are loaded via Include directives from the mods-enabled/, sites-enabled/, and conf-enabled/ subdirectories. The available modules, sites, and configuration files are included in the directories mods-available/, sites-available/, and conf-available/ subdirectories. The administrator can enable a module, site, or configuration by adding a symlink from one directory to the other. Ubuntu includes the programs a2enmod, a2dismod, a2ensite, a2dissite, a2enconf, and a2disconf to manage these links.
The file /etc/apache2/ports.conf configures the port(s) on which Apache listens. Older versions of Mint and Ubuntu use the file /etc/apache2/httpd.conf for local configuration information.
On a default system, there is one site enabled, named 000-default.conf on newer systems or 000-default on older systems. As an example, this is the default situation for Mint 18.2.
cgauss@germania ~ $ ls -l /etc/apache2/sites-enabled/
The ServerName directive is included in the file /etc/apache2/sites-enabled/000-default.conf, but it is commented out. That file also contains the ServerAdmin directive, which chooses webmaster@localhost for the default email address. The default document directory for this site is /srv/www/html.
The DirectoryIndex directive is in the file /etc/apache2/mods-enabled/dir.conf; that file typically has the content
The installation process includes a simple default document in DocumentRoot for the default web site, located at /var/www/index.html.
Apache Modules
Apache features are included in modules that need to be loaded in the Apache configuration files. These are added through a LoadModule directive in the Apache configuration.
Apache Modules: Apache Status
As an example of a module, an Apache web server can be configured to return detailed information about its status, either through the web interface or through the control program.
Loading Apache Modules in CentOS
In CentOS 5/6, the primary configuration file /etc/httpd/conf/httpd.conf contains the line
LoadModule status_module modules/mod_status.so
Because CentOS 5/6 sets ServerRoot to /etc/httpd in that same configuration file, this loads the module /etc/httpd/modules/mod_status.so. A check of the file system shows that the directory /etc/httpd/modules/ is symlinked to the directory /usr/lib/httpd/modules/.
On CentOS 7, the main configuration file /etc/httpd/conf/httpd.conf uses the directive Include conf.modules.d/*.conf to split the directives that load modules into separate files; the file /etc/httpd/conf.modules.d/00-base.conf contains the same LoadModule directive as CentOS 5/6.
Loading Apache Modules in OpenSuSE
OpenSuSE uses the file /etc/apache2/sysconfig.d/loadmodule.conf to determine which modules are loaded by Apache. That file however, is created by a script, and manual changes to the file are overwritten.2 That script is controlled by the values in /etc/sysconfig/apache2. To enable the Apache status module, update that file to include status in the APACHE_MODULES line:3
APACHE_MODULES="status actions alias auth_basic authn_file authz_host authz_groupfile authz_core authz_user autoindex cgi dir env expires include log_config mime negotiation setenvif ssl socache_shmcb userdir reqtimeout authn_core"
Restart Apache to ensure the module is loaded.
Loading Apache Modules in Mint/Ubuntu
On Ubuntu and Mint systems, the status module is loaded by default; the file /etc/apache2/mods-enabled/status.load contains the directive
The directory /etc/apache2/mods-enabled/ contains symlinks to the directory /etc/apache2/mods-available/. Modules can be added or removed using the commands a2dismod and a2enmod; it is also possible to make changes by manipulating the symlinks directly.4 For example, to disable the status module on Mint or Ubuntu, the administrator can run
jmaxwell@elpis:~$ sudo a2dismod status
Module status disabled.
To activate the new configuration, you need to run:
service apache2 restart
The module can be enabled with
jmaxwell@elpis:~$ sudo a2enmod status
Enabling module status.
To activate the new configuration, you need to run:
service apache2 restart
Module Configuration: Apache Status
Once the status module is loaded, it needs to be configured. Module configuration directives are in different locations depending on the distribution. Moreover, the allowable directives vary depending on the version of Apache.
To illustrate, consider the situation on OpenSuSE 42.1. In this case, the file that configures the Apache status module is /etc/apache2/mod_status.conf, which has the content in Listing 14-1.
#
# Allow server status reports generated by mod_status,
# with the URL of http://servername/server-status
#
# see http://httpd.apache.org/docs/2.4/mod/mod_status.html
#
<IfModule mod_status.c>
<Location /server-status>
SetHandler server-status
<IfModule !mod_access_compat.c>
Require local
</IfModule>
<IfModule mod_access_compat.c>
Order deny,allow
Deny from all
Allow from localhost
</IfModule>
</Location>
</IfModule>
Listing 14-1
The file /etc/apache2/mod_status.conf from OpenSuSE 42.1
In a CentOS 5 or CentOS 6 system, there is a section of the main configuration file /etc/httpd/conf/httpd.conf set aside for the configuration of the module with the (commented-out) content from Listing 14-2.
#<Location /server-status>
# SetHandler server-status
# Order deny,allow
# Deny from all
# Allow from .example.com
#</Location>
Listing 14-2
Portion of the file /etc/httpd/conf/httpd.conf from CentOS 6.8
On CentOS 7, although the module is present, it is not configured. Configuration directives must be manually added.
On Mint or Ubuntu systems, the configuration of loaded modules is generally done with a file in the /etc/apache2/modes-enabled/ directory. For example, for the status module, Ubuntu 11.04 includes the configuration file /etc/apache2/mods-enabled/status.conf with the content in Listing 14-3.
<IfModule mod_status.c>
#
# Allow server status reports generated by mod_status,
# with the URL of http://servername/server-status
# Uncomment and change the "192.0.2.0/24" to allow access from other hosts.
#
<Location /server-status>
SetHandler server-status
Order deny,allow
Deny from all
Allow from 127.0.0.1 ::1
# Allow from 192.0.2.0/24
</Location>
... Output Deleted ...
</IfModule>
Listing 14-3
The file /etc/apache2/mods-enabled/status.conf from Ubuntu 11.04
The structure of these directives is typical for directives throughout an Apache configuration. The <IfModulename>...</IfModule> blocks out a collection of directives that only apply if the module is loaded.
Location Directives
The <Locationname>...</Location> directives block out a portion of the web site and applies the contained directives only to that portion. For example, the directive <Location /server-status> applies to any URL of the form http://server.example/server-status or https://server.example/server-status.
Directory Directives
The Directory directive is used to apply directives to one or more directories in the file system, including all files and subdirectories. Symbolic and hard links in the file system mean that the same file may be reachable by more than one possible path; for example, on Ubuntu and Mint systems, the files /etc/apache2/mods-available/userdir.conf and /etc/apache2/mods-enabled/userdir.conf point to the same content. The Directory directive is applied to the path Apache takes to the resource. The wildcard * matches names, but not names with subdirectories.
SetHandler Directives
The SetHandler directive instructs Apache that any requests for the current location be parsed by the specified handler. Consider the combination
<Location /server-status>
SetHandler server-status
</Location>
These instruct Apache to handle requests for http(s)://server.example/server-status with the server-status module.
Controlling Access via Order Directives
Apache can control access to resources, including locations in the web site and directories in the file system. In Apache 2.2, this is done through Order, Allow, and Deny directives; these are included in the module mod_authz_host. In Apache 2.4 this is done through the Require directive, which is included in the module mod_authz_core. To provide backwards compatibility, Apache 2.4 includes the module mod_access_compat, which provides the Order, Allow, and Deny directives from Apache 2.2 in Apache 2.4.
The configuration file /etc/apache2/mod_status.conf on OpenSuSE 42.1 (Listing 14-1) allows for both possibilities; if the module mod_access_compat is loaded, it uses Order, Allow, and Deny while if the module is not loaded, it uses Require.
In an Apache 2.2 Order directive, the second value is the default. If a host matches either all or none of the subsequent Deny and Allow directives, then the default action is taken. Multiple Allow and multiple Deny directives are permitted. Hosts can be specified by IP address, hostname, address with netmask, and address with CIDR specification.
As an example, the configuration file /etc/apache2/sites-enabled/000-default on a default Ubuntu 11.04 system includes the directives
<Directory /var/www/>
Options Indexes FollowSymLinks MultiViews
AllowOverride None
Order allow,deny
allow from all
</Directory>
The Order directive configures the default policy as deny. The allow from all directive then permits access from arbitrary hosts. Because these are contained within the directives <Directory /var/www> ... </Directory>, these only apply to the directory /var/www on the server.
Listing 14-3 shows that access to the server status on Ubuntu 11.04 is restricted to localhost. To allow the host spica.stars.example access, add the directive inside the Location directive.
Allow from spica.stars.example
Controlling Access via Require Directives
On Apache 2.4, the Require directive is used to control access based on IP address or hostname. To allow access from any location, use the directive
Require all granted
To instead deny access from all locations, use the directive
Require all denied
As an example, on an Ubuntu 14.10 system the file /etc/apache2/apache2.conf contains the directives
<Directory /var/www/>
Options Indexes FollowSymLinks
AllowOverride None
Require all granted
</Directory>
The directive Require all granted gives Apache permission to serve files from the directory /var/www to arbitrary clients.
On Ubuntu 14.10, the file /etc/apache2/mods-available/status.conf has the following content
<Location /server-status>
SetHandler server-status
Require local
#Require ip 192.0.2.0/24
</Location>
These allow access to server status only from the localhost. To allow access to systems with IP address 10.0.2.98, or the system named atria.stars.example, the administrator can add the following within the <Location /server-status> ... </Location> directives.
Require ip 10.0.2.98
Require host atria.stars.example
Both the ip and host specification allow wildcarding, including partial domain names, netmasks, and CIDR notation.
Apache Status from the Browser
Provided the server status module is enabled, a user can view the state of the server by browsing to the appropriate web site as shown in Figure 14-1.
Figure 14-1
Viewing the Apache server status on the OpenSuSE 42.1 system wei.stars.example with the address 10.0.2.91
Apache Status from the Apache Control Program
Instead of a browser, it is also possible to use the server control program to examine the status of the server. For example, on OpenSuSE 42.1, the administrator can run
wei:~ # apachectl status
Apache Server Status for localhost (via ::1)
Server Version: Apache/2.4.16 (Linux/SUSE) OpenSSL/1.0.1i-fips
Server MPM: prefork
Server Built: 2015-10-21 13:01:59.000000000 +0000
━━━━━━━━━━━━━━━━━━━━━━━━━━━━━━━━━━━━━
Current Time: Tuesday, 20-Mar-2018 15:15:56 EDT
Restart Time: Tuesday, 20-Mar-2018 12:48:01 EDT
Parent Server Config. Generation: 1
Parent Server MPM Generation: 0
Server uptime: 2 hours 27 minutes 55 seconds
Server load: 0.04 0.03 0.05
1 requests currently being processed, 5 idle workers
"I" Idle cleanup of worker, "." Open slot with no current process
On Mint or Ubuntu systems, the Lynx text-only browser is required to use the Apache control program to view the system’s status. This can be installed with the command
jmaxwell@elpis:~$ sudo apt-get install lynx
CentOS 5/6 systems behave similarly, but the links package must be installed.
[root@scheat ~]# yum install links
On CentOS 7, the command apachectl status is redirected to systemd, even if the status module is properly configured and the links package installed. Here is the situation on CentOS 7.2.
Active: active (running) since Wed 2018-09-12 19:31:06 EDT; 1min 15s ago
Docs: man:httpd(8)
man:apachectl(8)
Main PID: 1437 (httpd)
Status: "Total requests: 0; Current requests/sec: 0; Current traffic: 0 B/sec"
CGroup: /system.slice/httpd.service
|-1437 /usr/sbin/httpd -DFOREGROUND
|-2843 /usr/sbin/httpd -DFOREGROUND
|-2844 /usr/sbin/httpd -DFOREGROUND
|-2845 /usr/sbin/httpd -DFOREGROUND
|-2846 /usr/sbin/httpd -DFOREGROUND
`-2847 /usr/sbin/httpd -DFOREGROUND
Sep 12 19:31:01 tsih.stars.example systemd[1]: Starting The Apache HTTP ...
Sep 12 19:31:06 tsih.stars.example systemd[1]: Started The Apache HTTP ...
Hint: Some lines were ellipsized, use -l to show in full.
Apache Modules: Individual User Directories
Apache can be configured so that local users can create their own web site by configuring files in their home directory, usually /home/username/public_html. These are served via Apache on the URL http://server.example/~username.
To use user directories, Apache requires the module userdir_module. On CentOS systems, this module is loaded by default, either in the main configuration file /etc/httpd/conf/httpd.conf for CentOS 5/6, or in the included file /etc/httpd/conf.modules.d/00-base.conf in CentOS 7.
OpenSuSE includes userdir in the list of modules loaded by default from /etc/sysconfig/apache2. For example, on OpenSuSE 42.1, that file has the content
APACHE_MODULES="actions alias auth_basic authn_file authz_host authz_groupfile authz_core authz_user autoindex cgi dir env expires include log_config mime negotiation setenvif ssl socache_shmcb userdir reqtimeout authn_core"
On Mint or Ubuntu systems, the module is available, but not enabled. It can be enabled with the commands
To activate the new configuration, you need to run:
service apache2 restart
jmaxwell@elpis:/etc/apache2/mods-available$ sudo service apache2 restart
Module Configuration: User Directories
Once the user directories module has been loaded, it must be configured before use.
On a Mint or Ubuntu system, the configuration for the module is in the file /etc/apache2/mods-enabled/userdir.conf. On Ubuntu 16.10, this file has the content in Listing 14-4.
Portion of the file /etc/httpd/conf/httpd.conf from CentOS 6.5 that configures user directories
By default, on these CentOS systems, though the module is loaded, user directories are disabled, and the corresponding configuration directives are commented out.
On CentOS 7, the configuration for user directories is in the separate file /etc/httpd.conf/userdir.conf. It is similar in content to CentOS 5/6, with the most significant difference being the replacement of the Apache 2.2 Order and Allow directives with the corresponding Apache 2.4 Require directives.
On OpenSuSE systems, configuration for the user directories module is in the file /etc/apache2/mod_userdir.conf. That file differs slightly between distributions depending on whether Apache 2.2 or Apache 2.4 is being used. As an example, Listing 14-6 shows the content for OpenSuSE 42.1.
#
# UserDir: The name of the directory that is appended onto a user's home
# directory if a ~user request is received.
#
<IfModule mod_userdir.c>
# Note that the name of the user directory ("public_html") cannot easily be
# changed here, since it is a compile time setting. The apache package
# would have to be rebuilt. You could work around by deleting
# /usr/sbin/suexec, but then all scripts from the directories would be
# executed with the UID of the webserver.
#
# To rebuild apache with another setting you need to change the
# %userdir define in the spec file.
# not every user's directory should be visible:
UserDir disabled root
# to enable UserDir only for a certain set of users, use this instead:
#UserDir disabled
#UserDir enabled user1 user2
# the UserDir directive is actually used inside the virtual hosts, to
Contents of the file /etc/apache2/mod_userdir.conf from OpenSuSE 42.1
UserDir Directives
Each of these approaches to configuring user directories begins by ensuring that the proper module is loaded with an IfModuledirective. Each continues with a UserDir directive. There are two primary ways the UserDir directive can be used. First, it can be used with a directory name in the form
UserDir public_html
In this form, the directive provides the name of the directory in the user’s home directory (which may need to be created) that will be used to share files. The example, public_html, means that the file /home/usermame/public_html/page.html would be served on the URL http://server.example/~username/page.html. The served file(s) needs to be accessible to the user running the Apache web server. The parent directory /home/username/ generally needs permissions of 711, and the directory /home/username/public_html/ generally needs permissions of 755. Note also that SELinux on CentOS in enforcing mode can block access to per-user directories leaving only a “Permission denied” entry in the log files.
The second form for the UserDir directive determines which users, if any, have their individual web site enabled. Consider the directives
UserDir disabled
UserDir enabled cgauss egalois gmonge
This disables individual web pages for all users, then selectively enables them for three users: cgauss, egalois, and gmonge.
AllowOverride Directive
Apache can use per-directory files to configure portions of Apache without modifying the main Apache configuration. The name of the directory configuration file is specified by the AccessFileName directive that has the default value “.htaccess”. If a directory contains a file with the name .htaccess that contains Apache directives, these may be applied when Apache serves files from the directory. The AllowOverride directive specifies which directives from the .htaccess file can be applied.
Allowable options include the following:
AuthConfig This allows authorization directives, including AuthType, AuthName, AuthUserFile, and Require.
FileInfo This allows some directives that control document types; these include directives from mod_actions, mod_alias, mod_mine, and mod_rewrite.
Indexes These allow some directives that control directory indexing, like DirectoryIndex.
Limit These allow directives like Order, Allow, and Deny that control host access.
Options Directive
The Options directive modifies how Apache treats a directory. Available choices include the following:
IncludesNoExec Server side includes controlled by mod_include are permitted, save for cgi and cmd includes.
Indexes If no default document (index.html) is present, return a directory listing.
MultiViews If a resource is available in multiple versions (say a web page in multiple languages), then the mod_negotiation module can be used to determine which resource to serve.
SymLinksIfOwnerMatch Apache should follow symbolic links, provided the target is owned by the same user as the owner of the link.
It is possible for multiple Directory directives to apply to the same directory in the system. If this occurs, Options are applied from the shortest directory to the longest. Normally, only one set of Options is applied, the last one. However, if each of the values in the Options directive start with either “+” or “-”, then earlier options settings are merged with later ones, rather than being overwritten. Options with “+” are applied; options with a “-” are removed if they were applied.
Limit and LimitExcept Directives
The Limit directive places restrictions on HTTP methods. Listing 14-4 for Apache 2.4 on Ubuntu 16.04 for example, contains the lines
<Limit GET POST OPTIONS>
Require all granted
</Limit>
This grants access to any user provided the request is either GET, POST, or OPTIONS. Listing 14-5 has similar lines for Apache 2.2 on CentOS 6.5 that use the Order and Allow directives instead of the Require directive.
The LimitException directive controls access to all the HTTP methods that are not listed. As an example, Listing 14-4 includes the lines
<LimitExcept GET POST OPTIONS>
Require all denied
</LimitExcept>
This ensures that HTTP methods like HEAD and PUT are prohibited.
Apache Modules: Aliases
An Alias directive in Apache is used to map a location in the web site into a location in the file system. This feature is enabled in mod_alias, which is loaded by default in all the Linux systems under consideration.
For example, the configuration file /etc/httpd/conf/httpd.conf on a CentOS 5/6 system contains a section of the form
Alias /icons/ "/var/www/icons/"
<Directory "/var/www/icons">
Options Indexes MultiViews FollowSymLinks
AllowOverride None
Order allow,deny
Allow from all
</Directory>
This Alias directive map URLs of the form http://server.example/icons/ to the directory /var/www/icons in the file system. Note the trailing forward slash in the URL; because the Alias directive ended with a forward slash, a forward slash is required in the URL. Visitors to this URL are presented with a directory listing showing a collection of icon files because the Indexes option is enabled in the Options directive for the Directory.
Apache Modules: CGI Scripts
Common Gateway Interface (CGI) scripts are programs that are run on the server to generate content served to the client. To use CGI scripts, Apache must load the appropriate dynamic module. The precise module depends on how Apache uses its multi-processing modules (MPM).
Loading the CGI Module
On CentOS 5/6, cgi_module is loaded by default in /etc/httpd/conf/httpd.conf with the command
LoadModule cgi_module modules/mod_cgi.so
On a CentOS 7 system, the file /etc/httpd/conf.modules.d/00-mpm.conf determines which multi-processing module is used. The default is the MPM prefork module; other options include MPM worker, and MPM event. The file /etc/httpd/conf.modules.d/01-cgi.conf loads the CGI module that matches the selected MPM module with the lines
<IfModule mpm_worker_module>
LoadModule cgid_module modules/mod_cgid.so
</IfModule>
<IfModule mpm_event_module>
LoadModule cgid_module modules/mod_cgid.so
</IfModule>
<IfModule mpm_prefork_module>
LoadModule cgi_module modules/mod_cgi.so
</IfModule>
Provided the proper CGI module is loaded, there is no significant difference in how the CGI module is configured.
On Ubuntu or Mint systems, the CGI module is not loaded by default, but it can be added using a2enmod. This command selects the CGI module that matches the MPM module used on the system. For example, on Ubuntu 15.04 the administrator can run the command
jmaxwell@hilda:~$ sudo a2enmod cgi
Your MPM seems to be threaded. Selecting cgid instead of cgi.
Enabling module cgid.
To activate the new configuration, you need to run:
service apache2 restart
On OpenSuSE systems, the CGI module is loaded by default from the configuration file in /etc/sysconfig/apache2.
Configuring the CGI Module; ScriptAlias
To use CGI, one or more locations must be configured with the ScriptAlias directive. This directive is part of the module mod_alias, which also must be installed. Like an Alias directive, the ScriptAlias directive tells the Apache to map a portion of the web site to the file system; it also instructs Apache that if a user requests a file from this portion of the web site, then Apache should execute the file and return the output.
For example, on CentOS 7 the file /etc/httpd/conf/httpd.conf contains the content
<IfModule alias_module>
... Output Deleted ...
ScriptAlias /cgi-bin/ "/var/www/cgi-bin/"
</IfModule>
That file continues and configures the directory /var/www/cgi-bin as follows.
<Directory "/var/www/cgi-bin">
AllowOverride None
Options None
Require all granted
</Directory>
CentOS 5/6 are configured similarly, though they use the Order and Allow directives from Apache 2.2 rather than the Require directive from Apache 2.4.
On Ubuntu 13.04 systems and earlier or Mint 15 systems and earlier, the file /etc/apache2/sites-enabled/000-default configures a CGI directory with the content
Later versions of Mint and Ubuntu configure CGI to use the directory /usr/lib/cgi-bin in the file /etc/apache2/conf-enabled/serve-cgi-bin.conf, which includes the content
OpenSuSE systems configure the directory /srv/www/cgi-bin for CGI scripts. For example, on OpenSuSE 42 systems, the file /etc/apache2/default-server.conf contains the content
ScriptAlias /cgi-bin/ "/srv/www/cgi-bin/"
# "/srv/www/cgi-bin" should be changed to whatever your ScriptAliased
# CGI directory exists, if you have that configured.
#
<Directory "/srv/www/cgi-bin">
AllowOverride None
Options +ExecCGI -Includes
<IfModule !mod_access_compat.c>
Require all granted
</IfModule>
<IfModule mod_access_compat.c>
Order allow,deny
Allow from all
</IfModule>
</Directory>
Older versions of OpenSuSE are similar but don’t check for mod_access_compat; they either use Order and Allow or use Require.
CGI Script: Example
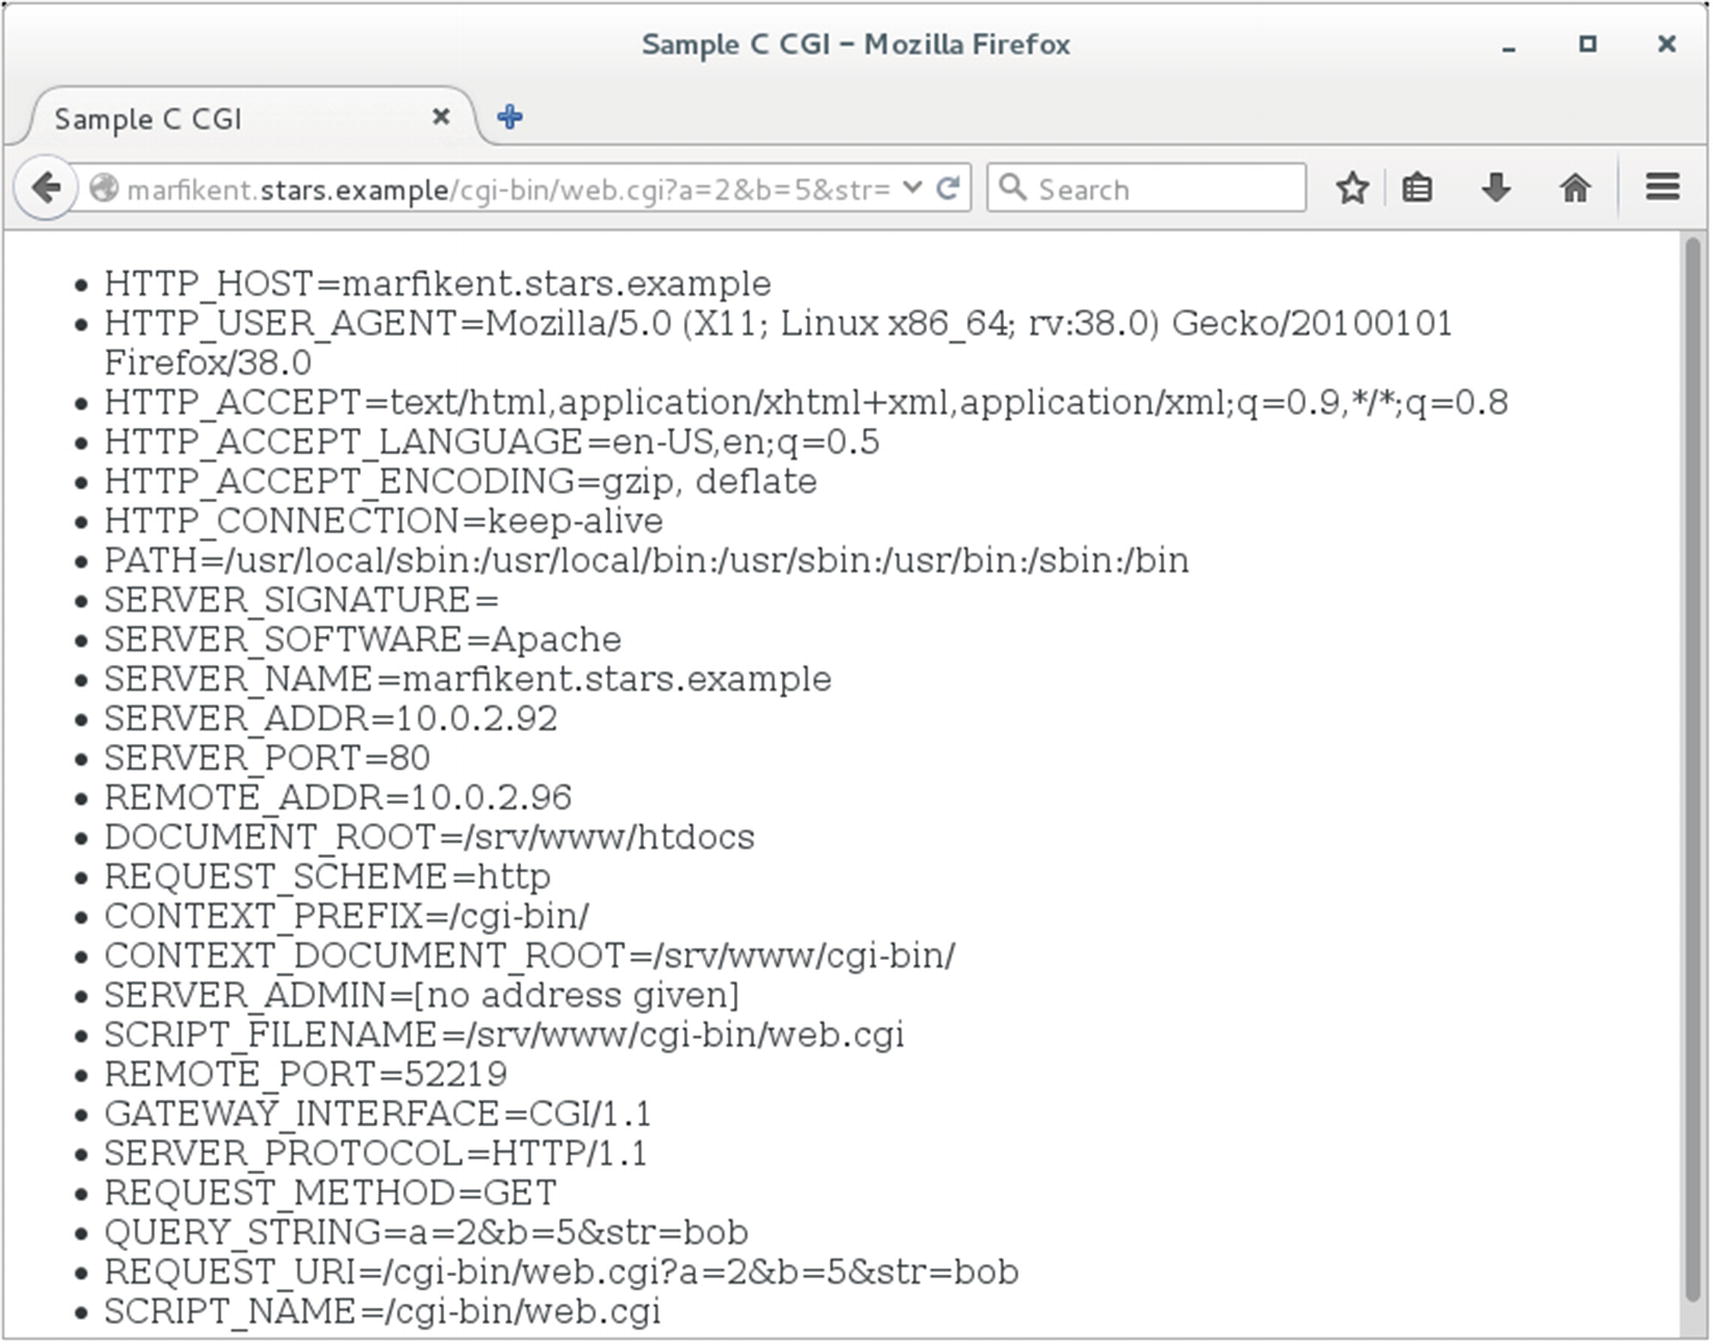
CGI scripts can be written in any language; Perl is a common choice. Listing 14-7 is a simple CGI script written in C named web.c
CGI program web.c; it prints the environment variables set on the server
Compile this program to web.cgi and store the executable in a CGI directory.
The program begins by printing the string "Content-type: text/html
"; this is required for the output from a CGI program, including both newlines. The program continues to build a valid HTML page, including a DOCTYPE and a title. It loops through the environment variables set for the program when it is run and returns these in a bulleted list.
The web server communicates with the CGI programs through the environment variables; in fact, the request method and full URI are included as environment variables. A CGI program can respond to a GET request with the environment data; POST requests also send data via stdin that needs to be parsed. The output from this program is shown in a browser in Figure 14-2.
Figure 14-2
Browser output of web.cgi parsing a GET request with three variables. Browser is Firefox on CentOS 7.2; the web server is on OpenSuSE 13.2.
Logs and Logging
Apache uses two kinds of logs: error logs and access logs. Access logs record requests made to the server, while the error log records problems with the server.
Error Log
The location of the Apache error log is determined by the ErrorLog directive. On CentOS systems, the location of the error log is specified in /etc/httpd/conf/httpd.conf by the directive
ErrorLog logs/error_log
The file location is specified relative to ServerRoot, which earlier in the file is set to /etc/httpd; thus, error logs are sent to /etc/httpd/logs/error_log. Because CentOS is configured so that /etc/httpd/logs is a symbolic link to /var/log/httpd, the error logs are sent to /var/log/httpd/error_log.
OpenSuSE does not specify a value for ServerRoot, so the full path of the error log file is required; the file /etc/apache2/httpd.conf contains the line
ErrorLog /var/log/apache2/error_log
On Mint and Ubuntu systems, the error log is /var/log/apache2/error.log; this is set in /etc/apache2/apache2.conf with a line of the form
ErrorLog ${APACHE_LOG_DIR}/error.log
The environment variable APACHE_LOG_DIR is set along with other environment variables in /etc/apache2/envvars. The result stores the error log in /var/log/apache2/error.log.
Like syslog messages, Apache generates error messages at different levels: debug, info, notice, warn, error, crit, alert, and emerg. The level recorded in the error log is set by the value of LogLevel; the discussed distributions set this to warn by default.
Access Log
The access log(s) record requests made of the server.
LogFormat Directive
The format of the access logs is customized via the LogFormat directive. In its most common use, LogFormat takes two arguments - a format string to determine what is logged, and a name for that logging format. For example, CentOS 5/6 in /etc/httpd/conf/httpd.conf defines four common formats: combined, common, referer, and agent with the directives
CentOS 7 includes the definition for combined and common.
Mint and Ubuntu define these same named formats with the same format strings in /etc/apache2/apache2.conf and OpenSuSE does so in /etc/apache2/mod_log_config.conf; all four distributions also define other logging formats.
Components of a format string include the following:
%b Response size (bytes) not including headers
%h Name or IP address of the remote host
%l The reported remote log name (generally just “-”)
%p The port on the server
%r The first line of the request
%s The status code returned
%t Time
%u The reported remote user name (generally just “-”)
%{User-Agent}i The user-agent reported by the client
%{SSL_PROTOCOL}x If mod_ssl is being used, then the SSL/TLS protocol
%{SSL_CIPHER}x If mod_ssl is being used, then the SSL/TLS cipher
If a format string directive includes “>” like “%>s”, then whenever the request has been internally redirected, the log entry should contain the final value.
CustomLog Directive
The CustomLog directive takes as arguments a file location and a defined log format, then tells Apache to record logs to that file with that format. On CentOS, for example, the primary configuration file /etc/httpd/conf/httpd.conf contains the line
CustomLog logs/access_log combined
The log file /var/log/httpd/access_log records requests in the combined log format.
Mint and Ubuntu use the combined log format to store logs in /var/log/apache2/access.log. This is done through a directive of the form
CustomLog ${APACHE_LOG_DIR}/access.log combined
This directive is present in /etc/apache2/sites-enabled/000-default on older systems or in /etc/apache2/sites-enabled/000-default on newer systems.
OpenSuSE keeps its configuration in /etc/sysconfig/apache2, which is then written to /etc/apache2/sysconfig.d/global.conf. It records logs in /var/log/apache2/access_log using the combined format.
TransferLog Directive
Another directive that can be used to configure logging is TransferLog. It specifies only the location of the log file; its format is determined by the most recent LogFormat that is not used to define a name. Consider the pair of directives:
LogFormat "%h %l %u %t "%r" %>s %b
TransferLog /var/log/apache2/access_log
These use the specified format (equivalent to the common log format) and send logs to the file /var/log/apache2/access_log.
Reading Apache Access Logs
As an example of typical access log entries, here is the access log entry generated by the request in Figure 14-2.
The plaintext format of Apache access logs makes them amenable to automated analysis via scripting languages. As a simple example, consider the following Python script in Listing 14-8.
# Host is the beginning of the line, up to the first space.
host = line.split(' ',1)[0]
remainder = line.split(' ',1)[1]
# Next is the remote system, ending with a space
remote_log_name = remainder.split(' ',1)[0]
remainder = remainder.split(' ',1)[1]
# Next is the user name, ending with a space
remote_user_name = remainder.split(' ',1)[0]
remainder = remainder.split(' ',1)[1]
# Next is the time. If starts with a bracket [
# Then comes the (text) date
# Then a space and the time zone
# Then the closing bracket
remainder = remainder.split('[',1)[1]
time = remainder.split(' ')[0]
# Next comes the request, which begins and ends with quotes
remainder = remainder.split('"',1)[1]
request = remainder.split('"',1)[0]
# Next is the return code, which starts and ends with a space
remainder = remainder.split('"',1)[1].lstrip()
return_code = remainder.split(' ',1)[0]
remainder = remainder.split(' ',1)[1]
# Next is the size of the response in bytes, separated by spaces
response_size = remainder.split('"')[0].strip()
# Next is the referer, in quotes
remainder = remainder.split('"',1)[1]
referer = remainder.split('"')[0]
# Last is the user agent, enclosed in quotes
user_agent = remainder. split('"')[2]
log_data.append({'host':host,
'remote_log_name':remote_log_name,
'remote_user_name':remote_user_name,
'text_time': time,
'request':request,
'return_code':return_code,
'response_size':response_size,
'referer':referer,
'user_agent':user_agent})
Listing 14-8
A Python script to parse Apache combined logs on a CentOS system
This opens an Apache access log in combined format (from the OpenSuSE default location /var/log/httpd/access_log) and reads through it one line at a time. Each line is split at a breakpoint from the format string: either a space, a quotation mark, or the opening bracket in the timestamp. The data at that point in the format string is retained and the remainder passed on for additional parsing. The result is stored in an array of Python dictionaries that can then be used in subsequent analysis.
Virtual Hosts
Virtual hosts allow Apache to run multiple web sites on the same server. Some common Apache configuration options include the following:
Single IP address, single hostname, single web site
Single IP address, single hostname, multiple ports, multiple web sites
Single IP address, multiple hostnames, multiple web sites
Multiple IP addresses, multiple hostnames, multiple web sites
OpenSuSE and CentOS systems are configured with one site in the global configuration, while subsequent sites are added using virtual hosts. Mint and Ubuntu do not have a globally configured site; they use virtual hosts for all their sites.
Configuring a Virtual Host
Adding a new virtual host first requires configuring Apache to listen on the proper port(s). If the server is running Apache 2.2, a NameVirtualHost directive is required. Finally, the properties of the virtual host must be set.
Listen Directives
The Listen directive has the form
Listen IP:port protocol
This determines the IP address, port, and protocol on which Apache should listen. If no address is specified, Apache listens on all assigned IP addresses, and if no protocol (http or https) is specified, then the https protocol is assumed if the port is TCP/443, and http is assumed otherwise.
On Ubuntu or Mint systems, the Listen directive is in the file /etc/apache2/ports.conf. On Ubuntu 17.04 for example, that file has the content
# If you just change the port or add more ports here, you will likely also
# have to change the VirtualHost statement in
# /etc/apache2/sites-enabled/000-default.conf
Listen 80
<IfModule ssl_module>
Listen 443
</IfModule>
<IfModule mod_gnutls.c>
Listen 443
</IfModule>
The file has similar content on other versions of Mint or Ubuntu.
On OpenSuSE, the Listen directives are in the file /etc/apache2/listen.conf. On CentOS systems, the main configuration file /etc/httpd/conf/httpd.conf contains a Listen directive.
NameVirtualHost Directives
A virtual host on Apache 2.2 must include a corresponding NameVirtualHost directive. This directive specifies the IP address and port that is associated with the virtual host. Ubuntu through Ubuntu 13.04 and Mint through Mint 15 use Apache 2.2. On those systems, the file /etc/apache2/ports.conf includes the directive
NameVirtualHost *:80
These distributions do not have a web site configured globally but use virtual hosts by default. This directive specifies that the virtual host uses any IP address associated with the system on TCP/80.
The natural place for NameVirtualHost directives on OpenSuSE systems is the file /etc/apache2/listen.conf. On CentOS systems, this directive is naturally placed in /etc/httpd/conf/httpd.conf.
The NameVirtualHost directive is not needed on Apache 2.4 systems. On these systems, the directive has no effect other than to generate a warning message in the logs.
VirtualHost Directive
The VirtualHost directive specifies the properties of a virtual host; these can include the location of DocumentRoot, the location of CGI scripts, and the location of logs. As an example, Listing 14-9 is the content of the file /etc/apache2/sites-enabled/000-default on Ubuntu 13.04.
# Possible values include: debug, info, notice, warn, error, crit,
# alert, emerg.
LogLevel warn
CustomLog ${APACHE_LOG_DIR}/access.log combined
</VirtualHost>
Listing 14-9
The file /etc/apache2/sites-enabled/000-default.conf on Ubuntu 13.04
All the directives here are enclosed in a pair of VirtualHost directives. These limit the directives to this single virtual host, which is running on any IP address and on TCP/80. This virtual host configures the ServerAdmin, DocumentRoot, CGI scripting directory, and the logging for this virtual host.
If the server is Apache 2.2, then the IP address and port in the VirtualHost directive must match a corresponding NameVirtualHost directive.
Building a Virtual Host on TCP/8080
Suppose that an administrator wants to configure a second web site on TCP/8080 that listens on all IP addresses. The first step is to add a Listen directive to the configuration in the form
Listen 8080
The proper port in the firewall must also be opened.
If the server is running Apache 2.2, then the administrator next adds a NameVirtualHost directive in the form
NameVirtualHost *:8080
The administrator then creates the VirtualHost directive. For definiteness, suppose that the target system is an older Ubuntu system running Apache 2.2. Then a reasonable approach would be to create the file /etc/apache2/sites-available/001-port-8080.conf with the content
The administrator creates the directory /var/www2 specified in the VirtualHost directive and populates it with a web site. Then the site is added with
jmaxwell@pretoria:~$ sudo a2ensite 001-port-8080
Enabling site 001-port-8080.
To activate the new configuration, you need to run:
service apache2 reload
Once the server restarts, the web site is live.
The situation for other distributions is similar, though the location of the Listen directive, whether the NameVirtualHost directive is required, and the structure of the VirtualHost directive can vary.
SELinux on CentOS in enforcing mode can block access to a website hosted in /var/www2, leaving only a “Permission denied” entry in the log files.
SSL and TLS
Web sites commonly use SSL and TLS so that clients can reliably identify the server and to encrypt data that passes between the server and the client. The process to configure Apache to use SSL/TLS is somewhat complex, with many slight differences between different distributions. For the convenience of the reader, the online supplement at https://www.apress.com/us/book/9781484242933 includes a step-by-step checklist.
Apache Modules: ssl_module
Apache includes support for SSL/TLS in a separate module, ssl_module. On OpenSuSE systems this module is loaded by default; however, OpenSuSE uses a flag passed to Apache on startup to determine if SSL/TLS support is to be used, and by default it is disabled. To enable SSL/TLS, add “SSL” to the variable APACHE_SERVER_FLAGS in /etc/sysconfig/apache2, then restart the server.
On Mint and Ubuntu systems, the module is loaded using a2enmod. For example, on Ubuntu 14.10
jmaxwell@pretoria:~$ sudo a2enmod ssl
Considering dependency setenvif for ssl:
Module setenvif already enabled
Considering dependency mime for ssl:
Module mime already enabled
Considering dependency socache_shmcb for ssl:
Enabling module socache_shmcb.
Enabling module ssl.
See /usr/share/doc/apache2/README.Debian.gz on how to configure SSL and create self-signed certificates.
To activate the new configuration, you need to run:
service apache2 restart
The situation on CentOS is more complex because the necessary module for SSL/TLS is not installed as part of the default Apache installation and must be added separately. It can be installed with the command
[root@tsih ~]# yum install mod_ssl
Once installed, on CentOS 7 it creates file /etc/httpd/conf.modules.d/00-ssl.conf with the directive
LoadModule ssl_module modules/mod_ssl.so
On CentOS 5/6, this installation creates the file /etc/httpd/conf.d/ssl.conf, which includes the LoadModule directive as well as other configurations needed for SSL/TLS.
SSL/TLS Configuration
The location of the configuration files for SSL/TLS vary depending on the distribution.
On OpenSuSE systems, the configuration file /etc/apache2/ssl-global.conf stores global settings that affect all SSL/TLS protected web sites. Virtual hosts are used for SSL/TLS protected web sites, and OpenSuSE includes a template /etc/apache2/vhosts.d/vhost-ssl.template that can be used as a starting point. Some versions of OpenSuSE, including 12.2, 12.3, 13.1, and 13.2 also include an SSL/TLS site configuration in the file /etc/apache2/default-vhost-ssl.conf; this serves files from the same directory (/srv/www/htdocs) as the main site.
On Mint and Ubuntu, there is an available site that contains the configuration information for SSL/TLS. Beginning with Ubuntu 13.10 and Mint 16, this is the file /etc/apache2/sites-available/default-ssl.conf, while for earlier versions of Mint and Ubuntu, it is the file /etc/apache2/sites-available/default. The site is enabled with a2ensite; for example, on Mint 18 the administrator can run the command
jmaxwell@elektra ~ $ sudo a2ensite default-ssl
Enabling site default-ssl.
To activate the new configuration, you need to run:
service apache2 reload
On CentOS, SSL/TLS configuration is contained in the file /etc/httpd/conf.d/ssl.conf.
SSLProtocol and Ciphers
There are multiple versions of the SSL/TLS protocol. The administrator chooses which one(s) to deploy with the SSLProtocol directive. As an example, CentOS 7.2 in /etc/httpd/conf.d/ssl.conf includes the directive
SSLProtocol all -SSLv2
Available options for the SSLProtocol directive include:
SSLv2 Only available on Apache 2.2
SSLv3
TLSv1
TLSv1.1 Only available with OpenSSL 1.0.1 and later
TLSv1.2 Only available with OpenSSL 1.0.1 and later
all
Care needs to be taken when selecting the SSLProtocol. For example, SSLv2 is an older protocol that has been removed from Apache 2.4 due to multiple security weaknesses including the August 2016 DROWN attack.6The SSLv3 protocol is vulnerable to the 2014 POODLE attack.7 The TLSv1 protocol does not meet the minimum standards for TLS servers as recommended by NIST.8
In addition to the protocol, the administrator selects an SSL/TLS cipher suite. An SSL/TLS cipher suite9 on Apache is a combination of
Authentication Algorithm (RSA, Diffie-Hellman, DSS, ECDSA, or none);
Cipher/Encryption Algorithm (AES, DES, Triple-DES, RC4, RC2, IDEA, etc.); and
MAC Digest Algorithm (MD5, SHA or SHA1, SHA256, SHA384).
The cipher suite is specified via the directive SSLCipherSuite. On OpenSuSE 42.1, for example, this directive is in /etc/apache2/ssl-global.conf and has the form
Rather than specify the individual cipher suites, Mint, Ubuntu, and CentOS use aliases for groups of cipher suites. For example, Mint 18 in /etc/apache2/mods-enabled/ssl.conf uses the directive
SSLCipherSuite HIGH:!aNULL
Both the client and the server express their preferences for a cipher suite during the SSL/TLS handshake. By default, Apache uses the preferences expressed by the client. The administrator can instruct Apache to use the server’s preference instead with the directive
SSLHonorCipherOrder on
To enable SSL/TLS, the administrator must also include the directive
SSLEngine On
These all can be used inside a VirtualHost directive block.
Selecting Protocols and Ciphers
The problem of determining which protocol(s) and cipher(s) to support is complex; it depends not only on the cryptographic strength of the different ciphers but also on which browsers support a given cipher suite.
Fortunately, the Mozilla Wiki at https://wiki.mozilla.org/Security/Server_Side_TLS keeps an updated list of recommended configurations. The SSL configuration generator at https://mozilla.github.io/server-side-tls/ssl-config-generator/ provides the result in a format that can be pasted directly into an Apache configuration file. The administrator specifies the version of Apache and the version of OpenSSL; they also choose a browser profile: Old, which includes Internet Explorer 6; Intermediate, which includes Internet Explorer 7 and Firefox 1; or Modern, which includes Internet Explorer 11 and Firefox 27.
Consider an OpenSuSE 13.2 system that is running Apache 2.4.10 with OpenSSL 1.0.1i. For intermediate browsers, their recommended configuration is
Once the administrator has selected the SSLProtocol and cipher suite(s), they must create the server’s private key. The private key is provided to the Apache server with the directive SSLCertificateKeyFile. The preferred directory for this key varies with the distribution.
CentOS: /etc/pki/tls/private
Ubuntu, Mint: /etc/ssl/private
OpenSuSE: /etc/apache2/ssl.key
The SSLCertificateKeyFile directive is placed within the VirtualHost that is serving SSL/TLS, as in the example configuration provided by the Mozilla SSL Configuration Generator.
To create the server’s private key, the administrator uses openssl. For example, suppose that the administrator on the Mint 18.2 system germania.asteroid.test wants to generate a 2048-bit RSA private key. To do so and to store the result in /etc/ssl/private/germania.key, the administrator runs the command
As was noted in Chapter 13, the National Institute of Science and Technology (NIST) concludes that a 2048-bit RSA key provides 112 bits of security and is acceptable through 2030 for sensitive but unclassified data.10
Properties of the private key, including its key size, can be found with the command
Once the key is generated, the administrator of an SSL/TLS site needs to create a public certificate for this key. The certificate is provided to the Apache server with the directive SSLCertificateFile. The preferred directory for the public certificate varies with the distribution.
CentOS: /etc/pki/tls/certs
Ubuntu, Mint: /etc/ssl/certs
OpenSuSE: /etc/apache2/ssl.crt
The SSLCertificateFile directive is placed within the VirtualHost that is serving SSL/TLS, as in the example configuration provided by the Mozilla SSL Configuration Generator.
One method to create a certificate is to use a self-signed certificate. In this case, the certificate is not signed by a trusted certificate authority (CA), so users see a browser warning when they first connect to the web site.
Suppose that the example Mint 18.2 administrator for germania.asteroid.test wishes to generate a self-signed certificate and store the result in /etc/ssl/certs/germania.crt. This can be done with the following command.
This process takes as input the server’s private key and returns a self-signed public certificate. The common name must match the DNS name of the web server, as it is checked by the browser. The properties of the resulting certificate can be inspected with the command
The problem with self-signed certificates is that they do not meet one of the two purposes of SSL/TLS - they do not identify the server. Indeed, each client that visits the site needs to accept or reject the self-signed certificate provided by the server based only on the untrusted data provided by the server.
Instead of relying on self-signed certificates for each server, an organization may choose to have their certificates signed, either by an externally recognized certificate authority or by a trusted internal server. An organization that uses a trusted internal signing server can configure their clients to trust the signing server instead of each individual web server.
To do so, first the administrator creates a certificate signing request (.csr). The example Mint 18.2 administrator for germania.asteroid.test can create a certificate signing request and store the result in /etc/ssl/germania.csr with the following command
This process takes as input the server’s private key and returns the certificate signing request /etc/ssl/germania.csr. OpenSuSE systems provide the directory /etc/apache2/ssl.csr as a natural place to store certificate signing requests, but other distributions do not. In this example, the certificate signing request is stored in /etc/ssl.
Like the self-signed certificate, the common name in the certificate signing request must match the DNS name of the web server.
The resulting certificate signing request can be sent to any certificate authority for signature. The certificate authority will return a certificate that can be used with the SSLCertificateFile in the Apache configuration.
Signing Certificates
An organization can create their own signing server and use it to sign certificate signing requests for web servers using any of the distributions discussed. Indeed, it is possible to create a complete certificate authority (CA); however, to save space, only the process of certificate signing is covered here.
A client that trusts the signing server will trust all the servers whose certificates have been signed by the signing server. An organization with many servers and many self-signed certificates would need each client to individually trust each self-signed certificate for each server. If the organization instead had a signing server, then the clients would need only to trust the one individual singing server.
Signing servers should be separate from web servers and should be carefully secured. If an attacker can gain access to a signing server and sign certificates, then the value of the signing server is lost, as no certificate signed by this server could be trusted. In 2011, the commercial certificate authority DigiNotar was attacked and fraudulent certificates issued; this resulted in the company’s bankruptcy.
CA Keys
The first step to building a signing server is to generate the private CA key that is to be used to sign certificates. This CA key should be maximally protected. On CentOS systems, the natural place to store the CA key is in the directory /etc/pki/CA/private, as it already is configured with strong permissions. Indeed, here is the structure of the directory /etc/pki on CentOS 7.2
[root@tsih ~]# ls -l /etc/pki/CA
total 0
drwxr-xr-x. 2 root root 6 Jun 29 2015 certs
drwxr-xr-x. 2 root root 6 Jun 29 2015 crl
drwxr-xr-x. 2 root root 6 Jun 29 2015 newcerts
drwx------. 2 root root 6 Jun 29 2015 private
On Ubuntu, Mint, or OpenSuSE, the default installation does not include directories set aside for a CA; however, an appropriate directory structure can be configured manually. Suppose an organization wishes to use an OpenSuSE 42.1 system as a signing server. The CentOS directory structure can then be replicated.
wei:~ # mkdir -p /etc/pki/CA/certs
wei:~ # mkdir -p /etc/pki/CA/crl
wei:~ # mkdir -p /etc/pki/CA/newcerts
wei:~ # mkdir -p /etc/pki/CA/private
wei:~ # chmod 700 /etc/pki/CA/private/
wei:~ # ls -l /etc/pki/CA
total 0
drwxr-xr-x 1 root root 0 Apr 1 22:30 certs
drwxr-xr-x 1 root root 0 Apr 1 22:30 crl
drwxr-xr-x 1 root root 0 Apr 1 22:30 newcerts
drwx------ 1 root root 0 Apr 1 22:30 private
The administrator then creates the CA key with the command
Enter pass phrase for /etc/pki/CA/private/ca.key: <enter passphrase here>
Verifying - Enter pass phrase for /etc/pki/CA/private/ca.key: <enter passphrase here>
This is essentially the same command used to generate a private key for a web server; here the result is stored in a different directory and the key is protected by a password with AES-128 encryption.
CA Certificate
Next the administrator creates the public CA certificate. Clients will that import and trust this CA certificate will then trust certificates signed by this signing server.
To create the certificate, the administrator runs the following command:
Enter pass phrase for /etc/pki/CA/private/ca.key: <enter passphrase here>
You are about to be asked to enter information that will be incorporated
into your certificate request.
What you are about to enter is what is called a Distinguished Name or a DN.
There are quite a few fields but you can leave some blank
For some fields there will be a default value,
If you enter '.', the field will be left blank.
-----
Country Name (2 letter code) [AU]:US
State or Province Name (full name) [Some-State]:Maryland
Locality Name (eg, city) []:Towson
Organization Name (eg, company) [Internet Widgits Pty Ltd]:Towson University
Organizational Unit Name (eg, section) []:Cyber Security Laboratory
Common Name (e.g. server FQDN or YOUR name) []:wei.stars.example
This is like the process used to generate a self-signed certificate for a web server. In this case though, the administrator is using the CA key, which requires a password to decrypt.
CA Serial Number File
A serial number file needs to be created in the certificates directory and initialized. The serial number file has the same name as the CA certificate but a different extension (.srl). The serial number file contains a hexadecimal serial number with an even number of digits and is updated each time a certificate is signed.
wei:~ # echo "01" > /etc/pki/CA/certs/ca.srl
At this point, the server can be used to sign certificates. It is not a complete CA or certificate authority; for example, certificate revocation lists have not been configured.
Signing a .csr
The process of signing a certificate signing request on a signing server is like the process of signing a certificate. First the .csr file is copied to the signing server. Suppose that the .csr for the example web server germaina.asteroid.test has been copied to the signing server wei.stars.example and stored in the file /etc/pki/CA/germania.csr. Then the administrator of the signing server signs it with the command
Note the serial number for this signed certificate is “2,” which follows the serial number chosen when the .srl file was created. After this certificate is signed, the value of the .srl file changes.
wei:~ # cat /etc/pki/CA/certs/ca.srl
02
The now-signed certificate /etc/pki/CA/newcerts/germania.crt must then be copied back to the web server, where it can be used instead in the Apache configuration.
Redirection
Apache can be configured to automatically redirect requests from one web page to another page. One common use of redirection is for SSL protected web sites. Consider a server kooshe.stars.example running an SSL protected web site exclusively. A user intending to visit that site may simply enter kooshe.stars.example in the address bar of their browser. The browser does not know that the user wants to visit https://kooshe.stars.example, and so instead sends the user to http://kooshe.stars.example. Since the server is serving SSL exclusively, the request fails. Rather than force the user to include the scheme (https) in any request, the administrator can instead redirect any traffic sent to http://kooshe.stars.example to the corresponding SSL protected page.
Since in this example the server is using SSL/TLS exclusively, one approach is to create a virtual host on port 80 with the configuration11
<VirtualHost *:80>
Redirect / https://kooshe.stars.example/
</VirtualHost>
This instructs Apache to redirect any page to the corresponding page on the SSL protected server. A client who makes a request for http://kooshe.stars.example/bob.html receives a 302 response informing the browser that the page has been moved to https://kooshe.stars.example/bob.html. The browser then loads the correct SSL protected page transparently to the client.
Testing the Server
Once the server is running, an administrator may wish to test it to see how it functions. The obvious tool to check the connection is the browser, but sometimes an administrator would like to see the raw data as it is returned from the server, rather than the result that is rendered by the browser.
Testing HTTP Connections
One way to check the server is to use a telnet client. Specify the name of the remote host and the port number, say TCP/80.
Once the connection is made, the user can specify a valid HTTP request. For example, suppose that the user wants to request the root page using HTTP 1.1. Request headers12 can be specified; for example, the user can specify the media types that are acceptable for the response, say text/html, and the host name, which in this example is the same as the name of the server. When the headers are complete, the user sends a blank line, then the server responds.
GET / HTTP/1.1
Accept: text/html
Host: markab.stars.example
HTTP/1.1 200 OK
Date: Mon, 09 Apr 2018 03:03:05 GMT
Server: Apache/2.2.3 (CentOS)
Last-Modified: Mon, 09 Apr 2018 02:56:09 GMT
ETag: "1683be-9e-8c3b6440"
Accept-Ranges: bytes
Content-Length: 158
Connection: close
Content-Type: text/html; charset=UTF-8
<!DOCTYPE html>
<html>
<head>
<title>Test Page for markab.stars.example</title>
</head>
<body>
This is a test page for markab.stars.example
</body>
</html>
Connection closed by foreign host.
The server response begins with the version of HTTP and the status code (200 OK); this is followed by the headers for the response. After the headers comes the web page being served; in this case this is a simple test page.
If telnet is not installed or nor available, tools like netcat can be used.
Testing HTTPS Connections
Telnet cannot be used to test the connection to an HTTPS protected site because it does not properly handle the encryption. Instead, a user can connect to the remote system with openssl s_client. To do so, the user specifies the name and the port for the remote system with the -connect flag. Once the connection has been made, the user is presented with the details about the certificate and the cipher being used. For example, if the user wants to connect to an HTTPS server at markab.stars.example on TCP/443, the user can run the following.
Examining the output, the user can see that this is a self-signed certificate. The connection uses SSLv3 with the cipher DHE-RSA-AES256-SHA. These can be compared with the values set during the server configuration.
Once openssl s_client has established the encrypted connection, the user can make an HTTP request and receive the result.
GET / HTTP/1.1
Accept: text/html
Host: markab.stars.example
HTTP/1.1 200 OK
Date: Mon, 09 Apr 2018 03:05:20 GMT
Server: Apache/2.2.3 (CentOS)
Last-Modified: Mon, 09 Apr 2018 02:57:38 GMT
ETag: "17000f-a8-91896c80"
Accept-Ranges: bytes
Content-Length: 168
Connection: close
Content-Type: text/html; charset=UTF-8
<!DOCTYPE html>
<html>
<head>
<title>SSL Test Page for markab.stars.example</title>
</head>
<body>
This is the SSL test page for markab.stars.example
</body>
</html>
closed
Basic Authentication
One approach to controlling access to a web site is by basic authentication. A user that connects to a web site protected by basic authentication is asked to provide a user name and a password to proceed (Figure 14-3). If the client authenticates, then the requested resource is returned.
Figure 14-3
An example of a basic authentication request by Firefox 52.2 on OpenSuSE 42.3
htpasswd
To configure Apache to protect a portion of a web site, a list of authorized users and credentials must first be created; this is done with the tool htpasswd. On OpenSuSE systems through OpenSuSE 13.2, this tool is named htpasswd2. Beginning with OpenSuSE 42.1, htpasswd2 is a symlink to htpasswd. The htpasswd tool is installed with Apache on most distributions, but it is not included by default on Ubuntu 13.10, 14.04, 14.10, or Mint 16, 17, 17.1, 17.2, or 17.3. For these systems it can be installed with
-b Use the password from the command line rather than prompting for it.
-i Read password from stdin without verification (for script usage).
-m Force MD5 encryption of the password (default).
-B Force bcrypt encryption of the password (very secure).
-C Set the computing time used for the bcrypt algorithm
(higher is more secure but slower, default: 5, valid: 4 to 31).
-d Force CRYPT encryption of the password (8 chars max, insecure).
-s Force SHA encryption of the password (insecure).
-p Do not encrypt the password (plaintext, insecure).
-D Delete the specified user.
-v Verify password for the specified user.
On other systems than Windows and NetWare the '-p' flag will probably not work.
The SHA algorithm does not use a salt and is less secure than the MD5 algorithm.
To create the authentication file /etc/apache2/passwd containing the user cgauss using bcrypt hashes, run the command:
wei:~ # htpasswd -c -B /etc/apache2/passwd cgauss
New password: <enter password here>
Re-type new password: <enter password here>
Adding password for user cgauss
Additional users (with passwords hashed with bcrypt) can then be added.
wei:~ # htpasswd -B /etc/apache2/passwd gmonge
New password: <enter password here>
Re-type new password: <enter password here>
Adding password for user gmonge
wei:~ # htpasswd -B /etc/apache2/passwd sgermain
New password: <enter password here>
Re-type new password: <enter password here>
Adding password for user sgermain
The contents of the password authentication file should not be included within a server’s DocumentRoot and should not be provided to clients. An attacker on Kali able to download the saved password hashes can use tools like John the Ripper to try to crack the passwords.
root@kali:~# john --wordlist=/usr/share/wordlists/metasploit/password.lst ./hashes
Using default input encoding: UTF-8
Loaded 3 password hashes with 3 different salts (bcrypt [Blowfish 32/64 X2])
Press 'q' or Ctrl-C to abort, almost any other key for status
Use the "--show" option to display all of the cracked passwords reliably
Session completed
This output shows that John attempted 1,320 cracks per second for these bcrypt hashes. Running the same process on the same accounts and passwords on the same machine but using the (default) MD5 hashes yields more than 51,000 cracks per second.
Configuring Basic Authentication
To require basic authentication before allowing clients access to a portion of a web site, an AuthType directive can be used. For example, to require basic authentication before users can access files in the directory /srv/www/ssl/safe, the following configuration can be used.
<Directory "/srv/www/ssl/safe">
AuthType Basic
AuthName "Wei Protected Files"
AuthUserFile /etc/apache2/passwd
Require valid-user
</Directory>
These directives can be included in the configuration file(s) for the web server; they can also be added to .htaccess files in the proper subdirectory, provided AllowOverride has been appropriately set.
The AuthType Basic directive specifies that the directory is protected by basic authentication. The AuthName directive provides the name of the security boundary; it is passed on to the client and appears in the dialog box requesting authentication. The AuthUserFile specifies the name of the file containing the password hashes created with htpasswd. The last directive, Require valid-user tells the server to allow access to any valid user in the authenticated users file. It is possible to restrict access to a single user or group of users with the AuthGroupFile directive.
When a resource is protected by basic authentication, requests for that resource are met with an HTTP 401 Authorization Required response. A typical browser request and response has the form
GET /safe/index.html HTTP/1.1
Host: atria.stars.example
User-Agent: Mozilla/5.0 (X11; U; Linux i686; en-US; rv:1.9.0.5)
The HTTP header “Authorization” of the subsequent request contains the authorization information used by the server. This is the Base64 encoding of the client’s username and password separated by a colon and can be trivially decoded.
Any directory protected by basic authentication must also be protected by SSL/TLS.
ModSecurity
ModSecurity is a web application firewall that is used to protect web servers and their clients from attack. It is a rule-based system that checks requests and responses against a flexible set of rules. These rules can be used to log or block traffic to and from the server. The OWASP project13 provides an open source set of rules, called the ModSecurity Core Rule Set (CRS). Rules in the CRS check for misconfigured or malformed HTTP traffic, common web application attack techniques, sensitive data leaving the server, and a host of other checks.
Installing ModSecurity
The source code for ModSecurity is available from the web site https://www.modsecurity.org/; however, most of the Linux distributions under consideration include a version of ModSecurity in either their primary or an associated software repository. ModSecurity 3.0.0 was released in December 2017, so the systems under consideration would have used an earlier version while the systems were initially deployed.
Installing ModSecurity on CentOS
ModSecurity is included in the base repository for CentOS 7, it and can be installed with the command
[root@tsih ~]# yum install mod_security
On CentOS 5/6, ModSecurity is not included in the base repository, but is included in the Extra Packages for Enterprise Linux (EPEL) repository; instructions for the use of EPEL are provided in the Notes and References section. Once the repository is added, ModSecurity is installed with yum install mod_security in the same fashion as CentOS 7.
On CentOS systems, the name of the Apache module is mod_security2. On CentOS 7, this module is loaded into the Apache configuration in the file /etc/httpd/conf.modules.d/10-mod_security.conf. This file also loads mod_unique_id, which is required for ModSecurity. On CentOS 5/6, these modules are loaded by /etc/httpd/conf.d/mod_security.conf. This file also contains the primary ModSecurity configuration directives for all versions of CentOS.
Installing ModSecurity on OpenSuSE
ModSecurity is included in the primary software repository for OpenSuSE systems. It has the name apache2-mod_security2 and can be installed via zypper.
alphard:~ # zypper install apache2-mod_security2
To use ModSecurity, two modules are needed: security2 and unique_id. These need to be included in the APACHE_MODULES line from /etc/sysconfig/apache2 and Apache restarted. These modules are loaded into the Apache configuration through the file /etc/apache2/sysconfig.d/loadmodule.conf.
The default configuration file for ModSecurity is /etc/apache2/conf.d/mod_security2.conf.
Installing ModSecurity on Ubuntu and Mint
On Ubuntu and Mint systems, ModSecurity is available in the Universe repository, but the name varies with the release.
Ubuntu 11.04, Mint 11: libapache-mod-security
Ubuntu 11.10 - 13.10, Mint 12-16: libapache2-modsecurity
Ubuntu 14.04+, Mint 17+: libapache2-mod-security2
To install ModSecurity, enable the Universe repository and install the package. As an example, on Ubuntu 15.04, the administrator can run
On the most recent versions of Ubuntu (13.10+) or Mint (16+), this process creates the file /etc/apache2/mods-enabled/security2.load with the LoadModule directive to add the module security2_module; it also creates the file /etc/apache2/mods-enabled/unique_id.load with the LoadModule directive to load unique_id_module, which is required for ModSecurity. The primary configuration file for ModSecurity is /etc/apache2/mods-enabled/security2.conf. That file sets the data directory for persistent data and loads configuration files from /etc/modescurity/*.conf. That directory contains the file /etc/modsecurity/modsecurity.conf-recommended which needs to be renamed to /etc/modsecurity/modsecurity.conf to serve as the configuration file for ModSecurity.
On older versions of Ubuntu (11.10-13.04) and Mint (12-15), the process creates the file /etc/apache2/mods-enabled/mod-security.load and /etc/apache2/mods-enabled/unique_id.load to load both ModSecurity and the required unique_id_module. The file /etc/apache2/mods-enabled/mod-security.conf loads configuration data from /etc/modsecurity/*.conf, but that directory only contains the file /etc/modsecurity/modsecurity.conf-recommended, which needs to be renamed to /etc/modsecurity/modsecurity.conf before ModSecurity can be used.
Ubuntu 11.04 and Mint 11 create the file /etc/apache2/mods-enabled/mod-security.load to load ModSecurity but does not provide a default configuration file. Instead, it includes a sample configuration file in /usr/share/doc/mod-security-common/examples/modsecurity.conf-minimal. This can be copied to /etc/apache2/mods-enabled/mod-security.conf and used as the default configuration file.
Some 64-bit Mint and Ubuntu systems suffer from a known bug;14 the file /etc/apache2/mods-enabled/mod-security.load loads an XML library with the line
LoadFile /usr/lib/libxml2.so.2
The issue is that on 64-bit systems, that file is in a different location. Correct the line to:
LoadFile /usr/lib/x86_64-linux-gnu/libxml2.so.2
Configuring ModSecurity
ModSecurity is complex and powerful, but it needs to be properly configured and tuned before it can be used.
Configuring the Rule Engine
ModSecurity works by comparing traffic to a set of rules, then acting based on those rules; this is controlled by SecRuleEngine. If SecRuleEngine is set to On, then rules are processed, while if SecRuleEngine is set to Off then they are not. It can also be set to the value DetectionOnly; in this mode the rules are processed, but no modifications to the traffic are made; traffic that matches a drop, block, or deny rule is merely logged.
Different distributions have different default values for this directive, so it should be configured before ModSecurity is used.
ModSecurity needs to be configured for access to the bodies of requests (which contain POST data) or responses (which would enable ModSecurity to identify data leakage). These are controlled by the directives SecRequestBodyAccess and SecResponseBodyAccess; these can be set On or Off.
ModSecurity Logging
ModSecurity can be used to log the requests that are made of the server. As an example, the configuration file /etc/httpd/conf.d/mod_security.conf on CentOS 7.2 contains the directives
SecAuditEngine RelevantOnly
SecAuditLogRelevantStatus "^(?:5|4(?!04))"
SecAuditLogParts ABIJDEFHZ
SecAuditLogType Serial
SecAuditLog /var/log/httpd/modsec_audit.log
The directive SecAuditEngine can take the values On, Off, or RelevantOnly. In the last case, the audit log includes all transactions that have either triggered a rule or those whose status code is considered relevant. The collection of relevant status codes is specified by the regular expression from SecAuditRelevantStatus. This logs status codes 4xx or 5xx except for 404.
The directive SecAuditType can have the value Serial or Concurrent. In the former case, all audit log entries are sent to the same file, while in the latter case a separate file is created for each transaction. The value of SecAuditLogParts specifies the elements that are to be recorded. The allowable parts include the following:
A the audit log header (required)
B the request headers
C the request body (SecRequestBodyAccess must be set to On)
D not implemented
E the response body (SecResponseBodyAccess must be set to On)
F the final response headers
H the audit log trailer
I a replacement for C that records the file parameters for uploaded multipart/form-data, but not the files themselves.
J information about files uploaded via multipart/form-data.
Z the final boundary (required)
A more detailed discussion of these components is available at the ModSecurity Reference Manual.15
ModSecurity also provides error logging; for example, the CentOS 5 configuration contains the directives
SecDebugLog /var/log/httpd/modsec_debug.log
SecDebugLogLevel 0
These set the location of the ModSecurity debugging log and its level. The level can take values between 0 (no logging) and 9 (log everything). Log levels above 3 can slow the system down and are recommended only when debugging ModSecurity itself. Log levels 1, 2, and 3 correspond to errors, warnings, and notices, and are copied to the Apache error log regardless of the ModSecurity log level, so unless the administrator is debugging ModSecurity, usually no changes need to be made to these directives.
ModSecurity Temporary Data
ModSecurity stores data in a pair of files determined by the directives SecTmpDir and SecDataDir. The first is used for temporary data and the second for session data. Both directories must exist and be writeable by the web server. On Mint 18, for example, the sample configuration file /etc/modsecurity/modsecurity.conf-recommended includes the directives
# The location where ModSecurity stores temporary files (for example, when
# it needs to handle a file upload that is larger than the configured
# limit).
#
# This default setting is chosen due to all systems have /tmp available
# however, this is less than ideal. It is recommended that you specify a
# location that's private.
#
SecTmpDir /tmp/
# The location where ModSecurity will keep its persistent data. This
# default setting is chosen due to all systems have /tmp available
# however, it too should be updated to a place that other users can't
# access.
#
SecDataDir /tmp/
CentOS in /etc/httpd/conf.d/mod_security.conf includes the directives
SecTmpDir /var/lib/mod_security
SecDataDir /var/lib/mod_security
The directory /var/lib/mod_security is configured so that the Apache user has access to the directory, but other users do not; for example, on CentOS 7.2
[root@tsih ~]# ls -l -d /var/lib/mod_security
drwxrwx---. 2 apache root 6 Jun 9 2014 /var/lib/mod_security
Some distributions, including older versions of OpenSuSE, Mint, and Ubuntu do not include SecTmpDir and SecDataDir directives in their default ModSecurity configuration files so they need to be added manually.
ModSecurity Rules
To use ModSecurity, rules are required. As an example, add the following testing rule to /etc/httpd/conf.d/mod_security.conf on a CentOS 7.2 system:
This rule tells ModSecurity that if the request has an argument containing the text “zzz” then the request should be logged, and the request denied with a 503 Service Unavailable error.
Restart Apache with both ModSecurity installed and the new testing rule. A check of the Apache Error logs /var/log/httpd/error_log shows that ModSecurity is installed and running.
If a client makes a request for a web page, say the page http://tsih.stars.example/index.html, then Apache and ModSecurity correctly serve the page. On the other hand, if the parameter “zzz” is passed with the request, say as a GET parameter for the variable a in a request like http://tsih.stars.example/index.html?a=zzz, then the server returns a 503 error to the client, and the error log /var/log/httpd/error_log contains the line
Producer: ModSecurity for Apache/2.7.3 (http://www.modsecurity.org/).
Server: Apache/2.4.6 (CentOS) OpenSSL/1.0.1e-fips
Engine-Mode: "ENABLED"
--34599479-Z--
The contents are split by a transaction ID number along with the part as defined by SecAuditLogParts. The request itself is shown in Part B (GET /?a=zzz HTTP/1.1) and the response in Part F (HTTP/1.1 503 Service Temporarily Unavailable). Part H provides the file (/etc/httpd/conf.d/mod_security.conf) and the line number (55) of the rule that triggered the alert.
ModSecurity Core Rule Set (CRS)
Rather than build rules, an administrator can download and install the ModSecurity Core Rule Set. These rules can block many kinds of attacks, including SQL injection, cross-site scripting, PHP code injection, and local/remote file inclusion.
Installing the CRS on CentOS
The core rule set (CRS) is included in the primary repository for CentOS 7 and in the EPEL repository for CentOS 5/6. It can be installed with the command
[root@gienah ~]# yum install mod_security_crs
The primary configuration file for the rules is /etc/httpd/modsecurity.d/modsecurity_crs_10_config.conf. One set of rules is provided, the base rules, in /usr/lib/modsecurity.d/base_rules/.
On CentOS 5/6 the primary configuration file for ModSecurity/etc/httpd/conf.d/mod_security.conf includes the directives
Include modsecurity.d/*.conf
Include modsecurity.d/activated_rules/*.conf
CentOS 7 is similar but uses IncludeOptional instead of Include. These directives load the default CRS configuration and rule set into Apache, which will run after Apache is restarted.
The directory/etc/httpd/modsecurity.d/activated_rules contains symlinks to the rules located in /usr/lib/modsecurity.d/base_rules/.
Installing the CRS on OpenSuSE
Support for the CRS on OpenSuSE in the original repositories is spotty. The CRS is available in the OpenSuSE repository for some recent releases, but not all. The packages owasp-modsecurity-crs, owasp-modsecurity-crs-base_rules, owasp-modsecurity-crs-experimental_rules, owasp-modsecurity-crs-optional_rules, and owasp-modsecurity-crs-slr_rules are available for OpenSuSE 42.3, 42.2, and 13.2; however, they are not available for OpenSuSE 42.1. These packages are also available for OpenSuSE 12.3 and 13.1; however, these packages provide version 2.2.6 of the rules, which requires16 ModSecurity 2.7 or later. The same repository only provides ModSecurity 2.6, so if the rules are installed, then Apache fails to start.
Making the situation more complicated, the package apache2-mod_security2 used to install ModSecurity on OpenSuSE also includes some CRS rules, though these are in different places depending on the distribution. On OpenSuSE 13.1, for example, the rules are contained in the directory /usr/share/doc/packages/apache2-mod_security2/rules, while on OpenSuSE 42.1 they are contained in /usr/share/apache2-mod_security2/rules/. Although the rules are present on the system, they are not enabled by default.
Finally, for OpenSuSE 42.2 or 42.3, if the zypper packages containing the CRS rules are installed and ModSecurity enabled, then Apache will fail to start. The underlying issue appears to be the fact that the package apache2-mod_security2 creates and includes in the Apache configuration the file /usr/share/apache2-mod_security2/rules/modsecurity_crs_10_setup.conf, while the package owasp-modsecurity-crs creates and includes in the Apache configuration the file /usr/share/owasp-modsecurity-crs/modsecurity_crs_10_setup.conf.example. These define some of the same ModSecurity rules, which results in Apache failing to start because of duplicated rule IDs.
Installing the CRS on Ubuntu and Mint
On Ubuntu 11.10 and later and Mint 12-15, the package modsecurity-crs is installed when the primary ModSecurity package is installed. This package installs the CRS to /usr/share/modsecurity-crs. For Mint 16 and later, the package modsecurity-crs is marked as recommended, but not automatically installed; it must be installed manually using apt.17
On Ubuntu 11.10-16.04 and Mint 12-18, one of the 2.x versions of the CRS is provided. For these systems, the name of the CRS configuration file varies between releases; on older versions it is named /usr/share/modsecurity-crs/modsecurity_crs_10_config.conf while on recent versions of Mint and Ubuntu up through 16.10, it is named /usr/share/modsecurity-crs/modsecurity_crs_10_setup.conf. Four sets of rules are provided: base rules, experimental rules, optional rules, and Spider Labs (slr) rules. These rules are in subdirectories of /usr/share/modsecurity-crs/. The rules are not activated by default.
To use these rules, update the primary ModSecurity configuration file /etc/modsecurity/modsecurity.conf with the location of the activated rules and the main CRS configuration file with directives like
Include /usr/share/modsecurity-crs/modsecurity_crs_10_setup.conf
Include /usr/share/modsecurity-crs/activated_rules/*.conf
Create the directory /usr/share/modsecurity-crs/activated_rules, if necessary, and create the symlinks to the base rules,
leuler@Eagle:~$ for f in `ls /usr/share/modsecurity-crs/base_rules/`; do sudo ln -s /usr/share/modsecurity-crs/base_rules/$f /usr/share/modsecurity-crs/activated_rules/$f; done
Restart Apache to begin using the CRS.
Ubuntu 17.04 and 17.10 use version 3.0.0-3 of the CRS, with a radically different rule structure. The file /etc/apache2/mods-enabled/security2.conf includes the directive
This loads the primary configuration file for the CRS, which is /etc/modsecurity/crs/crs-setup.conf; it also loads the CRS rules, including /usr/share/modsecurity-crs/rules/*.conf. Once ModSecurity is enabled, the CRS is also enabled; no additional work is needed.
Apache 2.2 reached its end of life at the start of 2018 and is no longer maintained. Apache has excellent online documentation; visit http://httpd.apache.org/docs/2.2/ for information about the 2.2 series and http://httpd.apache.org/docs/2.4/ for information about the 2.4 series.
Rory McCann has developed and released a Python library, apache-log-parser, which reads Apache logs; it is available from https://pypi.python.org/pypi/apache-log-parser/. Jochen Voss has written a Python script to parse Apache access logs in combined format using regular expressions; it is available at http://www.seehuhn.de/blog/52.
Running netstat on a system running Apache can sometimes return confusing results. Consider, for example, an OpenSuSE 12.1 system in its default configuration. A check of netstat shows
nunki:~ # netstat -nlptv
Active Internet connections (only servers)
Proto Recv-Q Send-Q Local Address Foreign Address State PID/Program
tcp 0 0 0.0.0.0:22 0.0.0.0:* LISTEN 1962/sshd
tcp 0 0 127.0.0.1:631 0.0.0.0:* LISTEN 728/cupsd
tcp 0 0 :::80 :::* LISTEN 2755/httpd2-
prefork
tcp 0 0 :::22 :::* LISTEN 1962/sshd
tcp 0 0 ::1:631 :::* LISTEN 728/cupsd
This listing appears to suggest that Apache is listening on TCP/80 for IPv6, but not for IPv4. Indeed, checking for just IPv4 connections shows
nunki:~ # netstat -nlptv --inet
Active Internet connections (only servers)
Proto Recv-Q Send-Q Local Address Foreign Address State PID/Program
tcp 0 0 0.0.0.0:22 0.0.0.0:* LISTEN 1962/sshd
tcp 0 0 127.0.0.1:631 0.0.0.0:* LISTEN 728/cupsd
However, a check from an external host shows that the server is reachable via IPv4. The issue is that Apache can handle IPv4 connections using IPv4-mapped IPv6 addresses. This behavior can be changed when Apache is compiled but is the default on non-BSD platforms. To prevent Apache from listening on both IPv4 and IPv6 addresses, the Listen directive can be modified; consider the directive
The Extra Packages for Enterprise Linux (EPEL) repository contains many useful software packages. The EPEL repositories are updated with current versions of software. Because CentOS 5 is no longer supported, the corresponding EPEL is no longer being actively updated.
To use this repository, create the file /etc/yum.repos.d/epel.repo with data that depends on the version and architecture: