© Mike O'Leary 2019
Mike O'LearyCyber Operationshttps://doi.org/10.1007/978-1-4842-4294-0_15

15.  IIS and ModSecurity

Mike O’Leary1 
(1)
Towson, MD, USA
 

Introduction

Microsoft Internet Information Services (IIS) is a web server available on Windows Server, as well as on Windows desktop systems. On Windows Server, it is considered a server role, and it is installed using the roles and features components. As a web server, IIS can run multiple web sites on multiple ports using multiple protocols. It can be managed locally or remotely through the graphical tool IIS Manager. Configuration information is stored in .xml configuration files that can be manipulated with command-line tools. Access to IIS web sites can be controlled in several ways, including filtering by properties of the client or the request. Authentication of remote clients can be done via HTTP basic authentication but can also take place using Windows authentication methods. Web sites can be protected by SSL using self-signed certificates, certificates signed by a local signing server, or by a commercial Certificate Authority. Customizable logging to plaintext log files is provided, and PowerShell can be used to parse these logs.

ModSecurity is a web application firewall that functions with IIS in much the same fashion as ModSecurity with Apache on Linux systems.

Installation

Different versions of IIS are available with different versions of Windows. Though the focus of this chapter is IIS on Windows Servers, IIS is available on desktop versions of Windows as a Windows feature (Control Panel ➤ Programs ➤ Turn Windows features on or off). Different versions of Windows provide different versions of IIS:
  • IIS 7.5 on Windows Server 2008 R2 (and Windows 7)

  • IIS 8.0 on Windows Server 2012 (and Windows 8)

  • IIS 8.5 on Windows Server 2012 R2 (and Windows 8.1)

  • IIS 10 on Windows Server 2016 (and Windows 10)

The installation of IIS on Windows Server is done by adding a new role to the server; this is the same technique used to install Active Directory (Chapter 6) or Windows file servers (Chapter 13). To install IIS, from Server Manager (Figure 6-1) select Add Roles and Features, or from Initial Configuration Tasks (Figure 6-4) select Add roles, then choose Web Server (IIS). Windows Server 2012, 2012 R2, and 2016 prompt the user to install the IIS Management console. Though it is possible to manage IIS remotely through another instance of the IIS Management console, it is reasonable to install it on the server alongside IIS.

The IIS installation process prompts the user to select from a wide range of IIS roles. In addition to the defaults, an appropriate collection of additional role services includes the following:
  • HTTP Redirection

  • Custom Logging

  • Logging Tools

  • Request Monitor

  • Basic Authentication

  • IP and Domain Restrictions

  • URL Authorization

  • Windows Authentication

  • Management Service (user is prompted to add additional required components)

These are included on the example servers presented in this chapter. On a production system, only those additional role services that are required should be installed.

IIS Manager

The primary tool to manage an IIS web site is the IIS Manager (Figure 15-1). It can be launched from the Start Menu via Administrative Tools or from Server Manager. On Windows Server 2012 or later, from Server Manager navigate Tools Internet Information Services (IIS) Manager; on Windows Server 2008 R2 from Server Manager expand Roles Web Server Internet Information Services.
../images/333712_2_En_15_Chapter/333712_2_En_15_Fig1_HTML.jpg
Figure 15-1

Internet Information Services (IIS) Manager on Windows Server 2016

When IIS Manager launches on Windows Server 2012 or later, the user is asked if they want to remain connected to the latest web platform components.

The navigation pane initially connects to the local server and shows the sites enabled on that server. Some settings, like those for worker processes, are only global, but most can be set either globally, on a per-site basis, or on a per-directory basis.

Managing Multiple Web Servers from IIS Manager

It is possible to manage multiple web servers from a single instance of IIS Manager. To allow a system to be remotely managed, from IIS Manager (Figure 15-1) on the remote system, select the server name in the navigation pane; from the Management group select Management Service. From the resulting feature (Figure 15-2) check the box “Enable Remote Connections” and select how IIS Manager authenticates users. Remote users that attempt to connect to IIS can be authenticated with their user credentials; it is also possible to create separate IIS Manager users with their own credentials. Access to the management service can be restricted by IP address. Once the changes have been made, apply the result and start the service; this automatically opens the proper firewall port (TCP/8172) with a rule named Web Management Service (HTTP Traffic-In).
../images/333712_2_En_15_Chapter/333712_2_En_15_Fig2_HTML.jpg
Figure 15-2

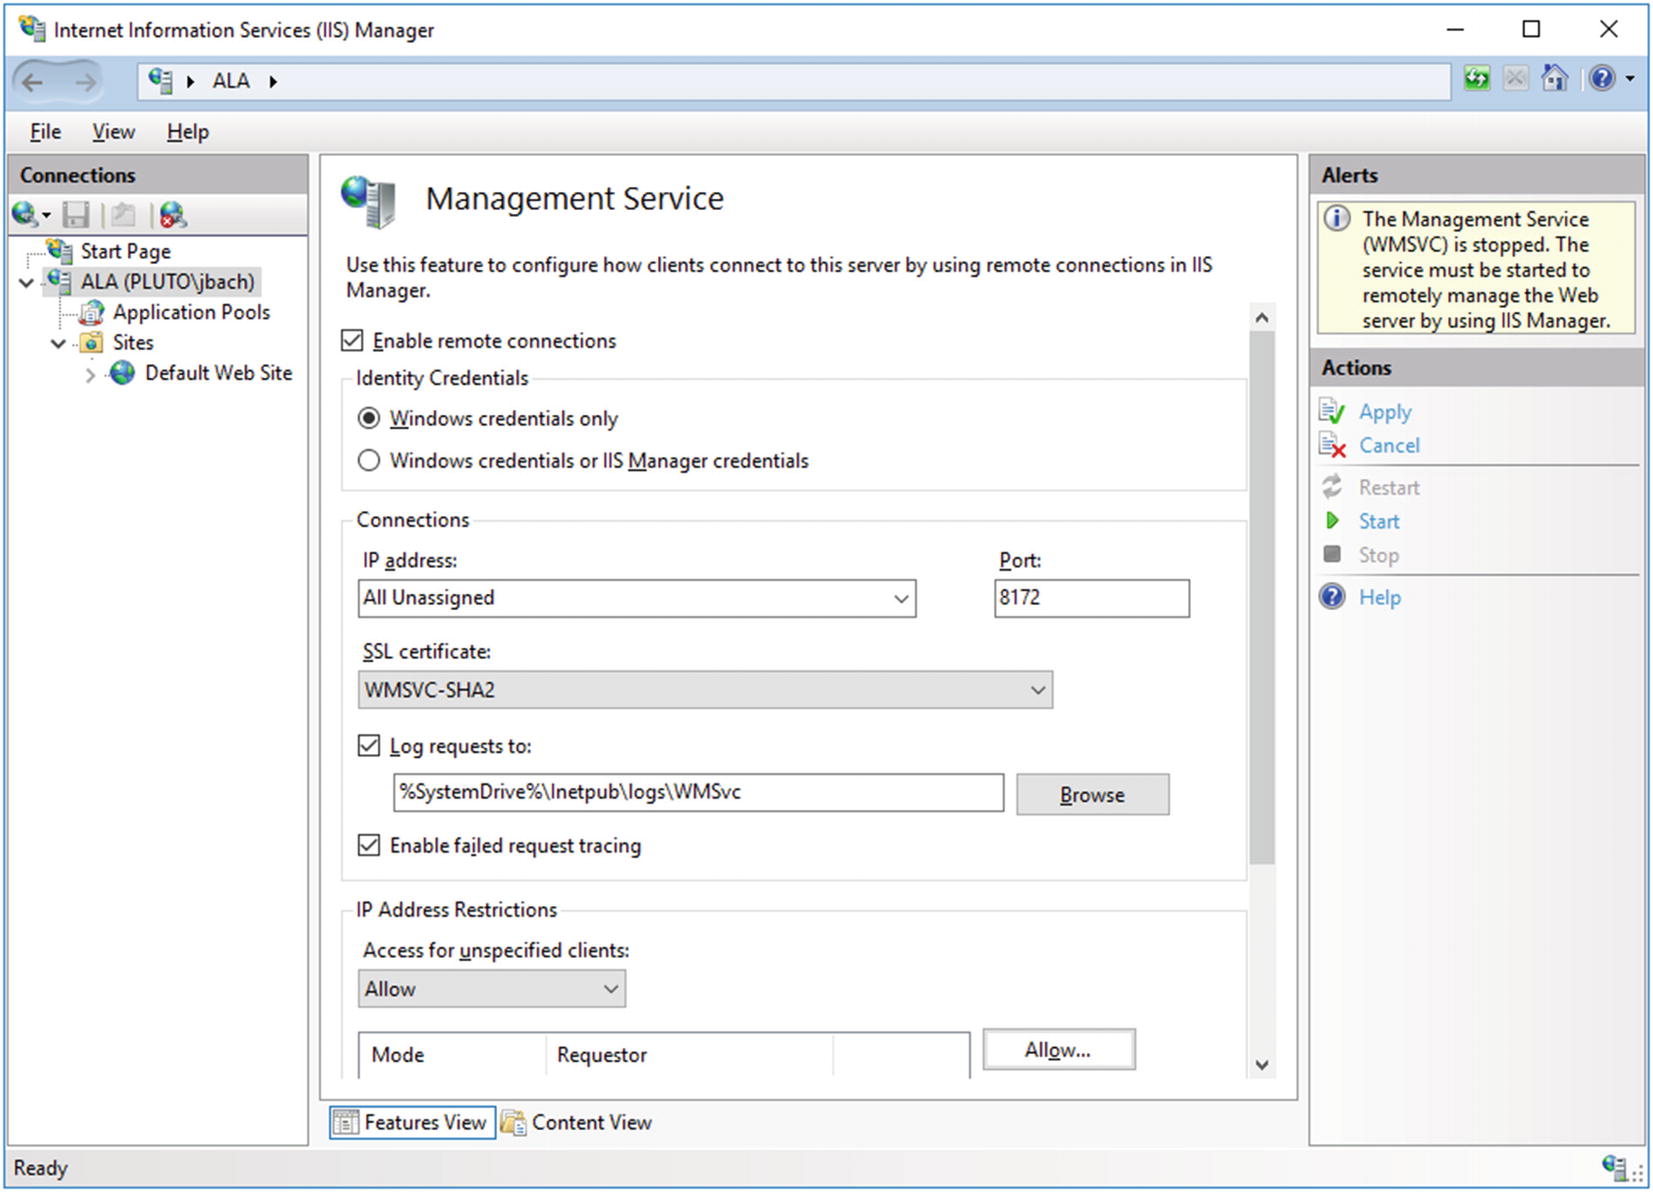
Configuring the Web Management Service on Windows Server 2016

Though this process starts the web management service, it does not configure the service to start on boot. To do so on Windows Server 2012 or later, launch Services from the Tools menu on Server Manager. On Windows Server 2008 R2, from the Start Menu navigate Administrative Tools ➤ Services. In either case, choose the entry for Web Management Service, and change the Startup type to Automatic.

To manage a remote system, from IIS Manager on the local system, select File ➤ Connect to a Server. Provide the required credentials for the remote server, specifying the domain for the user name if appropriate. In the default setting, the server uses SSL/TLS with a self-signed certificate to protect the communication. A user that connects may be warned that the certificate was issued to a different server. The user has the option of connecting to the remote server; the user can also view the remote certificate and install it locally as trusted. Depending on the remote server, the user may be prompted to add one or more additional features, including the Microsoft web management client. Connections can be saved; from the File menu select File ➤ Save Connections. Once the connection is made, a node for the new web server appears in the IIS Manager navigation pane (cf. Figure 15-5).

Enabling Remote Management on Servers Without a GUI

If the remote server does not have a graphical interface, then IIS Manager cannot be used to enable the remote management service. Instead, the remote management service needs to be enabled from the command line.

On Windows Server 2012 and later, the first step is to enable remote management; this is done through the registry. Navigate to HKLMSOFTWAREMicrosoftWebManagementServer, select the value EnableRemoteManagement, and set the REG_DWORD data to 1. This can be done via group policy, via regedit either locally or remotely, or it can be done from the command line locally or remotely. For example, to make the change from the command line to the remote system named slepinir, an administrator can run the command:
C:>reg add \slepinirHKLMSoftwareMicrosoftWebManagementServer /t REG_DWORD /v
EnableRemoteManagement /d 1
Value EnableRemoteManagement exists, overwrite(Yes/No)? y
The operation completed successfully.
The remote management service must be configured to start automatically and started. This can be done via group policy, remotely via MMC, or via the command line, either locally or remotely. For example, to make the change from the command line on the remote host slepinir, the administrator can run the commands:
C:Windowssystem32>sc \slepinir config WMSVC start=auto
[SC] ChangeServiceConfig SUCCESS
C:Windowssystem32>sc \slepinir start WMSVC
... Output Deleted ...
The firewall must also allow traffic to the Windows Management Service on TCP/8172. This too can be done via group policy, remotely via MMC, or via the command line, either locally or remotely. If the rule is created using group policy or via the GUI, the administrator can use the predefined rule named Web Management Service (HTTP). To enable the firewall rule from the command line for the remote host slepinir, the administrator can run the following.
C:Usersgmahler>netsh -r slepinir advfirewall firewall add rule name="IIS Remote Management" dir=in action=allow service=WMSVC
Ok.

Web Sites

Microsoft IIS includes a default web site when it is installed with the name “Default Web Site”; it appears in the IIS Manager navigation pane under the Sites node (Figure 15-1). The web site name can be changed by right-clicking on the site in IIS Manager then selecting Rename.

The contents of a web site can be seen by changing IIS Manager to content view at the bottom of the page. The contents of the default web site are stored in the directory C:inetpubwwwroot. One of the entries in the action pane for a web site in IIS Manager is Explore; this brings up Windows File Manager opened to the directory in the file system that contains the web site. User access controls (UAC) prevent most simple techniques to edit the contents of the default directory. Even a domain administrator cannot simply right-click in File Explorer to create a new file in C:inetpubwwwroot, nor can they edit an existing document in that directory in Notepad and save it back.1

Adding a Second Web Site

IIS can run multiple web sites on the same server. Possible configurations include the following:
  • Single IP address, single hostname, single web site

  • Single IP address, single hostname, multiple ports, multiple web sites

  • Single IP address, multiple hostnames, multiple web sites

  • Multiple IP addresses, multiple hostnames, multiple web sites

An administrator that wants to configure IIS to serve a second web site can start from IIS Manager, right-click on the name of the server in the navigation pane, and select Add Web Site. In the resulting dialog box (Figure 15-3), a name for the web site needs to be chosen; this is the name that appears in IIS Manager. The physical path is the location of the web site in the file system. This directory needs to be manually created; one reasonable location is inside the directory C:inetpub. When a web site is created, IIS can be configured to access the web site as a particular user; however, the default, which uses pass-through authentication, is reasonable.

A site’s bindings include the protocol (http or https), IP address, port, and hostname. All must match a request for the page to be served.

Bindings can be configured with wildcards. If the host name is omitted in a binding, it matches any hostname. When specifying an IP address, the administrator can select “All Unassigned, ” which matches any IP address not in use by another site. Once a web site is created, it is possible to modify the bindings by right-clicking on the web site in IIS Manager and selecting Edit Bindings. A single web site can have multiple bindings.
../images/333712_2_En_15_Chapter/333712_2_En_15_Fig3_HTML.jpg
Figure 15-3

Adding a second web site named Secondary Web Site running HTTP on TCP/8080 on Windows Server 2016

If the host name is specified in a binding and the server receives a request by IP address (and so without a host name), then IIS returns a 400 Bad Request error to the client. This behavior can be observed by connecting directly to the server. If a request is made that does not specify the host, then an error is returned.
root@kali-2016-2-u:~# telnet ala.pluto.test 8080
Trying 10.0.15.223...
Connected to ala.pluto.test.
Escape character is '^]'.
GET / HTTP/1.1
Accept: text/html
HTTP/1.1 400 Bad Request
Content-Type: text/html; charset=us-ascii
Server: Microsoft-HTTPAPI/2.0
Date: Sat, 21 Apr 2018 17:23:53 GMT
Connection: close
Content-Length: 334
<!DOCTYPE HTML PUBLIC "-//W3C//DTD HTML 4.01//EN""http://www.w3.org/TR/html4/strict.dtd">
<HTML><HEAD><TITLE>Bad Request</TITLE>
<META HTTP-EQUIV="Content-Type" Content="text/html; charset=us-ascii"></HEAD>
<BODY><h2>Bad Request - Invalid Hostname</h2>
<hr><p>HTTP Error 400. The request hostname is invalid.</p>
</BODY></HTML>
Connection closed by foreign host.
The same request including the host is successful.
root@kali-2016-2-u:~# telnet ala.pluto.test 8080
Trying 10.0.15.223...
Connected to ala.pluto.test.
Escape character is '^]'.
GET / HTTP/1.1
Accept: text/html
Host: ala.pluto.test
HTTP/1.1 200 OK
Content-Type: text/html
Last-Modified: Sat, 21 Apr 2018 17:18:44 GMT
Accept-Ranges: bytes
ETag: "abde71cd94d9d31:0"
Server: Microsoft-IIS/10.0
Date: Sat, 21 Apr 2018 17:24:24 GMT
Content-Length: 155
<!DOCTYPE html>
<html>
<head>
  <title>Test Page for ala.pluto.test</title>
</head>
<body>
This is a test page for ala.pluto.test
</body>
</html>
Connection closed by foreign host.

Creating a web site on a non-standard port (like TCP/8080 as in this example) does not automatically open the port in the firewall; this needs to be done manually.

If a server has multiple external IP addresses, then IIS can serve separate web sites on each address. Suppose, for example, that a host has two IP addresses: 10.0.5.112 with the DNS name ananke.ad.jupiter.test, and 10.0.5.114 with the DNS name thebe.ad.jupiter.test. To create a web site for thebe.ad.jupiter.test, right-click on the name of the server in the IIS Manager navigation pane, select Add Web Site, then add a new site, specifying the site name (Thebe), physical path (C:inetpubwww-thebe), binding type (http), the IP address (10.0.5.114), and the port (TCP/80). A client that browses to ananke.ad.jupiter.test gets the IP address 10.0.5.112 from their DNS server and then gets the web page for ananke; a client that browses to thebe.ad.jupiter.test gets the IP address 10.0.5.114 from their DNS server and then gets the web page for thebe.

Default Documents

If no document is specified in a URL, then IIS attempts to return a default document. There are five default documents; in order, they are Default.htm, Default.asp, index.htm, index.html, and then iisstart.htm. When IIS looks for a default document, it looks through this list in the specified order. It does not go on to the next item in the list until it is satisfied that the current list item does not exist. An administrator can change the default documents and their order, either server-wide or for a web site. From IIS Manager, navigate to either the server or the site, double-click on Default Document, and make the desired changes.

Directory Requests

If a directory is requested and no default page exists, then IIS returns a 403 error. This behavior can be changed at the server or site level through IIS Manager via Directory Browsing. IIS allows the administrator to return a directory listing instead of the 403 error and can select which information is included in the directory listing, including the date, time, size, and extension for each file.

Error Messages

When IIS needs to return an error to the client, by default it returns different error messages for local requests and remote requests. This behavior is configured through IIS Manager, in the Error Pages feature. The action pane hyperlink Edit Feature Settings allows the administrator to use detailed errors, custom errors, or vary depending on the request source. The main body in the setting links to the various, language-specific custom error pages. By default, these are in C:inetpubcusterr, with separate subdirectories depending on the language.

Because detailed errors provide so much information, they should be used judiciously. Consider Figure 15-4 that shows what is provided when a user makes a request of a directory without a default document on a site where directory browsing is not enabled.
../images/333712_2_En_15_Chapter/333712_2_En_15_Fig4_HTML.jpg
Figure 15-4

Detailed error messages provided by IIS 10 on Windows Server 2016

Virtual Directories

A virtual directory is a URL path that is mapped to a portion of the file system. One way to create a virtual directory for a site is to select the site from the navigation pane of IIS Manager, then use the hyperlink View Virtual Directories from the action pane. This presents a page that shows the virtual directories for the site; the action pane then has hyperlinks to view the settings for existing virtual directories or to create a new virtual directory.

To create a new virtual directory, choose the location in the file system, as well as the alias for the virtual directory. This is the path clients take to reach the directory. As an example, if an administrator on the site server.test creates a virtual directory with the physical path C:WebData and the alias Subdirectory, then the URL http://server.test/Subdirectory/page.htm serves its content from the file C:WebDatapage.htm.

It is possible that a single directory in the file system is mapped to multiple virtual directories in multiple web sites, all with different URLs.

Command-Line Tools

Windows includes the command-line tool appcmd.exe to administer Windows IIS from the command line. This tool is not located in the system path but resides in the directory C:WindowsSystem32inetsrvappcmd.exe. The tool requires administrative privileges and must be run from an elevated command prompt.

The tool takes a command and an object (Table 15-1), so, for example, to view the sites currently available on the server, run the command
C:WindowsSystem32inetsrv>appcmd.exe list site
SITE "Default Web Site" (id:1,bindings:http/*:80:,state:Started)
SITE "Alternate Web Site" (id:2,bindings:http/10.0.5.112:8080:ananke.ad.jupiter.test,state:Started)
SITE "Thebe" (id:3,bindings:http/10.0.5.114:80:,state:Started)
Table 15-1

Allowable Command and Object combinations for appcmd.exe

Command

Object

list set add delete start stop

site

list set add delete

app

list set add delete start stop recycle

apppool

list set add delete

vdir (virtual directories)

list set search lock unlock clear reset migrate

config

list

wp (worker processes)

list

request

list set add delete install uninstall

module (web server modules)

list add delete restore

backup

list configure inspect

trace

This server is running three web sites. The first is the default, listening on all unassigned addresses on TCP/80. The second is the alternate web site listening only on 10.0.5.112, TCP/8080. The third web site is listening on the server’s second IP address 10.0.5.114 on TCP/80.

An administrator that wants to stop the third site can run the command
C:WindowsSystem32inetsrv>appcmd.exe stop site "Thebe"
"Thebe" successfully stopped
C:WindowsSystem32inetsrv>appcmd.exe list site
SITE "Default Web Site" (id:1,bindings:http/*:80:,state:Started)
SITE "Alternate Web Site" (id:2,bindings:http/10.0.5.112:8080:ananke.ad.jupiter.test,state:Started)
SITE "Thebe" (id:3,bindings:http/10.0.5.114:80:,state:Stopped)
The list config command shows the configuration of the web server.
C:WindowsSystem32inetsrv>appcmd.exe list config
<system.webServer>
  <httpCompression directory="%SystemDrive%inetpub empIIS Temporary Compressed Files">
    <staticTypes>
      <add mimeType="text/*" enabled="true" />
      <add mimeType="message/*" enabled="true" />
      <add mimeType="application/javascript" enabled="true" />
      <add mimeType="application/atom+xml" enabled="true" />
      <add mimeType="application/xaml+xml" enabled="true" />
      <add mimeType="*/*" enabled="false" />
    </staticTypes>
    <dynamicTypes>
... Output Deleted ...
Changes can be made to the configuration via set config. For example, to configure the web site Thebe so that the default document has the name home.html, run the command
C:WindowsSystem32inetsrv>appcmd.exe set config "Thebe" /section:defaultDocument /enabled:true /+files.[value='home.html']
Applied configuration changes to section "system.webServer/defaultDocument" for "MACHINE/WEBROOT/APPHOST/Thebe" at configuration commit path "MACHINE/WEBROOT/APPHOST/Thebe"

From IIS Manager, navigate to the Thebe web site and view the list of default documents to see that home.html has been added to the top of the list.

As a second example, to enable directory browsing on the alternate web site and to display the time, size, extension, and data for each file, run the command
C:WindowsSystem32inetsrv>appcmd.exe set config "Alternate Web Site" /section:system.webServer/directoryBrowse /enabled:"True" /showFlags:"Date, Time, Size, Extension"
Applied configuration changes to section "system.webServer/directoryBrowse" for "MACHINE/WEBROOT/APPHOST/Alternate Web Site" at configuration commit path "MACHINE/WEBROOT/APPHOST/Alternate Web Site"

Navigate to alternate web site in IIS Manager and examine the settings for directory browsing to confirm that the changes have been made.

The configuration files themselves are .xml files; the primary configuration file is C:WindowsSystem32inetsrvconfigapplicationHost.cfg. Each web site has a configuration file named web.config in its root directory if its configuration differs from the default. For example, after making the previous changes to the web site Thebe, the configuration file in its root directory (C:inetpubwww-thebeweb.config) has the content
<?xml version="1.0" encoding="UTF-8"?>
<configuration>
    <system.webServer>
        <defaultDocument enabled="true">
            <files>
                <add value="home.html" />
            </files>
        </defaultDocument>
    </system.webServer>
</configuration>

Access Control

An administrator can deny access to the server, a web site, or a directory (including a virtual directory) by IP address range. This is done via the IP and Domain Restrictions role; this role must be manually added during IIS installation. Navigate to the component (server, site, or directory) in IIS Manager, then select IP Address and Domain Restrictions.

The action pane hyperlink Edit Feature Settings is used to determine the default response; this is set to allow access by unspecified clients by default. Access can be allowed or denied, either by IP address or by IP address range.

Care must be taken when using this feature. Figure 15-5 shows a Windows Server 2012 R2 server configured to deny access to all systems on the 10.0.2.0/24 subnet and to allow access to clients at 10.0.2.28. Windows applies these rules in order from first to last, and so an administrator might expect that this configuration allows access to clients at 10.0.2.28. In fact, Windows may or may not allow access. Although Windows does apply the rules in order, the default screen in Figure 15-5 does not show that order. An administrator must use the action pane hyperlink View Ordered List to see the actual ordering of the rules. If the deny rule is first in the ordered list, then access from 10.0.2.28 is denied, while if the allow rule is first then access from 10.0.2.28 is allowed.
../images/333712_2_En_15_Chapter/333712_2_En_15_Fig5_HTML.jpg
Figure 15-5

IP Address and Domain Restrictions on Windows Server 2012 R2

On Windows Server 2008 R2 systems, if IP address and domain restrictions deny a request, then the client receives a 403 Forbidden error. On Windows Server 2012 and later, the Edit Feature Settings hyperlink in the action pane allows the administrator to set the deny action type as well as the default access policy. Choices include Unauthorized (returns 401 Unauthorized), Forbidden (returns 403 Forbidden), Not Found (returns 404 Not Found), or Abort (which resets the connection).

Windows Server 2012 and later also allow for dynamic IP address restrictions. A client’s IP address can be blocked if they exceed a specified number of concurrent requests, or if they exceed a number of requests in a specified time period. These settings are available from the action pane through the hyperlink Edit Dynamic Resolution Settings.

Request Filtering

An administrator can configure IIS to filter requests based on the URL, the HTTP verb (e.g., GET, POST, HEAD, PUT) or even portions of the file system using request filtering.

To use request filtering, navigate IIS Manager to the server, the site or directory, then select Request Filtering (Figure 15-6). In the default configuration, IIS includes one hidden segment, with the value web.config. The file web.config is the XML file that contains the settings for the web site if they are different from the default; it is located in the same directory as the contents of the web site. This request filter prevents this configuration file from being served to clients; requests for the file are met with a 404 Not Found error.
../images/333712_2_En_15_Chapter/333712_2_En_15_Fig6_HTML.jpg
Figure 15-6

Request filtering, from IIS Manager on Windows Server 2008 R2

It is also possible to create rules that scan the URL or the query string in a request and block the request. For example, from the request filtering page in IIS Manager, select the Rules tab in the main pane, then choose Add Filtering Rule from the action pane. An administrator that wants to block any request where the query contains a null byte can do so by providing the name of the new filter (say Null Byte Check), checking the Scan query string box, and including the string %00 in the list of Deny Strings. Any client that requests a page from the server that includes a null byte in the query receives a 404 Not Found error rather than the page. This can be verified.
root@kali-2016-2-u:~# telnet ala.pluto.test 80
Trying 10.0.15.223...
Connected to ala.pluto.test.
Escape character is '^]'.
GET /?a=%00 HTTP/1.1
Accept: text/html
Host: ala.pluto.test
HTTP/1.1 404 Not Found
Content-Type: text/html
Server: Microsoft-IIS/10.0
Date: Sat, 21 Apr 2018 21:31:22 GMT
Connection: close
Content-Length: 1245
<!DOCTYPE html PUBLIC "-//W3C//DTD XHTML 1.0 Strict//EN" "http://www.w3.org/TR/xhtml1/DTD/xhtml1-strict.dtd">
<html xmlns:="http://www.w3.org/1999/xhtml">
... Output Deleted ...
<body>
<div id="header"><h1>Server Error</h1></div>
<div id="content">
 <div class="content-container"><fieldset>
  <h2>404 - File or directory not found.</h2>
  <h3>The resource you are looking for might have been removed, had its name changed, or is temporarily unavailable.</h3>
 </fieldset></div>
</div>
</body>
</html>

Authentication

Whenever a client makes a request of IIS, the server makes an authentication decision to determine if the client is granted access to the resource. These settings can be managed at the server, site, or directory level from IIS Manager using the Authentication settings. Navigate IIS Manager and select a server, site, or directory, then open the Authentication feature. Provided they were added as IIS server roles, anonymous authentication, basic authentication, and Windows authentication are available; Windows server 2012 or later also includes ASP.NET impersonation. At least one authentication mechanism must succeed for a client to be granted access to a requested resource.

Anonymous authentication is the simplest; it provides an identity for anonymous users. If a portion of a site is not meant to be accessed by anonymous users, then anonymous authentication must be disabled for that portion of the site.

Basic authentication is the same RFC 2617 method described in Chapter 14 for Apache systems. Credentials are passed by in essentially plain text by Base64 encoding <user name>:<password>. Basic authentication provides two options; the first is the authentication realm that plays the same role it did on Apache. The second is the default domain used for authentication. If no domain is specified, then windows domain users may need to include their domain name (domainusername) when authenticating.

Windows authentication uses Windows techniques (NTLM or Kerberos) for authentication; these use a challenge-response system that make them more resistant to sniffing and replay attacks.

SSL and TLS

To build a web site that uses SSL/TLS, the system administrator creates a new web site, but chooses https instead of http for the protocol type when selecting the binding. A drop-down box appears that enables the administrator to choose an existing SSL certificate.

Managing Web Server Certificates

To see the collection of available web server certificates, from IIS Manager, navigate to the server (not a site or directory) and select Server Certificates (Figure 15-7). By default, one certificate is present, issued to the host. On Windows Server 2012 and 2012 R2, it is named WMSVC; on Windows Server 2016, it is named WMSVC-SHA2, while on Windows Server 2008 R2 it is unnamed.
../images/333712_2_En_15_Chapter/333712_2_En_15_Fig7_HTML.jpg
Figure 15-7

Default IIS server certificates on Windows Server 2012 R2

Creating a Self-Signed Certificate

To create a self-signed certificate, select Create Self-Signed Certificate from the action pane (Figure 15-7). On Windows Server 2008 R2, all that needs to be specified is the name of the certificate. Windows Server 2012 and later allow the certificate to be stored either in the Personal store or a Web Hosting store. Although a server can listen on multiple IP addresses with different DNS names, the process of generating a self-signed certificate only generates a certificate for the system’s Windows hostname.

Windows System Certificates

Windows uses certificates for many purposes beyond IIS servers. The collection of certificates on a Windows system can be managed through the Microsoft management console (MMC), C:WindowsSystem32mmc.exe. Start MMC, and from the main menu navigate File ➤ Add/Remove Snap-in. From the list of snap-ins, select Certificates, then Add. Microsoft manages certificates for the computer account, service accounts, and user accounts separately; when the certificates’ snap-in is added, the user selects which collection of certificates to manage. Manage the certificates for the computer account, then navigate Certificates (Local Computer) ➤ Trusted Root Certification Authorities ➤ Certificates to see the self-signed certificate (Figure 15-8). Double-click on a certificate to see the details; to export the certificate to a range of other formats, right-click on the certificate, selecting All Tasks ➤ Export. These options are both also available from the server certificates component of IIS Manager.
../images/333712_2_En_15_Chapter/333712_2_En_15_Fig8_HTML.jpg
Figure 15-8

MMC with the certificate snap-in for the local computer on the Windows Server 2008 R2 host elara.ad.jupiter.test, showing its original certificate (WMSvc-ELARA) and a newly created self-signed certificate with the friendly name Elara Self Signed

Trusting a Signing Server

To create an SSL/TLS web site that uses a certificate signed by a local signing server (Chapter 14), the Windows server must first trust the signing server. Copy the certificate (named ca.crt in Chapter 14) from the signing server to the web server. From the certificates’ MMC snap-in for the local computer account, right-click on Trusted Root Certification Authorities, then navigate All Tasks ➤ Import to start the Certificate Import Wizard. Select the certificate from the signing server and import the certificate into the Trusted Root Certification Authorities. On Windows Server 2012 and later, this can also be accomplished by right-clicking on the certificate and selecting Install Certificate; be sure to choose the local machine as the store location. Right-clicking on the certificate in Windows Server 2008 R2 also allows the certificate to be installed, but only for the current user rather than the local machine; this is insufficient for what follows.

Creating a Signed Certificate

To create a signed certificate for SSL/TLS on IIS, from the server certificates page for the server in IIS Manager, select the hyperlink Create Certificate Request from the action pane. The administrator provides the data for the request, beginning with the common name, which should match the DNS name of the server. The administrator chooses a cryptographic service; RSA with 2048 bits is a reasonable choice.

This certificate signing request can be sent to a commercial CA for signing; it can also be signed by the local signing server as was done in Chapter 14.
[root@dubhe ~]# openssl x509 -req -days 365 -in /etc/pki/CA/Thebe.csr -CA /etc/pki/CA/certs/ca.crt -CAkey /etc/pki/CA/private/ca.key -out /etc/pki/CA/newcerts/Thebe.crt
Signature ok
subject=/C=US/ST=Maryland/L=Towson/O=Towson University/OU=None/CN=thebe.ad.jupiter.test
Getting CA Private Key
Enter pass phrase for /etc/pki/CA/private/ca.key: <enter passphrase here>

Once the certificate is signed, return it to the server. To complete the process, from the server certificates page for the server in IIS Manager, select the hyperlink Complete Certificate Request. Provide the certificate file (Thebe.crt in the example) and a name for the certificate. This certificate can be used in a new SSL protected web site, or by editing the bindings it can replace an already existing certificate, self-signed or otherwise.

Managing Remote Servers

The situation for a remotely managed Windows Server is more complex, because Server Certificates is not included in IIS Manager for remotely managed systems.

Creating a Self-Signed Certificate

If an administrator needs only to create a self-signed certificate on a remote Windows Server 2012 or later systm, one option is to use PowerShell. Provided the remote system has enabled WinRM (Chapter 7), this can be done by remoting into the target and using the cmdlet New-SelfSignedCertificate.
PS C:Windowssystem32> Enter-PSSession -ComputerName balrog.pluto.test
[balrog.pluto.test]: PS C:> New-SelfSignedCertificate -certstorelocation cert:localmachinemy -dnsname balrog.pluto.test
    Directory: Microsoft.PowerShell.SecurityCertificate::LocalMachinemy
Thumbprint                                Subject
----------                                -------
5034662B6A511ADB3ED0E142E71010CD6BAD06BC  CN=balrog.pluto.test

Trusting a Signing Server

Certificates can be managed remotely through MMC provided SMB traffic is permitted. To do so, use the Microsoft management console (MMC). From the main menu navigate File ➤ Add/Remove Snap-in. From the list of snap-ins, select Certificates, then Add. Choose the computer account and select the name of the remote system. A trusted root certificate can then be imported on the remote system in the same fashion as a local system.

Creating a Certificate Signing Request

To create a certificate signing request on a remote server, the first step is to create a file with the data identifying the server and the certificate. As an example, consider request.inf from Listing 15-1.
;----------------- request.inf -----------------
[Version]
Signature= $Windows NT$
[NewRequest]
Subject = "CN=slepinir.pluto.test, OU=Security Laboratory, O=Towson University, L=Towson, S=Maryland, C=US"
KeySpec = 1
KeyLength = 2048
Exportable = TRUE
FriendlyName = SlepinirIIS
MachineKeySet = TRUE
SMIME = False
PrivateKeyArchive = FALSE
UserProtected = FALSE
UseExistingKeySet = FALSE
ProviderName = Microsoft RSA SChannel Cryptographic Provider
ProviderType = 12
RequestType = PKCS10
KeyUsage = 0xa0
[EnhancedKeyUsageExtension]
OID=1.3.6.1.5.5.7.3.1
Listing 15-1

The file request.inf used to generate a certificate signing request (.csr) for the Windows 2016 host slepinir.pluto.test

The Subject line includes the FQDN of the remote server (slepinir.pluto.test), the organizational unit (Security Laboratory), the organization (Towson University), the location (Towson), the state (Maryland), and the country (US) that is included with the certificate. These should all be changed to match the characteristics of the server. The FriendlyName is the name that is used to identify the certificate in Windows and should also be changed.

To generate the certificate signing request with this data, the administrator runs the command certreq, specifying the name of the request file (request.inf) and the name of the output - say request.csr.
c:inetpub>certreq -new request.inf request.csr
CertReq: Request Created

Completing a Certificate Signing Request

Once the certificate signing request has been completed, it needs to be copied to a (trusted) signing server and signed. Suppose that the name of the signed certificate is slepinir.crt (named after the hostname chosen in Listing 15-1). This signed certificate is then copied to the server. To accept and import the signed certificate, the administrator runs the command
c:inetpub>certreq -accept slepinir.crt
The properties of the certificate can be viewed with the command
c:inetpub>certutil -dump slepinir.crt
X509 Certificate:
Version: 1
Serial Number: 06
Signature Algorithm:
    Algorithm ObjectId: 1.2.840.113549.1.1.5 sha1RSA
    Algorithm Parameters:
    05 00
Issuer:
    CN=wei.stars.example
    OU=Cyber Security Laboratory
    O=Towson University
    L=Towson
    S=Maryland
    C=US
  Name Hash(sha1): 90af306c575ba7915aa54cdd0390f24ddf62519e
  Name Hash(md5): d4d08596f7105ce2c6d4b4841b0c0e7b
 NotBefore: 5/27/2018 5:54 PM
 NotAfter: 5/27/2019 5:54 PM
Subject:
    CN=slepinir.pluto.test
    OU=Security Laboratory
    O=Towson University
    L=Towson
    S=Maryland
    C=US
  Name Hash(sha1): 41ec2bd4dfe2a47ad6028dfbb749746e429cad14
  Name Hash(md5): 0b69cde7dbe953aa0cb8b5bfbe72afe4
... Output Deleted ...
Public Key Length: 2048 bits
... Output Deleted ...

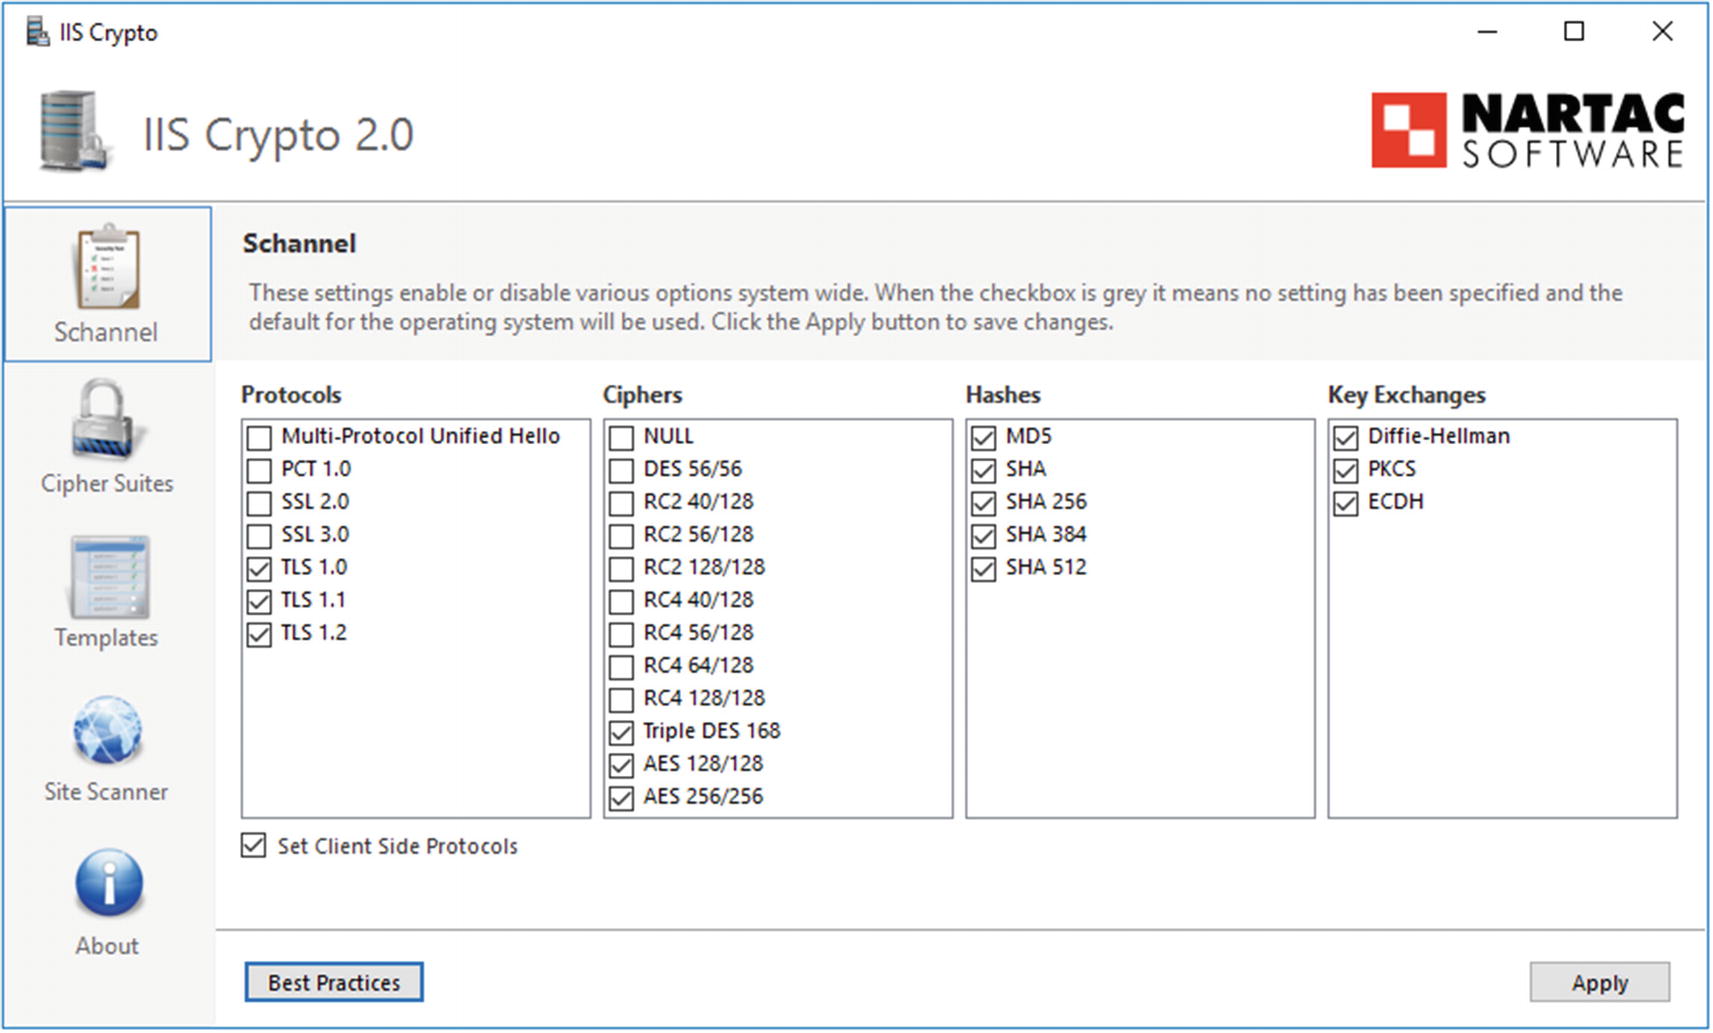
Choosing SSL/TLS Protocols and Ciphers

It is possible to customize the protocols and cipher suites used by Windows Server. The configuration information is stored in the registry, in the key HKEY_LOCAL_MACHINESYSTEMCurrentControlSetControlSecurityProvidersSCHANNEL. For example, to disable the use of SSL 2.0 by default on the server, set the value of HKEY_LOCAL_MACHINESYSTEMCurrentControlSetControlSecurityProvidersSCHANNELProtocolsSSL 2.0ServerDisabledByDefault to the DWORD 1. However, many of the registry values that control these settings are not included by default and must be manually added; this is the case for the previous value.

Fortunately, there is a free graphical tool named IIS Crypto (Figure 15-9) available from Nartac Software2 that provides a graphical way to set the protocols, ciphers, hashes, and key exchange methods. It includes a best practices template.
../images/333712_2_En_15_Chapter/333712_2_En_15_Fig9_HTML.jpg
Figure 15-9

IIS Crypto 2.0, running on Windows Server 2016

Redirection

An administrator running a site exclusively on SSL/TLS can redirect requests made to the server for http sites to the SSL/TLS protected https site. To do so, the administrator creates a web site running on port 80. From IIS Manager, navigate to the port 80 web site and then select HTTP Redirect (Figure 15-10). Redirect requests made on port 80 to the corresponding https server.
../images/333712_2_En_15_Chapter/333712_2_En_15_Fig10_HTML.jpg
Figure 15-10

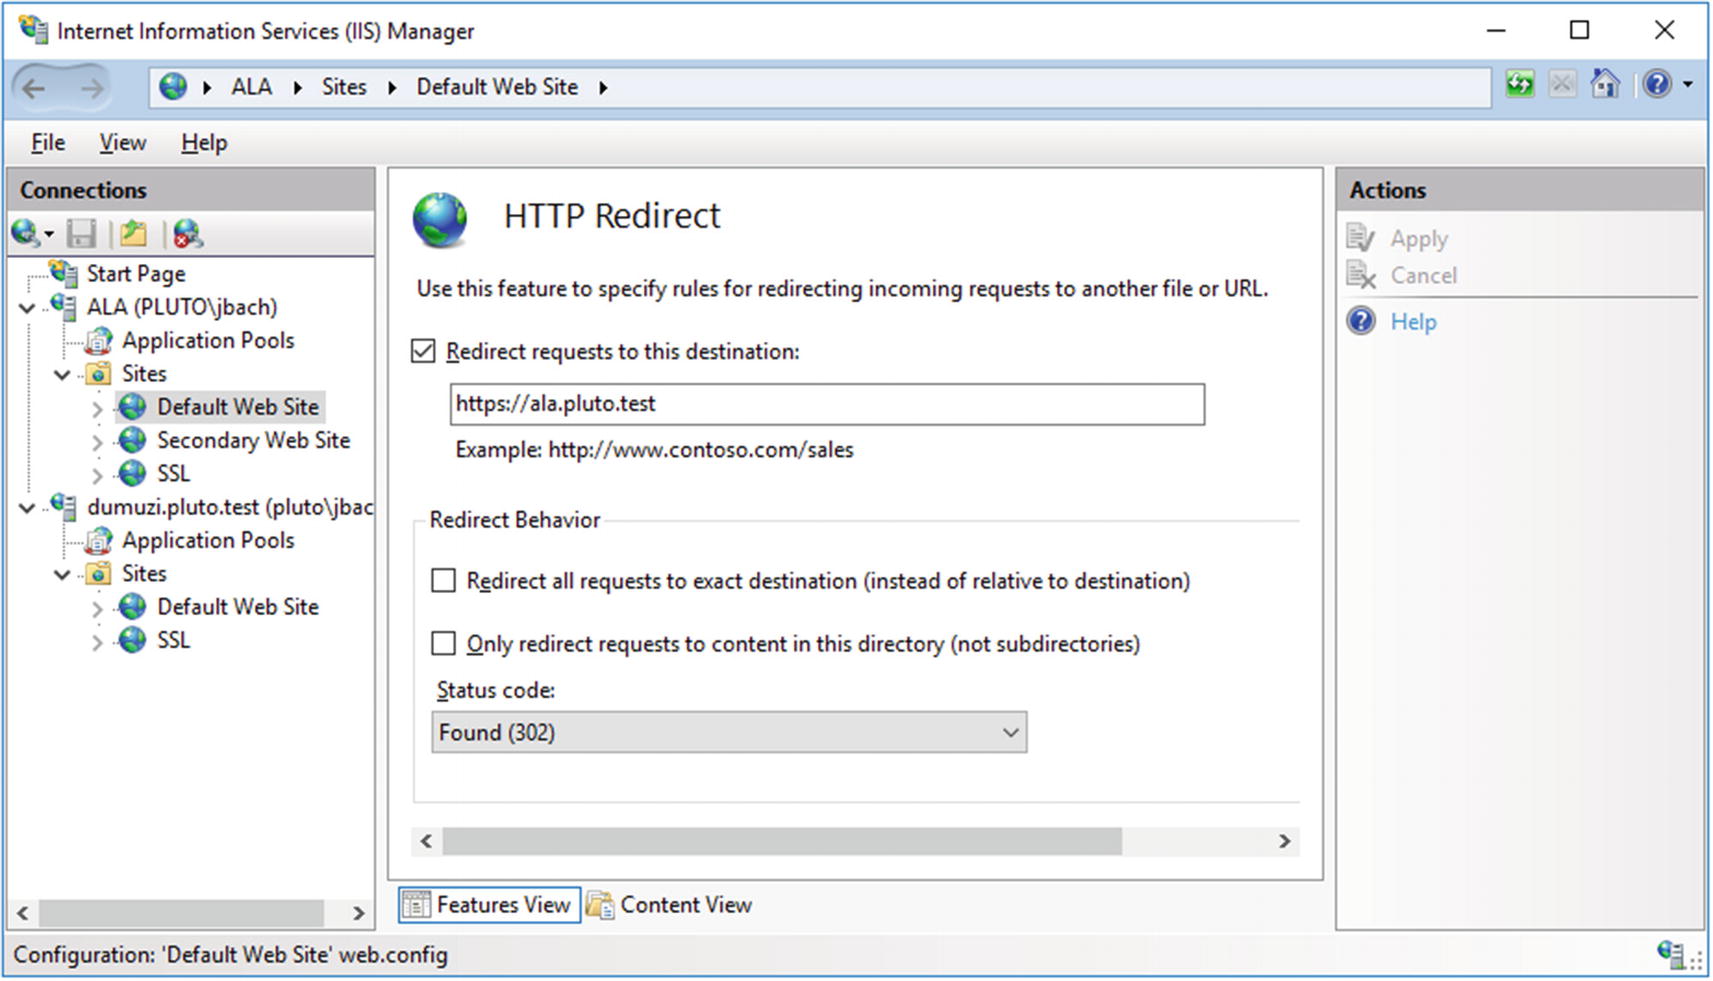
Configuring redirection on Windows Server 2016

Logs and Logging

Logging can be configured at the server level or at the site level. To determine the level at which logs are kept, from IIS Manager navigate to the server and select Logging (Figure 15-11). The first option determines whether there is one log file per web site (the default) or one log file for the entire server.

The log files themselves are plaintext files, encoded either as UTF-8 or with the older ANSI encoding. The default location for the log file for the first web site is C:inetpublogsLogFilesW3SVC1, with the second at C:inetpublogsLogFilesW3SVC2 and so on. Navigate to the sites node in the navigation pane for IIS manager to see the ID number for each web site. A typical log has the name u_ex180421.log, which is a UTF-8 encoded log using the W3C extended format from April 21, 2018.
../images/333712_2_En_15_Chapter/333712_2_En_15_Fig11_HTML.jpg
Figure 15-11

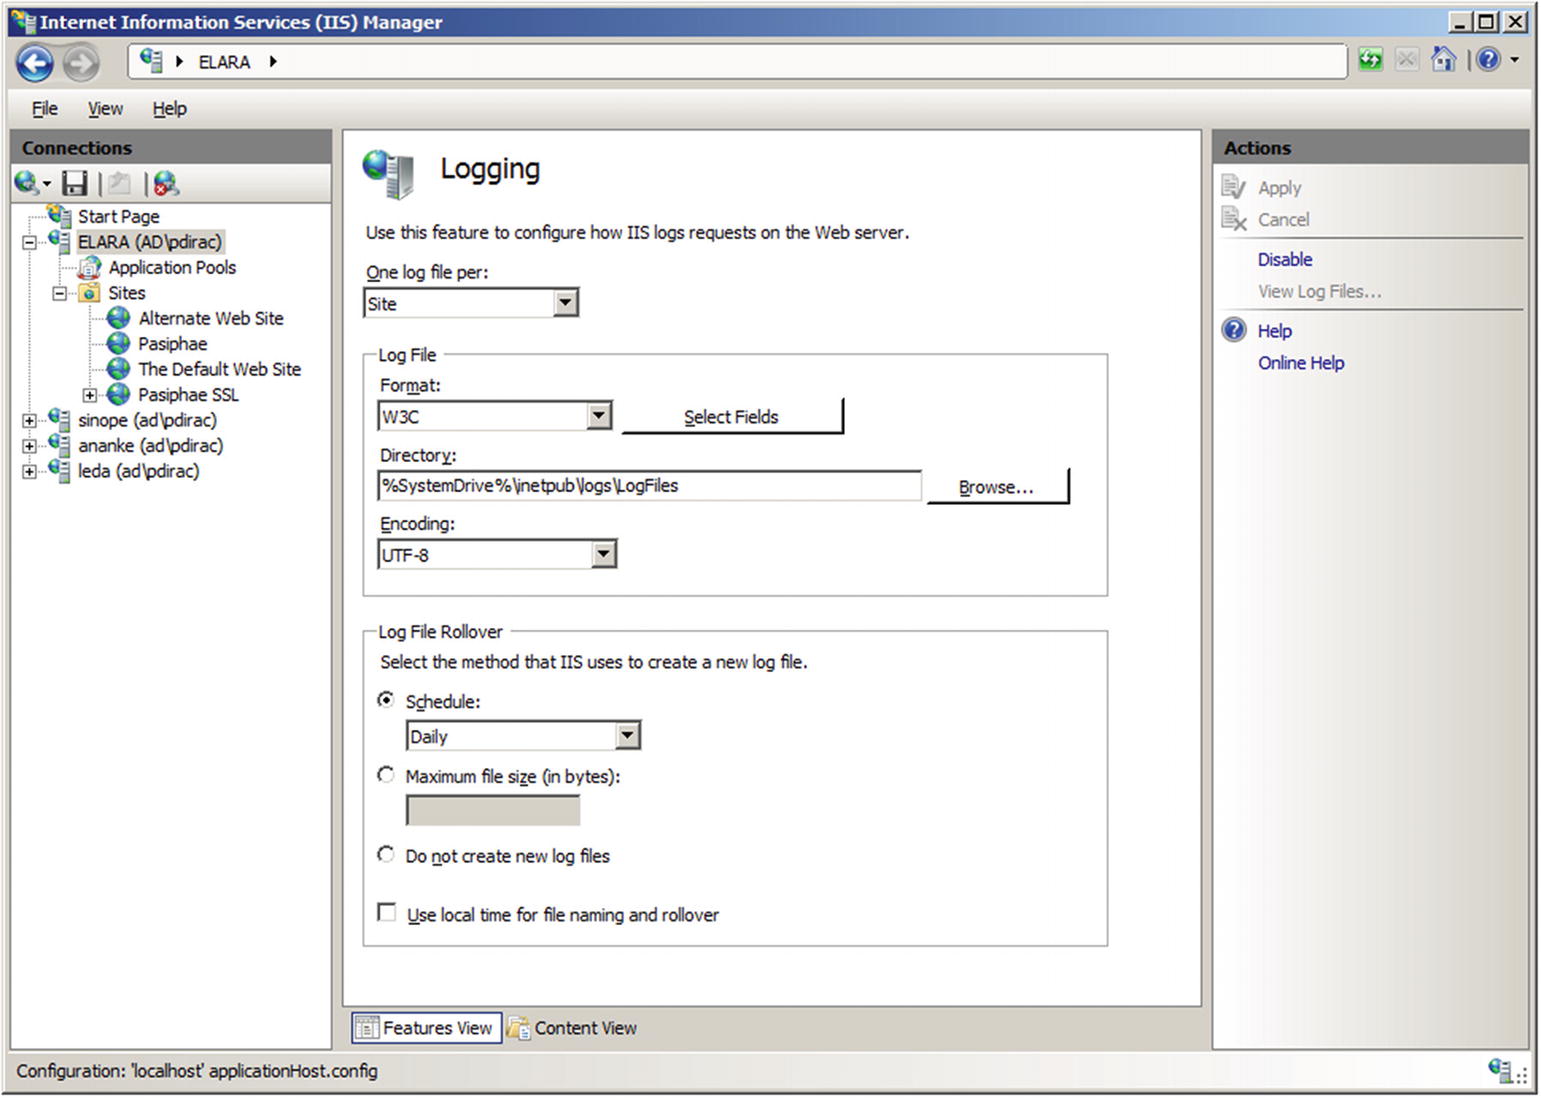
Configuring logging for IIS on Windows Server 2008 R2

Log files can be stored in a variety of formats including the default W3C format. The NCSA format is a fixed format that records remote hostname, username, date, time, request type, HTTP status code, and the number of bytes sent by the server. Items are separated by spaces; time is recorded as local time. The IIS format is an extension of NCSA that also records elapsed time, number of bytes sent, action and target file. The items are separated by commas.

The default W3C format allows the administrator to specify which fields are recorded; allowable fields are shown in Table 15-2.
Table 15-2

Standard Fields for the W3C Logging Format. Fields Marked in Italic are Selected by Default.

Date

Server name

URI query

Bytes received

Cookie

Time

Server IP

Protocol status

Time taken

Referer

Client IP

Server port

Protocol substatus

Protocol version


User name

Method

Win32 status

Host


Service name

URI stem

Bytes sent

User agent


Windows Server 2012 and later allow the administrator to add additional custom fields taken from the request header, the response header, or server variables.

A typical3 W3C log has the content
#Software: Microsoft Internet Information Services 10.0
#Version: 1.0
#Date: 2018-04-22 21:05:37
#Fields: date time s-ip cs-method cs-uri-stem cs-uri-query s-port cs-username c-ip cs(User-Agent) cs(Referer) sc-status sc-substatus sc-win32-status time-taken
2018-04-22 21:05:37 10.0.15.223 GET / - 80 - 10.0.15.217 Mozilla/5.0+(X11;+Ubuntu;+Linux+x86_64;+rv:50.0)+Gecko/20100101+Firefox/50.0 - 200 0 0 31
2018-04-22 21:05:43 10.0.15.223 GET /Default.htm - 80 - 10.0.15.217 Mozilla/5.0+(X11;+Ubuntu;+Linux+x86_64;+rv:50.0)+Gecko/20100101+Firefox/50.0 - 200 0 0 0
2018-04-22 21:05:49 10.0.15.223 GET /Default.htm/ a=%00 80 - 10.0.15.217 Mozilla/5.0+(X11;+Ubuntu;+Linux+x86_64;+rv:50.0)+Gecko/20100101+Firefox/50.0 - 404 19 0 0
... Output Deleted ...

The logs show three GET requests from 10.0.15.22 using Firefox 50.0; the first request was for the root directory, while the second was for Default.htm. Both requests were successfully served. The last request was for Default.htm but passed the GET parameter a=%00. This request received a 404 response.

One field that is included by default in the W3C format is the protocol substatus code. The protocol status code is the HTTP status code http://www.iana.org/assignments/http-status-codes/http-status-codes.xhtml . The protocol substatus is an IIS specific extension, and it is available from Microsoft at http://support.microsoft.com/kb/943891 . In the example, the request with the GET parameter a=%00 received a 404 response with substatus code 19 indicating that the request was denied by a filtering rule.

Because logs are recorded in plaintext, an administrator can parse them using PowerShell scripts. Suppose an administrator wants to determine the requests blocked by a filtering rule. This is done in Listing 15-2, which is a PowerShell script that looks for status code 404 with substatus code 19.
$log_file_name = "C:inetpublogsLogFilesW3SVC1u_ex180422.log"
# Assumes data elements occur in the following order
$field = @{"date" = 0;
           "time" = 1;
           "s-ip" = 2;
           "cs-method" = 3;
           "cs-uri-stem" = 4;
           "cs-uri-query" = 5;
           "s-port" = 6;
           "cs-username" = 7;
           "c-ip" = 8;
           "cs(User-Agent)" = 9;
           "cs(Referer)" = 10;
           "sc-status" = 11;
           "sc-substatus" = 12;
           "sc-win32-status" = 13;
           "time-taken" = 14}
foreach ($line in [System.IO.File]::ReadLines($log_file_name)){
   if ($line.StartsWith("#")) {
      # Nothing to do; this is a comment line.
   }
   else {
      $log = $line.split()
      if( $log[$field["sc-status"]] -eq 404) {
         if( $log[$field["sc-substatus"]] -eq 19) {
           $line
         }
      }
   }
}
Listing 15-2

PowerShell script IISLogAnalysis.ps1 to search IIS W3C format logs for requests blocked by a filtering rule (404.19)

Running this script yields a result like
PS C:Windowssystem32> C:UserspdiracDesktopIISLogAnalysis.ps1
2018-04-22 21:05:49 10.0.15.223 GET /Default.htm/ a=%00 80 - 10.0.15.217 Mozilla/5.0+(X11;+Ubuntu;+Linux+x86_64;+rv:50.0)+Gecko/20100101+Firefox/50.0 - 404 19 0 0

ModSecurity

ModSecurity is available for IIS installations. To install the current version (ModSecurity 2.9.2), the first step is to download and install the Visual C++ Redistributable for Visual Studio 2013;4 it is available from Microsoft either from http://www.visualstudio.com/downloads/download-visual-studio-vs or from http://www.microsoft.com/en-us/download/details.aspx?id=40784 .

ModSecurity for Windows is available as a Windows binary installer (.msi) from http://www.modsecurity.org/download.html ; it installs ModSecurity in the directory C:Program FilesModSecurity IIS. This directory contains the primary configuration file C:Program FilesModSecurity IISmodescurity.conf, which has the same structure seen on Apache installations (Chapter 14). To test the installation, update the configuration file by changing the value of SecRuleEngine.
#SecRuleEngine DetectionOnly
SecRuleEngine On
Add the previously used testing rule
SecRule ARGS, "zzz" phase:1,log,deny,status:503,id:1

This testing rule denies access to any page with a 503 error if any of the request’s arguments contains the string “zzz”. Note that files in the directory C:Program FilesModSecurity IIS are protected by user access controls (UAC).

Once installed, ModSecurity begins to function and protects all the IIS web sites on the server. Visit a site on the web server and pass the string “zzz” as an argument, for example, by making the GET request http://ala.pluto.test/Default.htm?a=zzz. The request should be denied, with the client receiving a 503 Access Denied error. The blocked request is noted in the Windows application log; see Figure 15-12.

The configuration file C:Program FilesModSecurity IISmodsecurity_iis.conf contains the Include directives that specify which configuration files are to be used. By default, it has the content
Include modsecurity.conf
Include modsecurity_crs_10_setup.conf
Include owasp_crsase_rules*.conf
../images/333712_2_En_15_Chapter/333712_2_En_15_Fig12_HTML.jpg
Figure 15-12

Message from ModSecurity in the Windows application log indicating that a request was blocked. Taken from a Windows Server 2008 R2 system.

The installer for ModSecurity includes the OWASP Common Rule Set (CRS) in the directory C:Program FilesModSecurity IISowasp_crs, and the base rules are loaded by default. Other rules can be included by modifying the configuration file.

It is possible to use PowerShell to parse the Windows application log for ModSecurity denies. As a simple example, consider Listing 15-3.
$logs = Get-EventLog -LogName application -Source ModSecurity
foreach ($entry in $logs) {
   if( $entry.("Message").Contains("Access denied")){
      $entry.("Message")
   }
}
Listing 15-3

PowerShell script ModSecurity.ps1 to search the Windows security log for ModSecurity alerts

When run, this returns
PS C:Windowssystem32> C:UserspdiracDesktopModSecurity.ps1
The description for Event ID '1' in Source 'ModSecurity' cannot be found. The local computer may not have the necessary registry information or message DLL files to display the message, or you may not have permission to access them.  The following information is part of the event:'[client 10.0.15.217] ModSecurity: Access denied with code 503 (phase 1). Pattern match "zzz" at ARGS:a. [file "C:Program FilesModSecurity IISmodsecurity.conf"] [line "229"] [id "1"] [hostname "ALA"] [uri "/Default.htm?a=zzz"] [unique_id "17798225729515683870"]'

Compare this result to Figure 15-12.

Notes and References

The alert reader may have noticed that instructions on how to install IIS on a Windows 2008 R2 core system - meaning a system without a GUI - are not included in the chapter. Fortunately,5 Microsoft has provided instructions at https://docs.microsoft.com/en-us/previous-versions/windows/it-pro/windows-server-2008-R2-and-2008/cc771209(v=ws.11) . They begin by asking the reader to “Type the following command into a script”
C:> CMD /C START /w PKGMGR.EXE /l:log.etw /iu:IIS-WebServerRole;IIS-WebServer;IIS-CommonHttpFeatures;IIS-StaticContent;IIS-DefaultDocument;IIS-DirectoryBrowsing;IIS-HttpErrors;IIS-HttpRedirect;IIS-ApplicationDevelopment;IIS-ASP;IIS-CGI;IIS-ISAPIExtensions;IIS-ISAPIFilter;IIS-ServerSideIncludes;IIS-HealthAndDiagnostics;IIS-HttpLogging;IIS-LoggingLibraries;IIS-RequestMonitor;IIS-HttpTracing;IIS-CustomLogging;IIS-ODBCLogging;IIS-Security;IIS-BasicAuthentication;IIS-WindowsAuthentication;IIS-DigestAuthentication;IIS-ClientCertificateMappingAuthentication;IIS-IISCertificateMappingAuthentication;IIS-URLAuthorization;IIS-RequestFiltering;IIS-IPSecurity;IIS-Performance;IIS-HttpCompressionStatic;IIS-HttpCompressionDynamic;IIS-WebServerManagementTools;IIS-ManagementScriptingTools;IIS-IIS6ManagementCompatibility;IIS-Metabase;IIS-WMICompatibility;IIS-LegacyScripts;WAS-WindowsActivationService;WAS-ProcessModel;IIS-FTPServer;IIS-FTPSvc;IIS-FTPExtensibility;IIS-WebDAV;IIS-ASPNET;IIS-NetFxExtensibility;WAS-NetFxEnvironment;WAS-ConfigurationAPI;IIS-ManagementService;MicrosoftWindowsPowerShell;NetFx2-ServerCore;NetFx2-ServerCore-WOW64

This does work, though the solution might be considered by some to be inelegant. Once this is done, remote management of the IIS server is enabled in the same way as it was for Windows Server 2012 and later. First, the registry entry HKLMSOFTWAREMicrosoftWebManagementServer, needs to have the value EnableRemoteManagement set to the DWORD 1, and the Web Management Service (WMSVC) needs to be enabled and configured to start. There is no predefined firewall rule for IIS Remote Management on Windows Server 2008 R2; instead, an administrator can create a new rule to allow traffic on TCP/8172 to allow the connections to the remote management service.

Detailed information about the SSL/TLS settings is available from Microsoft, at http://technet.microsoft.com/en-us/library/dn786418.aspx .

..................Content has been hidden....................

You can't read the all page of ebook, please click here login for view all page.
Reset
3.19.29.89