
To verify your code is working correctly, you must know what it is supposed to do. Like with unit testing, D has a built-in documentation generator called Ddoc. Ddoc is fairly simple, but it gets the job done and is always available.
Perform the following steps to document your code:
- Attach documentation comments to declarations by writing
/** Docs */or/++ Docs +/above them or/// short descriptiondirectly after them. - Put documentation comments on both collections and members. For example, if you document a class member, ensure that there's a
doccomment on the class itself too. - Document unit tests that you want to serve as usage examples.
- Document function parameters by writing lines in the format:
name = meaningunder a sectionParams:. - Compile the module with the
–Dflag todmdto generate the documentation's HTML file. - You may define and use macros. They are defined in a special section named
Macros:with aname=valuesyntax and used with$(name)syntax to extend the textual capabilities of Ddoc. - Move macros that you use across several modules to a separate file with the
.ddocextension and pass it to the compiler when generating the documentation.
The following is an example of how to use Ddoc to document an object:
/++
  Example is a structure meant to demonstrate Ddoc documentation.

  In addition to the first one-line short description, we can also write
  longer multi-line descriptions to expand on the object's functionality.
+/
struct Example {
  int a; /// This integer is documented briefly.
  /**
    This function has documented parameters.

    We document all the parameters in a params section.
    The return value and exceptions can also be documented.

    Params:
      x = The x coordinate
    Returns:
      The y coordinate
    Throws:
      Exception if x is negative.
  */
  int getY(int x) { return 0; /* implementation irrelevant */ }
}
If you name the file ddoc.d, compile with:
dmd –D –c ddoc.d
The generated HTML (ddoc.html) looks like the following in a browser:
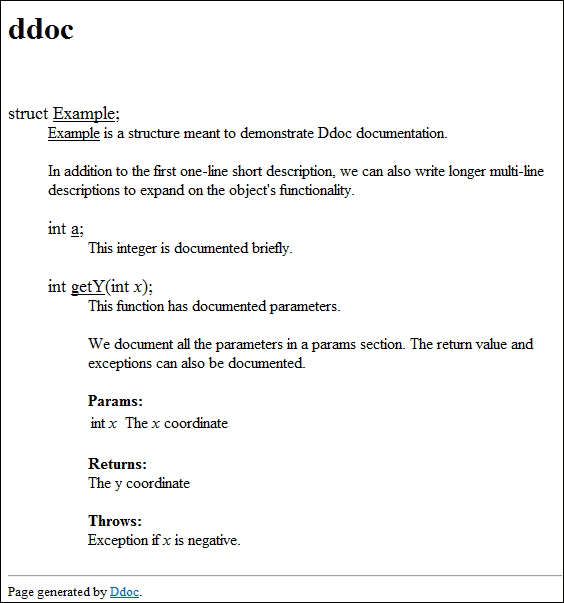
This screenshot uses the default HTML body and no CSS style sheet. You may customize the website's appearance with HTML and CSS by changing the DDOC macro to link to an external file.
The D language and compiler has a built-in documentation tool that has a simple syntax, is easy to use, and has knowledge of the language. Thanks to the integration with the language, Ddoc comments do not need to repeat information that is already obvious from the code.
Ddoc has very little built-in syntax. A documentation comment consists of up to four parts:
- A one line summary, which is always the first line.
- A multiline description, which is any content after the first line, but before any labelled sections.
- The third part is the sections, starting with a label and a colon. Of the sections,
Params:is special, because in that it also parsesname=descriptionlines.Macros:is special because it parses new macros in the format ofname=replacement. Other section names serve to organize content without changing Ddoc's parsing. - The fourth part is macros, which are sprinkled throughout.
Macros are Ddoc's tool for extension and customization. A macro works via textual replacement and is used with the syntax: $(MACRO_NAME arg1, arg2, …). Macros may span multiple lines. All of Ddoc's default output is defined as macros. You can see the defaults in the source code distributed with the dmd zip. The file is dmd2/src/dmd/doc.c, for example, the default HTML body is defined in the macro DDOC.
You may override this macro in your individual file (make a Macros: section at the top of your module) or with a separate file with the extension of .ddoc that you pass to dmd when generating the documentation.
Ddoc does not properly encode special characters for the output format. To work around this, you may replace special characters with macros, for example, $(GT) instead of > when generating HTML.
Macro syntax has three special forms in the replacement text: $0, which is all the arguments as a single string; $1 .. $n, which is one specific argument; and $+, which is all arguments beyond the first. Using $1 and $+, we can create recursive macros to simulate loops:
Macros:
LIST_ITEM=<li>$0</li>
LIST_TAIL=$(LIST_ITEM $1)$(LIST_TAIL $+)
LIST=<ul>$(LIST_ITEM $1)$(LIST_TAIL $+)</ul>
If you write $(LIST 1, 2, 3) in your documentation somewhere, this will be generated: <ul><li>1</li><li>2</li><li>3</li></ul>, a well-formed HTML list with fairly concise syntax in the D code.
As in the case of unit testing, the built-in facility is deliberately minimal to provide a baseline that there's just no excuse not to use. When additional features are needed, we'll turn to third-party documentation tools.
A pair of switches is possessed by dmd to help us with these:-X and -D. The -X switch generates a JSON file that lists all declarations it compiled. The -D switch generates the documentation. If you combine the two of them, the JSON file also includes the documentation comment attached to each declaration. This makes them easy to parse—no need to write a new compiler, as a JSON parser will suffice.