3. Introducing Data Binding in Windows Forms
The previous chapter showed you how to define and use typed data sets and table adapters for getting data into your Windows Forms application. Now we’ll get into the details of data binding to give you a solid foundation for understanding the rest of the material in the book.
In the past, developers often had to write a lot of custom code to present data and to take user input and put it into an underlying data source. At some point people realized it would make a lot more sense to encapsulate that functionality within the user interface framework, and automatic data binding was born. This chapter gives a quick introduction on how to bind sources of data to user interface controls in Windows Forms. It starts with the high-level concepts behind data binding introduced in Chapter 1 and dives a little deeper into each one, including how to set up data binding from code for various types of data-bound controls using Binding objects and the new BindingSource component, which is one of the most important additions to Windows Forms data binding in .NET 2.0.
Data binding is a mechanism for automatically associating and synchronizing data objects in memory with controls for presenting and managing that data in the user interface. You can use data binding to make an association between a data source and a control, and then leave it to the control to figure out how to display the data. This leads to better encapsulation of the code required to display and manage the bound data, and also gives a consistent approach to data binding that can be implemented once in a base class and reused by any derived classes.
Data binding can assume different forms, depending on the data source and type of control that presents the data. As discussed in Chapter 1, this is data in the presentation tier, so the data sources being referred to are client-side data types, such as data sets and object collections.
Keep the following two concepts in mind when you think about data binding:
• The direction that data flows between data sources and the data-bound controls
• When the data flows
In one-way data binding, data flows only in one direction: values from properties of the data source are placed into properties on the user interface control, but there is no flow of data back from the control to the data source if those property values change within the control, at least not automatically.
In two-way data binding, changes to the bound properties of a control also result in those changed values updating the corresponding data source values in the object in memory on the client. Most data-binding mechanisms in Windows Forms are designed to be two-way. You present data in user interface controls that comes from a data source, but if changes are made to the control property values through user interaction with the control, you want those changes to be reflected in the underlying data source as well. The idea of two-way data binding is to have this happen without needing to write a bunch of code yourself that collects those changes and makes the updates.
The other aspect to consider is at what point in the execution of your program the data flows from the data source to the control, and back to the data source from the control if you have two-way data binding. To have data flow in a program, there has to be some executing code that makes it flow. There could be several different triggers:
• The line of code establishing the data binding was just executed.
• A line of code was called that tells the control, the data source, or the data-binding mechanism itself to refresh itself.
• An event handler is called because of a change in the data source or the control values.
Depending on the data-binding mechanism and the data sources and controls involved, these things may happen implicitly behind the scenes in base class or Framework code, or they may need to be invoked explicitly at points in the program where you need the data to flow. Understanding when the data is expected to flow based on the controls and mechanisms you are using is crucial to getting the data-binding mechanism to behave the way you expect.
There are two primary forms of data binding built into .NET Framework control classes: simple and complex data binding. Simple data binding maps a property on a control (or more accurately, a property on a component that implements IBindableComponent) to a property in a data source item:
Binding bind = new Binding("Text", m_CustomerCollection,
"CompanyName", true);
m_TextBox.DataBindings.Add(bind);
The Binding object maps the Text property on a TextBox control to the CompanyName property on the current item within the m_CustomerCollection list data source. That Binding object is then added to the collection of data bindings for the control. Simple data binding isn’t limited to any one property, and in general it can be used for binding any control property.
Complex data binding is list-based binding—a list of data items (a collection object that implements the IList interface) is bound to a control for presentation of more than one item at a time. Complex data binding typically uses a DataSource property to map the list to the control:
m_CustomersGrid.DataSource = m_CustomersCollection;
The names “simple” and “complex” don’t necessarily indicate the difficultly of using the two mechanisms; they are more an indication of the complexity of the data that is being bound. In fact, for routine cases, complex data binding requires about the same amount of code as simple data binding. The rich data-binding support built into the Windows Forms controls, combined with the powerful code generation support provided by the Visual Studio designer, makes presenting data through data-bound controls easier than it ever has been.
.NET Framework 1.0 introduced a number of data-binding mechanisms that still are valid in .NET 2.0. The Control base class (from which every Windows Forms control derives) implements IBindableComponent, which exposes a collection of data bindings that let you tie properties of that control to data source properties, as described earlier when I defined simple data binding. Additionally, some Windows Forms controls that support complex binding allow you to set other properties that determine what portion of the list is presented. For example, on a ComboBox control you can set a DisplayMember property to tell the control what property on the data items in the DataSource list it should use for displaying each item. You can also specify a ValueMember property that tells the control which property on the data items to track along with the display member. This latter value is often used to hold the primary key or object reference to the data item so that it can be used for subsequent queries or updates. Listing 3.1 demonstrates setting up data binding for a ComboBox.
LISTING 3.1: ComboBox Data Binding
public partial class MyForm : Form
{
ComboBox m_Combo = new ComboBox();
public void OnFormLoad(object sender, EventArgs args)
{
CustomersDataSet dataSource = new CustomersDataSet();
CustomersTableAdapter adapter = new CustomersTableAdapter();
adapter.Fill(dataSource);
m_Combo.DataSource = dataSource.Customers;
m_Combo.DisplayMember = "CompanyName";
m_Combo.ValueMember = "CustomerID";
}
}
Listing 3.1 sets the DataSource property on a ComboBox control to the Customers table within a typed data set, which implements the IList interface and is the complex binding data source. The DisplayMember property takes the name of the property (or column in the case of a data table) whose value will be extracted for each item in the list and displayed in the ComboBox as text. The ValueMember identifies an additional field that keeps the value for each item displayed in the ComboBox. In this case, the code points the ValueMember property to the CustomerID column, so this primary key value can be used to select the appropriate row from the database or data set when the user has selected an item in the ComboBox.
Another capability available since .NET 1.0 is that container controls include something called a BindingContext. This keeps track of all the data sources within the container that are bound to the container’s controls, and ensures that changes within the individual controls and the data source are synchronized correctly.
Unfortunately, .NET 1.X had a lot of unnecessary complexity in how these mechanisms got surfaced to the programmer, and that made Windows Forms data binding a fairly painful process. While NET 1.X made it very easy to do some simple things—much more so than with UI technologies that preceded .NET—when you started trying to code slightly more complicated and real-world data-presentation scenarios, it was often difficult to get things to work consistently and correctly. This has been a major focus area for improvement in .NET 2.0, and things have gotten a lot better, both for the programmer and for the end user. Some of the data-binding improvements in .NET 2.0 include
• More of the complexity has been hidden from you unless you really need it.
• There are more options and flexibility.
• The code that you do need to write is more intuitive.
• You get more consistent results.
The designer does most of the grunt work for you, letting you use gestures and interactions with design-time UI to generate all the appropriate data-binding code for you. However, before you start to rely on the designer without understanding what it is doing for you, I will cover how things work at the code level.
One of the most common and visually satisfying things to do with data binding is to have a set of data presented in a grid. Most applications that deal with data need to present a collection of data in a grid so the user can see a summarized, compact view of that data. From there, the application may let users select individual rows and act upon them in some way. For now, we will just focus on the first step: taking a collection of data and presenting it in a tabular form to the user.
To present data in a tabular fashion, you need two things. First, you need the data that you want to present. The examples in this chapter use strongly typed data sets from the NorthwindDataAccess class library created in Chapter 2. The other thing you need is a control capable of presenting the data in a tabular form. In Windows Forms 2.0, you use the DataGridView control any time you want to present tabular data.
Let’s take a quick look at the code required to present a data table within the DataGridView control. The code in Listing 3.2 is from a form’s load event handler:
LISTING 3.2: DataGridView Data Binding
private void OnFormLoad(object sender, EventArgs e)
{
CustomersDataSet nwData = CustomersDataSet.GetCustomers();
m_CustomersGrid.DataSource = nwData.Customers;
}
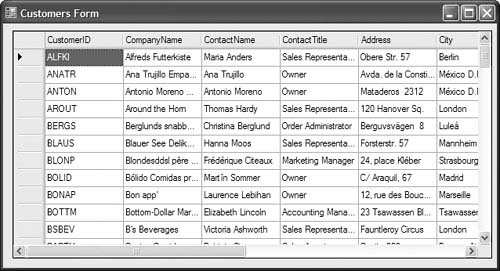
As you can see, you need to obtain the data set from your data access layer and set the DataSource property on the grid to the desired table within the data set. This example uses a strongly typed data set, so you just set the DataSource property on the grid to the table reference returned from the Customers property on the data set. This property returns a CustomersDataTable reference, which is simply a derived class from DataTable (as discussed in Chapter 2). All it takes is those two lines of code—and the code in the data access layer to create and populate the data set—to have a rich presentation of data as shown in Figure 3.1. However, as you will see a little later in this chapter, you should never bind your controls directly to a data source like this in .NET 2.0; you should bind your controls to a BindingSource component, and bind the binding source to the data source.
Another common scenario is to populate a list box or combo box from a property within a collection of data. Listing 3.1 showed an example of this. The code to bind a combo box or list box isn’t all that different from the code to bind a collection of data to a grid. The difference lies in how you specify which property within the collection to use for presentation in the control (the DisplayMember), and which property to hold onto for each item as an associated value (the ValueMember).
The value of the property set as the ValueMember for the current item in the combo box or list box is accessible through the SelectedValue property on the control at runtime. For example, take a look at the form in Figure 3.2.
If you hooked up the combo boxes and text boxes on this form as shown in Listing 3.3, the SelectedValue property on the combo boxes are used to drive the contents of the text boxes.
LISTING 3.3: Using SelectedValue from a Data-Bound ComboBox
public partial class SelectedValueForm : Form
{
public SelectedValueForm()
{
InitializeComponent();
}
private void OnFormLoad(object sender, EventArgs e)
{
// Get the data
m_CustomersDataSet = CustomersDataSet.GetCustomers();
// Set up the bindings for the combo boxes
m_CompanyNameCombo.DataSource = m_CustomersDataSet.Customers;
m_CompanyNameCombo.DisplayMember = "CompanyName";
m_CompanyNameCombo.ValueMember = "CustomerID";
m_ContactNameCombo.DataSource = m_CustomersDataSet.Customers;
m_ContactNameCombo.DisplayMember = "ContactName";
m_ContactNameCombo.ValueMember = "Phone";
// Hook up event handlers for selection change events
m_CompanyNameCombo.SelectedIndexChanged
+= OnComboSelectionChanged;
}
private void OnComboSelectionChanged(object sender, EventArgs args)
{
if (m_ContactNameCombo.SelectedValue == null ||
m_CompanyNameCombo.SelectedValue == null)
return;
m_CustomerIDTextBox.Text =
m_CompanyNameCombo.SelectedValue.ToString();
m_ContactPhoneTextBox.Text =
m_ContactNameCombo.SelectedValue.ToString();
}
}
In this example, the combo boxes are bound to the Customers table in the typed data set. The DisplayMember for each will show the CompanyName and ContactName properties (columns), respectively, as the text in the combo box for each item in the Customers table. Additionally, the ValueMember for the first combo box is set to the CustomerID property, and the second combo box is set to the Phone property. By doing this, the SelectedValue property on the combo box will give you back the value of the ValueMember property on the currently selected item in the combo box whenever it is called. In the code in Listing 3.3, the SelectedValue property for each of the combo boxes is accessed in an event handler for the SelectedIndexChanged event on the combo box, and it is used to set the Text property on the corresponding text boxes.
This same functionality could have been achieved better by simply data binding the text boxes as well, but the intent in this code was to demonstrate using the SelectedValue property and to show how it relates to the ValueMember. Instead of using the SelectedValue to populate a text box, a more common usage would be to perform a lookup query against the database for the CustomerID contained in the SelectedValue for the first combo box. You would typically do something like this if you have a large data set that you don’t want to hold in memory just to display a single column in a combo box or list box, but you want to get the full row corresponding to a selection to act on it in your code.
Another kind of data binding that you will commonly want to do is to bind properties on data items in a collection of data to properties on individual controls on a form. As mentioned earlier, this form of data binding is called simple data binding. To perform simple data binding, you use the DataBindings collection that every control inherits from the Control base class implementation of IBindableComponent. The DataBindings property exposes a collection of Binding objects, each of which represents an individual association between a data member within a data source and a property on the control itself.
A straightforward example of using simple data binding is to bind individual columns within a table to the Text property of TextBox or Label controls on a form, so the presented text in those controls shows the values from the current row of data in the table. If we extend the example shown in Figure 3.1 and add a set of text boxes to the form below the grid using the designer, we can add data binding so those text boxes will show the contents of some of the columns of the current row in the Customers table (see Listing 3.4).
LISTING 3.4: TextBox Data Bindings
private void AddTextBoxDataBindings(CustomersDataSet nwData)
{
DataTable table = nwData.Customers;
m_CustomerIDTextBox.DataBindings.Add("Text", table,
"CustomerID", true);
m_CompanyNameTextBox.DataBindings.Add("Text", table,
"CompanyName", true);
m_ContactNameTextBox.DataBindings.Add("Text", table,
"ContactName", true);
m_ContactPhoneTextBox.DataBindings.Add("Text", table,
"Phone", true);
}
This code adds a new entry in the DataBindings collection for each of a series of text boxes on the form. The DataBinding property exposes a reference to an object of type ControlBindingsCollection. This collection class exposes an overloaded Add method that allows you to set up each data binding in a single line of code by providing the four parameters shown in Listing 3.4. This method constructs a Binding object under the covers and passes the parameters to its constructor, and then adds the Binding object to the DataBindings collection for the control.
• The first parameter to the Add method is the name of the property on the control that you want to bind to; it can be any of the public properties exposed on the control. In Listing 3.4, all of the bindings are created against the Text property of the TextBox controls.
• The second parameter is the data source containing the data you are binding to, and could be one of the many forms of data collections discussed in the Data Sources section of Chapter 1. It can also be a reference to a single data object. In this code example, the data source is the same for each of the bindings. The code first stores the table reference in a local variable of type DataTable, and then passes that local variable as the data source argument to the Add method.
• The third parameter to the Add method in Listing 3.4 is the name of the data member within the data source. This parameter can take on a number of forms, depending on what the data source is and where the data member can be found within that data source. This code example just specifies the column name, because the data source is the table that contains that column.
• The last parameter, which is set to true for each of the bindings, is a flag to indicate whether to automatically format the displayed values. The next chapter discusses automatic and custom formatting in detail, but in general this should always be turned on.
If you run the SimpleNorthwindClient sample application from the download code, you will see the application shown in Figure 3.1 with the text boxes and a combo box added. The data is bound to the grid, combo box, and text boxes using code similar to that shown in Listing 3.2, 3.4. If you click on different rows in the grid, you’ll see that the content of the text boxes also automatically updates to reflect the contents of the bound fields in the data set based on the row that was selected. If you change the contents of one of the fields displayed in the text boxes and click on a different row in the grid, you’ll see that the changes you entered in the text box automatically change the contents of the underlying data source and update the grid display of that same data. Wow! How the heck did that happen? We didn’t write any code to keep the data in the grid and the data in the text boxes synchronized, or to propagate changes from the UI controls back into the underlying data source.
Well, that is part of the “magic” of the two-way complex data-binding mechanisms in Windows Forms. As mentioned earlier, when you set up a simple data binding between a control property and a data member within a data source, the control property would be set to the current item’s bound property value. Any changes made to the bound control property (Text in the case of the text boxes) will also be automatically pushed into the underlying data source when focus leaves the control. Things are a little more complex for a grid, but the same basic process happens if you think of each cell within the grid being a control itself.
You might be wondering how the controls determine what the current item is within the collection. This is discussed later in this chapter, but the short answer is that something called a CurrencyManager for each list-based data source keeps track of what the current item is within the collection. The bound controls know about their own currency manager and can subscribe to an event raised by the currency manager when the current item changes. When that notification occurs, the bound controls can update their presentation of the data based on the contents of the new current item.
Data sources specified in Windows Forms data binding are treated as hierarchical sources. The top-level object is a container for other collections of data (for example, data tables in a data set), and the collections themselves are containers for individual data items (the rows within a data table in a data set). Each data item then has values for each property in the object (the column values within the row). The data source can be even simpler: it could be an object containing properties, or it could be a simple array of objects. When dealing with custom object collections as your sources of data, the levels in the hierarchy can be arbitrarily deep. You could have a top-level object, Company, that contains a collection of Employees; each Employee could contain collections of Jobs, Tasks, and Contacts, as well as data items specific to the Employee; and each of the child collections could contain collections or data items themselves. To handle all these situations, data sources are treated as hierarchies, and a path syntax is used to specify data sources and data members. This accommodates specifying the exact location in a hierarchy of data where the desired collection, item, or value resides.
When I bound the TextBox controls to the data source in Listing 3.4, I specified the data source as the Customers table within the data set, and then I specified the data member as the column name within that table. You could also set the data source to the data set itself instead of the contained data table. But if you did that, you would also need to modify the way you specified the data member, because the data member represents a relative path within the data source hierarchy to the particular data object or value to which you are binding.
So an alternate approach to setting the text box data bindings could look like the code in Listing 3.5.
LISTING 3.5: Modified TextBox Data Bindings
private void AddTextBoxDataBindings(CustomersDataSet nwData)
{
// Alternative approach:
m_CustomerIDTextBox.DataBindings.Add("Text", nwData,
"Customers.CustomerID", true);
m_CompanyNameTextBox.DataBindings.Add("Text", nwData,
"Customers.CompanyName", true);
m_ContactNameTextBox.DataBindings.Add("Text", nwData,
"Customers.ContactName", true);
m_PhoneTextBox.DataBindings.Add("Text", nwData,
"Customers.Phone", true);
}
In this case, since the data source is the data set itself, you have to specify the column to bind to by prefacing the column name with the table name, separated with a dot in the same way you use a dot with members of types in .NET code.
If you made just this change in the SimpleNorthwindClient sample application and ran it again, the data in the text boxes would initially present the data for the first row just fine. But if you clicked on another row in the grid, you would see that the text boxes no longer updated properly—because even though both the grid and the text boxes are working against the same underlying data source (the instance of the CustomersDataSet), the way that data source has been specified to the data-binding mechanisms was different for each of the two controls. For the grid, the data source was specified to be the Customers table within the data set. Effectively, the data member for the grid is empty or null because it wasn’t specified, but now the data source for the text boxes is the data set itself, not the table within it.
This is an important concept that has tripped up a lot of developers when dealing with complex data-binding scenarios and trying to keep bound controls synchronized with one another. The data binding mechanisms create a separate synchronization object (either a CurrencyManager for list data sources or a PropertyManager for individual object data sources) for each data source that is specified. But even if two bindings use the same underlying logical data source, if that data source is specified differently between two bindings, then they will have separate synchronization objects created for each way the data source is specified, and you won’t get synchronization as you might expect it.
To remedy that problem for the situation just described, all you need to do is be consistent in the way you specify your data sources and data members, and you should get nice synchronized behavior between controls that are bound to the same data source.
However, the recommended practice is to set your data source at the list level and to avoid compound data members (e.g., Customers.Phone). One exception to this would be if you are setting up data binding to a complex object that holds a single complex child object. For example, consider a Customer object that has an Address property on it. The Address property exposes a complex type instance with properties of City, State, and so on for that instance. In this case, you might use a compound data member for binding to a single Customer object’s address information. You would probably set the data source to the Customer object, but then you might set a data member to Address.City if you were data binding to that piece of information within the Customer object.
If you wanted to violate this guidance and specify data bindings for your text boxes using the form just shown, but still wanted the text boxes to be synchronized with the data bound to the grid, then you’d also need to specify the data source and data member for the grid consistently. You would need to modify the form load event handler code to look like this instead:
private void OnFormLoad(object sender, EventArgs e)
{
CustomersDataSet nwData = CustomersDataSet.GetCustomers();
// Alternative approach:
m_CustomersGrid.DataSource = nwData;
m_CustomersGrid.DataMember = "Customers";
}
If you added this change in addition to the one shown in Listing 3.5 for the text boxes, you could run the application again and select rows in the grid, and the contents of the text boxes would be updated with each row selection in the grid as before.
Because the data sources are now specified to be exactly the same object reference (the data set), only one synchronization object gets created and used for all of the controls. Whereas the now-obsolete DataGrid control could be bound to a data set and it would present a hierarchical way of navigating the tables contained within the data set, the DataGridView control is designed to only be bound to a single list at a time. If you set the DataSource property on a DataGridView to a data set without specifying a table within that data set as the DataMember property, the grid will remain blank.
Let’s take another look at what is going on when you bind a control or multiple controls to a set of data on a form. As mentioned earlier, when you create the data bindings, the form itself creates some synchronization objects to manage the fact that you may have multiple controls on the form bound to the same data source, and that you (probably) want them to be synchronized.
The form itself has a BindingContext property that holds a collection of synchronization objects for each data source that is being used for data binding on the form. For the most part in .NET 2.0, you don’t have to deal directly with the binding context in your code, but it is still lurking under the covers making things work. (In .NET 1.X, you had to go through the binding context to get to the synchronization objects for a number of scenarios.) As discussed in the previous section, what gets created behind the scenes are instances of a CurrencyManager for list-based data sources or a PropertyManager for individual custom business objects. Each of these classes derives from BindingManagerBase, which is the type of object reference that the BindingContext is designed to contain. The CurrencyManager is the one you will deal with most often.
A container component (such as a Form or a BindingSource) creates a currency manager for each list-based data source that you specify for a control on a form, and it is added to the binding context for the form. The currency manager keeps track of both the underlying data source that controls are bound to and the controls that are bound to that data. You can use the currency manager to access the underlying data that is bound to controls, determine what the current row or object is, and change that current row and affect all of the controls that are bound to it. The currency manager notifies bound controls when items are added, removed, or changed in the bound collection, and controls can use these notifications to refresh their display of the data source.
So far we have been dealing exclusively with individual controls on a form and binding data sources directly to those controls. In .NET 1.X, this was basically the only way to do it. However, one problem with this approach is that if the underlying data source for multiple bound controls had to change at runtime, you had to write some code to reset the data source for each of the controls. Additionally, if you needed to figure out what the current item was in a bound collection or receive notifications when that data source changed, you had to dive deep into the guts of the form through the binding context to get access to the synchronization objects.
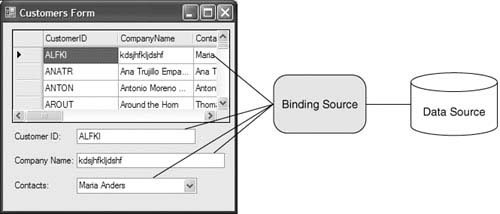
In .NET 2.0, the BindingSource component solves these problems. A binding source acts as a proxy between bound controls and their associated data source. It provides one-stop shopping for accessing or managing the data-binding context for one or more controls on a form. You bind controls on a form to a binding source, and then you bind the binding source to a data source. If you need to change the data source that controls are bound to, you only have to change the DataSource and DataMember properties on the binding source; all the controls bound to it will automatically update. If you need to know the current item in a data source, you can get it directly through the binding source. If you want to change the current item programmatically, the binding source exposes methods and properties to do so; if you want to be notified of changes in the data source, the binding source exposes events that you can subscribe to. The relationships between a binding source, bound controls, and a data source are depicted in Figure 3.3.
If we combined the code from Listings 3.2, 3.3, and 3.4 to hook up all the data bindings for a grid, combo box, and text boxes in one example, add a binding source to the form, and change the controls so they are bound to the binding source instead of the underlying data source, the code would look like this:
private void OnFormLoad(object sender, EventArgs e)
{
CustomersDataSet nwData = CustomersDataSet.GetCustomers();
m_CustomersGrid.DataSource = m_CustomersBindingSource;
m_CustomersBindingSource.DataSource = nwData.Customers;
AddTextBoxDataBindings(); // uses the binding source
AddComboBoxDataBindings(); // uses the binding source
}
Now all it would take to change the bindings of all the controls is to set the DataSource property on the binding source object to some other collection, and all controls that are bound to the binding source would automatically update to the new data source. For example, you might retrieve a filtered list of customers from the data access layer and want to bind that new list to the same set of controls. If you are going to swap out a data source like this, the shape of the new data source (the schema) will have to be the same as the original data source if the controls are bound to specific properties on the contained items. For example, the AddTextBoxDataBindings helper method adds data bindings for each text box to the CompanyName column, ContactName column, and so on. If you set the data source of the binding source to a collection of orders instead of customers, these data bindings would be broken—they wouldn’t be able to find the bound properties in the new collection of data items, so they would throw exceptions.
I will discuss in greater depth throughout the book the many ways the BindingSource component comes into play in data-binding scenarios. In general, you should always use binding sources between your bound controls and their data sources, even if you don’t anticipate changing the data source dynamically at runtime. The BindingSource also exposes functionality for controlling the current record in the data source and for monitoring changes in the data source through a set of events raised by the binding source.
Another common requirement is the need to be able to change the current record in a set of data programmatically, or in response to a user interaction that is outside of a data grid. In .NET 1.X, the way to do this was rather obscure: you had to obtain a reference to the CurrencyManager object for the data source you were working with, and then had to update the Position property on that object to change the current record:
private void SetNextRecord11Style()
{
CurrencyManager currMgr =
BindingContext[m_CustomersDataSet.Customers]
as CurrencyManager;
currMgr.Position++;
}
This mechanism still exists for backward compatibility and still works. However, as mentioned earlier, you should always favor binding your data-bound controls to a binding source. If you do so, the binding source itself contains a currency manager, and it exposes an easy-to-use API for controlling the current record position within the underlying data source.
The BindingSource class has a set of methods for explicitly navigating through the data source. The MoveNext, MovePrevious, MoveFirst, and MoveLast methods perform exactly what you would expect them to for positioning the current record within the data source. There is also a Position property exposed that lets you explicitly set the current position to an ordinal record number. In addition to these methods and the property, a series of events are raised whenever the position or data source changes; this allows other objects that may not be bound directly to the binding source or container to be notified when position changes occur so that they can react accordingly in their event handlers.
Using this functionality, programmatically moving to the next record is as simple as the following code:
m_CustomersBindingSource.Position += 1;
// or:
m_CustomersBindingSource.MoveNext();
The downloadable sample code contains an application called PagingSample that demonstrates both the basic use of the BindingSource for wiring a data source to bound controls, and the manual control of paging through a collection of data using the binding source. This application is shown in Figure 3.4.
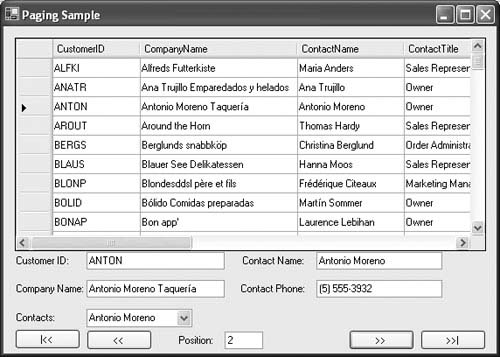
In the PagingSample application, the m_CustomersBindingSource binding source was added to the form from the Toolbox without using any of the designer support for connecting it to a data source. The code once again uses the data access layer from Chapter 2 to get a data set containing customer data and sets the Customers table as the data source for the binding source. It then sets the data source for the grid, text boxes, and combo box to the binding source as shown in Listing 3.6.
LISTING 3.6: Connecting Data Sources to Controls with a BindingSource
private void OnFormLoad(object sender, EventArgs e)
{
// Set up event handlers for connector position changed
// and text box text changed events
m_CustomersBindingSource.PositionChanged += OnPositionChanged;
m_PositionTextBox.TextChanged += OnPositionTextChanged;
// Set up data bindings
CustomersDataSet nwData = CustomersDataSet.GetCustomers();
m_CustomersGrid.DataSource = m_CustomersBindingSource;
m_CustomersBindingSource.DataSource = nwData.Customers;
AddTextBoxDataBindings();
AddComboBoxDataBindings();
}
private void AddTextBoxDataBindings()
{
m_CustomerIDTextBox.DataBindings.Add("Text",
m_CustomersBindingSource, "CustomerID");
m_CompanyNameTextBox.DataBindings.Add("Text",
m_CustomersBindingSource, "CompanyName");
m_ContactNameTextBox.DataBindings.Add("Text",
m_CustomersBindingSource, "ContactName");
m_ContactPhoneTextBox.DataBindings.Add("Text",
m_CustomersBindingSource, "Phone");
}
private void AddComboBoxDataBindings()
{
m_ContactsCombo.DataSource = m_CustomersBindingSource;
m_ContactsCombo.DisplayMember = "ContactName";
m_ContactsCombo.ValueMember = "CustomerID";
}
In addition to loading the data and hooking up the data binding, the OnFormLoad method also subscribes methods of the form to a couple of events. The first is the PositionChanged event of the binding source. This event will fire any time the current record position changes within its underlying data source. The form also subscribes a method to the TextChanged event of the position text box shown in Figure 3.4. The event subscriptions for the Click event of the forward and backward control buttons aren’t shown because they were created in the designer using the Events view of the Properties window. The event handlers for the control buttons and the two events just described are shown in Listing 3.7.
LISTING 3.7: Event Subscriptions for PagingSample
private void OnFirstRecord(object sender, EventArgs e)
{
m_CustomersBindingSource.MoveFirst();
}
private void OnPreviousRecord(object sender, EventArgs e)
{
m_CustomersBindingSource.MovePrevious();
}
private void OnNextRecord(object sender, EventArgs e)
{
m_CustomersBindingSource.MoveNext();
}
private void OnLastRecord(object sender, EventArgs e)
{
m_CustomersBindingSource.MoveLast();
}
void OnPositionChanged(object sender, EventArgs e)
{
m_PositionTextBox.Text =
m_CustomersBindingSource.Position.ToString();
}
private void OnPositionTextChanged(object sender, EventArgs e)
{
int enteredPos;
bool success = int.TryParse(m_PositionTextBox.Text, out enteredPos);
if (success)
{
m_CustomersBindingSource.Position = enteredPos;
}
}
As you can see from the code, the buttons on the form used for selecting records simply call the MoveXXX methods on the binding source and let it worry about incrementing or decrementing the position within the data source appropriately. When the binding source has done so, all controls bound to it will automatically update their displays because of the changed current record. In addition, the OnPositionChanged event handler method is called when the PositionChanged event is raised by the binding source. This method uses that event to update the position text box to the current record number. The OnPositionTextChanged handler lets the user enter a new record number in the position text box, and will use it to set the Position property of the binding source explicitly.
Note the use of the new TryParse method that has been added to all of the primitives in .NET 2.0. This method lets you try to parse a string into a value of that type, but avoids having an exception thrown if the parsing fails. The code uses TryParse to check in case the user enters an invalid number.
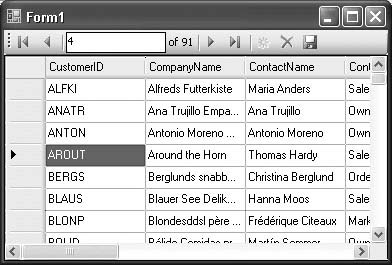
You probably wouldn’t want to have to write this code every time you needed to change the current record programmatically, and you wouldn’t be alone. As a result, another new control available in .NET 2.0 is the BindingNavigator control, which implements the paging functionality against a binding source for you. The binding navigator is just a specialized version of the new ToolStrip control in .NET 2.0 (see Appendix C for more about this control). As you can see in Figure 3.5, the binding navigator control simply encapsulates the functionality that we created manually in the last example. It has toolbar buttons for moving forward or back by one record, and for moving to the very first or last record. It also has an edit box to enter a position explicitly, like the position text box in Figure 3.4. It also has buttons for adding a new row, deleting the selected row, or saving the bound data source back to the data persistence layer. All it takes to get the binding navigator control hooked up is to add it to the form and set the BindingSource property to a reference to a binding source that is managing the data source for a set of controls on the form. The Save button in the BindingNavigator (indicated by a floppy disk icon) is disabled by default until you add some code to persist the changes in the data source to wherever it came from. You will see more examples using the BindingNavigator throughout the rest of this book.
Often you will work with data collections that have parent-child relationships. For example, a Customer may have a collection of Orders that they have placed, and each Order will have a collection of Order Detail objects that describe the items in that Order. In this situation, you often want to provide users with a way to view the collection of parent objects, and when they select a parent object, for them to see just the associated child objects. This often involves two tables in a data set with foreign key relations providing the links between child rows and their respective parent row.
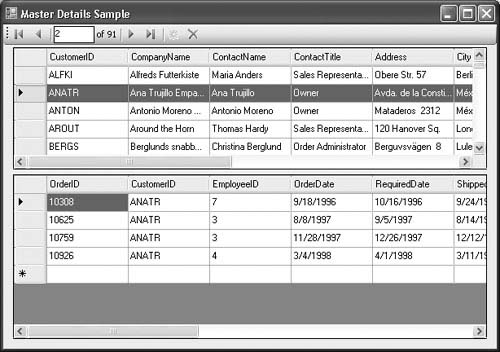
A common way to present this data and allow the user to navigate through it is to place the collection of parent objects in one grid (called the master), and display the set of related child objects in a second grid (called the details). You can easily accomplish this kind of data presentation using the Windows Forms DataGridView control and binding sources. To do this, you first need a data source that has the appropriate parent-child relations set up. Typically this is a data set with two (or more) tables in it that have a parent-child relation set up between the tables. You either do this manually using ADO.NET (described in Appendix D), or the data set designer will do it automatically for you when you add two related tables to a data set in the designer. You can also set up master-details binding with custom objects. To do so, each parent object must have a property that exposes a list (an implementation of IList) of related child objects.
Once you have a parent-child related set of data, you are ready to start hooking things up on the form. You can either read through these steps, or if you want to follow along, create a Windows Application project, and add two DataGridView controls, two BindingSources, and a BindingNavigator to the form. One grid is for the parent collection of data; the other is for the related child rows of data. In the MasterDetailsSample application in the download code, this data comes from the Customers and Orders tables, respectively. The first binding source is just for populating the parent grid with the Customers data, much like you have seen in previous examples.
1. Set the DataSource property on the binding source to the data set containing the Customers and Orders tables.
2. Set the DataMember property on the binding source to “Customers” to identify the table within that data set by name.
3. Set the DataSource properties on the grids to their respective binding sources.
4. When you hook up the child grid, you still just set the DataSource property on the grid to its respective binding source, called m_ChildOrdersBindingSource in the MasterDetailsSample.
The trick to making the master-details scenario work is that you set the DataSource property on the child binding source to the parent binding source, which is the m_CustomersBindingSource in the sample code. You then specify the name of the data relation that relates the parent rows to the child rows as the DataMember property for the child binding source, which is “FK_Orders_Customers” in the following sample:
private void OnFormLoad(object sender, EventArgs e)
{
// Get the data set with parent / child tables into a data set
CustomersDataSet customers = CustomersDataSet.GetCustomers();
// Set up the data sources normally for the first grid
m_CustomersBindingSource.DataSource = customers;
m_CustomersBindingSource.DataMember = "Customers";
m_CustomersGrid.DataSource = m_CustomersBindingSource;
// Set up the data sources for the child source to point to
// the parent source, and the contained relation
m_ChildOrdersBindingSource.DataSource = m_CustomersBindingSource;
m_ChildOrdersBindingSource.DataMember = "FK_Orders_Customers";
// Child grid to child connector
m_OrdersGrid.DataSource = m_ChildOrdersBindingSource;
// Navigator to parent connector
m_BindingNavigator.BindingSource = m_CustomersBindingSource;
}
That’s all there is to it. The chaining of a child binding source to a parent binding source automatically synchronizes the current row in the parent collection to the set of related child rows in the child collection. You can see this application in action in Figure 3.6.
As you saw in Listing 3.4, when you have controls bound to a data source in Windows Forms, you can get automatic updating of the underlying data source in memory (two-way data binding) if changes are made through the bound controls. This is true whether the data source is bound to a grid or to individual controls, such as text boxes, that let the user change the presented data values. The data source has to support certain interfaces to allow changes made in the bound control to be propagated into the underlying data source. Those interfaces and the requirements for implementing them is covered in Chapter 7; for now, just focus on the use of data sets, which implement all of the interfaces required for both simple and complex data binding, and for updating of the data set with changes made in the bound controls.
A number of things happen when a user makes a change to a control bound to a data source, such as a TextBox. First, events fire from the control itself based on the user’s interaction with the control. Usually the action that gets the ball rolling is that the user changes a value, such as the text in a TextBox control, and then tabs out of the control or clicks on some other control, resulting in a change of focus on the form. The series of events that fire in response to that action depend on which action the user takes, what control the user changed, what property on that control changed, and where the focus is switching to.
Validation is discussed more in Chapter 10, but the bottom line is that if a control supports both data binding and editing the values presented (as do the DataGridView, TextBox, and most controls in Windows Forms), then any changes the user makes to the presented data will be automatically pushed down into the bound data source when the focus is lost by that control. There is no additional code to show you for this capability, because it is an inherent part of the bindings that you set up to display the data in the first place. As soon as the focus has switched to another control, any edits in the previous control are written to the data source used to bind the control.
However, if you want to persist those changes from the bound data source to its storage layer, then you need to write the appropriate data access code to do so. You typically do this in response to the user clicking a toolbar button, menu item, or button on the form, and you just need to call Update on the appropriate table adapter. The following example shows the update code the designer generates for the Save button on the BindingNavigator:
private void bindingNavigatorSaveItem_Click(object sender,
EventArgs e)
{
if (this.Validate())
{
m_CustomersBindingSource.EndEdit();
m_CustomersTableAdapter.Update(m_NorthwindDataSet.Customers);
}
else
{
MessageBox.Show(this, "Validation errors occurred.", "Save",
MessageBoxButtons.OK, MessageBoxIcon.Warning);
}
}
The call to Validate ensures that validation occurs on the last control that had the focus. The call to EndEdit completes any changes made to the current data source item if that object supports transactional updates through the IEditableObject interface (discussed in Chapters 7 and 9). Finally, the call to Update on the table adapter iterates through any modified, deleted, or added rows in the Customers table and executes the appropriate commands in the table adapter to persist those changes to the database.
In this chapter, you stepped through the basic mechanisms and code for creating two-way data binding between data sources and controls in a Windows Forms application. Thanks to the rich support for data binding embedded in the controls themselves, as well as the support provided by the form and Binding and BindingSource objects, you only have to write a miniscule amount of code to get rich data-bound scenarios running. And as you saw at the beginning of Chapter 1, you can often avoid writing even that miniscule amount of code for simple situations because the designer will write it all for you.
Some key takeaways from this chapter are:
• Binding objects set up a two-way data binding between a single property on a control and a single property on the data items in a collection.
• The BindingSource component acts as a proxy between bound controls and their data sources. In .NET 2.0, you should always bind controls to binding sources, and binding sources to data sources.
• The BindingSource component lets you change the data source for bound controls without having to update the bindings for the individual controls, and also exposes a number of events that allow you to keep track of what is happening in the data source.
• To set up master-details data binding, you bind the parent control(s) to a binding source, bind the child control(s) to a second binding source, set the second binding source’s DataSource property to the first binding source, and the DataMember to the child collection property within the parent data source.
The next chapter dives deeper into the capabilities of BindingSources and Binding objects, and shows how to tackle a variety of more complex data-binding scenarios by coding things up by hand.