2. Working with Typed Data Sets and Table Adapters
To set up data binding in a Windows Forms application, you need a data source. A data source is an in-memory object that is typically a container for a collection of other objects, or it may be a single instance of an object itself. One of the most common and easiest ways to set up data binding is to use data sets (instances of the DataSet class or a derived typed data set class). This chapter briefly introduces what data sets are and how they work as a review for those who have not worked with them. It then dives right into the new features for creating and working with typed data sets in .NET Framework 2.0 to create a data access layer for your application using mostly designer features.
The DataSet type is a complex in-memory container for data. The DataSet class contains a collection of DataTable instances that contain the relational data stored in a data set. Each DataTable instance contains a collection of DataColumn instances that define the schema of the data within the table, and a collection of DataRow instances that provide access to the contained data as rows. To work with an instance of a data set, you typically create a data adapter for the data provider you are working with and use the data adapter to fill the data set based on a database query. Filling the data set creates the tables, columns, and rows within the data set to contain the data returned by the query, as shown in the following example:
string connString =
"server=localhost;database=Northwind;trusted_connection=true";
// SQL Server 2005 Express connection string:
// string connString =
// @"server=.SQLEXPRESS;AttachDbFileName=
// C: empNorthwind.mdf;trusted_connection=true";
SqlConnection conn = new SqlConnection(connString);
string query =
"SELECT CustomerID, CompanyName, ContactName, Phone FROM Customers";
SqlDataAdapter adapter = new SqlDataAdapter(query, conn);
DataSet data = new DataSet();
adapter.Fill(data,"Customers");
When working with untyped data sets (instances of the DataSet class), the pattern illustrated in this example is common. You first create an instance of a connection and pass the connection string to the constructor for the SqlConnection object. If you are working with SQL Server 2005 Express, the connection string is a little different: you use the AttachDbFilename property instead of the database or Initial Catalog property. Once you have a connection object, you create an instance of a SqlDataAdapter and pass in the SELECT query and the connection object. The query that you pass to the constructor of the data adapter sets that object’s SelectCommand property, which will be used whenever the Fill method is called.
When the Fill method is called, a number of things happen:
• The connection is opened if it isn’t already open.
• The SqlCommand object referenced by the SelectCommand property on the adapter is executed.
• The data set is inspected to see if it already contains a table with the appropriate name and schema to place the returned rows into. The name depends on whether a table name was specified in the call to the Fill method, as was “Customers” in the code sample.
• If there is an existing table, the results are added to that table or overwrite existing rows in the table, depending on the constraints on that table and the current value of the FillCommandBehavior property.
• If there isn’t an existing table, a new table is added to the data set and the results are placed in that table.
• The connection is closed if it was opened by the Fill method.
Data sets also let you update the database using optimistic concurrency. To support this, each data row has a RowState flag that says whether it is unmodified, modified, added, or deleted. The table also maintains an additional copy of each modified row so that it can preserve the values originally retrieved from the database as well as the current values. It uses these to detect whether the row in the database has been modified by someone else between when the data set was filled and when you go back to perform an update to the database using that data.
To perform updates to the database using a DataSet, you use the Update method on a data adapter. The Update method functions similarly to the Fill method described earlier in this chapter, except that it executes a separate command for each row in each table in the data set that it finds with a row state of modified, added, or deleted. The data adapter uses the SqlCommand objects referenced by the UpdateCommand, InsertCommand, and DeleteCommand properties to execute these commands. ADO.NET 2.0 has an option to batch the queries to avoid unnecessary round-trips to the database; it uses the UpdateBatchSize property on the data adapter.
In addition to these capabilities, the DataSet type also supports defining constraints on the tables contained within it to enforce primary key constraints, unique key constraints, and foreign key constraints. You can also define data relations so you can navigate easily from a parent row in one table to related child rows in another table, or vice versa, and you can define DataView instances to wrap a DataTable. Those views can be used to sort or filter the data contained within the table without modifying the actual contents in the table, much like a view in a database works against the tables in the database.
The bottom line is that the DataSet class is a highly capable data container designed to work seamlessly with the data-binding features of Windows Forms. If you need to learn more about the basics of the DataSet class and how to work with it, as well as other data access topics in general, see Appendix D.
Given all that capability in the DataSet class itself, why would you need anything else? Well, using the DataSet class directly and data adapters have two significant downsides in their basic form: type safety and the coding practices they generate. The problem with type safety is that the columns within a DataTable need to be able to contain any type of column contents to satisfy the schema of whatever data source they are mapped to. This is implemented by making the column simply hold an Object reference. Because all types derive from Object in .NET, the column can therefore hold a reference to any type; hence, the data set can be used with any underlying storage mechanism as long as the types of the store can be mapped into a .NET type. This approach makes the data set very flexible in containing data. But you usually have to give something up for flexibility, and in this case type safety is the first thing you give up.
When you create a DataTable by loading a data set programmatically, from XML, or from a database query, the types of the columns are automatically specified, and the data set can use these column types for runtime type checking. However, the indexer on the DataRow class that lets you access the columns in a row is simply exposed as an Object reference. This means that your code can attempt to assign any type value to a column and there isn’t any way the compiler can tell whether it will succeed or fail. You’ll want to avoid this when you’re developing code for a strongly typed platform like .NET. What you really want is for the compiler to be able to detect as many type incompatibilities as possible at design time, so that you don’t ship a product that can blow up for improper casts or assignments.
To make a data set type safe, you basically have to wrap it in an API that is specific to each schema that you plan to put in it. This means writing a new class with strongly typed properties for all the tables and rows (the schema elements) for every data set you want to implement. Yuck! Who is going to bother to do that?
Well, the good news is that the code you need to write is a direct conversion of the data’s schema, so it is a perfect candidate for code generation. The ability to generate a typed data set for any schema you want is part of Visual Studio—it simply involves running either a command line tool or using some of the built-in designers in the Visual Studio environment.
Using Visual Studio 2005 to create a typed data set from a database generates more than just the typed data set; it also generates something new called a table adapter, which provides a type-safe way of populating the data set from the database. You will learn how to work with both typed data sets and table adapters in this chapter, and then you’ll use these mechanisms for the bulk of the data retrieval and update used throughout the rest of the book.
The other problem that typed data sets address is tied into the type safety aspect and resolves certain unsavory coding practices that untyped data sets induce. Take a look at the code in Listing 2.1.
LISTING 2.1: Working with Data in a DataSet
private void UpdateCustomer(DataSet ds, string custID,
string compName, string contactName, string title, string phone)
{
DataRow[ ] rows = ds.Tables["Customers"].Select(
"CustomerID = '" + custID + "'");
DataRow row = rows[0];
row["CompanyName"] = compName;
row["ContactName"] = contactName;
row["ContactTitle"] = title;
row[10] = phone;
}
If you believe in writing maintainable code, seeing hard-coded column and table names and/or indices like in this code example should make you nervous—if the underlying schema changes, you have to hunt down all the places where the table and column names are used. If you use indices to get at the columns in a row, as the last line of code in this snippet does, the problem is even worse. At best, you can use find and replace, which is error prone and time consuming; often you will miss something, and you won’t know about the problem until runtime. Hopefully your regression tests are comprehensive enough that any problems will be caught during test, but often differences between the actual schema and the hard-coded column names or indices aren’t found until after the product has shipped.
Using typed data sets solves these problems. When you create a typed data set, code is generated that wraps the data set in a type-safe way by exposing tables and columns as strongly typed properties. If you program against those properties, the compiler will prevent you from assigning a value to a column that has the incorrect type. These properties also make sure you won’t be trying to access a schema element that doesn’t exist. If your schema changes, you simply regenerate the typed data set. If any of your code is trying to access parts of the schema that have been renamed or have gone away, you will get compilation errors instead of runtime errors. Tracking down disconnects with specific line information about what is broken will let you solve the problem much faster and reliably than with untyped data sets.
Another implicit benefit is that typed data sets expose the data set’s schema through strongly typed properties and methods, and that enhances productivity. When you have a lot of different database entities, it gets difficult to remember the exact schema of the data you are dealing with. When you work with typed data sets, IntelliSense tells you exactly what the table names and column names are when you drill down to a row, and IntelliSense autocompletes those names when you’re typing, so you don’t even have to type them out yourself. These benefits of typed data sets help you develop code that works against the data set more quickly, which translates to cost savings.
The type information contained in a typed data set is also an enabler for design tools to make you even more productive. When you add a typed data set to a Windows Form, for example, the designer can reflect on that type to determine what tables are available, what the columns are within those tables, what their names and types are, what relationships exist between tables in the data set, and so on. Using that information, the designer and Properties window can provide you the ability to hook up common data-binding scenarios using only drag-and-drop and property grid interactions, and the designer will generate all the corresponding code. That translates to major productivity gains. As a result, you should always favor using typed data sets over untyped data sets, unless there is no way for you to have the schema information about what a data set will contain at design time.
Keep in mind that typed data sets have no effect on runtime data binding. The data-binding mechanisms of Windows Forms have to be type agnostic to work with any kind of data set or any object collection. You should still use typed data sets for the programmatic code type safety they provide, as well as the ability to use those data sets with the design-time features of Visual Studio, but ultimately they have no significant effect on what happens at runtime with data binding.
Before discussing how to create the typed data sets, let’s look at what is generated when you do create them. Lots of examples in this book use them, and knowing what will be in a given typed data set based on some knowledge of the schema from whence it came will help you unravel the mysteries of typed data sets.
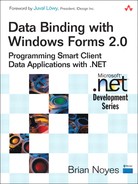
A typed data set is implemented as a set of classes derived from the basic classes that compose a data set. You get a class derived from the DataSet itself, and a class derived from the DataTable and DataRow classes, for each table in the data set. For example, creating a typed data set that contains the Customers table from Northwind would result in the set of classes shown in Figure 2.1 (using UML notation).
After generating the typed data set to contain the Customers table, you end up with a class derived from DataSet named CustomersDataSet (you can name it whatever you like). Within the CustomersDataSet class definition are two nested class definitions: CustomersDataTable derived from DataTable, and CustomersRow derived from DataRow. Each of these classes defines a number of additional properties and methods that provide type-safe access to the underlying data. At the data set level, the main property of interest is the Customers property, which gives you type-safe access to the CustomersDataTable instance held by the data set.
The CustomersDataTable class exposes a type-safe indexer that lets you iterate through the rows within the table as instances of the type-safe CustomersRow class. A Count property is exposed that allows you to find out how many rows there are for iteration purposes, or if you are just accessing the rows in a read-only way, you can use a foreach loop in C#. There are named properties for each of the columns in the table, such as CustomerIDColumn, CompanyNameColumn, and so on, each of type DataColumn, from which you can obtain type information about the columns by name, as you will see shortly in some sample code. The CustomersDataTable class also exposes a type-safe method named NewCustomerRow for creating a new row of type CustomersRow, and then you can call the AddCustomerRow method after populating the row to add it to the table as an inserted row.
New in .NET 2.0 is that the typed data table class exposes a set of strongly typed events that can notify you each time a row in the table is updated, inserted, or deleted. These events are exposed in pairs, named CustomersRowChanging, CustomersRowChanged, CustomersRowDeleting, and CustomersRowDeleted. The CustomersRowChanging event fires before the change is committed to the table, allowing you to perform data validation, and the CustomersRowChanged event fires after the change has been made to the table; the same applies to the deletion-related events. The change events cover insertions into the table as well as modifications to existing rows. The event arguments passed to event handlers for those events include a reference to the affected row, along with an enumerated value that indicates the specific action that was performed on the row.
The CustomersRow class then exposes each of the columns of the row through typed properties that match the specific type of data held by that column. This lets you get or set the value of that column within the row as a strongly typed value. By default, the names of those properties will match the names of the columns in the schema that was used to generate the typed data set. However, you can override this default naming to create a different property name than the underlying column name, which is useful if you have a different naming convention for columns in a database than you use for properties in your code. You can also use this to avoid needing to update all the code that consumes the data set if you have a simple column name change at the database level without the type or semantics of the column changing. To use this feature, set the column’s Name and Source properties in the DataSet designer. The Name sets the named property on the typed data row class, and the Source is the name of the column in the database.
Using typed data sets lets you write code like that shown in Listing 2.2 instead of what you saw in Listing 2.1 with untyped data sets.
LISTING 2.2: Strongly Typed Access to Data in a Typed Data Set
public void UpdateCustomer(CustomersDataSet custData, string custID,
string compName, string contactName, string title, string phone)
{
string custIDColumnName =
custData.Customers.CustomerIDColumn.ColumnName;
CustomersDataSet.CustomersRow[ ] rows =
(CustomersDataSet.CustomersRow[ ])ds.Customers.Select(
custIDColumnName + "='" + custID + "'");
CustomersDataSet.CustomerRow row = rows[0];
row.CompanyName = compName;
row.ContactName = contactName;
row.ContactTitle = title;
row.Phone = phone;
}
Although this code may look slightly more verbose due to the nested type definitions for the CustomersRow under the CustomersDataSet, the beauty of the code in Listing 2.2 is that there aren’t any hard-coded schema references. There aren’t any string literals for table or column names, and you don’t have to index any column positions because you can more easily and clearly get to them through the typed properties exposed on the typed row object. The CustomerIDColumn public property on the table class and the ColumnName property on the DataColumn instance it represents gets to the column name without having to be hard coded. By doing this, even if the schema changes, the code won’t necessarily have to.
The other part that isn’t apparent from a block of code like this is actually one of the best benefits of typed data sets from a productivity standpoint: IntelliSense! Because of the type definitions that underlie this code, you get full IntelliSense on the properties and methods that the typed classes add. So if you haven’t memorized all the column names exactly, you can just scroll through the member names after typing the “.” next to the typed data row variable to locate a column.
So what happens if the database schema changes and the DBA decides to rename the Phone column to PhoneNo? Well, as long as the DBA at least tells you of the change, you can quickly regenerate the CustomersDataSet class and its contained classes, and recompile. If you do this, anywhere in your code that you referenced the CustomersRow.Phone property, you would get a compiler error like the following:
D:CodeChapter 2TypedDataSetsForm1.cs(25,17): error CS0117:
'TypedDataSets.CustomersDataSet.CustomersRow' does not contain a
definition for 'Phone'
You could simply click through the compiler errors in the Task pane in Visual Studio, change the column names to PhoneNo instead of Phone, and try to compile again. You could also resolve this by changing the Name property of the PhoneNo column back to Phone after regenerating the data set, and leave the Source property set to PhoneNo.
If the DBA had changed the type of the column instead of the name, you would get the following errors for each of those references:
D:CodeChapter 2TypedDataSetsForm1.cs(25,25): error CS0029: Cannot
implicitly convert type 'string' to 'int'
This is a huge benefit. Granted that you would still have to click through all the compiler errors and decide how to resolve them. Of course, maybe you would decide to do a global find-and-replace operation or use some of the refactoring tools that are new in Visual Studio 2005. But the big difference between using the typed data set classes and when you were coding against the tables and columns using strings for their names is that you are pretty much guaranteed by the compiler that you will find all the affected lines of code—as long as you only program against the type-safe properties of the typed data set, table, and row.
It may be tempting at times to use some of the properties and methods of the DataSet base class, such as the Rows or Columns collection. These are still exposed on your typed data set class because they derive from DataSet. However, you should try to get any untyped reference back into a typed variable reference as quickly as possible so that you can maintain the benefit of using typed data sets throughout your code. When you do need to use one of the base class methods that returns an untyped row, such as the Select method shown in Listing 2.2, make sure to cast the result to the typed version of the row before you use it so that you can take full advantage of the type safety provided by the typed data sets.
To fill a typed data set or update a data source using a typed data set, you use code almost exactly like what you saw at the beginning of the chapter for filling an untyped data set. Because the typed data set is a derived class from DataSet, the data adapter uses methods of the base DataSet class to populate the typed data set instance during a Fill operation and to extract and propagate changes during an Update operation. This was how you had to work with typed data sets in .NET 1.X, and the problem was that you had to throw away some type safety at the point you interacted with the data source. How do you know whether the data adapter is configured properly to work with that strongly typed data set? You don’t, and so you won’t find out about errors again until runtime.
In .NET 2.0, a new construct brings type safety to the adapter between a data source and a type-safe data set. That construct, called a table adapter, will be discussed in detail later in this chapter.
There are several paths within Visual Studio 2005 for creating typed data sets. You can use the Data Sources window to create a typed data set and tie it to a database through a wizard, or you can use the data set designer and have more direct control over what gets created. You already saw one quick example of creating a typed data set with the Data Sources window in Chapter 1, and Chapter 5 describes how to use that window in more detail. This chapter focuses on creating typed data sets with the data set designer.
Under the covers, the starting point for a typed data set is actually just an XML Schema Definition (XSD) file. The schema defines a root document element that will represent the data set itself. It needs at least one child element, which will represent a table within the data set. That table element can represent its columns as either attributes or child elements. The schema definition can contain any number of elements defined as the first child of the root element, and those each become additional tables within the data set.
When you are working in Visual Studio, its designers and wizards “hide” that you’re actually working with XSD files. After creating a typed data set as part of your project, you will see an XSD file in Solution Explorer, but whenever you open the file, it opens in the data set designer, which lets you deal with the data set’s type definition at an abstract level—you don’t need to know anything about XSD itself.
To help you become familiar with the Visual Studio features for creating typed data sets, the following sections step you through the process of creating a data access layer for parts of the Northwind database. You need to:
1. Create a data access layer class library project and add a typed data set definition to it, and set up a data connection in Server Explorer for the database you will work with.
2. Add tables to the data set by dragging them from Server Explorer into the data set designer.
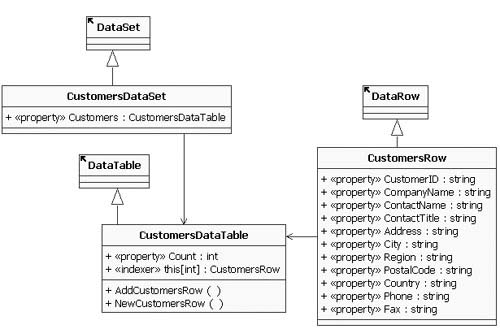
1. Create a new C# Class Library project in Visual Studio 2005 and name it NorthwindDataAccess (see Figure 2.2). Click OK.
Note: You’re creating a class library here, not a Windows application. Too many demos and samples have you generate your data access code in the client application. That is just bad practice from an architectural perspective; I recommend always placing your data access code in a separate class library that you can manage separately from your client application, and potentially reuse it across more than one client application.
2. Solution Explorer should be visible in the IDE. If it is not, display it by selecting Solution Explorer from the View menu. Delete the Class1.cs file that is added to the class library by default by right-clicking on it in Solution Explorer and selecting Delete from the context menu.
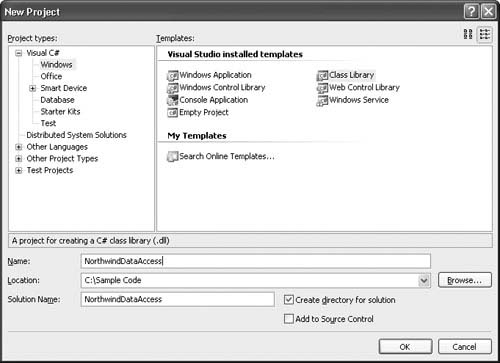
3. Right-click on the NorthwindDataAccess project in Solution Explorer and select Add > New Item from the pop-up menu. Select the DataSet item in the Add New Item dialog as shown in Figure 2.3.
4. Name the data set CustomersDataSet and click the Add button. This adds a CustomersDataSet.xsd file to your project and opens the data set designer with a blank canvas.
5. You can manually add items to a data set definition by dragging and dropping components from the Toolbox to the design surface, in the same way you design Windows Forms using the Toolbox and the design surface for a form. But one of the more powerful aspects of the data set designer is its ability to create data set table definitions by dragging items from a database onto the design surface from the Server Explorer window.
To see this in action, open the Server Explorer window (View > Server Explorer), and create a new data connection to the Northwind database if you don’t already have one. If you stepped through the example in Chapter 1, you already have a data connection for Northwind and you can skip to step 9 below. If you still need to add the data connection, right-click on the Data Connections node in the Server Explorer tree and select Add Connection from the context menu.
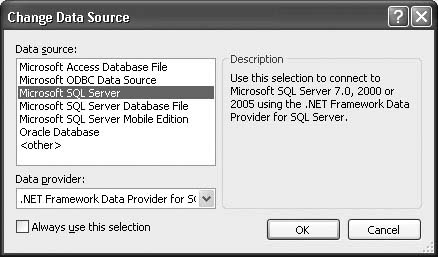
The first time you do this, the Change Data Source dialog displays (see Figure 2.4). You can select the data source that you want to use for this connection in this dialog. The entries in the list are self-explanatory, and the combo box at the bottom lets you select from the available providers for that kind of data source. For SQL Server, the .NET Framework Data Provider for SQL Server should be selected by default, which is what you want. If you are working with SQL Server 2005 Express, select the Microsoft SQL Server Database File option at the top.
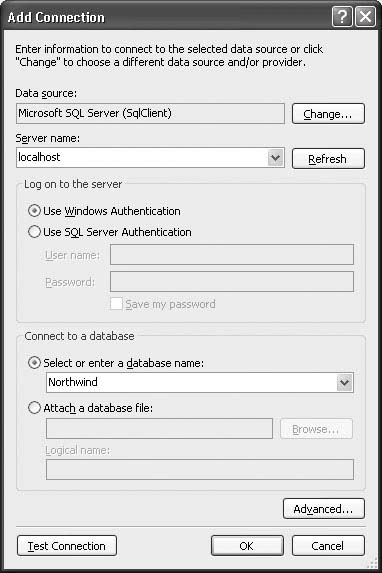
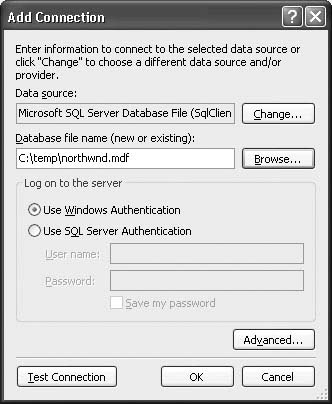
6. After selecting the data source (or if you have added other data connections before), the Add Connection dialog displays if you are using SQL Server 2000 or 2005 (see Figure 2.5), or the dialog shown in Figure 2.6 displays for SQL Server 2005 Express.
7. Do one of the following:
– For SQL Server 2000 or 2005, enter localhost for the server name to use the local machine’s default instance of SQL Server (or whatever server name makes sense for your development environment), and enter Northwind as the database name at the bottom.
– For SQL Server 2005 Express, enter the file path to the MDF file containing the Northwind database.
8. Select Use Windows Authentication for the logon information. Click OK.
9. Now that you have set up the data connection, expand the Northwind node that you added under Data Connections and expand the Tables node to see all the tables that are defined in the Northwind database.
10. Click and drag the Customers table onto the design surface. This creates a table definition that corresponds to the Customers table in the database (see Figure 2.7).
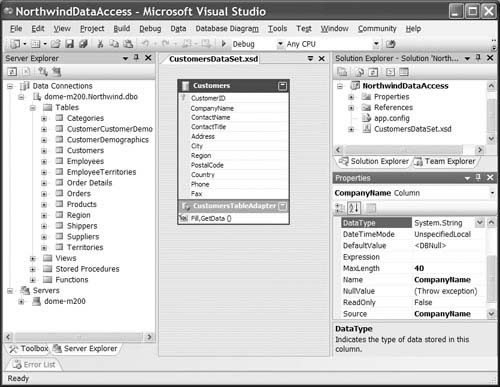
If you select any of the columns in the table definition in the data set designer and then look in the Properties window (in the bottom left in Figure 2.7), you will see that they are specified in terms of .NET types, not database types. The designer makes the translation between the database schema definitions of the columns and the corresponding types in .NET when you drag the table.
Also notice the Name and Source properties on a selected column in the data table as shown in Figure 2.7. The Name and Source properties (described earlier in this chapter) can be used to decouple the code property names from the database column names. There is also a Caption property not shown in Figure 2.7 that is used when a control is created by Visual Studio for data binding to that column.
Also notice that dragging the Customers table onto the design surface created a primary key in the data table definition for the CustomerID column. When the designer retrieves the schema information from the database to create the table and its columns, it also obtains the constraints from the database and adds those to the table definition as well.
You’ll also see something attached to the bottom of the table definition that is labeled CustomersTableAdapter (in the center of Figure 2.7). This will be discussed later in this chapter, but for now it’s enough to know that in addition to retrieving all the schema information when you drag a table out from Server Explorer, the data set designer also creates a table adapter class that lets you fill and update that table definition from the database with very little or no code.
Now let’s add a couple more tables to the data set.
1. Drag the Orders and Order Details tables from Server Explorer onto the design surface. You should see something like Figure 2.8.
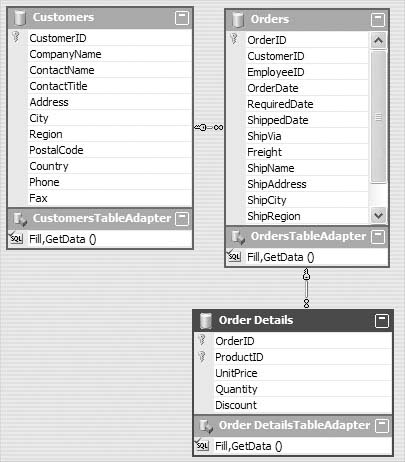
Notice that in addition to defining the data tables, Visual Studio 2005 also defined the data relations that correspond to the foreign key constraints between those tables in the database. This is a big improvement over Visual Studio .NET 2003, in which you had to create the relations for any multitable data sets yourself. It also generates table adapters for each table, as was done for the Customers table when it was added.
2. Once you have created a DataTable definition in your data set, you can also add additional columns to it if desired. For example, to add a column to the Order Details table that was named Total and contained the computation of UnitPrice * Quantity * (1- Discount), right-click on the table in the designer and select Add > Column.
3. Once the column has been added, set the Name property to Total, and set the Expression property to the expression in step 2 involving UnitPrice, Quantity, and Discount. Now when the data table gets filled, it will automatically compute that column’s contents based on the expression.
Tip: Check the Visual Studio Help documentation to learn what constitutes a valid expression, because the DataColumn class supports a fairly complex syntax for computed column expressions.
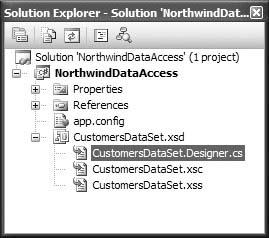
Whenever you save your data set definition in the designer, a code generation tool runs to define a set of strongly typed classes behind the scenes. These classes correspond to the data set schema elements that you specify with the designer. Like the Windows Forms designer, this code is placed in files with .Designer.cs (or .Designer.vb for a VB project) extensions, and the file is shown in Solution Explorer as a child of the XSD file. Two other designer support files are also generated (with extensions of XSC and XSS). When you look at your typed data set definition in Solution Explorer, you should see something like Figure 2.9.
If you open the CustomersDataSet.Designer.cs file, you will see that a whole ton of code has been generated for you (over a thousand lines of code per table in the data set). Scrolling through there and trying to make sense of it will be a little overwhelming at first, but Listing 2.3 highlights the most important parts, and you will get experience working with the rest of it throughout the book. Listing 2.3 shows a highly condensed version of the file with comments added for clarification.
LISTING 2.3: Typed DataSet Designer-Generated Code Sample
public partial class CustomersDataSet : System.Data.DataSet {
private CustomersDataTable tableCustomers;
private OrdersDataTable tableOrders;
private System.Data.DataRelation relationFK_Orders_Customers;
// Strongly typed table access
public CustomersDataTable Customers {
get {
return this.tableCustomers;
}
}
public OrdersDataTable Orders {
get {
return this.tableOrders;
}
}
// ...
// Nested typed DataTable definition
public partial class CustomersDataTable : System.Data.DataTable,
System.Collections.IEnumerable {
// Strongly typed indexer for accessing rows
public CustomersRow this[int index] { ... }
// ...
}
// Strongly typed DataRow definition
public partial class CustomersRow : System.Data.DataRow
{
// Strongly typed properties for each column in the row
public string CustomerID { ... }
public string CompanyName { ... }
// Strongly typed accessor methods for obtaining child rows
public OrdersRow[ ] GetOrdersRows() { ... }
// ...
}
public partial class OrdersRow : System.Data.DataRow
{
// ...
// Strongly typed properties for obtaining parent row
public CustomersRow CustomersRow { ... }
// ...
}
}
There are a number of things to note about the code in Listing 2.3. First, as described earlier, the typed data set class itself is just a derived class from the DataSet base class. The class definition uses the new partial classes feature that was introduced in .NET 2.0, which allows a class definition to span more than one file. Using partial classes lets you supplement the code in the typed data set with validation or business logic in a separate file in your project, and that file will be unaffected if you have to regenerate your typed data set definition. This was a big problem for many people in .NET 1.X; if they wanted to change the data set definition, they would lose those changes any time code generation was run, and this happened every time they saved the XSD file from which the code was generated.
Next you will notice that there are public properties at the data set level for each table contained within the data set, declared of a strongly typed class specific to that table. If there are relations defined between the tables, those show up as members as well; these can be accessed by name through the Relations property on the data set.
You can see that the skeleton of the CustomersDataTable definition toward the bottom of the listing uses inheritance as well to derive from DataTable. Within the table class (along with a lot of other members not shown) is a strongly typed indexer into the rows collection of that table. Using that indexer, whenever you index into a given row number, you get back a reference of type CustomersRow. CustomersRow is itself a derived class from DataRow, which is also defined as a nested class inside the data set class. Using a CustomersRow reference, you then get strongly typed access to each of the columns in the row based on the Name property you set for the column in the data set definition (as described earlier in the discussion about Figure 2.7). Both the CustomersDataTable and CustomersRow type definitions are nested classes within the CustomersDataSet class. This means that to create a variable of that type in your code, you have to specify the outer class as well, in the form CustomersDataSet.CustomersRow as seen in Listing 2.2.
Beyond what is shown here, a lot more code is generated to support the public-facing members of the classes. Each class has a lot of initialization code that runs at construction time; this code sets up the underlying schema of the data set to contain the expected data tables, columns, relations, constraints, and so on. The initialization code also sets up some code to optimize the speed of accessing each individual column within the data set when accessed through the strongly typed properties. I encourage you to spend some time browsing through the typed data set code to get a sense of what is defined in there. The way you normally use typed data sets means that code is all just a black box to you, but it’s a good idea to know how black boxes work if you really want to know how your program works and to be able to understand problems when your program doesn’t work as expected. It may also come in handy when you are misusing the black box, and the debugger stops on a line of code inside the data set definition code where things are blowing up.
As you saw at the bottom of the table definition in Figure 2.7, there was something attached in the designer labeled CustomersTableAdapter that contains two displayed methods named Fill and GetData. This additional class that gets generated for each table in your typed data set is called a table adapter.
The table adapter, new in .NET 2.0, greatly enhances the experience of working with typed data sets. As discussed earlier in this chapter, prior to .NET 2.0, when you wanted to fill a data set or push updates back to the data source from the data set, you had to use a data adapter. This meant you had to make sure the commands for that adapter got created correctly to fill the columns appropriately and push changes back. It also meant that you had to construct separate adapters or change those commands programmatically if you wanted to use the same data set with different SELECT queries to fill it. In addition, you had to be careful to make sure that the data from the queries you defined got placed in the appropriate table within the typed data set. In other words, working with data adapters leaves a lot to be desired. Basically, you were left to your own devices to write a lot of code to create a consistent and well-designed data access layer that could work with your typed data sets.
Table adapters are designed to address most, if not all, of the common problems people experienced working with data adapters and strongly typed data sets, and they can save you considerable coding for managing your data through typed data sets. A table adapter gives you a prefabricated data access component for managing data from an individual table in your data source. When you drag a table from Server Explorer onto the data set designer surface, or when the typed data set is generated through the Data Source Configuration wizard (which is discussed in a later chapter), the table adapter class is generated along with the data set, data table, and data row classes in the designer-generated file. SELECT, INSERT, UPDATE, and DELETE queries are generated for the table and wrapped in command objects within the table adapter so that you can execute those queries through the table adapter’s public methods. The table adapter also encapsulates a data adapter; the table adapter associates the command objects with that data adapter to work with the corresponding data table type to fill and update the database through the table adapter. All these details are hidden from you unless you go looking for them—you can just focus on the public methods that the table adapter exposes which let you execute queries on the corresponding table.
Listing 2.4 shows a trimmed-down version of the designer-generated code for a table adapter for the Customers table in Northwind. Some of the private members have been removed and the type names cleaned up to make it clear what is going on. The first thing you will notice is that the table adapter class is defined in a child namespace of the project namespace in which you create the typed data set. The project name is NorthwindDataAccess, and a child namespace, NorthwindDataAccess.CustomersDataSetTableAdapters, is declared and is where the table adapter classes are defined. The table adapter class is derived from the Component base class from the System.ComponentModel namespace by default. If you wanted to derive from a different base class, you could change the BaseClass designer property when that table adapter is selected in the data set designer in Visual Studio.
You can see from the private members depicted that the table adapter simply contains a data adapter, a connection, and an array of command objects that will be used to execute the queries represented by the table adapter methods. The public API exposed by the class includes type-safe Fill, GetData, and Update methods that will only work correctly with a CustomersDataSet.CustomersDataTable strongly typed table. There are also two Update methods defined; these let you work with untyped DataRow objects to support more dynamic situations, such as when you use the Select method to only get certain rows and want to use them for updates. The Select method returns an array of DataRow objects. This provides Update methods that accept a raw DataRow array, so you don’t have to cast them to the specific DataRow derived class that is defined in the typed data set just to pass them to the Update method of the table adapter.
The table adapter class also exposes Insert, Update, and Delete methods that take individual parameters for each column, rather than a data row. These methods let you use a table adapter as a data access component even when you aren’t working with an instance of a typed data set or data table. You can get the values used to execute the underlying query from wherever you need to within your application and then pass their values to these methods. Notice that the parameter list for the Update method includes both the values that will be used for the update as well as the original value of the corresponding columns. This is because the default queries generated for commands executed by the table adapter use the default designer optimistic concurrency checks. Specifically, they check the current value of every column in the database against the original values to see if any changes have been made since the data was retrieved, and if so, they will throw a DbConcurrencyException. If you don’t want to use this approach to optimistic concurrency, you can generate custom queries on the table adapter as described later in this chapter to do something different, such as only checking a single timestamp or datetime column.
LISTING 2.4: Table Adapter Designer-Generated Code
namespace NorthwindDataAccess.CustomersDataSetTableAdapters {
public partial class CustomersTableAdapter : Component {
private SqlDataAdapter _adapter;
private SqlConnection _connection;
private SqlCommand[ ] _commandCollection;
// Some other internal initialization
internal SqlConnection Connection { get{...} set{...} }
public virtual int Fill(CustomersDataSet.CustomersDataTable
dataTable) {...}
public virtual CustomersDataSet.CustomersDataTable GetData()
{...}
public virtual int Update(CustomersDataSet.CustomersDataTable
dataTable) { ... }
public virtual int Update(CustomersDataSet dataSet) {...}
public virtual int Update(DataRow dataRow) {...}
public virtual int Update(DataRow[ ] dataRows) {...}
public virtual int Delete(string Original_CustomerID,
string Original_CompanyName, string Original_ContactName,
string Original_ContactTitle, string Original_Address,
string Original_City, string Original_Region,
string Original_PostalCode, string Original_Country,
string Original_Phone, string Original_Fax) { ... }
public virtual int Insert(string CustomerID,
string CompanyName, string ContactName, string ContactTitle,
string Address, string City, string Region,
string PostalCode, string Country, string Phone, string Fax)
{...}
public virtual int Update(string CustomerID,
string CompanyName, string ContactName, string ContactTitle,
string Address, string City, string Region,
string PostalCode, string Country, string Phone, string Fax,
string Original_CustomerID, string Original_CompanyName,
string Original_ContactName, string Original_ContactTitle,
string Original_Address, string Original_City,
string Original_Region, string Original_PostalCode,
string Original_Country, string Original_Phone,
string Original_Fax) {...}
}
}
Also notice that the class is marked as a partial class, just like the typed data set was. This lets you extend the class’ functionality in a separate source file that won’t be affected if the table adapter code is regenerated by the designer due to changes. We will use this fact in a little bit to add a helper method to the CustomersTableAdapter class so that you can control the transactions used during queries.
Once you have created a typed data set and its associated table adapter using the data set designer, you can easily fill the data set from the data source from which the data set definition was created. Listing 2.5 shows how easy coding with typed data sets and table adapters can be.
LISTING 2.5: Using a Table Adapter to Fill and Update a Data Set
partial class Form1 : Form
{
CustomersTableAdapter m_Adapter = new CustomersTableAdapter();
CustomersDataSet m_Customers = new CustomersDataSet();
public Form1()
{
InitializeComponent();
}
private void OnFill(object sender, EventArgs e)
{
m_Adapter.Fill(m_Customers.Customers);
m_Grid.DataSource = m_Customers.Customers;
}
private void OnUpdate(object sender, EventArgs e)
{
m_Adapter.Update(m_Customers.Customers);
}
}
The code in Listing 2.5 comes from a simple Windows Forms client application. The form has two buttons on it, labeled Fill and Update, and a DataGridView control named m_Grid. The form class declares and initializes two member variables at the top, one for the typed data set instance and one for the table adapter.
The OnFill and OnUpdate methods are the button click event handlers for the form, and you can see that filling the data set is a simple matter of calling Fill on the adapter and passing in the specific table in the typed data set you want to fill. Because the parameter to the Fill method only accepts a CustomersDataTable type in a CustomersDataSet, you would get a compiler error if you tried to pass in any other type, including an untyped data set or data table. This helps to ensure that the Object you are trying to fill already has the correct schema for the data that will be returned by the SELECT query that is encapsulated in the table adapter. In the past, the developer had to ensure that the data set schema was aligned with the queries set on a data adapter; this was one of the most common places that mistakes occurred when filling data sets. By taking this strongly typed approach to table adapters, that problem is eliminated. So in Listing 2.5, Fill is passed the Customers property on the data set instance, which is a reference to the CustomersDataTable contained in the CustomersDataSet.
After the data set has been filled, it is data bound to the grid control using the grid’s DataSource property. (I go into a lot more detail on the DataGridView control and data binding in later chapters.) In the OnUpdate method, any changes that were made in the data set are pushed back into the underlying data source through the table adapter’s Update method, which again accepts a strongly typed CustomersDataTable reference.
The table adapters that the designer generates contain code to initialize the connection to the database. By default, when you drag a table onto the data set designer surface from Server Explorer, an app.config configuration file is added to your project. The connection string to the database you are working with is added to the connectionStrings configuration section in that configuration file:
<connectionStrings>
<add name="NorthwindDataAccess.Properties.Settings.
NorthwindConnectionString"
connectionString="Data Source=localhost;Initial
Catalog=Northwind;Integrated Security=True"
providerName="System.Data.SqlClient" />
</connectionStrings>
The connectionStrings section is a new part of the configuration file schema for .NET 2.0. The add element that you place under it adds a connection string that will be accessible in the project through a strongly typed Settings class. The add tag contains a name attribute that basically specifies a path to a property on a class that will contain the connection string at runtime. In this case, that is the NorthwindConnectionString property on the Settings class in the Properties child namespace within the NorthwindDataAccess project. The add element also contains a connectionString attribute that specifies the connection string that this entry corresponds to. Finally, the providerName attribute specifies the data access provider that the connection string corresponds to.
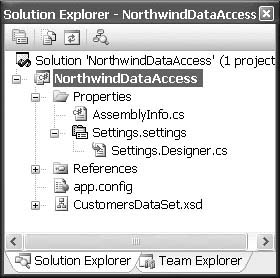
The Settings class that is specified in the connection string configuration setting is also created when you first drag a database Object onto the data set designer. Visual Studio adds the class and defines the Settings.Designer.cs file under the Properties node in Solution Explorer, as shown in Figure 2.10.
The Settings class contains strongly typed properties to programmatically access the settings in your configuration files. The connection string that is set when you create your table adapters in the designer is also hard coded as a default into that Settings class, so if the corresponding setting cannot be found in the application configuration file, it at least has the original value of the connection string that it can try to use.
The table adapter generated with your typed data set uses this Settings class to obtain the connection string when the table adapter initializes the connection object that is encapsulated in it:
private void InitConnection() {
this._connection = new System.Data.SqlClient.SqlConnection();
this._connection.ConnectionString =
NorthwindDataAccess.Properties.Settings.
Default.NorthwindConnectionString;
}
The Default static property on the Settings class returns a singleton instance of the Settings class, through which the other properties, such as NorthwindConnectionString, can be used to get to the underlying configuration data.
Because the connection string information is embedded in the configuration file, and the table adapter calls through the Settings class to get the connection string out of the configuration file, if you need to change the target database in your application, you just have to change the connection string information in the application’s configuration file.
At runtime in .NET, configuration files need to be named according to a particular convention and placed in the runtime folder on the application. For a Windows Forms application, the configuration file assumes the name of the executable file with a .config extension, such as MyDataApp.exe.config. For development in Visual Studio, a file named app.config is added to your project; this lets you set the configuration settings as part of your project. When you build a Windows Forms project that contains an app.config file, that file will be copied into the build output folder and renamed using the convention for the output executable file name.
If you place your data access code, including typed data set definitions, in a separate data access class library (as you always should for a good layered-application architecture), an app.config file will still be added to the project. This will contain the connection strings for your table adapters, and the Settings class in that project will contain a connection string property to access it. However, the app.config file won’t be copied to the build output folder for the class library, because configuration files can only be associated with executable files in a Windows application. If you then set a reference to that class library from a Windows Forms project and call the table adapter methods from your application code, the table adapter connections will use the connection string information that was hard coded as a default into the Settings class in the data access class library project.
If you want to change the connection information used in your application, you need to add the connection string information to the application configuration file for the Windows Forms application. The easiest way to do this is to copy the app.config file from the data access layer project into the Windows Forms project if there isn’t already one there. If there is already an app.config file in the Windows Forms project, then you can simply copy the connectionStrings section from the app.config file in the data access layer project into the app.config file in the Windows Forms project that will be using the data access layer. Then any changes you make to the connectionStrings configuration section in the Windows Forms project will be used by the table adapters in the data access layer code, because it will be loaded through the Settings class in the data access layer.
If you want additional programmatic control of the connection at runtime, you have to add some code to the assembly where the typed data set definition resides. In Listing 2.4, an internal property exposed on the table adapter, named Connection, gives you access to set or get the SqlConnection object that is being used by the table adapter. If you add code to the project containing the typed data set that accesses that property, you can dynamically set or modify the connection object. There are two ways you could do this: in a separate helper class, or you could define your own partial class file for the table adapter class and add a method or a property with a different name to expose the underlying private member variable that holds the connection. You’ll see an example of extending the partial class of the table adapter in the section on supporting transactions.
If you want to expose connection management on a table adapter by adding a separate class to the assembly, you can do it using a simple class like the following:
using System.Data.SqlClient;
using NorthwindDataAccess.CustomersDataSetTableAdapters;
namespace NorthwindDataAccess
{
public class CustomersTableAdapterConnectionManager
{
public static SqlConnection GetConnection(
CustomersTableAdapter adapter)
{
return adapter.Connection;
}
public static void SetConnection(CustomersTableAdapter adapter,
SqlConnection connection)
{
adapter.Connection = connection;
}
}
}
The GetConnection and SetConnection static methods take a CustomersTableAdapter parameter that is used to access the members of the class. The SetConnection method also takes the SqlConnection object that you want to use to set the current connection for the adapter. Because the Connection property is declared as internal on the table adapter class, it can be accessed by the methods of other classes in the same assembly that include these helper class methods. So the helper class methods simply either get or set the connection through the table adapter reference, even though code external to the assembly could not do so. (I think they should have exposed the Connection property as public to avoid needing to do this, but the design choice was made to encapsulate it more rather than less; this requires you to write more code for the cases where you need to access it outside the assembly.)
If you want to execute multiple queries through a table adapter within the scope of a single transaction, you have a couple of options. You can use the TransactionScope class from the new System.Transactions namespace to execute the queries within a single transaction scope:
public void ExecuteTransaction(CustomersDataSet.CustomersDataTable
customers)
{
CustomersTableAdapter adapter = new CustomersTableAdapter();
// Start the transaction
using (TransactionScope scope = new TransactionScope())
{
// Save any changes currently in the data table
adapter.Update(customers) // First query
customers[0].Phone = "030-0074321"; // make a change
adapter.Update(customers); // Second query
scope.Complete(); // Commits the transaction
}
}
However, doing this may result in this using a distributed transaction, and depending on the design of your application, this may have a higher performance cost than using a direct database transaction.
If you want to manage a transaction directly against a table adapter, you can extend the table adapter class by adding your own partial class definition to the project with the same name as the table adapter you want to modify, and then add some code to allow a client to establish a transaction that will encompass any queries executed through the table adapter.
If you add a new class file to the NorthwindDataAccess class library project and add the code in Listing 2.6 to it, the CustomersTableAdapter class will be extended to add capabilities to the code that was generated by the typed data set designer.
LISTING 2.6: CustomersTableAdapter Partial Class Definition
using System;
using System.Data;
using System.Data.SqlClient;
namespace NorthwindDataAccess.CustomersDataSetTableAdapters
{
public partial class CustomersTableAdapter
{
public SqlTransaction BeginTransaction(SqlConnection connection)
{
if (connection.State != ConnectionState.Open)
{
throw new ArgumentException(
"Connection must be open to begin a transaction");
}
// Set the connection for all the contained commands
Connection = connection;
SqlTransaction transaction = connection.BeginTransaction();
foreach (SqlCommand cmd in _commandCollection)
{
if (cmd != null)
cmd.Transaction = transaction;
}
if ((Adapter.InsertCommand != null))
{ Adapter.InsertCommand.Transaction = transaction;
}
if ((Adapter.DeleteCommand != null))
{
Adapter.DeleteCommand.Transaction = transaction;
}
if ((Adapter.UpdateCommand != null))
{
Adapter.UpdateCommand.Transaction = transaction;
}
if ((Adapter.SelectCommand != null))
{
Adapter.SelectCommand.Transaction = transaction;
}
return transaction;
}
}
}
The code in Listing 2.6 performs the following steps.
1. It verifies that the connection is open, and throws an exception if the connection isn’t open.
2. It sets the Connection property for the table adapter to that connection, which will set that connection for all the contained command objects in the designer-generated code.
3. The code loops through all the commands in the _commandCollection array, which is part of the designer-generated portion of the table adapter partial class. These commands are used for custom queries that have been added to the table adapter.
4. It checks and sets each of the commands held by the contained data adapter. These are the primary commands used for filling and updating from the corresponding table.
The BeginTransaction method lets you use this table adapter much like you work with transactions against the raw ADO.NET classes. When you work directly with database transactions in ADO.NET, you first have to:
1. Open a connection.
2. Call BeginTransaction on the connection.
3. Take the transaction object returned from that call and set it against each command that you want to execute as part of the transaction.
4. Finally, when you are done with the transaction, you call Commit on the transaction object itself.
The BeginTransaction method in the partial class extension to CustomersDataSet lets you follow a similar coding pattern when working with the table adapter. It allows you to pass in the connection that you’ll be using to execute the queries, and it will start a transaction. It sets the Transaction property of all the commands encapsulated in the table adapter using the transaction returned from the call to BeginTransaction on the connection, and then returns it to the caller so that the calling code can call Commit or Rollback on that transaction object.
The following code shows a client that wants to use the table adapter to get back the contents of the Customers table, modify the first record in the table, and submit the change back to the database, all as part of a transaction.
public void ExecuteTransactionRetrieveAndUpdate()
{
CustomersTableAdapter adapter = new CustomersTableAdapter();
SqlConnection connection =
new SqlConnection(Settings.Default.ConnectionString);
using (connection)
{
connection.Open();
SqlTransaction transaction =
adapter.BeginTransaction(connection);
CustomersDataSet.CustomersDataTable customers =
adapter.GetData();
customers[0].Phone = "030-0074321";
adapter.Update(customers);
transaction.Commit();
}
}
As you can see, this code follows a similar pattern to the way you write transactional code with just the ADO.NET connection and command classes. First it opens a connection, and then it calls BeginTransaction. In this case, BeginTransaction is called against the table adapter instead of the connection using the table adapter extension method, which takes the connection as a parameter and returns the SqlTransaction object that is created. Once the transaction has been started, any number of query methods can be called on the table adapter instance, and they will all be enlisted in the database transaction that was started with the BeginTransaction call. When the code is ready to commit the transaction, Commit is called directly on the SqlTransaction object returned by the call to BeginTransaction.
At this point, we have a data access layer class library with type definitions for a CustomersDataSet, which can contain Customers, Orders, and Order_Details table data and maintain the relations between those tables. We also have a table adapter for each table that lets us individually Fill and Update the tables in the data set. The designer wrote all of that code for us. We extended the table adapter for Customers to allow transactional updates, and we added a helper class that allows us to externally get or set the connection used by an instance of a CustomersTableAdapter.
What more could you possibly need? Well, in this case we have three tables in the data set that are related in a hierarchical manner. Orders is a child table for Customers, and Order_Details is a child table for Orders. In many situations, you will likely want to have all three tables populated at once, and it’s a pain for a client to have to create three table adapter instances and make sure they fill them in the right order to ensure that they don’t violate foreign key constraints. To avoid this, you can add some code to the data access layer to provide convenience methods to populate the whole data set in one simple method call. You could put this code in a couple of places. I am going to do it as a factory method on the CustomersDataSet class itself by adding to the partial class definition for that class.
If you add a new class file to the project and name it CustomersDataSet.cs, you can add the following partial class extension to the typed data set class:
using System;
using System.Data;
using NorthwindDataAccess.CustomersDataSetTableAdapters;
namespace NorthwindDataAccess
{
public partial class CustomersDataSet : DataSet
{
public static CustomersDataSet GetCustomers()
{
CustomersTableAdapter custAdapter =
new CustomersTableAdapter();
OrdersTableAdapter orderAdapter = new OrdersTableAdapter();
Order_DetailsTableAdapter detailsAdapter =
new Order_DetailsTableAdapter();
CustomersDataSet customers = new CustomersDataSet();
custAdapter.Fill(customers.Customers);
orderAdapter.Fill(customers.Orders);
detailsAdapter.Fill(customers.Order_Details);
return customers;
}
}
}
The GetCustomers static factory method is pretty straightforward in implementation. It simply creates an instance of each of the table adapters for the contained tables in the data set and uses them to fill the tables in the proper order to avoid foreign key constraint violations within the data set. This allows client code to simply call the factory method on the class to get back a fully populated instance of the data set to work with:
CustomersDataSet customers = CustomersDataSet.GetCustomers();
Updating a nested data set like this gets a little complicated, because you have to worry about performing the inserts, deletes, and updates to the database in the correct order so you won’t violate constraints. Encapsulating the details of that in a helper method would be a good idea and will depend on the scenarios in which you are going to use master-details data sets for performing updates.
Using stored procedures for all data access against a database has a number of advantages.
• It promotes looser coupling between the data access layer and the explicit schema of the database, because certain kinds of changes can be made to the underlying table schema, and the client code won’t have to change if the signature of the stored procedure didn’t change.
• Stored procedures improve your ability to secure the database to stored procedure-only access, which prevents clients from directly accessing tables and potentially violating data contracts through that access.
• You may benefit from improved execution performance in many scenarios.
You can also use views to expose logical tables of data that map to more complex schemas at the database level.
You can easily base your strongly typed data sets and table adapters on either stored procedures or views as well. If the stored procedure returns a result set (some combination of rows and columns), you can use that result set’s schema to create a strongly typed data set that contains that schema and a table adapter capable of loading the rows returned from the stored procedure into the data set. If the stored procedure takes in parameters to perform an update, insert, or delete, but doesn’t return any rows, it can also be used to configure the corresponding command on a table adapter to update the database from a data set. And finally, because a database view simply returns rows with a defined schema, it too can be used to fill a typed data set that matches the schema.
The method for using either stored procedures or views with typed data sets in the data set designer is very similar to what you have already seen with direct table access. Dragging a database view onto the data set designer surface gives you a strongly typed data table definition based on the schema of the rows that the view returns. It will also have a table adapter created to populate the data set from the database. However, because the views of data in underlying tables in the database are read-only in the general case, the created table adapter’s insert, update, and delete commands are set to null, so you can only use the table adapter to fill or retrieve a data set. You will have to use some other means to perform updates.
When you drag a stored procedure onto the data set designer surface, what you get depends on the kind of stored procedure. If the stored procedure returns rows, then the schema of the first result set of rows that the stored procedure returns will be used to create a typed data table and corresponding table adapter for that schema, which only has its select command configured for filling the data set. If the stored procedure is one that doesn’t return a result set, then a QueriesTableAdapter class will be created with methods exposed for each stored procedure that you drag onto the surface.
What if you want to execute other queries besides just selecting all rows to fill the data set and pushing entire rows back to the database for insert, update, and delete against the table that you are working with in a table adapter? The following procedure shows an easy way to define additional methods on the table adapter to perform other queries on that data table definition.
1. From the data set designer, right-click on the table adapter compartment of a data table definition.
2. On the pop-up menu, choose one of the following:
– Select Add Query to start the TableAdapter Query Configuration wizard.
This wizard steps you through defining an additional database query that you want the table adapter to be able to execute. You can use the wizard to create a new query based on a SQL statement, create a new stored procedure, or select existing stored procedures. This wizard helps you add methods to the table adapter that allow you to perform specialized selections to fill the data set differently, or specialized insert, update, or delete commands to modify the database based on specific conditions.
– Select Configure to start the TableAdapter Configuration wizard.
This wizard is similar to the one used for Add Query, but it lets you configure the SELECT, INSERT, UPDATE, and DELETE behavior of the table adapter all at once.
Let’s step through a simple example to demonstrate how to use these wizards.
1. If you don’t currently have the CustomersDataSet from the NorthwindDataAccess class library you created at the beginning of the chapter open in the designer, open it now.
2. Right-click on the CustomersTableAdapter at the bottom of the Customers table definition and select Add Query. This displays the Choose a Command Type page of the TableAdapter Query Configuration wizard (see Figure 2.11).
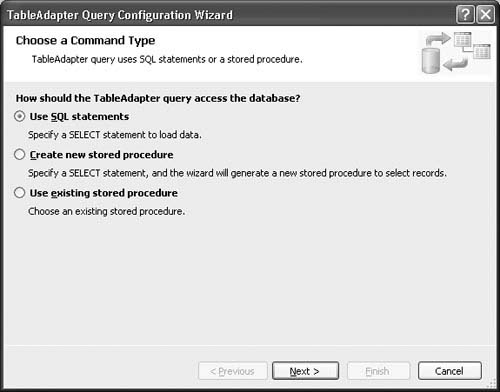
You can choose whether to base the query method you are adding on a new SQL statement, on a new stored procedure, or on an existing stored procedure that is already defined in the database. For this example, let’s define a new SQL statement.
3. After selecting or accepting the Use SQL statements option, click the Next button. This displays the Choose a Query Type page shown in Figure 2.12.
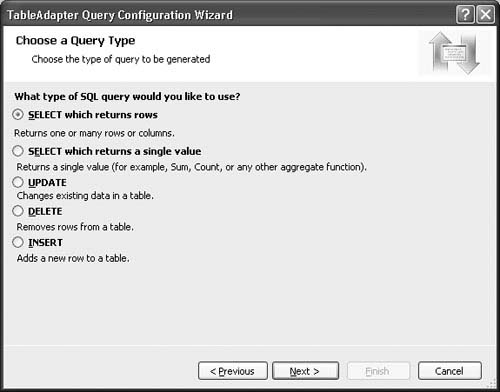
Here you can specify whether to add a query method to select rows into the data set (the default), select an individual value, or perform a delete, update, or insert. The last four options simply result in a new query method with a separate command object being added to the table adapter for performing the specified query against the underlying connection. They don’t affect the data set in any way; they just take in parameters and return a value.
SELECT returns a single result set—the result set that is returned is whatever the SELECT statement you specify returns. The DELETE, UPDATE, and INSERT statement options return an integer that represents the number of rows affected. The wizard will complain at the completion step if the query you provide is incompatible with the expected result of the query; for example, if you select the default option but then enter a query that doesn’t return a result set.
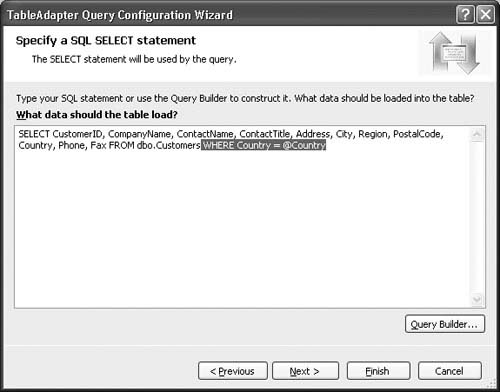
4. Click Next to accept the SELECT which returns rows option.
5. The next page lets you specify the exact query you’d like to add. Figure 2.13 shows the query that we are adding for this example, which is to perform a select on all columns with a WHERE clause that restricts the results based on a country parameter match against the Country column.
Using the Query Builder to Write a SQL Statement
There is a Query Builder that is similar to the one provided in Visual Studio .NET 2003 that you can access from the page in the wizard where you specify your SQL statement. This Query Builder lets you interactively specify the query you want to run and test it out. To use the Query Builder, follow these steps:
1. Click the Query Builder button (shown in Figure 2.13). Figure 2.14 shows the Query Builder in action.
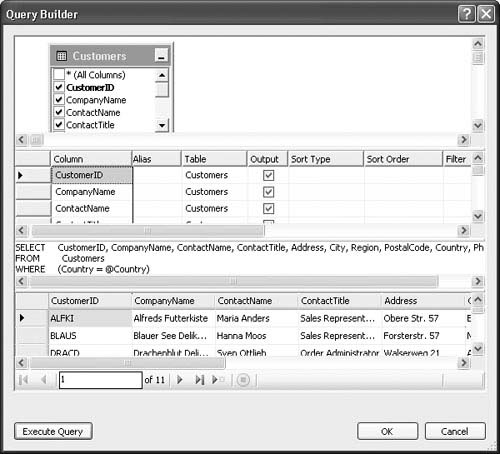
The Query Builder is a fairly complicated window. At the top is a diagram view pane; here you can add tables or remove them using the right-click pop-up menu. The Query Builder adapts its menus and what you are allowed to do depending on whether you entered it to build a SELECT, INSERT, UPDATE, or DELETE statement. For example, if you are building a SELECT statement, you can add multiple tables to build a JOIN query. However, if you are building an INSERT statement, only one table is allowed.
2. Once a table is displayed, check the boxes next to individual columns to include them in the query statement in the appropriate place based on the query type. Below the diagram pane is a grid pane—this lets you specify additional qualifiers for each selected column, such as default values and the direction of the parameter. Below the grid pane is the SQL statement itself, which dynamically changes based on your entries in the two panes above. You can also simply type the SQL text into that pane, and the other panes will update and the focus will change. At the bottom is a preview pane, where you can try to execute the query if it returns results to see what the results look like. You do this by clicking the Execute button.
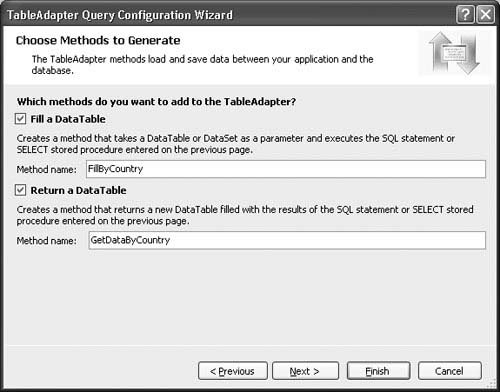
6. After you have determined the SQL statement for the query that you want to add, you specify the name(s) of the method(s) that will be added to the table adapter. If you chose a SELECT statement that will return rows, and therefore can be used to populate the typed data set associated with the table adapter, you can generate two methods: one to fill the data set based on the query, and another that will construct a new data table, fill it, and return it as a return parameter from the method. These methods will default to being selected for generation and will start with a naming convention of FillBy and GetBy, respectively.
7. Complete the method name with a meaningful addition based on the parameters that you are doing the select with. Figure 2.15 shows this step for the example, where we are performing a SELECT with a Country column WHERE restriction, so I named the methods FillByCountry and GetByCountry. If you are specifying one of the other types of queries that don’t fill the data set, you will be given a text box to specify a single method name for the query method that is generated. Click Next to move to the final step of the wizard.
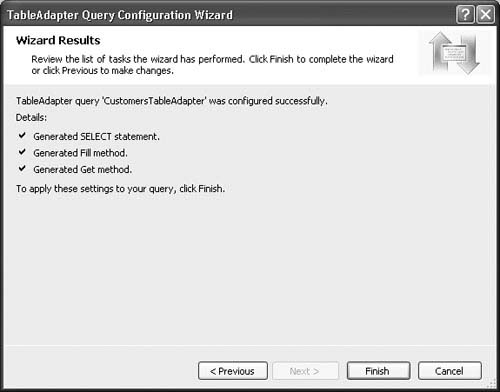
8. Assuming all went well and there were no errors, you will see a final feedback dialog (see Figure 2.16) that tells you what was done.
If you want to generate a new stored procedure and base the query method on that, the procedure is much the same as what was just covered for a SQL statement. You step through the wizard, and specify the SQL statement that the stored procedure should contain. The main difference is that when you complete the wizard, the stored procedure will also be created in the database that you are working with.
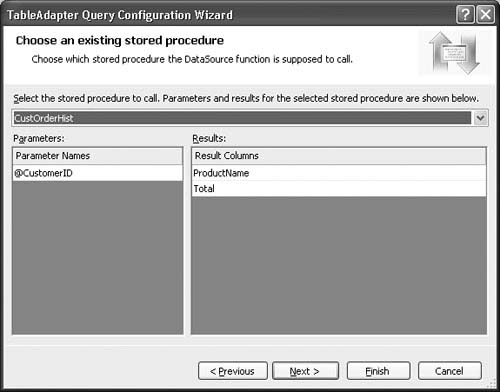
If you want to base your query method on an existing stored procedure, the wizard experience is a little different. Instead of the step shown in Figure 2.13 for specifying the SQL statement, the wizards displays the page shown in Figure 2.17 for choosing the stored procedure from the list of stored procedures in the database that you are connected to. Once you select a stored procedure, the dialog fills in and shows you what the parameters are and what result columns will be returned from the execution of that stored procedure.
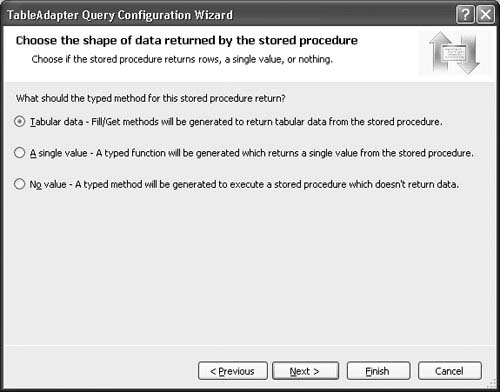
The next step in the wizard for a stored procedure is also a little different. It lets you specify the “shape,” or schema, of the data returned from the stored procedure (see Figure 2.18). This is because stored procedures might return result sets, even though their primary purpose is to perform an insert, update, or delete. For example, a stored procedure might perform a SELECT statement to see if a row exists before trying to delete it. Because of the embedded SELECT statement, to the wizard the stored procedure looks like it returns a result set. However, it doesn’t know if that result set is the intent of the stored procedure or just something that is generated as part of the execution of the stored procedure. So the wizard page shown in Figure 2.18 lets you choose whether the stored procedure returns rows, a single value, or no values.
As you can see, the data set designer, table adapters, and the Query wizard give you a great deal of power and flexibility to quickly generate a lot of data access code with just a few mouse clicks and drag-and-drop operations. For the simple example just covered with the Customers, Orders, and Order Details tables, the result is over 5,000 lines of generated code. And that is clean, well-factored code as well. With 5,000 fewer lines of tedious, error-prone data access code that you have to write, you can get on with implementing the specific logic and functionality of your application instead of writing a bunch of CRUD (Create-Retrieve-Update-Delete) methods in a data access layer. That fact, coupled with the type safety, IntelliSense, and clean design benefits of working with typed data sets, amounts to a huge win in my mind.
One other way to create typed data set definitions may make sense for some situations, but it means giving up some of the best features described so far. The command line tool XML Schema Support utility (xsd.exe) that comes with the .NET Framework SDK does a number of things, one of which is to let you run it against an XML Schema definition and generate a typed data set class definition from that schema. There are a number of limitations as to the shape of the schema provided—basically it has to be a schema that can be flattened into a relational schema within the data set definition that is generated.
The big limitation with the typed data set definition this tool generates is that the definition is just the data set definition itself—it doesn’t have any associated table adapters. Because you are working from the command line, there is no direct tie to a database and its schema, and it would require a complicated syntax to include all the information that you easily specify through drag-and-drop and wizard operations in Visual Studio. You will also have to get the XML schema you are basing it on from somewhere; there is no autogeneration of the schema based on a database as in the Visual Studio environment.
Even with its limitations, this is still a useful tool to be aware of: There may be times you’ll be building distributed applications that pass around data sets and you may not have direct access to the database that those data sets are going to be populated from. Or you may be specifically using typed data sets as simple but powerful business data entity definitions that are decoupled from the database schema by design. As long as someone can provide you with a schema that describes what the data sets will look like that you’ll be working with—or you can define one yourself—you can easily generate a strongly typed data set class with xsd.exe for working with that data. The tool also supports other capabilities, such as the conversion of XML Data Reduced (XDR) schemas to XML Schema Definition (XSD) schemas, as well as the generation of classes from a schema that are simple data transfer classes that aren’t related to data sets.
Because the typed data tables and rows in a data set definition are declared as nested types, they can become a little cumbersome when you are writing a lot of programmatic code against them. Needing the type name to be CustomersDataSet.CustomersRow for every row variable you declare, for example, can get a little hard to read, even though IntelliSense makes it fairly easy to type. In C# this is easy to address with the type aliasing capabilities of the using statement. For instance, to write some data access code to work with CustomersRow objects, you would first alias the full type name of that class with a using statement, and then declare your variables using the alias:
using System;
using NorthwindDataAccess.CustomersDataSetTableAdapters;
using CustomersRow =
NorthwindDataAccess.CustomersDataSet.CustomersRow;
namespace NorthwindDataAccess
{
class MyDataAccessComponent
{
public CustomersRow GetCustomer(string customerId)
{
CustomersTableAdapter adapter = new CustomersTableAdapter();
CustomersRow row = adapter.GetDataByCustomerID(customerId)[0];
return row;
}
}
}
This makes the code much more readable. The only downside to this approach is that the alias will have to be added to every individual source file where you want to use this shorthand notation. There is no clean and maintainable way to do this at a global scope level, because you would inevitably run into naming scope conflicts.
In this chapter you learned about the strong Visual Studio support for creating typed data set definitions, as well as data access code in the form of table adapters that work with those data set definitions and fill and update them from their data source. You saw that you can use the data set designer directly to create definitions of tables from Server Explorer, and that you can add new tables and columns manually from the designer Toolbox. You also learned that you can define additional queries that are exposed as methods on the table adapters, so that your table adapters can provide most of the data access functionality you need in a data access layer without having to write any code.
Some key takeaways from this chapter are:
• Favor using typed data sets when you know the data schema at design time.
• Place your data access code (including typed data sets) in a separate class library, not in your Windows Forms project, for a decoupled, layered architecture.
• Dragging tables, stored procedures, or views from Server Explorer onto the data set designer generates typed data table classes and corresponding table adapters. Those table adapters can be used for strongly typed retrieval and updating of data from the tables.
• Add queries to your table adapters through the designer’s Add Query context menu.
• Extend the partial classes created for data sets, table adapters, tables, or rows to add custom functionality that won’t be destroyed if you need to regenerate the data set definition.
Now that you are well armed to create and use typed data sets, you are ready to launch into the real meat of this book—data binding.