
You don’t care about video, never shoot movies, and wonder what all the fuss is about with live view? Get with the program! It’s true that shooting stills and video while viewing the exact image the sensor sees rather than looking through the viewfinder is quite a bit different from capturing stills. But there are significant advantages to shooting stills in Live View mode, especially when used in conjunction with the D500’s swiveling monitor to shoot macro photos of blooms best captured at foot-level rather than eye-level. And video capture can open up whole new worlds of creativity for you, even if movie making does require a slightly different skill set.
Live view and video are closely related, and use much of the same technology, so this chapter will introduce live view, giving you a foundation for Chapters 15 and 16, which will deal with movie making.
Introducing Live View
Live View is invoked by pressing the Lv button on the back of the camera, located next to the lower-right corner of the color LCD monitor. A switch around the button has still and movie camera icons, and can be rotated to change from Live View to Movie Shooting mode at any time (even when live view or movie capture is active).
When live view is invoked, the mirror flips up, blocking view through the optical viewfinder. The shutter opens, and the image being captured by the sensor is displayed on the swiveling color LCD monitor. Live view will continue until you press the Lv button a second time, or the camera begins to overheat (you’ll be given a 30-second warning). If you’re viewing your live view image on an external monitor through the HDMI connection, live view will halt if the cable is removed. Turning the camera off, and removing a lens or memory card will also deactivate the feature.
As I noted in Chapter 12, you can use Custom Setting f8 to define the action performed when you press the Lv button. When you choose Disable, live view is not activated, whether the Live View switch is in the Live View or Movie positions. Use this when you know you will not be using live view and want to avoid accidentally activating it. Select Enable, and pressing the Lv button always switches the D500 to Live View mode. I prefer Enable (standby timer active), which avoids most accidental live view episodes, but allows me to switch to that mode by tapping the shutter release or pressing a multi selector button if I’ve chosen Restart Standby Timer in Custom Setting f5.
In live view you can frame your image, focus manually, fine-tune the camera’s autofocus, use the touch screen to specify a focus spot and take a picture, as well as perform some other useful functions. For example, if Touch Controls are enabled, you can set the camera’s white balance to PRE, depress the WB button, and then touch the screen at the point where you want to measure the current white balance. A useful split-screen display zoom shows side-by-side magnified images from the left and right sides of the image.
Nailing the correct exposure is simplified, too; you can evaluate a live histogram rather than wait until after the picture is taken to check histograms during image review. An optional exposure scale can be overlaid on the right side of the screen, too.
Electronic flash can be used in live view (but not while movie shooting), although the mirror will flip back down temporarily, blacking out the LCD image, so the D500’s 180,000-pixel RGB exposure system can read and interpret the monitor preflash before the main burst. Continuous shooting is possible, too, and in most cases is even quieter—but the live view image is quenched during the burst, so you’ll be shooting blind. You can access Playback review and most menu functions (except Photo Shooting menu banks) during live view.
A key difference between using the optical viewfinder and working in live view is how the D500 handles focus, so I’m going to explain that first. What you learned in Chapter 5 about the difference between phase detection and contrast detection autofocus will come in handy here.
Focusing in Live View
When you’re not using the optical viewfinder, and instead using the D500’s Live View mode on the back-panel color LCD, available focus modes differ slightly. Instead of using phase detection autofocus (or the human eye’s contrast detection system when focusing manually), the D500 puts contrast detection to work full-time. The camera evaluates the focus of the image as seen by the sensor, and makes adjustments from there.
Focus Mode
Activate live view for still or movie mode by rotating the Lv switch to either Still or Movie modes, and then pressing the Lv button on the back of the D500. You can adjust the focus mode by pressing the focus mode button and rotating the main command dial. The available modes differ slightly from those possible when not shooting in live view, and your selection will appear at the top of the live view screen (highlighted in yellow when initially set):
- AF-S. This single autofocus mode, which Nikon calls single-servo AF, locks focus when the shutter release is pressed halfway. This mode uses focus-priority; the shutter can be fully released to take a picture only if the D500 is able to achieve sharp focus.
- AF-F. This mode is roughly the equivalent of AF-C. Nikon calls it full-time servo AF. The D500 focuses and refocuses continually as you shoot stills or record movies. Unlike AF-C, this mode also uses focus-priority. You can’t release the shutter unless the camera has achieved sharp focus.
Focus Area
With the AF-mode mode button depressed, you can also choose the D500’s AF-area mode for live view by rotating the sub-command dial. Your choices are as follows:
- Face-priority AF. The camera automatically detects faces, and focuses on subjects facing the camera, as when you’re shooting a portrait. This differs from the face-detection mode available when using the optical viewfinder, which uses facial features and color as one of the factors in determining correct focus. With live view’s Face-priority AF, the D500 really does assign finding faces and autofocusing on them its number-one priority.
You can’t select the focus zone yourself. Instead, a double yellow border will be displayed on the LCD when the camera detects a face. You don’t need to press the shutter release to activate this behavior. (Up to five faces may be detected; the D500 focuses on the face that is closest to the camera.) When you press down the shutter release halfway, the camera attempts to focus the face. As sharp focus is achieved, the border turns green (see Figure 14.1). If the camera is unable to focus, the border blinks red. Focus may also be lost if the subject turns away from the camera and is no longer detectable by Face-priority.
- Wide-area AF. This is the mode to use for non-portrait subjects, such as landscapes, as you can select the focus zone to be used manually. It’s good for shooting hand-held, because the subjects may change as you reframe the image with a hand-held camera, and the wide-area zones are forgiving of these changes. The focus zone will be outlined in red. You can move the focus zone around the screen with the multi selector buttons. When sharp focus is achieved, the focus zone box will turn green. (See Figure 14.2.)
- Normal-area AF. This mode uses smaller focus zones, and so is best suited for tripod-mounted images where the camera is held fairly steady. As with Wide-area AF, the focus zone will be outlined in red. You can move the focus zone around the screen with the multi selector buttons. When sharp focus is achieved, the focus zone box will turn green. (See Figure 14.3.)
- Subject-tracking AF. This mode allows the camera to “grab” a subject, focus, and then follow the subject as it moves within the frame. You can use this mode for subjects that don’t remain stationary, such as small children. When using Subject-tracking AF, a white border appears in the center of the frame, and turns yellow when focus is locked in (as described in the section that follows). To activate focus or refocus, press the multi selector up button. I’ll explain Subject-tracking in more detail next. (See Figure 14.4.)
- Manual focus. In this non-automatic focus mode, which you have to select by setting the focus mode switch on the camera to M (or the equivalent control on your lens), you can select the focus zone to use with the multi selector buttons, press the shutter release halfway, and then adjust focus manually by rotating the focus ring on the lens.
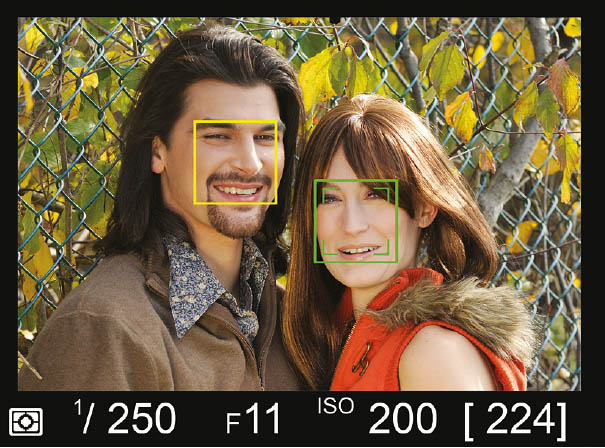
Figure 14.1 Face-priority AF attempts to focus on the face that’s closest to the camera.

Figure 14.2 Wide-area AF is best for subjects with large elements.
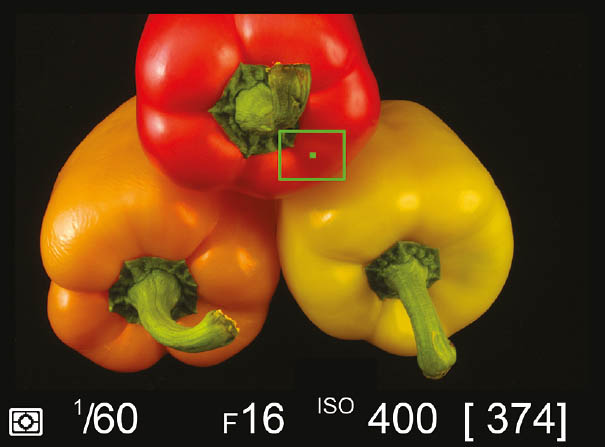
Figure 14.3 Normal-area AF allows you to zero in on a specific point of focus.
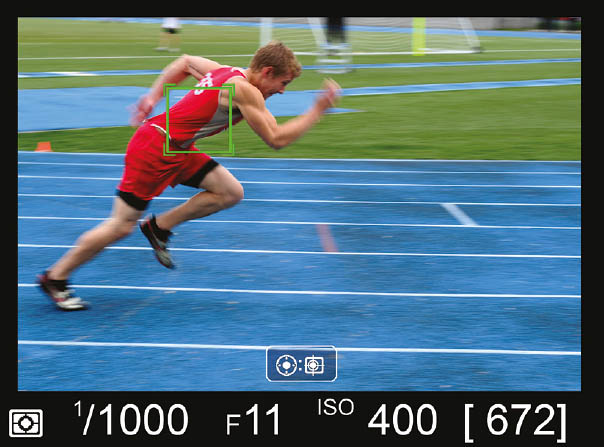
Figure 14.4 Subject-tracking can keep focus as it follows your subject around in the frame.
Introducing Subject-Tracking
The useful Subject-tracking autofocus feature is one of those features that can be confusing at first, but once you get the hang of it, it’s remarkably easy to use. Face-priority, in comparison, is almost intuitive to learn. Here’s the quick introduction you need to Subject-tracking.
- Ready, aim . . . When you’ve activated Subject-tracking, a white border appears in the center of the frame. Use that border to “aim” the camera until the subject you want to focus on and track is located within the border.
- . . . Focus. When you’ve pinpointed your subject, press the shutter button halfway to activate the D500’s contrast detection autofocus feature. The focus frame will turn yellow and the camera will emit a beep (unless you’ve disabled the beep within the Setup menu) when locked in.
- Reframe as desired. Once the focus frame has turned yellow, it seemingly takes on a life of its own, and will “follow” your subject around on the LCD as you reframe your image. (In other words, the subject being tracked doesn’t have to be in the center of the frame for the actual photo.) Best of all, if your subject moves, the D500 will follow it and keep focus as required.
- Tracking continues. The only glitches that may pop up might occur if your subject is small and difficult to track, or is too close in tonal value to its background, or if the subject approaches the camera or recedes sufficiently to change its relative size on the LCD significantly.
- Grab a new subject. If you want to refocus or grab a new subject, press the center button again.
You may not have considered just what you can do with live view. Once you’ve played with it, you’ll discover dozens of applications for this capability.
- Preview your images on the monitor or a TV. You can see a preview of your image on the LCD monitor. Or, connect your camera to a standard-definition or high-definition television using an (optional) HDMI cable and you can preview your image on a large screen.
- Preview remotely. Extend the cable between the camera and TV screen, and you can preview your images some distance away from the camera.
- Improve your point of view. Sometimes, looking through the viewfinder to frame your subject is awkward. Perhaps you need to hold the D500 with the swiveling LCD monitor over your head to clear obstructions such as a crowd of people, or you want to photograph a low-lying flower without prostrating yourself on the ground. In either case, live view may allow you to see what you’re going to shoot before you snap the shutter. (A remote release is a good idea in this mode.)
- Shoot from your computer. With Camera Control Pro 2 (an extra-cost option) or Lightroom, you can control your camera from your computer in “tethered” mode, so you can preview images and take pictures without physically touching the D500.
- Continuous shooting. You can shoot bursts of images using live view.
- Shoot from tripod or hand-held. Of course, holding the camera out at arm’s length to preview an image is poor technique, and will introduce a lot of camera shake. If you want to use live view for hand-held images, use an image-stabilized lens and/or a high shutter speed. A tripod is a better choice if you can use one.
- Watch your power. Live view uses a lot of juice and will deplete your battery rapidly. The optional AC adapter is a useful accessory.
- Watch your usage times. Nikon says live view can be used continuously for as long as one hour, but notes that after periods of more than a few minutes, the sensor warms up and increases image noise and color artifacts. Your D500 will shut down before your camera seriously overheats, and will give you a warning on the monitor 30 seconds before shut off. (If you’ve chosen an automatic monitor off delay for live view using Custom Settings menu option c4—other than No Limit—you’ll be warned before the live view monitor shuts off automatically.)
Viewing Live View Information
Once you’ve activated live view, a display like the one shown in Figure 14.5 appears. Not all of the information appears all the time. For example, the Time Remaining indicator shows only when there are 30 seconds or less remaining for live view shooting. The indicators overlaid on the image can be displayed or suppressed by pressing the Info button (that’s to the lower right of the LCD).
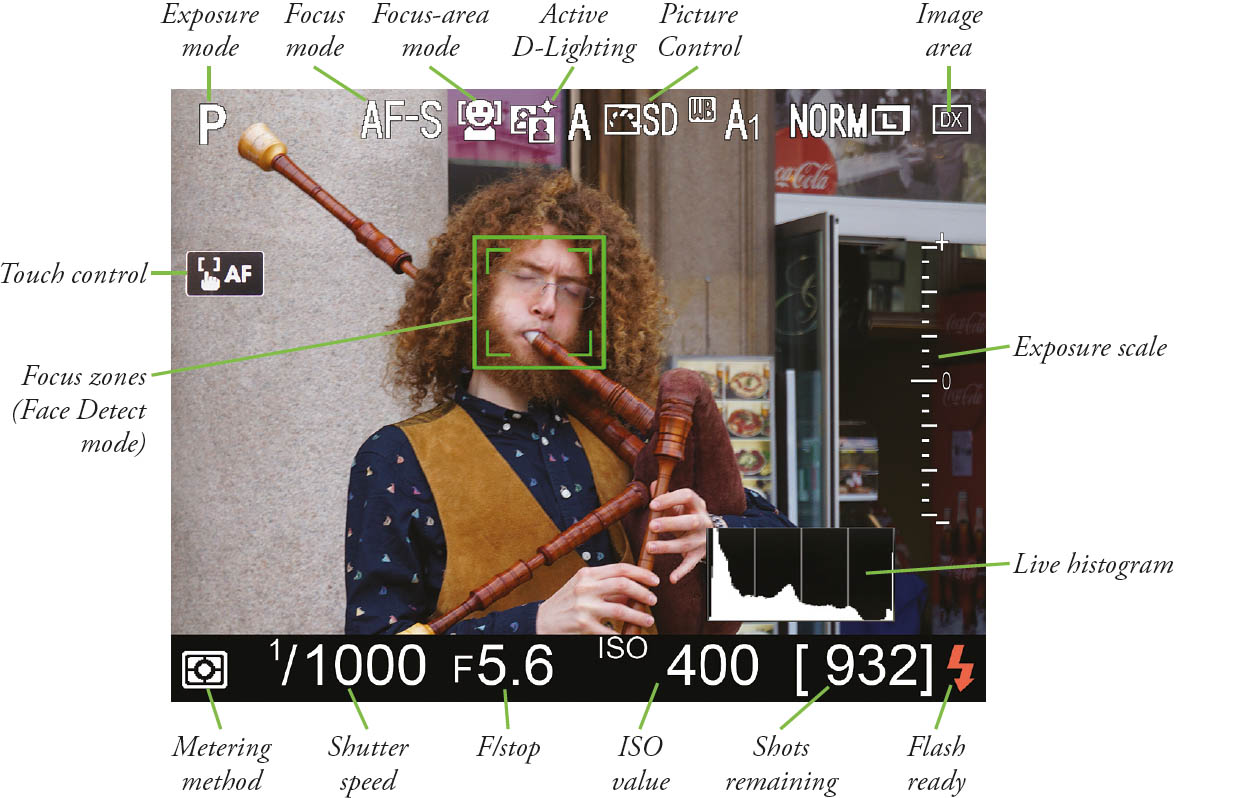
Figure 14.5 The live view display for still photography includes a lot of information, some of which can be hidden.
As you press the button, the LCD cycles among these screen variations:
- Live view screen overlaid with shooting information, as shown in Figure 14.5. To enable display of the exposure scale at the right side and live histogram at bottom right, press the OK button.
- Live view screen overlaid with only minimal information. (Figures 14.1 to 14.4 are examples of this kind of display.)
- Live view screen overlaid with a 16-segment alignment grid. (See Figure 14.6.)
- Live view screen overlaid with a virtual horizon leveling aid. (See Figure 14.7.)
If the Lv switch is set to the Movie position instead, the information screens that can be summoned by pressing the Info button are slightly different:
- Additional shooting data related to movie making, such as audio levels and movie format, appear on the shooting information screen.
- The minimal information screen (and all other live view screens) are masked to show the 16:9 aspect ratio of the HD movie format.
- The 16-segment grid screen and the virtual horizon leveling screen are both basically the same, except for the masking.
- An additional screen showing a live histogram is available. The exposure scale is not available.
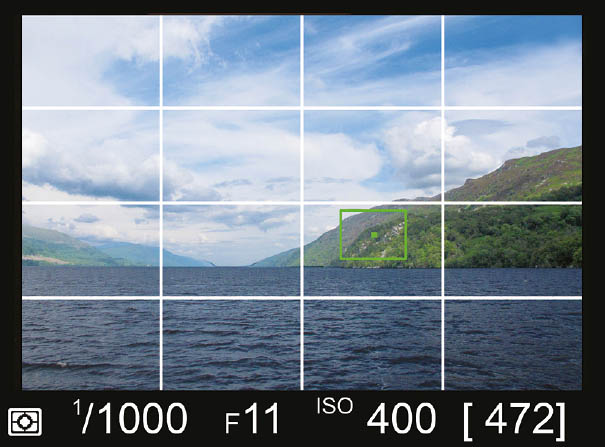
Figure 14.6 The live view display with alignment grid.
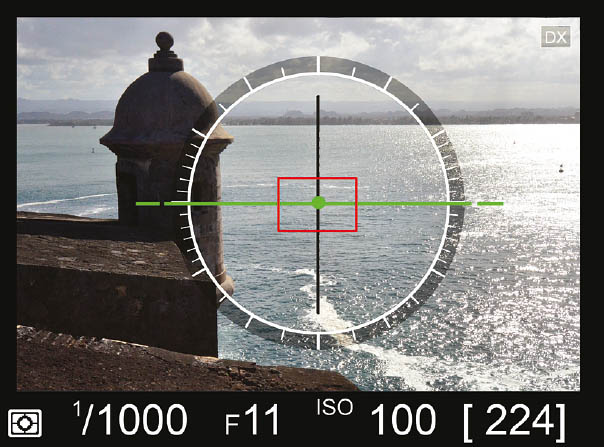
Figure 14.7 The live view display with virtual horizon.
The overlaid indicators include:
- Exposure Mode. Indicates whether P, S, A, M, Auto, Scene, or Effects mode is active.
- Touch Control. Tap this area to enable or disable the Touch Shutter/AF feature. Your choices are Touch Shutter/AF: Off, Touch AF: On (which autofocuses, but does not take a picture), and Touch Shutter/AF: On (which autofocuses when you touch the screen, and takes a picture when you lift your finger). Touch AF does not operate when the focus mode is set to manual.
- Focus Mode. Shows AF-S or AF-F when active. If you switch to manual focus mode, this indicator disappears.
- Focus Area Mode. Shows whether Face-priority, Wide-area, Normal-area, or Subject-tracking autofocus will be used.
- Active D-Lighting Status. Shows the D-Lighting that will be applied.
- Picture Control. Shows the current active Picture Control.
- White Balance. Displays the current white balance preset or WB Auto status.
- Image Size. Displays the current resolution, L (Large), M (Medium), or S (Small).
- Image Quality. Shows JPEG Image Quality: Fine, Norm, or Basic.
- Image Area. Shows current image area setting, such as FX, DX, 1.2X, or 5:4.
- Live Histogram. Enabled when you press the OK button.
- Exposure Scale. Enabled when you press the OK button.
- Focus Zones. Shows the appropriate focus indicator for the AF-area mode in use.
Additional information is arrayed along the bottom and side of the monitor image, more or less duplicating much of the data in the LED display that is seen through the viewfinder when not using live view. These indicators include:
- Metering method. Shows whether Matrix, Center-weighted, or Spot metering is selected. Choose before entering live view.
- Shutter speed. The currently selected shutter speed.
- F/stop. The current f/stop.
- ISO value. Shows the ISO sensitivity setting, or ISO Auto
- Shots remaining. Indicates the number of images remaining on your memory card at the current Image Size and Image Quality settings.
- Flash ready. Shows the electronic flash is fully charged and ready to shoot.
More icons not shown in the figure include the alignment grid, and indicators for movie modes:
- Alignment grid. (Shown in Figure 14.6.) This set of guides can be used to help line up horizontal or vertical lines.
- Audio recording indicator. Shows when a microphone is being used.
- No movies possible. This shows that it is not possible to shoot movies, because there is not enough space remaining on your memory card.
- Movie time remaining. Indicates the number of minutes and seconds remaining for movie shooting.
- Movie frame size. Displays the resolution of the movie frame and frames per second rate, from 3840 × 2150 pixels (4K video) and 1920 × 1080 pixels down to 1280 × 720, at your selected frame rate.
Shooting Stills (and Movies, Too!) in Live View
Shooting stills and movies in live view is easy. I’ll show you more about movie making in Chapters 15 and 16, but you can begin shooting stills or movies right now with no further instruction. Just follow these steps:
- Rotate Lv switch. Specify Live View mode by rotating the switch to either the still or movie icons (what Nikon calls Photography and Movie Live View). Then press the Lv button. The D500 can be hand-held or mounted on a tripod. (Using tripod mode makes it easier to obtain and keep sharp focus.) You can exit live view at any time by pressing the Lv button again.
- Zoom in/out. Check your view by pressing the Zoom In and Zoom Out buttons (located to the left of the color monitor). Five levels of magnification are available, up to 6.7X zoom. A navigation box appears in the lower right of the monitor with a yellow box representing the portion of the image zoomed, just as when you’re reviewing photos you’ve already taken using Playback mode. Use the multi selector keys to change the zoomed area within the full frame. Press the Zoom Out button to zoom out again.
- Make exposure adjustments. While using an automatic exposure mode, you can add or subtract exposure using the EV settings, as described in Chapter 4. Hold down the EV button (just southeast of the shutter release) and rotate the main command dial to add or subtract exposure when using P, S, and A modes. The back-panel color monitor will brighten or darken to represent the exposure change you make.
- Choose a focus mode. Select from autofocus or manual focus with the AF/MF switch on the camera body. Choose AF-S or AF-F by pressing the focus mode button in the center of the AF/MF switch and rotating the main command dial.
- Choose an AF-area mode. Select autofocus area by pressing the focus mode button in the center of the AF/MF switch and rotating the sub-command dial. Choices include Face-priority AF, Wide-area AF, Normal-area AF, or Subject-tracking AF. You’ll find complete descriptions of focus and AF-area modes in Chapter 5.
- Shoot. Lock focus and begin capture by pressing the shutter release all the way down to take a still picture, or the Movie button (on top of the camera with the red dot) to begin capturing video. Press the Movie button a second time to stop.
i Button Options
In Live View mode, pressing the i button produces a screen of settings and options that are especially useful for live shooting, including one—split-screen display zoom—that is sensational for comparing opposite sides of the frame under high magnification. The screen that appears is shown in Figure 14.8. The available options include:
- Image area. Select the image area used for live view photography, as described in Chapter 11.
- Active D-Lighting. Adjust the Active D-Lighting setting, described in detail under the Shooting menu in Chapter 11.
- Electronic front-curtain shutter. Enable or disable the electronic front-curtain shutter, as described under Custom Setting d6 in Chapter 12.
- Monitor brightness. Select this option and then press the up/down buttons to adjust the monitor brightness applied only during live view. A scale appears on the right side of the live view screen with +5 to –5 settings. The adjustment has no effect on the photographs or movies that you capture, nor on the brightness of the monitor during playback or menu access. To change the brightness for those other modes, use the Monitor Brightness entry in the Setup menu, as described in Chapter 13.
- Photo Live View Display White Balance. This changes the hue (white balance) of the monitor (only) during live view, and is useful to help make what you see (on the screen) resemble what you get (in the finished photograph), if the lighting used to make the exposure is different from the lighting used to view the scene.
For example, if you’re using flash when working with live view, you’ll have the D500 white balance set for Flash, in almost all cases. However, you might be framing the picture under lighting that is very different, perhaps much warmer incandescent lighting. Although our eyes adapt well visually to changes in white balance, your live view image won’t be similar to the final image in terms of color. This control allows you to adjust the live view display white balance setting to more closely match the final image. If you want to use the same white balance for live view and the photograph, select None. This setting has no effect on the white balance of the captured image.
- Split-screen display zoom. This feature divides the live view display into two boxes, each of which shows magnified view of a different area of the frame, as described next.
Split-Screen Display Zoom
When you activate this feature, the D500 divides the live view LCD display into two boxes, each showing a separate area of the frame side-by-side. To use this capability, just follow these steps.
- Split the screen. While in live view, press the i button and scroll down to the bottom icon that appears on the right side of the screen. Press OK to activate.
- Areas are indicated by a navigation window. The screen will split into two areas, shown next to each other. The relative positions of the two areas are shown in a magnification window, seen at lower right in Figure 14.9.
- Zoom in or out of the split display. Use the Zoom In and Zoom Out buttons to magnify or reduce magnification of both portions of the image.
- Choose one of the two sides of the frame. Press the Help (?) button to select one of the two sides of the frame.
- Move selected area horizontally. You can use the left/right buttons to scroll that box’s selected area from side to side.
- Move both areas vertically. Press the up or down buttons to scroll both areas up or down simultaneously. In other words, the split screen images will always match horizontally, but you can adjust either of their positions left or right. Landscape photographers have already noted that they’d like the ability to change the locations in both horizontal and vertical directions.
- Focus on selected area. When either box is selected, you can focus the image on that area by pressing the shutter release button halfway.
- Exit. Press the i button again to exit the split-screen display.

Figure 14.8 Press the i button while in live view to access these options.

Figure 14.9 Split-screen display in live view.
You’re probably wondering what this feature is useful for—unless you’re way ahead of me. Here are some typical applications. These are all fairly technical in nature, and likely to be needed only for specialized types of photography, particularly in the architectural and landscape fields. But if you do need the split screen feature, you’ll really need it.
- Check horizontal alignment. Some subjects lend themselves to symmetrical compositions (or, demand such treatment, in the case of buildings or other bi-laterally symmetrical scenes that look weird if the camera has been placed slightly to one side or the other). Use the split screen to view comparable parts of the same image simultaneously to see if the camera is aligned appropriately.
- Check front/back tilt. Sometimes you unintentionally lean the camera forward or back slightly, which can produce fall-back or fall-forward effects when shooting very tall or very deep subjects (pitch), or rotate the camera around its base (imagine a line running vertically through, say, the tripod socket; that’s yaw). You might also roll the camera by rotating it along the axis that runs through the center of the lens.
When these rotations are severe, you’ll probably notice it visually; lean way back to take in the top of a building, and you’ll see the effect on the screen. However, less drastic tilting may escape your attention. You can use the split-screen feature in conjunction with the live view virtual horizon (discussed earlier in this chapter) to ensure the camera is completely level. The virtual horizon’s indicators will show you when the camera is rotated around the axis running through the center of the front element of the lens, or pitched forward or back. The split-screen capability can help you counter yaw by comparing the two magnified sides of the image.
- Control perspective and focus. The split screen allows you to check the focus of different parts of a scene, which landscape photographers will like. Those using shift-tilt lenses will like the feature even more. These specialized lenses can be tilted without changing the position of the camera, providing control over which part of subjects photographed at an angle are in focus. The split screen can be used to select either side of the image, and focus on the side that you want to be rendered most sharply. These lenses can also be shifted side to side, say to allow photographing the top of a building while keeping the focal plane of the camera parallel to the structure. In such cases, you can use the D500 in portrait orientation (in which case the screen will be split top and bottom, rather than side to side), and then view both parts of the image before making additional shift adjustments for the best perspective control.