
Once upon a time, the ability to shoot video with a digital still camera was one of those “gee whiz” gimmicks camera makers seemed to include just to have a reason to get you to buy a new camera. That hasn’t been true for a couple of years now, as the video quality of many digital still cameras has gotten quite good. The D500 is a stellar example. It’s capable of Ultra HD (4K) and HD-quality video and is actually capable of outperforming typical modestly priced digital video camcorders, especially when you consider the range of lenses and other helpful accessories available for it.
Producing good-quality video is more complicated than just buying good equipment. There are techniques that make for gripping storytelling and a visual language the average person is very used to, but also pretty unaware of. After all, by comparison we’re used to watching the best productions that television, video, and motion pictures can offer. Whether it’s fair or not, our efforts are compared to what we’re used to seeing produced by experts. While this book can’t make you a professional videographer, there is some advice I can give you that will help you improve your results with the camera.
There are a number of different things to consider when planning a video shoot, and when possible, a shooting script and storyboard can help you produce a higher-quality video.
“Clean” HDMI Output
Although techniques for professional video shooting are beyond the scope of this book, if you’re truly becoming an advanced videographer, you’ll probably be working with the D500’s ability to output “clean” non-compressed HDMI video to an external monitor or video recorder, including the Atomos Shogun lineup, which includes versions that are quite affordable, at least in terms of professional video gear ($1,350 and up for some models). You can choose models both with and without an external LCD monitor, and capture to solid-state drives (SSD), a laptop’s internal or connected hard drive, or to CFast memory cards. The latter are chiefly as a nod to those still using Compact Flash cards (which are not supported by the D500). Such equipment allows very high transfer rates and is certainly your best choice if you’re shooting 4K video.
VIDEO FORMATS
Your Nikon D500 captures its video in the standard H.264/MPEG-4 Part 10 format, which compresses that stream of images as much as 50X. That’s the capture format. The video is then saved as a MOV file.
The HDMI port on the D500 accepts an HDMI mini-C cable. Nikon offers the HC-E1, but I prefer to purchase less-pricey third-party cables, which I buy in convenient lengths of 3 feet, 6 feet, 10 feet, or longer. The cable can be connected to the monitor, recorder, or other device of your choice. (Some of the screen shots in this book were output to a Blackmagic Intensity shuttle that allowed capturing stills of the D500’s menus, live view, and video.)
As described in Chapter 13, there are several sets of adjustments to make, including output resolution, output contrast range, display size (which sometimes must be adjusted so that the full image can be seen), and an option to show the D500’s output either on the camera LCD monitor and on your external device or on the external device alone (which saves battery power). If you intend to capture the output on an external recorder for editing later, it’s important to use the Live View On-Screen Display option and select Off so the image will be shown exclusively on the external recorder/monitor with the shooting information not overlaid on your video. A final adjustment is to use Custom Setting c4, as described in Chapter 12, and set Live View to No Limit, so you can continue capturing the video stream with your recorder.
Lens Craft
I covered the use of lenses with the D500 in more detail in Chapter 7, but a discussion of why lens selection is important when shooting movies may be useful at this point. In the video world, not all lenses are created equal. The two most important considerations are depth-of-field, or the beneficial lack thereof, and zooming. I’ll address each of these separately.
Depth-of-Field and Video
Have you wondered why professional videographers have gone nuts over still cameras that can also shoot video? The producers of Saturday Night Live could afford to have Alex Buono, their director of photography, use the niftiest, most-expensive high-resolution video cameras to shoot the opening sequences of the program. Instead, Buono opted for a pair of digital SLR cameras. One thing that makes digital still cameras so attractive for video is that they have relatively large sensors, which provides improved low-light performance and results in the oddly attractive reduced depth-of-field, compared with most professional video cameras.
But wait! you say. No matter what size sensor is used to capture a video frame, isn’t the number of pixels in that frame exactly the same? That’s true—the final resolution of a full HD 1080p video image is exactly 1920 × 1080 pixels. For standard HD (720p) the resolution is 1280 × 720 pixels, and for ultra HD/4K (2160p), the resolution is 3820 × 2160. The resolution, at least for 1080p and 720p, is exactly the same whether you’re capturing that frame with a point-and-shoot camera, a professional video camera, or a digital SLR like the Nikon D500. But that’s only the final resolution. The number of pixels used to capture each video frame varies by sensor size.
For example, your D500 does not use only its central 1920 × 1080 pixels to capture a full HD video frame. If it did that, you’d have to contend with a “crop” factor. That doesn’t happen! (See Chapter 7 for a longer discussion of the effects of the so-called “crop” factor.)
Instead, the D500 captures a video frame using an area that stretches across the full width of the sensor, measuring 5568 × 3128 pixels, using the proportions of a 16:9 area of its sensor. The pixels within that area are then sub-sampled, using only some of the available photosites to reduce the captured frame to 1920 × 1080 or 1280 × 720 video resolution. Your wide-angle and telephoto lenses retain roughly their same fields of view, and you can frame and compose your video through the viewfinder normally, with only the top and bottom of the frame cropped off to account for the wider video aspect ratio.
A completely different method is used to produce ultra HD 4K video. The D500 uses a 3840 × 2160 area in the center of the frame, corresponding to the resolution of 4K video, and does not require sub-sampling to reduce the resolution to the required frame size. However, that does introduce a cropping effect, roughly 1.5x, adding to the magnification of your lens. Figure 16.1 makes the difference clear. The area outlined by the yellow lines shows the capture area used for 1080p and 720p video; the green line marks the area used for 2160p/4K video.
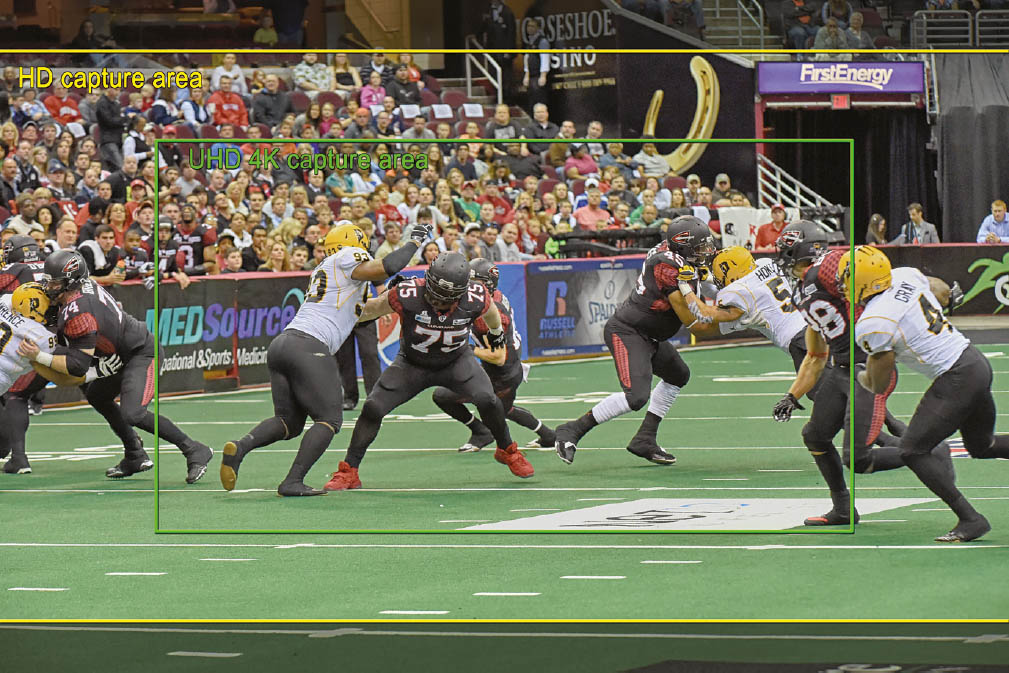
Figure 16.1 Video capture areas for full HD (yellow lines) and 4K video (green lines).
As you learned in Chapter 7, a larger sensor calls for the use of longer focal lengths to produce the same field of view, so, in effect, a larger sensor like the APS-C sensor used in the D500 has reduced depth-of-field. And that’s what makes cameras like the D500 attractive from a creative standpoint. Less depth-of-field means greater control over the range of what’s in focus. Your D500, with its larger sensor, has a distinct advantage over consumer camcorders in this regard, and even does a better job than many professional video cameras. Figure 16.2 compares some typical sensor sizes.
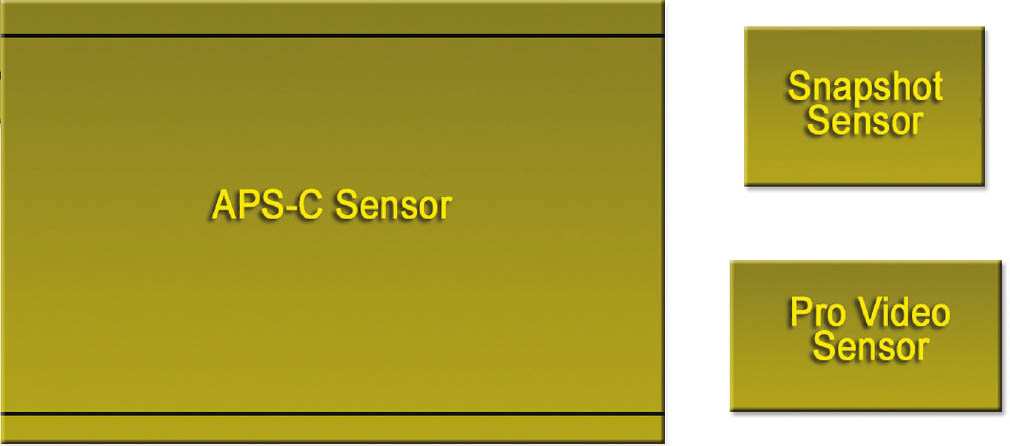
Figure 16.2 Relative size of APSC, snapshot, and pro video sensors.
Zooming and Video
When shooting still photos, a zoom is a zoom is a zoom. The key considerations for a zoom lens used only for still photography are the maximum aperture available at each focal length (“How fast is this lens?), the zoom range (“How far can I zoom in or out?”), and its sharpness at any given f/stop (“Do I lose sharpness when I shoot wide open?”).
When shooting video, the priorities may change, and there are two additional parameters to consider. The first two I listed, lens speed and zoom range, have roughly the same importance in both still and video photography. Zoom range gains a bit of importance in videography, because you can always/usually move closer to shoot a still photograph, but when you’re zooming during a shot most of us don’t have that option (or the funds to buy/rent a dolly to smoothly move the camera during capture). But, oddly enough, overall sharpness may have slightly less importance under certain conditions when shooting video. That’s because the image changes in some way many times per second (24/60 times per second with the D500), so any given frame doesn’t hang around long enough for our eyes to pick out every single detail. You want a sharp image, of course, but your standards don’t need to be quite as high when shooting video.
Here are the remaining considerations:
- Zoom lens maximum aperture. The speed of the lens matters in several ways. A zoom with a relatively large maximum aperture lets you shoot in lower light levels, and a big f/stop allows you to minimize depth-of-field for selective focus. Keep in mind that the maximum aperture may change during zooming. A lens that offers an f/3.5 maximum aperture at its widest focal length may provide only f/5.6 worth of light at the telephoto position.
- Zoom range. Use of zoom during actual capture should not be an everyday thing, unless you’re shooting a kung-fu movie. However, there are effective uses for a zoom shot, particularly if it’s a “long” one from extreme wide angle to extreme close-up (or vice versa). Most of the time, you’ll use the zoom range to adjust the perspective of the camera between shots, and a longer zoom range can mean less trotting back and forth to adjust the field of view. Zoom range also comes into play when you’re working with selective focus (longer focal lengths have less depth-of-field), or want to expand or compress the apparent distance between foreground and background subjects. A longer range gives you more flexibility.
- Linearity. Interchangeable lenses may have some drawbacks, as many photographers who have been using the video features of their digital SLRs have discovered. That’s because, unless a lens is optimized for video shooting, zooming with a particular lens may not necessarily be linear. Rotating the zoom collar manually at a constant speed doesn’t always produce a smooth zoom. There may be “jumps” as the elements of the lens shift around during the zoom. Keep that in mind if you plan to zoom during a shot, and are using a lens that has proved, from experience, to provide a non-linear zoom. (Unfortunately, there’s no easy way to tell ahead of time whether you own a lens that is well-suited for zooming during a shot.)
Keep Things Stable and on the Level
Camera shake’s enough of a problem with still photography, but it becomes even more of a nuisance when you’re shooting video. The image-stabilization feature found in many Nikon lenses (and some third-party optics) can help minimize this. That’s why Nikon’s VR-capable zoom lenses (described in Chapter 7) make an excellent choice for video shooting if you’re planning on going for the hand-held cinema verité look.
The D500 also has an electronic VR option, which I’ve described several times in this book. It’s available only in 1080p and 720p modes. To recap, electronic vibration reduction reduces the frame size by about 10 percent (in DX mode only), and uses the extra image area to realign the frames to counteract any camera motion.
Just realize that while hand-held camera shots—even image stabilized—may be perfect if you’re shooting a documentary or video that intentionally mimics traditional home movie making, in other contexts it can be disconcerting or annoying. And even VR can’t work miracles. As I’ll point out in the next section, it’s the camera movement itself that is distracting—not necessarily any blur in our subject matter.
If you want your video to look professional, putting the D500 on a tripod will give you smoother, steadier video clips to work with. It will be easier to intercut shots taken from different angles (or even at different times) if everything was shot on a tripod. Cutting from a tripod shot to a hand-held shot, or even from one hand-held shot to another one that has noticeably more (or less) camera movement can call attention to what otherwise might have been a smooth cut or transition.
Remember that telephoto lenses and telephoto zoom focal lengths magnify any camera shake, even with VR, so when you’re using a longer focal length, that tripod becomes an even better idea. Tripods are essential if you want to pan from side to side during a shot, dolly in and out, or track from side to side (say, you want to shoot with the camera in your kid’s coaster wagon). A tripod and (for panning) a fluid head built especially for smooth video movements can add a lot of production value to your movies.
ROLL ON, SHUTTER
Another side-effect to watch out for occurs when panning or capturing moving subjects, caused by the D500’s rolling shutter. Because the camera captures all 2160, 1080, or 720 lines one at a time, the last line in a frame is captured a fraction of a second later (about 15 ms) after the first line. So if the subject or camera is moving from side to side, a vertical subject will appear to lean backward, causing what is termed a “Jello effect.” There’s no way to eliminate this defect, but you should be aware of it when shooting.
Shooting Script
A shooting script is nothing more than a coordinated plan that covers both audio and video and provides order and structure for your video when you’re in planned, storytelling mode. A detailed script will cover what types of shots you’re going after, what dialogue you’re going to use, audio effects, transitions, and graphics. A good script needn’t constrain you: as the director you are free to make changes on the spot during actual capture. But, before you change the route to your final destination, it’s good to know where you were headed, and how you originally planned to get there.
When putting together your shooting script, plan for lots and lots of different shots, even if you don’t think you’ll need them. Only amateurish videos consist of a bunch of long, tedious shots. You’ll want to vary the pace of your production by cutting among lots of different views, angles, and perspectives, so jot down your ideas for these variations when you put together your script.
If you’re shooting a documentary rather than telling a story that’s already been completely mapped out, the idea of using a shooting script needs to be applied more flexibly. Documentary filmmakers often have no shooting script at all. They go out, do their interviews, capture video of people, places, and events as they find them, and allow the structure of the story to take shape as they learn more about the subject of their documentary. In such cases, the movie is typically “created” during editing, as bits and pieces are assembled into the finished piece.
Storyboards
A storyboard makes a great adjunct to a detailed shooting script. It is a series of panels providing visuals of what each scene should look like. While the ones produced by Hollywood are generally of very high quality, there’s nothing that says drawing skills are important for this step. Stick figures work just fine if that’s the best you can do. The storyboard just helps you visualize locations, placement of actors/actresses, props and furniture, and also helps everyone involved get an idea of what you’re trying to show. It also helps show how you want to frame or compose a shot. You can even shoot a series of still photos and transform them into a “storyboard” if you want, such as in Figure 16.3.
Storytelling in Video
Today’s audience is used to fast-paced, short-scene storytelling. In order to produce interesting video for such viewers, it’s important to view video storytelling as a kind of shorthand code for the more leisurely efforts print media offers. Audio and video should always be advancing the story. While it’s okay to let the camera linger from time to time, it should only be for a compelling reason and only briefly.

Figure 16.3 A storyboard is a series of simple sketches or photos to help visualize a segment of video.
Above all, look for movement in your scene as you shoot. You’re not taking still photographs! Perhaps your ideal still picture of an old castle in Segovia, Spain might be to show the edifice in its modern-day surroundings, but a movie needs to show something moving, like the hang glider who soared overhead when I captured the image shown in Figure 16.4.
It only takes a second or two for an establishing shot to impart the necessary information. For example, many of the scenes for a video documenting a model being photographed in a rock ‘n’ roll music setting might be close-ups and talking heads, but an establishing shot showing the studio where the video was captured helps set the scene.
Provide variety too. If you put your shooting script together correctly, you’ll be changing camera angles and perspectives often and never leave a static scene on the screen for a long period of time. (You can record a static scene for a reasonably long period and then edit in other shots that cut away and back to the longer scene with close-ups that show each person talking.)
When editing, keep transitions basic! I can’t stress this one enough. Watch a television program or movie. The action “jumps” from one scene or person to the next. Fancy transitions that involve exotic “wipes,” dissolves, or cross fades take too long for the average viewer and make your video ponderous.

Figure 16.4 Movies need motion to come alive.
Composition
In movie shooting, several factors restrict your composition, and impose requirements you just don’t always have in still photography (although other rules of good composition do apply). Here are some of the key differences to keep in mind when composing movie frames:
- Horizontal compositions only. Some subjects, such as basketball players and tall buildings, just lend themselves to vertical compositions. But movies are shown in horizontal format only. So if you’re interviewing a local basketball star, you can end up with a worst-case situation like the one shown in Figure 16.5. If you want to show how tall your subject is, it’s often impractical to move back far enough to show him full-length. You really can’t capture a vertical composition. Tricks like getting down on the floor and shooting up at your subject can exaggerate the perspective, but aren’t a perfect solution.
- Wasted space at the sides. Moving in to frame the basketball player as outlined by the yellow box in Figure 16.5 means that you’re still forced to leave a lot of empty space on either side. (Of course, you can fill that space with other people and/or interesting stuff, but that defeats your intent of concentrating on your main subject.) So when faced with some types of subjects in a horizontal frame, you can be creative, or move in really tight. For example, if I was willing to give up the “height” aspect of my composition, I could have framed the shot as shown by the green box in the figure, and wasted less of the image area at either side.
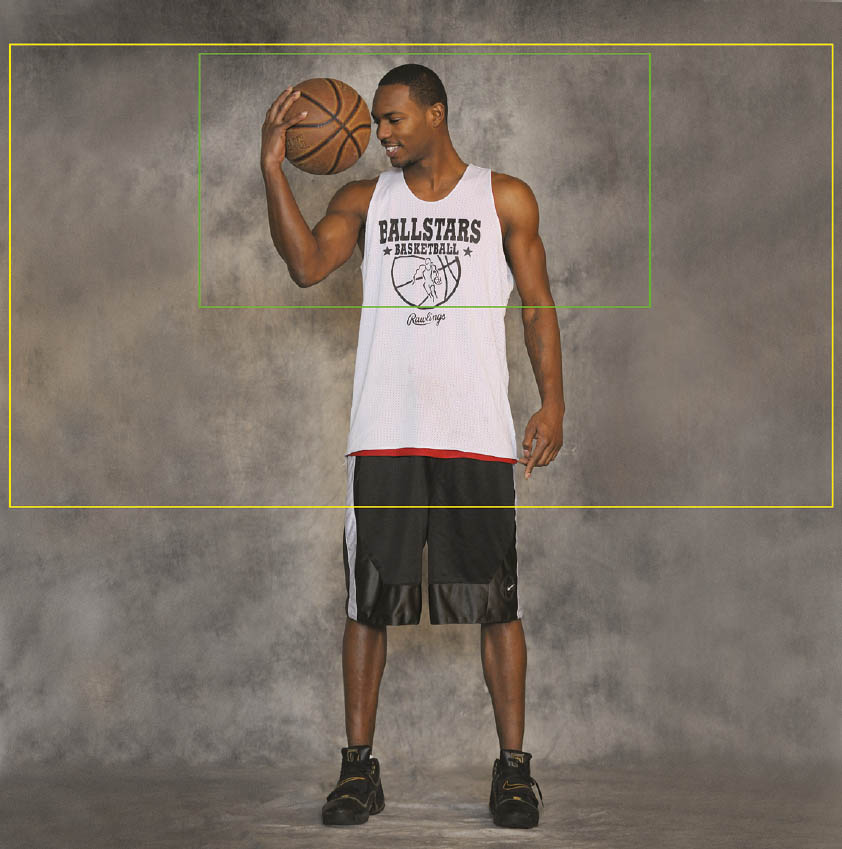
Figure 16.5 Movie shooting requires you to fit all your subjects into a horizontally oriented frame.
- Seamless (or seamed) transitions. Unless you’re telling a picture story with a photo essay, still pictures often stand alone. But with movies, each of your compositions must relate to the shot that preceded it, and the one that follows. It can be jarring to jump from a long shot to a tight close-up unless the director—you—is very creative. Another common error is the “jump cut” in which successive shots vary only slightly in camera angle, making it appear that the main subject has “jumped” from one place to another. (Although everyone from French New Wave director Jean-Luc Goddard to Guy Ritchie—Madonna’s ex—have used jump cuts effectively in their films.) The rule of thumb is to vary the camera angle by at least 30 degrees between shots to make it appear to be seamless. Unless you prefer that your images flaunt convention and appear to be “seamy.”
- The time dimension. Unlike still photography, with motion pictures there’s a lot more emphasis on using a series of images to build on each other to tell a story. Static shots where the camera is mounted on a tripod and everything is shot from the same distance are a recipe for dull videos. Watch a television program sometime and notice how often camera shots change distances and directions. Viewers are used to this variety and have come to expect it. Professional video productions are often done with multiple cameras shooting from different angles and positions. But many professional productions are shot with just one camera and careful planning, and you can do just fine with your D500.
Here’s a look at the different types of commonly used compositional tools:
- Establishing shot. Much as it sounds, this type of composition, as shown in Figure 16.6, upper left, establishes the scene and tells the viewer where the action is taking place. Let’s say you’re shooting a video of your offspring’s move to college; the establishing shot could be a wide shot of the campus with a sign welcoming you to the school in the foreground. Another example would be for a child’s birthday party; the establishing shot could be the front of the house decorated with birthday signs and streamers or a shot of the dining room table decked out with party favors and a candle-covered birthday cake. In the example, I wanted to show the studio where the video was shot.
- Medium shot. This shot is composed from about waist to head room (some space above the subject’s head). It’s useful for providing variety from a series of close-ups and also makes for a useful first look at a speaker. A medium shot is used to bring the viewer into a scene without shocking them. It can be used to introduce a character and provide context via their surroundings. (See Figure 16.6, upper right.)
- Close-up. The close-up, usually described as “from shirt pocket to head room,” provides a good composition for someone talking directly to the camera. Although it’s common to have your talking head centered in the shot, that’s not a requirement. In Figure 16.6, center left, the subject was offset to the right. This would allow other images, especially graphics or titles, to be superimposed in the frame in a “real” (professional) production. But the compositional technique can be used with D500 videos, too, even if special effects are not going to be added. A close-up generally shows the full face with a little head room at the top and down to the shoulders at the bottom of the frame.
- Extreme close-up. When I went through broadcast training, this shot was described as the “big talking face” shot and we were actively discouraged from employing it. Styles and tastes change over the years and now the big talking face is much more commonly used (maybe people are better looking these days?) and so this view may be appropriate. Just remember, the D500 is capable of shooting in high-definition video and you may be playing the video on a high-def TV; be careful that you use this composition on a face that can stand up to high definition. (See Figure 16.6, center right.) An extreme close-up is a very tight shot that cuts off everything above the top of the head and below the chin (or even closer!). Be careful using this shot since many of us look better from a distance!
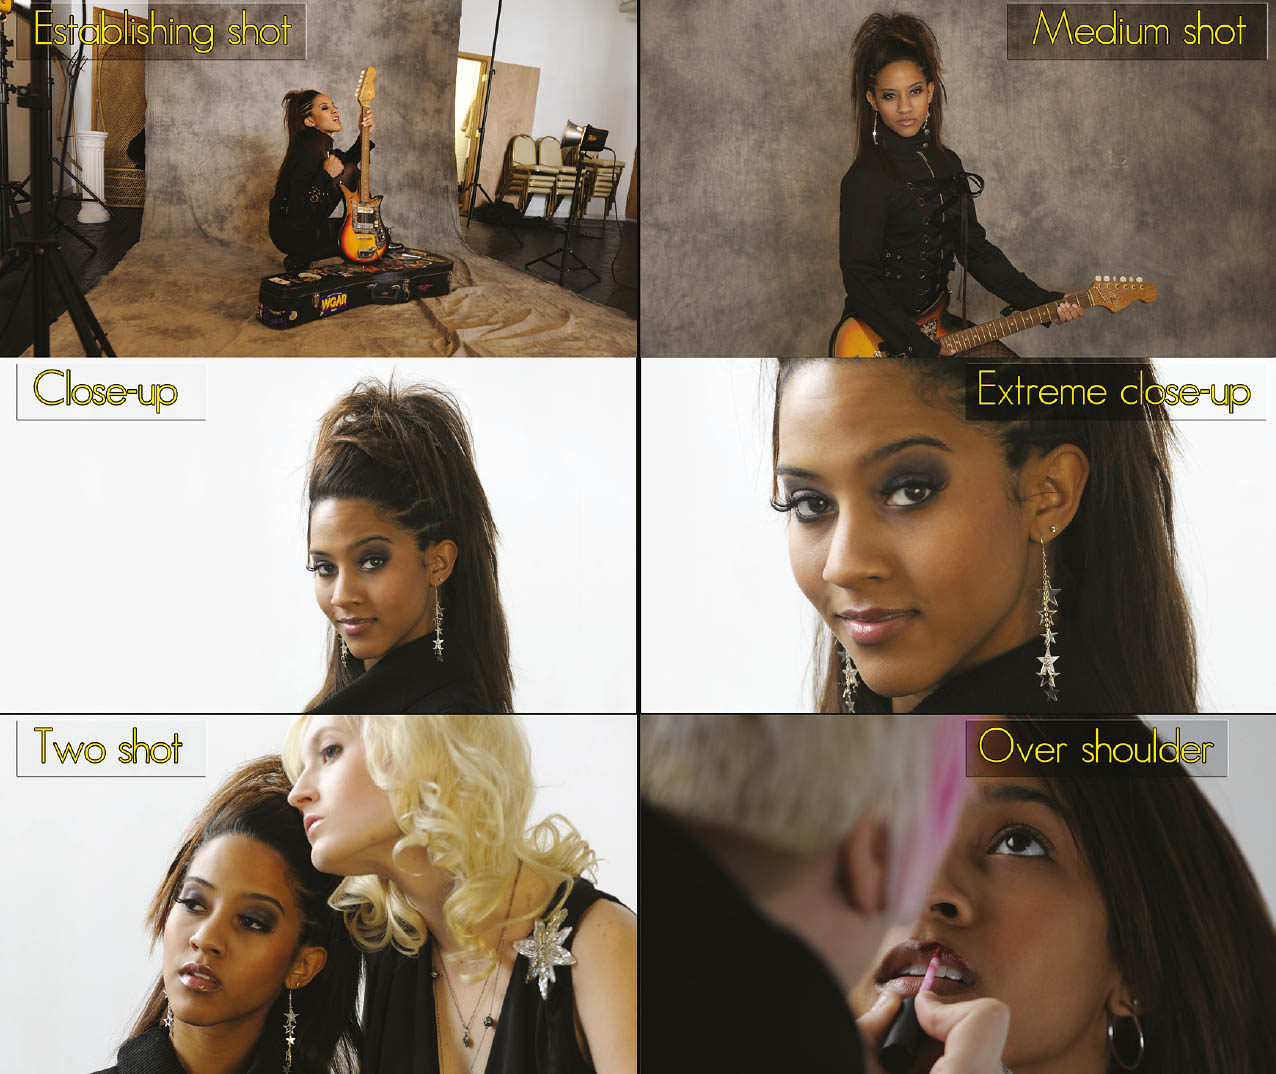
Figure 16.6 Use a full range of shot types.
- “Two” shot. A two shot shows a pair of subjects in one frame. They can be side by side or one in the foreground and one in the background. (See Figure 16.6, lower left.) This does not have to be a head-to-ground composition. Subjects can be standing or seated. A “three shot” is the same principle except that three people are in the frame. A “two shot” features two people in the frame. This version can be framed at various distances such as medium or close-up.
- Over-shoulder shot. Long a composition of interview programs, the “over-shoulder shot” uses the rear of one person’s head and shoulder to serve as a frame for the other person. This puts the viewer’s perspective as that of the person facing away from the camera. (See Figure 16.6, lower right.) An “over-shoulder” shot is a popular shot for interview programs. It helps make the viewers feel like they’re the one asking the questions.
Lighting for Video
Much like in still photography, how you handle light pretty much can make or break your videography. Lighting for video can be more complicated than lighting for still photography, since both subject and camera movement are often part of the process.
Lighting for video presents several concerns. First off, you want enough illumination to create a useable video. Beyond that, you want to use light to help tell your story or increase drama. Let’s take a better look at both.
Illumination
You can significantly improve the quality of your video by increasing the light falling in the scene. This is true indoors or out, by the way. While it may seem like sunlight is more than enough, it depends on how much contrast you’re dealing with. If your subject is in shadow (which can help them from squinting) or wearing a ball cap, a video light can help make them look a lot better.
Lighting choices for amateur videographers are a lot better these days than they were a decade or two ago. An inexpensive incandescent video light, which will easily fit in a camera bag, can be found for $15 or $20. You can even get a good-quality LED video light for less than $100. Work lights sold at many home improvement stores can also serve as video lights since you can set the camera’s white balance to correct for any color casts. You’ll need to mount these lights on a tripod or other support, or, perhaps, to a bracket that fastens to the tripod socket on the bottom of the camera.
Much of the challenge depends upon whether you’re just trying to add some fill-light on your subject versus trying to boost the light on an entire scene. A small video light will do just fine for the former. It won’t handle the latter. Fortunately, the versatility of the D500 comes in quite handy here. Since the camera shoots video in Auto ISO mode, it can compensate for lower lighting levels and still produce a decent image. For best results though, better lighting is necessary.
Creative Lighting
While ramping up the light intensity will produce better technical quality in your video, it won’t necessarily improve the artistic quality of it. Whether we’re outdoors or indoors, we’re used to seeing light come from above. Videographers need to consider how they position their lights to provide even illumination while up high enough to angle shadows down low and out of sight of the camera.
When lighting for video, there are several factors to consider. One is the quality of the light. It can either be hard (direct) light or soft (diffused) light. Hard light is good for showing detail, but can also be very harsh and unforgiving. “Softening” the light, but diffusing it somehow, can reduce the intensity of the light but make for a kinder, gentler light as well.
While mixing light sources isn’t always a good idea, one approach is to combine window light with supplemental lighting. Position your subject with the window to one side and bring in either a supplemental light or a reflector to the other side for reasonably even lighting.
Lighting Styles
Some lighting styles are more heavily used than others. Some forms are used for special effects, while others are designed to be invisible. At its most basic, lighting just illuminates the scene, but when used properly it can also create drama. Let’s look at some types of lighting styles:
- Three-point lighting. This is a basic lighting setup for one person. A main light illuminates the strong side of a person’s face, while a fill light lights up the other side. A third light is then positioned above and behind the subject to light the back of the head and shoulders. (See Figure 16.7.)
Figure 16.7 With three-point lighting, two lights are placed in front and to the side of the subject (45-degree angles are ideal) and positioned about a foot higher than the subject’s head. Another light is directed on the background in order to separate the subject and the background.
- Flat lighting. Use this type of lighting to provide illumination and nothing more. It calls for a variety of lights and diffusers set to raise the light level in a space enough for good video reproduction, but not to create a particular mood or emphasize a particular scene or individual. With flat lighting, you’re trying to create even lighting levels throughout the video space and minimize any shadows. Generally, the lights are placed up high and angled downward (or possibly pointed straight up to bounce off of a white ceiling). (See Figure 16.8.)
- “Ghoul lighting.” This is the style of lighting used for old horror movies. The idea is to position the light down low, pointed upward. It’s such an unnatural style of lighting that it makes its targets seem weird and “ghoulish.”
- Outdoor lighting. While shooting outdoors may seem easier because the sun provides more light, it also presents its own problems. As a general rule of thumb, keep the sun behind you when you’re shooting video outdoors, except when shooting faces (anything from a medium shot and closer) since the viewer won’t want to see a squinting subject. When shooting another human this way, put the sun behind her and use a video light to balance light levels between the foreground and background. If the sun is simply too bright, position the subject in the shade and use the video light for your main illumination. Using reflectors (white board panels or aluminum foil–covered cardboard panels are cheap options) can also help balance light effectively.

Figure 16.8 Flat lighting is another approach for creating even illumination. Here the lights can be bounced off of a white ceiling and walls to fill in shadows as much as possible. It is a flexible lighting approach since the subject can change positions without needing a change in light direction.
Audio
When it comes to making a successful video, audio quality is one of those things that separates the professionals from the amateurs. We’re used to watching top-quality productions on television and in the movies, yet the average person has no idea how much effort goes in to producing what seems to be “natural” sound. Much of the sound you hear in such productions is actually recorded on carefully controlled sound stages and “sweetened” with a variety of sound effects and other recordings of “natural” sound.
Tips for Better Audio
Since recording high-quality audio is such a challenge, it’s a good idea to do everything possible to maximize recording quality. Here are some ideas for improving the quality of the audio your camera records:
- Get the camera and its microphone close to the speaker. The farther the microphone is from the audio source, the less effective it will be in picking up that sound. While having to position the camera and its built-in microphone closer to the subject affects your lens choices and lens perspective options, it will make the most of your audio source. Of course, if you’re using a very wide-angle lens, getting too close to your subject can have unflattering results, so don’t take this advice too far. It’s important to think carefully about what sounds you want to capture. If you’re shooting video of an acoustic combo that’s not using a PA system, you’ll want the microphone close to them, but not so close that, say, only the lead singer or instrumentalist is picked up, while the players at either side fade off into the background.
- Use an external microphone. You’ll recall the description of the camera’s external microphone port in Chapter 2. As noted, this port accepts a stereo mini-plug from a standard external microphone, allowing you to achieve considerably higher audio quality for your movies than is possible with the camera’s built-in microphones (which are disabled when an external mic is plugged in). An external microphone reduces the amount of camera-induced noise that is picked up and recorded on your audio track. (The action of the lens as it focuses can be audible when the built-in microphones are active.)
The external microphone port can provide plug-in power for microphones that can take their power from this sort of outlet rather than from a battery in the microphone. Nikon provides optional compatible microphones such as the ME-1 ($180) or wireless ME-W1 ($250); you also may find suitable microphones from companies such as Shure and Audio-Technica. If you are on a quest for really superior audio quality, you can even obtain a portable mixer that can plug into this jack, such as the affordable Rolls MX124 (around $150) (www.rolls.com), letting you use multiple high-quality microphones (up to four) to record your soundtrack.
An exciting new option designed specifically for still cameras like the Nikon D500 is the Beachtek DXA-SLR Ultra HDSLR Audio Adapter. It’s more expensive, at around $300, but has even more professional sound options and clips right onto the bottom of your camera using the tripod mounting socket.
One advantage that a sound-mixing device like the DXA-SLR Ultra HDSLR offers over the stock D500 is that it adds an additional headphone output jack to your camera, so you can monitor the sound actually being captured by the recorder (you can also listen to your soundtrack through the headphones during playback, which is way better than using the D500’s built-in speaker). The adapter has two balanced XLR microphone inputs and can also accept line input (from another audio source), and provides cool features like AGC (automatic gain control), built-in limiting, and VU meters you can use to monitor sound input.
- Hide the microphone. Combine the first few tips by using an external mic, and getting it as close to your subject as possible. If you’re capturing a single person, you can always use a lapel microphone (described in the next section). But if you want a single mic to capture sound from multiple sources, your best bet may be to hide it somewhere in the shot. Put it behind a vase, using duct tape to fasten the microphone, and fix the mic cable out of sight (if you’re not using a wireless microphone).
- Turn off any sound makers you can. Little things like fans and air handling units aren’t obvious to the human ear, but will be picked up by the microphone. Turn off any machinery or devices that you can plus make sure cell phones are set to silent mode. Also, do what you can to minimize sounds such as wind, radio, television, or people talking in the background.
- Make sure to record some “natural” sound. If you’re shooting video at an event of some kind, make sure you get some background sound that you can add to your audio as desired in post-production.
- Consider recording audio separately. Lip-syncing is probably beyond most of the people you’re going to be shooting, but there’s nothing that says you can’t record narration separately and add it later. It’s relatively easy if you learn how to use simple software video-editing programs like iMovie (for the Macintosh) or Windows Movie Maker (for Windows PCs). Any time the speaker is off-camera, you can work with separately recorded narration rather than recording the speaker on-camera. This can produce much cleaner sound.
External Microphones
The single-most important thing you can do to improve your audio quality is to use an external microphone. The D500’s internal stereo microphones mounted on the front of the camera will do a decent job, but have some significant drawbacks, partially spelled out in the previous section:
- Camera noise. There are plenty of noise sources emanating from the camera, including your own breathing and rustling around as the camera shifts in your hand. Manual zooming is bound to affect your sound, and your fingers will fall directly in front of the built-in mics as you change focal lengths. An external microphone isolates the sound recording from camera noise.
- Distance. Anytime your D500 is located more than 6 to 8 feet from your subjects or sound source, the audio will suffer. An external unit allows you to place the mic right next to your subject.
- Improved quality. Obviously, Nikon wasn’t able to install a super-expensive super-high-quality microphone, even on a $2,000 dSLR. Not all owners of the D500 would be willing to pay the premium, especially if they didn’t plan to shoot much video themselves. An external microphone will almost always be of better quality.
- Directionality. The D500’s internal microphone generally records only sounds directly in front of it. An external microphone can be either of the directional type or omnidirectional, depending on whether you want to “shotgun” your sound or record more ambient sound.
You can choose from several different types of microphones, each of which has its own advantages and disadvantages. If you’re serious about movie making with your D500, you might want to own more than one. Common configurations include:
- Shotgun microphones. These can be mounted directly on your D500, although, if the mic uses an accessory shoe mount, you’ll need the optional adapter to convert the camera’s shoe to a standard hot shoe. I prefer to use a bracket, which further isolates the microphone from any camera noise. One thing to keep in mind is that while the shotgun mic will generally ignore any sound coming from behind it, it will pick up any sound it is pointed at, even behind your subject. You may be capturing video and audio of someone you’re interviewing in a restaurant, and not realize you’re picking up the lunchtime conversation of the diners seated in the table behind your subject. Outdoors, you may record your speaker, as well as the traffic on a busy street or freeway in the background.
- Lapel microphones. Also called lavalieres, these microphones attach to the subject’s clothing and pick up their voice with the best quality. You’ll need a long enough cord or a wireless mic (described later). These are especially good for video interviews, so whether you’re producing a documentary or grilling relatives for a family history, you’ll want one of these.
- Hand-held microphones. If you’re capturing a singer crooning a tune, or want your subject to mimic famed faux newscaster Wally Ballou, a hand-held mic may be your best choice. They serve much the same purpose as a lapel microphone, and they’re more intrusive—but that may be the point. A hand-held microphone can make a great prop for your fake newscast! The speaker can talk right into the microphone, point it at another person, or use it to record ambient sound. If your narrator is not going to appear on-camera, one of these can be an inexpensive way to improve sound.
- Wired and wireless external microphones. This option is the most expensive, but you get a receiver and a transmitter (both battery-powered, so you’ll need to make sure you have enough batteries). The transmitter is connected to the microphone, and the receiver is connected to your D500. In addition to being less klutzy and enabling you to avoid having wires on view in your scene, wireless mics, such as the Nikon MW-W1, let you record sounds that are physically located some distance from your camera. Of course, you need to keep in mind the range of your device, and be aware of possible signal interference from other electronic components in the vicinity.
Always use the wind screen provided with an external microphone to reduce the effect of noise produced by even light breezes blowing over the microphone. Many mics, such as the Nikon ME-1 (about $180), include a low-cut filter to further reduce wind noise. However, these can also affect other sounds. You can disable the low-cut filters for the ME-1 by changing a switch on the back from L-cut (low cutoff) to Flat. Other external mics also have their own low-cut filter switch.
Special Features
The D500 also has two audio frequency ranges (Wide and Vocal Range), described in Chapter 11, so you can tailor your microphone capture to your subject matter (for ambient sound or voice recording). Audio levels can be adjusted while recording, and the camera’s internal microphones have improved wind noise reduction. The new Flat Picture Control is another great feature, and gives you a dull, washed-out rendition that’s actually easier to adjust while post-processing in a movie-editing program.