
Canon has simplified operation of the EOS RP by providing quick access to the most frequently adjusted commands and functions through a clever use of multi-function controls, like the Control Ring found on RF lenses and adapters, as well as the Multi-function (M-Fn) and Quick Control (Q) buttons. Canon says it’s implemented this approach because the smaller size of the EOS RP doesn’t lend itself to the daunting number of buttons found on traditional, large digital SLRs. Your camera has reduced the number of dedicated controls, but still minimizes the need to delve into the sometimes-confusing thicket of conventional menus.
That’s a good thing. After all, while menus are easy to learn, because each entry describes its function in text form, their ironic disadvantage is that they are clumsy to use. Even though a well-designed menu system can lead you to the right commands, they require negotiating through all the various levels with multiple steps.
Your EOS RP’s more limited number of controls summon concise icon-based choices you can select with the twirl of a dial and press of a button or two. Best of all, with a customizable Control Ring, M-Fn button, and Quick Control button, you can tailor the camera to work the way you want it to, rather than succumb to the manufacturer’s notion of how it should work.
However, even with the EOS RP’s clean, versatile design, you’ll still need to learn the location, function, and application of all its parts. What you really need is a street-level roadmap that shows where everything is, and how it’s used. But what Canon gives you in the comprehensive PDF user’s manual is akin to a world globe with an overall view and not much information on how to use each component. Check out the Parts Names pages of the full Canon EOS RP manual (pages 31 to 38), which offer sparse black-and-white line drawings of the camera body that show front, back, two sides, and the top and bottom of the EOS RP, plus lenses, screens, and other features. There are nearly 60 callouts pointing to various buttons, dials, controls, components, and icons. If you can find the control you want in this cramped layout, you’ll still need to flip back and forth among multiple pages to locate the information about them.
I originated the up-close-and-personal full-color, street-level roadmap (rather than a satellite view) that I use in this book and my previous camera guidebooks. I provide you with many different views and lots of explanation accompanying each zone of the camera, so that by the time you finish this chapter, you’ll have a basic understanding of every control and what it does. I’m not going to delve into menu functions here—you’ll find a discussion of your Set-up, Shooting, and Playback menu options in Chapters 11 through 14. Everything here is devoted to the button pusher and dial twirler in you.
You’ll also find this “roadmap” chapter a good guide to the rest of the book, as well. I’ll try to provide as much detail here about the use of the main controls as I can, but some topics (such as autofocus and exposure) are too complex to address in depth right away. So, I’ll point you to the relevant chapters that discuss things like set-up options, exposure, use of electronic flash, and working with lenses with the occasional cross-reference.

NOTE
When I ask you to press or tap in this book, I mean you should press and release a button or tap the touch screen (described later). The EOS RP will then give you some time (usually about 6 seconds, depending on the function) to make an adjustment. When I am asking you to keep a button depressed while using another control, I’ll say hold. For many functions, the camera’s exposure meters must be active; just tap the shutter release button lightly to wake them up.
Front View
The front of the EOS RP is the face seen by your subjects as you snap away. For the photographer, though, the front is the surface your fingers curl around as you hold the camera, and there are really only three buttons to press, all within easy reach of the fingers of your left hand, plus the shutter button and Main Dial, which are on the top/front of the hand grip. There are additional controls on the lens itself. Figure 2.1 is a view of the front of the EOS RP with the lens detached. The other main components you need to know about are as follows:
- Shutter release button. Angled on top of the hand grip is the shutter release button. Press this button down halfway to lock exposure and focus (in One-Shot mode and AI Focus with non-moving subjects).
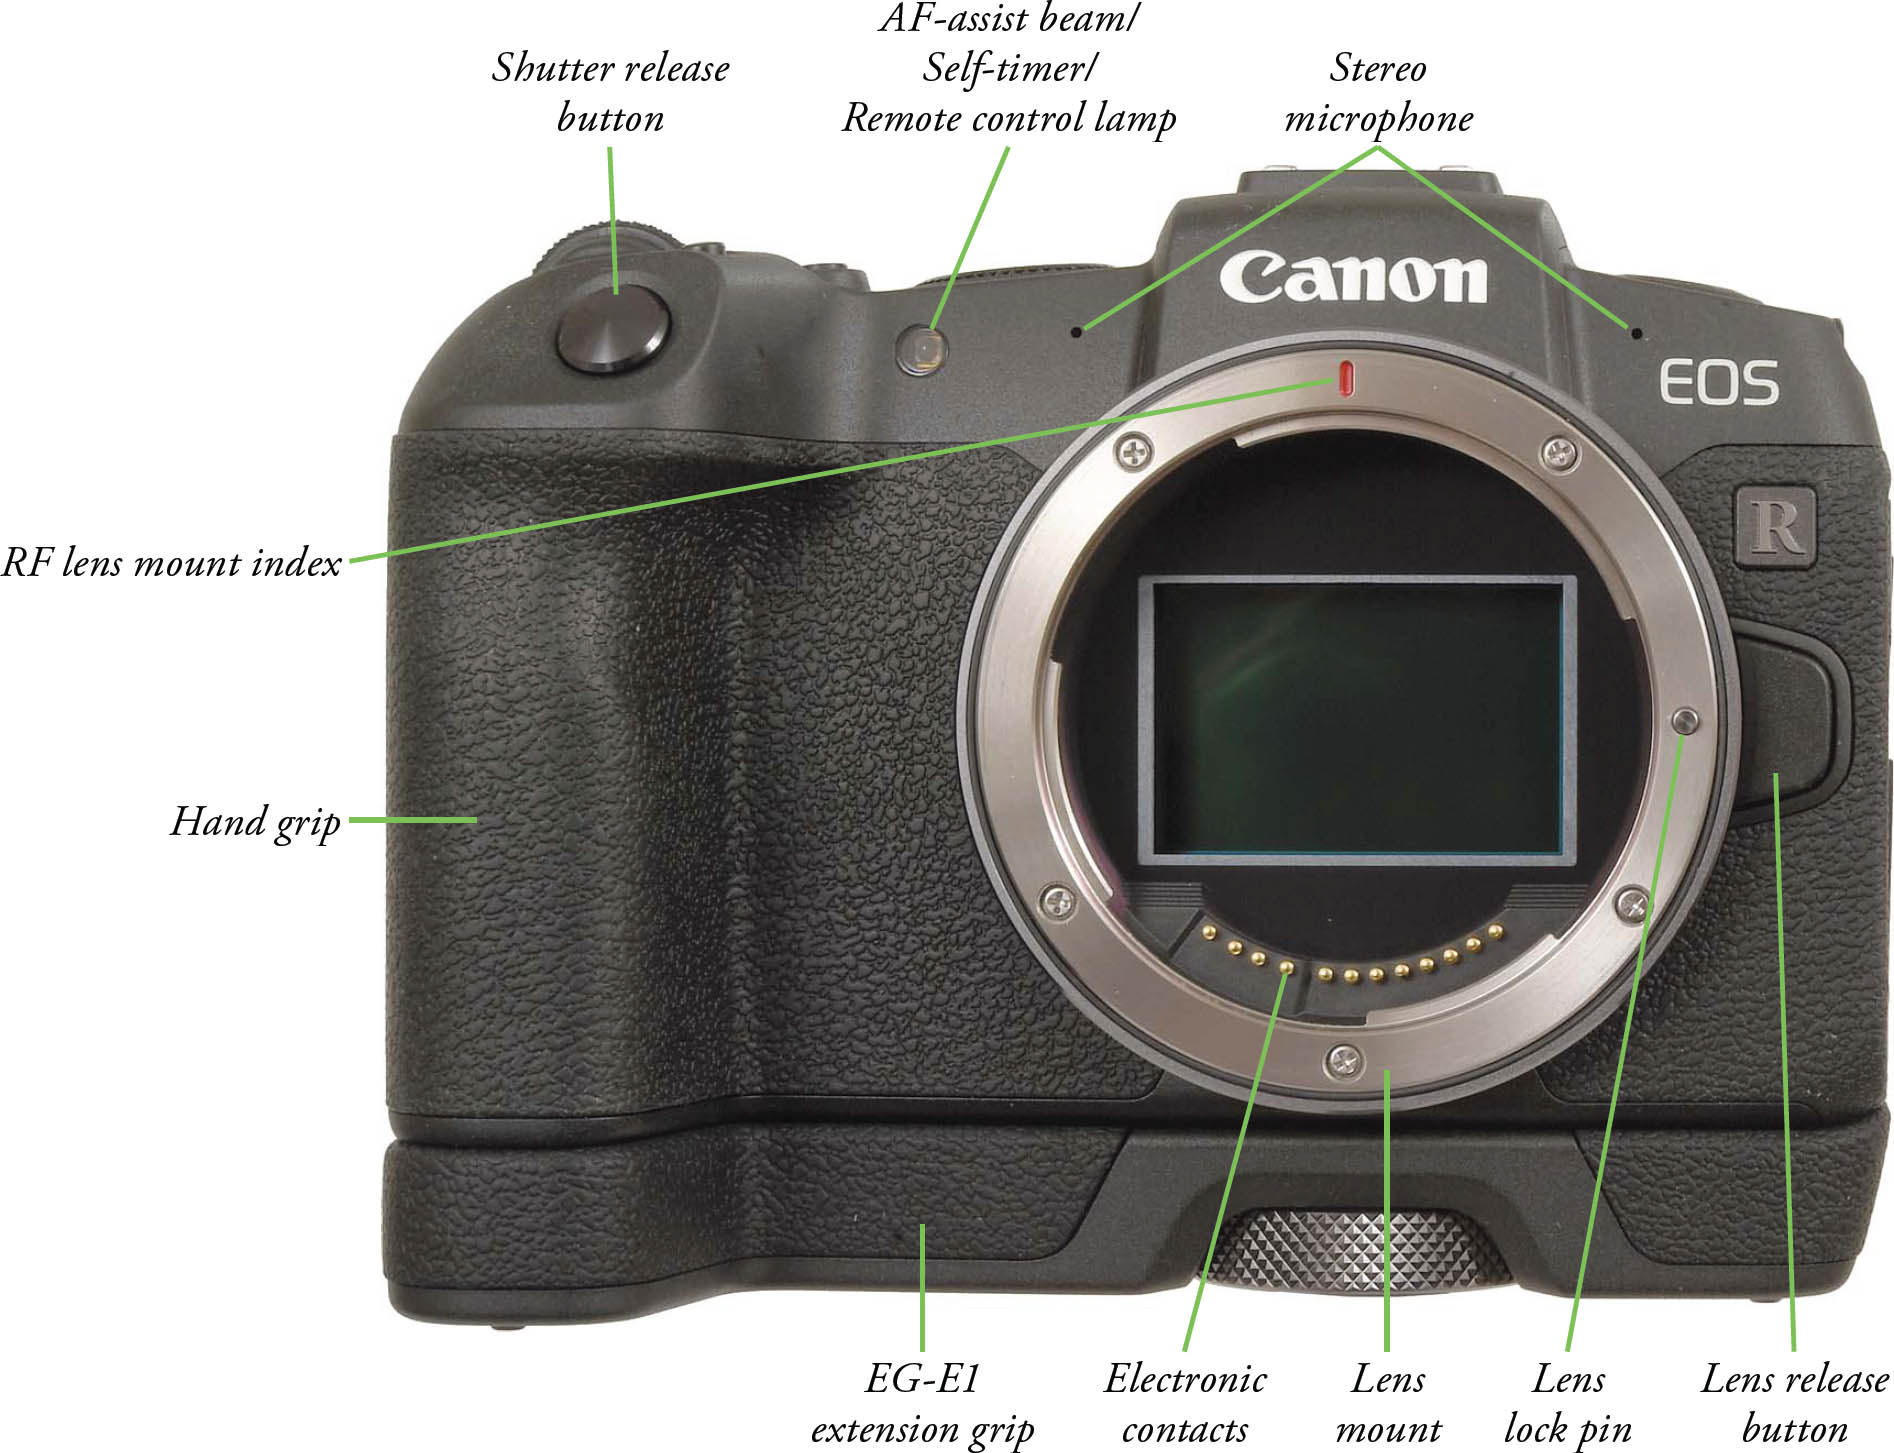
Figure 2.1
- AF-assist beam/Self-timer/Remote control lamp. This LED flashes when needed to provide additional illumination to facilitate autofocus. This lamp also flashes to indicate that the remote control has connected, and when using the self-timer to mark the countdown until the photo is taken.
- Hand grip. This provides a comfortable hand-hold, and also contains the EOS RP’s battery and memory card.
- Lens mount. This sturdy flange accepts a matching bayonet on the rear of each lens or accessory you mount on the EOS RP.
- Lens release button. Press and hold this button to unlock the lens so you can rotate the lens to remove it from the camera.
- Lens lock pin. This pin on the lens flange retracts when the release button is held down to unlock the lens.
- RF lens mount index. Line up this mark with the matching red detent on the barrel of your RF or mount adapter lens to align it as you mount it on the camera.
- Electronic contacts. These contacts connect to matching points on the lens to allow the camera and lens to communicate electronically.
- Stereo microphone. The EOS RP has a stereo microphone pair located on either side of the front of the camera slightly above the lens mount.
- EG-E1 extension grip. Some find that this optional extension improves the handling of the rather squat EOS RP camera. When I purchased mine, it was a free add-on: it may be an extracost purchase for those who buy theirs later. I’ll describe this accessory in more detail later in this chapter.
You’ll find more controls on the side of the EOS RP, shown in Figure 2.2. In the illustration, you can also see some of the key components of the lens that is mounted on the camera. The main elements are as follows:
- Lens hood bayonet. Canon offers lens hoods designed specifically for each lens; they attach to this grooved mount that rings the front of the lens, in both forward-facing and reversed positions. The hood serves to keep extraneous light, which reduces contrast and causes flare, from entering the lens. You should always use a hood when shooting, as they are your best protection from damage due to collisions and other mishaps. Filters are designed to shatter easily (that’s how filter manufacturers convince you to buy more filters to “save” your lens), and are best reserved for when you want to filter something, or are working in wet or dusty environments. (Lens hoods won’t disintegrate into razor sharp shards of glass, either.)
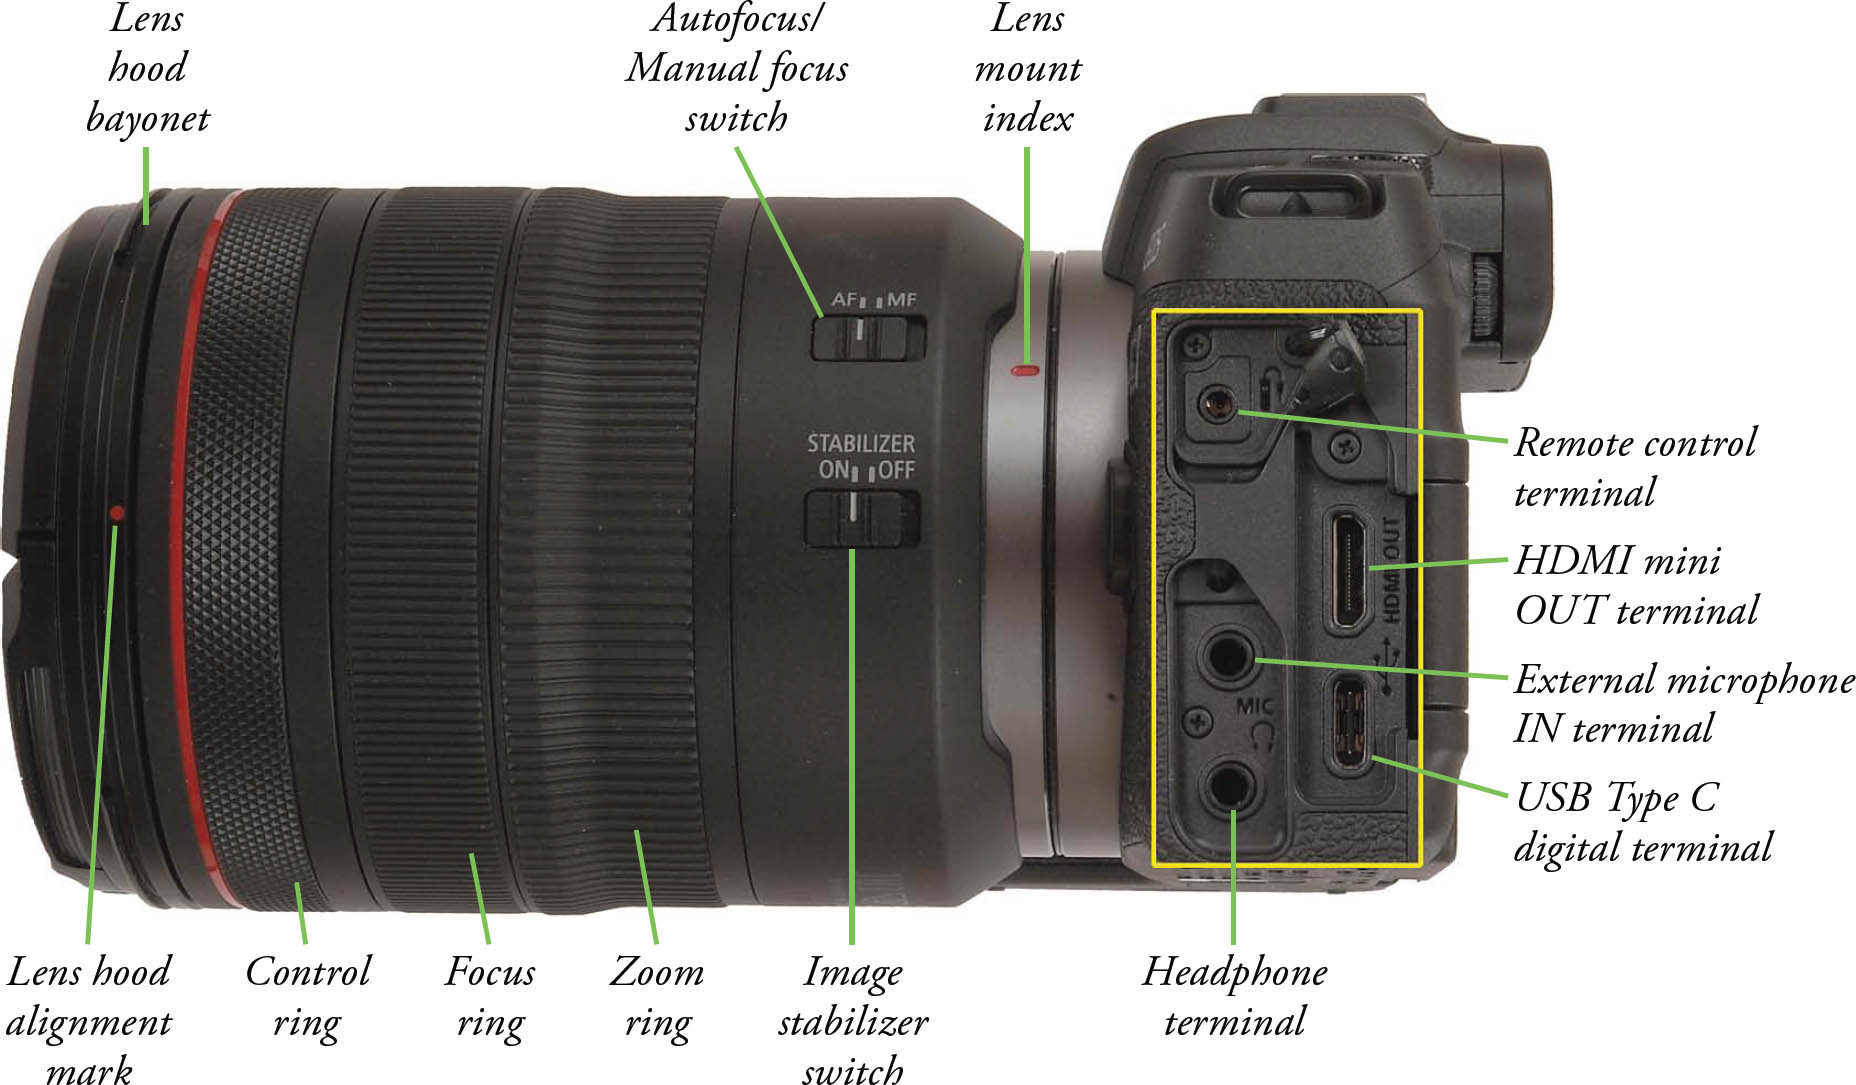
Figure 2.2
- Lens hood alignment mark. Line up a matching indicator on your lens hood, and rotate the hood to fasten it securely to the front of your lens.
- Control ring. This brilliant new feature can be programmed to change aperture, shutter speed, ISO, and exposure compensation, as I’ll explain in Chapter 14.
- Focus ring. Rotate this ring to focus manually or fine-tune autofocus.
- Zoom ring. Turn this ring to zoom in or out.
- Image stabilizer switch. This switch turns image stabilization on and off. You might want to disable IS when the camera is mounted on a tripod.
- Autofocus/Manual focus switch. Canon autofocus lenses have a switch to allow changing between automatic focus and manual focus.
- Lens mount index. This marking on the lens barrel is lined up with the matching mark on the lens mount.
Five terminals/ports are located under the terminal covers, as shown in the yellow box in Figure 2.2. They include:
- Remote control terminal. You can plug in an optional RS-60E3 wired remote switch, or TC-80N3 timer remote controller (with the required RA-E3 remote controller adapter).
- USB Type C digital terminal. This Type C connector accepts an optional USB cable, which you can use to transfer photos to your computer. The terminal can be used with the Wireless File Transmitter WFT-E7 II and GPS Receiver GP-E2.
- HDMI mini OUT terminal. You’ll need to buy an accessory cable to connect your EOS RP to an HDMI-compatible television, video recorder, or other device, as one to fit this terminal is not provided with the camera. If you have a high-resolution television, it’s worth the expenditure to be able to view your camera’s output in all its glory. Canon’s HDMI cable HTC-100, and other Type C HDMI cables are compatible.
- Headphone terminal. Connect headphones or other audio playback gear here. It accepts a 3.5mm stereo mini-plug.
- External microphone IN terminal. Connect an external stereo microphone with a 3.5mm stereo mini-plug here to bypass the internal stereo microphone pair when recording sound.
The Canon EOS RP’s Business End
The back panel of the EOS RP (see Figure 2.3) bristles with more than a dozen different controls, buttons, and knobs. That might seem like a lot of components to learn, but you’ll find that the camera has a reasonable number of dedicated controls that make routine adjustments more quickly than a visit to a traditional menu every time you want to change a setting.

Figure 2.3
You can see the controls clustered on the upper edge of the back panel in Figure 2.4. The key buttons and components and their functions are as follows:
- MENU button. Summons/exits the menu displayed on the LCD screen or electronic viewfinder of the EOS RP. When you’re working with submenus, this button also serves to exit a submenu and return to the main menu.
- Dioptric adjustment control. Rotate this knob while looking through the viewfinder to make adjustments for your vision, as described in Chapter 1.
- Viewfinder eyecup/eyepiece. You can frame your composition by peering into the viewfinder eyepiece. It’s surrounded by a soft rubber eyecup/frame that seals out extraneous light when pressing your eye tightly up to the viewfinder, and it also protects your eyeglass lenses (if worn) from scratching.
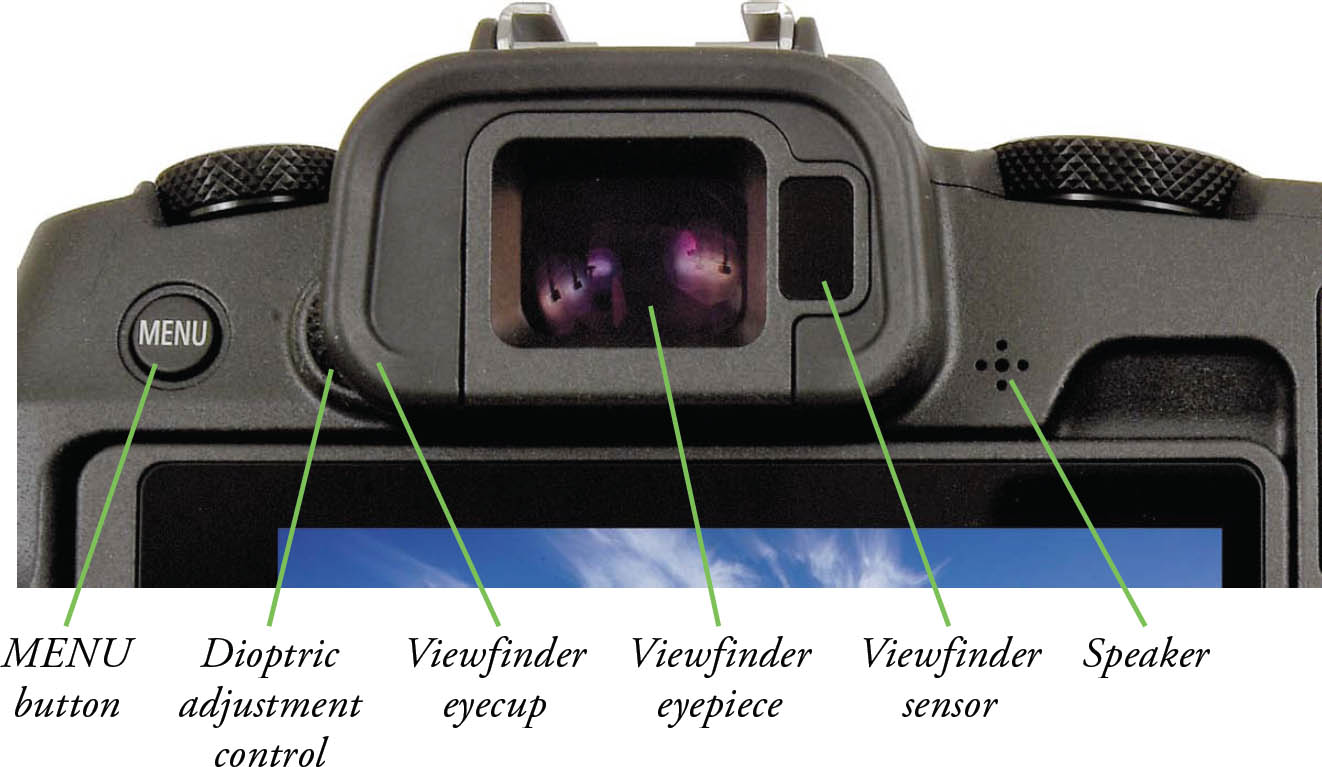
Figure 2.4
- Viewfinder sensor. This sensor recognizes when your eye (or any other object) approaches the viewfinder eyepiece. By default, the EOS RP switches between the two automatically, but you can configure the camera to switch only manually, using the Display Settings entry in the Set-up 4 menu, as described in Chapter 13.
- Speaker. Beeps and other sounds emitted by your camera emanate from this speaker.
Right Side Controls
More buttons reside on the right side of the back panel, as shown in Figure 2.5. The key controls and their functions are as follows:
- Quick Control Dial (QCD). Used to select shooting options, such as f/stop or exposure compensation value, or to navigate through menus. It also serves as an alternate controller for some functions set with other controls, such as AF point selection.
- AF-ON button. Press this button to activate the autofocus system without needing to partially depress the shutter release. This control, used with other buttons, allows you to lock exposure and focus separately. Lock exposure by pressing the shutter release halfway, or by pressing the AE lock button; autofocus by pressing the shutter release halfway, or by pressing the AF-ON button. Functions of this button will be explained in more detail in Chapter 5.
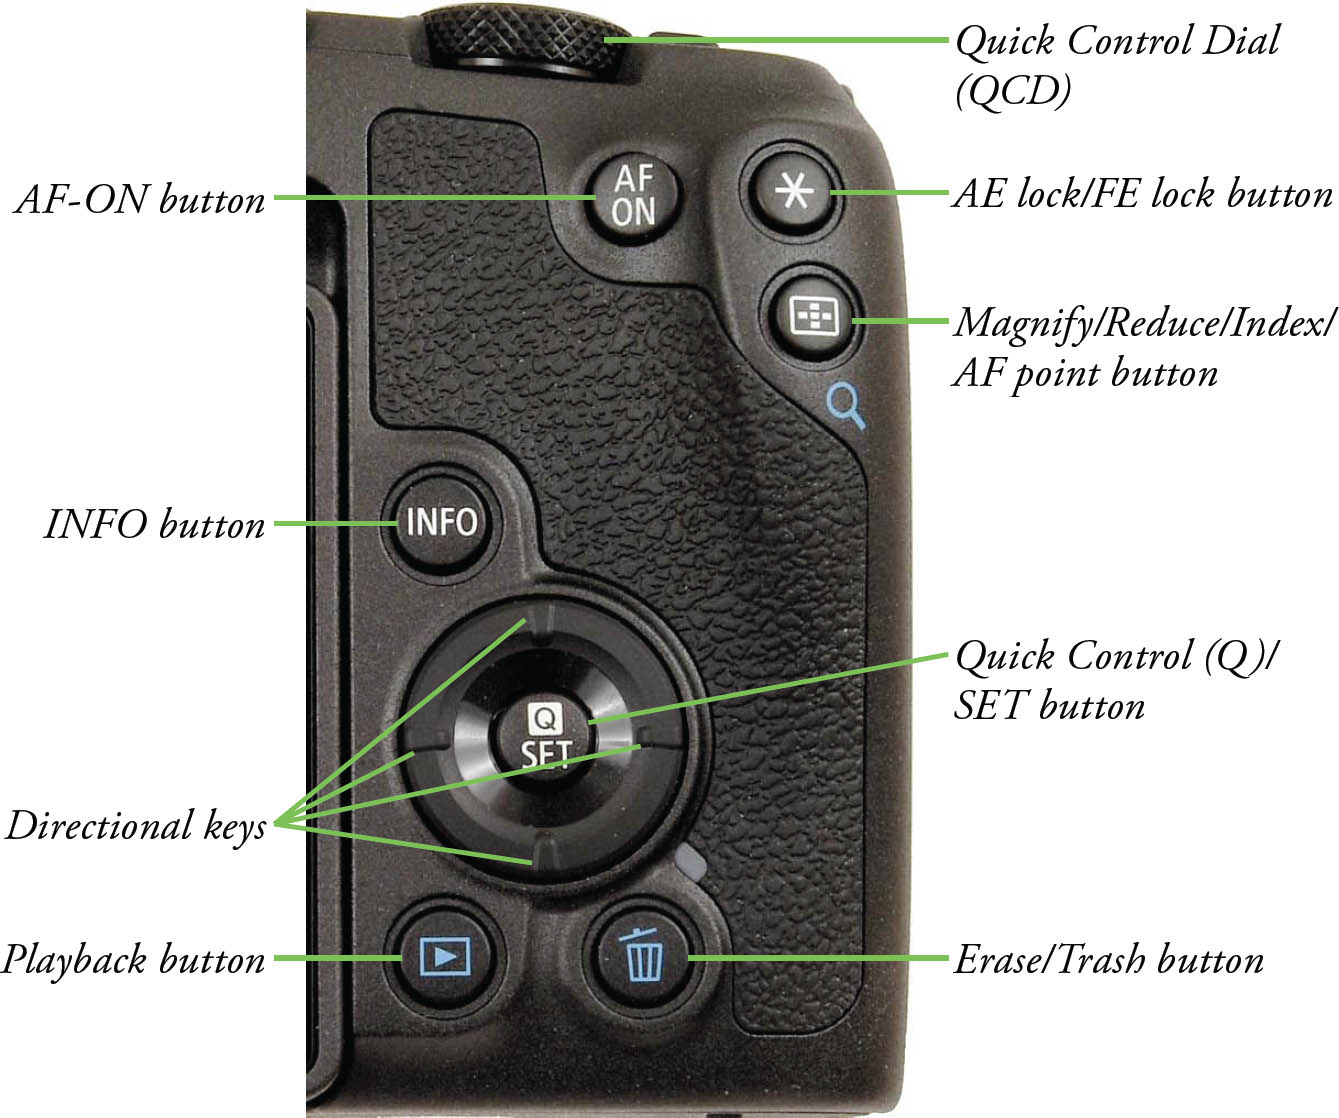
Figure 2.5
- AE/FE (autoexposure/flash exposure) lock button. In Shooting mode, it locks the exposure or external flash exposure that the camera sets when you partially depress the shutter button. The exposure lock indication (*) appears at lower left in the display. If you want to recalculate exposure with the shutter button still partially depressed, press the * button again. The exposure will be unlocked when you release the shutter button or take the picture. To retain the exposure lock for subsequent photos, keep the * button pressed while shooting.
When using external flash, pressing the * button fires an extra pre-flash when you partially depress the shutter button that allows the unit to calculate and lock exposure prior to taking the picture.
- Magnify/Reduce/Index/AF point button. This button has separate functions for Shooting and Playback modes.
- Shooting mode. Press this button once, then press the M-Fn button multiple times to cycle through the available AF methods. Then, press SET to confirm your choice. (See Chapter 5 for information on setting autofocus/exposure point selection.) If you press it once without pressing the M-Fn button, it functions as an AF Point Selection button; you can then use the directional buttons or Quick Control and Main Dials to select the autofocus point.
- Playback mode. Press this button and release it. Then rotate the Main Dial to the right to progressively zoom in on a still image. Rotate the Main Dial to the left to zoom out to full-frame mode and then to 4-, 9-, 36-, and 100-image index views. In any index or magnified view, press SET to see a full-frame view of the currently highlighted image.
- Quick Control (Q)/SET button. Press this button to produce the Quick Control screen, which gives you access to many features when in Shooting mode. When making choices, the button serves as a SET/Enter control to activate or confirm your selection. When you’re reviewing images in Playback, a different Quick Control screen pops up that allows you to protect or rate images, change jump method, resize, crop, rotate, or perform other functions. I’ll show you how to work with the two Quick Control screens later in this chapter.
- Access lamp. When lit or blinking, this lamp indicates that the memory card is being accessed.
- Erase/Trash button. In Playback mode, this button deletes the currently displayed image.
- Playback button. Displays the most recent image.
- Directional keys. Used to navigate menus and image displays and position focus point/zones.
- INFO button. Changes the type of information displayed in shooting and playback modes. It’s also used within some menu screens to access additional information or options.
Mastering the Touch Screen
The EOS RP’s versatile 3.0-inch LCD display screen is articulated so it can be positioned in multiple orientations and is also touch sensitive for rapid selection of menu and focus options. The articulation feature makes it easy to take pictures in a variety of orientations. Using the touch screen, you can perform many routine operations, including menu navigation/selection functions, by tapping the screen. This section will show you how to best make use of those features.
Flexible View
The articulated screen offers several alternative ways of previewing and reviewing your images in ways that the electronic viewfinder can’t. Here are a few to consider:
- Selfie mode. Swing the LCD out from the body and rotate it so the screen is pointing in the same direction as the lens. Mount the EOS RP on a tripod, or any temporary resting place, then position yourself (alone or with a group) for a selfie. You can see the image the camera will capture before taking the shot with the self-timer or remote control. The camera can immediately display the photo, so you can review it and change poses before taking another shot, if you like.
- Share the fun. Even if you’re not in the picture yourself, you can share the image you’re about to take with your subject when the LCD is in the “selfie” position. (See Figure 2.6, left.) It works best if the camera is on a tripod. Your subject can evaluate the pose, adjust his or her hair, or turn to their “good” side before you shoot. When you move your eye to the viewfinder, the LCD preview will turn off, and you’ll be able to see the image as you take the picture.

Figure 2.6 The articulated screen allows multiple views.
- Waist-level view. With the LCD swung out, you can tilt the screen back, giving you a waist-level preview of the picture you’re about to take. That perspective can be especially useful when photographing low-lying subjects without needing to crouch or get down on your hands and knees. It’s also useful for semi-stealth photography, because you don’t need to bring the camera up to your eye to compose the image. (See Figure 2.6, right.)
- Periscope view. The screen can pivot so it is facing completely downward so you can hold the camera over your head and shoot using a periscopic perspective. Great for shooting over crowds, particularly at parades.
- Screen protection. Swivel the screen so the back of the LCD is facing outward, and you’ve got solid protection—at least from scratches and minor impacts. Even so, I’d avoid whacking the back of the camera. But it’s nice to keep your screen shielded when traveling.
Touch Operation
Of course, for many veteran shooters, some touch-friendly tasks, such as navigating through menus, may be no quicker than the button/dial procedures we are used to, and can even be more awkward for those with large fingers or who need/want to wear gloves. However, there are several uses for the touch screen that border on outstanding as you become more accustomed to working with the EOS RP’s screen. You can even use it while viewing through the electronic viewfinder! Here are some of the things you can do:
- Move focus point while using the EVF. You can touch the screen with one finger and drag to move the AF point or Zone AF frame around as you preview your image through the viewfinder. You just need to activate the Touch & Drag AF feature in the Shooting 7 menu and choose one of several alternative methods for specifying the active area of the screen and how the point or zone moves. I’ll explain how to use this feature in Chapter 5.
- Touch focus point/shutter. While viewing the touch screen you can specify the exact focus point (or zone) you want by tapping the screen. The camera can focus at the point you just selected, or even take a picture if you’ve activated the Touch Shutter feature (using an icon located at lower left on the screen). If you’d prefer to drag the point around the screen to the desired location, press the point selection button, and then swipe your finger around the touch screen to move the focus point. (See Chapter 5 for more on this.)
- Menu navigation. You may find some menu operations are easier to complete using the touch screen, although, as I noted, many of us prefer old-school directional buttons and dials.
- Text entry. If you’ve ever had to type in copyright information, tried to rename the My Menu tab, or performed any other text-entry operation using the EOS RP’s buttons and dials, you’ll appreciate the ability to just tap on the virtual keyboard to input your data (See Figure 2.7.)
- Playback. As you’ll see, you can scroll through images rapidly during review, zoom in and out, and perform other functions that are much clumsier with buttons and dials—even if you’ve had years of experience and are adept with the traditional methods.
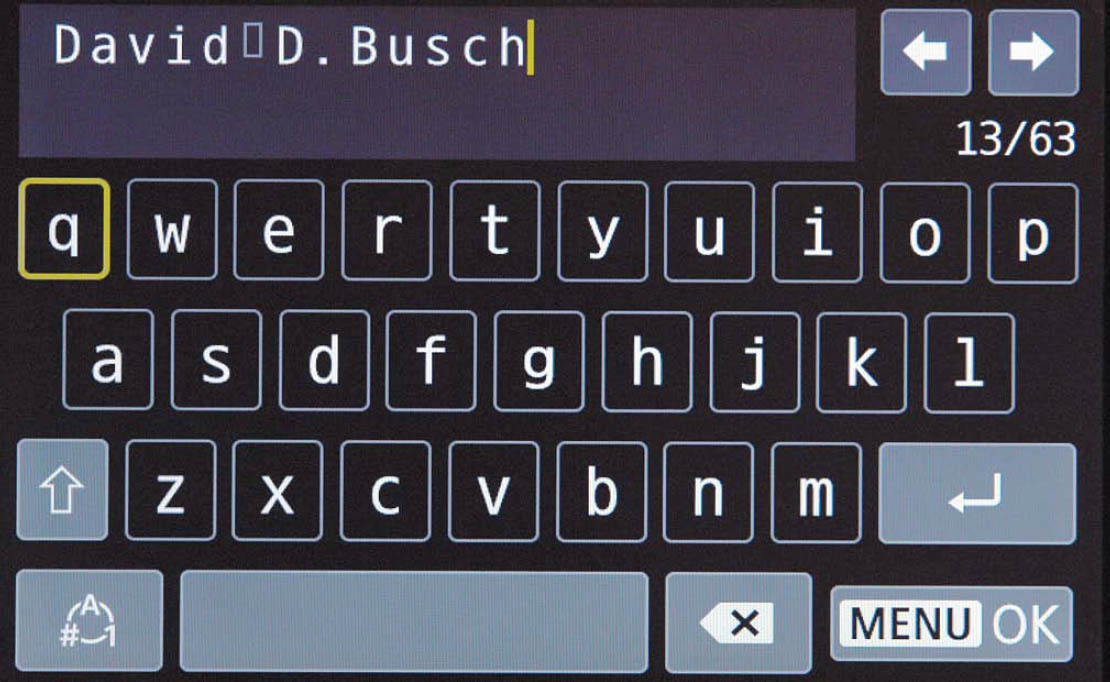
Figure 2.7 The EOS RP’s virtual keyboard makes text entry easy.
When you’ve activated the touch screen using the Touch Control entry in the Set-up 3 menu (as described in Chapter 13), you have a large range of capabilities available to you with a simple tap on the screen (represented by the green/red circles shown in Figure 2.8). Here’s a quick overview of the options:
- 1. Quick Control menu. Tap the Q icon in the upper right of the screen and the Quick Control menu (which I first showed you in Figure 1.11 in the first chapter) pops up. You can adjust any of the options shown in the left and right columns in Figure 2.8. I’ll show you more Quick Control options at the end of this chapter.
- 2. Touch shutter. Tap here to turn the touch shutter feature on or off. When active, tapping the screen tells the EOS RP to focus at the point you’ve specified and take a picture.
- 3. Adjust shutter speed or aperture. You can adjust any parameter with a box around it. The camera is set for Tv shooting mode (Shutter-priority), so you can tap the box displaying the current shutter speed, then rotate either dial or use the left/right directional buttons to change the shutter speed. In Av (Aperture-priority) mode, you can change the f/stop; in M (Manual) mode, both shutter speed and aperture can be adjusted.
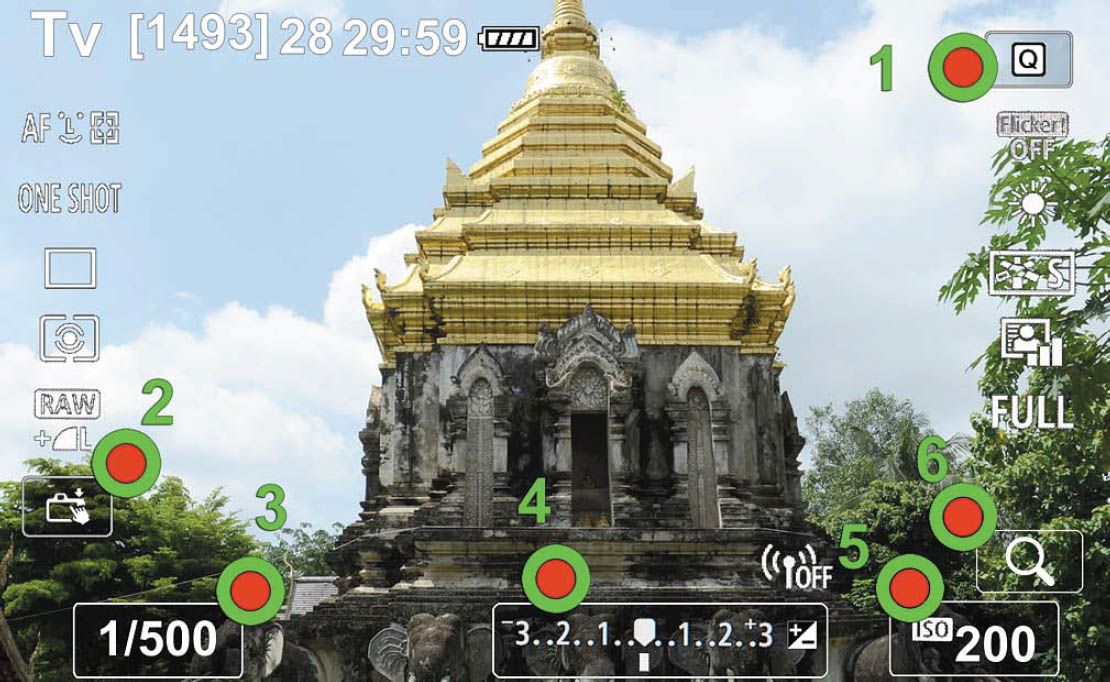
Figure 2.8 Tap any of the boxed icons to change that function’s settings.
- 4. Exposure compensation. Tap this scale and use the dials/directional buttons (or tap the scale itself) to add or subtract from the metered exposure. I’ll explain exposure compensation in more detail in Chapter 4.
- 5. ISO sensitivity. Tap the ISO icon to select a fixed ISO setting or ISO Auto.
- 6. Zoom. Tap the magnifying glass immediately above the ISO icon to zoom in on your image.
TIP: YOUR CHOICE
Throughout this book, I may not explicitly say “tap the screen, or use the button, or visit the menu” for every single operation. Given the large number of how-to entries in this book, that would require unnecessarily long descriptions and extra verbiage. I’m going to assume that once you master the touch screen using the information in this section, you’ll make your own choice and use whichever method you prefer. I’ll generally stick to using the physical controls that we’re all accustomed to. But, unless I specifically say to use the touch screen or physical controls, assume I mean you can use either one.
Meaningful Gestures
When a main menu, adjustment screen, or the Quick Control menu is displayed, you will often elect to use the touch screen to make your changes. Optionally, you can resort to the physical controls that provide the equivalent functions, including the available buttons and navigational buttons. However, I think that once you become familiar with the speed with which the touch screen allows you to make these adjustments, you’ll be reluctant to go back to the “old” way of doing things.
The EOS RP’s touch screen is capacitive rather than resistive, making it more like the current generation of smartphones than earlier computer touch-sensitive screens. The difference is that your camera’s LCD responds to the electrical changes that result from contact rather than the force of pressure on the screen itself. That means that the screen can interpret your touches and taps in more complex ways. It “knows” when you’re using two fingers instead of one, and can react to multitouch actions and gestures, such as swiping (to scroll in any direction), and pinching/spreading of fingers to zoom in and out. Since you probably have been using a smartphone for a while, these actions have become ingrained enough to be considered intuitive. Virtually every main and secondary function or menu operation can be accessed from the touch screen. However, if you want to continue using the buttons and dials, the EOS RP retains that method of operation.
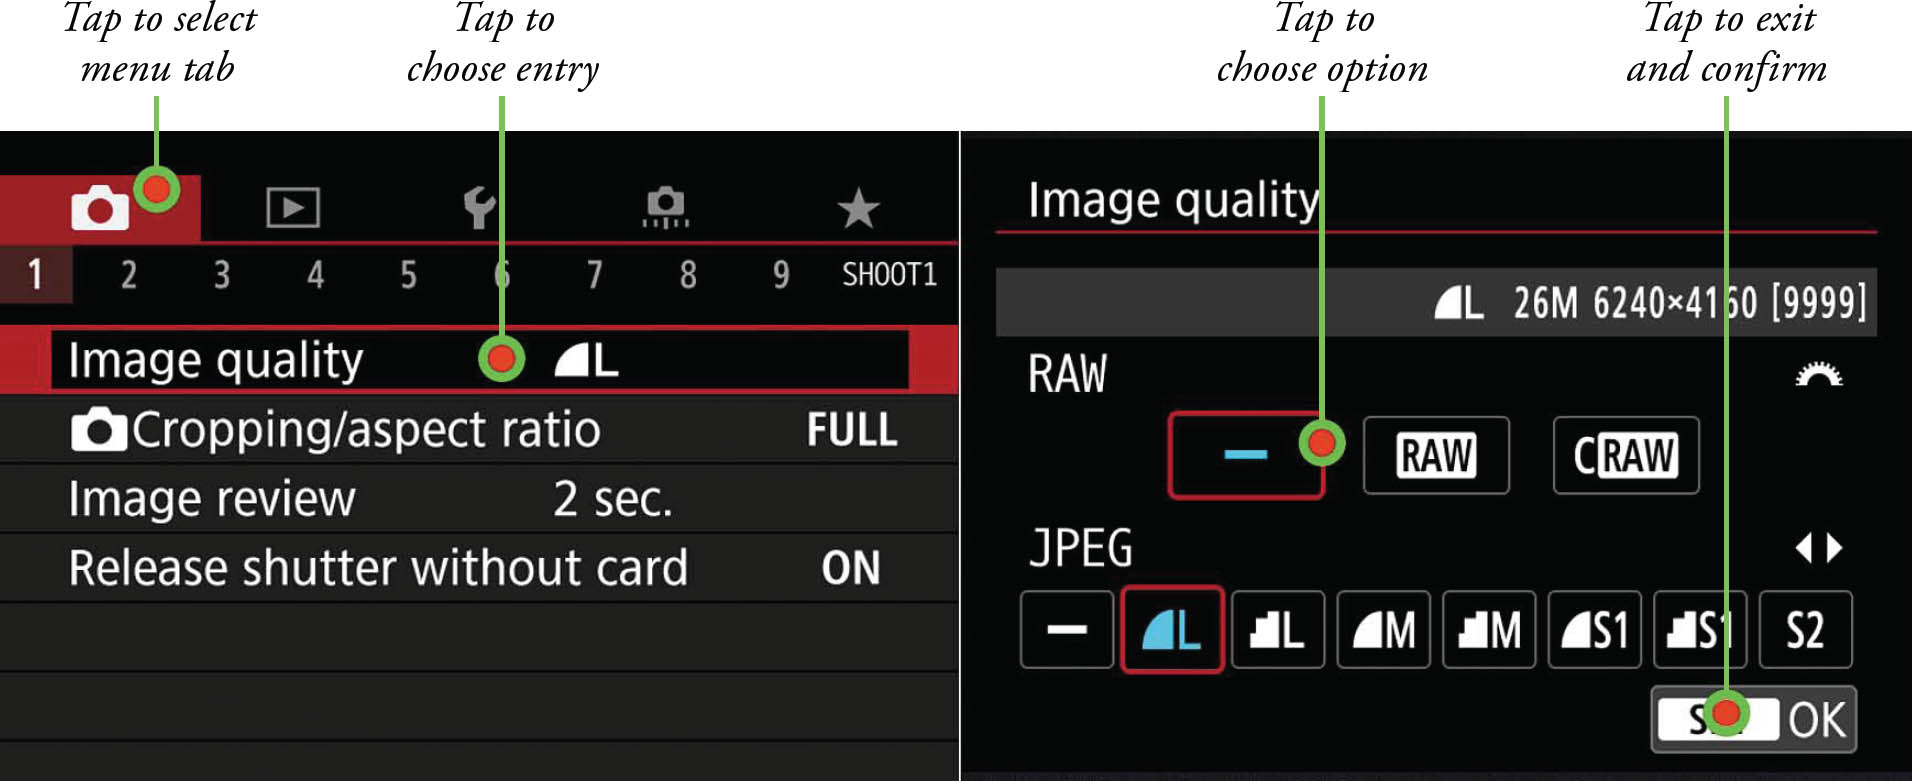
Figure 2.9 Select a menu tab and entry (left) and change settings (right).
Here’s what you need to know to get started:
- Tap to select. Tap (touch the LCD screen briefly) to select an item, including a menu heading or icon. Any item you can tap will have a frame or box around it. Figure 2.9 shows the taps needed to select a menu tab and specific entry within that menu and then make your adjustments on the screen that appears. On settings screens, tappable items will have a box around them.
- Drag/swipe to select. Many functions can be selected by touching the screen and then sliding your finger to the right or left until the item you want is highlighted. For example, instead of tapping, you can slide horizontally along the main menu’s tabs to choose any Shooting, Playback, Custom, Set-up, or My Menu tab. However, you can’t slide vertically to choose an individual menu entry; tap the desired entry instead.
- Drag/swipe to adjust scales. Screens that contain a sliding scale can be adjusted by dragging. In Figure 2.10, left, the arrows show how you can drag along the scale to adjust LCD screen brightness, and at right, to add/subtract exposure compensation. You can also tap the minus/plus buttons, and exit by tapping the SET/OK icon. Even when you are using the touch screen, you can still opt for the Main Dial or QCD to make your changes.
- Pinch/spread to reduce/enlarge. During playback, you can use two fingers to “pinch” the screen to reduce/shrink the image, from, say, single-image to index view. Tap on a thumbnail to view it full size. Spread those two fingers apart to enlarge an image, to zoom in from, say, a 9-image index array to the 4-image display, then to single image. If you continue spreading, you can magnify the image up to about 10X. Tap the return icon to resume single-image display. (See the arrows in the top half of Figure 2.11, left.)
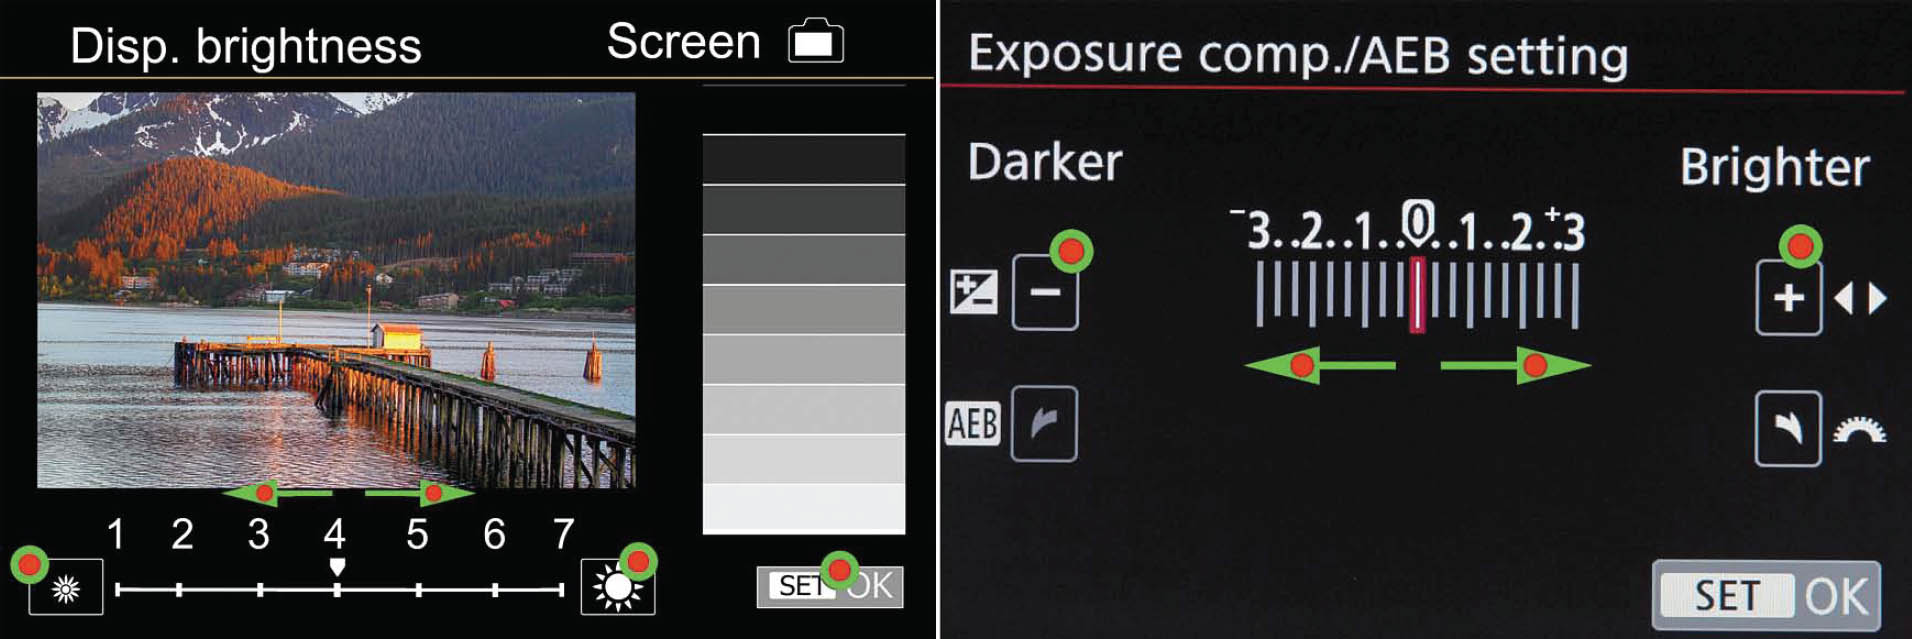
Figure 2.10 Use sliding scales or tap icons to make adjustments in screen brightness (left) and exposure compensation (right).
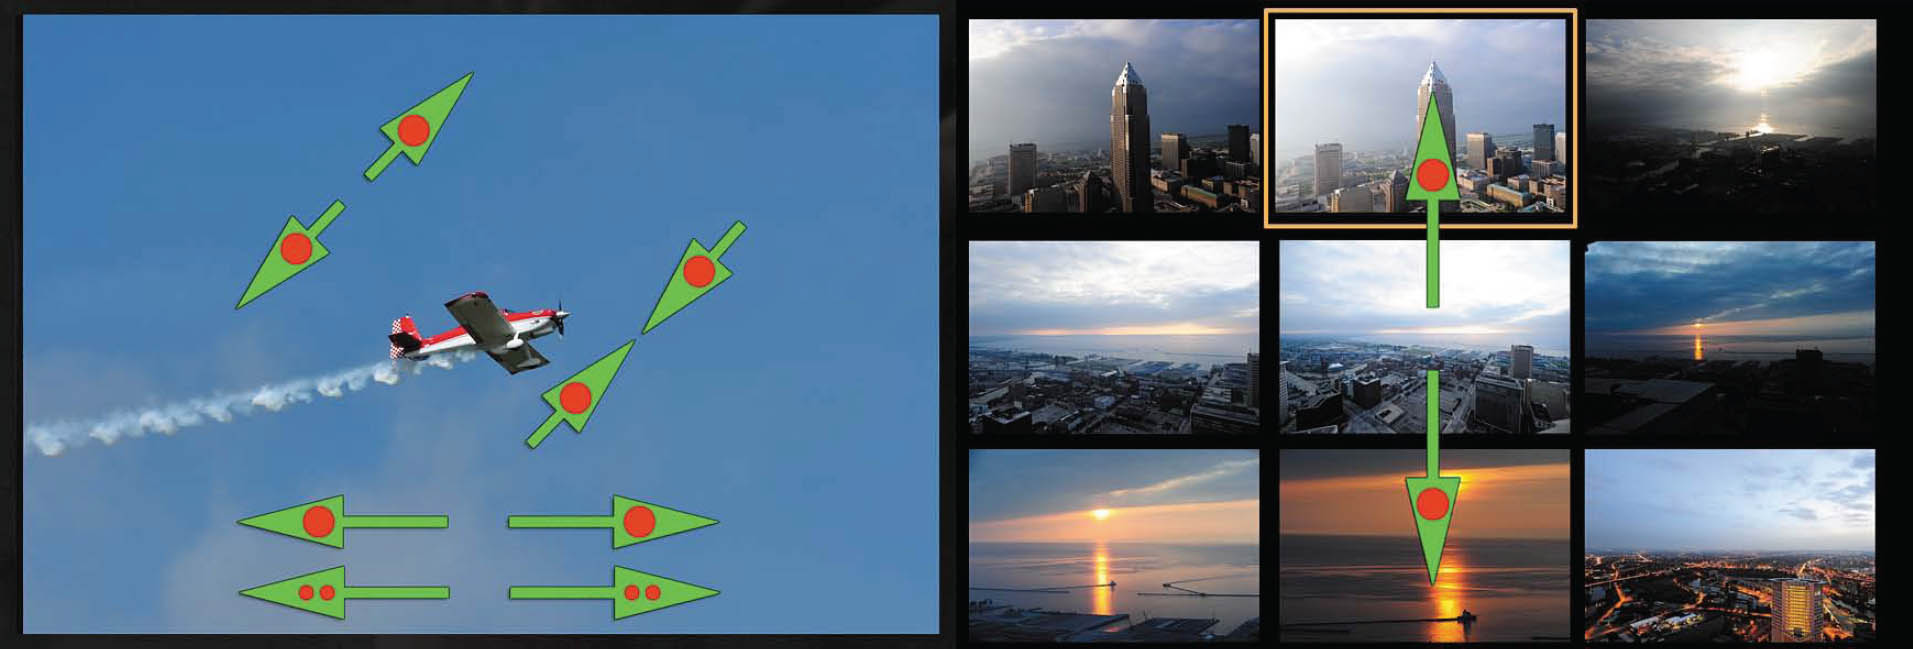
Figure 2.11 In Playback, pinch or spread fingers to magnify or reduce images (top left), and swipe/drag to move/jump among them (bottom left). You can scroll among thumbnails, too (right).
- Drag/swipe to scroll among single images. In Playback single-image mode, as you review your images, you can drag your finger left and right to advance from one image to another, much as you might do with a smartphone or tablet computer. Use one finger to scroll one image at a time, and two to jump using the image jump method you’ve chosen in the Playback 3 menu, as described in Chapter 13. The arrows at the bottom of Figure 2.11, left, represent this function.
- Drag to scroll among thumbnails. When viewing thumbnails, you can drag through the thumbnail screen to quickly move among sets of index images, as represented in Figure 2.11, right.
- Fine-tune touch features. As I’ll explain in Chapter 9, you can enable or disable touch operation and change sensitivity from Standard to Sensitive in the Set-up 3 menu under the Touch Control entry. The click sound the touch feature makes can be turned on or off using the Beep setting in the Set-up 3 menu.
- Avoid “protective” sheets, moisture, and sharp implements. The LCD uses capacitive technology to sense your touch, rather than pressure sensitivity. LCD protectors or moisture can interfere with the touch functions, and styluses or sharp objects (such as pens) won’t produce the desired results. I have, in fact, used “skins” and thin tempered glass shields on my EOS RP’s LCD with good results (even though the screen is quite rugged and really doesn’t need protection from scratches), but there is no guarantee that all such protectors will work for you.
As I noted, the choice of whether to use the traditional buttons or touch screen is up to you. I’ve found that with some screens, the controls are too close together to be easily manipulated with my wide fingers. The touch screen can be especially dangerous when working with some functions, such as card formatting. In displays where the icons are large and few in number, such as the screen used to adjust LCD brightness, touch control works just fine. Easiest of all is touch operation during Playback. It’s a no-brainer to swipe your finger from side to side to scroll among images and pinch/spread to zoom out and in.
Going Topside
The top surface of the Canon EOS RP has its own set of frequently accessed controls. The key controls, and two additional lens control features, are shown in Figure 2.12:
- Zoom scale. Shows the current zoom focal length. (Only available on zoom lenses!)
- Zoom lock. When the zoom has been set to its widest position, you can flip this switch to keep the zoom locked there. This avoids possible “zoom creep” when the lens is pointed downward.
- Shutter button. Partially depress this button to lock in exposure and focus. Press all the way to take the picture. Tapping the shutter release when the camera has turned off the autoexposure and autofocus mechanisms reactivates both. When a review image is displayed on the back-panel color LCD, tapping this button removes the image from the display and reactivates the autoexposure and autofocus mechanisms.
- M-Fn button. This multi-function button can be used to change the autofocus area selection mode (as described in Chapter 5). You can assign any of 40 different functions to this control using the Custom Controls feature, as described in Chapter 14.
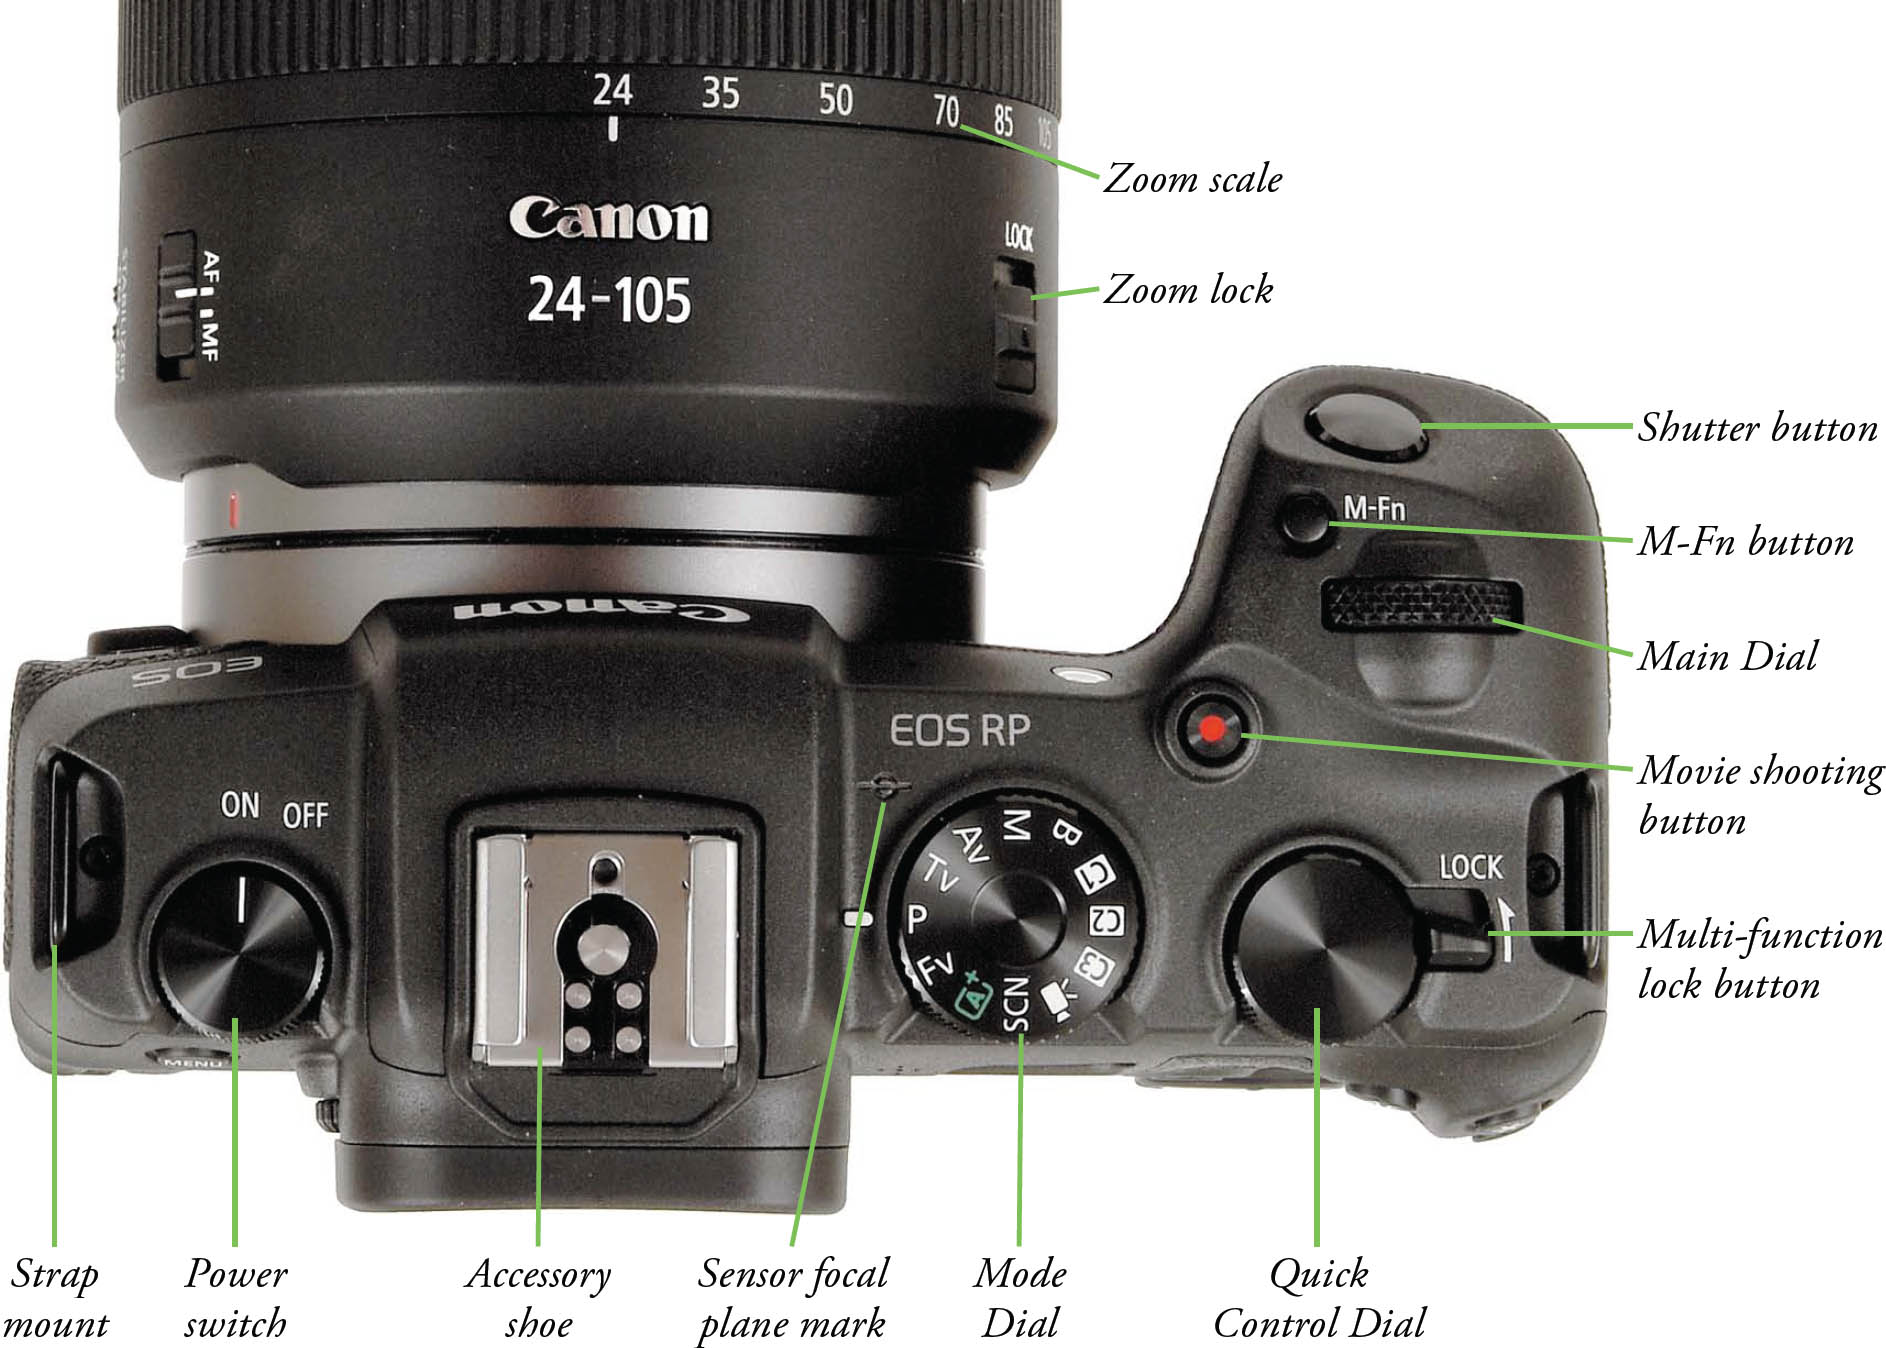
Figure 2.12
- Main Dial. This dial is used to make many shooting settings. When settings come in pairs (such as shutter speed/aperture in Manual shooting mode), the Main Dial is used for one (for example, shutter speed), while the Quick Control Dial is used for the other (aperture). When an image is on the screen during playback, this dial also specifies the leaps that skip a particular number of images during playback of the shots you’ve already taken. Jumps can be 1 image, 10 images, 100 images, jump by date, or jump by screen (that is, by screens of thumbnails when using Index mode), date, or folder. (Jump method is selected in the Playback 3 menu, as described in Chapter 13.) This dial is also used to move among tabs when the MENU button has been pressed, and is used within some menus (in conjunction with the Quick Control Dial) to change pairs of settings.
- Movie shooting button. Press to start capturing video; press again to stop. You can redefine this button to perform any of 40 other functions if you like.
- Multi-function lock button. Pressing this button can be set to lock certain controls to prevent them from being changed accidentally. Press again to unlock those controls. You can choose to lock any or all of the following: Main Dial, Quick Control Dial, M-Fn bar, control ring, or touch screen panel. Choose which of these to lock using the Multi Function Lock entry in the Set-up 6 menu.
- Quick Control Dial. Used to select shooting options, such as f/stop or exposure compensation value, or to navigate through menus. It also serves as an alternate controller for some functions set with other controls, such as AF point selection.
- Mode Dial. Rotate this dial to cycle among the available semi-automatic/manual exposure and Special Scene modes, Movie mode, and to choose one of the camera user settings (C1, C2, or C3).
- Accessory shoe. Slide an electronic flash into this multi-purpose accessory shoe when you need an external Speedlite. A dedicated flash unit, like those from Canon, can use the multiple contact points shown to communicate exposure, zoom setting, white balance information, and other data between the flash and the camera. There’s more on using electronic flash in Chapters 9 and 10.
- Sensor focal plane mark. Precision macro and scientific photography sometimes requires knowing exactly where the focal plane of the sensor is. The symbol on the side of the pentaprism marks that plane.
- Strap mount. A neck strap fastens to this mount, with a matching mount on the other side of the camera.
- Power switch. Rotate to turn the EOS RP on or off.
Underneath Your EOS RP
There’s not a lot going on with the bottom panel of your EOS RP. Here, you’ll find, as shown in Figure 2.13:
- Tripod socket. Secures the camera to a tripod and is also used to lock on the optional EG-E1 Extension Grip.
- Battery/Memory card compartment cover/cover lock. Slide the cover lock latch toward the center of the camera to open the compartment cover and access the LP-E17 battery and memory card. (See Figure 2.13).
- Accessory positioning holes. Fit matching studs on the EG-E1 Extension Grip (available in black-, red-, and blue-accented models).
To mount the grip, slide the battery cover lock to open the door, then push the black battery compartment door release lever toward the back of the camera. That will let you remove the battery door. Then attach the extension grip to the underside of the camera (see Figure 2.14, left), the two pins on the grip with the accessory positioning holes. Tighten the grip’s tripod socket knob (see Figure 2.14, right) to lock the grip onto the bottom of your EOS RP.

Figure 2.13
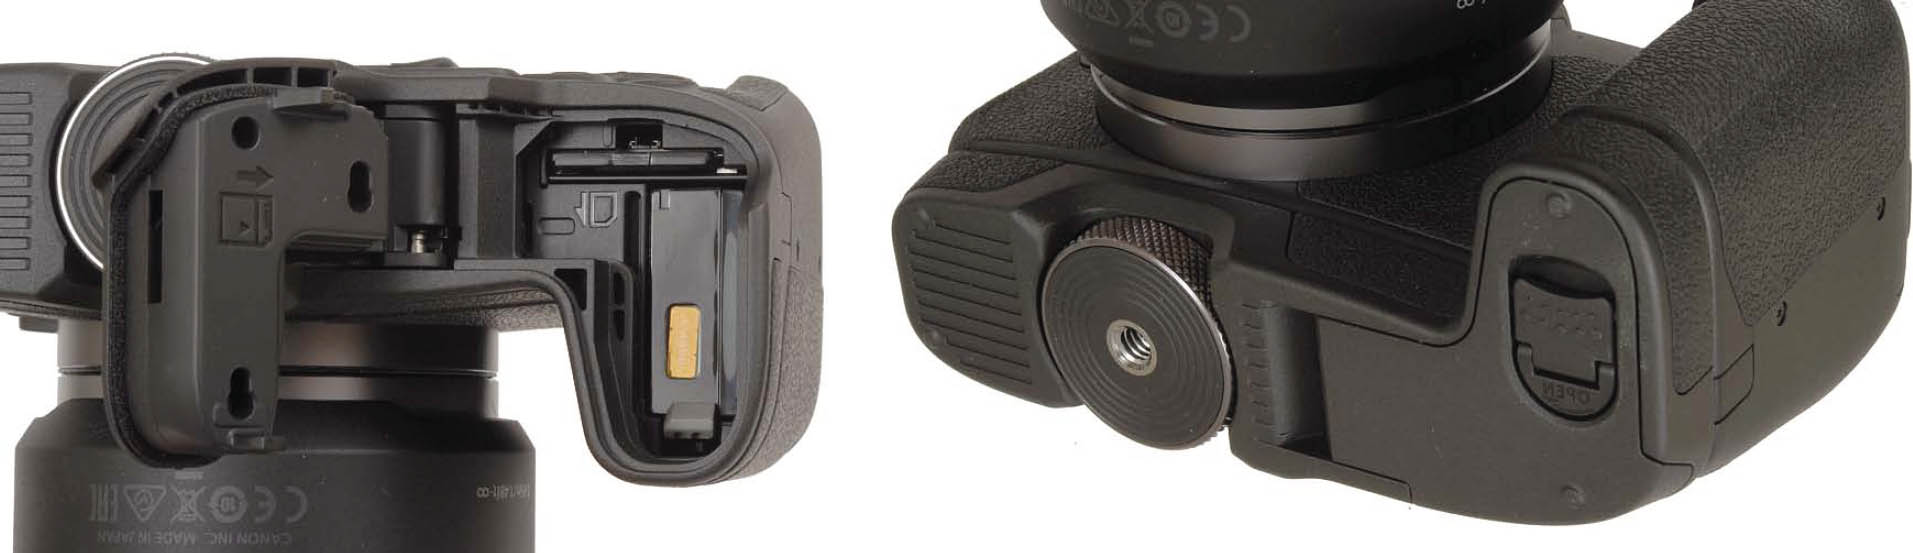
Figure 2.14
Note that Canon does not currently offer a battery/vertical grip for the EOS RP (although one is available for the EOS R). The camera lacks electrical contacts on the bottom that would make a grip with a full array of vertically oriented controls available. However, the removable door and accessory mounting holes do mean that Canon could design a battery-only grip, if there is a significant demand for one. Third-party vendors like Meike have built such grips and included a remote control jack that plugs into the camera’s own remote connector, allowing the grip to include a shutter release button. So far I haven’t heard any rumors about either possibility, but additional bottom-mounted accessories are technically possible.