Getting the right exposure is one of the foundations of a great photograph, but a lot more goes into a compelling shot than good tonal values. A sharp image, proper white balance, good color, and other factors all can help elevate your image from good to exceptional. So, now that you’ve got a good understanding of exposure tucked away, you’ll want to learn how to work with some additional exposure options, use the automatic and manual focusing controls available with the Nikon D3500, and master some of the many ways you can fine-tune your images.
In this chapter I’m including some specific advanced shooting techniques you can apply to your Nikon D3500. If you master these concepts, you can be confident that you’re well on your way toward mastering your Nikon D3500. In fact, you’ll be ready for the discussions of using lenses (Chapter 10) and working with light (Chapter 11).
Continuous Shooting
The Nikon D3500’s 5-frames-per-second Continuous shooting release mode reminds me how far digital photography has brought us. The first accessory I purchased when I worked as a newspaper sports photographer some years ago was a motor drive for my film SLR. It enabled me to snap off a series of shots in rapid succession, which came in very handy when a fullback broke through the line and headed for the end zone. Even a seasoned action photographer can miss the decisive instant when a crucial block is made, or a baseball superstar’s bat shatters and pieces of cork fly out. Continuous shooting simplifies taking a series of pictures, either to ensure that one has more or less the exact moment you want to capture or to capture a sequence that is interesting as a collection of successive images.
The D3500’s “motor drive” capabilities are, in many ways, much superior to what you get with a film camera. For one thing, a motor-driven film camera can eat up film at an incredible pace, which is why many of them were used with cassettes that held hundreds of feet of film stock. At three frames per second (typical of film cameras), a short burst of a few seconds can burn up as much as half of an ordinary 36 exposure roll of film. The Nikon D3500, which fires off bursts at a faster frame rate (up to 5 frames per second), has reusable “film,” so if you waste a few dozen shots on non-decisive moments, you can erase them and shoot more. Figure 9.1 shows the kind of results you can expect.
To use the D3500’s Continuous shooting mode, press the Release mode button (located just above the Trash button) and use the multi selector to set the camera for continuous shooting. When you partially depress the shutter button, the viewfinder will display at the right side a number representing the maximum number of shots you can take at the current quality settings. As a practical matter, the buffer in the Nikon D3500 will generally allow you to take up to a dozen JPEG shots in a single burst, but only a few RAW photos. It can also not be used when using the built-in flash.
To get the maximum number of shots, reduce the image-quality setting by switching to JPEG only (from RAW+Fine), to a lower JPEG quality setting, or by reducing the D3500’s resolution from L to M or S. The reason the size of your bursts is limited is that continuous images are first shuttled into the D3500’s internal memory buffer, then doled out to the memory card as quickly as they can be written to the card. Technically, the D3500 takes the RAW data received from the digital image processor and converts it to the output format you’ve selected—either JPG or NEF (RAW)—and deposits it in the buffer ready to store on the card.
This internal “smart” buffer can suck up photos much more quickly than the memory card and, indeed, some memory cards are significantly faster or slower than others. When the buffer fills, you can’t take any more continuous shots until the D3500 has written some of them to the card, making more room in the buffer. (You should keep in mind that faster memory cards write images more quickly, freeing up buffer space faster.)
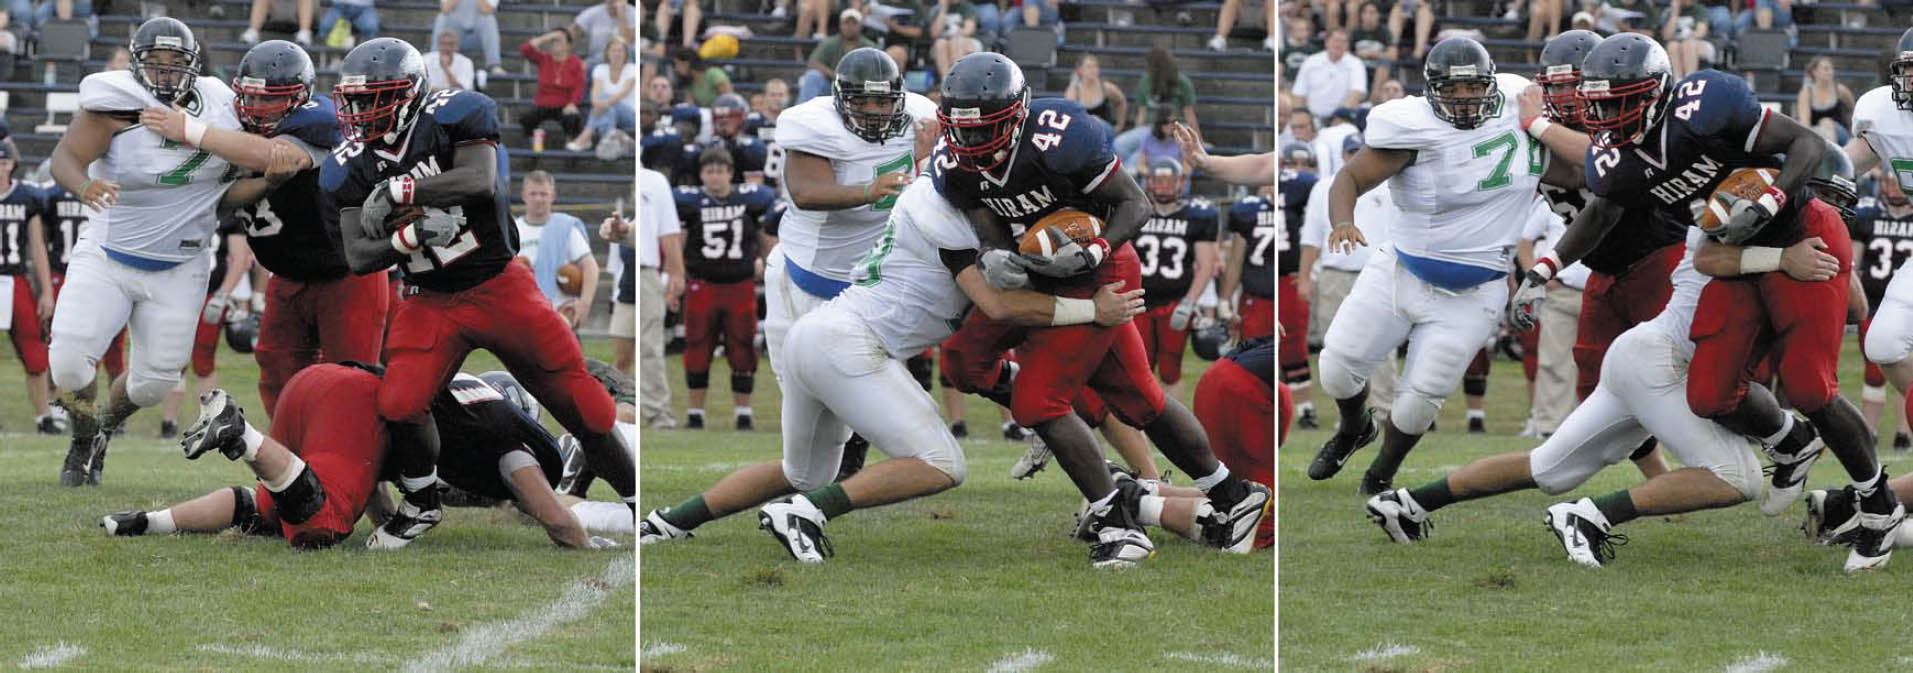
Figure 9.1 Continuous shooting allows you to capture an entire sequence of exciting moments as they unfold.
Exploring Ultra-Fast Exposures
Fast shutter speeds stop action because they capture only a tiny slice of time. Electronic flash also freezes motion by virtue of its extremely short duration—as brief as 1/50,000th second or less. The Nikon D3500 has a top shutter speed of 1/4,000th second and its built-in flash unit fires off brief bursts that can give you more of these ultra-quick glimpses of moving subjects. An external flash, such as one of the Nikon SB-series strobes, offers even more versatility. You can read more about using electronic flash to stop action in Chapter 11.
In this section, I’m going to emphasize the use of short exposures to capture a moment in time. The Nikon D3500 is fully capable of immobilizing all but the fastest movement using only its shutter speeds, which range all the way up to that impressive 1/4,000th second. Some cameras have speeds up to 1/8,000th second, but those ultra-fast shutters are generally overkill when it comes to stopping action, and are rarely needed for achieving the exposure you desire. For example, the image shown in Figure 9.2 required a shutter speed of just 1/2,000th second to freeze the high jumper clearing the bar.

Figure 9.2 A shutter speed of 1/2000th second will stop most action.
When it comes to stopping action, most sports can be frozen at 1/2,000th second or slower, and for many sports a slower shutter speed is actually preferable—for example, to allow the wheels of a racing automobile or motorcycle, or the propeller on a helicopter, to blur realistically.
In practice, shutter speeds faster than 1/4,000th second are rarely required. If you wanted to use an aperture of f/1.8 at ISO 200 outdoors in bright sunlight, say, to throw a background out of focus with a wide aperture’s shallow depth-of-field, a shutter speed of 1/4,000th second would more than do the job. You’d need a faster shutter speed only if you moved the ISO setting to a higher sensitivity, and you probably wouldn’t do that if your goal were to use the widest f/stop possible. Under less than full sunlight, 1/4,000th second is more than fast enough for any conditions you’re likely to encounter. That’s why electronic flash units work so well for high-speed photography when used as the only source of illumination: they provide both the effect of a very brief shutter speed and the high levels of light needed for an exposure.
Of course, as you’ll see, the tiny slices of time extracted by the millisecond duration of an electronic flash exact a penalty. To use flash at its full power setting, you have to use a shutter speed equal to or slower than the maximum sync speed of your camera. With the D3500, the top speed usable for flash is 1/200th second (unless you’re using the special High-speed sync mode I’ll describe in Chapter 11). The sync speed is the fastest speed at which the camera’s focal plane shutter is completely open. At shorter speeds, the camera uses a “slit” passed in front of the sensor to make an exposure. The flash will illuminate only the portion of the slit exposed during the duration of the flash.
Indoors, that shutter speed limitation may cause problems: at 1/200th second, there may be enough existing (“ambient”) light to cause ghost images. Outdoors, you may find it difficult to achieve a correct exposure. In bright sunlight at the lowest ISO settings available with the cameras, an exposure of 1/200th second at f/13 might be required. So, even if you want to use daylight as your main light source, and work with flash only as a fill for shadows, you can have problems. I’ll explain the vagaries of electronic flash in more detail in Chapter 11.
You can have a lot of fun exploring the kinds of pictures you can take using very brief exposure times, whether you decide to take advantage of the action-stopping capabilities of your built-in or external electronic flash or work with the motion-freezing capabilities of the Nikon D3500’s faster shutter speeds (between 1/1,000th and 1/4,000th second). Here are a few ideas to get you started:
- Take revealing images. Fast shutter speeds can help you reveal the real subject behind the façade, by freezing constant motion to capture an enlightening moment in time. Legendary fashion/portrait photographer Philippe Halsman used leaping photos of famous people, such as the Duke and Duchess of Windsor, Richard Nixon, and Salvador Dali, to illuminate their real selves. Halsman said, “When you ask a person to jump, his attention is mostly directed toward the act of jumping and the mask falls so that the real person appears.” Try some high-speed portraits of people you know in motion to see how they appear when concentrating on something other than the portrait.
- Create unreal images. High-speed photography can also produce photographs that show your subjects in ways that are quite unreal. A helicopter in mid-air with its rotors frozen or a motocross cyclist leaping over a ramp, but with all motion stopped so that the rider and machine look as if they were frozen in mid-air, makes for an unusual picture. (See the frozen rotors at top in Figure 9.3.) When we’re accustomed to seeing subjects in motion, seeing them stopped in time can verge on the surreal.
- Capture unseen perspectives. Some things are never seen in real life, except when viewed in a stop-action photograph. MIT professor Dr. Harold Edgerton’s famous balloon burst photographs were only a starting point for the inventor of the electronic flash unit. Freeze a hummingbird in flight for a view of wings that never seem to stop. Or, capture the splashes as liquid falls into a bowl, as shown in Figure 9.4. No electronic flash was required for this image (and wouldn’t have illuminated the water in the bowl as evenly). Instead, a clutch of high-intensity lamps bounced off a green card and an ISO setting of 1600 allowed the camera to capture this image at 1/2,000th second.

Figure 9.3 Freezing a helicopter’s rotors with a fast shutter speed makes for an image that doesn’t look natural (top); a little blur helps convey a feeling of motion (bottom).
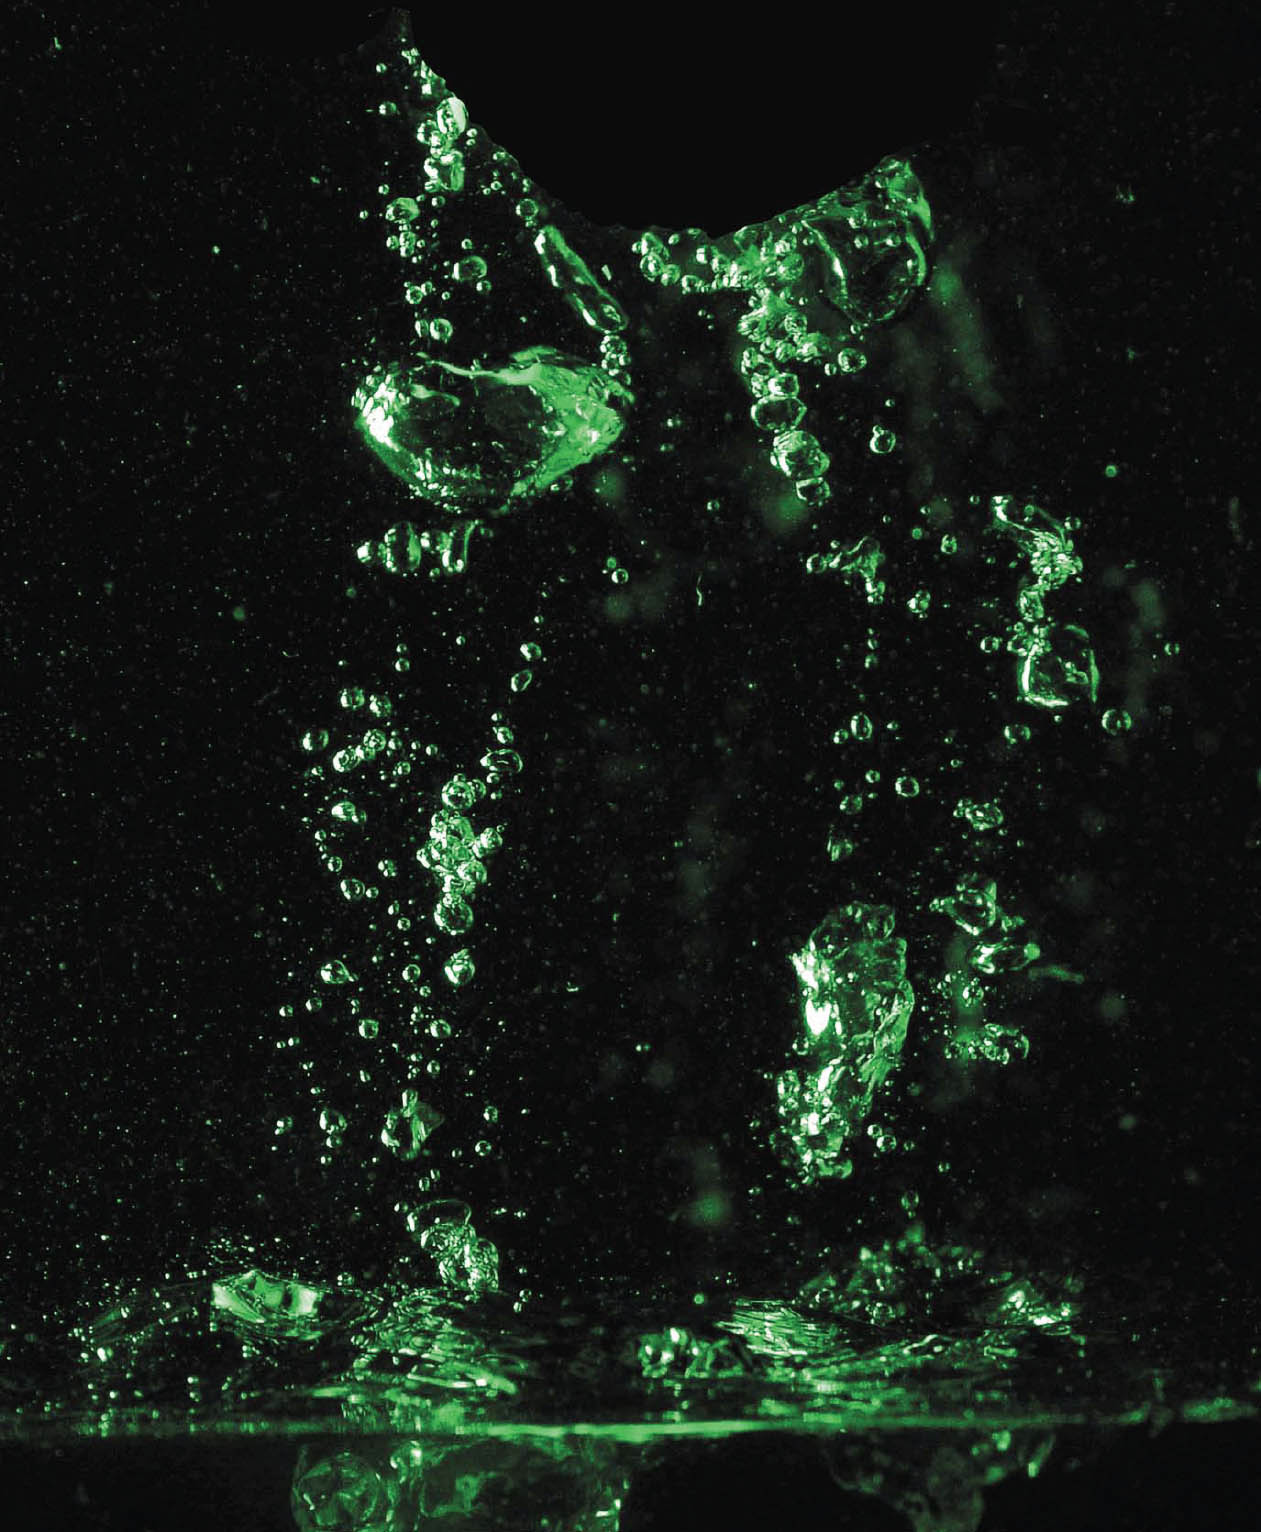
Figure 9.4 A large amount of artificial illumination and an ISO 1600 sensitivity setting allowed capturing this shot at 1/2000th second without use of an electronic flash.
Long Exposures
Longer exposures are a doorway into another world, showing us how even familiar scenes can look much different when photographed over periods measured in seconds. At night, long exposures produce streaks of light from moving, illuminated subjects like automobiles or amusement park rides, such as the Ferris wheel shown in Figure 9.5. Extra-long exposures of seemingly pitch-dark subjects can reveal interesting views using light levels barely bright enough to see by. At any time of day, including daytime (in which case you’ll often need the help of neutral-density filters to make the long exposure practical), long exposures can cause moving objects to vanish entirely, because they don’t remain stationary long enough to register in a photograph.

Figure 9.5 Long exposures can produce interesting streaks of light.
Three Ways to Take Long Exposures
There are actually three common types of lengthy exposures: timed exposures, bulb exposures, and time exposures. The Nikon D3500 offers all three. Because of the length of the exposure, all of the following techniques should be used with a tripod to hold the camera steady.
- Timed exposures. These are long exposures from 1 second to 30 seconds, measured by the camera itself. To take a picture in this range, simply use Manual or Shutter-priority mode and use the control dial to set the shutter speed to the length of time you want, choosing from several preset speeds ranging from 1.0 to 30.0 seconds. The advantage of timed exposures is that the camera does all the calculating for you. There’s no need for a stopwatch. If you review your image on the EVF or LCD and decide to try again with the exposure doubled or halved, you can dial in the correct exposure with precision. The disadvantage of timed exposures is that you can’t take a photo for longer than 30 seconds.
- Bulb exposures. This type of exposure is so-called because in the olden days the photographer squeezed and held an air bulb attached to a tube that provided the force necessary to keep the shutter open. Traditionally, a bulb exposure is one that lasts as long as the shutter release button is pressed; when you release the button, the exposure ends. To make a bulb exposure with the Nikon D3500, set the camera on Manual exposure mode and use the control dial to select the shutter speed immediately after 30 seconds, labeled Bulb. Then, press the shutter to start the exposure, and release it to close the shutter.
- Time exposures. This is an alternate setting used to produce longer exposures. The shutter opens when you press the shutter release button, and remains open until you press the button again. To use the Time exposure feature, put the D3500 in Manual exposure mode, and select the shutter speed after Bulb, labeled Time. Press the shutter button once to start the exposure, and a second time to stop it. The advantage of this approach is that you can take an exposure of virtually any duration without the need for special equipment, as you can take a time exposure by manually pressing the shutter button. There’s no need to remain at the camera holding down the shutter button. You can press the release, go off for a few minutes, and come back to close the shutter (assuming your camera is still there). The disadvantages of this mode are exposures must be timed manually, and with shorter exposures it’s possible for the vibration of manually opening and closing the shutter to register in the photo. For longer exposures, the period of vibration is relatively brief and not usually a problem.
Working with Long Exposures
Because the Nikon D3500 produces such good images at longer exposures, and there are so many creative things you can do with long-exposure techniques, you’ll want to do some experimenting. Get yourself a tripod or another firm support and take some test shots with long exposure noise reduction both enabled and disabled (to see whether you prefer low noise or high detail) and get started. Here are some things to try:
- Make people invisible. One very cool thing about long exposures is that objects that move rapidly enough won’t register at all in a photograph, while the subjects that remain stationary are portrayed in the normal way. That makes it easy to produce people-free landscape photos and architectural photos at night or, even, in full daylight if you use a neutral-density filter (or two or three) to allow an exposure of at least a few seconds. At ISO 100, f/22, and a pair of 8X (three-stop) neutral-density filters, you can use exposures of nearly two seconds; overcast days and/or even more neutral-density filtration would work even better if daylight people vanishing is your goal. They’ll have to be walking very briskly and across the field of view (rather than directly toward the camera) for this to work. At night, it’s much easier to achieve this effect with the 20- to 30-second exposures that are possible. (See Figure 9.6.)
- Create streaks. If you aren’t shooting for total invisibility, long exposures with the camera on a tripod can produce some interesting streaky effects. Even a single 8X ND filter will let you shoot at f/22 and 1/6th second in daylight. Indoors, you can achieve interesting streaks with slow shutter speeds, as shown in Figure 9.7. I shot the dancers using a 1/2-second exposure, triggering the shot at the beginning of a movement.

Tip
Neutral-density filters are gray (non-colored) filters that reduce the amount of light passing through the lens, without adding any color or effect of their own.
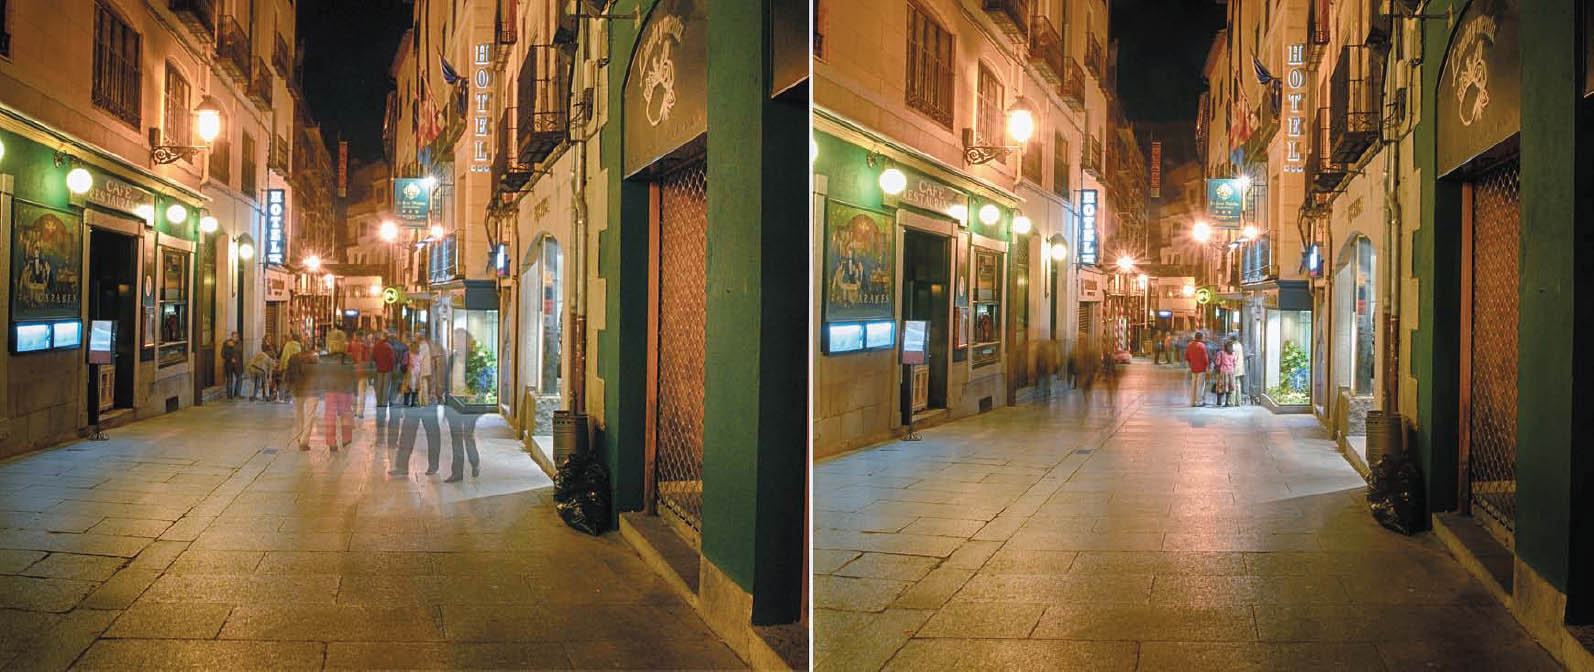
Figure 9.6 This street was packed with tourists (left), but those who were moving were rendered invisible by the 30-second exposure (right).

Figure 9.7 The shutter opened as the dancer began her movement from a standing position, and finished as she rotated.
- Produce light trails. At night, car headlights, taillights, and other moving sources of illumination can generate interesting light trails. Your camera doesn’t even need to be mounted on a tripod; hand-holding the Nikon D3500 for longer exposures adds movement and patterns to your trails. If you’re shooting fireworks, a longer exposure—with a tripod—may allow you to capture a burst as it blossoms, as shown in Figure 9.8.
- Blur waterfalls, etc. You’ll find that waterfalls and other sources of moving liquid produce a special type of long-exposure blur, because the water merges into a fantasy-like veil that looks different at different exposure times, and with different waterfalls. Cascades with turbulent flow produce a rougher look at a given longer exposure than falls that flow smoothly. Although blurred waterfalls have become almost a cliché, there are still plenty of variations for a creative photographer to explore, as you can see in Figure 9.9. For that shot, I incorporated the flowing stream in the background.
- Show total darkness in new ways. Even on the darkest, moonless nights, there is enough starlight or glow from distant illumination sources to see by, and, if you use a long exposure, there is enough light to take a picture, too. I was visiting a Great Lakes park hours after sunset, but found that a several-second exposure revealed the skyline scene shown in Figure 9.10, even though in real life, there was barely enough light to make out the boats in the distance. Although the photo appears as if it were taken at twilight or sunset, in fact the shot was made at 10 p.m.

Figure 9.8 I captured these fireworks using a four-second exposure.
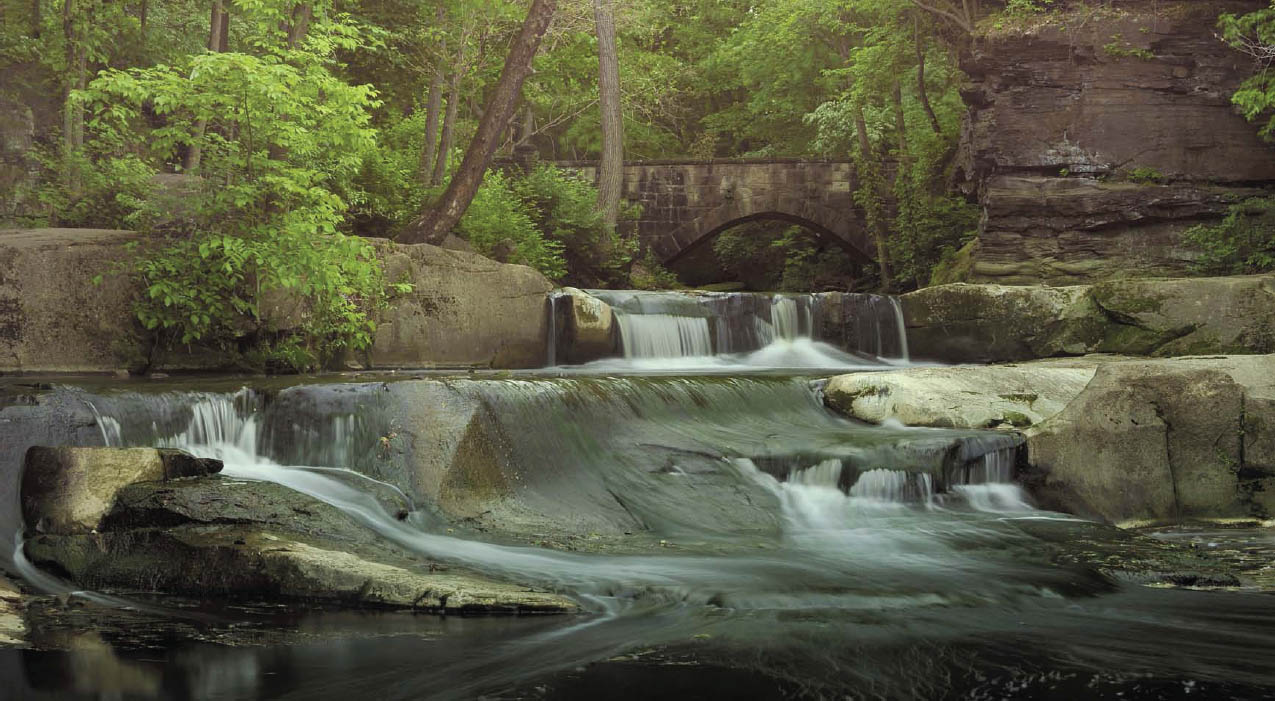
Figure 9.9 Long exposures can transform a waterfall and stream into a display of flowing silk.

Figure 9.10 A long exposure transformed this night scene into a picture apparently taken at dusk.
Using SnapBridge
Nikon has elected to blaze a trail of its own in implementing wireless connectivity on the D3500, using a new system it calls SnapBridge. SnapBridge provides several useful features in letting you link your camera to a smartphone or tablet. At this time, SnapBridge does not allow you to connect your camera to your computer over a Wi-Fi network; communication is strictly between the D3500 and your smart device. Here’s what you can do:
- Bluetooth. If you own an Android or iOS device that supports Bluetooth 4.1, you can connect your camera and device using the D3500’s built-in low-energy Bluetooth connection.
- Auto uploads. You can use SnapBridge to automatically upload JPEG images (but not RAW files) from your camera to your smart device.
- Upload selected photos. During image review, you can press the i button and choose Select to Send to Smart Device/Deselect to choose specific images to transfer to your smart device. You can also use the Select to Send to Smart Device entry in the Playback menu. Up to 1,000 photos can be marked for upload in one session.
- Resize images. Obviously uploading full-resolution images to your smart device would be slow and use a lot of storage space on your device. SnapBridge defaults to low-resolution 2-megapixel images (which should be fine for smart device display or sharing on social media), and the app lets you specify an original size.
- Photo info. The app also lets you choose to embed comments and copyright information entered in the Setup menu (as described in Chapter 5) or entered using the SnapBridge app itself.
- Multiple devices. If you own multiple phones and tablets, you can pair the camera with as many as five different devices. However, the D3500 can connect to only one at a time. You can manually switch between devices using the connection options described shortly.
As I noted earlier, the D3500’s SnapBridge app supports only camera-to-smart-device communications. Your first step in using SnapBridge is to download and install the SnapBridge app onto your smart device (Android phone or tablet) from the Google Play store or Nikon’s snapbridge.nikon.com web link. You can find the iOS version in the Apple iTunes store. There are several ways to connect your D3500 to your device.
- 1. Access Connect To Smart Device. You’ll find this entry in the Setup menu (see Figure 9.11, upper left). As with all menu entries, and those that follow in this list, proceed by pressing the right directional arrow or pressing OK.
- 2. When the screen shown at upper right in Figure 9.11 appears, press OK to advance to the screen where you can connect your smart device and the camera.
- 3. Next, the screen shown at lower left in the figure is displayed on the D3500’s LCD monitor. It advises you to install the SnapBridge app (if you haven’t already).
- 4. Open the SnapBridge app on your device and choose Connect. The D3500 should appear on the list of available connections.
- 5. An authorization screen appears on the D3500 (Figure 9.11, lower right) and on your smart device. The same authorization number should be displayed on each. Press the OK button on the D3500 and Pair on the smart device. When you’re successful, the screen shown in Figure 9.12 appears.
- 6. Press OK again. The Connect screen in the app (shown at left in Figure 9.13) can be used to give permission for the smart device to share location data with the camera. Select Yes and press the right directional button or the OK button to confirm. You can access another version of this screen at any time to enable/disable this feature in the Other > Info/Settings menu of the app on your device.
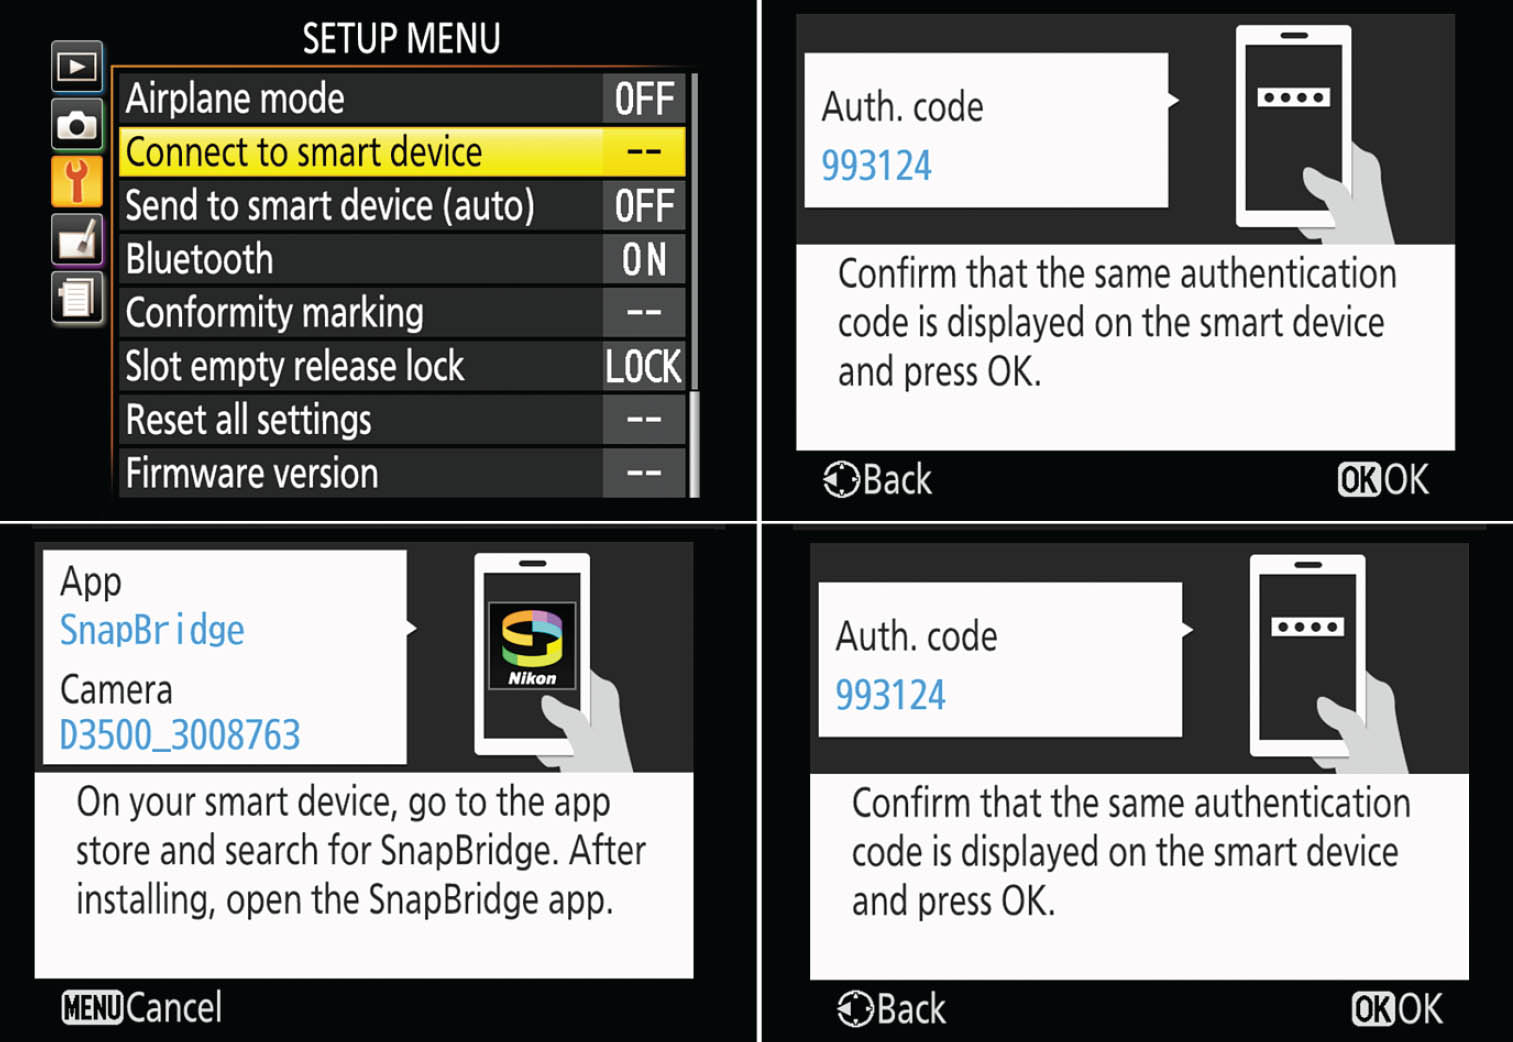
Figure 9.11 Connecting to a smart device.
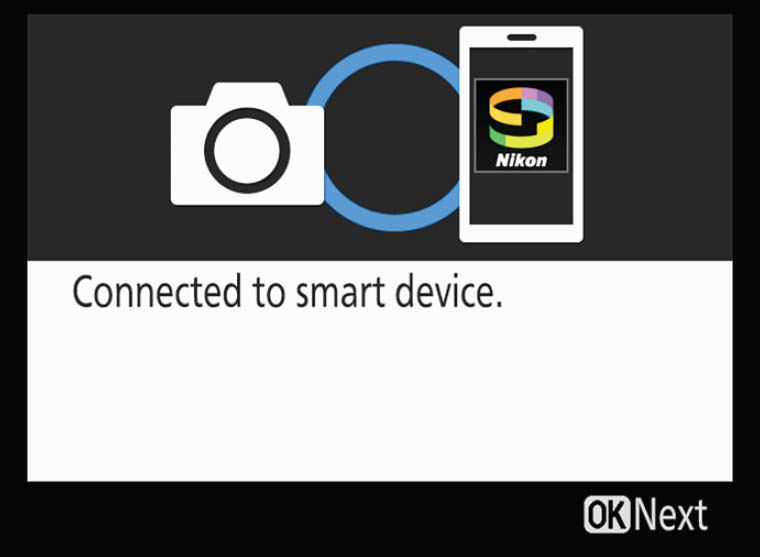
Figure 9.12 Successful connection.

Figure 9.13 Connect screen (left). Choose download size and other parameters (right).
- 7. The Synchronize Clock screen lets you give permission to allow the smart device to provide the D3500 with time information to synchronize the camera and device. Choose Yes and confirm to finish pairing your device with the camera. The Synchronize Clock feature is also available from the Other > Info/Settings menu any time you are using the app.
- 8. The Auto Download screen, also available from the Connect screen, lets you tell your smart device that it’s OK to automatically download images from your camera. You can choose a compact 2-megapixel size, or original size, as shown at right in Figure 9.13. After you’ve signed up for a Nikon Image Space account, you can activate the Auto Upload to Nikon Image Space feature.
- 9. Back in the Setup menu, choose Send to Smart Device (Auto), and in the screen that appears, select and confirm On.
- 10. Make sure Airplane Mode is turned off, using the entry located just above the two Smart Device entries in the Setup menu. Choose Disable to allow the connectivity features of the D3500 to operate. It’s a good idea to Enable Airplane Mode when you don’t plan to use SnapBridge in order to save power.
- 11. Next, find the Bluetooth entry in the Setup menu (see Figure 9.14) and select Send While Off, and confirm it. This allows the camera to maintain a Bluetooth connection with your device and continue to upload images even when the D3500 is powered down. Note: this setting will consume even more power if you have many images to upload. Your images will be stored in the Snapshot Gallery in the app.
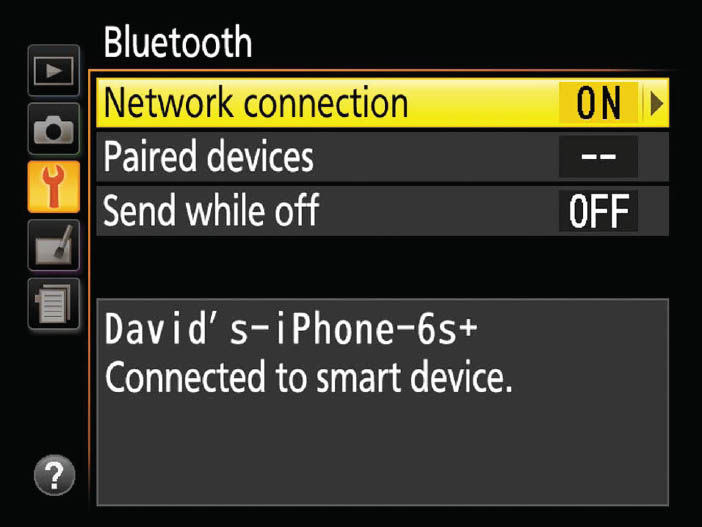
Figure 9.14 Activate Send While Off to allow the camera to upload files even when powered down.
Now that you’re all set up and ready to go, you can use the Camera page of the app (see Figure 9.15, left) to select and download only specific photos. If you aren’t using automatic upload/download, you can access your photos using the Download Selected Pictures entry on the same menu. First, select the folder containing the camera images you want to access (Figure 9.15, center), and, after the app downloads thumbnails of the images, choose which ones you want to transfer (Figure 9.15, right). When you tap on a thumbnail, it will appear enlarged in a separate screen. Tap the i icon for information about the photo (such as date shot, resolution, and size). Tap Download at the bottom of that screen to transfer the image from your D3500 to your device.
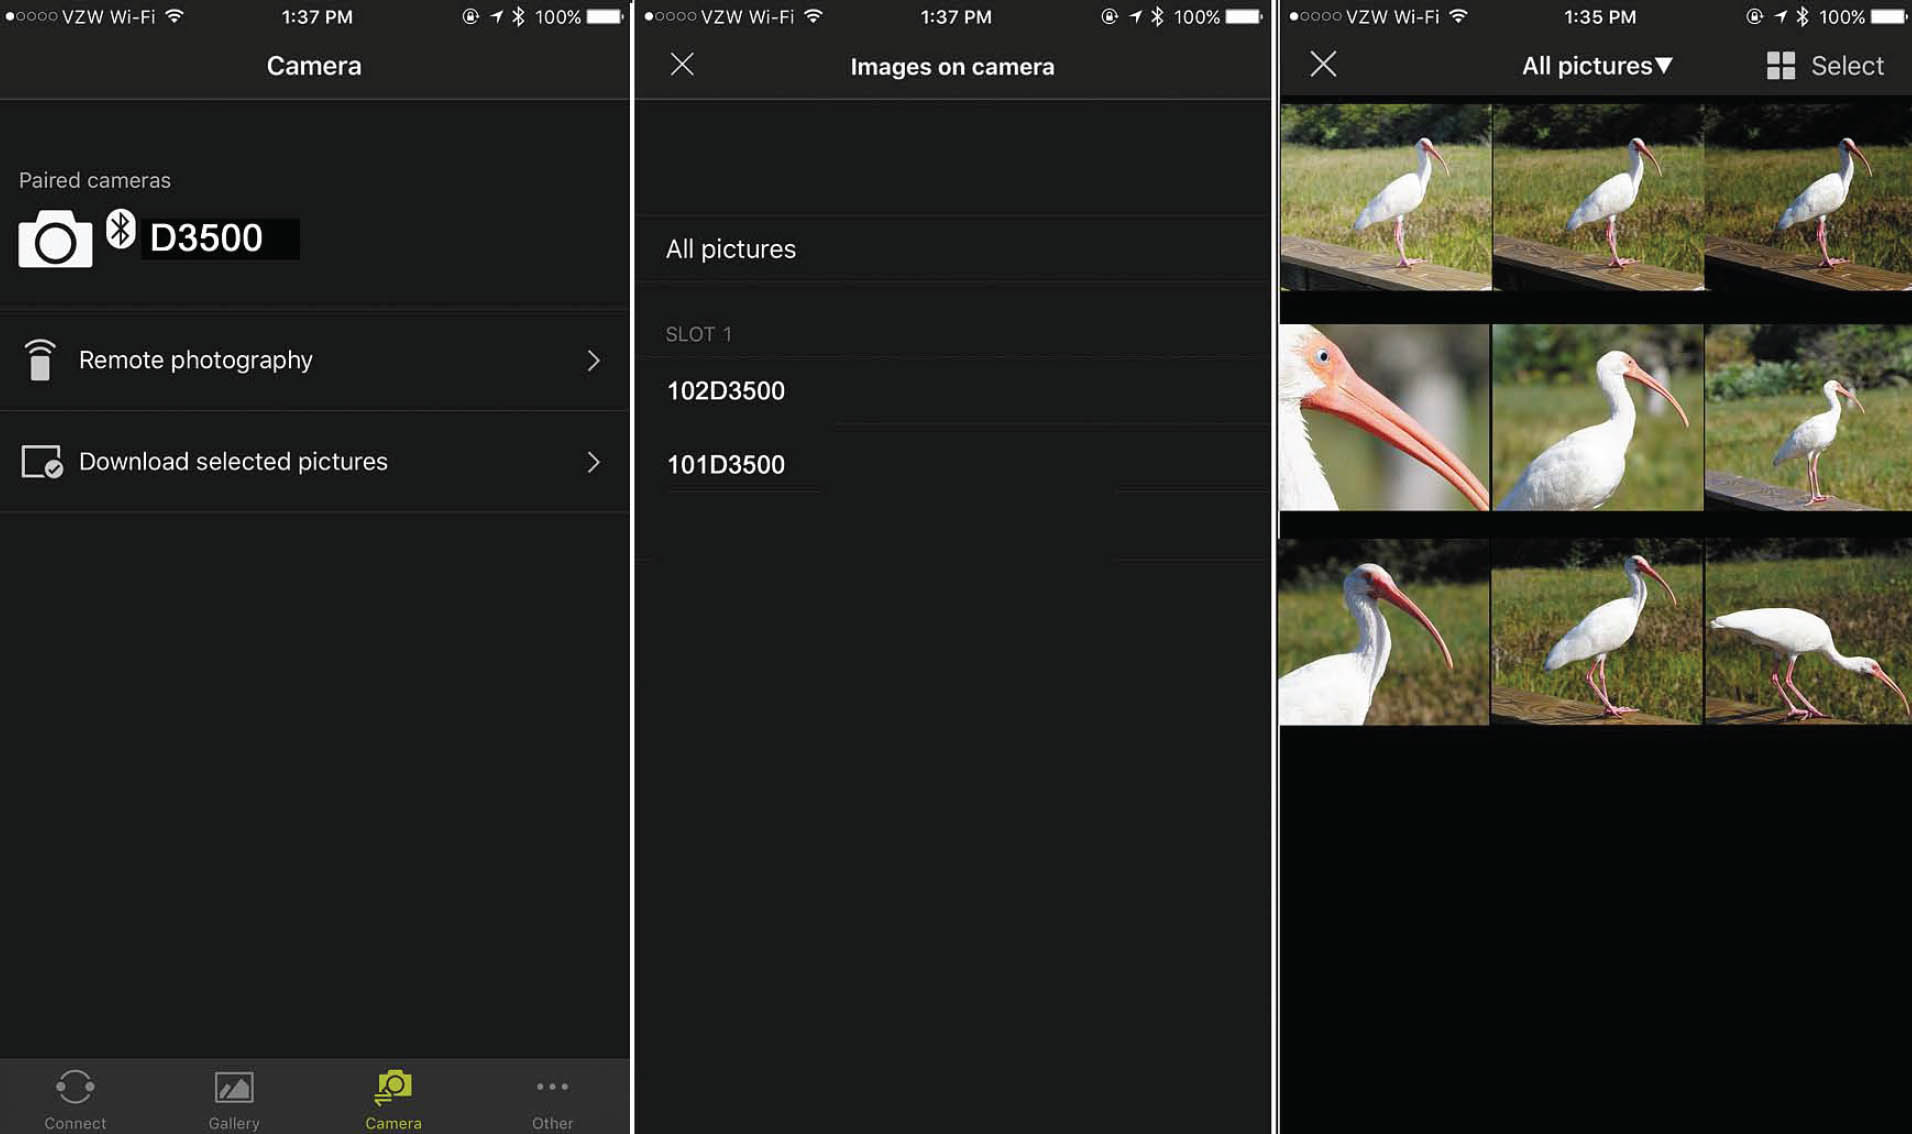
Figure 9.15 Selecting and downloading images.
Don’t forget to sign up for Nikon Image Space. It’s easy, and can be done using the app. It gives you access to an online image gallery, and you can download many Nikon manuals for easy viewing right on your device. (See Figure 9.16.)

Figure 9.16 Signing up for Nikon Image Space.