One of the nice things about modern mirrorless cameras like the Sony a7R IV is that they have fewer mechanical moving parts to fail, so they are less likely to “wear out.” No film transport mechanism, no wind lever or motor drive, and no complicated mechanical linkages from camera to lens to physically stop down the lens aperture. Instead, tiny, reliable motors are built into each lens (and you lose the use of only that lens should something fail).
Of course, the camera also has a moving physical shutter (which augments the electronic shutter “curtains”). It can fail, but the shutter is built rugged enough that you can expect it to last several hundred thousand shutter cycles or more. Unless you’re shooting sports in continuous mode day in and day out, the shutter on your Sony a7R IV is likely to last as long as you expect to use the camera.
The only other things on the camera that move are switches, dials, buttons, and the doors that open to allow you to remove and insert the memory card and battery. I’m not fond of the removable battery door mechanism, which I have to use each time I mount the battery grip to my camera, but it hasn’t failed me yet. Unless you’re extraordinarily clumsy or unlucky or give your camera a good whack while it is in use, there’s not a lot that can go wrong mechanically with your Sony a7R IV.
On the other hand, one of the chief drawbacks of modern electronic cameras is that they are modern electronic cameras. Your Sony a7R IV is fully dependent on two different batteries, the main NP-FZ100 that powers most functions, and a smaller inaccessible battery within the camera’s innards that stores setup and settings information. Without them, the camera can’t be used. There are numerous other electrical and electronic connections in the camera (many connected to those mechanical switches and dials), and components like the color LCD that can potentially fail or suffer damage. The camera also relies on its “operating system,” or firmware, which can be plagued by bugs that cause unexpected behavior. Luckily, electronic components are generally more reliable and trouble-free, especially when compared to their mechanical counterparts from the pre-electronic film camera days.
Digital cameras have problems unique to their breed, too; the most troublesome being the need to clean the sensor of dust and grime periodically. This chapter will show you how to diagnose problems, fix some common ills, and, importantly, learn how to avoid some of them in the future.
Upgrading Your Firmware
As I said, the firmware in your Sony a7R IV is the camera’s operating system, which handles everything from menu display (including fonts, colors, and the actual entries themselves), what languages are available, and even support for specific devices and features. Upgrading the firmware to a new version makes it possible to add new features while fixing some of the bugs that sneak in.
Official firmware for your Sony a7R IV is given a version number that you can view by turning the power on, pressing the MENU button, and navigating to Version in the Setup 6 menu. The first number in the string represents the major release number, while the second and third represent less significant upgrades and minor tweaks, respectively. Theoretically, a camera should have a firmware version number of 1.0 when it is introduced, but vendors have been known to do some minor fixes during testing and unveil a camera with a 1.1 firmware designation. If a given model is available long enough, it can evolve into significant upgrades, such as the current 2.0 or higher designations.
Firmware upgrades are used for both cameras and certain lenses (each listed separately in the Version entry), most frequently to fix bugs in the software, and much less frequently to add or enhance features. The exact changes made to the firmware are generally spelled out in the firmware release announcement. You can examine the remedies provided and decide if a given firmware patch is important to you. If not, you can usually safely wait a while before going through the bother of upgrading your firmware—at least long enough for the early adopters to report whether the bug fixes have introduced new bugs of their own. Each new firmware release incorporates the changes from previous releases, so if you skip a minor upgrade you should have no problems.
![]()
WARNING Don’t open the memory card door or turn off the camera while your old firmware is being overwritten. You should have sufficient power for the camera while upgrading, because Sony requires you to connect the camera to your computer using a USB cable, and that cable conveys power from the host computer as well as information.
Upgrading your firmware is ridiculously easy. The following is a fictitious example that may not coincide exactly with the procedure you will use, as Sony changes the process from time to time. Simply follow these steps:
- 1. Search for firmware. Visit the Sony support site for your area, such as esupport.sony.com and navigate to the Drivers and Software page for your camera. It will vary by country, but you can quickly click the Drivers and Software link, enter model information about your camera, select your operating system, such as Windows 10 64 Bit, and eventually arrive at the Firmware download page.
- 2. Download firmware. You’ll see a message like the following when you reach the download page. Click the Download button.
UPDATE: ILCE-7RM4 System Software Update.
Release Date 10/19/2020
Version 2.00
File Size 236.80MB
[Download]
- 3. Check USB Connection status. Make sure the USB Connection entry in the Setup 4 menu is set to Mass Storage. Then turn off your camera.
- 4. Connect camera to your computer. Link to a USB port on your Internet-connected computer using the USB cable that came with your camera for use when recharging the battery. Then turn on the camera.
- 5. Open firmware file. It will have a name like Update_ILCE7RM4V200.exe (for Windows) or Update_ILCE7RM4V200.dng (for Macs). The version number will vary, depending on the particular release it is.
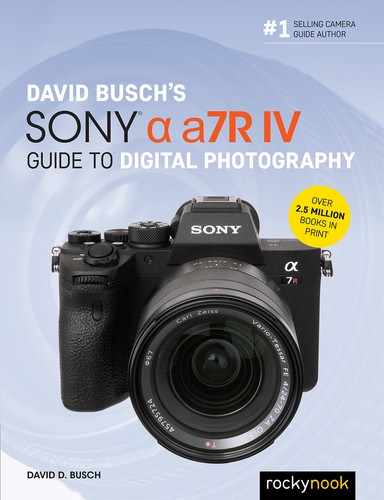
- 6. Follow the instructions shown on the update utility, pictured in Figure 14.1.
- 7. Turn off camera. When finished, you can turn off the camera. It will have the new firmware installed the next time you power up.
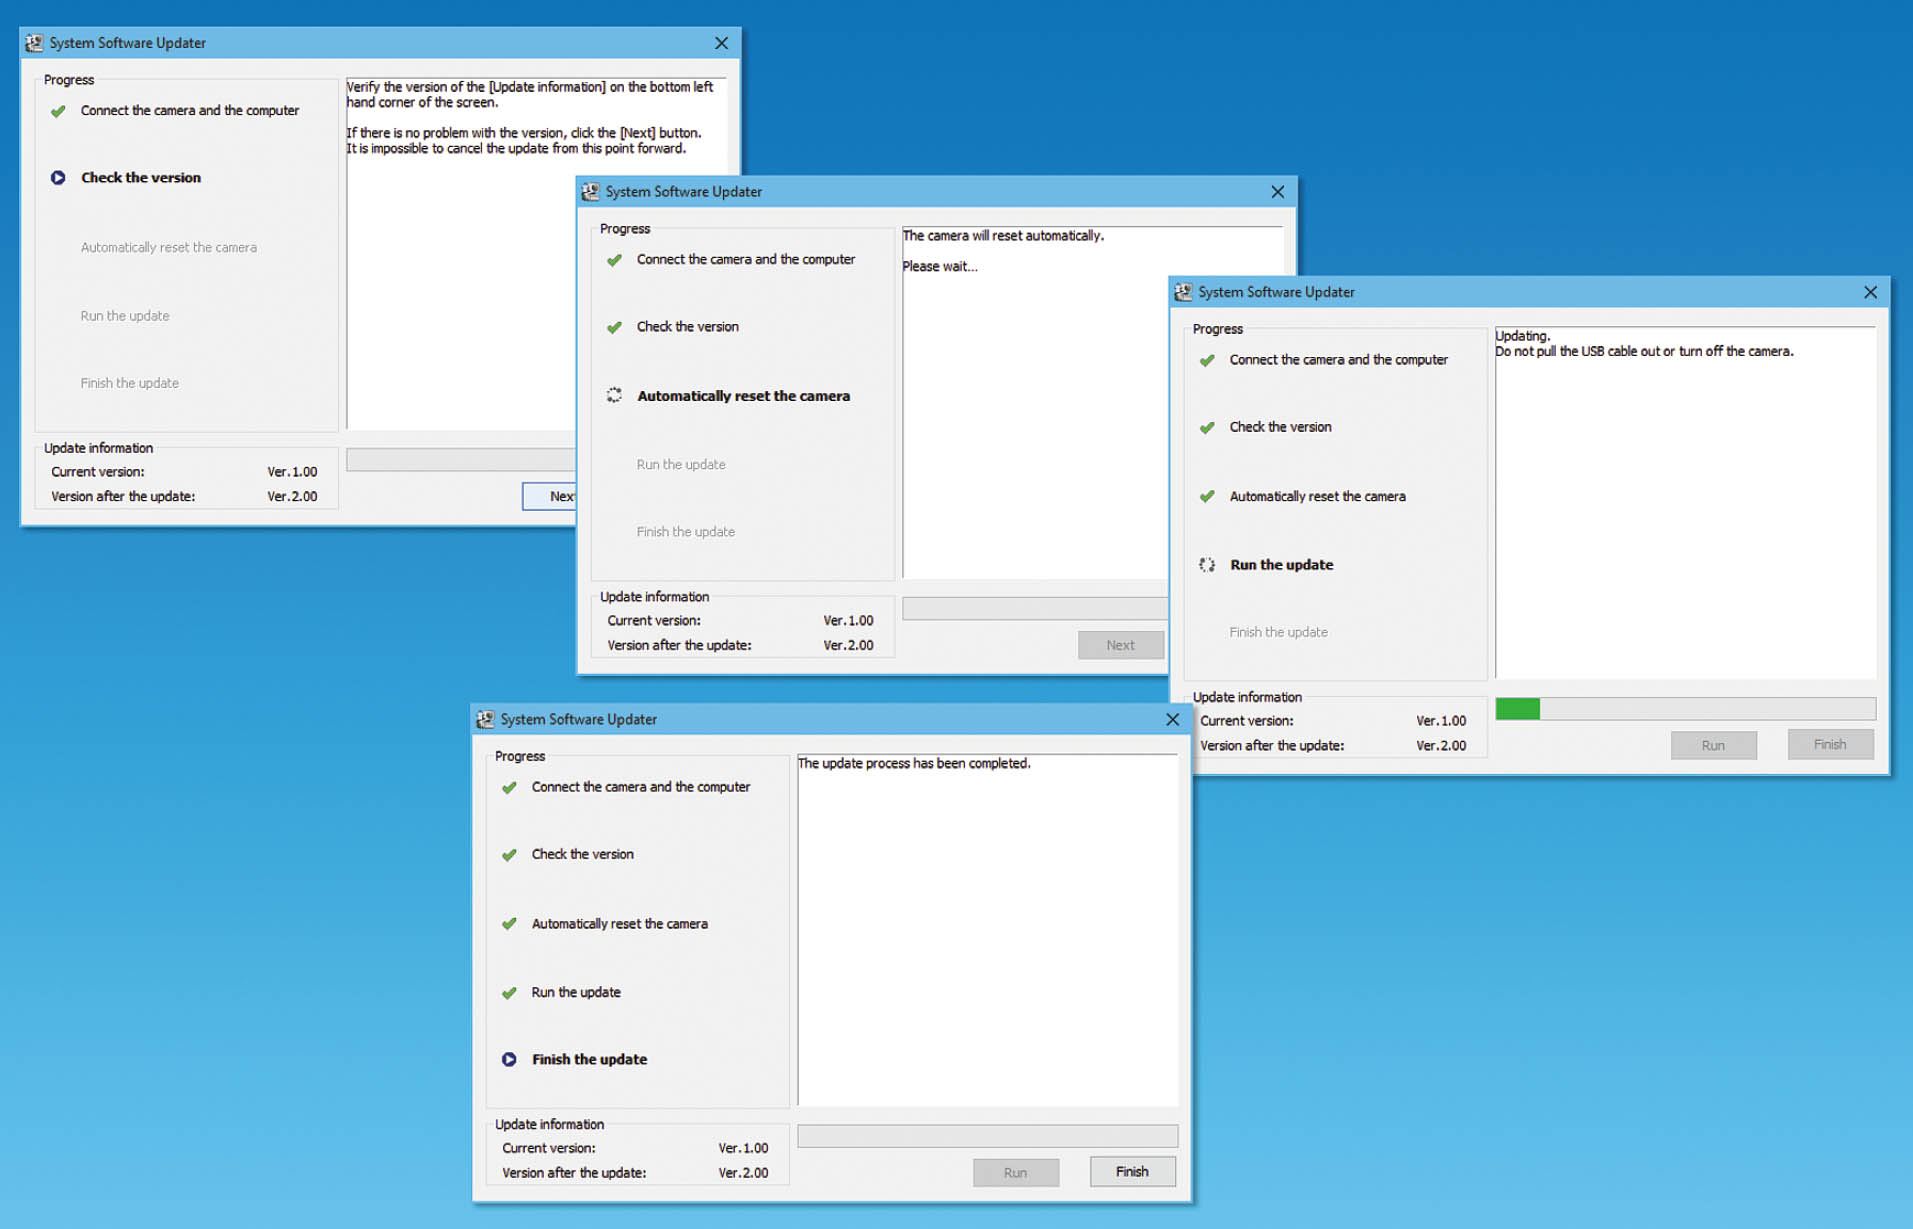
Figure 14.1 The firmware update utility.
Protecting Your LCD
The color LCD monitor on the back of your Sony a7R IV almost seems like a target for banging, scratching, and other abuse. Fortunately, it’s quite rugged, and a few errant knocks are unlikely to shatter the protective cover over the LCD, and scratches won’t easily mar its surface. However, if you want to be on the safe side, there are a number of protective products you can purchase to keep your LCD safe.
Sony itself offers the PCK-LG1 (about $30) semi-hard protective sheet. It’s not too costly and includes an anti-fingerprint coating to reduce smudges. Like other such protectors, it fastens securely to the LCD monitor with a residue-free adhesive and can be easily removed by threading a piece of dental floss between the sheet and screen. I prefer the ultra-thin (0.3mm) glass GGS screens available on Amazon and from a variety of other sources for anywhere from around $10 to $20 for the deluxe “Larmour” version, which use a strong silicon adhesive for gapless mounting. You can also use simple plastic overlay sheets, or “skins” made for smartphones, cut to fit your LCD.
Troubleshooting Memory Cards
Sometimes good memory cards go bad. Sometimes good photographers can treat their memory cards badly. It’s possible that a memory card that works fine in one camera won’t be recognized when inserted into another. In the worst case, you can have a card full of important photos and find that the card seems to be corrupted and you can’t access any of them. Don’t panic! If these scenarios sound horrific to you, there are lots of things you can do to prevent them from happening, and a variety of remedies available if they do occur. You’ll want to take some time—before disaster strikes—to consider your options.
All Your Eggs in One Basket?
The “Don’t put all your eggs in one basket” myth is one of the most contentious in photography, second only to the “protective” filter myth. Most of us have had a memory card fail and have lost—or have thought we lost—some photos that we’d rather have kept. That certainly underlines the importance of backing up our pictures to other media at regular intervals, even while traveling. But whether multiple smaller cards offers an additional degree of protection is a separate issue.
Given the 42.4MB images my a7R IV produces, as I noted at the beginning of this book, I prefer the 64GB Sony G-series SDXC cards and will purchase 128GB cards when the prices come down a little. The debate about whether it’s better to use one large memory card or several smaller ones has been going on since even before there were memory cards!
I can remember when computer users wondered whether it was smarter to install a pair of 200 megabyte (not gigabyte) hard drives in their computer, or if they should go for one of those new-fangled 500MB models. By the same token, a few years ago the conventional wisdom insisted that you ought to use 128MB memory cards rather than the huge 512MB versions. Today, most of the arguments involve 32GB cards vs. 64GB cards, with the implication that smaller cards are “better” in this regard. Conventional wisdom is often more conventional than wise.
For professional users, this does make sense. I have professional wedding photographer friends who chortle at the folly of using large memory cards (I’ve actually witnessed the chortling), and they have special reasons for their preference. Of course, in addition to multiple cards, they use second shooters, copy photos on-site from a full memory card to a laptop, and employ other techniques in order to avoid having to ask the bride and groom whether it would be possible to restage a wedding. When your living depends on never losing any pictures, different rules apply.
But most of us have no cause to fear using mature memory storage technologies. Resorting to lots of small cards instead of fewer large ones may actually increase the chances of losing some. While I don’t want to be a pioneer in working with 512GB memory cards (and have no need to do so), but I’m perfectly comfortable with my 64GB and larger cards for the following reasons:
- Memory cards don’t magically wait until they are full before they fail. You will not automatically lose 64GB worth of photos, rather than 32GB if a memory card implodes. If you typically shoot 16GB worth of images on a typical day before you have the chance to back them up to your computer or laptop, then that’s the most you are at risk for under average circumstances. Whether you’re using a 16GB, 32GB, 64GB, or 128GB card, the number of images you shoot in a typical session prior to backup will be the number you actually may lose. The only time I actually fill up my 128GB memory cards is when I am traveling, and in those instances, I have already backed up each day’s shooting to multiple additional media. Most of the time, all a larger memory card does is give you greater flexibility when you want to shoot more in one session and don’t want or don’t have time to swap cards.
Many photojournalists and sports photographers change cards when they are 80 percent full to avoid missing a crucial shot. Instead of interrupting your shoot to swap out a 16GB card that becomes full, you can go ahead and shoot 17GB or 18GB on your 32GB card and change media during lulls in the festivities. In truth, the biggest danger comes from waiting too long—say, several days—to back up your images. We all know photographers who have New Years Eve, July 4, and Thanksgiving images on a single card, and who never backup their photos.
- 64GB cards aren’t twice as likely to fail as 32GB cards, although many seem to feel that’s so. Indeed, I’ve heard the same advice to use “safer” 256MB cards, 2GB cards, or 4GB cards virtually up the line as capacities have increased. Once a fabrication technology is mature, the reliability of particular sizes is the same across the board. An easy way to tell is to compare the per-gigabyte costs for the card. Once a particular card is less than twice the cost of a card with half the capacity, you can bet the technology is solid.
- Using multiple smaller cards may increase your odds of losing photos. Memory cards do fail, but that most often happens from user error. The first 128GB card I bought, a Sony model, failed within a few months, because I put it in my wallet for “safekeeping” and accidentally folded it nearly in half. It’s also common for photographers to lose cards, put them through a wash and dry cycle, or perform other atrocities unrelated to the reliability of the card itself.
Yes, if you use smaller cards you may lose half as many photos, but you might also find that more cards equates to a higher risk of losing one or damaging one through stupidity. I find it’s better to use the minimum number of photo “baskets” and then make sure nothing happens to that basket. If all your images are important, the fact that you’ve lost 100 of them rather than 200 pictures isn’t very comforting.
- When your family goes on vacation, do you split up family members to travel in several smaller cars? After all, in a terrible collision, with multiple cars you might lose only a couple of your kinfolk rather than all of them. Keep in mind that your family is much more important to you than your photos, and the odds of being in a traffic accident is much greater than encountering a faulty memory card. Humans are susceptible to the cognitive fallacy “neglect of probability.” I’ve taken hundreds of thousands of pictures and lost two memory cards, and I know three other photographers who’ve had memory card problems. On the other hand, I’ve driven hundreds of thousands of miles and been in four traffic accidents and know a dozen people who have had auto mishaps. Should my family be riding around in different cars while I stick to 16GB memory cards?
- The typical memory card is rated for a Mean Time Between Failures of 1,000,000 hours of use. That’s constant use 24/7 for more than 100 years! According to the manufacturers, they are good for 10,000 insertions in your camera, and should be able to retain their data (and that’s without an external power source) for something on the order of 11 years. Of course, with the millions of cards in use, there are bound to be a few lemons here or there.
So, what can you do? Here are some options for preventing loss of valuable images:
- Internal backup. Your a7R IV has dual memory card slots, so when your photos are particularly important use the Backup feature to write copies to both cards simultaneously. Or, if you’re on vacation, copy a day’s shots onto another card when you get back to your hotel room.
- External backup. It’s easy to physically transfer your images to a laptop, smart device, or other backup storage, particularly when you’re on vacation. When I’m traveling, I take a tiny Mac-Book Air and at least two 1TB portable drives and copy my pictures to them frequently. (See Figure 14.2.) Ideally, one of your backups should be offsite, and that’s difficult while traveling. However, offsite can be a DVD you burn and mail home, or a storage site in the cloud.
- Transmit your images. Another option is to transmit your images frequently over a network to your laptop or smart device. Or upload them to a cloud drive, such as iCloud, Google Drive, OneDrive, or DropBox. Many cameras have that option.
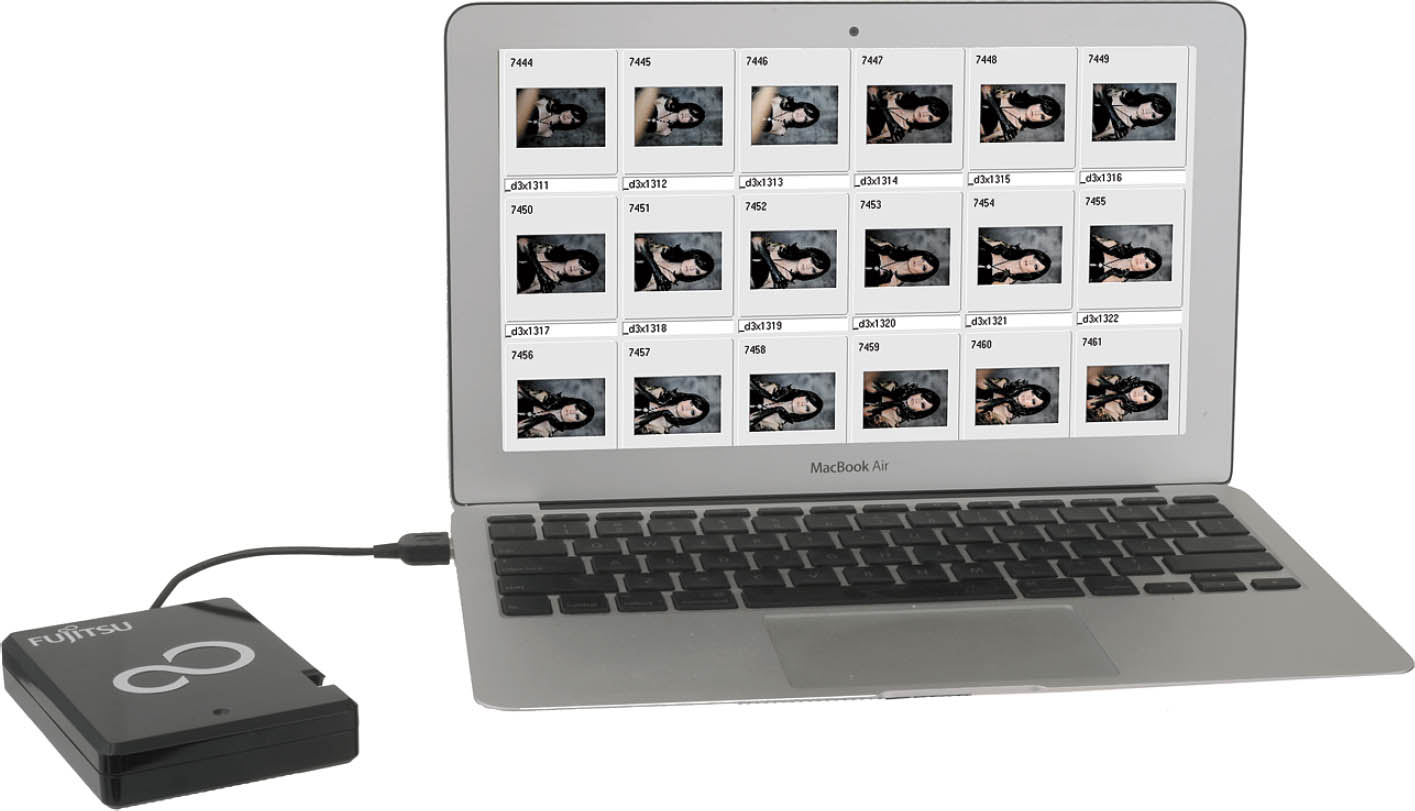
Figure 14.2 Back up your images when traveling.
- Interleaving. You can also interleave your shots. Perhaps you don’t shoot weddings, but you do go on vacation from time to time. Take 100 or so pictures on one card. Then, replace it with a different card and shoot another 100. Repeat these steps with diligence (you’d have to be determined to go through this degree of inconvenience), and, if you use four or more memory cards (of whatever capacity), you’ll find your pictures from each location scattered among the different media. If you lose or damage one (which, alas, may be more likely because of the use of those multiple cards), you’ll still have some pictures from all the various stops on your trip on the other cards. That’s more work than I like to do, especially when it comes to sorting out the pictures back at home, but it’s an option.
- Be smart. If you’re having problems, the first thing you should do is stop using that memory card. Don’t take any more pictures. Your second line of defense is to do no harm that hasn’t already been done. If you take a picture of your business card as the first photo in a session, should the memory card be lost, your odds of having it returned to you are increased.
What Can Go Wrong?
There are lots of things that can go wrong with your memory card, but the ones that aren’t caused by human stupidity are statistically very rare. Yes, a memory card’s internal bit bin or controller can suddenly fail due to a manufacturing error or some inexplicable event caused by old age. However, if your memory card works for the first week or two that you own it, it should work forever. There’s really not a lot that can wear out.
Given the reliability of solid-state memory, compared to magnetic memory, though, it’s more likely that your memory problems will stem from something that you do. Memory cards are small and easy to misplace if you’re not careful. For that reason, it’s a good idea to keep them in their original cases or a “card safe” offered by Pelican (www.pelican.com), and others. Always placing your memory card in a case can provide protection from the second-most common mishap that befalls memory cards: the common household laundry. If you slip a memory card in a pocket, rather than a case or your camera bag, often enough, sooner or later it’s going to end up in the washing machine and probably the clothes dryer, too. There are plenty of reports of relieved digital camera owners who’ve laundered their memory cards and found they still worked fine, but it’s not uncommon for such mistreatment to do some damage.
Memory cards can also be stomped on, accidentally bent, dropped into the ocean, chewed by pets, and otherwise rendered unusable in myriad ways. It’s also possible to force a card into your Sony a7R IV’s memory card slot incorrectly if you’re diligent enough. Or, if the card is formatted in your computer with a memory card reader, your Sony a7R IV may fail to recognize it. Occasionally, I’ve found that a memory card used in one camera would fail if used in a different camera (until I reformatted it in Windows, and then again in the camera). Every once in a while, a card goes completely bad and—seemingly—can’t be salvaged.
Another way to lose images is to do commonplace things with your memory card at an inopportune time. If you remove the card from the Sony a7R IV while the camera is writing images to the card, you’ll lose any photos in the buffer and may damage the file structure of the card, making it difficult or impossible to retrieve the other pictures you’ve taken. The same thing can happen if you remove the memory card from your computer’s card reader while the computer is writing to the card (say, to erase files you’ve already moved to your computer). You can avoid this by not using your computer to erase files on a memory card but, instead, always reformatting the card in your Sony a7R IV before you use it again.
What Can You Do?
Pay attention: As mentioned, if you’re having problems, the first thing you should do is stop using that memory card. Don’t take any more pictures. Don’t do anything with the card until you’ve figured out what’s wrong. Your second line of defense (your first line is to be sufficiently careful with your cards that you avoid problems in the first place) is to do no harm that hasn’t already been done. Read the rest of this section and then, if necessary, decide on a course of action (such as using a data recovery service or software described later) before you risk damaging the data on your card further.
Now that you’ve calmed down, the first thing to check is whether you’ve actually inserted a card in the camera. If you’ve set the camera in the Shooting menu so that Shoot w/o Card has been turned on, it’s entirely possible (although not particularly plausible) that you’ve been snapping away with no memory card to store the pictures to, which can lead to massive disappointment later on. Of course, the No Memory Card message appears on the LCD when the camera is powered up, and it is superimposed on the review image after every shot, but maybe you’re inattentive, or aren’t using picture review. You can avoid all this by turning the Shoot w/o Card feature off and leaving it off.
Things get more exciting when the card itself is put in jeopardy. If you lose a card, there’s not a lot you can do other than take a picture of a similar card and print up some Have You Seen This Lost Flash Memory? flyers to post on utility poles all around town.
If all you care about is reusing the card, and have resigned yourself to losing the pictures, try reformatting the card in your camera. You may find that reformatting removes the corrupted data and restores your card to health. Sometimes I’ve had success reformatting a card in my computer using a memory card reader (this is normally a no-no because your operating system doesn’t understand the needs of your Sony a7R IV), and then reformatting again in the camera.
If your memory card is not behaving properly, and you do want to recover your images, things get a little more complicated. If your pictures are very valuable, either to you or to others (for example, a wedding), you can always turn to professional data recovery firms. Be prepared to pay hundreds of dollars to get your pictures back, but these pros often do an amazing job. You wouldn’t want them working on your memory card on behalf of the police if you’d tried to erase some incriminating pictures. There are many firms of this type, and I’ve never used them myself, so I can’t offer a recommendation. Use a Google search to turn up a ton of them. I use a software program called RescuePro, which came free with one of my SanDisk memory cards.
A more reasonable approach is to try special data recovery software you can install on your computer and use to attempt to resurrect your “lost” images yourself. They may not actually be gone completely. Perhaps your memory card’s “table of contents” is jumbled, or only a few pictures are damaged in such a way that your camera and computer can’t read some or any of the pictures on the card. Some of the available software was written specifically to reconstruct lost pictures, while other utilities are more general-purpose applications that can be used with any media, including floppy disks and hard disk drives. They have names like OnTrack, Photo Rescue 2, Digital Image Recovery, MediaRecover, Image Recall, and the aptly named Recover My Photos.
DIMINISHING RETURNS
Usually, once you’ve recovered any images on a memory card, reformatted it, and returned it to service, it will function reliably for the rest of its useful life. However, if you find a particular card going bad more than once, you’ll almost certainly want to stop using it forever. See if you can get it replaced by the manufacturer, if you can, but, in the case of memory card failures, the third time is never the charm.
Cleaning Your Sensor
There’s no avoiding dust. No matter how careful you are, some of it is going to settle on your camera and on the mounts of your lenses, eventually making its way inside your camera. As you take photos, the physical shutter movement causes the dust to become airborne and eventually come to rest atop your sensor. There, dust and particles can show up in every single picture you take at a small enough aperture to bring the foreign matter into sharp focus. No matter how careful you are and how cleanly you work, eventually you will get some of this dust on your camera’s sensor.
Fortunately, one of the Sony a7R IV’s most useful features is the automatic sensor cleaning system in the Setup 2 menu that reduces or eliminates the need to clean your camera’s sensor manually. Sony has applied anti-static coatings to the sensor and other portions of the camera body interior to counter charge build-ups that attract dust. The sensor carriage vibrates ultrasonically to shake loose any dust. You can activate sensor cleaning at any time.
Dust the FAQs, Ma’am
Here are some of the most frequently asked questions about sensor dust issues.
Q. I see a bright spot in the same place in all of my photos. Is that sensor dust?
A. You’ve probably got either a “hot” pixel or one that is permanently “stuck” due to a defect in the sensor. A hot pixel is one that shows up as a bright spot only during long exposures as the sensor warms. A pixel stuck in the “on” position always appears in the image. Both show up as bright red, green, or blue pixels, usually surrounded by a small cluster of other improperly illuminated pixels, caused by the camera’s interpolating the hot or stuck pixel into its surroundings, as shown in Figure 14.3. A stuck pixel can also be permanently dark. Either kind is likely to show up when they contrast with plain, evenly colored areas of your image.

Figure 14.3 A stuck pixel is surrounded by improperly interpolated pixels created by the Sony a7R IV’s demosaicing algorithm.
Bad pixels can also show up on your camera’s color LCD panel, but, unless they are abundant, the wisest course is to just ignore them.
Q. I see an irregular out-of-focus blob in the same place in my photos. Is that sensor dust?
A. Yes. Sensor contaminants can take the form of tiny spots, larger blobs, or even curvy lines if they are caused by minuscule fibers that have settled on the sensor. They’ll appear out of focus because they aren’t actually on the sensor surface but, rather, a fraction of a millimeter above it on the filter that covers the sensor. The smaller the f/stop used, the more in-focus the dust becomes. At large apertures, it may not be visible at all.
Q. I never see any dust on my sensor. What’s all the fuss about?
A. Those who never have dust problems with their Sony a7R IV fall into one of four categories: those for whom the camera’s automatic dust removal features are working well; those who seldom change their lenses and have clean working habits that minimize the amount of dust that invades their cameras in the first place; those who simply don’t notice the dust (often because they don’t shoot many macro photos or other pictures using the small f/stops that makes dust evident in their images); and those who are very, very lucky.
Identifying and Dealing with Dust
Sensor dust is less of a problem than it might be because it shows up only under certain circumstances. Indeed, you might have dust on your sensor right now and not be aware if it. The dust doesn’t actually settle on the sensor itself, but, rather, on a protective filter a very tiny distance above the sensor, subjecting it to the phenomenon of depth-of-focus. Depth-of-focus is the distance the focal plane can be moved and still render an object in sharp focus. At f/2.8 to f/5.6 or even smaller, sensor dust, particularly if small, is likely to be outside the range of depth-of-focus and blur into an unnoticeable dot.
However, if you’re shooting at f/16 to f/22 or smaller, those dust motes suddenly pop into focus. Dust spots can easily show up in your images if you’re shooting large, empty areas that are light colored. Dust motes are most likely to show up in the sky, as in Figure 14.4, or in white backgrounds of your seamless product shots and are less likely to be a problem in images that contain lots of dark areas and detail.

Figure 14.4 Only the dust spots in the sky are apparent in this shot.
To see if you have dust on your sensor, take a few test shots of a plain, blank surface (such as a piece of paper or a cloudless sky) at small f/stops, such as f/22, and a few wide open. Open Photoshop, copy several shots into a single document in separate layers, then flip back and forth between layers to see if any spots you see are present in all layers. You may have to boost contrast and sharpness to make the dust easier to spot.
Avoiding Dust
Of course, the easiest way to protect your sensor from dust is to prevent it from settling on the sensor in the first place. Some lenses come with rubberized seals around the lens mounts that help keep dust from infiltrating, but you’ll find that dust will still find a way to get inside. Here are my tips for eliminating the problem before it begins.
- Clean environment. Avoid working in dusty areas if you can do so. Hah! Serious photographers will take this one with a grain of salt, because it usually makes sense to go where the pictures are. Only a few of us are so paranoid about sensor dust (considering that it is so easily removed) that we’ll avoid moderately grimy locations just to protect something that is, when you get down to it, just a tool. If you find a great picture opportunity at a raging fire, during a sandstorm, or while surrounded by dust clouds, you might hesitate to take the picture, but, with a little caution (don’t remove your lens in these situations and clean the camera afterward!) you can still shoot. However, it still makes sense to store your camera in a clean environment. One place cameras and lenses pick up a lot of dust is inside a camera bag. Clean your bag from time to time, and you can avoid problems.
- Clean lenses. There are a few paranoid types that avoid swapping lenses in order to minimize the chance of dust getting inside their cameras. It makes more sense just to use a blower or brush to dust off the rear lens mount of the replacement lens first, so you won’t be introducing dust into your camera simply by attaching a new, dusty lens. Do this before you remove the lens from your camera, and then avoid stirring up dust before making the exchange.
- Work fast. Minimize the time your camera is lensless and exposed to dust. That means having your replacement lens ready and dusted off, and a place to set down the old lens as soon as it is removed, so you can quickly attach the new lens.
- Let gravity help you. Face the camera downward when the lens is detached so any dust inside the camera will tend to fall away from the sensor. Turn your back to any breezes, indoor forced air vents, fans, or other sources of dust to minimize infiltration.
- Protect the lens you just removed. Once you’ve attached the new lens, quickly put the end cap on the one you just removed to reduce the dust that might fall on it.
- Clean out the vestibule. From time to time, remove the lens while in a relatively dust-free environment and use a blower bulb like the ones shown in Figure 14.5 (not compressed air or a vacuum hose) to clean out the interior area. A blower bulb is generally safer than a can of compressed air, or a strong positive/negative airflow, which can tend to drive dust further into nooks and crannies.

Figure 14.5 Use a robust air bulb for cleaning your sensor.
- Be prepared. If you’re embarking on an important shooting session, it’s a good idea to clean your sensor now, rather than come home with hundreds or thousands of images with dust spots caused by flecks that were sitting on your sensor before you even started. Before I left on my recent trip to Spain, I put both cameras I was taking through a rigid cleaning regimen, figuring they could remain dust-free for a measly 10 days. I even left my bulky blower bulb at home. It was a big mistake, but my intentions were good.
- Clone out existing spots in your image editor. Photoshop and other editors have a clone tool or healing brush you can use to copy pixels from surrounding areas over the dust spot or dead pixel. This process can be tedious, especially if you have lots of dust spots and/or lots of images to be corrected. The advantage is that this sort of manual fix-it probably will do the least damage to the rest of your photo. Only the cloned pixels will be affected.
- Use filtration in your image editor. A semi-smart filter like Photoshop’s Dust & Scratches filter can remove dust and other artifacts by selectively blurring areas that the plug-in decides represent dust spots. This method can work well if you have many dust spots, because you won’t need to patch them manually. However, any automated method like this has the possibility of blurring areas of your image that you didn’t intend to soften.
Sensor Cleaning
Those new to the concept of sensor dust actually hesitate before deciding to clean their camera themselves. Isn’t it a better idea to pack up your Sony a7R IV and send it to a service center so their crack technical staff can do the job for you? Or, at the very least, shouldn’t you let the friendly folks at your local camera store do it?
Of course, if you choose to let someone else clean your sensor, they will be using methods that are more or less identical to the techniques you would use yourself. None of these techniques are difficult, and the only difference between their cleaning and your cleaning is that they might have done it dozens or hundreds of times. If you’re careful, you can do just as good a job.
Of course, vendors like Sony may not tell you this, but it’s not because they don’t trust you. It’s not that difficult for a real goofball to mess up his camera by hurrying or taking a shortcut. If Sony recommended any method that’s mildly risky, someone would do it wrong, and then the company would face lawsuits from those who’d contend they did it exactly in the way the vendor suggested, so the ruined camera is not their fault.
You can see that vendors like Sony tend to be conservative in their recommendations, and, in doing so, make it seem as if sensor cleaning is more daunting and dangerous than it really is. Some vendors recommend only dust-off cleaning, through the use of reasonably gentle blasts of air, while condemning more serious scrubbing with swabs and cleaning fluids. However, these cleaning kits for the exact types of cleaning they recommended against are for sale in Japan only, where, apparently, your average photographer is more dexterous than those of us in the rest of the world. These kits are similar to those used by official repair staff to clean your sensor if you decide to send your camera in for a dust-up.
There are three basic kinds of cleaning processes that can be used to remove dusty and sticky stuff that settles on your dSLR’s sensor. All of these must be performed with the shutter locked open. I’ll describe these methods and provide instructions for locking the shutter later in this section.
- Air cleaning. This process involves squirting blasts of air inside your camera with the shutter locked open. This works well for dust that’s not clinging stubbornly to your sensor.
- Brushing. A soft, very fine brush is passed across the surface of the sensor’s filter, dislodging mildly persistent dust particles and sweeping them off the imager.
- Liquid cleaning. A soft swab dipped in a cleaning solution such as ethanol is used to wipe the sensor filter, removing more obstinate particles.
AIR CLEANING
Your first attempts at cleaning your sensor should always involve gentle blasts of air. Many times, you’ll be able to dislodge dust spots, which will fall off the sensor and, with luck, out of the interior. Attempt one of the other methods only when you’ve already tried air cleaning and it didn’t remove all the dust. Here are some tips for doing air cleaning:
- Use a clean, powerful air bulb. Your best bet is bulb cleaners designed for the job, like the Giottos Rocket. Smaller bulbs, like those air bulbs with a brush attached sometimes sold for lens cleaning or weak nasal aspirators, may not provide sufficient air or a strong enough blast to do much good.
- Hold the Sony a7R IV pointed downward. Then look up into the cavity behind the lens mount as you squirt your air blasts, increasing the odds that gravity will help pull the expelled dust downward, away from the sensor. You may have to use some imagination in positioning yourself. (See Figure 14.6.)
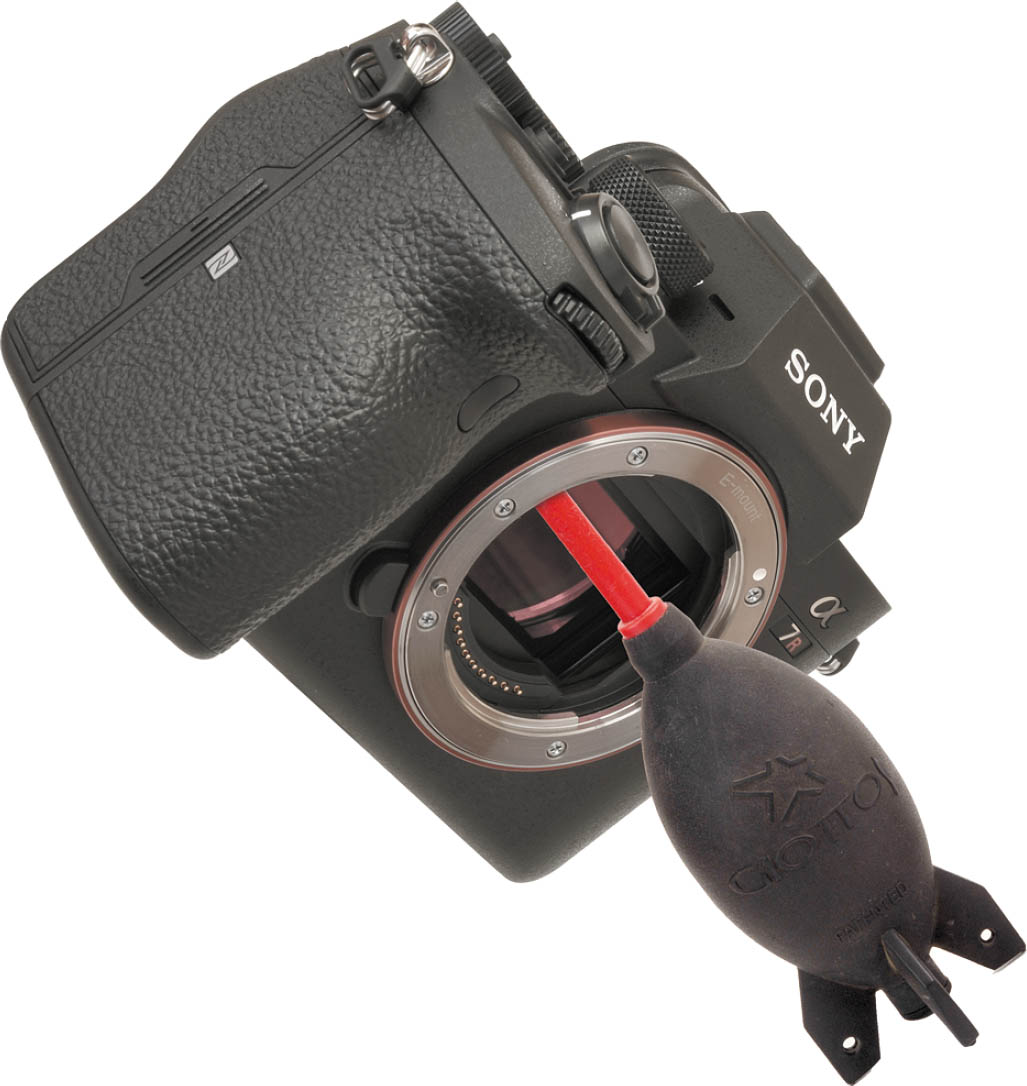
Figure 14.6 Point the camera downward.
- Never use air canisters. The propellant inside these cans can permanently coat your sensor if you tilt the can while spraying. It’s not worth taking a chance.
- Avoid air compressors. Super-strong blasts of air are likely to force dust under the sensor filter.
BRUSH CLEANING
If your dust is a little more stubborn and can’t be dislodged by air alone, you may want to try a brush, charged with static electricity, that can pick off dust spots by electrical attraction. One good, but expensive, option is the Sensor Brush sold at www.visibledust.com. You need a 24mm version, like the one shown in Figure 14.7, that can be stroked across the short dimension of your Sony a7R IV’s sensor.
Ordinary artist’s brushes are much too coarse and stiff and have fibers that are tangled or can come loose and settle on your sensor. A good sensor brush’s fibers are resilient and described as “thinner than a human hair.” Moreover, the brush has a wooden handle that reduces the risk of static sparks.
Brush cleaning is done with a dry brush by gently swiping the surface of the sensor filter with the tip. The dust particles are attracted to the brush particles and cling to them. You should clean the brush with compressed air before and after each use and store it in an appropriate air-tight container between applications to keep it clean and dust-free. Although these special brushes are expensive, one should last you a long time.
I like the Arctic Butterfly, shown in Figure 14.8. You activate the built-in motor that spins the brush at high speed to charge it with static electricity. Then, shut the motor off and pass the charged brush above the sensor surface so that dust will leap off the sensor and onto the brush.

Figure 14.7 A proper brush is required for dusting off your sensor.
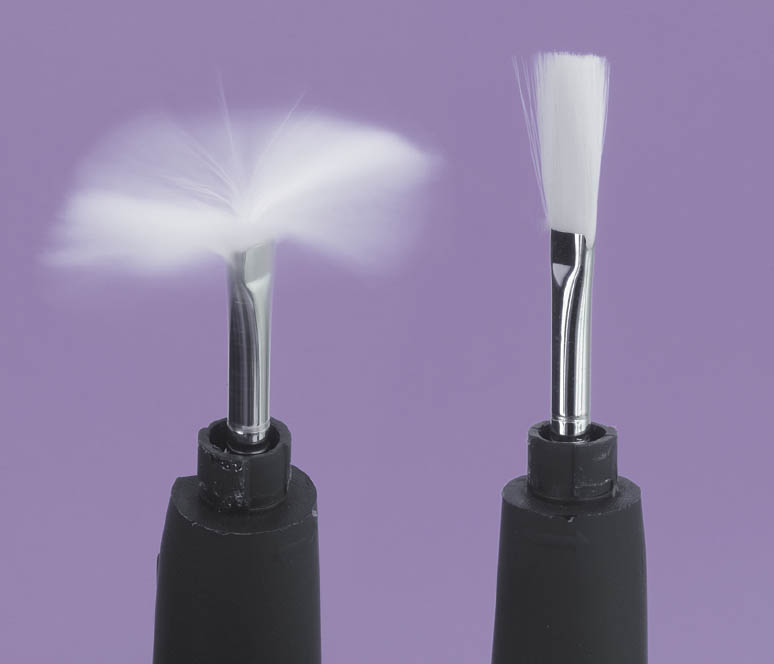
Figure 14.8 The motor in the Arctic Butterfly flutters the brush tips for a few minutes to charge them for picking up dust (left). Then, turn off the power and flick the tip above the surface of the sensor (right).
Unfortunately, you’ll often encounter really stubborn dust spots that can’t be removed with a blast of air or flick of a brush. These spots may be combined with some grease or a liquid that causes them to stick to the sensor filter’s surface. In such cases, liquid cleaning with a swab may be necessary. During my first clumsy attempts to clean my own sensor, I accidentally got my blower bulb tip too close to the sensor, and some sort of deposit from the tip of the bulb ended up on the sensor. I panicked until I discovered that liquid cleaning did a good job of removing whatever it was that took up residence on my sensor.
You can make your own swabs out of pieces of plastic (some use fast-food restaurant knives, with the tip cut at an angle to the proper size) covered with a soft cloth or Pec-Pad, as shown in Figures 14.9 and 14.10. However, if you’ve got the bucks to spend, you can’t go wrong with good-quality commercial sensor cleaning swabs, such as those sold by Photographic Solutions, Inc. (www.photosol.com).
You want a sturdy swab that won’t bend or break so you can apply gentle pressure to the swab as you wipe the sensor surface. Use the swab with methanol (as pure as you can get it, particularly medical grade; other ingredients can leave a residue), or the Eclipse solution also sold by Photographic Solutions. Eclipse is actually quite a bit purer than even medical-grade methanol. A couple drops of solution should be enough, unless you have a spot that’s extremely difficult to remove. In that case, you may need to use extra solution on the swab to help “soak” the dirt off.
Once you overcome your nervousness at touching the protective cover of your Sony a7R IV’s sensor, the process is easy. You’ll wipe continuously with the swab in one direction, then flip it over and wipe in the other direction. You need to completely wipe the entire surface; otherwise, you may end up depositing the dust you collect at the far end of your stroke. Wipe; don’t rub.
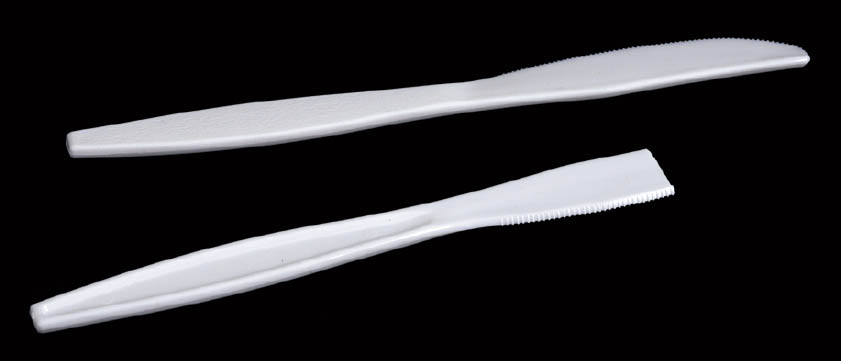
Figure 14.9 You can make your own sensor swab from a plastic knife that’s been truncated.
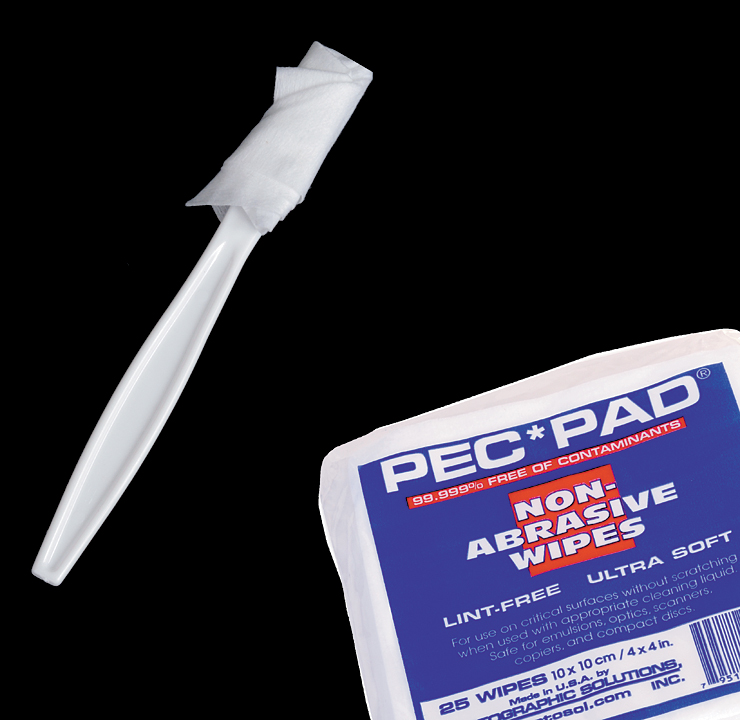
Figure 14.10 Carefully wrap a Pec-Pad around the swab.
If you want a close-up look at your sensor to make sure the dust has been removed, you can pay $50 to $100 for a special sensor “microscope” with an illuminator. Or, you can do like I do and work with a plain old Carson MiniBrite PO-55 illuminated 5X magnifier, as seen in Figure 14.11. It has a built-in LED and, held a few inches from the lens mount with the lens removed from your Sony a7R IV, provides a sharp, close-up view of the sensor, with enough contrast to reveal any dust that remains. You can read more about this great device at http://dslrguides.com/carson.
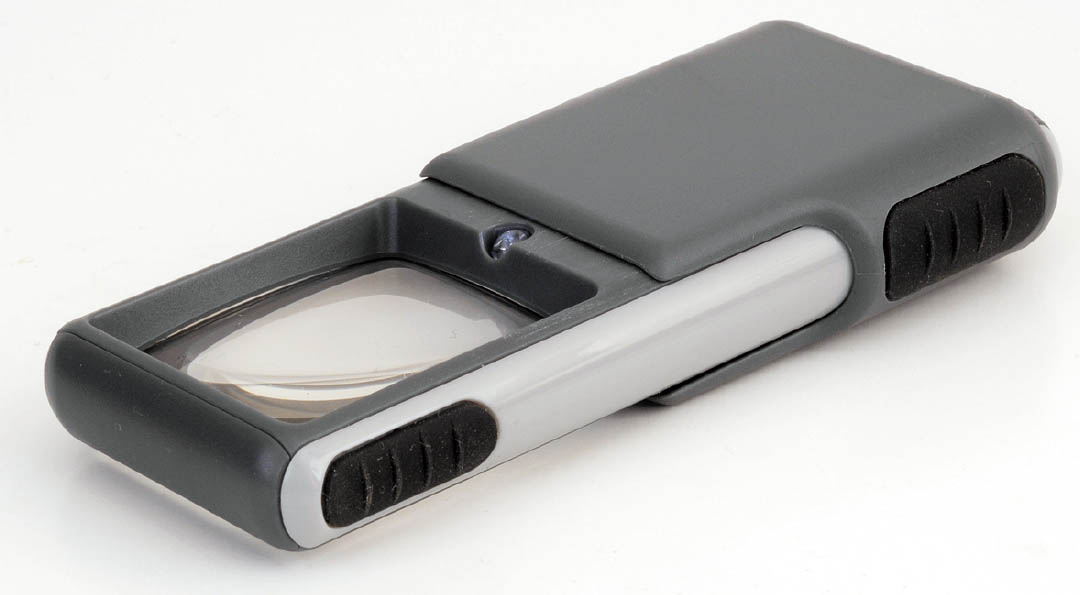
Figure 14.11 An illuminated magnifier like this Carson MiniBrite PO-55 can be used as a ‘scope to view your sensor.