13 The Playback and Wireless Menus
In the last two chapters, I introduced you to the layout and general functions of the menu system used in the R7, with specifics on how to customize your camera with the Shooting and Autofocus menus. In this chapter, you’ll learn how to work with the Playback and Wireless menus. If you’re jumping directly to this chapter and need some guidance in how to navigate the menu maze, review the first few pages of Chapter 11. Otherwise, you’re welcome to dive right in.
Playback Menu Options
The six blue-coded Playback menus are where you select options related to the display, review, transfer, and printing of the photos you’ve taken. Most of these entries are functions rather than settings, and thus only a few have actual default values, such as Image Jump with Main Dial (10 images), Magnification (2X), and Control over HDMI (Disable). The choices you’ll find include:
Playback 1
◼ Protect Images
◼ Erase Images
◼ Rotate Stills
◼ Change Movie Rotate Info
◼ Rating
◼ Image Copy
Playback 2
◼ Print Order
◼ Photobook Set-up
Playback 3
◼ RAW Image Processing
◼ Creative Assist
◼ Quick Control RAW Processing
◼ Cloud RAW Image Processing
◼ Playback Creative Filters
◼ Resize
Playback 4
◼ Cropping
◼ HEIF→JPEG Conversion
Playback 5
◼ Slide Show
◼ Set Image Search Conditions
◼ View From Last Seen
◼ Magnification (Approximate)
◼ Image Jump with Main Dial
Playback 6
◼ Playback Information Display
◼ Highlight Alert
◼ AF Point Disp.
◼ Playback Grid
◼ Movie Play Count
◼ HDMI HDR Output
Protect Images
Options: Select Images, Select Range, All Images in Folder, Unprotect All Images in Folder, All Images on Card, Unprotect All Images on Card
My preference: N/A
This is the first entry in the Playback 1 menu (see Figure 13.1). If you want to keep an image from being accidentally erased (either with the Erase button or by using the Erase Images entry in the Playback menu), you can mark that image for protection. Use the Protect entry in the Playback version of the Quick Controls menu or use this menu item. To protect one or more images, press the MENU button while viewing an image and choose Protect from the Playback 1 menu.

Figure 13.1 The Playback 1 menu.
One of two screens will appear:
◼ Default screen. By default, the screen shown at left in Figure 13.2 appears with these choices.
• Select Images. Choose individual images from the current card by scrolling through an array of thumbnail previews.
• Select Range. Specify a continuous range of images by selecting the first image, pressing Q/ SET, then scrolling to the last image and pressing Q/SET again.
• All Images in Folder. Select all the images in a folder. You’ll be shown a list of available folders (if more than one is available). Press Q/SET to specify the highlighted folder.
• Unprotect All Images in Folder. Select a folder and unprotect all images within that folder.
• All Images on Card. Protect all images in the active card.
• Unprotect All Images on Card. Unprotect all images in the active card.

Figure 13.2 Default Protect Images screen (left). Protect/Unprotect only images meeting search conditions (right).
◼ Specified Search screen. As I’ll explain later in this chapter, you can tell the camera to use specified parameters when searching for images during playback. If you have set up these search conditions, the screen shown in Figure 13.2, right, appears. You can then select images to protect using these options.
• Select Images. Choose any of the individual images on the current card by scrolling through an array of thumbnail previews.
• Select Range. Specify a continuous range of images on the card, as described earlier.
• All Found Images. Protect all the images located using the parameters you chose in the Set Image Search Conditions entry in the Playback 4 menu, as described later. You could, for example, protect all images with a particular Rating, those taken on a particular date, only Still photos, or only Movies.
• Unprotect All Found Images. Remove protection from the images meeting your image search conditions.
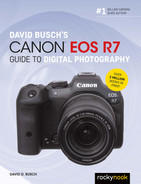
FAST PROTECTION
A fast way to protect images is to press the Q/SET button when an image is displayed, then navigate to the Protect “key” icon that appears at top in the left-hand column. (See Figure 13.3.) When Enable is highlighted, press Q/SET to protect the current image, or press INFO to select multiple images using the Select Range, All Images on Card, or Unprotect All Images on Card options that appear.
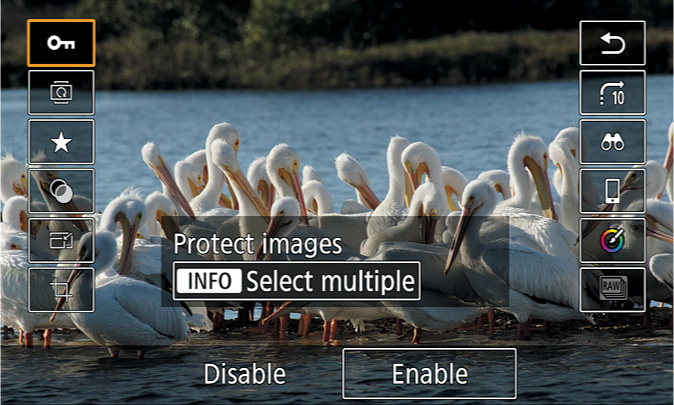
Figure 13.3 Protected images can be locked against accidental erasure (but not preserved from formatting) using the Q menu.
Cull Images Conveniently
The Protect feature gives you a convenient way of removing the “duds” from your entire memory card or just those in a particular folder. Just follow these steps:
1. Apply the Protect feature as described above to add protection either to All Images on Card or All Images in Folder, depending on the scope of the culling you want to do.
2. Review your images. Choose Protect Images from the Playback 1 menu, then select Select Images. The R7 will begin displaying images, and you use the left/right directional buttons to scroll through each photo.
3. Unprotect the duds. When you see an image that’s not a keeper, press the Q/SET button to unprotect it.
4. Review before erasing (optional). The most valuable aspect of this method is that nothing happens to the images on your card until you decide to erase the clunkers. You can wait until the end of a shooting session, review your images again to see if you have changed your mind, or even copy everything on the card or in the folder to your computer (or to the second card you have inserted in the camera).
5. Erase images. Use the Erase Images entry (described next) to erase All Images on Card or All Images in Folder. Only the photos you have Unprotected will be removed. The rest are safe, at least until you decide to reformat the card.
6. Unprotect remaining images (optional). Since all the other images on your card are protected, you will be unable to trash them later. You can restore them to unprotected status by using Unprotect All Images in Folder or Unprotect All Images on Card.
Erase Images
Options: Select and Erase Images, Select Range, All Images in Folder, All Images on Card
My preference: N/A
Choose this menu entry and you’ll be given four choices: Select and Erase Images, Select Range, All Images in Folder, and All Images on Card. You can use the first three to selectively remove images, while the third option deletes all the pictures on a card. Protected images will not be erased. But, using the Format command is usually faster and more thorough.
This function works similarly to the Protect function described above. If no Image Search Conditions have been set, the default screen appears with these choices.
◼ Select and Erase Images. View the images on your card by pressing the left/right directional controls to scroll through them. To mark an image for deletion or to remove a checkmark, press the Q/SET button. When you’re finished selecting, press the MENU button and you’ll be asked to confirm. Choose Cancel or OK and Q/SET to finish.
◼ Select Range. Operates similarly to the range protect option listed earlier. Choose Select Range and you can mark the first of a string of images by highlighting it and pressing Q/SET. Then navigate to the last image to be erased and press Q/SET again. Press MENU to confirm and delete the images.
◼ All Images in Folder. You’ll be shown a list of the available folders on your memory card. Select Q/ SET, and a prompt will appear asking you to confirm, and reminding you that Protected images will not be removed.
◼ All Images on Card. A prompt will ask you to confirm this step. The All Images on Card choice removes all the pictures on the card, except for those you’ve marked with the Protect command. This step only removes images and does not reformat the memory card.
If you have set Image Search Conditions in the Playback 4 menu, your choices are as follows:
◼ Select and Erase Images. Choose any of the individual images on the current card by scrolling through an array of thumbnail previews.
◼ Select Range. Specify a continuous range of images on the card, as described earlier.
◼ All Found Images. Delete all images located using the parameters you chose in the Set Image Search Conditions entry, except for Protected images.
Rotate Stills
Options: Rotate Image
My recommendation: N/A
While you can set the camera to automatically rotate images taken in a vertical orientation using the Auto Rotate option in the Set-up 1 menu (as described in Chapter 14), you can manually rotate an image during playback using this menu selection. Select Rotate Stills from the Playback 1 menu, use the QCD to page through the available images on your memory card until the one you want to rotate appears, then press Q/SET. The image will appear on the screen rotated 90 degrees. Press Q/SET again, and the image will be rotated 270 degrees. (See Figure 13.4.) Note that you can also rotate images from the Quick Controls menu that appears when you press the Q/SET button during Playback. It’s the second icon from the top in the left column, as shown earlier in Figure 13.3.
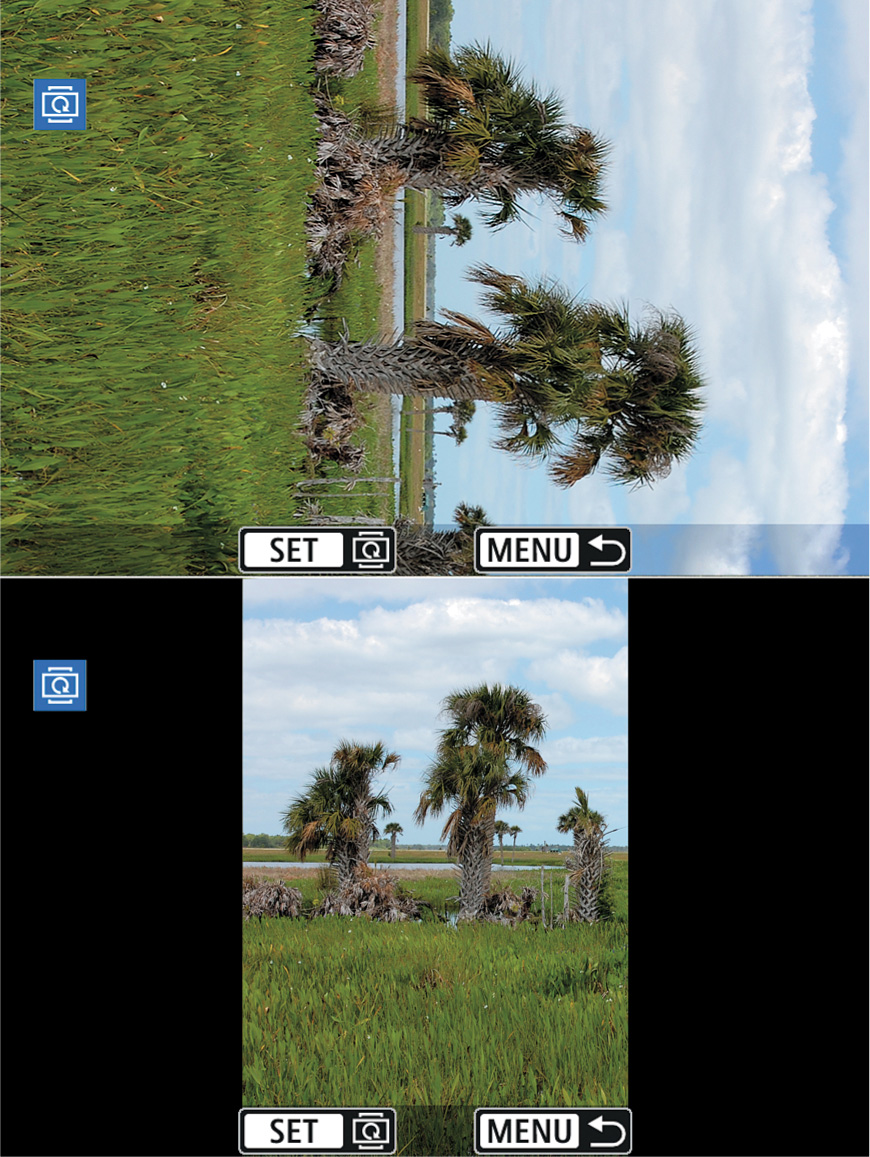
Figure 13.4 A vertically oriented image that isn’t rotated appears larger on the LCD (top), but rotation allows viewing the photo without turning the camera (bottom).
Change Movie Rotate Information
Options: Change playback orientation
My recommendation: N/A
Those of us who have used smartphones to record movies know that the orientation of the device can vary from horizontal to vertical and upside-down. This entry allows you to change the orientation of your camera’s videos when viewed on other devices. Your movies will always be shown horizontally on the camera’s display; this option affects only display on your smartphone and other devices. You’ll also need to activate the Add Movie Rotate Info option in the Set-up 1 menu, as described in Chapter 14 to enable this feature.
Just select this entry from the Playback 1 menu, then choose a movie by rotating the QCD. An icon at the upper-left corner of the screen includes an arrow indicating which side of the movie frame will appear at the top when the video is played back. Each time you press Q/SET, the orientation changes from top (the default) to right side, to left side.
Rating
Options: Select Images (Individual Images, Range, All Images in Folder, All Images on Card); One to five stars, None
My recommendation: N/A
If you want to apply a quality rating to images or movies you’ve shot (or use the rating system to represent some other criteria), you can use this entry to give images one, two, three, four, or five stars, or turn the rating system off. The Image Jump function can display only images with a given rating. Suppose you were photographing a track meet with multiple events. You could apply a one-star rating to jumping events, two stars to relays, three stars to throwing events, four stars to hurdles, and five stars to dashes. Then, using the Image Jump feature, you could review only images of one type.
With a little imagination, you can apply the rating system to all sorts of categories. At a wedding, you could classify pictures of the bride, the groom, guests, attendants, and parents of the couple. If you were shooting school portraits, one rating could apply to first grade, another to second grade, and so on. Given a little thought, this feature has many more applications than you might think. Ratings can be used to specify images for a slide show, too, or to select images in Digital Photo Professional.
There are three ways to apply ratings to an image or movie:
◼ RATE button. If you’ve assigned the Rate function to a button using the Customize Buttons entry in the Custom Functions 3 menu (as described in Chapter 15), a rating from one to five stars, or none, can be applied by pressing that RATE button repeatedly. The Rate Button Function entry also allows you to specify how many stars are available; you could limit ratings to just one to three stars, for example.
◼ Quick Controls menu. You can also apply ratings from the Quick Controls menu that appears when you press the Q/SET button during Playback. It’s the third icon from the top in the left column, as shown earlier in Figure 13.3.
◼ This Menu entry. To apply a rating using this entry, use the steps described next, if you want to apply ratings to more than a few images or movies quickly.
To use the Ratings menu entry, just follow these steps:
1. Choose the Rating menu item.
2. Choose Select Images, Select Range, All Images in Folder, or All Images on Card to specify images to be rated.
3. When an image or movie you want to rate is visible, press Q/SET. You can also select a range of images, all those in a folder, or all on a card, as described under the Protect and Erase Images entries earlier.
4. Now rotate the QCD to apply a one- to five-star rating, or turn a rating off. You can rate up to 999 images.
5. When finished rating, choose MENU to exit.
Image Copy
Options: Select Image, Range, Select Folder, All Images
My preference: N/A
The ability to work with two memory cards simultaneously ranks as one of my favorite features in any camera that offers dual slots. One of the best uses for two cards is to make back-up images while traveling, or at any other time that your computer isn’t easily accessible. Here are some examples of what I do:
◼ Shoot to two cards simultaneously. This gives you an instant backup in case pictures on your primary card become corrupt or erased. Ideally, your two cards should be equal in storage size. Just choose Record to Multiple in the Record Functions + Card/Folder Settings entry in the Set-up 1 menu. I’ll explain the many other different options for specifying how the two memory card slots are used in Chapter 14.
◼ Make a copy. Use this Image Copy facility to make a copy of images you shot on one card to your second card. Instead of shooting and saving to two cards at once (which does slow down the camera a bit), use only one card when you take photos, then make a backup onto a second card at the end of the day. You can copy all or only some of the photos you’ve shot using this menu entry.
◼ Make copies to distribute. I bought a bunch of 16GB memory cards for $4 each, and find it’s quick and easy to make multiple copies of photos, not for backup, but for distribution either on the spot, say, to provide models I’ve hired with some raw (not RAW) images or to send by snail mail to colleagues, friends, or family. Such small cards won’t hold many images, but in many cases, that’s enough space. No computer required!
◼ Leave your laptop or external storage at home. Since I’ve begun using cameras with dual memory card slots, I leave my hard disk/personal storage device with its built-in reader or my laptop at home more often. If I am going to be gone for only a day or two, it’s easier to just make copies in the camera, and not bother with another external device. I purchased a Lexar 1TB memory card on sale specifically for this purpose. It’s not a fast card—just 70MB/second when writing files, but a terabyte is enough for the most ambitious day (or week) of shooting.
To copy images from one card to another, just follow these steps (which are available only when two memory cards are present in the camera):
1. Access copy menus. Choose Image Copy from the Playback 1 menu. The screen shown in Figure 13.5, upper left, appears. It shows which card will be used as the source, and the amount of space remaining on the destination card. The camera will notify you if you don’t have two cards installed.
2. Choose selection type. The initial screen has four options: Select Image (individual images), Range, Select Folder, and All Images. Press Q/SET to choose the selection method.
3. Choose folder. For the Select Image, Range, and Select Folder methods, a screen (not shown) will appear displaying a list of available folders on the source card, the number of images in each folder, along with the lowest and highest file number of the images in the highlighted folder.
Press Q/SET to choose the highlighted folder. If you selected All Images, Steps 3 and 4 are skipped.
4. Select image(s). If you chose Select Image or Range, you can specify the images to copy. If you chose Select Folder, Step 4 is skipped.
• Individual images. A screen like the one shown in Figure 13.5 (upper center) appears. Scroll through the available images and press Q/SET to add a checkmark to the ones you want to copy. When finished selecting individual images, press the MENU button to continue and proceed to the screen shown at upper right in Figure 13.5.
• Range of images. A scrollable list of thumbnails appears. Navigate to the first image in the range and press Q/SET. You can use the Multi-controller joystick to find the last image in the range and press Q/SET again. Press MENU to confirm and then Q/SET to proceed to the screen shown at upper right in Figure 13.5.
5. Choose Target. The folders available on the other memory card are shown. (See Figure 13.5, lower left.) You may highlight one and press Q/SET to select it, or choose Create Folder instead and create a new folder with a default name, or change the folder name using the Canon text-entry screen.
6. Commence copy. The screen shown at bottom, center of Figure 13.5, appears once the source images and target folder have been specified. At this point you can press Q/SET to proceed, or highlight Cancel and press Q/SET to abort.
7. Finish copying. The copy process may take some time, depending on the number of images you’ll be copying and the read/write speed of the memory cards. When the screen at lower right in Figure 13.5 is shown, press Q/SET to exit.

Figure 13.5 Image Copy steps.
Print Order
Options: Select Image, Multiple: Select Range, Mark/Clear All in Folder, Mark All/Clear All on Card; Set Up: Print type (Standard, Index, Both); Date (On/Off); File Number (On/Off)
My preference: N/A
This is one of only two entries on the Playback 2 page (see Figure 13.6). Your camera supports the DPOF (Digital Print Order Format) that is now almost universally used by digital cameras to specify which images on your memory card should be printed, and the number of prints desired of each image. This information is recorded on the memory card, and can be interpreted by a compatible printer. Photo labs are also equipped to read this data and make prints when you supply your memory card to them.
Figure 13.6 The Playback 2 menu page.

Figure 13.7 Select the images to be printed individually, by folder, or all the images on your memory card.
Once marked for DPOF printing, you can print the selected images, or take your memory card to a digital lab or kiosk, which is equipped to read the print order and make the copies you’ve specified. (You can’t “order” prints of RAW images or movies.) To create a DPOF print order, just follow these steps:
1. Access Print Order screen. In the Playback 2 menu, navigate to Print Order. Press Q/SET.
2. Access Set-up. The Print Order screen will appear. (See Figure 13.7.) Use the directional controls to highlight Set Up. Press Q/SET.
3. Select Print type. Choose Print Type (Standard, Index, or Both), and specify whether Date or File Number imprinting should be turned on or off. You cannot set print type individually; all images in the print order will use the same print type. Press MENU to return to the Print Order screen.
4. Choose selection method. Highlight Sel. Image (choose individual images) or Multiple.
• Select individual images. With Sel. Image, use the directional controls to view the images, and press Q/SET to mark or unmark an image for printing. If you’d rather view thumbnails of images, press the Thumbnail/Zoom In button. Press the Magnify/Zoom Out button to return to single-image view.
• Multiple. Allows you to select a Range, Mark All in Folder, Clear All in Folder, Mark All on Card, or Clear All on Card, By Folder (to select/deselect all images in a folder), or All Images (to mark/unmark all the images on your memory card). Press Q/SET to choose a range or folder, and MENU to return to the print order screen.
5. Choose number of prints. If you’ve selected individual images (rather than a range, folder, or card) as an image is selected, you can press the up/down directional controls or rotate the QCD to specify 1 to 99 prints for that image. (For Index prints, you can only specify whether the selected image is included in the index print, not the number of copies.) Press Q/SET to confirm. You can then use the up/down buttons to select additional images. Press MENU when finished selecting to return to the Print Order screen.
6. Output your hardcopies. If the camera is linked to a PictBridge-compatible printer, an additional option appears on the Print Order screen—Print. You can select that; optionally, adjust Paper Settings as described in the previous section, and start the printing process. Alternately, you can exit the Print Order screen by tapping the shutter release button. Then turn off the camera and printer, remove the memory card, and insert it in the memory card slot of a compatible printer, retailer kiosk, or digital minilab.
Photobook Set-up
Options: Select Images, Multiple
My preference: N/A
You can select up to 998 images on your memory card, and then use the EOS Utility to copy them all to a specific folder on your computer. This is a handy way to transfer only specific images to a particular folder, and is especially useful when you’re collecting photos to assemble in a photobook. RAW images and movies cannot be chosen for a photobook. Your choices include:
◼ Select images. You can mark individual images from any folder on your memory card.
◼ Multiple. You can choose Select Range, All Images in Folder, Clear All in Folder, All Images on Card, or Clear All on Card. Note that movies or RAW images will not be collected when using the Multiple option.
Once you marked the images you want to transfer to the specified folder, use the EOS Utility to copy them.
RAW Image Processing
Options: Select Images, Select Range; Use Shot Settings; Set Up Processing: JPEG; Set Up Processing: HEIF
My recommendation: N/A
This is the first entry on the Playback 3 menu page (see Figure 13.8). This option allows you to produce JPEG or HEIF versions of your full-size RAW or CRAW images right in the camera. The original RAW shot is not modified. When you select this menu entry, only compatible RAW images are offered for your selection.
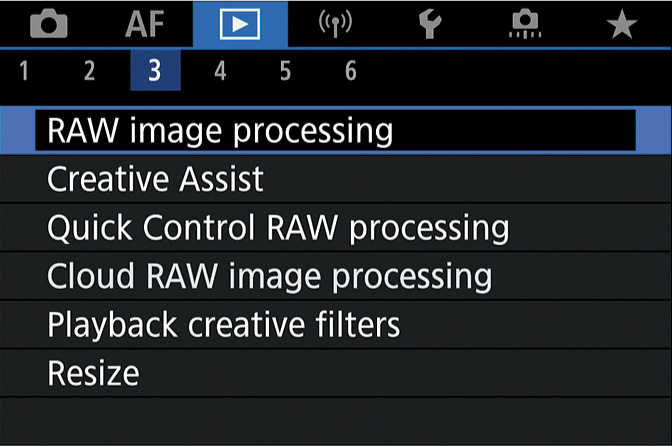
Figure 13.8 The Playback 3 menu.
Just follow these steps:
1. View RAW images. From the first screen that appears, select either Select Images (to choose individual RAW images) or Select Range (to choose a continuous series of images). Rotate the QCD to scroll through compatible images. Press the Magnify/Reduce button and rotate the Main Dial counterclockwise to activate a selection of index images instead.
2. Select image to process. Press Q/SET to select an image for processing. A checkmark will appear next to it. When you are done choosing, press the MENU button to move on to the next step.
3. Use Shot Settings or Set Up Processing (JPEG or HEIF). If you select Use Shot Settings in the next screen, the camera will immediately create JPEG copies of the RAW image(s) you specified, asking you to confirm that you want to save as a new file. If you want to customize settings, proceed to Step 4.
Note: If you elect the default Use Shot Settings, the image settings in effect at the time the picture was taken will be used. If HDR PQ Settings was set to Disable in the Shooting 2 menu, JPEGs are created; if set to Enable, HEIFs are created instead.
4. Specify parameters. If you select Set up Processing→JPEG or Set up Processing→HEIF, a screen appears with a selection of parameters you can adjust. (See Figure 13.9.) Navigate to the parameter you want to manipulate using the Multi-controller joystick. Your choices include:
• Brightness Adjustment
• White Balance
• Picture Style (A, 1, 2, and 3 Styles with JPEG only)
• Clarity (JPEG only)
• Auto Lighting Optimizer + Adjust Face Lighting (JPEG only)
• High ISO Noise Reduction
• Image Quality
• HDR PQ (HEIF images only)
• Color Space (JPEG images only)
• Lens Aberration Correction

Figure 13.9 Select from the nine types of correction shown using RAW Image Processing. The HDR PQ option appears only for HEIF images.
5. Make adjustments. All parameters will already be set to those specified when you exposed the RAW file. When a parameter you want to change is highlighted, press Q/SET, then rotate either the Main Dial or QCD to select an option. Some changes are difficult to see; press the Magnify button to enlarge a portion of the image for review. Press SET to confirm your option, and return to the main screen.
6. Repeat Step 5 (optional). You can continue making adjustments to any or all of the other parameters. At any time you can press the Trash/Erase button to cancel all the changes you’ve made so far.
7. Compare before/after. Here’s the cool part. After you’ve made adjustments, you can press the INFO button to compare your before and after images. The image will be shown in the After Change version (and labeled as such) with the parameters you’ve modified highlighted in orange in the upper-right corner of the screen. Rotate the QCD to toggle between the After Change image and the Shot Settings (original) version. (Digital Lens Optimizer effects are shown only in magnified view.) Press MENU to exit Compare mode.
8. Save JPEG/HEIF. When you’re satisfied with your changes, navigate to the Save icon at the bottom right of the screen (just above the Return arrow) and press Q/SET. Choose OK to save as a new file, or Cancel to abort the process. If the original was shot using an aspect ratio other than 3:2, the image will be displayed in those proportions, and the JPEG or HEIF will be saved in that aspect ratio.
9. Continue processing? If you’ve selected several images, you’ll be asked whether you want to continue processing them. Choose Yes to continue.
10. Select image to display. You can tell the camera which of the two versions to display, the Original Image or the Processed Image.
11. Repeat. If you have more images selected, continue processing all the images you want to work with.
Creative Assist
Options: Presets: Vivid, Soft, Warm, Cool, Green, Shine, Lime, Peach, Black-and-White, Blue, Purple, Normal, and Auto 1–3; Effects: Background Blur, Brightness, Contrast, Saturation, Color Tone 1, Color Tone 2, Monochrome
My recommendation: N/A
You don’t have to apply Scene Intelligent Auto’s Creative Assist when taking photos. This Playback menu option lets you apply those effects to images after they have been captured. Just follow these steps:
1. Select image. Press the Playback button, highlight the image you want to process using Creative Assist and press the Q/SET button.
2. View Effects. A horizontal scrollable list appears. It has icons representing Effects ranging from Background Blur, Brightness, Contrast, Saturation, Color Tone 1, Color Tone 2, and Monochrome. (See Figure 13.10, top row). You can also select Presets, seen in the bottom row of the figure, and which include Vivid, Soft, Warm, Cool, Green, Shine, Lime, Peach, Black-and-White, Blue, Purple, Normal, and Auto 1–3.
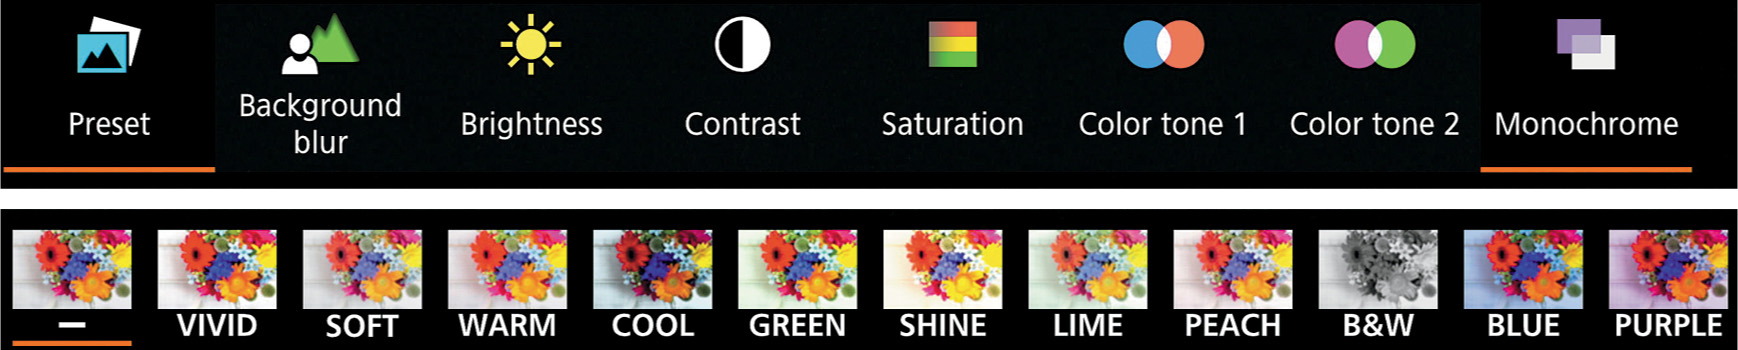
Figure 13.10 Creative Assist Effects (top row) and Presets (bottom row).
3. Adjust Effect. Highlight the effect you want to use, press Q/SET to access the adjustment screen, each equipped with an appropriate adjustment slider. Press the AF point selection button to apply the effect.
4. Confirm and save. Cancel or OK and press the Q/SET button to save the image as a new file.
Quick Control RAW Processing
Options: Creative Assist, RAW Processing
My recommendation: N/A
The first two entries on the Playback 3 menu, RAW Image Processing and Creative Assist can be accessed directly from the Playback version of the Quick Controls screen (shown in Figure 13.3, earlier). This entry allows you to specify which of the two is active. By default, the Creative Assist icon is displayed in the Quick Controls screen as the second from the bottom of the right column. If you’d prefer to summon RAW Processing instead, highlight it on the screen that appears when you access this menu, and press Q/SET.
Cloud RAW Image Processing
Options: Quantity Selected, Processing Capacity, Last Updated, Check Processing Capacity (Refresh), Add Images to Process, Check/Remote Selected images, [Send]
My recommendation: N/A
Strictly speaking, this menu entry is not actually an R7 feature. It is a gateway to Canon’s subscription service that provides cloud-based RAW image processing that is theoretically better than what the camera can accomplish internally. The service uses neural network processing and can reduce noise, false color, moiré, and jagged lines and perform other functions. Canon says the service is most effective for images such as night scenes and astronomical images taken with a high ISO, images taken with a moving subject in a dark place, images with fine stripes, and images of buildings with tile/brick patterns.
Pre-processed RAW images and processed images will be stored in Canon’s cloud storage for 30 days in original qualities, and they can be transferred to your computer or other services, such as Google Photos. A free account to image.canon (lowercase is their usage, not mine) is available, but Cloud RAW Image Processing requires a paid monthly subscription, which costs $4.99 and allows you to process up to 80 images. If you use up your allowance in any month, additional processing in 80 image increments can be purchased for $4.99 each.
This menu entry is used to check the status of your account, select images, and send them to the Canon server while the R7 is connected to the internet. When processing is finished, Canon will send you an email notifying you that your images are ready.
This service is too new to estimate how many R7 users want it or need it, or will be willing to pay the monthly fee. My guess is that Canon will be adding features in the future that will make it more useful.
Playback Creative Filters
Options: Grainy B/W, Soft Focus, Fish-eye Effect, Art Bold Effect, Water Painting Effect, Toy Camera Effect, and Miniature Effect
My recommendation: N/A
This entry allows you to apply any of the Creative Filter effects described in Chapter 4 to images that you’ve already taken. All but Miniature Effect and the HDR Art filters allow you to modify the effect by pressing the up directional button and using the left/right controls to change parameters. Your choices include: Grainy B/W (Contrast), Soft Focus, Fish-eye Effect (Strength of the effect), Art Bold Effect (Strength of the Effect), Water Painting Effect (Color Density), and Toy Camera Effect (Warm, Neutral, Cool color tone).
Resize
Options: Medium, Small 1, Small 2 image sizes
My recommendation: N/A
If you’ve already taken an image and would like to create a smaller JPEG or HEIF version (say, to send by e-mail), you can create one from this menu entry. Just follow these steps:
1. Choose Resize. Select this menu entry from the Playback 3 menu.
2. View images to resize. You can scroll through the available images with the touch screen or directional controls. Only images that can be resized are shown. They include JPEG or HEIF Large, Medium, and Small 1 images. Small 2 and RAW images of any type and movies cannot be resized.
3. Select an image. Choose Q/SET to select an image to resize. You cannot resize an image to a size that is larger than its current size; that is, you cannot save a Medium image as Large. A pop-up menu will appear on the screen offering the choice of reduced-size images: M, S1, or S2 sizes. Rotate the QCD to select. The resolutions are: Medium (4800 × 3200, 15MP); S1 (3472 × 2320, 8.1MP); S2 (2400 × 1600, 3.8MP).
4. Resize and save. Choose Q/SET to save as a new file, and confirm your choice by selecting OK from the screen that pops up, or cancel to exit without saving a new version. The old version of the image is untouched.
As with some other entries in the Playback menu, you can also apply resize images from the Quick Controls menu that appears when you press the Q/SET button during Playback. It’s the fifth icon from the top in the left column, as shown earlier in Figure 13.3.
Cropping
Options: Crop, Aspect Ratio
My recommendation: N/A
This is the first entry of only two entries in the Playback 4 menu. (See Figure 13.11.) If you need to crop an image, you can do it here. You don’t have as much control as you would have in an image editor, but if you, say, need to crop an image for emailing or uploading to a social media site, this may do the job. You can crop only JPEG or HEIF images. This function does not work on RAW images, or frames grabbed from 4K movies.

Figure 13.11 The Playback 4 menu.
Simply select this menu entry and press Q/SET. A compatible image appears. Use the QCD to select an image for cropping. Press Q/SET when you’ve chosen your image and go to the screen shown in Figure 13.12. (Note that you can also crop images from the Quick Controls menu that appears when you press the Q/SET button during Playback. It’s the sixth icon from the top in the left column, as shown earlier in Figure 13.3.)
In the cropping screen you can apply one of these tools:
◼ Select adjustment. Arrayed along the top row of the screen are function icons. Rotate the QCD to highlight any of these four (from left to right):
• Change the Crop View. Enlarge/reduce crop. When this option is highlighted, rotate the Main Dial to enlarge and reduce the green cropping frame (see Figure 13.12). Use the Multi-controller joystick to relocate the position of the cropping frame within the image.
• Straighten the Image. Correct for tilt. When this option is highlighted, press Q/SET to produce a grid overlaid on your image. Up to plus/minus 10 degrees of tilt can be corrected. Rotating the QCD will adjust orientation in 0.1-degree increments. Rotational arrows appear in the top row that you can tap on the touch screen to adjust in 0.5-degree increments. The grid helps you straighten your image. Press Q/SET to finish this correction and confirm.
• Change aspect ratio. When this option is highlighted, press Q/SET repeatedly to cycle the cropping frame’s proportions among 3:2, 16:9, 4:3, 1:1, 2:3, 9:16, or 3:4 aspect ratios.
• Return from cropping. Exit the Crop feature.
◼ Save cropped image. Highlight this option and press Q/ SET, select OK, and press Q/SET again to save your cropped image as a new file. Your original image is retained unharmed.
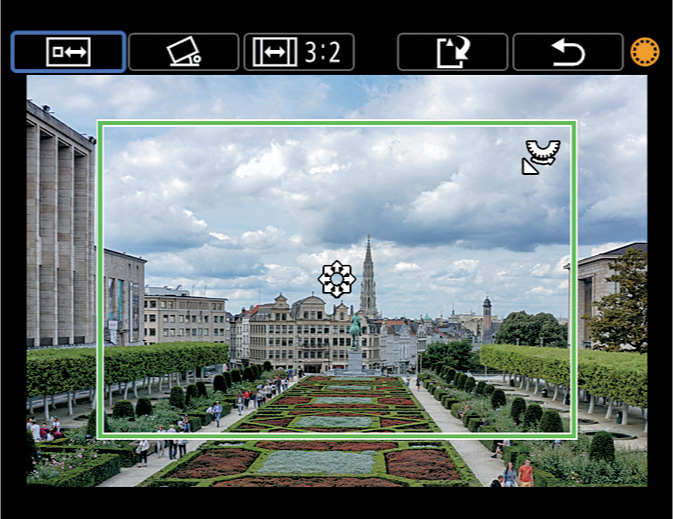
Figure 13.12 The green frame represents the cropped area.
HEIF→JPEG Conversion
Options: Convert to JPEG
My recommendation: N/A
You can convert HEIF images captured during HDR Shooting with PQ (perceptual quantization) enabled (as discussed in Chapter 11) to JPEG format if you need a conventional image. Select this menu entry and you’ll be shown only compatible HDR images. Press Q/SET and a message Converting to JPEG appears, followed by a Save As New File prompt. That’s all there is to it. Your original file is unchanged.
Slide Show
Options: Image Selection, Display Time, Repeat, Transition Effect
My recommendation: N/A
This is the first entry on the Playback 5 menu (see Figure 13.13). Slide Show is a convenient way to review images or movies one after another, without the need to manually switch between them. To activate, just choose Slide Show from the Playback 5 menu. During playback, you can press the Q/SET button to pause the “slide show” (in case you want to examine an image more closely), or the INFO button to change the amount of information displayed on the screen with each image. For example, you might want to review a set of images and their histograms to judge the exposure of the group of pictures.

Figure 13.13 The Playback 5 menu.
To set up your slide show, follow these steps:
1. Choose images. By default, the Slide Show feature chooses all images on the card. If that’s what you want, proceed to Step 3. If you want to choose specific images, continue to Step 2.
2. Specify certain images. You can “filter” which images will be displayed in your slide show. The parameters can include Rating, Date, Folder, Protected, and File Type (RAW, RAW+JPEG, JPEG, or Movie). You’ll find instructions for filtering images in the entry described after Slide Show: Set Image Search Conditions.
3. Choose Set Up. Highlight the Set Up option and press Q/SET to begin choosing display parameters.
4. Choose Display Time. Highlight Display Time and press Q/SET to produce a screen with a choice of playing times (1, 2, 3, 5, 10, or 20 seconds per image). Press Q/SET to confirm.
5. Repeat. If you want the show to keep playing, highlight Repeat, press Q/SET, and Enable.
6. Exit Set Up. Press MENU to exit Set Up.
7. Start the show. Highlight Start and press Q/SET to begin your show. (If you’d rather cancel the show you’ve just set up, press MENU instead.) Note: The display time of each slide will vary, depending on the file size of the image.
8. Use show options during display. Press Q/SET to pause/restart; INFO to cycle among the information displays for still photos; and MENU to stop the show. The auto power off feature will not turn the camera off during playback. Sound volume of movies can be adjusted by rotating the Main Dial, and during playback or pause, you can rotate the QCD to view a different slide.
Set Image Search Conditions
Options: Filter by: Rating, Date, Folder, Protection, File Type, HDR PQ
My preference: N/A
You don’t need to see every image on your memory card as you play them back or perform functions like Protect or Erase. This entry allows you to specify which images are shown during image review, available in a slide show, or subject to the Protect and Erase features. Just follow these steps:
1. Choose Set Image Search Conditions. Highlight the entry and press Q/SET.
2. Select condition. A vertical column at left appears with the conditions available, listed, from top to bottom: Rating, Date, Folder, Protection, File Type, or HDR PQ (On/Off). Use the QCD to scroll to and highlight a condition. (See Figure 13.14.)
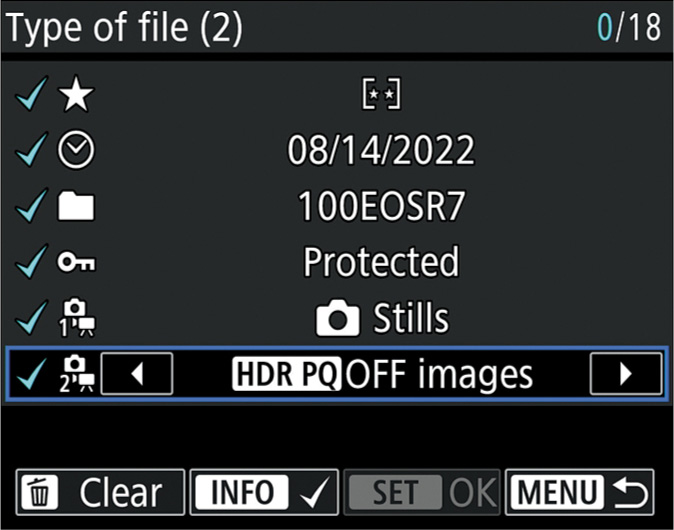
Figure 13.14 Image search conditions.
3. Enter parameter. Use the Main Dial, Multi-controller, or directional buttons to set the parameter for a particular condition:
• Rating. You can choose one to five stars.
• Date. Select a specific date that includes photos taken. (That is, you cannot select a date on which no images were taken with this card.)
• Folder. Select from among the various folders on your card. If only one folder is available, that is chosen by default.
• Protected. Choose Protected or Unprotected images.
• Type of File 1 and 2. Choose to show only stills, various combinations of RAW, RAW+JPEG, HEIF, and JPEG, plus movie files.
• HDR PQ. You can specify whether HDR PQ images should be included, nor not.
4. Set condition. When parameters are set for a condition, press INFO to add it to your conditions. You can press INFO again to unselect it. Mix and match conditions, choosing any one, or any combination of the six parameters. Press Trash to remove/clear all conditions.
5. Confirm. Press Q/SET to exit. An informational screen will appear. Press OK to confirm. If no images meet the conditions you specified, you will be unable to apply them.
View From Last Seen
Options: Enable (default), Disable
My preference: Disable
This entry determines what happens when you resume playback review of your images. When you select Enable, playback starts with the last image displayed during review. When disabled, playback shows the last image you shot. Most of the time, when I am actively shooting, I want to see my most recent images immediately, so I leave this set to Disable. However, if you were reviewing a large group of images and performing some other function (say, cropping or resizing them), you’d want to return to the last image you were already working with.
Magnification
Options: Magnification: 2X (default), 4X, 8X, 10X, Actual size, Same as last magnification; Magnified Position: From Center, From Focus Point (default); Magnified Position: Enable, Disable (default)
My recommendation: I prefer the default values.
This setting allows you to specify the initial magnification for magnified view during playback, as well as the starting position on the screen. Choose your starter magnification based on how often you tend to take a close-up look at your images during review. If you’re a pixel-peeper, you might want an in-depth 10X view each time you magnify your image. I like to use the same magnification I most recently used, because I am likely to examine a series of similar images at the same zoom level during a shooting or review session. Your options are as follows:
◼ Magnification (apx)
• 2X, 4X, 8X, 10X. The initial magnified view will be 2, 4, 8, or 10X (your choice), centered around the middle of the frame.
• Actual Size. Magnified view starts at 100 percent, centered around the autofocus point used to achieve focus; if manual focus was used, the image will be centered around the middle of the frame.
• Same as last magnification. The camera uses the same magnification value you last used.
◼ Magnified Position. You can choose to have the magnified image centered around the center point of the frame, or around the autofocus point used to capture the image. If the image was taken using manual focus, the starting position is the center of the frame. When viewing subsequent images, this initial position can be overridden by the next option.
◼ Maintain Position. Choose Enable, and the R7 will maintain your current magnified position when you return to view additional images during playback, ignoring the Magnified Position you set above. Select Disable and the Magnified Position is always used.
Image Jump with Main Dial
Options: 1 Image, 10 Images (default), Specified number (1–100), Date, Folder, Movies, Stills, Protected, Rating
My preference: 10 Images

Figure 13.15 The Jump method is shown on the LCD briefly when you leap forward or back using the Main Dial or a two-fingered touch screen swipe.
As first described in Chapter 2, you can leap ahead or back during picture review by swiping across the touch screen with two fingers, or by rotating the Main Dial. You can select from a variety of increments that will be used with this menu entry. The Jump method is shown briefly on the screen as you leap ahead to the next image displayed, as shown in Figure 13.15. Your options are as follows:
◼ 1 image. Rotating the Main Dial one click or swiping jumps forward or back 1 image.
◼ 10 images. Rotating the Main Dial one click or swiping jumps forward or back 10 images.
◼ Specified number. When this option is highlighted, rotate the Main Dial to choose the increment between jumps, from one image to 100.
◼ Date. Rotating the Main Dial one click or swiping jumps forward or back to the first image taken on the next or previous calendar date.
◼ Folder. Rotating the Main Dial one click or swiping jumps forward or back to the first image in the next folder available on your memory card (if one exists).
◼ Movies. Rotating the Main Dial one click or swiping jumps forward or back, displaying movies you captured only.
◼ Stills. Rotating the Main Dial one click or swiping jumps forward or back, displaying still images only.
◼ Protected. Rotating the Main Dial jumps between Protected images only. This is a good way to review images you deemed worthy of protection, or which you have marked with the protected attribute for some other reason (say, you wanted to group some favorite shots for review, but not apply a specific star rating).
◼ Rating. Rotating the Main Dial one click or swiping jumps forward or back, displaying images by the ratings you’ve applied (as described earlier). Tap the touch screen or rotate the Main Dial to choose the rating parameter.
Playback Information Display
Options: Enable or Disable nine informational screens
My recommendation: Screens 1 and 2 only
This is the first entry on the Playback 6 menu. (See Figure 13.16.) When you press the INFO button during Playback, the camera cycles among three different screens, shown in Figure 13.17. They include an uncluttered screen with no overlaid information, a basic information screen, and a shooting information screen that provides more complete information, and can include several additional optional panels of data. Use this entry to specify which of the optional screens you want to display using the INFO button.

Figure 13.16 The Playback 6 menu.
I opt to display only screens 1 (Basic Information) and 2 (Shooting Information). In that mode, pressing the INFO button cycles among the No Information (just a plain screen with the image), Basic Information, and Shooting Information. All of the other screens described below are still available. Just use the Multi-controller joystick to scroll down to them when the Shooting Information screen is displayed. Activate any of the other screens for INFO button display only if you really need to see it quickly during picture review.
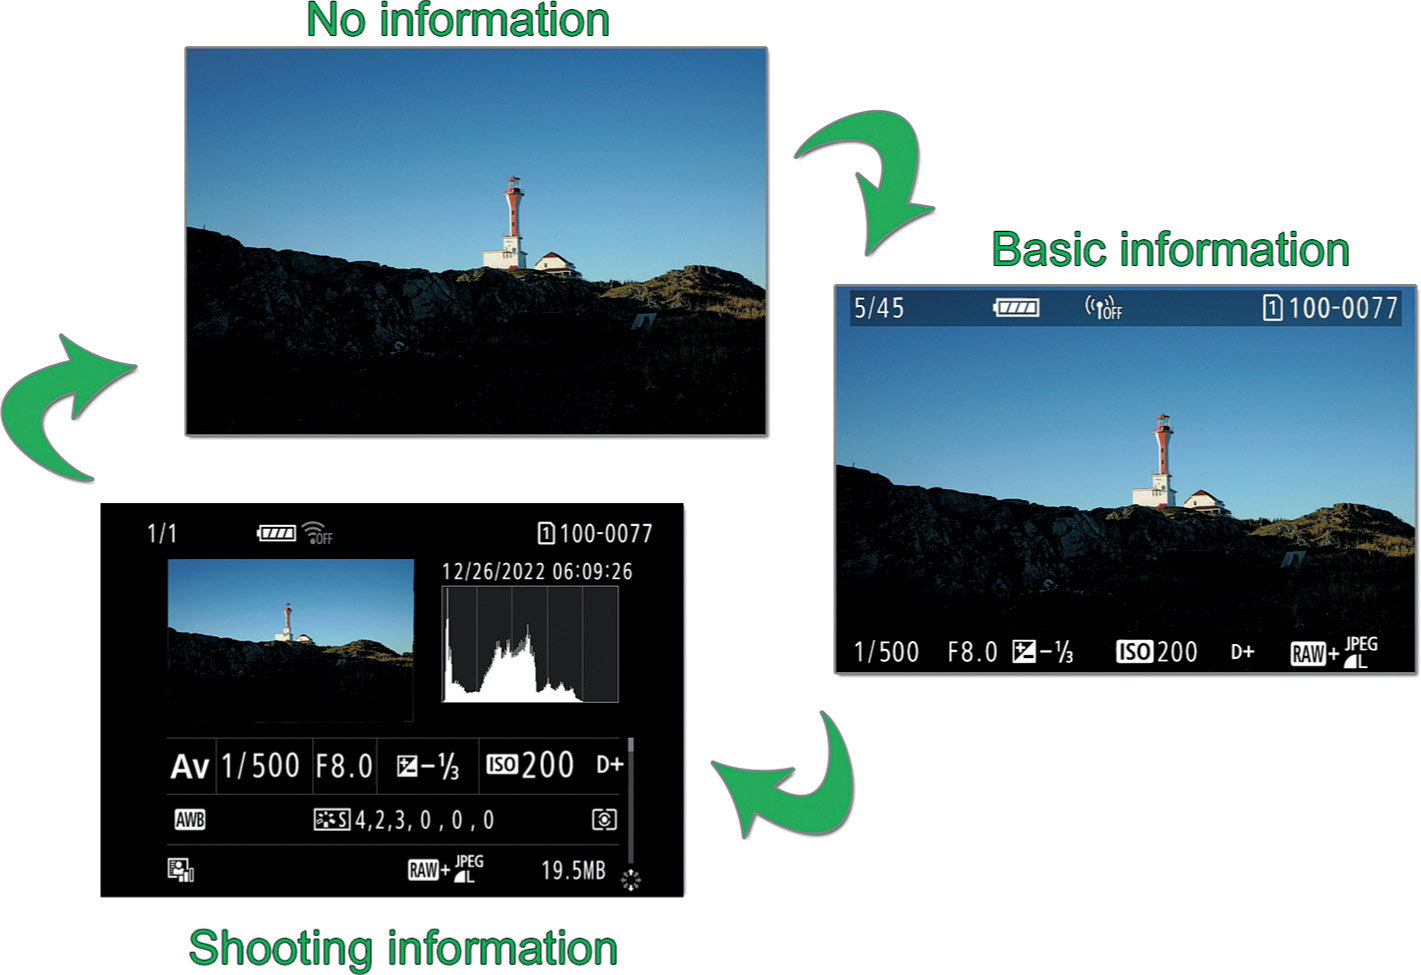
Figure 13.17 Press INFO to cycle among these three screens: No information (upper left); Basic Information (center right); Shooting Information (lower left). You can enable or disable all but the No Information version.
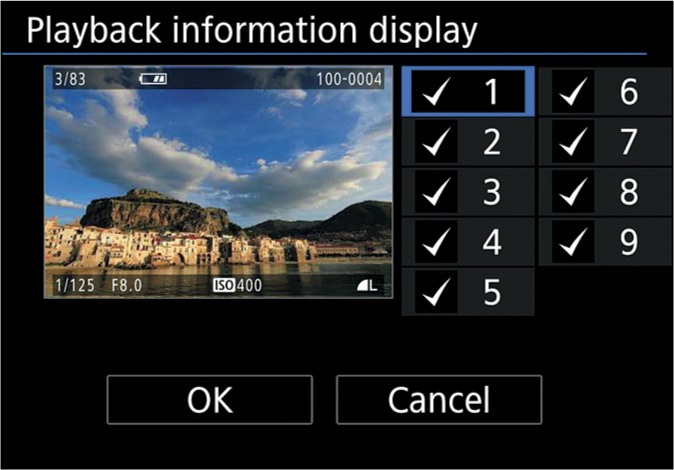
Figure 13.18 Mark any, all, or none of the Playback display options using this screen.
Just follow these steps to include/exclude the available displays:
1. Access with menu entry. A screen similar to the one shown in Figure 13.18 appears.
2. Highlight the screens that you want to see using the INFO button, and press Q/SET to add a checkmark. To hide a display, highlight a checkmarked option and press Q/SET to unmark it. Reminder: You can still view unchecked screens by scrolling down with the Multi-controller when viewing the Shooting Information screen.
3. You can mark or unmark any or all. If none are selected, only the No Information screen will be displayed during Playback. (See Figure 13.17, upper left.)
4. The available screens are as follows (numbers correspond to Figure 13.18):
1. The Basic Information screen. (See Figure 13.17, right.) This shows a limited amount of information, such as battery status, picture number, shutter speed, aperture, exposure compensation, ISO setting, highlight priority, and image quality.
2. The Shooting Information screen, which provides more detailed information like that shown in Figure 13.17, lower left. Note the scroll bar at lower right. Options 2–9 in the Playback Information Display represent additional panels, described next. By default, a brightness/ luminance histogram is displayed at upper right in the Shooting Information Screen. You can press INFO while activating this entry to substitute an RGB histogram instead. I showed you how to work with histograms in Chapter 4.
3. Lens information/alternate histogram. Activate this option and scrolling down from the main Shooting Information screen displays information about the lens used to take the current photo, as well as the other histogram display. (If the main screen shows the Brightness histogram, the RGB histogram appears here, and vice versa.) You can press INFO and exchange the order of the two histograms if you wish.
4. White balance. Adds WB information to the scrolling screen, including a color bias display.
5. Picture Control. Displays current Picture Control settings.
6. Color Space/Noise Reduction. Appends these details to the display.
7. Peripheral Illumination/Distortion Correction.
8. Image Sent To. Lets you know that the image has been transferred to your smart device.
9. GPS Information. Appears if the image was taken using a GPS device.
5. When finished adding screen options, highlight OK at the bottom left of the Playback Information Display screen and press Q/SET.
6. During Playback, when the Shooting Information screen is displayed (press INFO to make it appear, if necessary), you can scroll among the activated options using the Multi-controller joystick.
Highlight Alert
Options: Enable, Disable (default)
My recommendation: Enable
Choose Enable, and overexposed highlight areas will blink on the LCD screen during picture review (these are commonly known as “blinkies”). Set to Disable if you find this alert distracting. Many users access the histogram displays during playback as a more precise indicator of over (and under) exposure.
AF Point Disp.
Options: Enable, Disable (default)
My recommendation: N/A
Select Enable, and the exact AF point(s) used to determine focus will be highlighted in red. If automatic AF point selection was used, you may find multiple points highlighted.
Playback Grid
Options: 3 × 3, 6 × 4, 3 × 3 + diagonal lines, Off (default)
My recommendation: N/A
You can superimpose a 3 × 3, 6 × 4, or 3 × 3 plus diagonal lines grid over your image during playback, or disable the grid display entirely. (See Figure 13.19.) These grids are the same three that can be shown on the monitor or electronic viewfinder while in shooting mode, as explained in Chapter 11.
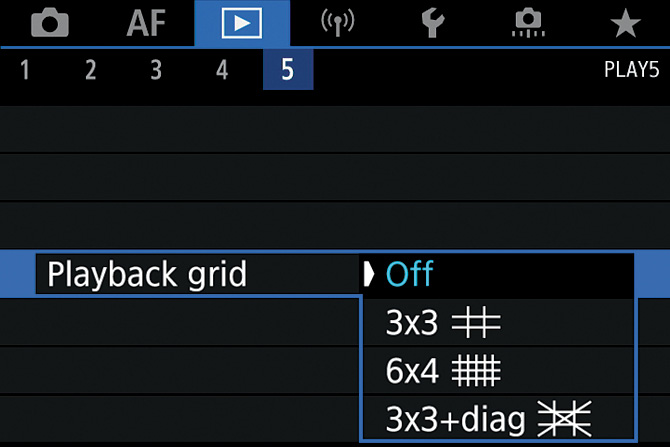
Figure 13.19 Playback grid options.
Movie Play Count
Options: Record Time (default), Time Code
My recommendation: N/A
Determines whether the movie recording and playback time (Rec Time) is shown on the screen, or whether the Time Code (an absolute positional marker/index) is displayed instead. If you change the Movie Play Count setting in the Movie Shooting menus or here, the other will be changed automatically. You’ll find additional Time Code options in the Movie Shooting menus, described in Chapter 16.
HDMI HDR Output
Options: Off, On (default)
My recommendation: N/A
This entry allows you to view RAW or HEIF images in high dynamic range mode when the camera is connected to an HDR TV using an HDMI cable. Television innovations come and go, but some are more likely than others to catch on, and Canon is keeping abreast of the curve. Unlike, say, 3D TV (which suffered from a lack of content and consumer desire and had mercifully died by 2018), High Dynamic Range (HDR) TV is here to stay. If your current television doesn’t have HDR, it’s likely your next one will (along with 4K display). In that case, you’ll be able to output your camera’s RAW images for display on your nifty new set. They’ll look mar-velous (at least, that’s what I’m told).
In addition to an HDR-compatible TV, you’ll need to remember to set up your television’s input to accept HDR images. While viewing HDR output from your camera, some features, such as RAW processing, are not available. The camera will also send JPEG images instead of RAW to your HDR TV when displaying multiple-exposure RAW images.
Wireless Menu
Your EOS camera has built-in wireless communications capabilities that allow you to link the camera to multiple devices, as I’ll describe in this chapter. In addition, you’ll want to study Canon’s online guides for advanced networking techniques and settings, and the latest information on using the software Canon offers for the camera. Visit the Canon website for your country for more information and/or downloadable manuals on:
◼ EOS Utility for Windows and Macintosh. As I write this, Version 3.15.20 is the latest edition. Canon offers a downloadable PDF manual that will help you use its functions. With this utility, you can download and display images, perform remote shooting, and adjust camera controls after you’ve connected to the camera using the steps I outline in this chapter.
◼ Wireless Help. I’ll show you how to connect using Bluetooth, the camera’s built-in Wi-Fi hot spot, and access points. For more advanced LAN information, Canon’s online Wireless Help tool can be useful.
◼ Digital Photo Professional (DPP) for Windows and Macintosh. The application for your Windows or Mac computer, in Version 4.16.11 as I write this, is a powerful RAW processor that you may be familiar with. Canon provides a manual for it on its website. However, you may not be familiar with DPP Express, a wireless tool for recent iPads that works in conjunction with the Camera Connect app that installs on your smartphone. You can use DPP express to view images and adjust settings on your camera, and save files to the cloud, a computer, or your camera.
Applications, especially, are updated frequently enough that instructions provided in this book would likely be out-of-date before the book is even published. That’s why you’ll find little discussion of software like Adobe Photoshop, Digital Photo Professional, or apps like Camera Connect. The software has been designed to be easy to use with plenty of built-in help files. In addition, this book concentrates on still photography rather than information technology, obviously, so I’m not going to go into fine detail on LAN configuration and other IT topics. However, I think you’ll find enough information in the following sections to get you up and running with the basics.
First, here is a list of the connections you can make with the camera’s built-in Wi-Fi:
◼ Phones and tablets. You can connect to a smartphone or tablet and use an app on the device to operate the camera remotely or review images on your memory card. Both Android and iOS are supported.
◼ Connect and control your camera from your computer. The EOS Utility will allow you to connect your camera to your computer over Wi-Fi and operate it remotely.
◼ Print images. If you have a PictBridge-compatible printer with wireless local area network (WLAN) features, you can print images directly from your camera.
◼ Web upload. The Canon image.canon subscription cloud service can be used to share your images with colleagues, family, or friends over the Internet once you’ve signed up for a paid account.
I’ll explain all of these in the next sections, but the first step is helping you get connected using the most common methods. You have your choice of linking your camera using Bluetooth, Wi-Fi using the camera’s built-in access point (“hot spot”), or your existing home/office network that operates using a router. I’m going to cover the Wireless menu by logical function rather than listing each menu entry in the order presented on the camera.
Connecting to a Smartphone via Bluetooth
Connecting your smart device to your camera is most easily done using a Bluetooth connection, which is available on virtually all smart devices introduced within the last five years. After making sure Bluetooth is enabled on your smartphone, just follow these steps:
1. Connect to smartphone. In the Wireless menu (see Figure 13.20, left), select Wi-Fi/Bluetooth Connection. In the screen that appears (see Figure 13.20, right), highlight the Connect to Smart-phone icon (leftmost in the top row). Press Q/SET to proceed.
2. Add a device. The screen shown at top left in Figure 13.21 appears. Select Add a Device to Connect To and press Q/SET.
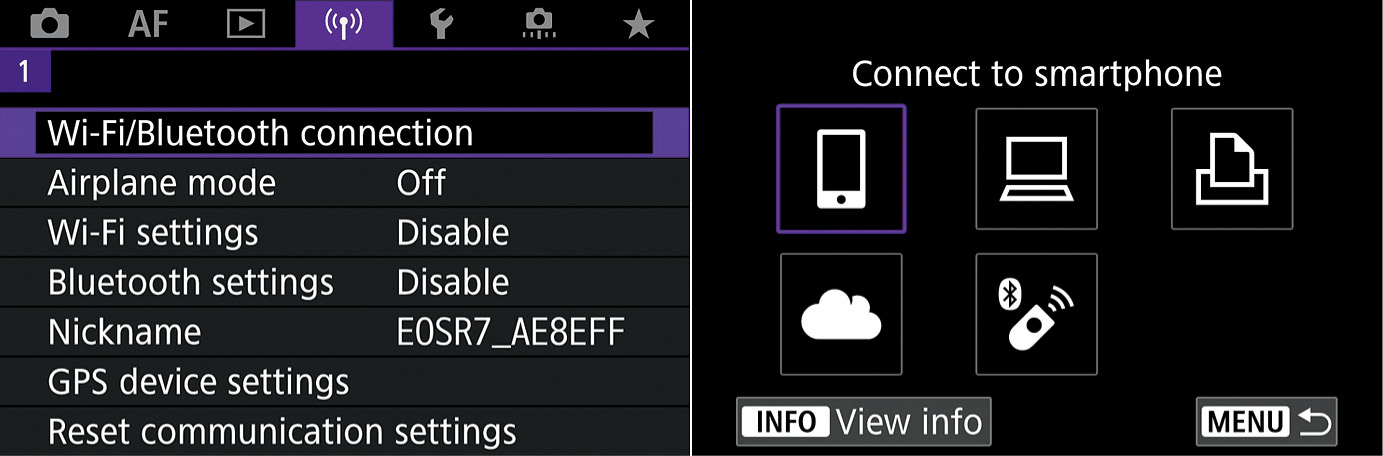
Figure 13.20 The Wireless menu (left); choosing a function (right).
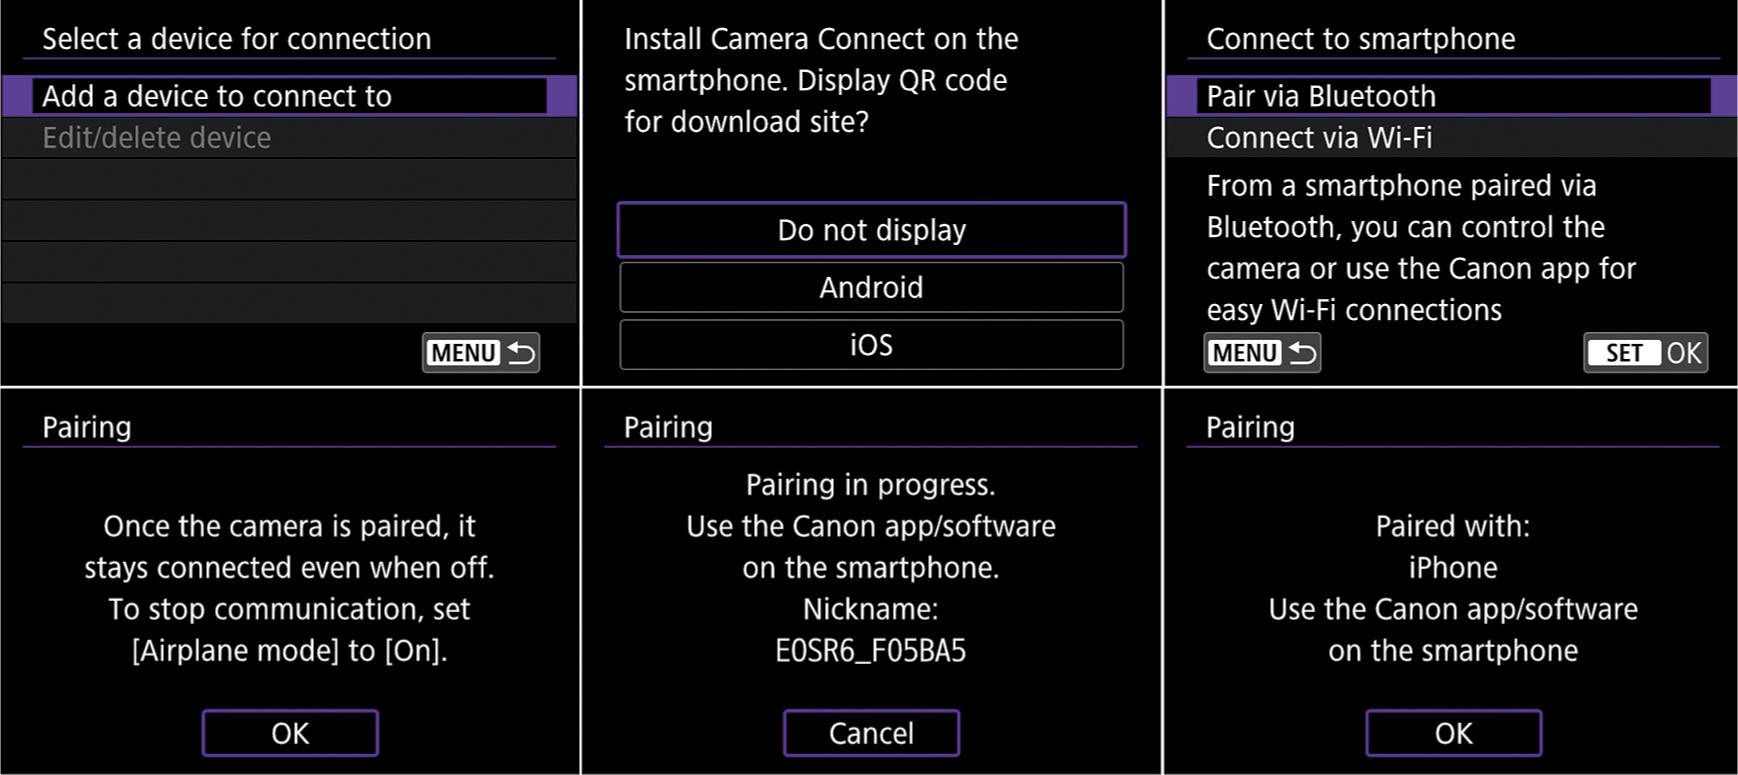
Figure 13.21 Pair using Bluetooth.
3. Install Camera Connect (if not installed). The screen seen in Figure 13.21, top center, will pop up. If the Camera Connect app is already installed on your phone, select Do Not Display; otherwise, choose Android or iOS to display a QR code you can scan with your phone to access the Google Play or Apple App Store to install the Camera Connect app.
4. Start Pairing. Select Pair Via Bluetooth to enable pairing with your smartphone on the camera. (See Figure 13.21, top right.)
5. Pairing continues. In the step after this one, you’ll switch from your camera to your smartphone. As you carry out the steps that follow, you’ll see the messages shown in the bottom row of Figure 13.21.
6. Open the Camera Connect app on your phone. Follow the directions for the screens that appear to pair the camera and phone. You’ll see a message on the order of “Choose a camera for pairing” (see Figure 13.22, upper left). Tap the camera name.
7. Grant pairing request. When the Bluetooth Pairing Request screen appears (see Figure 13.22, upper right). Tap Pair.
8. Finish pairing. Continue following the prompts shown in Figure 13.22, bottom left and right, to join the two devices using Camera Connect.
INSTALL CAMERA CONNECT
All the instructions for using Camera Connect will assume you have already installed the app as directed in Step 3 above. You can safely choose Do Not Display when the screen described in the step is shown.
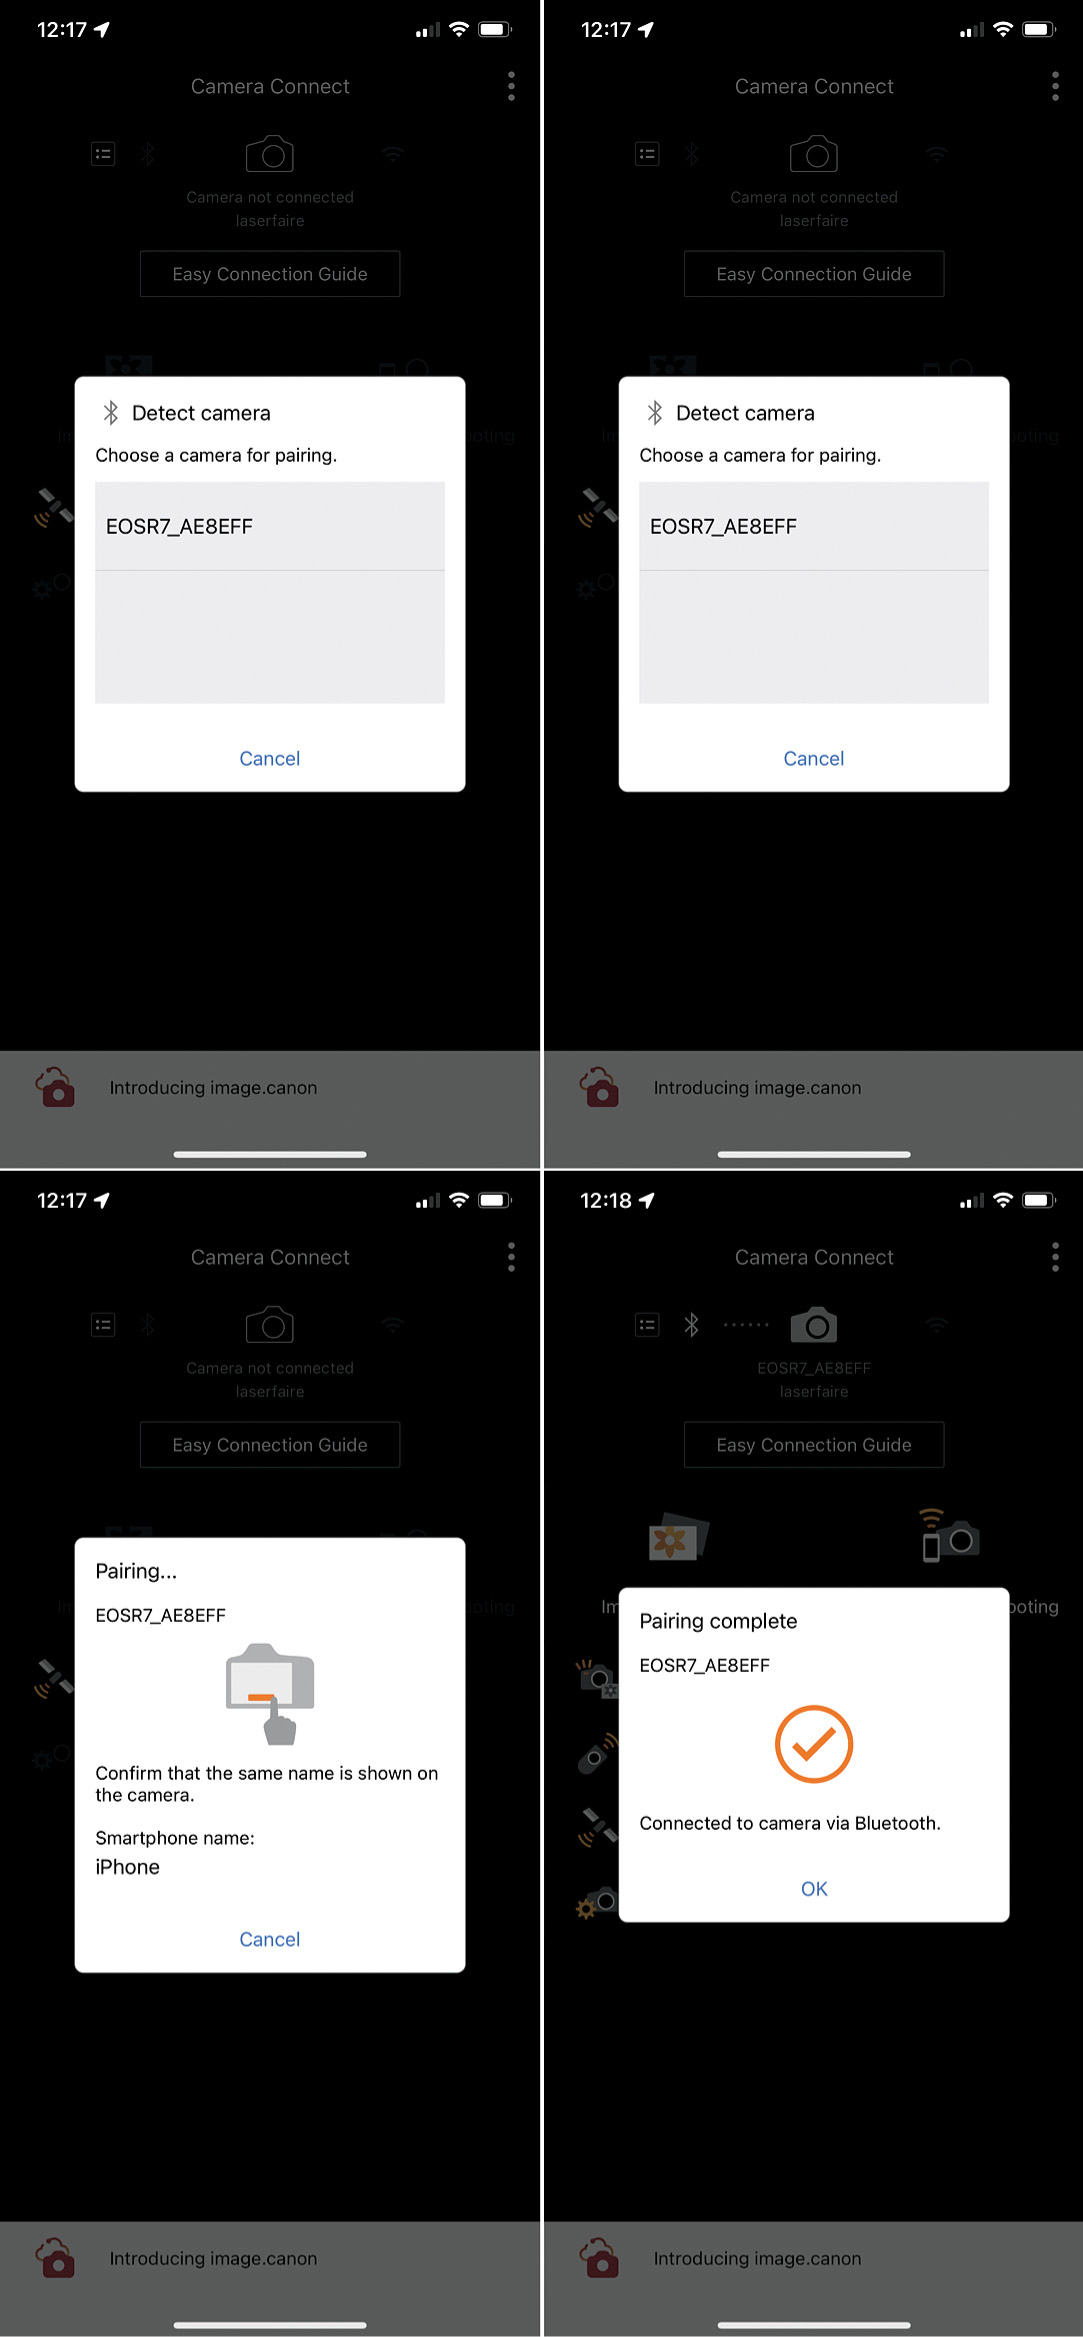
Figure 13.22 Prompts on the smartphone.
Once you’ve connected using Bluetooth you can easily keep in touch. Just choose Stay Connected If Off in the Bluetooth Function menu, and the camera will remain connected to your device even if you turn the camera off. Low-energy Bluetooth requires little power, so you can safely enable the camera and device to remain connected when they are in range of each other. Just launch Camera Connect on your device, select Images on Camera (tap Join if using iOS), and you’ll be able to view a list of images on the camera.
Connecting to a Smartphone Using Wi-Fi
If you cannot or do not want to connect your camera to your smartphone using Bluetooth, you can connect using Wi-Fi alone. Just follow these steps:
1. In the Wireless menu (see Figure 13.20, left, shown earlier), select Wi-Fi/Bluetooth Connection. In the screen that appears (see Figure 13.20, right), highlight the Connect to Smartphone icon (leftmost in the top row).
2. Press MENU to confirm and exit.
3. Select Add a Device to Connect To. As I noted, if the Camera Connect app is already installed on your phone, select Do Not Display; otherwise, choose Android or iOS to display a QR code you can scan with your phone to access the Google Play or Apple App Store to install the Camera Connect app.
4. Select Connect Via Wi-Fi to connect your smartphone to the camera. (See Figure 13.23, left.)
5. Check the SSID (network name) and password. The password will appear only if you have specified one in the Wi-Fi settings entry (as I’ll explain later). (See Figure 13.23, right.)
6. Go to the Settings page of your smartphone and choose Wi-Fi settings. The camera’s built-in network will appear among the available networks. Select it and enter the password (if necessary). Figure 13.24 shows the steps I use for my iOS phone.
7. Open the Camera Connect app on your phone. Follow the directions for the screens that appear to pair the camera and phone.
8. To specify viewable images, press the INFO button. (See Figure 13.25, left.)
9. A message that the connection is complete will appear. (See Figure 13.25, right.)
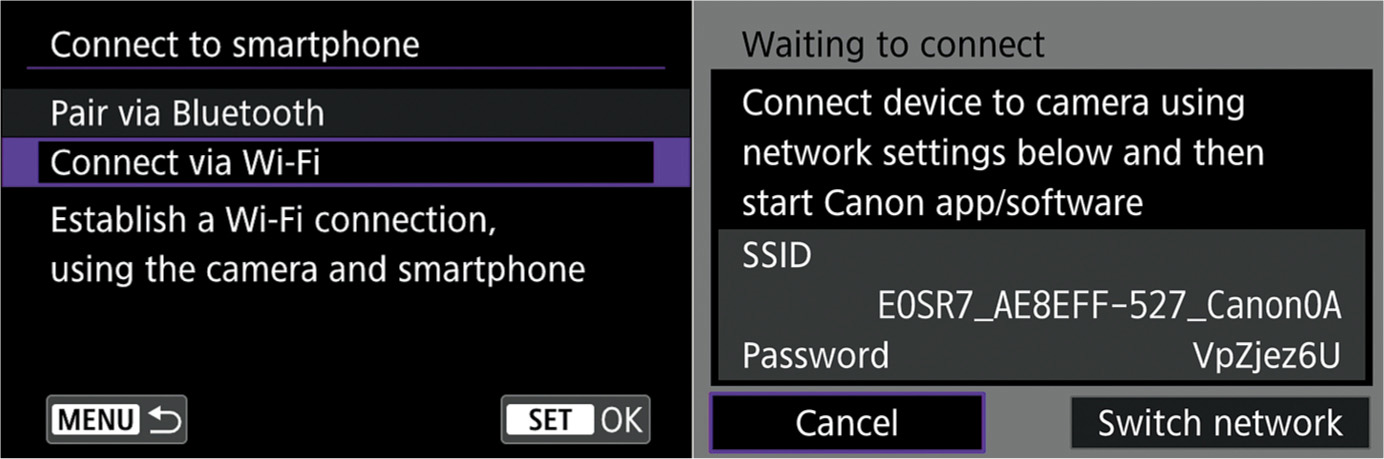
Figure 13.23 Connecting via Wi-Fi.

Figure 13.24 Check SSID and enter password on the smartphone.
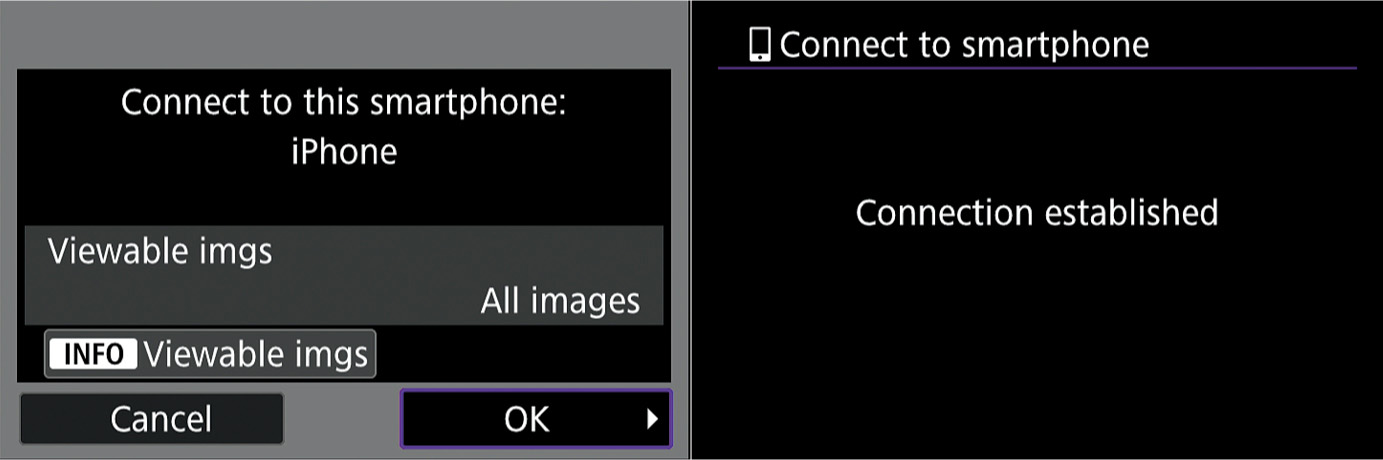
Figure 13.25 Screens displayed on the R7.
Connecting to a Computer Using Wi-Fi
While you can control your camera using the Camera Connect app on your smartphone as described above, you can also use a laptop or desktop computer to wirelessly operate your camera using the free EOS Utility that can be downloaded from the Canon website.
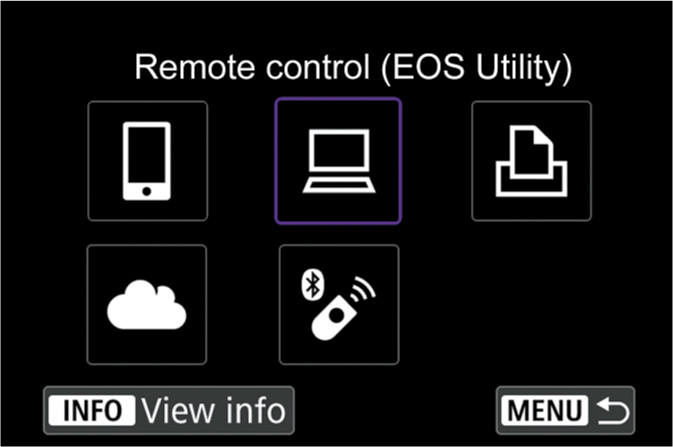
Figure 13.26 Link using the EOS Utility.
Connection is done in a similar way:
1. In the Wireless menu, select Wi-Fi/Bluetooth Connection. In the screen that appears (see Figure 13.26), highlight the Remote Control (EOS Utility). Press MENU to confirm and exit.
2. Select Add a Device to Connect To.
3. Check the SSID (network name) and password. The password will appear only if you have specified one in the Wi-Fi settings entry (as I’ll explain later).
4. Access your computer/operating system’s wireless settings. Keep in mind that while virtually all laptops have wireless built-in, not all desktop computers do. The screen shown for my Windows OS appears in Figure 13.27.
5. Select the camera’s SSID from the list and enter the password/encryption/network security key.
6. Start the EOS Utility 3 on your computer and select Pairing Over Wi-Fi/LAN.
7. Choose OK when the Start Pairing Device notice shows up on the camera. (See Figure 13.28.)
8. Follow the prompts on the camera and computer to complete the linkup.
9. When pairing is accomplished, you will be able to access the camera wirelessly using the EOS Utility.

Figure 13.27 Select the camera’s SSID from your Windows or Mac operating system’s Wireless settings.

Figure 13.28 Use the EOS Utility.
Wi-Fi Connection Using an Access Point
This wireless option allows you to join a Wi-Fi network using an access point that uses the WPS (Wi-Fi Protected Setup) security standard. If your home/office router is a recent one, your network is probably set up to use a password that’s encrypted with the WPA Personal or WPA2 Personal security protocols. If that’s the case, you can avoid all the complex LAN setup procedures and link your camera to the network simply by pressing the WPA button on your router. It’s usually labeled WPA or has the WPA symbol (shown below) as a label.
1. In the Wireless menu, select Wi-Fi/Bluetooth Connection. In the screen that appears, highlight the Connect to Smartphone icon.
2. Press MENU to confirm and exit.
3. Select Add a Device to Connect To. On the next screen, select Connect Via Wi-Fi.
4. Select Switch Network. (See Figure 13.29, upper left.)
5. The available Wi-Fi network will be displayed, as shown in Figure 13.29, upper right. Select Connect with WPS.
6. Select WPS (PBC Mode), which allows you to connect using Push Button Configuration. If your router requires a PIN, choose WPS (PIN Mode) instead. (See Figure 13.29, lower left.)
7. Connect to the network by pressing the  button on the router. Select OK on the prompt screen that pops up.
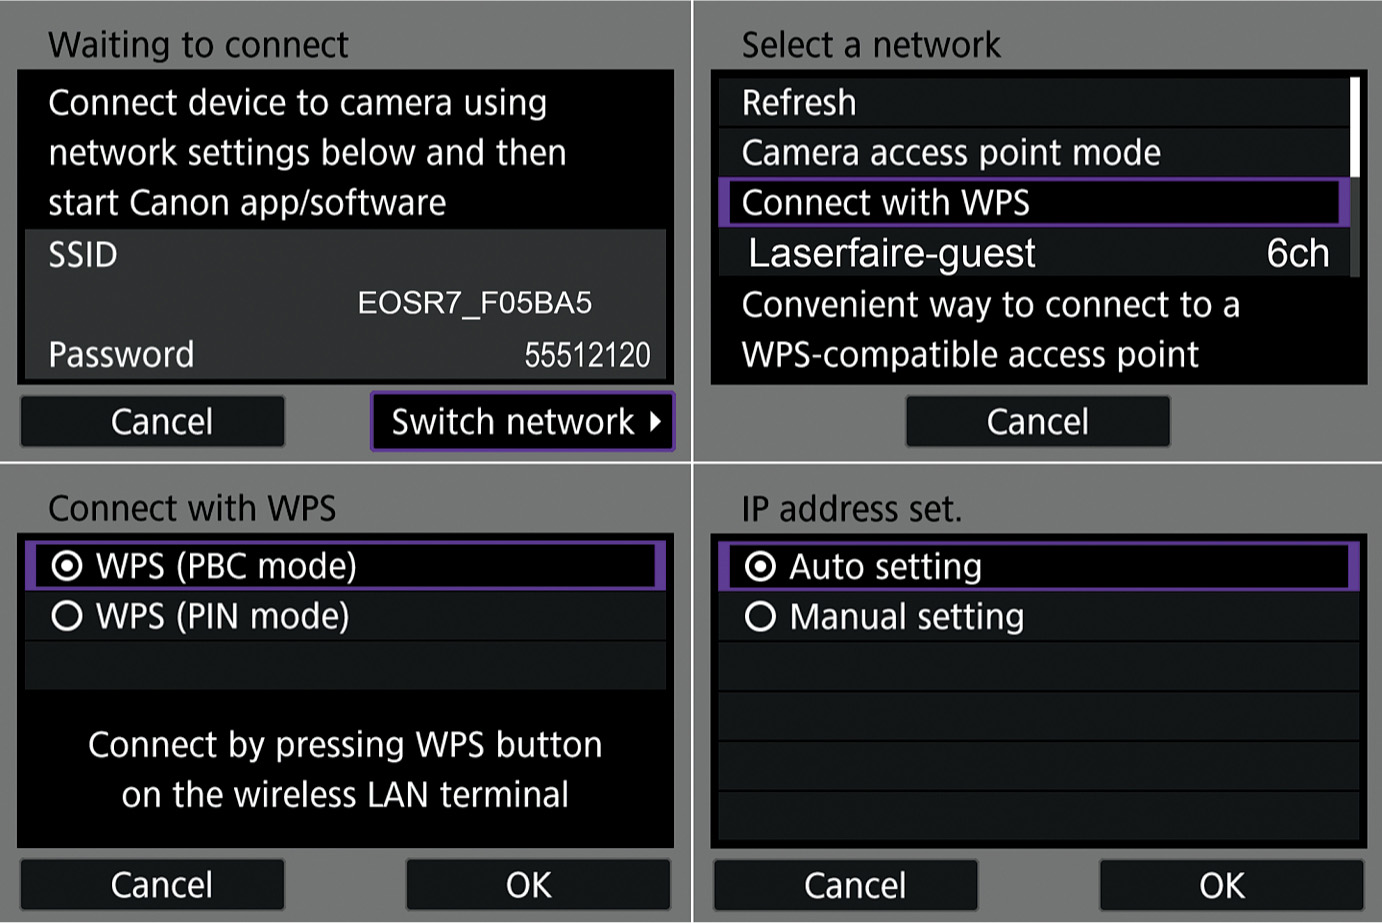
Figure 13.29 Select Switch Network (upper left); available Wi-Fi networks (upper right); choose WPS (PBC mode) (lower left); select Auto Setting for IP address (lower right).
8. Select Auto Setting to allow the IP address to be supplied automatically. IT types can use Manual Setting instead if they want a specific IP address to be applied. (See Figure 13.29, lower right.)
9. Finally, connect to your smartphone, the EOS Utility, or image.canon cloud service.
• Smartphone. Start Camera Connect and tap the camera name to connect by Wi-Fi.
• EOS Utility. Start the EOS Utility and click Pairing over Wi-Fi/LAN.
• iMAGE.canon. Log into the image.canon cloud service, an optional paid service.
Connecting to Wireless Remote Control
The fifth and last icon on the Wi-Fi/Bluetooth Connection screen, shown earlier in Figure 13.26, is the Connect to Wireless Remote entry, which allows you to link your camera to the optional Canon Wireless Remote Control BR-E1, which uses Bluetooth. When you reach the Add a Device to Connect To screen as you did when linking to your phone, computer, or web service above, choose Wireless Remote. When the Pairing screen appears, hold down the W and T buttons on the BR-E1 remote simultaneously for at least three seconds, until a message appears confirming the pairing. Then press Q/SET to exit.
Set the camera Drive mode to one of the Remote Self-Timer settings when shooting stills, and set the Remote Control entry in the Shooting menu to Enable when capturing movies.
Ready to Go
By now you should be comfortable with the full range of wireless capabilities your camera offers. I recommend connecting the camera to your smartphone using the camera’s built-in Wi-Fi hot spot and exploring the options available with Camera Connect, an app that is still under development and changing constantly. Figure 13.30 shows you the key screens you’ll be working with to perform the following tasks.
◼ Main screen. At upper left in Figure 13.30 is the main screen, which is your gateway to:
• Accessing images on your camera.
• Remote live view shooting.
• Automatic transfer of images from your camera to your smart device.
• Location information for individual images.
• Adjusting camera settings.
◼ Remote shooting. This screen lets you preview the same image your camera’s sensor sees, adjust exposure settings and other parameters, and take a picture by tapping the red circle at the bottom. (See Figure 13.30, upper center.)
◼ Camera Settings. You can adjust individual settings of the camera here. At upper right in Figure 13.30 you can see the settings for Day/Time.
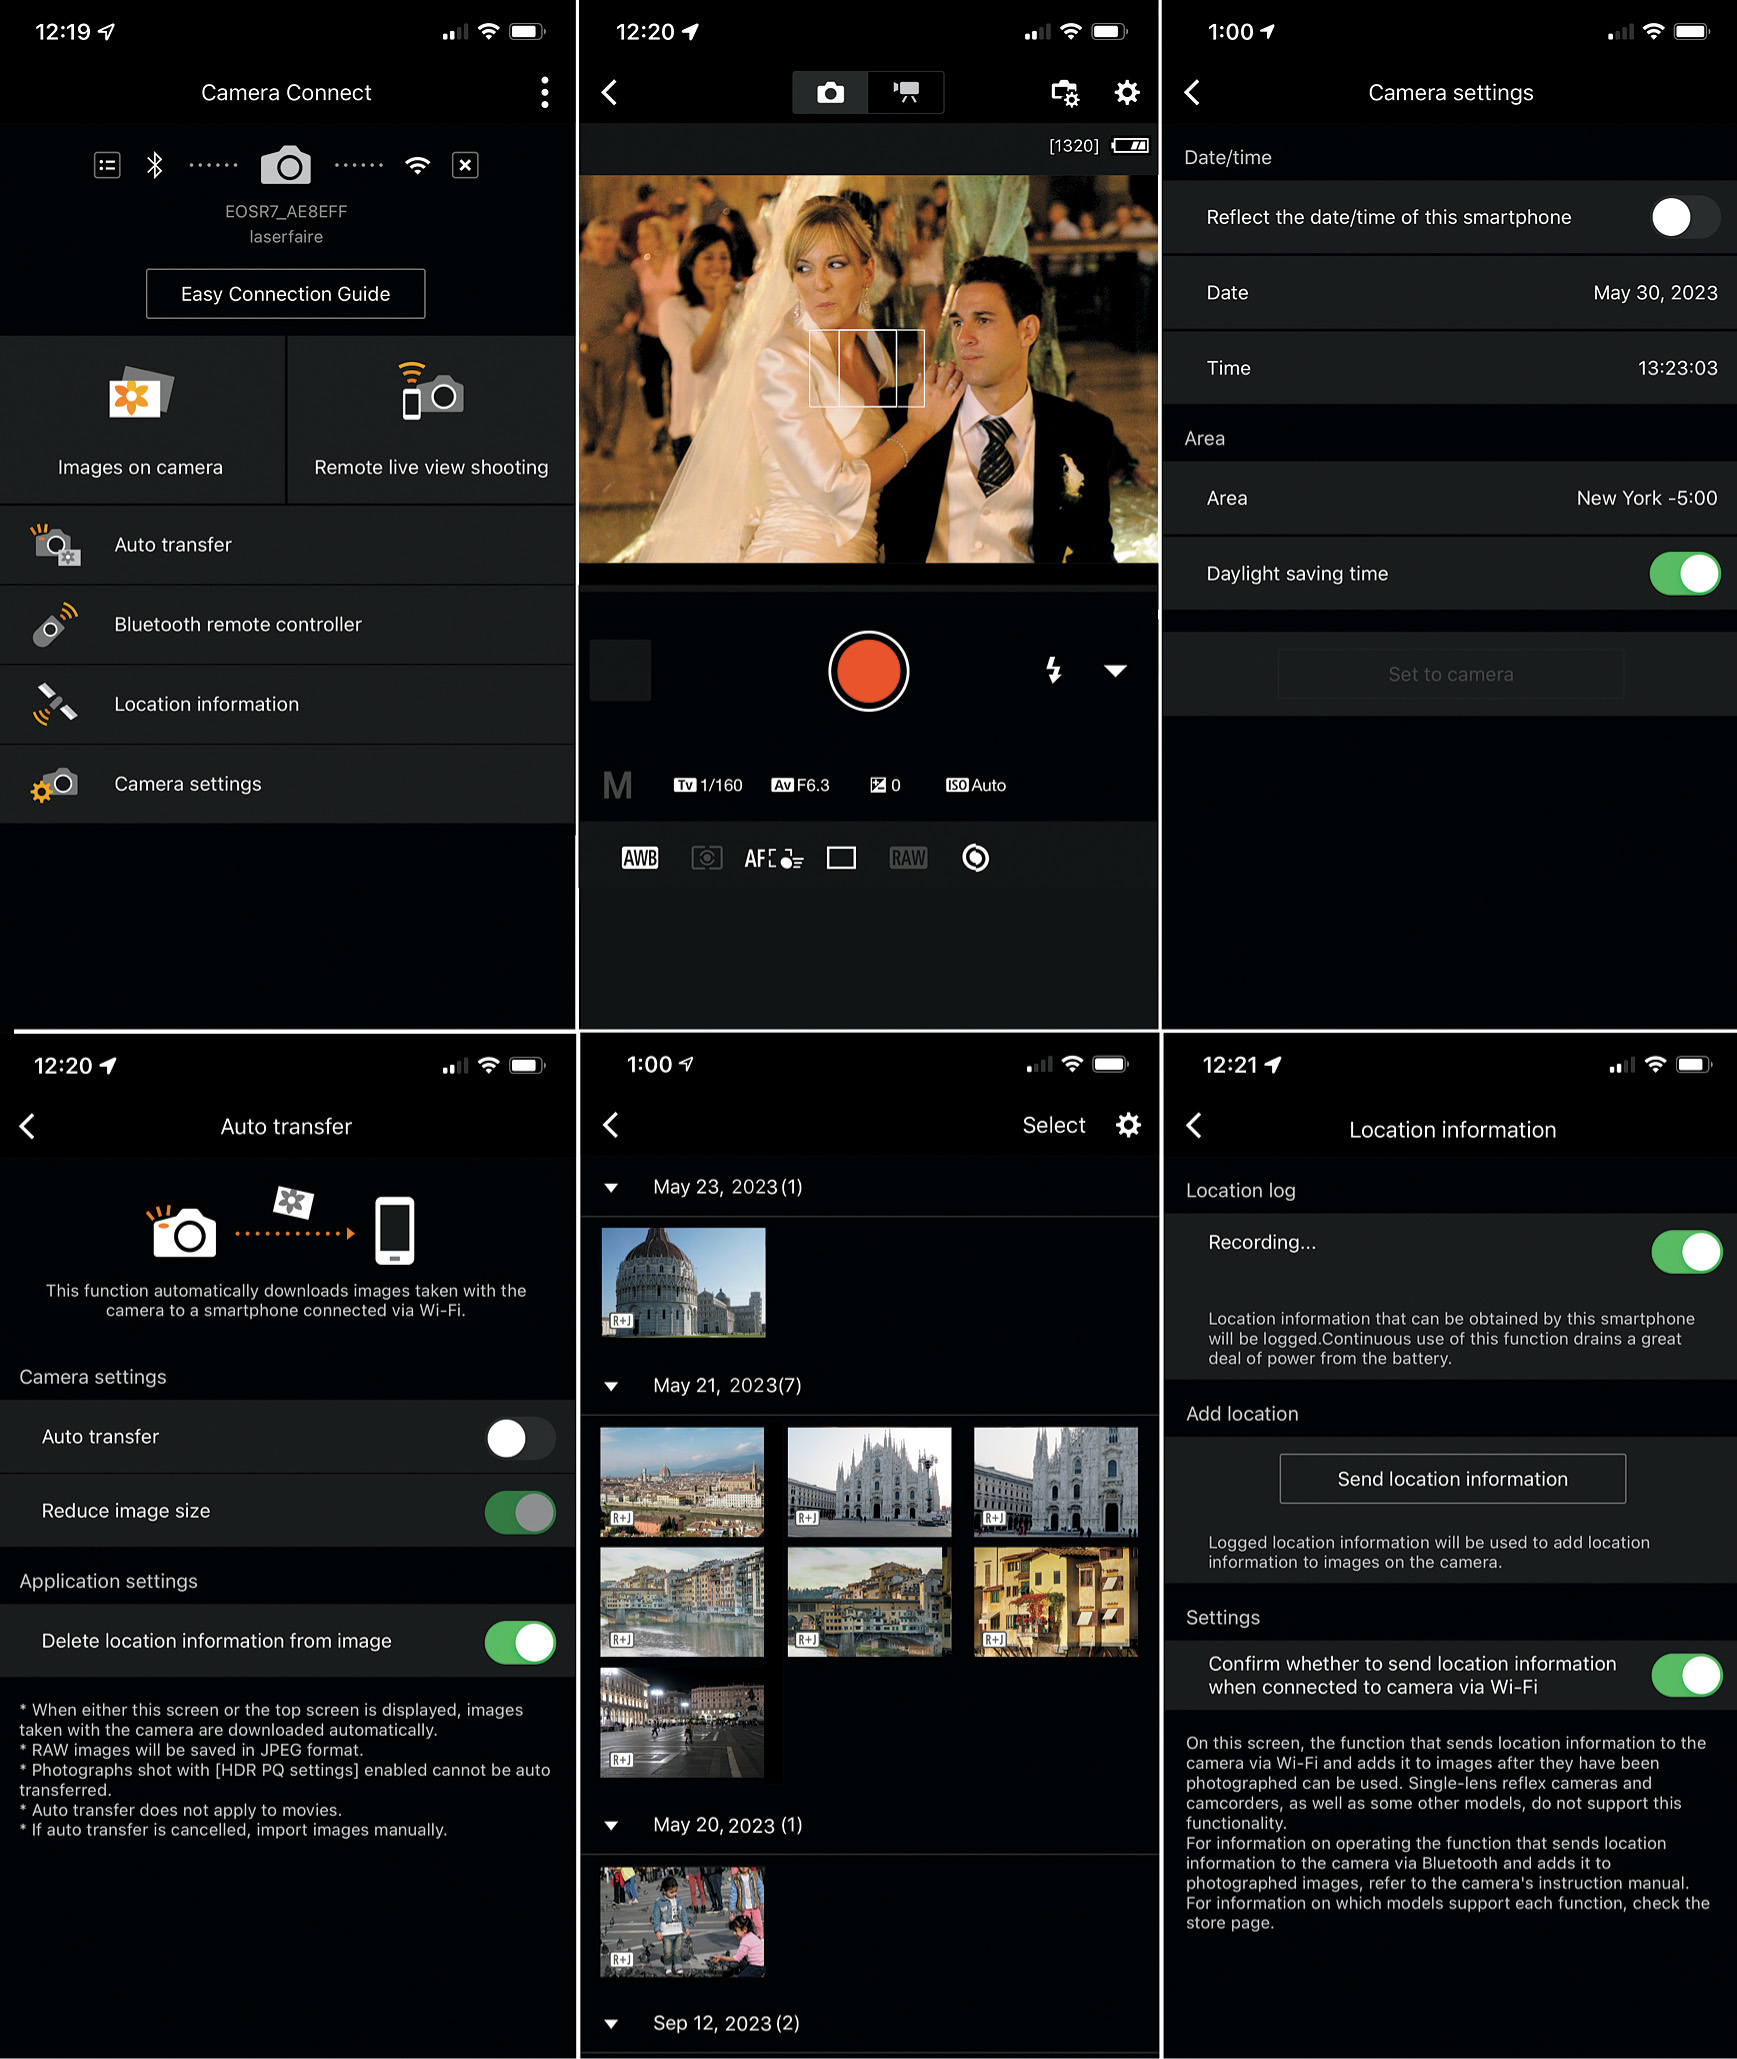
Figure 13.30 Camera Connect main screen (upper left); Remote Shooting (upper center); Camera Settings (upper right); Auto Transfer (lower left); Select Images (lower center); and Location Information (lower right).
◼ Auto Transfer. This screen (lower left in the figure) allows you to set up automatic transfer of your still images from the camera to your device. (Video cannot be transferred for practical reasons; they are generally too long and require too much storage space/bandwidth for efficient wireless transfer.) You have the option of reducing the image size (to save space and speed transfer) and including or deleting location information during transfer. Note that RAW images are transferred in JPEG format, again because of their size and because most smart devices don’t handle RAW files well.
◼ Select Images. You can preview thumbnails of images on your memory card and select the ones to be transferred individually. (See Figure 13.30, lower center.)
◼ Location Information. Use this screen to enable/disable logging of GPS information with your phone and embedding it into your image files. (See Figure 13.30, lower right.)
You can fine-tune your wireless connections using the other tools available in the Wireless menu. Here’s a summary:
◼ Nickname. This option is available from the main Wireless menu. You can specify a nickname for your camera using the standard text-entry screen. This is especially useful if you own several Canon cameras (a pro might even own more than one camera). I use the nickname option because I own and use other cameras that have similar wireless capabilities.
◼ Password. In the Wi-Fi Settings screen you’ll find the option to require a password to connect, which I recommend highly. You can also disable this feature if you choose. However, a password will still be required when connecting to an access point with Wi-Fi. Even if this parameter is set to None. (See Figure 13.31, left.)
◼ Connection History. This setting displays the history of Wi-Fi devices that are connected to the camera. You can set it to Show or Hide.
◼ Auto Send Images To Computer. You’re not locked into sending your images to your smart device. Studio and event photographers who want to transfer their images to a computer can do so with the Image Transfer Utility 2 after enabling this setting.
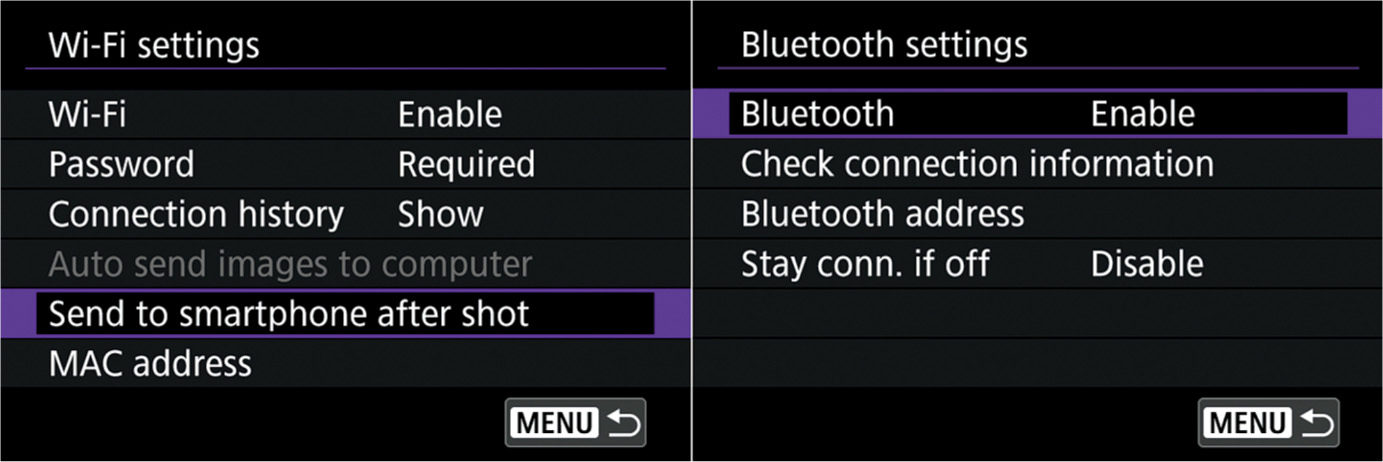
Figure 13.31 Wi-Fi Settings (left); Bluetooth Settings (right).
◼ Send to Smartphone After Shot. This setting enables/disables automatic transmitting of images to your connected smart device.
◼ MAC Address. If you need the unique media access control (MAC) address of your camera, you can see it by clicking this entry.
◼ Check Connection Information. This is one of three additional options in the Bluetooth Settings entry (see Figure 13.31, right). It shows the camera’s connection data, including device and connections. Clear these settings by pressing the INFO button.
◼ Bluetooth Address. This displays the six-number hexadecimal address of your Bluetooth connection, which will look something like this: 00:9B:6D:4B:0A:A5.
◼ Stay Connected If Off. You can enable or disable this feature here. It allows you to keep your camera and smartphone device linked even when the camera is turned off. That’s because the camera’s implementation uses Bluetooth LE (for low energy), which has much lower power demands than traditional Wi-Fi or even the NFC protocol that Canon formerly used to link its cameras to Android devices. So, under many circumstances, it’s practical to allow your smart device and camera to keep in touch even with the camera powered down.
When enabled, you can view images on the camera with your smartphone and control the camera in other ways even when the camera is off.