
7
Application composition
In this chapter
- Composing console applications
- Composing Universal Windows Programming (UWP) applications
- Composing ASP.NET Core MVC applications
Cooking a gourmet meal with several courses is a challenging undertaking, particularly if you want to partake in the consumption. You can’t eat and cook at the same time, yet many dishes require last-minute cooking to turn out well. Professional cooks know how to resolve many of these challenges. Amidst many tricks of the trade, they use the general principle of mise en place, which can be loosely translated to everything in place.1 Everything that can be prepared well in advance is, well, prepared in advance. Vegetables are cleaned and chopped, meats cut, stocks cooked, ovens preheated, tools laid out, and so on.
If ice cream is part of the dessert, it can be made the day before. If the first course contains mussels, they can be cleaned hours before. Even such a fragile component as sauce béarnaise can be prepared up to an hour before. When the guests are ready to eat, only the final preparations are necessary: reheat the sauce while frying the meat, and so on. In many cases, this final composition of the meal need not take more than 5 to 10 minutes. Figure 7.1 illustrates the process.

Figure 7.1 Mise en place involves preparing all components of the meal well in advance so that the final composition of the meal can be done as quickly and effortlessly as possible.
The principle of mise en place is similar to developing a loosely coupled application with DI. You can write all the required components well in advance and only compose them when you absolutely must.

Figure 7.2 The Composition Root composes all the independent modules of the application.
As with all analogies, we can only take this one so far. In cooking, preparation and composition are separated by time, whereas in application development, separation occurs across modules and layers. Figure 7.2 shows how to compose the components in the Composition Root.
At runtime, the first thing that happens is Object Composition. As soon as the object graph is wired up, Object Composition is finished, and the constituent components take over. In this chapter, we’ll focus on the Composition Roots of several application frameworks. In contrast to mise en place, Object Composition doesn’t happen as late as possible, but in a place where integration of the different modules is required.
Object Composition is the foundation of DI, and it’s one of the easiest parts to understand. You already know how to do it because you compose objects all the time when you create objects that contain other objects.
In section 4.1, we covered the basics of when and how to compose applications. This chapter doesn’t repeat that information. Instead, we want to help you address some of the challenges that can arise as you compose objects. Those challenges stem not from Object Composition itself, but from the application frameworks in which you work. These issues tend to be specific to each framework, and so are the resolutions. In our experience, these challenges pose some of the greatest obstacles to successfully applying DI, so we’ll focus on them. Doing so will make the chapter less theoretical and more practical than the previous chapters.
It’s easy to compose an application’s entire Dependency hierarchy when you have full control over the application’s lifetime (as you do with command-line applications). But some frameworks in .NET (for example, ASP.NET Core) involve Inversion of Control, which can sometimes make it more difficult to apply DI. Understanding each framework’s Seams is key to applying DI for that particular framework. In this chapter, we’ll examine how to implement Composition Roots in the most common .NET Core frameworks.
We’ll begin each section with a general introduction to applying DI in a particular framework, followed by an extensive example built on the e-commerce example that runs throughout most of this book. We’ll start with the easiest framework in which to apply DI, and then gradually work through the more complex frameworks. The easiest type to apply DI to is, by far, a console application, so we’ll discuss this next.
7.1 Composing console applications
A console application is, hands down, the easiest type of application to compose. Contrary to most other .NET BCL application frameworks, a console application involves virtually no Inversion of Control. When execution hits the application’s entry point (usually the Main method in the Program class), you’re on your own. There are no special events to subscribe to, no interfaces to implement, and precious few services you can use.
The Program class is a suitable Composition Root. In its Main method, you compose the application’s modules and let them take over. There’s nothing to it, but let’s look at an example.
7.1.1 Example: Updating currencies using the UpdateCurrency program
In chapter 4, we looked at how to provide a currency conversion feature for the sample e-commerce application. Section 4.2.4 introduced the ICurrencyConverter Abstraction that applies exchange rates from one currency to other currencies. Because ICurrencyConverter is an interface, we could have created many different implementations, but in the example, we used a database. The purpose of the example code in chapter 4 was to demonstrate how to retrieve and implement currency conversion, so we never looked at how to update exchange rates in the database.
To continue the example, let’s examine how to write a simple .NET Core console application that enables an administrator or super-user to update the exchange rates without having to interact directly with the database. The console application talks to the database and processes the incoming command-line arguments. Because the purpose of this program is to update the exchange rates in the database, we’ll call it UpdateCurrency. It takes two command-line arguments:
- The currency code
- The exchange rate from the primary currency (USD) to this currency
USD is the primary currency in our system, and we store all the exchange rates of other currencies relative it. For example, the exchange rate for USD to EUR is expressed as 1 USD costing 0.88 EUR (December 2018). When we want to update the exchange rate at the command line, it looks like this:
d:> dotnet commerceUpdateCurrency.dll EUR "0.88"
Updated: 0.88 EUR = 1 USD.
Executing the program updates the database and writes the new values back to the console. Let’s look at how we build such a console application.
7.1.2 Building the Composition Root of the UpdateCurrency program
UpdateCurrency uses the default entry point for a console program: the Main method in the Program class. This acts as the Composition Root for the application.
Listing 7.1 The console application’s Composition Root
class Program
{
    static void Main(string[] args)
    {
        string connectionString =    ①
            LoadConnectionString();    ①

        CurrencyParser parser =    ②
            CreateCurrencyParser(connectionString);  ②

        ICommand command = parser.Parse(args);    ③
        command.Execute();    ③
    }

    static string LoadConnectionString()
    {
        var configuration = new ConfigurationBuilder()
            .SetBasePath(AppContext.BaseDirectory)
            .AddJsonFile("appsettings.json", optional: false)
            .Build();

        return configuration.GetConnectionString(
            "CommerceConnectionString");
    }

    static CurrencyParser CreateCurrencyParser(string connectionString) ...
}
The Program class’s only responsibilities are to load the configuration values, compose all relevant modules, and let the composed object graph take care of the functionality. In this example, the composition of the application’s modules is extracted to the CreateCurrencyParser method, whereas the Main method is responsible for calling methods on the composed object graph. CreateCurrencyParser composes its object graph using hardwired Dependencies. We’ll return to it shortly to examine how it’s implemented.
Any Composition Root should only do four things: load configuration values, build the object graph, invoke the desired functionality, and, as we’ll discuss in the next chapter, release the object graph. As soon as it has done that, it should get out of the way and leave the rest to the invoked instance.
With this infrastructure in place, you can now ask CreateCurrencyParser to create a CurrencyParser that parses the incoming arguments and eventually executes the corresponding command. This example uses Pure DI, but it’s straightforward to replace it with a DI Container like those covered in part 4.
7.1.3 Composing object graphs in CreateCurrencyParser
The CreateCurrencyParser method exists for the express purpose of wiring up all Dependencies for the UpdateCurrency program. The following listing shows the implementation.
Listing 7.2 CreateCurrencyParser method that composes the object graph
static CurrencyParser CreateCurrencyParser(string connectionString)
{
    IExchangeRateProvider provider =    ①
        new SqlExchangeRateProvider(    ①
            new CommerceContext(connectionString));    ①
    ①
    return new CurrencyParser(provider);    ①
}
In this listing, the object graph is rather shallow. The CurrencyParser class requires an instance of the IExchangeRateProvider interface, and you construct SqlExchangeRateProvider for communicating with the database in the CreateCurrencyParser method.
The CurrencyParser class uses Constructor Injection, so you pass it the SqlExchangeRateProvider instance that was just created. You then return the newly created CurrencyParser from the method. In case you’re wondering, here’s the constructor signature of CurrencyParser:
public CurrencyParser(IExchangeRateProvider exchangeRateProvider)
Recall that IExchangeRateProvider is an interface that’s implemented by SqlExchangeRateProvider. As part of the Composition Root, CreateCurrencyParser contains a hard-coded mapping from IExchangeRateProvider to SqlExchangeRateProvider. The rest of the code, however, remains loosely coupled, because it consumes only the Abstraction.
This example may seem simple, but it composes types from three different application layers. Let’s briefly examine how these layers interact in this example.
7.1.4 A closer look at UpdateCurrency’s layering
The Composition Root is where components from all layers are wired together. The entry point and the Composition Root constitute the only code of the executable. All implementation is delegated to lower layers, as figure 7.3 illustrates.

Figure 7.3 Component composition of the UpdateCurrency application
The diagram in figure 7.3 may look complicated, but it represents almost the entire code base of the console application. Most of the application logic consists of parsing the input arguments and choosing the correct command based on the input. All this takes place in the application services layer, which only talks directly with the domain layer via the IExchangeRateProvider interface and the Currency class.
IExchangeRateProvider is injected into CurrencyParser by the Composition Root and is subsequently used as an Abstract Factory to create a Currency instance used by UpdateCurrencyCommand. The data access layer supplies the SQL Server–based implementations of the domain Abstractions. Although none of the other application classes talk directly to those implementations, CreateCurrencyParser maps the Abstractions to the concrete classes.
Using DI with a console application is easy because there’s virtually no external Inversion of Control involved. The .NET Framework spins up the process and hands control to the Main method. This is similar to working with Universal Windows Programming (UWP), which allows Object Composition without any Seams.
7.2 Composing UWP applications
Composing a UWP application is almost as easy as composing a console application. In this section, we’ll implement a small UWP application for managing products of the e-commerce application using the Model-View-ViewModel (MVVM) pattern. We’ll take a look at where to place the Composition Root, how to construct and initialize view models, how to bind views to their corresponding view models, and how to ensure we can navigate from one page to the next.
A UWP application’s entry point is fairly uncomplicated, and although it doesn’t provide Seams explicitly targeted at enabling DI, you can easily compose an application in any way you prefer.
In this section, we won’t be teaching UWP itself. Basic knowledge about building UWP applications is assumed.3
7.2.1 UWP composition
A UWP application’s entry point is defined in its App class. As with most other classes in UWP, this class is split into two files: App.xaml and App.xaml.cs. You define what happens at application startup in the App.xaml.cs.
When you create a new UWP project in Visual Studio, the App.xaml.cs file defines an OnLaunched method that defines which page is shown when the application starts; in this case, MainPage.
Listing 7.3 OnLaunched method of the App.xaml.cs file
protected override void OnLaunched(LaunchActivatedEventArgs e)
{
    ...

    rootFrame.Navigate(typeof(MainPage), e.Arguments);    ①

    ...
}
The OnLaunched method is similar to a console application’s Main method — it’s the entry point for your application. The App class becomes the application’s Composition Root. You can use a DI Container or Pure DI to compose the page; the next example uses Pure DI.
7.2.2 Example: Wiring up a product-management rich client
The example in the previous section created our commerce console application for setting exchange rates. In this example, you’ll create a UWP application that enables you to manage products. Figures 7.4 and 7.5 show screen captures of this application.

Figure 7.4 Product Management’s main page is a list of products. You can edit or delete products by tapping on a row, or you can add a new product by tapping Add Product.

Figure 7.5 Product Management’s product-edit page lets you change the product name and unit price in dollars. The application makes use of UWP’s default command bar.
The entire application is implemented using the MVVM approach and contains the four layers shown in figure 7.6. We keep the part with the most logic isolated from the other modules; in this case, that’s the presentation logic. The UWP client layer is a thin layer that does little apart from defining the UI and delegating implementation to the other modules.

Figure 7.6 The four distinct assemblies of the product-management rich client application
The diagram in figure 7.6 is similar to what you’ve seen in previous chapters, with the addition of a presentation logic layer. The data access layer can directly connect to a database, as we did in the e-commerce web application, or it can connect to a product-management web service. How the information is stored isn’t that relevant where the presentation logic layer is concerned, so we won’t go into details about that in this chapter.
With MVVM, you assign a ViewModel to a page’s DataContext property, and the data-binding and data-templating engines take care of presenting the data correctly as you spin up new ViewModels or change the data in the existing ViewModels. Before you can create the first ViewModel, however, you need to define some constructs that enable ViewModels to navigate to other ViewModels. Likewise, for a ViewModel to be initialized with the runtime data required when a page is shown to the user, you must let the ViewModels implement a custom interface. The following section addresses these concerns before getting to the meat of the application: the MainViewModel.
Injecting Dependencies into the MainViewModel
MainPage contains only XAML markup and no custom code-behind. Instead, it uses data binding to display data and handle user commands. To enable this, you must assign a MainViewModel to its DataContext property. This, however, is a form of Property Injection. We'd like to use Constructor Injection instead. To allow this, we remove the MainPage’s default constructor with an overloaded constructor that accepts the MainViewModel as an argument, where the constructor internally assigns that DataContext property:
public sealed partial class MainPage : Page
{
    public MainPage(MainViewModel vm)
    {
        this.InitializeComponent();

        this.DataContext = vm;
    }
}
MainViewModel exposes data, such as the list of products, as well as commands to create, update, or delete a product. Enabling this functionality depends on a service that provides access to the product catalog: the IProductRepository Abstraction. Apart from IProductRepository, MainViewModel also needs a service that it can use to control its windowing environment, such as navigating to other pages. This other Dependency is called INavigationService:
public interface INavigationService
{
    void NavigateTo<TViewModel>(Action whenDone = null, object model = null)
        where TViewModel : IViewModel;
}
The NavigateTo method is generic, so the type of ViewModel that it needs to navigate to must be supplied as its generic type argument. The method arguments are passed by the navigation service to the created ViewModel. For this to work, a ViewModel must implement IViewModel. For this reason, the NavigateTo method specifies the generic type constraint where TViewModel : IViewModel.5 The following code snippet shows IViewModel:
public interface IViewModel
{
    void Initialize(Action whenDone, object model);    ①
}
The Initialize method contains the same arguments as the INavigationService.NavigateTo method. The navigation service will invoke Initialize on a constructed ViewModel. The model represents the data that the ViewModel needs to initialize, such as a Product. The whenDone action allows the originating ViewModel to get notified when the user exits this ViewModel, as we’ll discuss shortly.
Using the previous interface definitions, you can now construct a ViewModel for MainPage. The following listing shows MainViewModel in its full glory.
Listing 7.4 The MainViewModel class
public class MainViewModel : IViewModel,
    INotifyPropertyChanged    ①
{
    private readonly INavigationService navigator;
    private readonly IProductRepository repository;

    public MainViewModel(
        INavigationService navigator,
        IProductRepository repository)
    {
        this.navigator = navigator;
        this.repository = repository;

        this.AddProductCommand =
            new RelayCommand(this.AddProduct);
        this.EditProductCommand =
            new RelayCommand(this.EditProduct);
    }

    public IEnumerable<Product> Model { get; set; }    ②
    public ICommand AddProductCommand { get; }    ②
    public ICommand EditProductCommand { get; }    ②

    public event PropertyChangedEventHandler
        PropertyChanged = (s, e) => { };

    public void Initialize(    ③
        object model, Action whenDone)
    {
        this.Model = this.repository.GetAll();
        this.PropertyChanged.Invoke(this,    ④
            new PropertyChangedEventArgs("Model"));
    }

    private void AddProduct()    ⑤
    {    ⑤
        this.navigator.NavigateTo<NewProductViewModel>(  ⑤
            whenDone: this.GoBack);    ⑤
    }

    private void EditProduct(object product)    ⑥
    {
       this.navigator.NavigateTo<EditProductViewModel>(
            whenDone: this.GoBack,
            model: product;    ⑦
    }

    private void GoBack()
    {
        this.navigator.NavigateTo<MainViewModel>();
    }
}
The command methods, AddProduct and EditProduct, both instruct INavigationService to navigate to the page for the corresponding ViewModel. In the case of AddProduct, this corresponds to NewProductViewModel. The NavigateTo method is supplied with a delegate that’ll be invoked by NewProductViewModel when the user finishes working on that page. This results in invoking the MainViewModel’s GoBack method, which will navigate the application back to MainViewModel. To paint a complete picture, listing 7.5 shows a simplified version of the MainPage XAML definition and how the XAML is bound to the Model, EditProductCommand, and AddProductCommand properties of MainViewModel.
Listing 7.5 XAML of MainPage
<Page x:Class="Ploeh.Samples.ProductManagement.UWPClient.MainPage"
    xmlns:commands="using:ProductManagement.PresentationLogic.UICommands"
    ...>
    <Grid>
        <Grid.RowDefinitions>
            ...
        </Grid.RowDefinitions>

        <GridView ItemsSource="{Binding Model}"
            commands:ItemClickCommand.Command="{Binding EditProductCommand}"
            IsItemClickEnabled="True">
            <GridView.ItemTemplate>
                <DataTemplate>
                    <Grid>
                        <Grid.ColumnDefinitions>
                            <ColumnDefinition Width="2*"/>
                            <ColumnDefinition Width="*"/>
                        </Grid.ColumnDefinitions>
                        <StackPanel Grid.Column="0">
                            <TextBlock Text="{Binding Name}" />
                        </StackPanel>
                        <StackPanel Grid.Column="1">
                            <TextBlock Text="{Binding UnitPrice}" />
                        </StackPanel>
                    </Grid>
                </DataTemplate>
            </GridView.ItemTemplate>
        </GridView>

        <CommandBar Grid.Row="5" Grid.ColumnSpan="3" Grid.Column="0">
            <AppBarToggleButton Icon="Add" Label="Add product"
                Command="{Binding AddProductCommand}" />
        </CommandBar>
    </Grid>
</Page>
Although the previous XAML makes use of the older Binding markup extension, as a UWP developer, you might be used to using the newer x:Bind markup extension. x:Bind gives compile-time support, but requires types to be fixed at compile time, typically defined in the view’s code-behind class. Because you bind to a ViewModel that’s stored in the untyped DataContext property, you lose compile-time support and, therefore, need to fall back to the Binding markup extension.6
The two main elements in the MainPage XAML are a GridView and a CommandBar. The GridView is used to display the available products and bind to both the Model and EditProductCommand properties; its DataTemplate binds to the Name and UnitPrice properties of the Model’s Product elements. The CommandBar displays a generic ribbon with operations that the user is allowed to invoke. The CommandBar binds to the AddProductCommand property. With the definitions of MainViewModel and MainPage, you can now start wiring up the application.
Wiring up MainViewModel
Before wiring up MainViewModel, let’s take a look at all the classes involved in this Dependency graph. Figure 7.7 shows the graph for the application, starting with MainPage.
Now that you’ve identified all the building blocks of the application, you can compose it. To do this, you must create both a MainViewModel and a MainPage, and then inject the ViewModel to the MainPage’s constructor. To wire up MainViewModel, you have to compose it with its Dependencies:
IViewModel vm = new MainViewModel(navigationService, productRepository);
Page view = new MainPage(vm);
As you saw in listing 7.3, the default Visual Studio template calls Frame.Navigate(Type). The Navigate method creates a new Page instance on your behalf and shows that page to the user. There’s no way to supply a Page instance to Navigate, but you can work around this by manually assigning the page created to the Content property of the application’s main Frame:
var frame = (Frame)Window.Current.Content;
frame.Content = view;
Because these are the important pieces to glue the application together, this is exactly what you’ll do in the Composition Root.

Figure 7.7 Dependency graph of the product-management rich client
7.2.3 Implementing the Composition Root in the UWP application
There are many ways to create the Composition Root. For this example, we chose to place both the navigation logic and the construction of View/ViewModel pairs inside the App.xaml.cs file to keep the example relatively succinct. The application’s Composition Root is displayed in figure 7.8 .

Figure 7.8 The product-management rich client’s Composition Root
The next listing shows our Composition Root in action.
Listing 7.6 The product-management App class containing the Composition Root
public sealed partial class App : Application, INavigationService
{
    protected override void OnLaunched(    ①
        LaunchActivatedEventArgs e)
    {
        if (Window.Current.Content == null)
        {
            Window.Current.Content = new Frame();    ②
            Window.Current.Activate();
            this.NavigateTo<MainViewModel>(null, null);  ③
        }
    }

    public void NavigateTo<TViewModel>(
        Action whenDone, object model)
        where TViewModel : IViewModel
    {
        var page = this.CreatePage(typeof(TViewModel));  ④
        var viewModel = (IViewModel)page.DataContext;    ④
    ④
        viewModel.Initialize(whenDone, model);    ④
    ④
        var frame = (Frame)Window.Current.Content;    ④
        frame.Content = page;    ④
    }

    private Page CreatePage(Type vmType)
    {
        var repository = new WcfProductRepository();    ⑤
    ⑤
        if (vmType == typeof(MainViewModel))    ⑤
        {  ⑤
            return new MainPage(    ⑤
                new MainViewModel(this, repository));    ⑤
        }  ⑤
        else if (vmType == typeof(EditProductViewModel))  ⑤
        {  ⑤
            return new EditProductPage(    ⑤
                new EditProductViewModel(repository));  ⑤
        }  ⑤
        else if (vmType == typeof(NewProductViewModel))  ⑤
        {  ⑤
            return new NewProductPage(    ⑤
                new NewProductViewModel(repository));    ⑤
        {  ⑤
        else
        {
            throw new Exception(“Unknown view model.”);
        }
    ...
}
The CreatePage factory method is similar to the Composition Root examples we discussed in section 4.1. It consists of a big list of else if statements to construct the correct pair accordingly.
UWP offers a simple place for a Composition Root. All you need to do is remove the call to Frame.Navigate(Type) from OnLaunched and set Frame.Content with a manually created Page class, which is composed using a ViewModel and its Dependencies.
In most other frameworks, there’s a higher degree of Inversion of Control, which means we need to be able to identify the correct extensibility points to wire up the desired object graph. One such framework is ASP.NET Core MVC.
7.3 Composing ASP.NET Core MVC applications
ASP.NET Core MVC was built and designed to support DI. It comes with its own internal composition engine that you can use to build up its own components; although, as you’ll see, it doesn’t enforce the use of a DI Container for your application components. You can use Pure DI or whichever DI Container you like.7
In this section, you’ll learn how to use the main extensibility point of ASP.NET Core MVC, which allows you to plug in your logic for composing controller classes with their Dependencies. This section looks at ASP.NET Core MVC from the perspective of DI Object Composition. There’s a lot more to building ASP.NET Core applications than we can address in a single chapter, however. If you want to learn more about how to build applications with ASP.NET Core, take a look at Andrew Lock’s ASP.NET Core in Action (Manning, 2018). After that, we’ll take a look at how to plug in custom middleware that requires Dependencies.
As is always the case with practicing DI in an application framework, the key to applying it is finding the correct extensibility point. In ASP.NET Core MVC, this is an interface called IControllerActivator. Figure 7.9 illustrates how it fits into the framework.

Figure 7.9 The ASP.NET Core MVC request pipeline
Controllers are central to ASP.NET Core MVC. They handle requests and determine how to respond. If you need to query a database, validate and save incoming data, invoke domain logic, and so on, you initiate such actions from a controller. A controller shouldn’t do such things itself, but rather delegate the work to the appropriate Dependencies. This is where DI comes in.
You want to be able to supply Dependencies to a given controller class, ideally by Constructor Injection. This is possible with a custom IControllerActivator.
7.3.1 Creating a custom controller activator
Creating a custom controller activator isn’t particularly difficult. It requires you to implement the IControllerActivator interface:
public interface IControllerActivator
{
    object Create(ControllerContext context);
    void Release(ControllerContext context, object controller);
}
The Create method provides a ControllerContext that contains information such as the HttpContext and the controller type. This is the method where you get the chance to wire up all required Dependencies and supply them to the controller before returning the instance. You’ll see an example in a moment.
If you created any resources that need to be explicitly disposed of, you can do that when the Release method is called. We’ll go into further details about releasing components in the next chapter. A more practical way to ensure that Dependencies are disposed of is to add them to the list of disposable request objects using the HttpContext.Response.RegisterForDispose method. Although implementing a custom controller activator is the hard part, it won’t be used unless we tell ASP.NET Core MVC about it.
Using a custom controller activator in ASP.NET Core
A custom controller activator can be added as part of the application startup sequence — usually in the Startup class. They’re used by calling AddSingleton<IControllerActivator> on the IServiceCollection instance. The next listing shows the Startup class from the sample e-commerce application.
Listing 7.7 Commerce application’s Startup class
public class Startup
{
    public Startup(IConfiguration configuration)
    {
        this.Configuration = configuration;
    }

    public IConfiguration Configuration { get; }

    public void ConfigureServices(IServiceCollection services)
    {
        services.AddMvc();

        var controllerActivator = new CommerceControllerActivator(
            Configuration.GetConnectionString("CommerceConnectionString"));

        services.AddSingleton<IControllerActivator>(controllerActivator);
    }

    public void Configure(ApplicationBuilder app, IHostingEnvironment env)
    {
        ...
    }
}
This listing creates a new instance of the custom CommerceControllerActivator. By adding it to the list of known services using AddSingleton, you ensure the creation of controllers is Intercepted by your custom controller activator. If this code looks vaguely familiar, it’s because you saw something similar in section 4.1.3. Back then, we promised to show you how to implement a custom controller activator in chapter 7, and what do you know? This is chapter 7.
Example: implementing the CommerceControllerActivator
As you might recall from chapters 2 and 3, the e-commerce sample application presents the visitor of the website with a list of products and their prices. In section 6.2, we added a feature that allowed users to calculate a route between two locations. Although we’ve shown several snippets of the Composition Root, we didn’t show a complete example. Together with listing 7.7’s Startup class, listing 7.8’s CommerceControllerActivator class shows a complete Composition Root.
The e-commerce sample application needs a custom controller activator to wire up controllers with their required Dependencies. Although the entire object graph is considerably deeper, from the perspective of the controllers themselves, the union of all immediate Dependencies is as small as two items (figure 7.10).
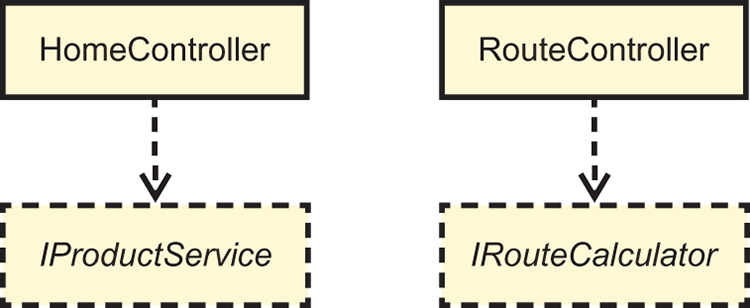
Figure 7.10 Two controllers in the sample application with their Dependencies
The following listing shows a CommerceControllerActivator that composes both HomeController and RouteController with their Dependencies.
Listing 7.8 Creating controllers using a custom controller activator
public class CommerceControllerActivator : IControllerActivator
{
    private readonly string connectionString;

    public CommerceControllerActivator(string connectionString)
    {
        this.connectionString = connectionString;
    }

   public object Create(ControllerContext context)
    {
        Type type = context.ActionDescriptor    ①
            .ControllerTypeInfo.AsType();    ①

        if (type == typeof(HomeController))    ②
        {    ②
            return this.CreateHomeController();    ②
        }    ②
        else if (type == typeof(RouteController))    ②
        {    ②
            return this.CreateRouteController();    ②
        }
        else
        {
            throw new Exception("Unknown controller " + type.Name);
        }
    }

    private HomeController CreateHomeController()
    {
        return new HomeController(    ③
            new ProductService(    ③
                new SqlProductRepository(    ③
                    new CommerceContext(    ③
                        this.connectionString)),    ③
                new AspNetUserContextAdapter()));    ③
    }

    private RouteController CreateRouteController()
    {
        var routeAlgorithms = ...;    ③
        return new RouteController(    ③
            new RouteCalculator(routeAlgorithms));    ③
    }

    public void Release(    ④
        ControllerContext context, object controller)    ④
    {    ④
    }    ④
}
When a CommerceControllerActivator instance is registered in Startup, it correctly creates all requested controllers with the required Dependencies. Besides controllers, other common components that often require the use of DI are what ASP.NET Core calls middleware.
7.3.2 Constructing custom middleware components using Pure DI
ASP.NET Core makes it relatively easy to plug in extra behavior in the request pipeline. Such behavior can influence the request and response. In ASP.NET Core, these extensions to the request pipeline are called middleware. A typical use of hooking up middleware to the request pipeline is through the Use extension method:
var logger =
    loggerFactory.CreateLogger("Middleware");    ①

app.Use(async (context, next) =>    ②
{
    logger.LogInformation("Request started");    ③

    await next();    ④

    logger.LogInformation("Request ended");    ⑤
});
More often, however, more work needs to be done prior to or after the request’s main logic runs. You might therefore want to extract such middleware logic into its own class. This prevents your Startup class from being cluttered and gives you the opportunity to unit test this logic, should you want to do so. You can extract the body of our previous Use lambda to an Invoke method on a newly created LoggingMiddleware class:
public class LoggingMiddleware
{
    private readonly ILogger logger;

    public LoggingMiddleware(ILogger logger)    ①
    {
        this.logger = logger;
    }

    public async Task Invoke(    ②
        HttpContext context, Func<Task> next)
    {
        this.logger.LogInformation("Request started");
        await next();
        this.logger.LogInformation("Request ended");
    }
}
With the middleware logic now moved into the LoggingMiddleware class, the Startup configuration can be minimized to the following code:
var logger = loggerFactory.CreateLogger("Middleware");

app.Use(async (context, next) =>
{
    var middleware = new LoggingMiddleware(logger);    ①

    await middleware.Invoke(context, next);    ②
});
The great thing about ASP.NET Core MVC is that it was designed with DI in mind, so, for the most part, you only need to know and use a single extensibility point to enable DI for an application. Object Composition is one of three important dimensions of DI (the others being Lifetime Management and Interception).
In this chapter, we’ve shown you how to compose applications from loosely coupled modules in a variety of different environments. Some frameworks actually make it easy. When you’re writing console applications and Windows clients (such as UWP), you’re more or less in direct control of what’s happening at the application’s entry point. This provides you with a distinct and easily implemented Composition Root. Other frameworks, such as ASP.NET Core, make you work a little harder, but they still provide Seams you can use to define how the application should be composed. ASP.NET Core was designed with DI in mind, so composing an application is as easy as implementing a custom IControllerActivator and adding it to the framework.
Without Object Composition, there’s no DI, but you may not yet have fully realized the implications for Object Lifetime when we move the creation of objects out of the consuming classes. You may find it self evident that the external caller (often a DI Container) creates new instances of Dependencies — but when are injected instances deallocated? And what if the external caller doesn’t create new instances each time, but instead hands you an existing instance? These are topics for the next chapter.
Summary
- Object Composition is the act of building up hierarchies of related components, which takes place inside the Composition Root.
- A Composition Root should only do four things: load configuration values, build object graphs, invoke the desired functionality, and release the object graphs.
- Only the Composition Root should rely on configuration files because it’s more flexible for libraries to be imperatively configurable by their callers.
- Separate the loading of configuration values from the methods that do Object Composition. This makes it possible to test Object Composition without the existence of a configuration file.
- Model View ViewModel (MVVM) is a design in which the ViewModel is the bridge between the view and the model. Each ViewModel is a class that translates and exposes the model in a technology-specific way. In MVVM, ViewModels are the application components that will be composed using DI.
- In a console application, the
Programclass is a suitable Composition Root. - In a UWP application, the
Appclass is a suitable Composition Root, and itsOnLaunchedmethod is the main entry point. - In an ASP.NET Core MVC application, the
IControllerActivatoris the correct extensibility point to plug in Object Composition. - A practical way to ensure that Dependencies are disposed of in ASP.NET Core is to use the
HttpContext.Response.RegisterForDisposemethod to add them to the list of disposable request objects. - Middleware can be added to ASP.NET Core by registering a function to the pipeline that implements a small part of the Composition Root. This composes the middleware component and invokes it.