
4
DI patterns
In this chapter
- Composing object graphs with Composition Root
- Statically declaring required Dependencies with Constructor Injection
- Passing Dependencies outside the Composition Root with Method Injection
- Declaring optional Dependencies with Property Injection
- Understanding which pattern to use
Like all professionals, cooks have their own jargon that enables them to communicate about complex food preparation in a language that often sounds esoteric to the rest of us. It doesn’t help that most of the terms they use are based on the French language (unless you already speak French, that is). Sauces are a great example of the way cooks use their professional terminology. In chapter 1, we briefly discussed sauce béarnaise, but we didn’t elaborate on the taxonomy that surrounds it.
A sauce béarnaise is really a sauce hollandaise where the lemon juice is replaced by a reduction of vinegar, shallots, chervil, and tarragon. Other sauces are based on sauce hollandaise, including Mark’s favorite, sauce mousseline, which is made by folding whipped cream into the hollandaise.
Did you notice the jargon? Instead of saying, “carefully mix the whipped cream into the sauce, taking care not to collapse it,” we used the term folding. Instead of saying, “thickening and intensifying the flavor of vinegar,” we used the term reduction. Jargon allows you to communicate concisely and effectively.
In software development, we have a complex and impenetrable jargon of our own. You may not know what the cooking term bain-marie refers to, but we’re pretty sure most chefs would be utterly lost if you told them that “strings are immutable classes, which represent sequences of Unicode characters.” And when it comes to talking about how to structure code to solve particular types of problems, we have design patterns that give names to common solutions. In the same way that the terms sauce hollandaise and fold help us succinctly communicate how to make sauce mousseline, design patterns help us talk about how code is structured.
We’ve already named quite a few software design patterns in the previous chapters. For instance, in chapter 1 we talked about the patterns Abstract Factory, Null Object, Decorator, Composite, Adapter, Guard Clause, Stub, Mock, and Fake. Although, at this point, you might not be able to recall each of them, you probably won’t feel that uncomfortable if we talk about design patterns. We human beings like to name reoccurring patterns, even if they’re simple.
Don’t worry if you have only a limited knowledge of design patterns in general. The main purpose of a design pattern is to provide a detailed and self-contained description of a particular way of attaining a goal — a recipe, if you will. And besides, you already saw examples of three out of the four basic DI design patterns that we’ll describe in this chapter:
- Composition Root — Describes where and how you should compose an application’s object graphs.
- Constructor Injection — Allows a class to statically declare its required Dependencies.
- Method Injection — Enables you to provide a Dependency to a consumer when either the Dependency or the consumer might change for each operation.
- Property Injection — Allows clients to optionally override some class’s default behavior, where this default behavior is implemented in a Local Default.
This chapter is structured to provide a catalog of patterns. For each pattern, we’ll provide a short description, a code example, advantages and disadvantages, and so on. You can read about all four patterns introduced in this chapter in sequence or only read the ones that interest you. The most important patterns are Composition Root and Constructor Injection, which you should use in most situations — the other patterns become more specialized as the chapter progresses.
4.1 Composition Root
When you’re creating an application from many loosely coupled classes, the composition should take place as close to the application’s entry point as possible. The Main method is the entry point for most application types. The Composition Root composes the object graph, which subsequently performs the actual work of the application.

Figure 4.1 Close to the application’s entry point, the Composition Root takes care of composing object graphs of loosely coupled classes. The Composition Root takes a direct dependency on all modules in the system.
In the previous chapter, you saw that most classes used Constructor Injection. By doing so, they pushed the responsibility for the creation of their Dependencies up to their consumers. Such consumers, however, also pushed the responsibility for creating their Dependencies up to their consumers.
You can’t delay the creation of your objects indefinitely. There must be a location where you create your object graphs. You should concentrate this creation into a single area of your application. This place is called the Composition Root.
In the previous chapter, this resulted in the object graph that you saw in listing 3.13 (figure 4.1). This listing also shows that all components from all application layers are constructed in the Composition Root.
Listing 4.1 The application’s object graph from chapter 3
new HomeController(    ①
    new ProductService(    ②
        new SqlProductRepository(    ③
            new CommerceContext(connectionString)),  ③
        new AspNetUserContextAdapter()));    ④
If you were to have a console application that was written to operate on this particular object graph, it might look as shown in the following listing.
Listing 4.2 The application’s object graph as part of a console application
public static class Program
{
    public static void Main(string[] args)    ①
    {
        string connectionString = args[0];    ②

        HomeController controller =
            CreateController(connectionString);    ③

        var result = controller.Index();

        var vm = (FeaturedProductsViewModel)result.Model;

        Console.WriteLine("Featured products:");

        foreach (var product in vm.Products)
        {
            Console.WriteLine(product.SummaryText);
        }
    }

    private static HomeController CreateController(    ④
        string connectionString)
    {
        var userContext = new ConsoleUserContext();    ⑤

        return
            new HomeController(    ⑥
                new ProductService(    ⑥
                    new SqlProductRepository(    ⑥
                        new CommerceContext(    ⑥
                            connectionString)),    ⑥
                    userContext));    ⑥
    }
}
In this example, the Composition Root is separated from the Main method. This isn’t required, however — the Composition Root isn’t a method or a class, it’s a concept. It can be part of the Main method, or it can span multiple classes, as long as they all reside in a single module. Separating it into its own method helps to ensure that the composition is consolidated and not otherwise interspersed with subsequent application logic.
4.1.1 How Composition Root works
When you write loosely coupled code, you create many classes to create an application. It can be tempting to compose these classes at many different locations in order to create small subsystems, but that limits your ability to Intercept those systems to modify their behavior. Instead, you should compose classes in one single area of your application.
When you look at Constructor Injection in isolation, you may wonder, doesn’t it defer the decision about selecting a Dependency to another place? Yes, it does, and that’s a good thing. This means that you get a central place where you can connect collaborating classes.
The Composition Root acts as a third party that connects consumers with their services. The longer you defer the decision on how to connect classes, the more you keep your options open. Thus, the Composition Root should be placed as close to the application’s entry point as possible.
Even a modular application that uses loose coupling and late binding to compose itself has a root that contains the entry point into the application. Examples follow:
- A .NET Core console application is a library (.dll) containing a
Programclass with aMainmethod. - An ASP.NET Core web application also is a library containing a
Programclass with aMainmethod. - UWP and WPF applications are executables (.exe) with an App.xaml.cs file.
Many other technologies exist, but they have one thing in common: one module contains the entry point of the application — this is the root of the application. Don’t be misled into thinking that the Composition Root is part of your UI layer. Even if you place the Composition Root in the same assembly as your UI layer, as we’ll do in the next example, the Composition Root isn’t part of that layer.
Assemblies are a deployment artifact: you split code into multiple assemblies to allow code to be deployed separately. An architectural layer, on the other hand, is a logical artifact: you can group multiple logical artifacts in a single deployment artifact. Even though the assembly that holds both the Composition Root and the UI layer depends on all other modules in the system, the UI layer itself doesn’t.
It’s not a requirement for the Composition Root to be placed in the same project as your UI layer. You can move the UI layer out of the application’s root project. The advantage of this is that you can prevent the project that holds the UI layer from taking on a dependency (for instance, the data access layer project in chapter 3). This makes it impossible for UI classes to accidentally depend on data access classes. The downside of this approach, however, is that it isn’t always easy to do. With ASP.NET Core MVC, for instance, it’s trivial to move controllers and view models to a separate project, but it can be quite challenging to do the same with your views and client resources.
Separating the presentation technology from the Composition Root might not be that beneficial, either, because a Composition Root is specific to the application. Composition Roots aren’t reused.
You shouldn’t attempt to compose classes in any of the other modules, because that approach limits your options. All classes in application modules should use Constructor Injection (or, in rare cases, one of the other two patterns from this chapter), and then leave it up to the Composition Root to compose the application’s object graph. Any DI Container in use should be limited to the Composition Root.
In an application, the Composition Root should be the sole place that knows about the structure of the constructed object graphs. Application code not only relinquishes control over its Dependencies, it also relinquishes knowledge about its Dependencies. Centralizing this knowledge simplifies development. This also means that application code can’t pass on Dependencies to other threads that run parallel to the current operation, because a consumer has no way of knowing whether it’s safe to do so. Instead, when spinning off concurrent operations, it’s the job of the Composition Root to create a new object graph for each concurrent operation.
The Composition Root in listing 4.2 showed an example of Pure DI. The Composition Root pattern, however, is both applicable to Pure DI and DI Containers. In the next section, we’ll describe how a DI Container can be used in a Composition Root.
4.1.2 Using a DI Container in a Composition Root
As described in chapter 3, a DI Container is a software library that can automate many of the tasks involved in composing objects and managing their lifetimes. But it can be misused as a Service Locator and should only be used as an engine that composes object graphs. When you consider a DI Container from that perspective, it makes sense to constrain it to the Composition Root. This also significantly benefits the removal of any coupling between the DI Container and the rest of the application’s code base.
A Composition Root can be implemented with a DI Container. This means that you use the container to compose the entire application’s object graph in a single call to its Resolve method. When we talk to developers about doing it like this, we can always tell that it makes them uncomfortable because they’re afraid that it’s terribly inefficient and bad for performance. You don’t have to worry about that. That’s almost never the case and, in the few situations where it is, there are ways to address the issue, as we’ll discuss in section 8.4.2.
Don’t worry about the performance overhead of using a DI Container to compose large object graphs. It’s usually not an issue. In part 4, we’ll do a deep dive into DI Containers and show how to use a DI Container inside the Composition Root.
When it comes to request-based applications, such as websites and services, you configure the container once, but resolve an object graph for each incoming request. The e-commerce web application in chapter 3 is an example of that.
4.1.3 Example: Implementing a Composition Root using Pure DI
The sample e-commerce web application must have a Composition Root to compose object graphs for incoming HTTP requests. As with all other ASP.NET Core web applications, the entry point is in the Main method. By default, however, the Main method of an ASP.NET Core application delegates most of the work to the Startup class. This Startup class is close enough to the application’s entry point for us, and we’ll use that as our Composition Root.
As in the previous example with the console application, we use Pure DI. This means you compose your object graphs using plain old C# code instead of a DI Container, as shown in the following listing.
Listing 4.3 The e-commerce application’s Startup class
public class Startup
{
    public Startup(IConfiguration configuration)
    {
        this.Configuration = configuration;    ①
    }

    public IConfiguration Configuration { get; }

    public void ConfigureServices(    ②
        IServiceCollection services)
    {
        services.AddMvc();

        services.AddHttpContextAccessor();    ③

        var connectionString =    ④
            this.Configuration.GetConnectionString(    ④
                "CommerceConnection");    ④

        services.AddSingleton<IControllerActivator>(    ⑤
            new CommerceControllerActivator(    ⑤
                connectionString));    ⑤
    }

    ...
}
If you’re not familiar with ASP.NET Core, here’s a simple explanation: the Startup class is a necessity; it’s where you apply the required plumbing. The interesting part is the CommerceControllerActivator. The entire setup for the application is encapsulated in the CommerceControllerActivator class, which we’ll show shortly.
To enable wiring MVC controllers to the application, you must employ the appropriate Seam in ASP.NET Core MVC, called an IControllerActivator (discussed in detail in section 7.3). For now, it’s enough to understand that to integrate with ASP.NET Core MVC, you must create an Adapter for your Composition Root and tell the framework about it.
The Startup.ConfigureServices method only runs once. As a result, your CommerceControllerActivator class is a single instance that’s only initialized once. Because you set up ASP.NET Core MVC with the custom IControllerActivator, MVC invokes its Create method to create a new controller instance for each incoming HTTP request (you can read about the details in section 7.3). The following listing shows the CommerceControllerActivator.
Listing 4.4 The application’s IControllerActivator implementation
public class CommerceControllerActivator : IControllerActivator
{
    private readonly string connectionString;

    public CommerceControllerActivator(string connectionString)
    {
        this.connectionString = connectionString;
    }

    public object Create(ControllerContext ctx)    ①
    {
        Type type = ctx.ActionDescriptor
            .ControllerTypeInfo.AsType();

        if (type == typeof(HomeController))    ②
        {
            return
                new HomeController(
                    new ProductService(
                        new SqlProductRepository(
                            new CommerceContext(
                                this.connectionString)),
                        new AspNetUserContextAdapter()));
        }
        else
        {
            throw new Exception("Unknown controller.");  ③
        }
    }
}
Notice how the creation of HomeController in this example is almost identical to the application’s object graph from chapter 3 that we showed in listing 4.1. When MVC calls Create, you determine the controller type and create the correct object graph based on this type.

Figure 4.2 The Composition Root is spread across two classes, but they’re defined within the same module.
In section 2.3.3, we discussed how only the Composition Root should rely on configuration files, because it’s more flexible for reusable libraries to be imperatively configurable by their callers. You should also separate the loading of configuration values from the methods that do Object Composition (as shown in listings 4.3 and 4.4). The Startup class of listing 4.3 loads the configuration, whereas the CommerceControllerActivator of listing 4.4 only depends on the configuration value, not the configuration system. An important advantage of this separation is that it decouples Object Composition from the configuration system in use, making it possible to test without the existence of a (valid) configuration file.
The Composition Root in this example is spread out across two classes, as shown in figure 4.2. This is expected. The important thing is that all classes are contained in the same module, which, in this case, is the application root.
The most important thing to notice in this figure is that these two classes are the only classes in the entire sample application that compose object graphs. The remaining application code only uses the Constructor Injection pattern.
4.1.4 The apparent dependency explosion
An often-heard complaint from developers is that the Composition Root causes the application’s entry point to take a dependency on all other assemblies in the application. In their old, tightly coupled code bases, their entry point only needed to depend on the layer directly below. This seems backward because DI is meant to lower the required number of dependencies. They see the use of DI as causing an explosion of dependencies in their application’s entry point — or so it seems.
This complaint comes from the fact that developers misunderstand how project dependencies work. To get a good view of what they’re worried about, let’s take a look at the dependency graph of Mary’s application from chapter 2 and compare that with the dependency graph of the loosely coupled application of chapter 3 (figure 4.3).

Figure 4.3 Comparing the dependency graph of Mary’s application to that of the loosely coupled application
At first glance, it indeed looks as if there are two more dependencies in the loosely coupled application, compared to Mary’s application with “only” three dependencies. The diagram, however, is misleading.
Changes to the data access layer also ripple through the UI layer and, as we discussed in the previous chapter, the UI layer can’t be deployed without the data access layer. Even though the diagram doesn’t show it, there’s a dependency between the UI and the data access layer. Assembly dependencies are in fact transitive.
This transitive relationship means that because Mary’s UI depends on the domain, and the domain depends on data access, the UI depends on data access too, which is exactly the behavior you’ll experience when deploying the application. If you take a look at the dependencies between the projects in Mary’s application, you’ll see something different (figure 4.4).

Figure 4.4 The dependencies between the libraries in Mary’s application
As you can see, even in Mary’s application, the entry point depends on all libraries. Both Mary’s entry point and the Composition Root of the loosely coupled application have the same number of dependencies. Remember, though, that dependencies aren’t defined by the number of modules, but the number of times each module depends on another module. As a result, the total number of dependencies between all modules in Mary’s application is, in fact, six. That’s one more than the loosely coupled application.
Now imagine an application with dozens of projects. It’s not hard to imagine how the number of dependencies in a tightly coupled code base explodes compared with a loosely coupled code base. But, by writing loosely coupled code that applies the Composition Root pattern, you can lower the number of dependencies. As you’ve seen in the previous chapter, this lets you replace complete modules with different ones, which is harder in a tightly coupled code base.
The Composition Root pattern applies to all applications developed using DI, but only startup projects will have a Composition Root. A Composition Root is the result of removing the responsibility for the creation of Dependencies from consumers. To achieve this, you can apply two patterns: Constructor Injection and Property Injection. Constructor Injection is the most common and should be used almost exclusively. Because Constructor Injection is the most commonly used pattern, we’ll discuss that next.
4.2 Constructor Injection
How do we guarantee that a necessary Volatile Dependency is always available to the class we’re currently developing?
By requiring all callers to supply the Volatile Dependency as a parameter to the class’s constructor.
When a class requires an instance of a Dependency, you can supply that Dependency through the class’s constructor, enabling it to store the reference for future use.
The constructor signature is compiled with the type and is available for all to see. It clearly documents that the class requires the Dependencies it requests through its constructor. Figure 4.5 demonstrates this.

Figure 4.5 Constructing a HomeController instance with a required IProductServiceDependency using Constructor Injection
This figure shows that the consuming class HomeController needs an instance of the IProductService Dependency to work, so it requires the Composition Root (the client) to supply an instance via its constructor. This guarantees that the instance is available to HomeController when it’s needed.
4.2.1 How Constructor Injection works
The class that needs the Dependency must expose a public constructor that takes an instance of the required Dependency as a constructor argument. This should be the only publicly available constructor. If more than one Dependency is needed, additional constructor arguments can be added to the same constructor. Listing 4.5 shows the definition of the HomeController class of figure 4.5.
Listing 4.5 Injecting a Dependency using Constructor Injection
public class HomeController
{
    private readonly IProductService service;    ①

    public HomeController(    ②
        IProductService service)    ③
    {
        if (service == null)    ④
            throw new ArgumentNullException("service");  ④

        this.service = service;    ⑤
    }
}
The IProductService Dependency is a required constructor argument of HomeController; any client that doesn’t supply an instance of IProductService can’t compile. But, because an interface is a reference type, a caller can pass in null as an argument to make the calling code compile. You need to protect the class against such misuse with a Guard Clause.1 Because the combined efforts of the compiler and the Guard Clause guarantee that the constructor argument is valid if no exception is thrown, the constructor can store the Dependency for future use without knowing anything about the real implementation.
It’s good practice to mark the field holding the Dependency as readonly. This guarantees that once the initialization logic of the constructor has executed, the field can’t be modified. This isn’t strictly required from a DI point of view, but it protects you from accidentally modifying the field (such as setting it to null) somewhere else in the depending class’s code.
When the constructor has returned, the new instance of the class is in a consistent state with a proper instance of its Dependency injected into it. Because the constructed class holds a reference to this Dependency, it can use the Dependency as often as necessary from any of its other members. Its members don’t need to test for null, because the instance is guaranteed to be present.
4.2.2 When to use Constructor Injection
Constructor Injection should be your default choice for DI. It addresses the most common scenario where a class requires one or more Dependencies, and no reasonable Local Defaults are available.
Constructor Injection addresses the common scenario of an object requiring a Dependency with no reasonable Local Default available, because it guarantees that the Dependency must be provided. If the depending class absolutely can’t function without the Dependency, such a guarantee is valuable. Table 4.1 provides a summary of the advantages and disadvantages of Constructor Injection.
| Advantages | Disadvantages |
| Injection guaranteed Easy to implement Statically declares a class’s Dependencies |
Frameworks that apply the Constrained Construction anti-pattern can make using Constructor Injection difficult. |
In cases where the local library can supply a good default implementation, Property Injection can also be a good fit, but this is usually not the case. In the earlier chapters, we showed many examples of Repositories as Dependencies. These are good examples of Dependencies, where the local library can supply no good default implementation because the proper implementations belong in specialized data access libraries. Apart from the guaranteed injection already discussed, this pattern is also easy to implement using the structure presented in listing 4.5.
The main disadvantage to Constructor Injection is that if the class you’re building is called by your current application framework, you might need to customize that framework to support it. Some frameworks, especially older ones, assume that your classes will have a parameterless constructor.3 (This is called the Constrained Construction anti-pattern, and we’ll discuss this in more detail in the next chapter.) In this case, the framework will need special help creating instances when a parameterless constructor isn’t available. In chapter 7, we’ll explain how to enable Constructor Injection for common application frameworks.
As previously discussed in section 4.1, an apparent disadvantage of Constructor Injection is that it requires that the entire Dependency graph be initialized immediately. Although this sounds inefficient, it’s rarely an issue. After all, even for a complex object graph, we’re typically talking about creating a few dozen new object instances, and creating an object instance is something the .NET Framework does extremely fast. Any performance bottleneck your application may have will appear in other places, so don’t worry about it.4
Now that you know that Constructor Injection is the preferred way of applying DI, let’s take a look at some known examples. For this, we’ll discuss Constructor Injection in the .NET BCL next.
4.2.3 Known use of Constructor Injection
Although Constructor Injection tends to be ubiquitous in applications employing DI, it isn’t very present in the BCL. This is mainly because the BCL is a set of reusable libraries and not a full-fledged application. Two related examples where you can see a sort of Constructor Injection in the BCL is with the System.IO.StreamReader and System.IO.StreamWriter classes. Both take a System.IO.Stream instance in their constructors. Here’s all of StreamWriter's Stream-related constructors; the StreamReader constructors are similar:
public StreamWriter(Stream stream);
public StreamWriter(Stream stream, Encoding encoding);
public StreamWriter(Stream stream, Encoding encoding, int bufferSize);
Stream is an abstract class that serves as an Abstraction on which StreamWriter and StreamReader operate to perform their duties. You can supply any Stream implementation in their constructors, and they’ll use it, but they’ll throw ArgumentNullExceptions if you try to slip them a null stream.
Although the BCL provides examples where you can see Constructor Injection in use, it’s always more instructive to see a working example. The next section walks you through a full implementation example.
4.2.4 Example: Adding currency conversions to the featured products
Mary’s boss says her app is working fine, but now some customers who are using it want to pay for goods in different currencies. Can she write some new code that enables the app to display and calculate costs in different currencies? Mary sighs and realizes that it’s not going to be enough to hard-code in a few different currency conversions. She’ll need to write code flexible enough to accommodate any currency over time. DI is calling again.
What Mary needs is both an object for representing money and its currency and an Abstraction that allows converting money from one currency into another. She’ll name the Abstraction ICurrencyConverter. For simplicity, the Currency will only have a currency Code, and Money is composed of both a Currency and an Amount, as shown in figure 4.6.

Figure 4.6 Exchanging currencies using ICurrencyConverter
The following listing shows the Currency and Money classes, and the ICurrencyConverter interface, as envisioned in figure 4.6.
Listing 4.6 Currency, Money, and the ICurrencyConverter interface
public interface ICurrencyConverter
{
    Money Exchange(Money money, Currency targetCurrency);
}

public class Currency
{
    public readonly string Code;

    public Currency(string code)
    {
        if (code == null) throw new ArgumentNullException("code");

        this.Code = code;
    }
}

public class Money
{
    public readonly decimal Amount;
    public readonly Currency Currency;

    public Money(decimal amount, Currency currency)
    {
        if (currency == null) throw new ArgumentNullException("currency");

        this.Amount = amount;
        this.Currency = currency;
    }
}
An ICurrencyConverter is likely to represent an out-of-process resource, such as a web service or a database that supplies conversion rates. This means that it’d be fitting to implement a concrete ICurrencyConverter in a separate project, such as a data access layer. Hence, there’s no reasonable Local Default.
At the same time, the ProductService class will need an ICurrencyConverter. Constructor Injection is a good fit. The following listing shows how the ICurrencyConverter Dependency is injected into ProductService.
Listing 4.7 Injecting an ICurrencyConverter into ProductService
public class ProductService : IProductService
{
    private readonly IProductRepository repository;
    private readonly IUserContext userContext;
    private readonly ICurrencyConverter converter;

    public ProductService(
        IProductRepository repository,
        IUserContext userContext,
        ICurrencyConverter converter)
    {
        if (repository == null)
            throw new ArgumentNullException("repository");
        if (userContext == null)
            throw new ArgumentNullException("userContext");
        if (converter == null)
            throw new ArgumentNullException("converter");

        this.repository = repository;
        this.userContext = userContext;
        this.converter = converter;
    }
}
Because the ProductService class already had a Dependency on IProductRepository and IUserContext, we add the new ICurrencyConverter Dependency as a third constructor argument and then follow the same sequence outlined in listing 4.5. Guard Clauses guarantee that the Dependencies aren’t null, which means it’s safe to store them for later use in read-only fields. Because an ICurrencyConverter is guaranteed to be present in ProductService, it can be used from anywhere; for example, in the GetFeaturedProducts method as shown here.
Listing 4.8 ProductService using ICurrencyConverter
public IEnumerable<DiscountedProduct> GetFeaturedProducts()
{
    Currency userCurrency = this.userContext.Currency;    ①

    var products =
        this.repository.GetFeaturedProducts();

    return
        from product in products
        let unitPrice = product.UnitPrice    ②
        let amount = this.converter.Exchange(    ③
            money: unitPrice,    ③
            targetCurrency: userCurrency)    ③
        select product
            .WithUnitPrice(amount)
            .ApplyDiscountFor(this.userContext);
}
Notice that you can use the converter field without needing to check its availability in advance. That’s because it’s guaranteed to be present.
4.2.5 Wrap-up
Constructor Injection is the most generally applicable DI pattern available, and also the easiest to implement correctly. It applies when the Dependency is required. If you need to make the Dependency optional, you can change to Property Injection if it has a proper Local Default.
The next pattern in this chapter is Method Injection, which takes a slightly different approach. It tends to apply more to the situation where you already have a Dependency that you want to pass on to the collaborators you invoke.
4.3 Method Injection
How can we inject a Dependency into a class when it’s different for each operation?
By supplying it as a method parameter.
In cases where a Dependency can vary with each method call, or the consumer of such a Dependency can vary on each call, you can supply a Dependency via a method parameter.

Figure 4.7 Using Method Injection, ProductService creates an instance of Product and injects an instance of IUserContext into Product.ApplyDiscountFor with each method call.
4.3.1 How Method Injection works
The caller supplies the Dependency as a method parameter in each method call. An example of this approach in Mary’s e-commerce application is in the Product class, where the ApplyDiscountFor method accepts an IUserContext Dependency using Method Injection:

IUserContext presents contextual information for the operation to run, which is a common scenario for Method Injection. Often this context will be supplied to a method alongside a “proper” value, as shown in listing 4.9.
Listing 4.9 Passing a Dependency alongside a proper value
public decimal CalculateDiscountPrice(decimal price, IUserContext context)
{
    if (context == null) throw new ArgumentNullException("context");

    decimal discount = context.IsInRole(Role.PreferredCustomer) ? .95m : 1;

    return price * discount;
}
The price value parameter represents the value on which the method is supposed to operate, whereas context contains information about the current context of the operation; in this case, information about the current user. The caller supplies the Dependency to the method. As you’ve seen many times before, the Guard Clause guarantees that the context is available to the rest of the method body.
4.3.2 When to use Method Injection
Method Injection is different from other types of DI patterns in that the injection doesn’t happen in a Composition Root but, rather, dynamically at invocation. This allows the caller to provide an operation-specific context, which is a common extensibility mechanism used in the .NET BCL. Table 4.2 provides a summary of the advantages and disadvantages of Method Injection.
| Advantages | Disadvantages |
| Allows the caller to provide operation-specific context Allows injecting Dependencies into data-centric objects that aren’t created inside the Composition Root |
Limited applicability Causes the Dependency to become part of the public API of a class or its Abstraction |
There are two typical use cases for applying Method Injection:
- When the consumer of the injected Dependency varies on each call
- When the injected Dependency varies on each call to a consumer
The following sections show an example of each. Listing 4.9 is an example of how the consumer varies. This is the most common form, which is why we’ll start with providing another example.
Example: Varying the Dependency's consumer on each method call
When you practice Domain-Driven Design (DDD), it’s common to create domain Entities that contain domain logic, effectively mixing runtime data with behavior in the same class.8 Entities, however, are typically not created within the Composition Root. Take the following Customer Entity, for example.
Listing 4.10 An Entity containing domain logic but no Dependencies (yet)
public class Customer    ①
{
    public Guid Id { get; private set; }    ②
    public string Name { get; private set; }    ②

    public Customer(Guid id, string name)    ③
    {
        ...
    }

    public void RedeemVoucher(Voucher voucher) ...    ④


    public void MakePreferred() ...    ⑤
}
The RedeemVoucher and MakePreferred methods in listing 4.10 are domain methods. RedeemVoucher implements the domain logic that lets the customer redeem a voucher. (You may have redeemed a voucher to get a discount when you purchased this book.) voucher is a value object9 used by the method. MakePreferred, on the other hand, implements the domain logic that promotes the customer. A regular customer could get upgraded to become a preferred customer, which might give certain advantages and discounts, similar to being a frequent flyer airline customer.
Entities that contain behavior besides their usual set of data members would easily get a wide range of methods, each requiring their own Dependencies. Although you might be tempted to use Constructor Injection to inject such Dependencies, that leads to a situation where each such Entity needs to be created with all of its Dependencies, even though only a few may be necessary for a given use case. This complicates testing the logic of an Entity, because all Dependencies need to be supplied to the constructor, even though a test might only be interested in a few Dependencies. Method Injection, as shown in the next listing, offers a better alternative.
Listing 4.11 An Entity using Method Injection
public class Customer
{
    public Guid Id { get; private set; }
    public string Name { get; private set; }

    public Customer(Guid id, string name)
    {
        ...
    }

    public void RedeemVoucher(    ①
        Voucher voucher,
        IVoucherRedemptionService service)
    {
        if (voucher == null)
            throw new ArgumentNullException("voucher");
        if (service == null)
            throw new ArgumentNullException("service");

        service.ApplyRedemptionForCustomer(
            voucher,
            this.Id);
    }

    public void MakePreferred(IEventHandler handler)    ①
    {
        if (handler == null)
            throw new ArgumentNullException("handler");

        handler.Publish(new CustomerMadePreferred(this.Id));
    }
}
Inside a CustomerServices component, the Customer's RedeemVoucher method can be called while passing the IVoucherRedemptionService Dependency with the call, as shown next.
Listing 4.12 A component using Method Injection to pass a Dependency
public class CustomerServices : ICustomerServices
{
    private readonly ICustomerRepository repository;
    private readonly IVoucherRedemptionService service;

    public CustomerServices(    ①
        ICustomerRepository repository,    ①
        IVoucherRedemptionService service)    ①
    {
        this.repository = repository;
        this.service = service;
    }

    public void RedeemVoucher(
        Guid customerId, Voucher voucher)
    {
        var customer =
            this.repository.GetById(customerId);

        customer.RedeemVoucher(voucher, this.service);    ②

        this.repository.Save(customer);
    }
}
In listing 4.12, only a single Customer instance is requested from ICustomerRepository. But a single CustomerServices instance can be called over and over again using a multitude of customers and vouchers, causing the same IVoucherRedemptionService to be supplied to many different Customer instances. Customer is the consumer of the IVoucherRedemptionService Dependency and, while you’re reusing the Dependency, you’re varying the consumer.
This is similar to the first Method Injection example shown in listing 4.9 and the ApplyDiscountFor method discussed in listing 3.8. The opposite case is when you vary the Dependency while keeping its consumers around.
Example: Varying the injected Dependency on each method call
Imagine an add-in system for a graphical drawing application, where you want everyone to be able to plug in their own image effects. External image effects might require information about the runtime context, which can be passed on by the application to the image effect. This is a typical use case for applying Method Injection. You can define the following interface for applying those effects:
public interface IImageEffectAddIn    ①
{
    Bitmap Apply(    ②
        Bitmap source,
        IApplicationContext context);    ③
}
The IImageEffectAddIn's IApplicationContext Dependency can vary with each call to the Apply method, providing the effect with information about the context in which the operation is being invoked. Any class implementing this interface can be used as an add-in. Some implementations may not care about the context at all, whereas other implementations will.
A client can use a list of add-ins by calling each with a source Bitmap and a context to return an aggregated result, as shown in the next listing.
Listing 4.13 A sample add-in client
public Bitmap ApplyEffects(Bitmap source)
{
    if (source == null) throw new ArgumentNullException("source");

    Bitmap result = source;

    foreach (IImageEffectAddIn effect in this.effects)
    {
        result = effect.Apply(result, this.context);
    }

    return result;
}
The private effects field is a list of IImageEffectAddIn instances, which allows the client to loop through the list to invoke each add-in’s Apply method. Each time the Apply method is invoked on an add-in, the operation’s context, represented by the context field, is passed as a method parameter:
result = effect.Apply(result, this.context);
At times, the value and the operational context are encapsulated in a single Abstraction that works as a combination of both. An important thing to note is this: as you’ve seen in both examples, the Dependency injected via Method Injection becomes part of the definition of the Abstraction. This is typically desirable in case that Dependency contains runtime information that’s supplied by its direct callers.
In cases where the Dependency is an implementation detail to the caller, you should try to prevent the Abstraction from being “polluted”; therefore, Constructor Injection is a better pick. Otherwise, you could easily end up passing the Dependency from the top of our application’s object graph all the way down, causing sweeping changes.
The previous examples all showed the use of Method Injection outside of the Composition Root. This is deliberate. Method Injection is unsuitable when used within the Composition Root. Within a Composition Root, Method Injection can initialize a previously constructed class with its Dependencies. Doing so, however, leads to Temporal Coupling and for that reason it’s highly discouraged.
The Temporal Coupling code smell
Temporal Coupling is a common problem in API design. It occurs when there’s an implicit relationship between two or more members of a class, requiring clients to invoke one member before the other. This tightly couples the members in the temporal dimension. The archetypical example is the use of an Initialize method, although copious other examples can be found — even in the BCL. As an example, this usage of System.ServiceModel.EndpointAddressBuilder compiles but fails at runtime:
var builder = new EndpointAddressBuilder();
var address = builder.ToEndpointAddress();
It turns out that an URI is required before an EndpointAddress can be created. The following code compiles and succeeds at runtime:
var builder = new EndpointAddressBuilder();
builder.Uri = new UriBuilder().Uri;
var address = builder.ToEndpointAddress();
The API provides no hint that this is necessary, but there’s a Temporal Coupling between the Uri property and the ToEndpointAddress method.
When applied inside the Composition Root, a recurring pattern is the use of some Initialize method, as shown in listing 4.14.

Listing 4.14 Temporal Coupling example
public class Component
{
    private ISomeInterface dependency;

    public void Initialize(    ①
        ISomeInterface dependency)    ①
    {
        this.dependency = dependency;
    }

    public void DoSomething()
    {
        if (this.dependency == null)    ②
            throw new InvalidOperationException(    ②
                "Call Initialize first.");    ②

        this.dependency.DoStuff();
    }
}
Semantically, the name of the Initialize method is a clue, but on a structural level, this API gives us no indication of Temporal Coupling. Thus, code like this compiles, but throws an exception at runtime:
var c = new Component();
c.DoSomething();
The solution to this problem should be obvious by now — you should apply Constructor Injection instead:
public class Component
{
    private readonly ISomeInterface dependency;

    public Component(ISomeInterface dependency)
    {
        if (dependency == null)
            throw new ArgumentNullException("dependency");

        this.dependency = dependency;
    }

    public void DoSomething()
    {
        this.dependency.DoStuff();
    }
}
4.3.3 Known use of Method Injection
The .NET BCL provides many examples of Method Injection, particularly in the System.ComponentModel namespace. You use System.ComponentModel.Design.IDesigner for implementing custom design-time functionality for components. It has an Initialize method that takes an IComponent instance so that it knows which component it’s currently helping to design. (Note that this Initialize method causes Temporal Coupling.) Designers are created by IDesignerHost implementations that also take IComponent instances as parameters to create designers:
IDesigner GetDesigner(IComponent component);
This is a good example of a scenario where the parameter itself carries information. The component can carry information about which IDesigner to create, but at the same time, it’s also the component on which the designer must subsequently operate.
Another example in the System.ComponentModel namespace is provided by the TypeConverter class. Several of its methods take an instance of ITypeDescriptorContext that, as the name says, conveys information about the context of the current operation, such as information about the type’s properties. Because there are many such methods, we don’t want to list them all, but here’s a representative example:
public virtual object ConvertTo(ITypeDescriptorContext context,
    CultureInfo culture, object value, Type destinationType)
In this method, the context of the operation is communicated explicitly by the context parameter, whereas the value to be converted and the destination type are sent as separate parameters. Implementers can use or ignore the context parameter as they see fit.
ASP.NET Core MVC also contains several examples of Method Injection. You can use the IValidationAttributeAdapterProvider interface, for instance, to provide IAttributeAdapter instances. Its only method is this:
IAttributeAdapter GetAttributeAdapter(
    ValidationAttribute attribute, IStringLocalizer stringLocalizer)
ASP.NET Core allows properties of view models to be marked with ValidationAttribute. It’s a convenient way to apply metadata that describes the validity of properties encapsulated in the view model.
Based on a ValidationAttribute, the GetAttributeAdapter method allows an IAttributeAdapter to be returned, which allows relevant error messages to be displayed in a web page. In the GetAttributeAdapter method, the attribute parameter is the object an IAttributeAdapter should be created for, whereas the stringLocalizer is the Dependency that’s passed through Method Injection.
Next, we’ll see how Mary uses Method Injection in order to prevent code repetition. When we last saw Mary (in section 4.2), she was working on ICurrencyConverter: she injected it using Constructor Injection into the ProductService class.
4.3.4 Example: Adding currency conversions to the ProductEntity
Listing 4.8 showed how the GetFeaturedProducts method called the ICurrencyConverter.Exchange method using the product’s UnitPrice and the user’s preferred currency in Mary’s application. Here’s that GetFeaturedProducts method again:
public IEnumerable<DiscountedProduct> GetFeaturedProducts()
{
    Currency currency = this.userContext.Currency;

    return
        from product in this.repository.GetFeaturedProducts()
        let amount = this.converter.Exchange(product.UnitPrice, currency)
        select product
            .WithUnitPrice(amount)
            .ApplyDiscountFor(this.userContext);
}
Conversions of Product Entities from one Currency to another will be a recurring task in many parts of her application. For this reason, Mary likes to move the logic concerning the conversion of the Product out of ProductService and centralize it as part of the Product Entity. This prevents other parts of the system from repeating this code. Method Injection turns out to be a great candidate for this. Mary creates a new ConvertTo method in Product, as shown in the next listing.
Listing 4.15 ProductEntity with ConvertTo method
public class Product
{
    public string Name { get; set; }
    public Money UnitPrice { get; set; }
    public bool IsFeatured { get; set; }

    public Product ConvertTo(
        Currency currency,    ①
        ICurrencyConverter converter)    ②
    {
        if (currency == null)
            throw new ArgumentNullException("currency");
        if (converter == null)
            throw new ArgumentNullException("converter");

        var newUnitPrice =
            converter.Exchange(    ③
                this.UnitPrice,
                currency);

        return this.WithUnitPrice(newUnitPrice);    ④
    }

    public Product WithUnitPrice(Money unitPrice)
    {
        return new Product
        {
            Name = this.Name,
            UnitPrice = unitPrice,
            IsFeatured = this.IsFeatured
        };
    }
    ...
}
With the new ConvertTo method, Mary refactors the GetFeaturedProducts method.
Listing 4.16 GetFeaturedProducts using ConvertTo method
public IEnumerable<DiscountedProduct> GetFeaturedProducts()
{
    Currency currency = this.userContext.Currency;

    return
        from product in this.repository.GetFeaturedProducts()
        select product
            .ConvertTo(currency, this.converter)    ①
            .ApplyDiscountFor(this.userContext);
}
Instead of calling the ICurrencyConverter.Exchange method, as you’ve seen previously, GetFeaturedProducts now passes ICurrencyConverter on to the ConvertTo method using Method Injection. This simplifies the GetFeaturedProducts method and prevents any code duplication when Mary needs to convert products elsewhere in her code base. By using Method Injection instead of Constructor Injection, she avoided having to build up the Product Entity with all of its Dependencies. This simplifies construction and testing.
Unlike the other DI patterns in this chapter, you mainly use Method Injection when you want to supply Dependencies to an already existing consumer. With Constructor Injection and Property Injection, on the other hand, you supply Dependencies to a consumer while it’s being created.
The last pattern in this chapter is Property Injection, which allows you to override a class’s Local Default. Where Method Injection was solely applied outside the Composition Root, Property Injection, just as Constructor Injection, is applied from within the Composition Root.
4.4 Property Injection
How do we enable DI as an option in a class when we have a good Local Default?
By exposing a writable property that lets callers supply a Dependency if they want to override the default behavior.
When a class has a good Local Default, but you still want to leave it open for extensibility, you can expose a writable property that allows a client to supply a different implementation of the class’s Dependency than the default. As figure 4.8 shows, clients wanting to use the Consumer class as is can create an instance of the class and use it without giving it a second thought, whereas clients wanting to modify the behavior of the class can do so by setting the Dependency property to a different implementation of IDependency.

Figure 4.8 Property Injection
4.4.1 How Property Injection works
The class that uses the Dependency must expose a public writable property of the Dependency’s type. In a bare-bones implementation, this can be as simple as the following listing.
Listing 4.17 Property Injection
public class Consumer
{
    public IDependency Dependency { get; set; }
}
Consumer depends on IDependency. Clients can supply implementations of IDependency by setting the Dependency property.
Other members of the depending class can use the injected Dependency to perform their duties, like this:
public void DoSomething()
{
    this.Dependency.DoStuff();
}
Unfortunately, such an implementation is fragile. That’s because the Dependency property isn’t guaranteed to return an instance of IDependency. Code like this would throw a NullReferenceException if the value of the Dependency property is null:
var instance = new Consumer();

instance.DoSomething();    ①
This issue can be solved by letting the constructor set a default instance on the property, combined with a proper Guard Clause in the property’s setter. Another complication arises if clients switch the Dependency in the middle of the class’s lifetime:
var instance = new Consumer();

instance.Dependency = new SomeImplementation();    ①

instance.DoSomething();

instance.Dependency = new SomeOtherImplementation();    ②

instance.DoSomething();
This can be addressed by introducing an internal flag that only allows a client to set the Dependency during initialization.11
The example in section 4.4.4 shows how you can deal with these complications. But before we get to that, we’d like to explain when it’s appropriate to use Property Injection.
4.4.2 When to use Property Injection
Property Injection should only be used when the class you’re developing has a good Local Default, and you still want to enable callers to provide different implementations of the class’s Dependency. It’s important to note that Property Injection is best used when the Dependency is optional. If the Dependency is required, Constructor Injection is always a better pick.
In chapter 1, we discussed good reasons for writing code with loose coupling, thus isolating modules from each other. But loose coupling can also be applied to classes within a single module with great success. This is often done by introducing Abstractions within a module and letting classes within that module communicate via Abstractions, instead of being tightly coupled to each other. The main reasons for applying loose coupling within a module boundary is to open classes for extensibility and for ease of testing.
We haven’t shown you any real examples of Property Injection so far because the applicability of this pattern is more limited, especially in the context of application development. Table 4.3 summarizes its advantages and disadvantages.
| Advantages | Disadvantages |
| Easy to understand | Not entirely simple to implement robustly Limited applicability Only applicable to reusable libraries Causes Temporal Coupling |
The main advantage of Property Injection is that it’s so easy to understand. We’ve often seen this pattern used as a first attempt when people decide to adopt DI.
Appearances can be deceptive, though, and Property Injection is fraught with difficulties. It’s challenging to implement it in a robust manner. Clients can forget to supply the Dependency because of the previously discussed problem of Temporal Coupling. Additionally, what would happen if a client tries to change the Dependency in the middle of the class’s lifetime? This could lead to inconsistent or unexpected behavior, so you may want to protect yourself against that event.
Despite the downsides, it makes sense to use Property Injection when building a reusable library. It allows components to define sensible defaults, and this simplifies working with a library’s API.
When developing applications, you wire up your classes in your Composition Root. Constructor Injection prevents you from forgetting to supply the Dependency. Even in the case that there’s a Local Default, such instances can be supplied to the constructor by the Composition Root. This simplifies the class and allows the Composition Root to be in control over the value that all consumers get. This might even be a Null Object implementation.
The existence of a good Local Default depends in part on the granularity of modules. The BCL ships as a rather large package; as long as the default stays within the BCL, it could be argued that it’s also local. In the next section, we’ll briefly touch on that subject.
4.4.3 Known uses of Property Injection
In the .NET BCL, Property Injection is a bit more common than Constructor Injection, probably because good Local Defaults are defined in many places, and also because this simplifies the default instantiation of most classes. For example, System.ComponentModel.IComponent has a writable Site property that allows you to define an ISite instance. This is mostly used in design time scenarios (for example, by Visual Studio) to alter or enhance a component when it’s hosted in a designer. With that BCL example as an appetizer, let’s move on to a more substantial example of using and implementing Property Injection.
4.4.4 Example: Property Injection as an extensibility model of a reusable library
Earlier examples in this chapter extended the sample application of the previous chapter. Although we could show you an example of Property Injection using the sample application, this would be misleading because Property Injection is hardly ever a good fit when building applications; Constructor Injection is almost always a better choice. Instead, we’d like to show you an example of a reusable library. In this case, we’re looking at some code from Simple Injector.
Simple Injector is one of the DI Containers that’s discussed in part 4. It helps you construct your application’s object graphs. Chapter 14 will have an extensive discussion on Simple Injector, so we won’t go into much detail about it here. From the perspective of Property Injection, how Simple Injector works isn’t important.
As a reusable library, Simple Injector makes extensive use of Property Injection. Lots of its behavior can be extended, and the way this is done is by providing default implementations of its behavior. Simple Injector exposes properties that allow the user to change the default implementation. One of the behaviors that Simple Injector allows to be replaced is how the library selects the correct constructor for doing Constructor Injection.14
As we discussed in section 4.2, your classes should only have one constructor. Because of this, Simple Injector, by default, only allows classes that have just one public constructor to be created. In any other case, Simple Injector throws an exception. Simple Injector, however, lets you override this behavior. This might be useful for certain narrow integration scenarios. For this, Simple Injector defines an IConstructorResolutionBehavior interface.15 A custom implementation can be defined by the user, and the library-provided default can be replaced by setting the ConstructorResolutionBehavior property, as shown here:
var container = new Container();

container.Options.ConstructorResolutionBehavior =
    new CustomConstructorResolutionBehavior();
The Container is the central Facade16 pattern in Simple Injector’s API. It’s used to specify the relationships between Abstractions and implementations, and to build object graphs of these implementations. The class includes an Options property of type ContainerOptions. It includes a number of properties and methods that allow the default behavior of the library to be changed. One of those properties is ConstructorResolutionBehavior. Here’s a simplified version of the ContainerOptions class with its ConstructorResolutionBehavior property:
public class ContainerOptions
{
    IConstructorResolutionBehavior resolutionBehavior =
        new DefaultConstructorResolutionBehavior();    ①

    public IConstructorResolutionBehavior ConstructorResolutionBehavior
    {
        get
        {
            return this.resolutionBehavior;
        }
        set
        {
            if (value == null)    ②
              throw new ArgumentNullException("value");

            if (this.Container.HasRegistrations)    ③
            {
                throw new InvalidOperationException(
                    "The ConstructorResolutionBehav" +
                    "ior property cannot be changed" +
                    " after the first registration " +
                    "has been made to the container.";
            }

            this.resolutionBehavior = value;    ④
        }
    }
}
The ConstructorResolutionBehavior property can be changed multiple times as long as there are no registrations made in the container. This is important, because when registrations are made, Simple Injector uses the specified ConstructorResolutionBehavior to verify whether it’ll be able to construct such a type by analyzing a class’s constructor. If a user was able to change the constructor resolution behavior after registrations were made, it could impact the correctness of earlier registrations. This is because Simple Injector could, otherwise, end up using a different constructor for a component from that which it approved to be correct during the time of registration. This means that either all previous registrations should be reevaluated or the user should be prevented from being able to change the behavior after registrations are made. Because reevaluating can have hidden performance costs and is harder to implement, Simple Injector implements the latter approach.
Compared to Constructor Injection, Property Injection is more involved. It may look simple in its raw form (as shown in listing 4.19), but, properly implemented, it tends to be more complex.
You use Property Injection in a reusable library where the Dependency is optional and you have a good Local Default. In cases where there’s a short-lived object that requires the Dependency, you should use Method Injection. In other cases, you should use Constructor Injection.
This completes the last pattern in this chapter. The following section provides a short recap and explains how to select the right pattern for your job.
4.5 Choosing which pattern to use
The patterns presented in this chapter are a central part of DI. Armed with a Composition Root and an appropriate mix of injection patterns, you can implement Pure DI or use a DI Container. When applying DI, there are many nuances and finer details to learn, but these patterns cover the core mechanics that answer the question, “How do I inject my Dependencies?”
These patterns aren’t interchangeable. In most cases, your default choice should be Constructor Injection, but there are situations where one of the other patterns affords a better alternative. Figure 4.9 shows a decision process that can help you decide on a proper pattern, but, if in doubt, choose Constructor Injection. You can’t go terribly wrong with that choice.
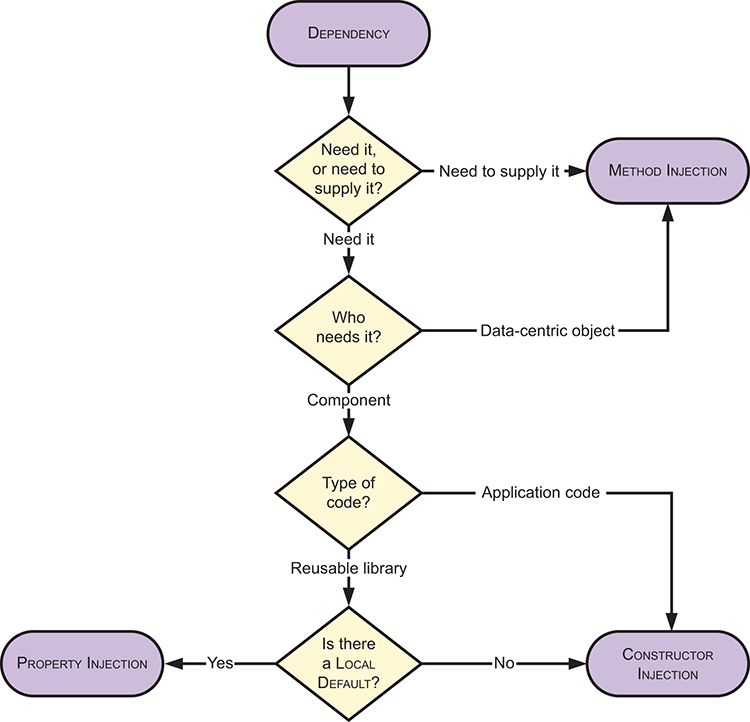
Figure 4.9 Pattern decision process. In most cases, you should choose Constructor Injection, but there are situations where one of the other DI patterns is a better fit.
The first thing to examine is whether the Dependency is something you need or something you already have but want to communicate to another collaborator. In most cases, you’ll probably need the Dependency. But in add-in scenarios, you may want to convey the current context to an add-in. Every time the Dependency varies from operation to operation, Method Injection is a good candidate for an implementation.
Secondly, you’ll need to know what kind of class needs the Dependency. In case you’re mixing runtime data with behavior in the same class, as you might do in your domain Entities, Method Injection is a good fit. In other cases, when you’re writing application code, opposed to writing a reusable library, Constructor Injection automatically applies.
When it comes to writing application code, even the use of Local Defaults should be prevented in favor of having these defaults set in one central place in the application — the Composition Root. On the other hand, when writing a reusable library, a Local Default is the deciding factor, as it can make explicitly assigning the Dependency optional — the default takes over if no overriding implementation is specified. This scenario can be effectively implemented with Property Injection.
Constructor Injection should be your default choice for DI. It’s easy to understand and simpler to implement robustly than any of the other DI patterns. You can build entire applications with Constructor Injection alone, but knowing about the other patterns can help you choose wisely in the few cases where it doesn’t fit perfectly. The next chapter approaches DI from the opposite direction and takes a look at ill-advised ways of using DI.
Summary
- The Composition Root is a single, logical location in an application where modules are composed together. The construction of your application’s components should be concentrated into this single area of your application.
- Only startup projects will have a Composition Root.
- Although a Composition Root can be spread out across multiple classes, they should be in a single module.
- The Composition Root takes a direct dependency on all other modules in the system. Loosely coupled code that applies the Composition Root pattern lowers the overall number of dependencies between modules, subsystems, and layers, compared to tightly coupled code.
- Even though you might place the Composition Root in the same assembly as your UI or presentation layer, the Composition Root isn’t part of those layers. Assemblies are deployment artifacts, whereas layers are logical artifacts.
- Where a DI Container is used, it should only be referenced from the Composition Root. All other modules should be oblivious to the existence of the DI Container.
- Use of a DI Container outside the Composition Root leads to the Service Locator anti-pattern.
- The performance overhead of using a DI Container to compose large object graphs is usually not an issue in a well-designed system.
- The Composition Root should be the sole place in the entire application that knows about the structure of the constructed object graphs. This means that application code can’t pass on Dependencies to other threads that run parallel to the current operation, because a consumer has no way of knowing whether it’s safe to do so. Instead, when spinning off concurrent operations, it’s the Composition Root’s job to create a new object graph for each concurrent operation.
- Constructor Injection is the act of statically defining the list of required Dependencies by specifying them as parameters to the class’s constructor.
- A constructor that’s used for Constructor Injection should do no more than apply Guard Clauses and store the receiving Dependencies. Other logic should be kept out of the constructor. This makes building object graphs fast and reliable.
- Constructor Injection should be your default choice for DI, because it’s the most reliable and the easiest to apply correctly.
- Constructor Injection is well suited when a Dependency is required. It’s important to note, however, that Dependencies should hardly ever be optional. Optional Dependencies complicate the component with null checks. Inside the Composition Root, a Null Object implementation should instead be injected when there’s no reasonable implementation available.
- Application components should only have a single constructor. Overloaded constructors lead to ambiguity. For reusable class libraries, like the BCL, having multiple constructors often makes sense; for application components, it doesn’t.
- Method Injection is the act of passing Dependencies on method invocations.
- Where either a Dependency or a Dependency’s consumer can differ for each operation, you can apply Method Injection. This can be useful for add-in scenarios where some runtime context needs to be passed along to the add-in’s public API, or when a data-centric object requires a Dependency for a certain operation, as will often be the case with domain Entities.
- Method Injection is unsuited for use inside the Composition Root because it leads to Temporal Coupling.
- A method that accepts a Dependency through Method Injection shouldn’t store that Dependency. This leads to Temporal Coupling, Captive Dependencies, or hidden side effects. Dependencies should only be stored with Constructor Injection and Property Injection.
- A Local Default is a default implementation of a Dependency that originates in the same module or layer.
- Property Injection allows class libraries to be open for extension, because it lets callers change the library’s default behavior.
- Property Injection may look simple, but when properly implemented, it tends to be more complex compared to Constructor Injection.
- Beyond optional Dependencies within reusable libraries, the applicability of Property Injection is limited, and Constructor Injection is usually a better fit. Constructor Injection simplifies the class, allows the Composition Root to be in control over the value that all consumers get, and prevents Temporal Coupling.