
Workflow Manager is an external system to SharePoint Server, but is leveraged for advanced workflows created through SharePoint Designer 2013 or Visual Studio. Workflow Manager is designed to run in a separate Workflow Manager “farm,” although it can be colocated on SharePoint.
Initial Setup
In our topology design, Workflow Manager 1.0 will be installed on LSWFM01, LSWFM02, and LSWFM03 for a highly available farm. Workflow Manager supports an architecture of one or three servers in a Workflow Manager farm. No other farm configuration is valid.
The SharePoint farm will consume Workflow Manager via the DNS name “workflow.corp.learn-sp2016.com,” which is a virtual IP on a load balancer in front of the three Workflow Manager servers. A trusted SSL certificate, in this case a wildcard certificate, is used during the Workflow Manager configuration. This certificate must either have the SANs of the Workflow Manager servers and the URL used to connect to Workflow Manager, or a wildcard for the DNS name of the Workflow Manager servers. The certificate must also be trusted by the SharePoint farm. Workflow Manager 1.0 supports SQL Server 2008 R2 and SQL Server 2012. This installation will be using SQL Server 2012 with the AlwaysOn Listener of “gensql.corp.learn-sp2016.com.”
Workflow Manager is installed via the Web Platform Installer (WebPI) , which is run on each of the Workflow Manager servers.
Tip
WebPI requires an Internet connection in order to download the applicable products. Not covered in this chapter is an Offline Installation of Workflow Manager. Microsoft has Offline Installation instructions at https://msdn.microsoft.com/en-us/library/jj906604.aspx .
In this installation, we will be starting with Service Bus 1.1 and the Service Bus 1.1 KB2972621. The Service Bus 1.1 installation will also include the Service Bus 1.1 KB3086798, which is an update for .NET 4.6 Framework compatibility. Search for ‘Service Bus’ and select ‘Windows Azure Pack: Service Bus 1.1’ and ‘Windows Azure Pack: Security Update for Service Bus 1.1 (KB2972621),’ as shown in Figure 10-1.
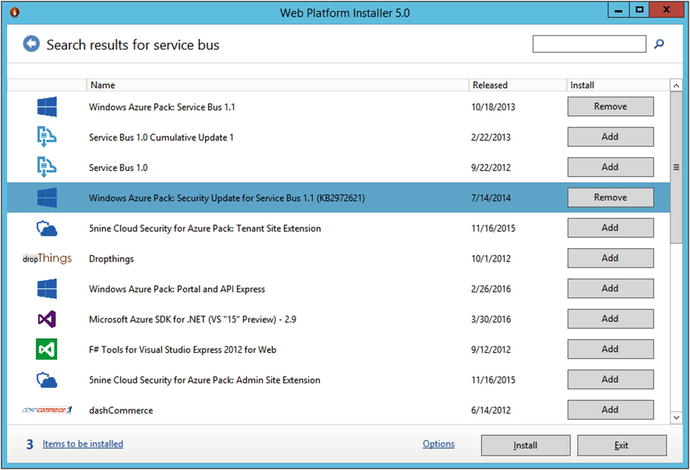
Figure 10-1. Installing Service Bus 1.1
Once the installation of the Service Bus 1.1 components has completed, search for ‘Workflow Manager’ in the Web Platform Installer. Find and select ‘Workflow Manager 1.0 Refresh (CU2),’ as shown in Figure 10-2.
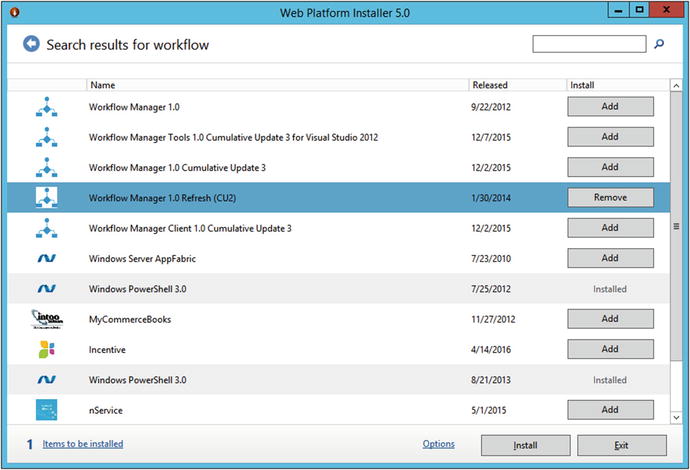
Figure 10-2. Installing the Workflow Manager Refresh
Once the Workflow Manager 1.0 Refresh (CU2) package has completed installing, you may be asked to run the Workflow Manager wizard. Instead, close out the wizard and then close and reopen the Web Platform Installer. This is done in order for the Web Platform Installer to detect that Service Bus 1.1 and Workflow Manager 1.0 are installed.
Again, search for ‘Workflow Manager.’ Find and select ‘Workflow Manager 1.0 Cumulative Update 3,’ as shown in Figure 10-3, and install it. Close the Workflow Manager wizard, if prompted, as well as the Web Platform Installer.
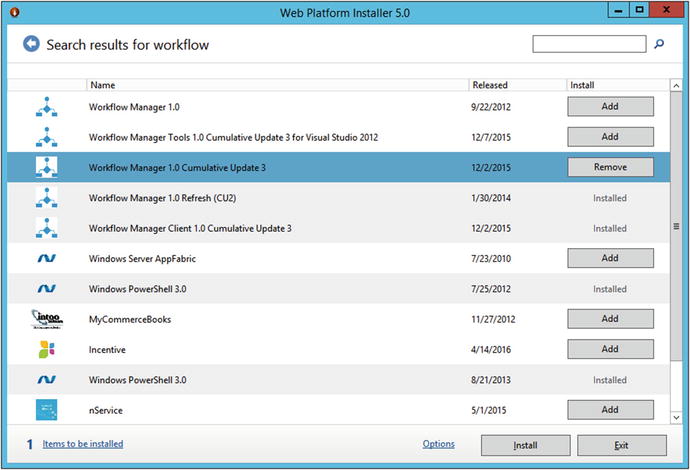
Figure 10-3. Workflow Manager 1.0 CU3
During the installation process, the Windows Fabric V1 RTM and IIS components will also be installed automatically.
Repeat the installation steps for the remaining two Workflow Manager servers.
Prior to deploying Workflow Manager, add the Service Account as a Local Administrator to each Workflow Manager server.
To create the Workflow Manager farm, we will be using the following PowerShell script , CreateWFMFarm.ps1.
$ErrorActionPreference = "Stop"$ra = ConvertTo-SecureString "Password1!" -AsPlainText -Force$certThumbprint = '3CF5BA40F795373E77A63A76F89C972EB7D6B81D'$admins = 'BUILTINAdministrators'$svcAcct = 's-wfm@CORP'$mgUsers = 's-wfm@CORP','trevor@CORP','vlad@CORP'$baseConnectionString = 'Data Source=gensql.corp.learn-sp2016.com;Integrated Security=True;Encrypt=False;Initial Catalog='$sbConnString = $baseConnectionString + 'SbManagementDB;'$sbGateConnString = $baseConnectionString + 'SbGatewayDatabase;'$sbMsgConnString = $baseConnectionString + 'SBMessageContainer01;'$wfConnString = $baseConnectionString + 'WFManagementDB;'$wfInstConnString = $baseConnectionString + 'WFInstanceManagementDB;'$wfResConnString = $baseConnectionString + 'WFResourceManagementDB;'
The variables that must be adjusted in this script for your particular deployment are as follows:
$raThis variable contains the password of the RunAs account. Note this script uses the same RunAs account for the Service Bus and Workflow Manager farms.
$certThumbprintThis contains the certificate thumbprint from the valid SSL certificate in use by the Workflow Manager farm.
$svcAcctThis is the RunAs, or Service Account of the Service Bus and Workflow Manager farms. Note this script uses a single account to run both services.
$mgUsersThis is a comma separated list of users in the format of username@DOMAIN that will have administrative rights over the Service Bus and Workflow Manager farms.
$baseConnectionStringThis variable contains the SQL Server AlwaysOn Availability Group fully qualified domain name. Alternatively, it can be adjusted to use a SQL Alias or SQL Server Name, as well as Instance Name if required.
All other variables may be left as they are.
Add-Type -Path "C:Program FilesWorkflow Manager1.0WorkflowArtifactsMicrosoft.ServiceBus.dll"Write-Host -ForegroundColor Yellow "Creating Service Bus farm..."New-SBFarm -SBFarmDBConnectionString $sbConnString `-InternalPortRangeStart 9000 -TcpPort 9354 -MessageBrokerPort 9356 -RunAsAccount $svcAcct -AdminGroup $admins `-GatewayDBConnectionString $sbGateConnString -FarmCertificateThumbprint $certThumbprint `-EncryptionCertificateThumbprint $certThumbprint -MessageContainerDBConnectionString $sbMsgConnString
New-SBFarm creates the ServiceBus farm and ServiceBus databases.
Write-Host -ForegroundColor Yellow "Creating Workflow Manager farm..."New-WFFarm -WFFarmDBConnectionString $wfConnString `-RunAsAccount $svcAcct -AdminGroup $admins -HttpsPort 12290 -HttpPort 12291 `-InstanceDBConnectionString $wfInstConnString `-ResourceDBConnectionString $wfResConnString -OutboundCertificateThumbprint $certThumbprint `-SslCertificateThumbprint $certThumbprint `-EncryptionCertificateThumbprint $certThumbprintWrite-Host -ForegroundColor Yellow "Adding host to Service Bus farm..."Add-SBHost -SBFarmDBConnectionString $sbConnString -RunAsPassword $ra -EnableFirewallRules $true
Likewise, New-WFFarm creates the Workflow Manager farm and databases . The next step, Add-SBHost, adds this particular server to the ServiceBus farm.
Try{New-SBNamespace -Name 'WorkflowDefaultNamespace' -AddressingScheme 'Path' -ManageUsers $mgUsersStart-Sleep -s 90}Catch [system.InvalidOperationException] {}$SBClientConfiguration = Get-SBClientConfiguration -Namespaces 'WorkflowDefaultNamespace'Write-Host -ForegroundColor Yellow "Adding host to Workflow Manager Farm..."Add-WFHost -WFFarmDBConnectionString $wfConnString -RunAsPassword $ra -EnableFirewallRules $true `-SBClientConfiguration $SBClientConfigurationWrite-Host -ForegroundColor Green "Completed."$ErrorActionPreference = "Continue"
These last pieces of the script create the ServiceBus namespace along with add this particular server to the Workflow Manager farm.
Once the farm is created, one at a time, we will add the remaining two Workflow Manager servers to the farm using the ConnectWFMFarm.ps1 script . For these two servers, the PowerShell script is slightly shorter. The script adds the server to the ServiceBus farm and then to the Workflow Manager farm.
$ErrorActionPreference = "Stop"$ra = ConvertTo-SecureString "Password1!" -AsPlainText -Force$certThumbprint = '3CF5BA40F795373E77A63A76F89C972EB7D6B81D'$mgUsers = 's-wfm@CORP','trevor@CORP'$baseConnectionString = 'Data Source=gensql.corp.learn-sp2016.com;Integrated Security=True; Encrypt=False;Initial Catalog='$sbConnString = $baseConnectionString + 'SbManagementDB;'$wfConnString = $baseConnectionString + 'WFManagementDB;'Add-Type -Path "C:Program FilesWorkflow Manager1.0WorkflowArtifactsMicrosoft.ServiceBus.dll"Write-Host -ForegroundColor Yellow "Adding host to Service Bus Farm..."Add-SBHost -SBFarmDBConnectionString $sbConnString -RunAsPassword $ra -EnableFirewallRules $true -Verbose;$ErrorActionPreference = "Continue"Try{New-SBNamespace -Name 'WorkflowDefaultNamespace' -AddressingScheme 'Path' `-ManageUsers $mgUsers -Verbose;Start-Sleep -s 90}Catch [system.InvalidOperationException] {}try{$SBClientConfiguration = Get-SBClientConfiguration -Namespaces 'WorkflowDefaultNamespace' -Verbose;}Catch [system.InvalidOperationException] {}Write-Host -ForegroundColor Yellow "Adding host to Workflow Manager Farm…"Add-WFHost -WFFarmDBConnectionString $wfConnString -RunAsPassword $ra -EnableFirewallRules $true `-SBClientConfiguration $SBClientConfiguration -Verbose;Write-Host -ForegroundColor Green "Completed."$ErrorActionPreference = "Continue"
As with the CreateWFMFarm.ps1 script , the same variables are available to be adjusted, with the exception of $svcAcct. Note that when adding the second servers, it will stop and start the Service Bus and dependent services on the initial Workflow Manager server, and the final server will stop and start the Service Bus and dependent services on the first two servers.
Ultimately, the output of Get-SBFarm, in Figure 10-4, and Get-WFFarm, in Figure 10-5, will look similar to the following output.

Figure 10-4. The output of the Get-SBFarm cmdlet
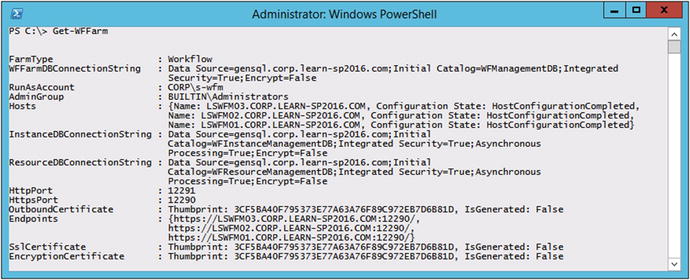
Figure 10-5. The output of the Get-WFFarm cmdlet
When the deploy has been completed, verify that the following services are running on each farm member.
Service Bus Gateway
Service Bus Message Broker
Service Bus Resource Provider
Windows Fabric Host Service
Workflow Manager Backend
In addition, verify the status of the services via Get-SBFarmStatus, as shown in Figure 10-6, and Get-WFFarmStatus, as shown in Figure 10-7.
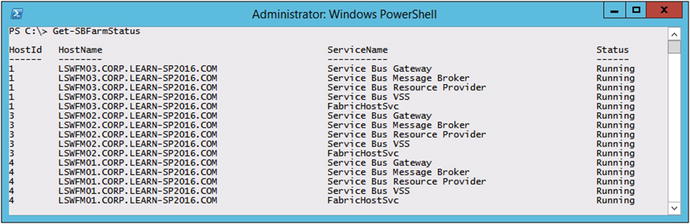
Figure 10-6. The output of Get-SBFarmStatus
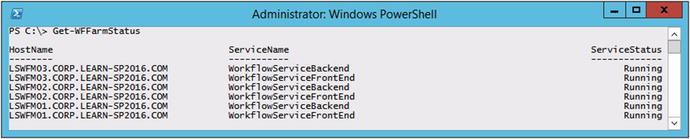
Figure 10-7. The output of Get-WFFarmStatus
The final step in the Workflow Manager configuration is to add the databases to the Availability Group on the SQL Server 2012 AlwaysOn Availability Group. Take a full backup of three Service Bus and three Workflow Manager databases.
SbGatewayDatabase
SbManagementDB
SBMessageContainer01
WFInstanceManagementDB
WFManagementDB
WFResourceManagementDB
Add the databases to the remaining replicas, and then add the Service Bus and Workflow Manager service account to the secondary node logins.
SSL Configuration
As we have enforced the use of TLS 1.2 for SharePoint, we must enable strong crypto as outlined in Microsoft Security Advisory 2960358. Per the advisory, it may be necessary to enable TLS 1.2 support on Windows Server 2012 R2 via a registry entry. Save the following text as a UseStrongCrypto.reg and import it into each Workflow Manager server. Once imported, restart each Workflow Manager server.
Windows Registry Editor Version 5.00[HKEY_LOCAL_MACHINESOFTWAREMicrosoft.NETFrameworkv4.0.30319]"SchUseStrongCrypto"=dword:00000001
Now that the Workflow Manager farm setup has been completed, we will move onto configuring and testing the SharePoint Server 2016 integration with Workflow Manager.
SharePoint Server Workflow Manager Integration
Prior to configuring the integration with Workflow Manager in the SharePoint farm, you must install the Workflow Manager Client. The client can be downloaded directly from Microsoft without the WebPI. The currently available version as of the publishing of this book is Workflow Manager Client Cumulative Update 3. This update may be installed without deploying previous versions of the Workflow Manager Client.
Note
The Workflow Manager Client Cumulative Update 3 is available from https://www.microsoft.com/en-us/download/details.aspx?id=50043 . Download the file WorkflowManagerClient_x64.msi.
As Workflow Manager will need to communicate with SharePoint via HTTPS requests, we must grant the Workflow Manager service account, CORPs-wfm in this case, with Full Control over the SharePoint Web Applications where Workflow Manager will be used. Because we only have a single Web Application for Team, Publishing, and other sites, we will only grant this right on https://sharepoint.learn-sp2016.com . Using the SharePoint Management Shell, grant the service account Full Control via the User Policy.
$wa = Get-SPWebApplication https://sharepoint.learn-sp2016.com$zp = $wa.ZonePolicies("Default")$policy = $zp.Add("i:0#.w|CORPs-wfm", "Workflow Manager")$policyRole = $wa.PolicyRoles.GetSpecialRole("FullControl")$policy.PolicyRoleBindings.Add($policyRole)$wa.Update()
Workflow Manager may only be configured with SharePoint via the SharePoint Management Shell. From the SharePoint Management Shell, register Workflow Manager using the load balanced URL on port 12290 (default SSL port for Workflow Manager).
Register-SPWorkflowService -SPSite https://sharepoint.learn-sp2016.com -WorkflowHostUri https://workflow.corp.learn-sp2016.com:12290 Note that while Register-SPWorkflowService needs a validate SharePoint site to register against, once Workflow Manager has been registered successfully, it will be registered for the entire farm, not just the specified Site Collection.
Note
It may be necessary to restart the SharePoint servers in order to fully register the Workflow Manager binaries.
Now that Workflow Manager has been integrated into SharePoint, the next step will be to perform a simple test with SharePoint Designer 2013.
Testing Workflow Manager with SharePoint Designer 2013
For testing Workflow Manager with SharePoint Designer 2013, provision a new Site Collection using the Team Site template. If using an existing site, make sure the Site Feature “Workflow Task Content Type Feature” has been enabled.
On the site, create a new List named WorkflowTest. No additional configuration on the List needs to be performed for this test.
Using SharePoint Designer 2013 from a client computer, connect to the Site Collection and create a new List Workflow. Given the workflow a name and select the SharePoint 2013 Workflow under Platform Type as shown in Figure 10-8.
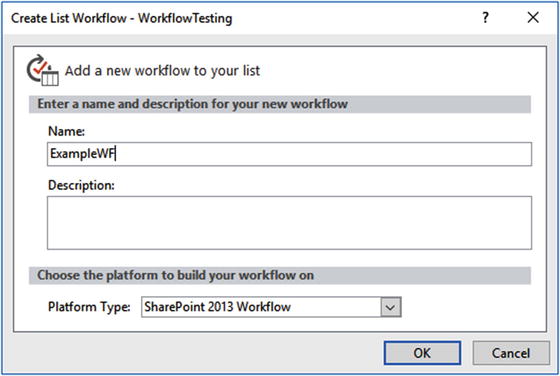
Figure 10-8. Creating a new SharePoint 2013 Workflow for testing
Insert an Action of “Log to History List” and add text to the action. Under Transition to Stage, select End of Workflow. In Figure 10-9, the Log to History List text is “Workflow Testing .”
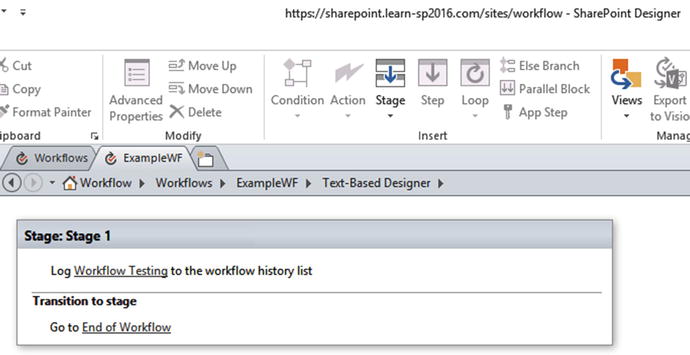
Figure 10-9. The steps in the example workflow
Under Workflow Settings, check the box next to “Start this workflow automatically when an item is created” as shown in Figure 10-10. When we create an entry on the new List, it will automatically start the workflow for us. Click the Publish button to publish the workflow to SharePoint.
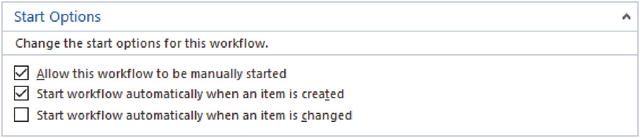
Figure 10-10. Enabling the workflow to automatically start when a new item is created
From SharePoint, navigate to the custom List. Create a new item, specifying any value for the title. The workflow will automatically start. Monitor the status by clicking the ellipsis next to the List Item and navigate to Advanced ➤ Workflows. This page will display the workflow status , along with allowing you to manually start it if needed, as shown in Figure 10-11.
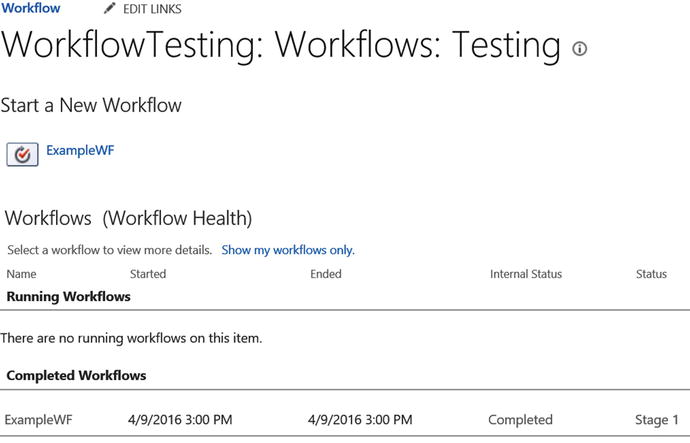
Figure 10-11. The workflow completed without errors
Clicking the ExampleWF link in Figure 10-11 will provide additional details about the workflow, including any potential errors during execution. Figure 10-12 displays a successful workflow execution, but if there were an error, an informational icon would be displayed next to the Internal Status. Hovering over the icon will display a pop-out with the error encountered.
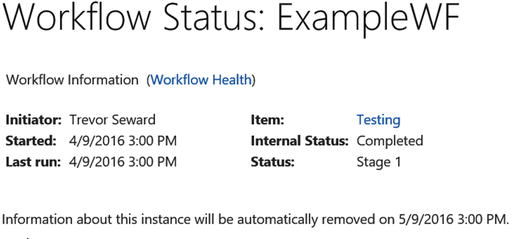
Figure 10-12. Details about the successful execution of the workflow
It may also be helpful to monitor the ULS logs across the farm. Using Microsoft’s ULSViewer, filter to the category “Workflow Services,” which will provide detailed information regarding any potential errors. Errors are also logged in the Workflow Manager WFInstanceManagementDB database. Using SQL Server Management Studio, connect to the SQL Server instance that hosts the WFInstanceManagementDB. Run the following query to retrieve the additional information which will primarily be contained within the Message column.
Use [WFInstanceManagementDB]SELECT * FROM DebugTraces (NoLock)ORDER BY CreationTime DESC
This completes the deployment of the Workflow Manager and SharePoint Server 2016 integration. With working SharePoint 2013 Workflows, it is now possible to allow users to create modern workflows for their sites.
Next Steps
With working SharePoint 2013 Workflows, the next chapter will look at SharePoint Server 2016 and Exchange Server 2016 integration.