While SharePoint Server 2016 alone provides great value to each and every company that decides to install it, it can offer more features when integrated with other servers from the Office suite such as Exchange Server 2016.
By integrating Exchange Server 2016 with SharePoint Server 2016, you enable features such as the Site Mailbox and Modern Attachments. As noted in the first chapter of this book, the Work Management Service from SharePoint 2013 does not exist in SharePoint Server 2016.
Site Mailbox Overview
The Site Mailbox was first introduced in Exchange 2013 / SharePoint 2013 and aims to increase collaboration as well as user productivity when dealing with both documents and e-mails for the same task. Traditionally, e-mails are stored in Exchange Server and consumed in Outlook, while documents are stored and consumed in SharePoint. This creates two different silos where users need to check for information. By implementing the Site Mailbox, you can create an Exchange Mailbox for specific SharePoint Sites, allowing your users to consume both SharePoint documents and Exchange e-mails from the same place.
After successfully being configured, the Site Mailbox will become an app (like a List or Document Library) that can be added in the Site Collection as seen in Figure 11-1.
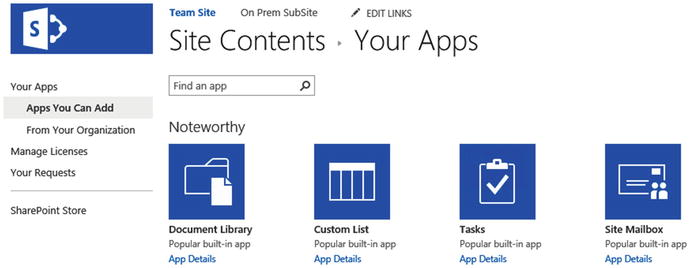
Figure 11-1. Add a Site Mailbox to a SharePoint Site
It’s important to know that only one Site Mailbox can be added per SharePoint Site. Once created, the Site Mailbox will be assigned an e-mail address following the following naming convention: [email protected]. The Site Mailbox we created in a Site called “Team Site” is named “Team Site” and can be e-mailed at “[email protected].” The Site Mailbox can be accessed from the browser as seen in Figure 11-2.
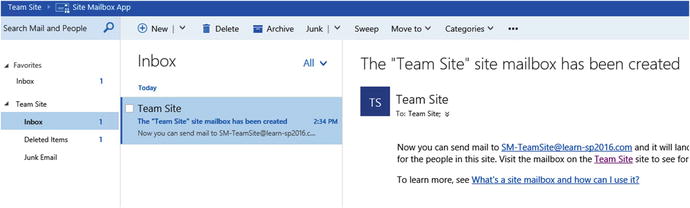
Figure 11-2. Viewing the Site Mailbox in the browser
The Site Mailbox can also be accessed directly from Outlook. When a user has access to a Site Mailbox, it will automatically be added to that user’s Outlook client as seen in Figure 11-3.

Figure 11-3. The ‘Team Site’ Site Mailbox in Outlook 2016
Another advantage of the Site Mailbox is that document libraries that are displayed in the Quick Launch will also be available as a folder in your Outlook client. Users will be able to quickly open documents in their client applications, as well as drag and drop documents in Outlook, which will automatically be uploaded to their SharePoint document library. Figure 11-4 shows the “SharePoint Conference 2014” document library inside Outlook 2016.
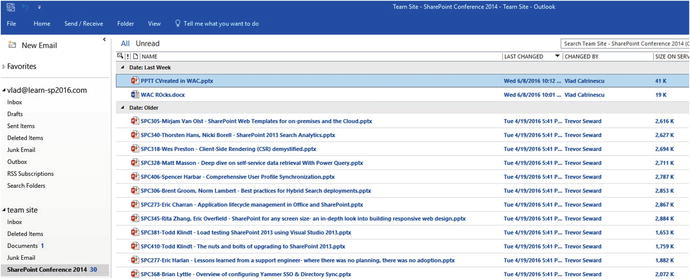
Figure 11-4. A Document Library inside Outlook 2016
Now that we know what a Site Mailbox is, in the next section we will learn how to configure it.
Configure SharePoint Server 2016 Site Mailbox
The process to configure the SharePoint Server 2016 Site Mailbox is pretty straightforward. We will first need to install the Exchange Web Services (EWS) Managed API 2.2 on all the servers in our farm. This will install the required tools that SharePoint will use to communicate with Exchange Server 2016. The next step will then be to create a trust between our SharePoint Server 2016 and Exchange Server 2016 so they can securely exchange information. Lastly, we will need to enable the Site Mailbox feature on the sites we want to use this feature on.
It’s important to know that Site Mailboxes will only work on Web Applications that use SSL on their default Zone. Furthermore, in order for Site Mailboxes to work, the User Profile Service Application needs to work and users need to be synchronized from Active Directory. Lastly, the App Management Service Application should be configured. We covered both those requirements in previous chapters.
Installing Exchange Web Services Managed API
To get our SharePoint Servers ready, we will need to download the Exchange Web Services (EWS ) Managed API on every server in our SharePoint Server Farm. You can download EWS Managed API 2.2 from the Microsoft Download Center:
Microsoft Exchange Web Services Managed API 2.2 ( https://www.microsoft.com/en-ca/download/details.aspx?id=42951 )
Once downloaded, run the following cmd either from an elevated Command Prompt or PowerShell Window:
msiexec /i EwsManagedApi.msi addlocal="ExchangeWebServicesApi_Feature,ExchangeWebServicesApi_Gac" After the install finishes successfully, you will have to do an IIS Reset on every server in the farm. With the Prerequisites configured, it’s time to configure SharePoint 2016 to trust the Exchange Server.
Establish OAuth Trust and Permissions on SharePoint
In this section, we will configure our Exchange Server as a new SP Trusted Security Token Issuer, as well as add a property in the Web Application Property Bag. We will do this by using PowerShell scripts provided by Microsoft. There are two scripts that we need to create on any one of our SharePoint Servers. The first script is named Set-SiteMailboxConfig.ps1 and can be found in Appendix A of the book. The Second Script is called Check-SiteMailboxConfig.ps1 and it can also be found in Appendix A.
Note
Both scripts can be downloaded from TechNet at the following link: https://technet.microsoft.com/library/jj552524(office.15).aspx.
The Set-SiteMailboxConfig script is the script that will configure everything, while the Check-SiteMailboxConfig.ps1 will simply verify that the configuration is valid before enabling the CollaborationMailbox Farm Feature.
To run the Set-SiteMailboxConfig, open SharePoint Management Shell as an administrator, and run the following cmdlet:
.Set-SiteMailboxConfig.ps1 -ExchangeSiteMailboxDomain <Domain Name> -ExchangeAutodiscoverDomain <Exchange Server FQDN>Where the <Domain Name> is the Domain Name that your Exchange Mailbox addresses should be created in, and the <ExchangeAutodiscoverDomain> is the FQDN of your Exchange Server. Here is the cmdlet that we ran in our environment.
.Set-SiteMailboxConfig.ps1 -ExchangeSiteMailboxDomain learn-sp2016.com -ExchangeAutodiscoverDomain LSEXCH01.CORP.LEARN-SP2016.COMIf you only want to enable it on a certain Web Application, you can add the –WebApplication parameter to the script, for example:
.Set-SiteMailboxConfig.ps1 -ExchangeSiteMailboxDomain learn-sp2016.com -ExchangeAutodiscoverDomain LSEXCH01.CORP.LEARN-SP2016.COM –WebApplication https://sharepoint.learn-sp2016.com/ The script will add the Exchange Server and Mailbox domain in the Web App properties as seen in Table 11-1.
Table 11-1. Web Application Property Bag for Site Mailboxes
Property Name | Value |
|---|---|
ExchangeAutodiscoverDomain | LSEXCH01.CORP.LEARN-SP2016.COM |
ExchangeTeamMailboxDomain | learn-sp2016.com |
With everything configured on the SharePoint side, we need to configure Exchange Server as well.
Configure Exchange Server 2016 for Site Mailboxes
The last part of the Site Mailbox configuration is to configure Exchange Server 2016 for Site Mailboxes. The scripts required for the configuration are included with ever Exchange Server installation, and you will find them at the following path: ‘C:Program FilesMicrosoftExchange ServerV15Scripts’
As we have enforced the use of TLS 1.2 for SharePoint, we must enable strong crypto as outlined in Microsoft Security Advisory 2960358. Per the advisory, it may be necessary to enable TLS 1.2 support on Windows Server 2012 R2 via a registry entry. Save the following text as a UseStrongCrypto.reg and import it into each Office Online Server. Once imported, restart each Office Online Server in your farm.
Windows Registry Editor Version 5.00[HKEY_LOCAL_MACHINESOFTWAREMicrosoft.NETFrameworkv4.0.30319]"SchUseStrongCrypto"=dword:00000001
After the reboot, open Exchange Management Shell as an Administrator and make sure you are in that script location and run the following PowerShell cmdlet:
.Configure-EnterprisePartnerApplication.ps1 -ApplicationType Sharepoint -AuthMetadataUrl https://<SP Site Collection>/_layouts/15/metadata/json/1Where <SP Site Collection> is the Root Site Collection of the Web Application where you enabled Site Mailbox. In our environment, the cmdlet we ran was
.Configure-EnterprisePartnerApplication.ps1 -ApplicationType Sharepoint -AuthMetadataUrl https://sharepoint.learn-sp2016.com/_layouts/15/metadata/json/1The Script should output that the Configuration has succeeded. To test the Site Mailbox feature, navigate to a SharePoint Site and try to add a new Site Mailbox from the “Add an app” page. After adding the Site Mailbox, SharePoint will display a note that it might take up to 30 minutes for the Site Mailbox to be created as seen in Figure 11-5.
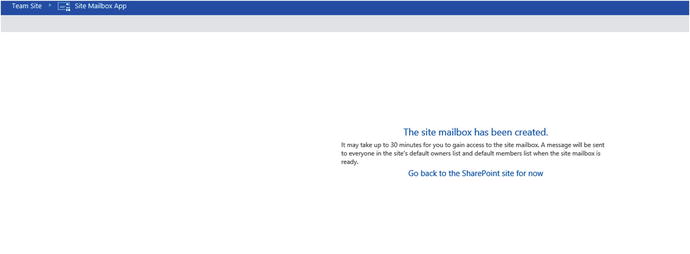
Figure 11-5. Site Mailbox has been created
Once the Site Mailbox is ready to use, every Site Owner will receive an e-mail notifying them of the Site Mailbox e-mail address as well as a link to learn more about what a Site Mailbox is. An example of this welcome e-mail can be seen in Figure 11-6.
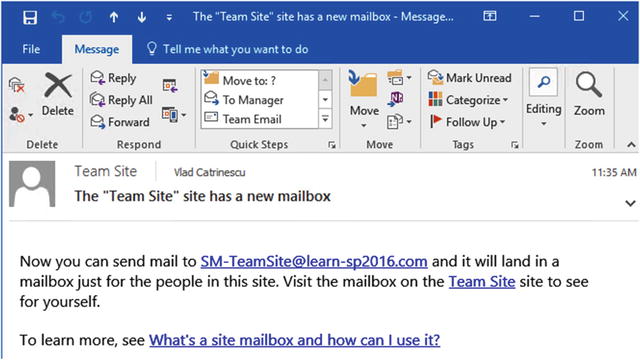
Figure 11-6. Site Mailbox Welcome E-mail
By default, all the Site Owners and Site Members will have access to the Site Mailbox and will be able to view and send e-mails.
With the Site Mailbox configured, another feature we can enable by integrating SharePoint Server and Exchange Server together is Exchange Photo Synchronization.
Exchange Photo Synchronization
The User Profile Service is capable of synchronizing photos from Exchange Server 2013 or Exchange Server 2016 instead of the thumbnailPhoto attribute in Active Directory. This provides significantly higher-quality pictures.
As we’ve already performed the preceding prerequisites by installing the Exchange Web Services API on SharePoint and configuring OAuth between Exchange Server and SharePoint using the Configure.EnterprisePartnerApplication.ps1 script, those steps will not be repeated here. Instead, only the necessary steps for Exchange Photo Synchronization will be present.
First, validate the Autodiscovery domain for Exchange Server. This can be done using the Exchange Management Console. In this example, the Exchange Server name is LSEXCH01.
(Get-AutodiscoverVirtualDirectory -Server LSEXCH01).InternalUrl.AbsoluteUriThis will provide the full path for the Autodiscovery URL.
On SharePoint, using the SharePoint Management Shell, configure the Security Token Service, setting the HybridStsSelectionEnabled property to true.
$sts=Get-SPSecurityTokenServiceConfig$sts.HybridStsSelectionEnabled = $true$sts.AllowMetadataOverHttp = $false$sts.AllowOAuthOverHttp = $false$sts.Update()
The next step is to retrieve the Exchange Trusted Security Token Issuer and apply the App Principal to our MySite Host. In this farm, the MySite Host is https://sharepoint-my.learn-sp2016.com .
$exchange = Get-SPTrustedSecurityTokenIssuer -Identity "Exchange"$app = Get-SPAppPrincipal -Site https://sharepoint-my.learn-sp2016.com -NameIdentifier $exchange.NameId$site = Get-SPSite https://sharepoint-my.learn-sp2016.comSet-SPAppPrincipalPermission -AppPrincipal $app -Site $site.RootWeb -Scope SiteSubscription -Right FullControl -EnableAppOnlyPolicy
Continuing to use the SharePoint Management Shell, place the MySite Web Application into a variable, set the ExchangeAutodiscoverDomain property to the Autodiscovery URL, the photo expiration properties, and finally enable the user photo import.
$wa.Properties[“ExchangeAutodiscoverDomain”] = https://autodiscover.learn-sp2016.com$wa.UserPhotoErrorExpiration = 1$wa.UserPhotoExpiration = 12$wa.UserPhotoImportEnabled = $true$wa.Update()
Once this is completed, each user must visit the About Me page to establish the OAuth session between Exchange and SharePoint to import the picture into the MySite host.
There can be a variety of errors present in the ULS log for picture import. To filter to just the specific errors, set the Category to “Exchange Integration.” This will narrow the scope to the import process when a user visits their About Me page.
As previously mentioned, pictures are imported when a user visits their own About Me (profile) page. If the import process runs into an error, SharePoint will not retry for the number of hours specified in UserPhotoErrorExpiration. Likewise, if the photo import is successful, SharePoint will not look for a new photo for the number of hours specified in UserPhotoExpiration. The value for when the last import took place is the timestamp of the photo in the MySite Host. This includes the generic person image when a photo import fails.
When a photo has been successfully imported, it will be displayed for that user. If you search for the user’s profile in the User Profile Service Application, as shown in Figure 11-7, the picture cannot be changed by the administrator via editing the User Profile.
Figure 11-7. The Picture property when a user’s profile photo is synchronized from Exchange
Additionally, if the user edits their own profile via the MySite Host to change their picture, they will be redirected to Outlook on the Web.
Next Steps
With the integration between Exchange and SharePoint now completed, in the next chapter we will learn how to deploy Business Intelligence Services in SharePoint 2016.