In previous chapters, we have already learned how to configure some Service Applications such as Search and User Profile as well as the App Management and Subscription Service Applications.
SharePoint Server 2016 includes other Service Applications that add many other features to SharePoint Server 2016 which can increase your users’ productivity.
In this chapter, we will learn to configure the Managed Metadata Service Application, Business Connectivity Services, Word Automation Services, PowerPoint Automation Service, Visio Graphics Service, Machine Translation Services, and lastly Access Services.
Managed Metadata Service Application
The Managed Metadata Service Application is one of the most popular Service Applications that are deployed with SharePoint. This Service Application makes it possible to use managed metadata and share content types across site collections and Web Applications. Managed Metadata is a central repository that stores your information taxonomy in a hierarchical view. There are two ways to create this Service Application, Central Administration or PowerShell.
To create the Managed Metadata Service Application using the Central Administration , from the Manage Service Applications Page, click New on the ribbon, then select Managed Metadata Service Application. A window will open similar to Figure 8-1, in which you have to enter the name of your Managed Metadata Service Application as well as the database server and Database name you want to deploy it on.

Figure 8-1. Create New Managed Metadata Service Part 1
Scrolling down to the end of the New Managed Metadata Service window seen in Figure 8-2, we need to select which Application Pool to host this Service Application on. Unless you have business requirements requiring this Service Application to be isolated from others, we recommend putting it in the same Service Application Pool as the rest of your Service Applications for a better resource management and server performance. In our environment, this application pool is named SharePoint Web Services Default. Lastly, you can optionally enter the Content Type hub URL . The Content Type Hub is a central location where you can manage and publish your content types. Other Site Collections can subscribe to this hub, and pull down the published content types and even receive updates when you update Content Types in the Content Type Hub. There is no special Site Collection template for the Content Type hub, and it’s usually a Team Site template which is used for the Content Type Hub. The Content Type hub can also be configured after the Managed Metadata Service Application has been created. The Report Syndication import errorsfrom Site Collections using this service application will report import errors in the Content type publishing error log, accessible from the Site Collection Site Settings page.
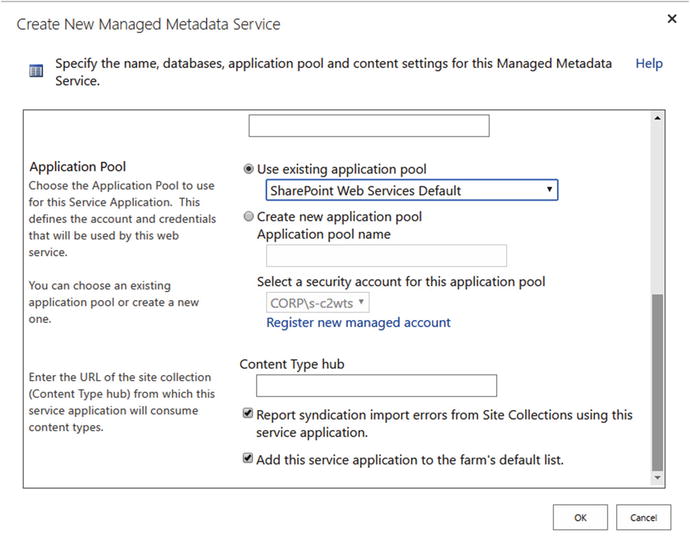
Figure 8-2. Create a New Managed Metadata Service Application Part 2
Lastly, you can click OK and the Service Application will be created. The Managed Metadata Service Application can also be created by PowerShell using the New-SPMetadataServiceApplication cmdlet. To create the Service Application with the same settings used when we created it using Central Administration , we would run the following cmdlet in an elevated SharePoint Management Shell.
$sa = New-SPMetadataServiceApplication -Name "Managed Metadata Service" -DatabaseName "MMS" -ApplicationPool "SharePoint Web Services Default" -SyndicationErrorReportEnabledWhen creating the Service Application by the UI, SharePoint will also create the Service Application Proxy automatically; however, that is not the case by PowerShell. The next step will be to create the Service Application proxy by using the New-SPMetadataServiceApplicationProxy cmdlet . In our example we would run the following PowerShell cmdlet
New-SPMetadataServiceApplicationProxy -Name "Managed Metadata Service Proxy" -ServiceApplication $sa -DefaultProxyGroup -ContentTypePushdownEnabled -DefaultKeywordTaxonomy -DefaultSiteCollectionTaxonomyWe have added the -DefaultProxyGroupswitch to specify that this Service Application Proxy will be part of the default proxy group for the farm. Next, the -ContentTypePushdownEnabled switch specifies that existing instances of changed content types in subsites and libraries will be updated. The -DefaultKeywordTaxonomy switch specifies that Enterprise Keywords will be stored in this service application, and lastly the -DefaultSiteCollectionTaxonomy switch specifies that when users create Managed Metadata Columns in a Site Collection, the term will be saved in this Service Application.
Note
The preceding options are not in the form when creating the Managed Metadata Service Application using the Central Administration. To access those options from the Central Administration, select the Managed Metadata Service Proxy from the Manage Service Application Page, and click Properties as seen in Figure 8-3.

Figure 8-3. Manage Metadata Service Proxy Properties
For both options of creating the Service Application, if you are running a farm that uses the MinRole model , the Managed Metadata Service will be automatically started on all the servers running the Web Front End, or Application Roles. If you are running in a Custom mode farm, make sure to manually start the Managed Metadata Web Service on at least one server in your farm.
With the Managed Metadata Service Application created, you can now create Managed Terms that users can use throughout your SharePoint farm. To configure the Content Type Hub, you can create a Site Collection with a team site template that will be used for this purpose. We have created it using the following PowerShell cmdlet
New-SPSite -Url https://sharepoint.learn-sp2016.com/sites/ContentTypeHub -Template STS#0 -Name "Content Type Hub " -OwnerAlias "CORPvlad"Afterward, run the Set-SPMetadataServiceApplication to specify the Content Type Hub URL with the -HubUri parameter.
Set-SPMetadataServiceApplication -Identity "Managed Metadata Service" -HubUri https://sharepoint.learn-sp2016.com/sites/ContentTypeHub With the Managed Metadata Service Application configured, we will configure the Business Connectivity Service Application Next.
Business Data Connectivity Service
The Business Data Connectivity Service , often referred to as BCS, is a Service Application that allows SharePoint Administrators to display data from other data sources directly into SharePoint Server 2016. By using SharePoint Designer users can connect to an external data source such as a SQL Server database, and expose that information as an External List in SharePoint. Developers can also create External Content Types in Visual Studio that connect to more types of data sources, such as an OData Source. A Business Data Connectivity Service Application can be created either from the Central Administration, or through PowerShell.
To create the Business Data Connectivity Service Application by the Central Administration, from the Service Applications Page, click New on the ribbon, and Business Data Connectivity Service Application. A window will open similar to Figure 8-4, in which you have to enter the name of your Business Data Connectivity Service Application as well as the database server and Database name you want to deploy it on.

Figure 8-4. Create a New Business Data Connectivity Service Application
Scrolling down to the end of the New Business Data Connectivity Service Application window seen in Figure 8-5, we need to select which Application Pool to host this Service Application on. Unless you have business requirements requiring this Service Application to be isolated from others, we recommend putting it in the same Service Application Pool as the rest of your Service Applications for a better resource management and server performance. Simply press on OK to create the Service Application.
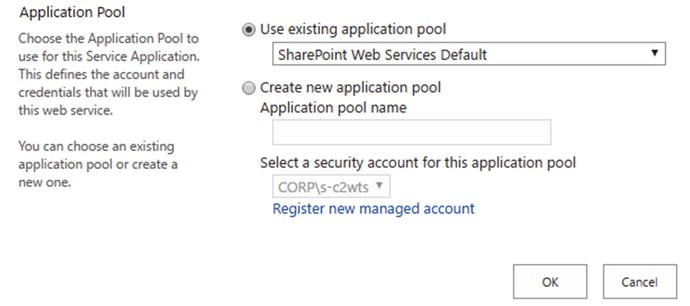
Figure 8-5. Select an Application Pool for the Business Data Connectivity Service Application
To create the Service Application by PowerShell, we need to use the New-SPBusinessDataConnectivityServiceApplication PowerShell cmdlet from an elevated SharePoint Management Shell. We need to specify the name of the Service Application, the Database name, and the Service Application Pool. To create a Service Application like the one we would have created by the User Interface, we would run the following PowerShell cmdlet:
New-SPBusinessDataCatalogServiceApplication -Name "BCS" -DatabaseName "BCS" -ApplicationPool "SharePoint Web Services Default" If you are running SharePoint 2016 in a MinRole farm, the Business Data Connectivity Service will be automatically started on all the servers running the Web Front End or the Application roles. If you are running a farm using the Custom MinRole, you will need to start the Business Data Connectivity Service on at least one server in your SharePoint Server farm.Your users can now create External Content Types by using SharePoint Designer to connect to external systems. For an example of how a developer can create an External Content Type by using an OData Service, you can refer to Chapter 14, the section on Hybrid Business Connectivity Services. Next, we will configure Word Automation Services.
Word Automation Services
The Word Automation Services Service Application is a Service Application that automatically converts documents supported by the Word client application into formats such as PDF and XPS. In a simpler way to explain it, the Word Automation Services takes the “Save As” functionality of the Word client, and replicates the functionality on SharePoint. A Word Automation Service Application can be created either through the User Interface , or through PowerShell.
To create a Word Automation Service Application, from the Central Administration on the Manage Service Applications page, click New on the Ribbon and select Word Automation Services. A window similar to Figure 8-6 will open in which you will have to enter the name and Application Pool, and select whether to add this Service Application to the farm default Proxy list . Similar to previous Service Applications, unless you have business requirements for this Service Application to be isolated from the rest, we recommend you to deploy it in the same Service Application Pool as the rest of your Service Applications. The Partitioned Mode checkbox must be checked only when you deploy the SharePoint farm in Multi-Tenant mode.
Figure 8-6. Create a New Word Automation Services Application
After clicking Next, SharePoint will ask you for the Database Server as well as the Database Name as seen in Figure 8-7.
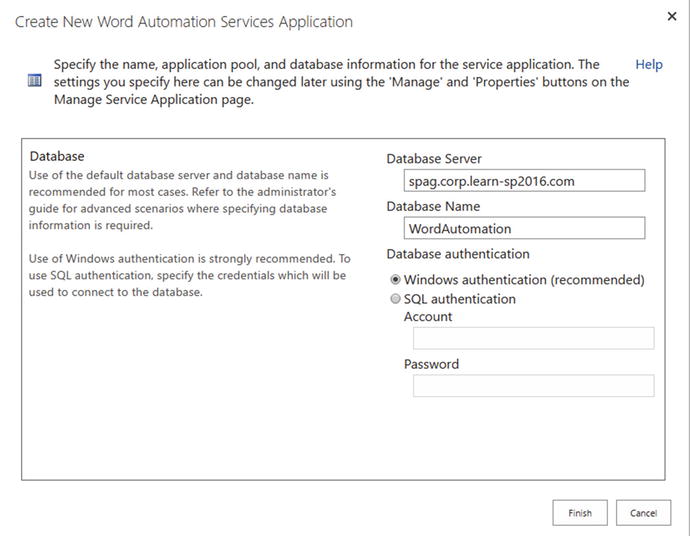
Figure 8-7. Word Services Application Database Option
After clicking OK, the Service Application will be created. To create a Word Automation Services Application with PowerShell, we will use the New-SPWordConversionServiceApplication cmdlet from an elevated SharePoint Management Shell. To create a Service Application like the one we would have created in the preceding screenshots, we would have used the following PowerShell cmdlet
New-SPWordConversionServiceApplication -Name "Word Automation” -DatabaseName "WordAutomation" -ApplicationPool "SharePoint Web Services Default" -DefaultThe Word Automation Services can only be used via Code, and not by the User Interface; therefore, it is a bit trickier to test, but we can test it by calling functions directly from PowerShell. To test Word Automation Services, we have uploaded a document called “Document1.docx,” which we want to convert to PDF with the name “Document1-Final.pdf.” We will first load the assembly required to call Word Automation Services functions.
Add-Type -Path'C:WindowsMicrosoft.NETassemblyGAC_MSILMicrosoft.Office.Word.Serverv4.0_16.0.0.0__71e9bce111e9429cMicrosoft.Office.Word.Server.dll'We then create new Object of type ConversionJobSettingsspecifying the Output format is PDF.
$jobSettings = New-Object Microsoft.Office.Word.Server.Conversions.ConversionJobSettings$jobSettings.OutputFormat = "PDF"
We then create a new object of type ConversionJob and give it our Service Application Proxy Name, in our case Word Automation, as well as the $jobsettings object. We then set the $Job.Usertoken to the SharePoint SPWeb where the document is stored.
$job = New-Object Microsoft.Office.Word.Server.Conversions.ConversionJob("Word Automation", $jobSettings)$job.UserToken = (Get-SPWeb https://sharepoint.learn-sp2016.com).CurrentUser.UserToken
Lastly, we add the properties for the file that we want converted. We give it the URL to the Word Document, as well as the URL to the future PDF document, which does not exist yet. We then Start the Job.
$job.AddFile("https://sharepoint.learn-sp2016.com/Shared%20Documents/Document1.docx", "https://sharepoint.learn-sp2016.com/Shared%20Documents/Document1-Final.pdf")$job.Start()
The Word Automation Services job runs asynchronous, meaning that we won’t know when it will run directly from PowerShell; however, we can force the job to run right away by starting the Word Automation timer job.
Start-SPTimerJob "Word Automation"If we put it all together, the script looks like this:
Add-Type -Path 'C:WindowsMicrosoft.NETassemblyGAC_MSILMicrosoft.Office.Word.Serverv4.0_16.0.0.0__71e9bce111e9429cMicrosoft.Office.Word.Server.dll'$jobSettings = New-Object Microsoft.Office.Word.Server.Conversions.ConversionJobSettings$jobSettings.OutputFormat = "PDF"$job = New-Object Microsoft.Office.Word.Server.Conversions.ConversionJob("Word Automation", $jobSettings)$job.UserToken = (Get-SPWeb https://sharepoint.learn-sp2016.com).CurrentUser.UserToken$job.AddFile("https://sharepoint.learn-sp2016.com/Shared%20Documents/Document1.docx", "https://sharepoint.learn-sp2016.com/Shared%20Documents/Document1-Final.pdf")$job.Start()Start-SPTimerJob "Word Automation"
To see the status of the job, run the following PowerShell cmdlet where “Word Automation” is the name of your Word Automation Services Application.
new-object Microsoft.Office.Word.Server.Conversions.ConversionJobStatus("Word Automation", $job.JobId,$null);Initially it will show as InProgress since we force started the Timer Job as seen in Figure 8-8.
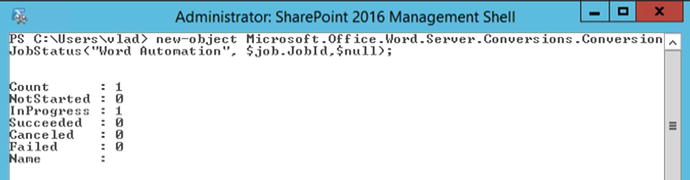
Figure 8-8. Word Automation Job in Progress
Once the job is completed, it will either show as Succeeded or Failed. If everything was configured correctly, it should show as Succeeded as seen in Figure 8-9, and you should see your PDF document in your document library.

Figure 8-9. Word Automation Job Succeeded
In a MinRole farm configuration, the Word Automation Service will automatically be started on all the servers that have the Application Role. If you are running a farm using Custom Roles, you will need to start it manually on at least one server in the farm.
PowerPoint Automation Service
The PowerPoint Automation Service is very similar to the Word Automation Service that we just talked about, but it’s for PowerPoint files instead of Word files. The PowerPoint Automation Service allows developers to create solutions that will convert PowerPoint Files to formats such as PDF, JPG, PNG, or XPS.
Unlike the Word Automation Service, the PowerPoint Automation Service can only be created via PowerShell, and not by the Central Administration. We will need to use the New-SPPowerPointConversionServiceApplication cmdlet from an elevated SharePoint Management Shell. We need to give it a name, as well as the Service Application Pool in which it should be deployed.
$sa = New-SPPowerPointConversionServiceApplication -Name "PowerPoint Conversion Service" -ApplicationPool "SharePoint Web Services Default" After the Service Application is created, we will create a PowerPoint Conversion Service Application Proxy by using the New-SPPowerPointConversionServiceApplicationProxy cmdlet, and adding it to the default group with the -AddToDefaultGroup switch.
New-SPPowerPointConversionServiceApplicationProxy "PowerPoint Conversion Service Proxy" -ServiceApplication $sa –AddToDefaultGroupYour developers will then be able to use the PowerPoint Conversion APIs to convert PowerPoint files to supported formats.
Note
To learn more about the available APIs, check out the resources on MSDN: https://msdn.microsoft.com/en-us/library/office/FP179894.aspx
Visio Graphics Service
The Visio Graphics Service Application allows user to visualize Visio diagrams directly in the browser, without needing the client application installed. Furthermore, users could consume those Visio files directly on their mobile devices. The Visio Service Application also makes it possible to automatically refresh drawings hosted on a SharePoint Site.
The Visio Graphics Service Application can either be created from the Central Administration, or from PowerShell. To create a Visio Graphics Service Application from the Central Administration, navigate to the Service Application Management page, click New in the Ribbon and select Visio Graphics Service Application. A window similar to Figure 8-10 will open, in which you will need to input the Service Application name, choose to create a new Application Pool or use an existing one, and finally create a Visio Graphics Service Application Proxy. We recommend using the same Service Application pool as the rest of the Service Application, unless you have a business requirement to isolate this Service Application from the rest.
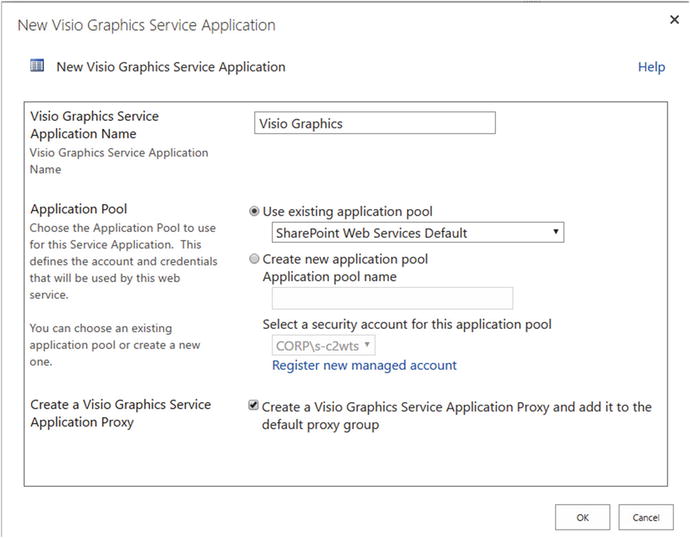
Figure 8-10. New Visio Graphics Service Application
The Visio Graphics Service Application can also be created by using the New-SPVisioServiceApplication cmdlet from an elevated SharePoint Management Shell. To create a Visio Graphics Service, we need to specify the Service Application name, Application Pool, and the switch to add it to the default Proxy group.
$sa = New-SPVisioServiceApplication -Name "Visio Graphics" -ApplicationPool "SharePoint Web Services Default" -AddToDefaultGroupTo test the Service Application, simply upload a Visio Diagram into SharePoint, and when clicking the document, it will open in the browser, instead of downloading it to the computer.
Machine Translation Services
The Machine Translation Services Service Application is a Service Application that allows users and developers to translate not only sites, but their content as well, to other languages. The Machine Translation Services is interacted through APIs, and the users do not have a “Translate Document” button, unless of course, their developers created a custom action for them.
Before creating the Machine Translation Service Application, you need to make sure the following Service Application exists in the SharePoint 2016 farm:
App Management Service Application (seen in Chapter 5)
A User Profile Service Application Proxy in the Default Group of the Farm
The SharePoint Farm has access to the Internet
The Machine Translation Service Application can be created either from the Central Administration or by PowerShell. To create the machine Translation Service Application via the Central Administration, navigate to the Manage Service Application page, from the Ribbon click New, and select Machine Translation Service.
A Window will open similar to Figure 8-11, in which you will have to enter the Name of the Service Application as well as selecting whether to create a new Service Application pool or not. We recommend using the same Application pool as for the previous service applications, unless there is a business requirement to isolate this Servicer Application.
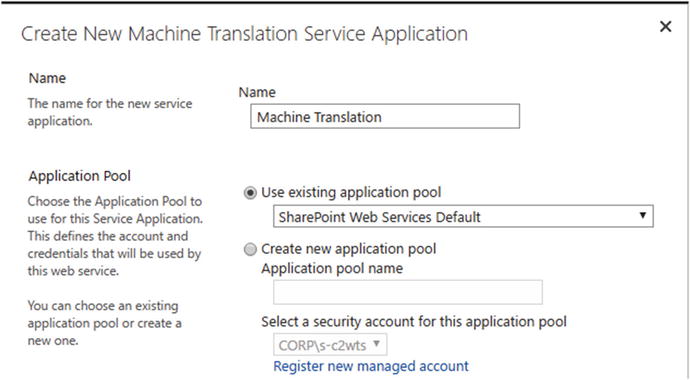
Figure 8-11. New Machine Translation Service Application Name and Application Pool
We then need to select whether to run the Machine Translation Service Application in Partitioned Mode, as well as whether you want to add it to the Default Proxy List. The Partitioned Mode checkbox must be checked only when you deploy the SharePoint farm in Multi-Tenant mode. This is an edge case, and is generally something you should not do, unless you have a specific requirement for Multi-Tenancy in your organization. Finally we must enter the Database Server and name for our Machine Translation database as seen in Figure 8-12.
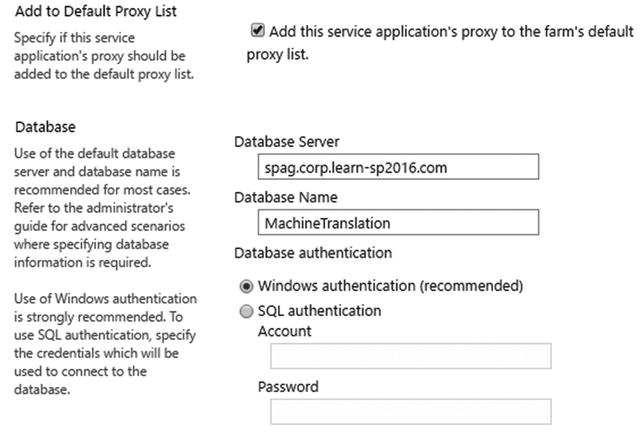
Figure 8-12. New Machine Translation Service Application
To create the Machine Translation Service Application via PowerShell, you must use the New-SPTranslationServiceApplication cmdlet from an elevated SharePoint Management Shell. To create the Machine Translation Service Application with the same settings as in the preceding screenshot, we would run the following PowerShell command.
New-SPTranslationServiceApplication -Name "Machine Translation" -DatabaseName "MachineTranslation" -ApplicationPool "SharePoint Web Services Default" -DefaultTo test the Machine Translation Service Application works properly, you can run a PowerShell script that uses CSOM to call the required functions. We have created the following sample script:
$siteUrl = "https://sharepoint.learn-sp2016.com"$loginname = "corpvlad"$language = "fr-fr"$input = "https://sharepoint.learn-sp2016.com/Shared%20Documents/DocumentToTranslate.docx"$output = "https://sharepoint.learn-sp2016.com/Shared%20Documents/DocumentFR.docx"Add-Type -Path 'C:Program FilesCommon FilesMicrosoft SharedWeb Server Extensions15ISAPIMicrosoft.SharePoint.Client.dll'Add-Type -Path 'C:Program FilesCommon FilesMicrosoft SharedWeb Server Extensions15ISAPIMicrosoft.SharePoint.Client.Runtime.dll'Add-Type -Path 'C:Program FilesCommon FilesMicrosoft SharedWeb Server Extensions15ISAPIMicrosoft.Office.Client.TranslationServices.dll'Write-Host "Please enter password for $($siteUrl):"$pwd = Read-Host -AsSecureString$ctx = New-Object Microsoft.SharePoint.Client.ClientContext($siteUrl)$ctx.Credentials = New-Object System.Net.NetworkCredential($loginname, $pwd)$job = New-Object Microsoft.Office.Client.TranslationServices.SyncTranslator($ctx, $language)$job.OutputSaveBehavior = [Microsoft.Office.Client.TranslationServices.SaveBehavior]::AppendIfPossible$job.Translate([string]$input, [string]$output);$ctx.ExecuteQuery()
Where the $SiteUrl variable is the Site Collection where the document you want translated is stored. The $loginname is your username, and the $language is the language that you want the document translated into. The $input variable is the original document you want translated into another language, and the $output variable is the path where Machine Translation Services will create the document. The $input variable must be a valid URL to a document, while the $output variable will be the future URL where the translated document will be.
With the Machine Translation Service Application created, your developers can now create code that uses the Machine Translation Service.
Tip
To learn more about the Machine Translation Services APIs, visit the page on MSDN: https://msdn.microsoft.com/en-us/library/office/jj163145.aspx
Access Services 2010
SharePoint Server 2016 includes two different Access service applications. The first one is called “Access Services 2010,” while the second one is “Access Services 2013”. Access Services 2010 has been around since SharePoint 2010 and is present for compatibility purposes, while Access Services 2013 is a more advanced Service Application about which we will talk a bit later in this chapter. Access Services 2010 is a Service Application that allows users to modify and publish in SharePoint 2016, an access Web Database that was previously created in SharePoint 2010. Users can view the published web database without having Access installed locally; however, they need the Office application in order to modify the database structure.
To create the Access Services 2010 Service Application from Central Administration, navigate to the Manage Service Applications page, click New in the Ribbon, and select Access Services 2010. As seen in Figure 8-13, you will have to enter a name for the Service Application, select the Service Application Pool we created earlier for those Service Applications, and select whether this Service Application will be in the default proxy list.

Figure 8-13. New Access Services 2010 Service Application
This can also be done by PowerShell with the New-SPAccessServiceApplication cmdlet from an elevated SharePoint Management Shell. In order to create a Service Application with the same parameters as before, we would run the following cmdlet.
New-SPAccessServiceApplication -Name "Access Services 2010" -ApplicationPool "SharePoint Web Services Default" –DefaultWith the Access 2010 Service Application created, let’s look at the Access App Services 2013 version.
Access Services 2013
Access Apps for SharePoint are a type of database that you build in Access, and use and share with others as an app in SharePoint directly in the browser. Access Services 2013 is a more advanced Service Application that allows you to create Access apps and track data such as contacts, orders, and so on. Access Services 2013 is a bit more complicated to configure compared to the other Service Applications, and will require installing extra prerequisites.
Before starting to configure Access Services, the following Service Applications need to be configured:
Secure Store Service
App Management Service
Microsoft SharePoint Foundation Subscription Settings Service
Access Services 2010
Your App environment must also be configured as we covered in Chapter 5.
First, since the account running Access Services 2013 requires more SQL permissions than the other Service Applications, we will create a new service account dedicated for this service application. In our environment, the account we created has the username CORPs-access. Since this account will be used to run an Application Pool, we will register it as a managed account by running the following PowerShell cmdlet .
$cred = Get-Credential -UserName "CORPs-access" -Message "Managed Account"New-SPManagedAccount -Credential $cred
We will then create a new Service Application called “SharePoint Access App Services ” in which we will run the Service Application.
New-SPServiceApplicationPool -Name "SharePoint Access App Services" -Account (Get-SPManagedAccount "CORPs-access")After the Service Application is created, we need to modify a setting in IIS that will be unique to this Service Application. Navigate to the IIS Application Pools , and from Advanced Settings, change “Load User Profile” to True, as seen in Figure 8-14.
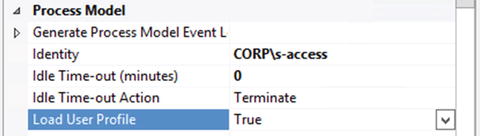
Figure 8-14. Load User Profile Setting in IIS
Note
Remember to make this change on all the servers where the App Pool is Present
Next we need to make sure our new Service Account has rights to the other content databases, since that is where the Access Apps will be created. This is done by the following PowerShell cmdlets:
$w = Get-SPWebApplication https://sharepoint.learn-sp2016.com$w.GrantAccessToProcessIdentity("CORPs-access")$w.Update()
Remember to repeat this step for every Web Application where you wish to host Access Apps. Lastly, the service account must have Read/Write permission to the config cache folder located at C:ProgramDataMicrosoftSharePointConfig on every server.
After those permissions are done, we need to install prerequisites from the SQL Server Feature Pack on our SharePoint servers. This is only required on the servers on which you will run the Access Services SharePoint service; however, we recommend installing those prerequisites on all the servers in your farm. This will make your farm more flexible if you decide to change roles in the future. In a MinRole configuration, Access Services are automatically started on all the servers running the Web Front End role. The Prerequisites are:
Microsoft SQL Server Local DB (SQLLocalDB.msi)
Microsoft SQL Server Data-Tier Application Framework (Dacframework.msi)
Microsoft SQL Server Native Client (sqlncli.msi)
Microsoft SQL Server Transact-SQL ScriptDom (SQLDOM.MSI)
Microsoft System CLR Types for Microsoft SQL Server (SQLSysClrTypes.msi)
After the prerequisites are installed, we need to configure SQL Server for Access Services. The SQL Server you use needs to have the following Instance features:
Database Engine Services
Full-Text and Semantic Extractions for Search
Client Tools Connectivity
If those features weren’t installed when originally creating the Instance, you can add them afterward from the SQL Server Installation Center. To install them using the command line, use the following command.
Setup.exe /IACCEPTSQLSERVERLICENSETERMS /Action=Instal /FEATURES=FullText,ConnNext we need to create a new login in your SQL Server from SQL Server Management Studio as seen in Figure 8-15.

Figure 8-15. New Login in SQL Server
On the General Tab, write the username of the Access service account, and from the Server Roles tab, select dbcreator as well as securityadmin as seen in Figure 8-16.
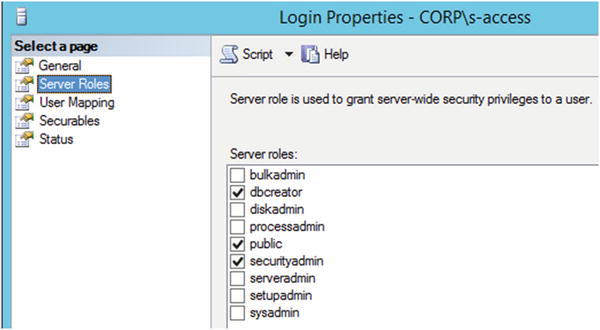
Figure 8-16. Access Service Account Server Roles
Since this account will also have to run some stored procedures on the Configuration database, in the User Mapping tab, give this account the SPDataAccess permission as seen in Figure 8-17.
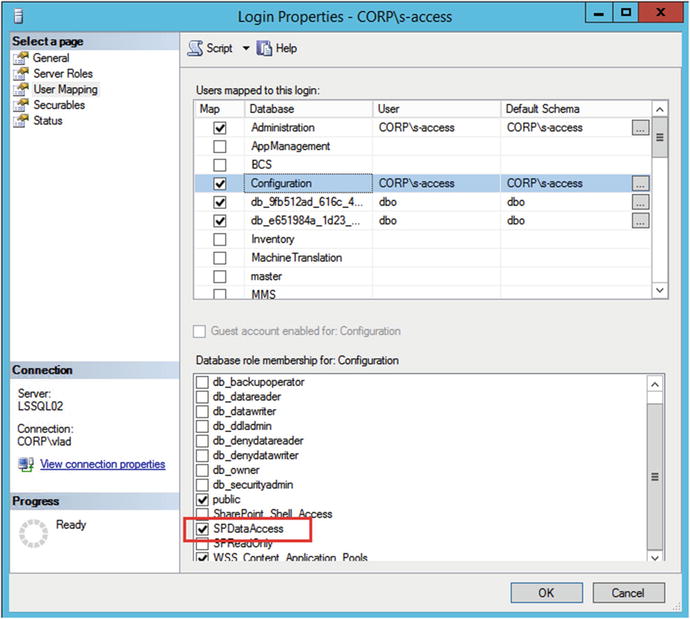
Figure 8-17. SPDataAccess on the Config Database
We then need to go to the SQL Server Properties, and from the Security Tab, enable mixed authentication mode (SQL Server and Windows) as seen in Figure 8-18.
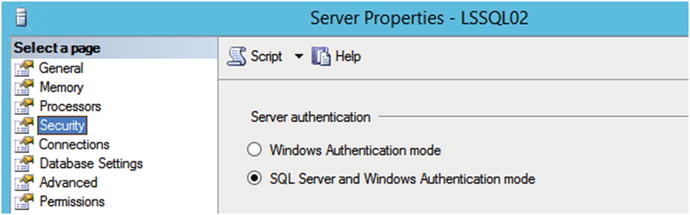
Figure 8-18. Mixed SQL Authentication mode
Afterward, from the Advanced Tab, we need to change the “Enable Contained Databases” and “Allow Triggers to Fire Others” to True, and set the Default Language to English as seen in Figure 8-19.

Figure 8-19. Advanced SQL Server properties
Lastly, we need to configure SQL Server protocols. Both the TCP/IP and Named Pipes protocols must be enabled. This can be done from the SQL Server Configuration Manager as seen in Figure 8-20.

Figure 8-20. Protocols for SQL Server
For those changes to take effect, you need to restart the SQL Server Engine Service .
After SQL Server is configured, you must enable the following ports through the firewall:
TCP 1433
TCP 1434
UDP 1434
With all the prerequisites configured, it’s time to create the Access Service Application.
To create the Access Services 2013 Service Application we would use the New-SPAccessServicesApplication cmdlet , notice the extra s in Services compared to Access 2010. To create a Service Application with the name Access App Services in our Service Application pool dedicated for Access Services, we would run the following cmdlet:
New-SPAccessServicesApplication -Name "Access App Services" -ApplicationPool "SharePoint Access App Services" –DefaultThe last step is to navigate to the Central Administration , into the Access App Services 2013 Service Application. At the bottom of the configuration window, open the New Application Database Server configuration group, and type the SQL Server that you want to use for the Access Services App Databases as seen in Figure 8-21.
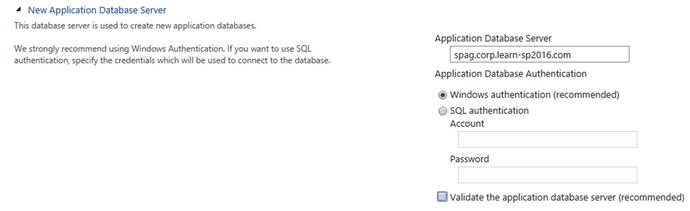
Figure 8-21. New Application Database Server
Note
While the checkbox “Validate the application database server” is recommended, at the moment of writing this book it generated an error if selected. This error is documented by Microsoft in KB3153957 at https://support.microsoft.com/en-ca/kb/3153957
After the Application Database Server is configured, we can test the Service Application from a client that has Access 2016 installed. From Access, create a new Custom Web App as seen in Figure 8-22.
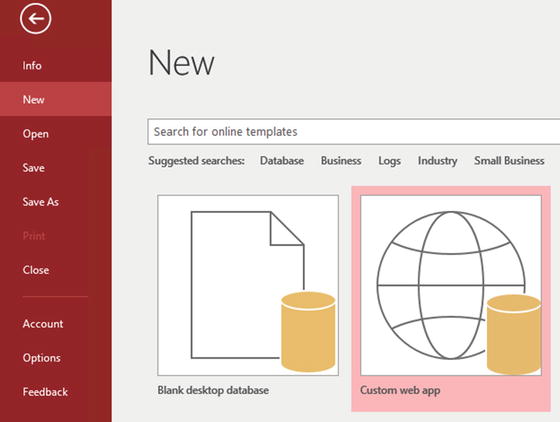
Figure 8-22. New Custom Web App
When prompted, enter the URL of a Site Collection to which you have contribute access. In our example seen in Figure 8-23, we have created an Access App by using the default Orders template.
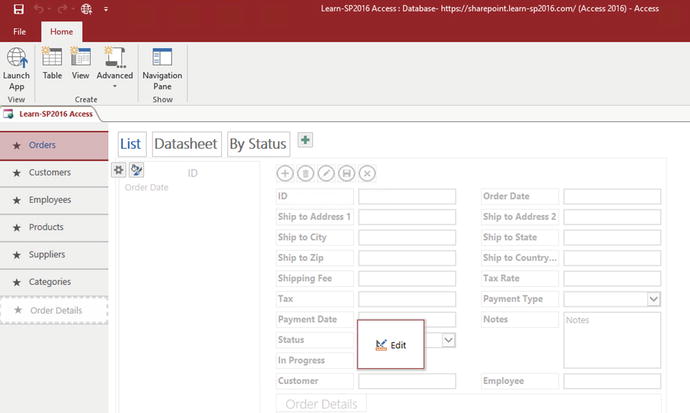
Figure 8-23. Orders Access Database
When ready to publish, click “Launch App” from the Ribbon, and the App should open in SharePoint 2016 as seen in Figure 8-24.
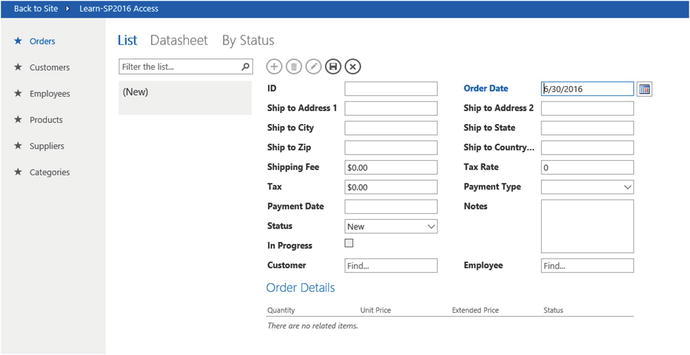
Figure 8-24. Access App in SharePoint
Access Services has successfully been configured. As a SharePoint Admin, it’s important to understand that each App creates its own database in SQL Server; therefore, it’s important to make sure new App databases are added to your SQL Maintenance plan and to your SQL AlwaysOn availability group or mirroring.
Next Steps
In this chapter, we learned how to deploy the productivity Service Applications in SharePoint Server 2016 both by the Central Administration, and by using PowerShell. In the next chapter, we will look at how to install and configure Office Online Server to allow our users to view, edit, and create Office documents directly in the browser.