
In this chapter,we're going to explore the role of the Search service in SharePoint Server. As organizations experience more data proliferation (documents, spreadsheets, images, databases, and other sorts of content), keeping a list of bookmarks or memorizing URLs becomes a dauntingtask. The role of Search in the SharePoint environment is to help users locate the resources they need quickly and efficiently.
SharePoint Search works by crawling lists and libraries, indexing content, and adding site columns and values to the search index. Once inside the search index, the site columns are mapped to managed properties. When users perform searches, the query is sent to the search index, which then returns the results to the search results page.
SharePoint Search has two different search experiences: one for classic SharePoint and one for modern SharePoint. Modern Search creates a more personalized search, based on the content you have access to and your previous Office 365 activity. Classic search, on the other hand, uses the search results web part, while modern Search does not. As you saw inChapter 3,Manage and Maintain a SharePoint Farm,you perform customization differently between the modern and classic experiences.
When choosing which search experience to promote for your users, consider these factors:
- Modern Search doesn't support filters or formatting for organization-specific content types or company name extraction.
- Classic search supports custom refiners and search verticals.
- Modern Search lets users search across connected hub sites.
- Modern Search doesn't support changing the sort order of results or metadata-based refiners.
The structure, organization, and design of your SharePoint environment will help drive which searchexperience will work best for your users.
In this chapter, we're going to explore the following topics:
- Creating and updating search dictionaries
- Managing query suggestions
- Managing result sources
- Managing the search schema
- Managing the Search Center settings
- Monitoring Search Usage Reports and Crawl Logs
Let's get started!
Overview of Search
Search is the service application responsible for indexing content and making it available to users via a discovery mechanism, such as a Search center. Search has several components and sub-processes, including the following:
- Crawl: The crawling process is responsible for moving through connected data sources to gather content for processing.
- Analytics: Analytics processing covers two subcomponents: usage and search. Analytics can be used to help refine the relevance of content for users, as well as provide metrics for reporting.
- Content processing: The content processing component handles document parsing, as well as linguistics processing subcomponents for language detection and entity extraction. Content processing then hands data over to the indexing component.
- Index: The search index is the storage component that contains extracted entities and data. The index components receive the output of content processing and return results to the queries.
- Query processing: The primary function of the query processing component is to analyze a query and then submit it to the index component. The query processing component of the search also handles linguistics processing tasks such as word breaking and stemming.
- Administration: This is responsible for the system-level processes related to search, such as provisioning search instances and running the actual search process.
Next, we'll start looking at the components of Search and some of its functions, starting with the search schema.
Managing the search schema
In SharePoint Server, the search schema determines how content is ingested from the search index. In Chapter 7, Planning and Configuring Managed Metadata, we discussed how metadata is data about data. That metadata is extracted during the crawling process, including both structured content (derived from properties of documents, pages, or other data) and unstructured content (extracted keywords). The search schema defines the configuration of whatusers can search for and how the results are presented. SharePoint Search returns only what is stored in the search index. The results are security-trimmed, meaning that the user only sees what they have access to see.
The SharePoint search index, just like your favorite internet search tool's index, is populated by crawling sites and the content of your SharePoint Online sites. The content and metadata make up the properties of an item, while the schema'scrawled propertiesinstruct the search crawler on what to retrieve and store.
Crawled propertiesare mapped tomanaged properties, and those managed properties are what the search index contains. By default, the SharePoint search service has many managed properties defined. However, if you want to add additional managed properties, you'll need to map them to crawled properties so that the data can successfully flow into the search index and be discoverable.
Administrators have the ability to create new custom-managed properties, but the content is limited to either text or Yes/No values. Other content types are available, but you'll need to reuse one of the existing built-in (but unused) managed properties. You can rename the unused managed properties with an alias.
There's a number of settings for managed properties (includingsearchable, queryable, retrievable, sortable, and refinable). Not all of the managed property settings apply to both classic and modern experiences, so if you are going to start configuring managed properties, you should refer to the table athttps://docs.microsoft.com/en-us/sharepoint/search/search-schema-overviewfor more information.
You can manage the search schema for either a site collection or the entire farm. The overall schema will apply to both classic and Modern Search. In this example, we'll create a simple managed property forwriterand map it to the crawled propertyauthor.Let's get started:
- Navigate to theSearch Schemapage for a site collection or the tenant:
- For a site collection, navigate to the site collection, click the gear icon, select Site information, select Site settings, and select View all site settings. Locate Search Schema and select it.
- For the farm, navigate to Central Administration | Application Management | Manage service applications | Search Service Application and click on Search Schema.
- ClickNew Managed Property.
- Enter a value forNamein theProperty namebox (since we're mappingwritertoauthor, you can name the propertyWriter):
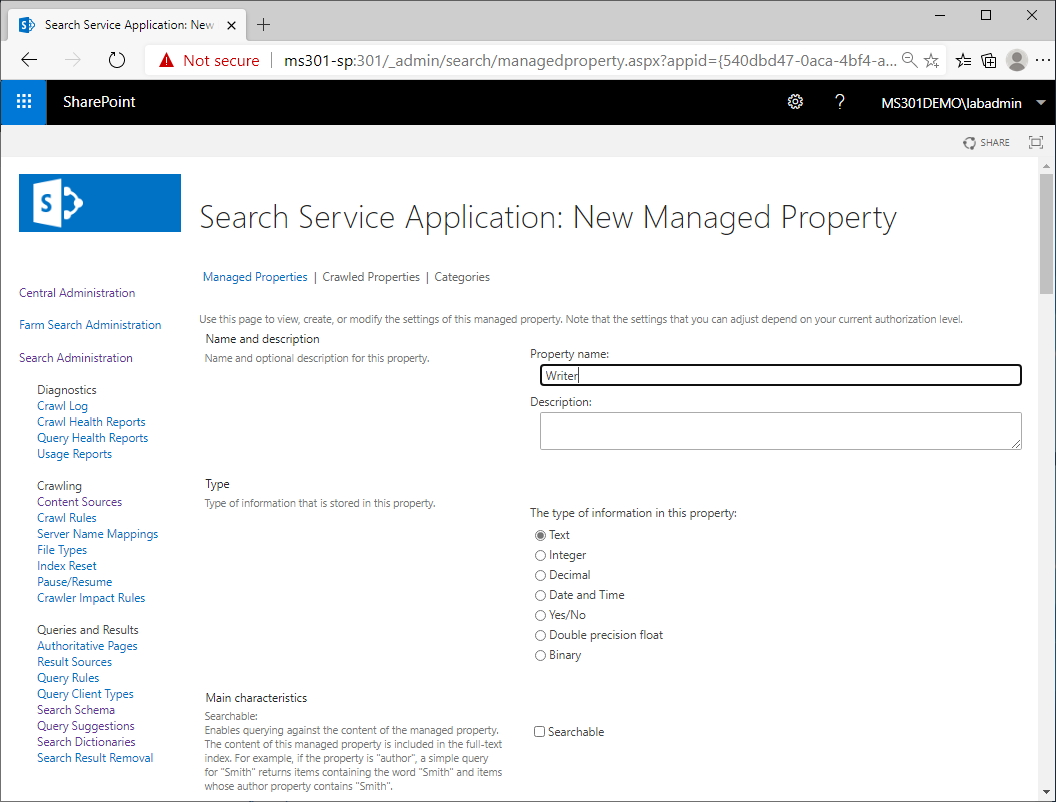
- UnderType, selectText.
- UnderMain characteristics, select the checkboxes forSearchable,Queryable, andRetrievable.
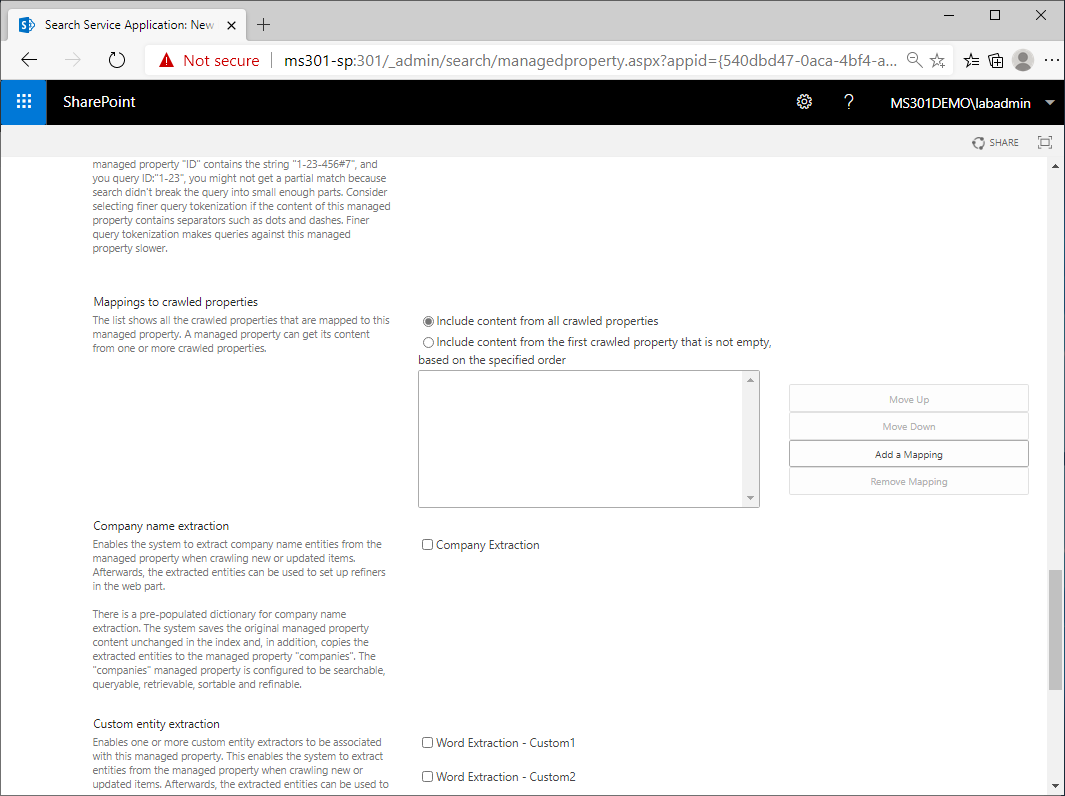
- UnderMappings to crawled properties, clickAdd a mapping:
- On theCrawled property selectionpage, locate theAuthorproperty and click theNextarrow at the bottomof the list of crawled properties:
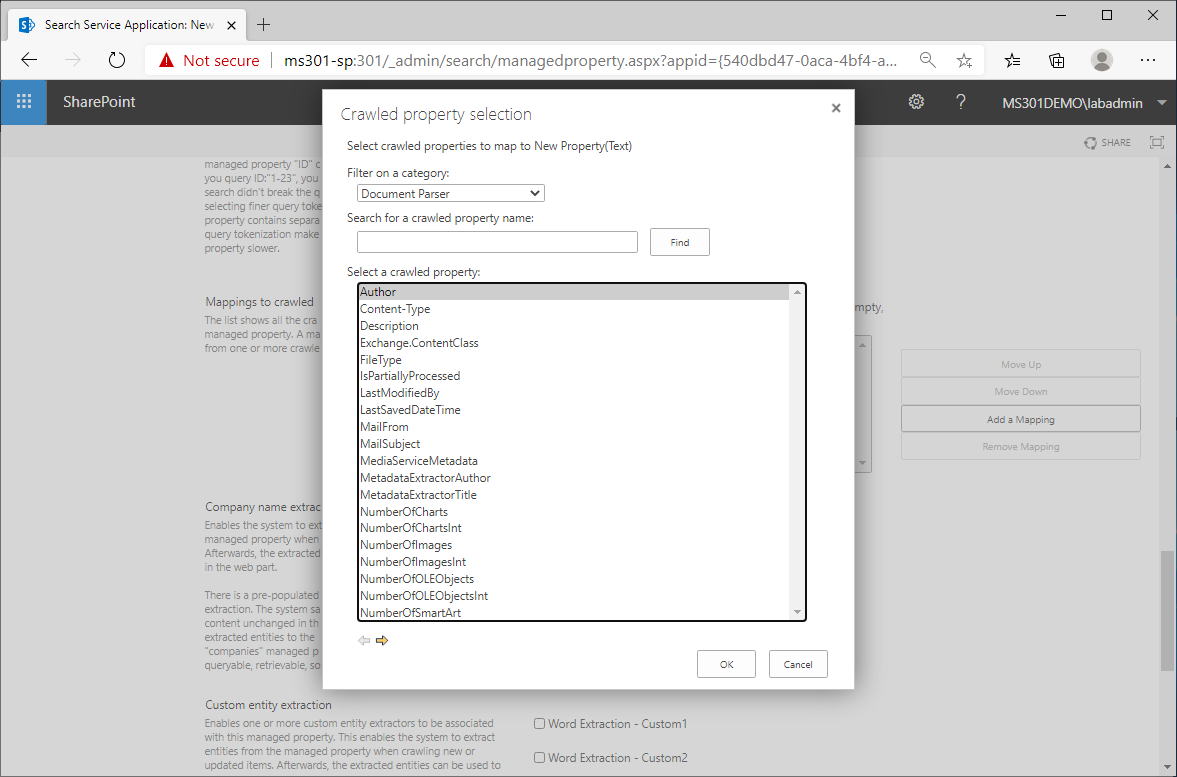
- ClickOKto close theCrawled property selectionpage.
- ClickOKto save.
Now, you'll be able to search for content usingwriter:<name> as a way to filter content.
Next, we'll review the search dictionaries.
Creating and updating search dictionaries
Search dictionaries are used to manage content that is extracted from documents. Company name extraction and query spellings are two examples of how search dictionaries are used.
Company name extractionis a feature that pulls company name entities from content and maps it to the companies managed property. Customizing this feature only affects classic search.
Query spelling suggestions allow you to configure words that you wish to include or exclude for spelling corrections. Query spelling suggestionsalso only work for classic search.
The following examples demonstrate some of the scenarios where search dictionaries can be used.
Managing company names
Company name extraction works by finding company names and mapping them to the companies managed property. For example, if a company name is found in the body of a document, the company name is extracted. You can then use the companies managed property to create refiners using the company name in the Refinement Web Part on a classic search results page.
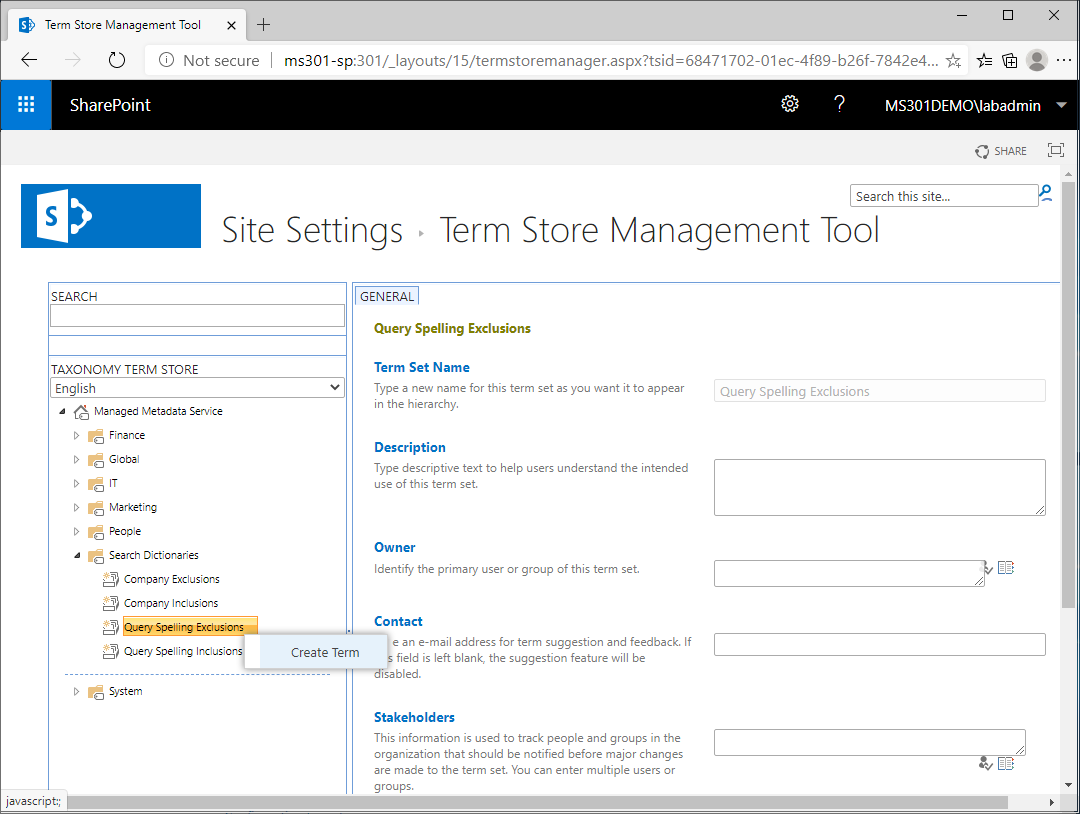
SharePoint Server comes with a pre-populated dictionary for company name extraction. You can add additional company names to be extracted by placing their names in the Company Inclusions section of the Term Store. You can also prevent the extraction and mapping of a company name by placing it in the Company Exclusions list.
In order to manage company name extraction, you'll need to configure the company names in the Term Store. To complete this task, you will need to be a Term Store administrator (see Chapter 7, Planning and Configuring Managed Metadata, for more information). To update the company names, perform these steps:
- Launch Central Administration, select Application Management, select Manage service applications, and then select Managed MetadataService to open Term Store Management Tool:
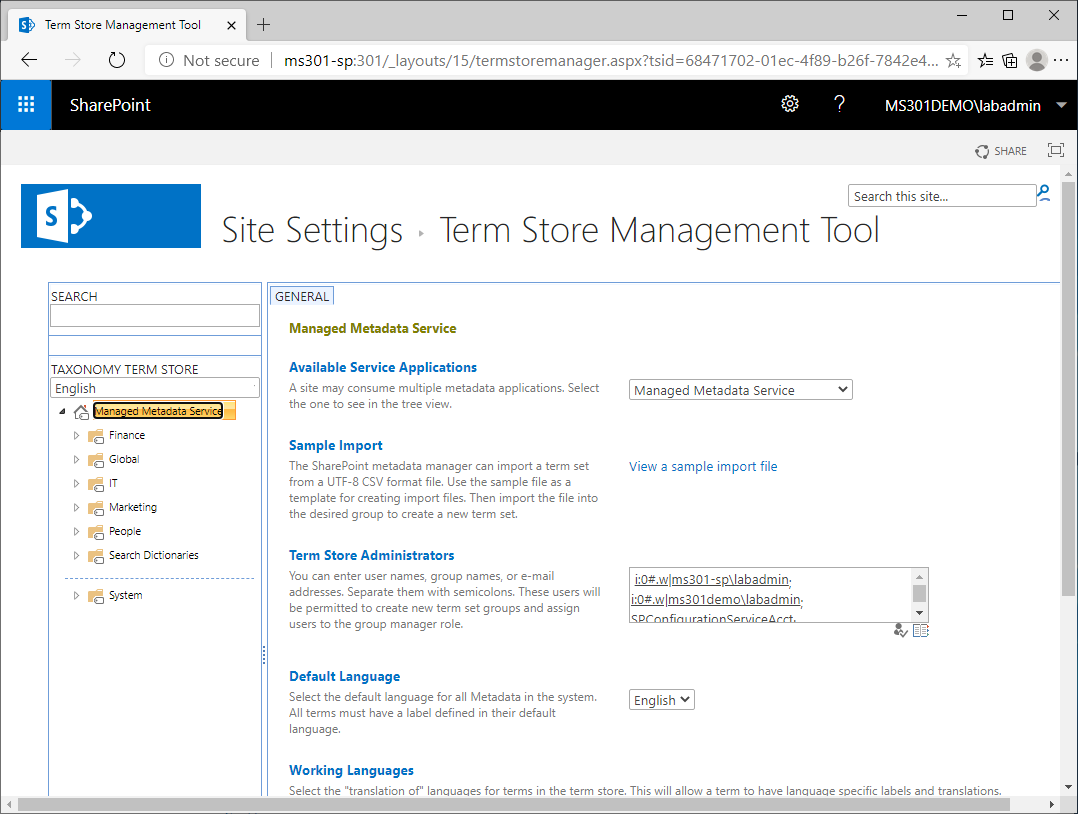
- Expand Search Dictionaries in the navigation pane.
- Point to eitherCompany InclusionsorCompany Exclusions. Then, select the down arrow that appears and clickCreate Term:

- Enter the name of the company to include or exclude, and either click outside the typing area or pressEnter.
As indexing is performed, the company names listed inCompany InclusionsorCompany Exclusionswill be processed accordingly.
Managing query spelling
Query spelling, also known as "Did you mean?", is a tool that can help users locate resources, even when they've misspelled what they're looking for. SharePoint Online has a dynamic query dictionary, but it only identifies words that appear in at least 50 documents by default. To include (or exclude) query spellings, you'll need to use the Term Store Management Tool's Search Dictionaries feature.
Under either area, you'll enter thespellings of terms you want to have suggested(under Query Spelling Inclusions) or thespellings ofterms you never want to have suggested(under Query Spelling Exclusions). To do this, follow these steps:
- Launch Central Administration, select Application Management, select Manage service applications, and then select Managed MetadataService to open the Term Store Management Tool.
- ExpandSearch Dictionariesin the Term Store Management Tool.
- Point to eitherQuery Spelling InclusionsorQuery Spelling Exclusions. Then, select the down arrow that appears and clickCreate Term:
- Enter the spelling of the query word to include or exclude, and then click outside the typing area or pressEnter.
The updated dictionary settings should be available in about 10 minutes and should be reflected in user searches.
In the next section, we'll work on further managing search with Query Suggestions.
Managing Query Suggestions
Unlike Search Dictionaries, which only affect classic SharePoint search, Query Suggestions customization affects both classic and Modern Search, since they can use the same default result source (you can think of a result source as the contentthat you'll be sending your query to search against). Query suggestions (also known as predictive text or type-ahead words) appear below the search box as a user enters their query words. SharePoint Online creates a query result for a suggested term whenyou've clicked aresult at least six times.
The query suggestions are populated daily per result source and per site collection, meaning that the suggestions can be different across the organization. These automatically generated suggestions for the default result source are used in both search experiences.
In addition to the automatically generated query suggestions, you can also create your own lists and upload them. These manual lists apply to all the result sources and site collections for both search experiences. If you want to create suggestions for multiple languages, you'll need to create a separate query suggestion file for each language. The files must be saved in UTF-8 encoding format to be successfully imported.
Similar to search dictionaries, you can create lists of words and phrases that will always be suggested, as well as lists of words and phrases that will never be suggested.
To manage search query suggestions, follow these steps:
- Using a text editor such as Notepad, create a list of terms and phrases to eitheralways suggestornever suggest. Enter each term or phrase on its own line. When you're finished, save the text file in UTF-8 format.
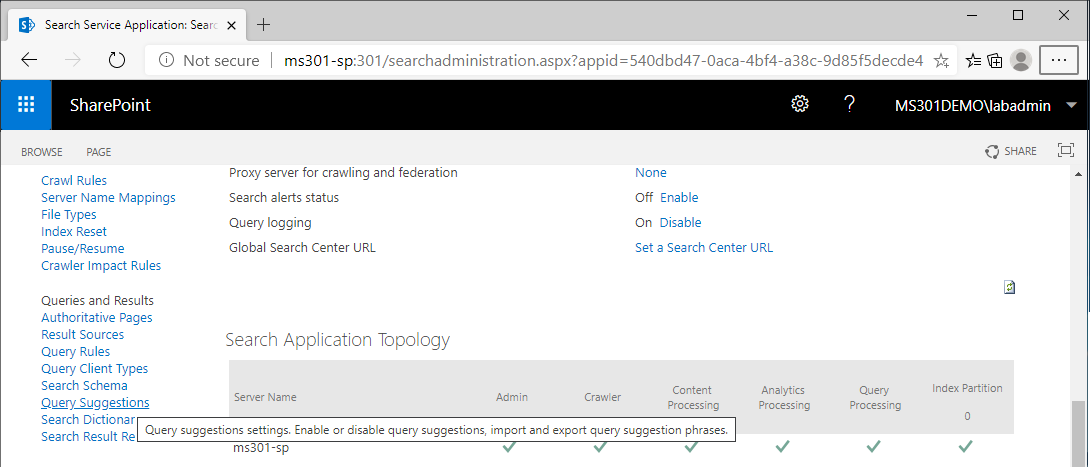
- Launch Central Administration, select Application Management, select Manage service applications, and then click Search Service Application.
- Under Queries and Results, select Query Suggestions:
- On theSearchpage, underAlways suggest phrasesorNever suggest phrases, selectImport from a text file:
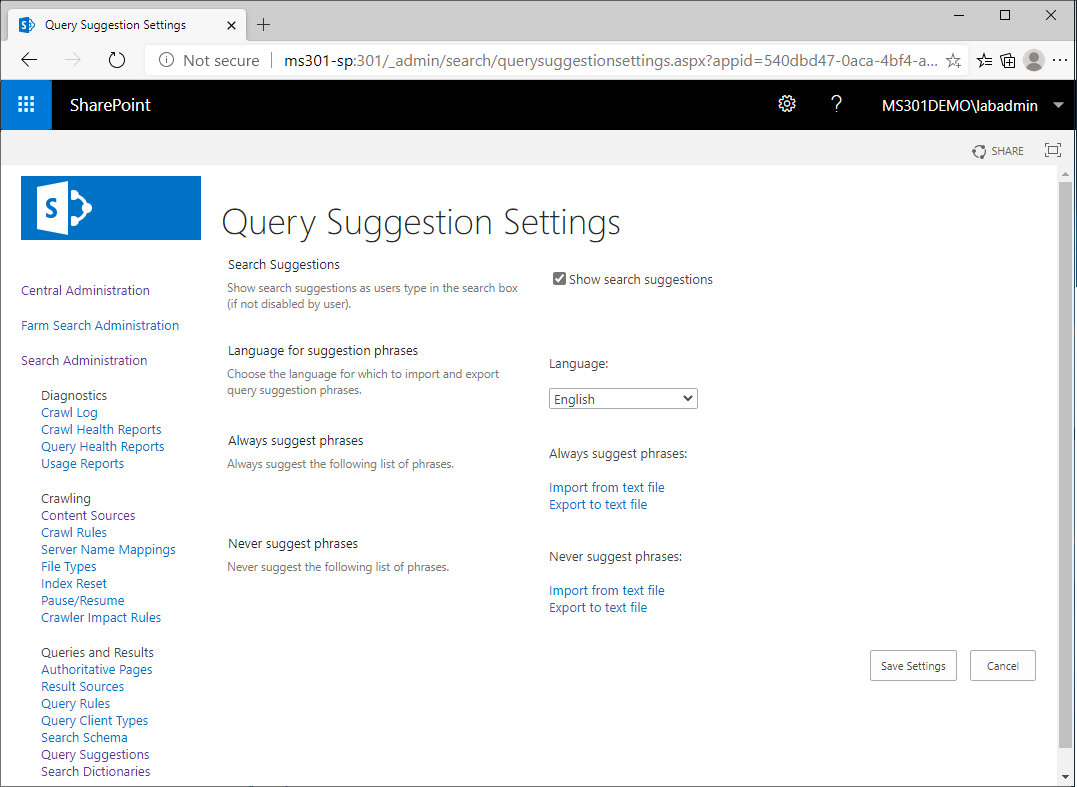
- ClickBrowseand select the file you created previously. Then, clickOK.
- ClickOK.
- Finally, clickSave Settings.
The query suggestions will be updated and should be visible to your users shortly. Next, we'll look at using result sources to deliver more scoped content results.
Managing result sources
Result sources can be used to limit the scope of searches to a certain set of content or to a particular subset of search results. Result sources may also be configured to include external search services and to send queries to third parties. Both classic and Modern Search experiences can use the default result source, but you can only create result sources for the classic search experience. If you change the default result source for the tenant, it will affect both the classic and Modern Search experiences. You can use a feature called query transform to restrict result sources to a particular subset of content as well.
You can configure a result source for the farm, a site collection, or a site.
Creating a result source
To configure a resultsource, follow these steps:
- Locate theManage Results Sourcepage for the scope of the search:
- For the farm, this is located in Central Administration (Application Management | Manage service applications|Search Service Application | Result Sources).
- For either a site collection or a site, navigate to the site, click the gear icon, selectSite information, selectSite settings, and selectView all site settings. Locate eitherSearch Result Sources(site collection) orResult Sources(site).
- ClickNew Result Source.
- Fill out a name and description for the result source.
- Select a protocol–most likely, you'll be configuring Local SharePoint (the default), but you do have other options. If you want to configure another SharePoint farm as a result source, selectRemote SharePoint. You can also select an Exchange server index (and you'll be prompted to supply an EWS URL). Finally, you can choose OpenSearch 1.0/1.1 to send queries to an external search service, such as Bing, that supports the OpenSearch protocol. In this example, we're going to select OpenSearch 1.0/1.1 as the protocol so that we can send queries to the Bing search engine:
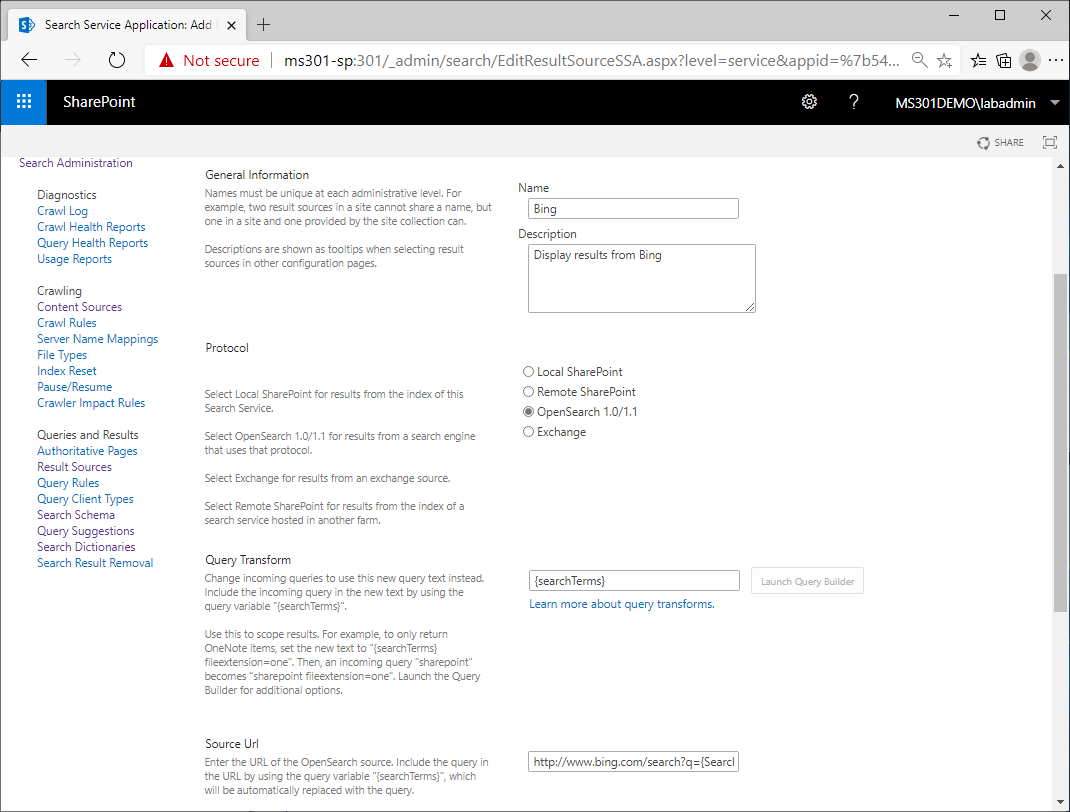
- The default query transform is {searchTerms}, but you can use the query builder to create your own. If you launch the Query Builder tool, you can specify query filters on theBASICStab, sort options on theSORTINGtab, and then test out the query on theTESTtab.
- Depending on the protocol selected, you may need to populate additional fields, such as a Remote Service URL (Remote SharePoint), Source Url (OpenSearch), Exchange Source URL (Exchange), or authentication. In this example, we used the Source URL value of http://www.bing.com/search?={searchTerms}+site:packtpub.com&format=rss&Market=en-US. The effect is to send whatever search terms to bing.com and only returning results from the site packtpub.com.
- ClickSave.
You can test the search and ensure your result source is configured correctly by querying for content that you know only exists in your newly configured result source:

After creating a custom result source, you can create custom query rules that will use this result source.
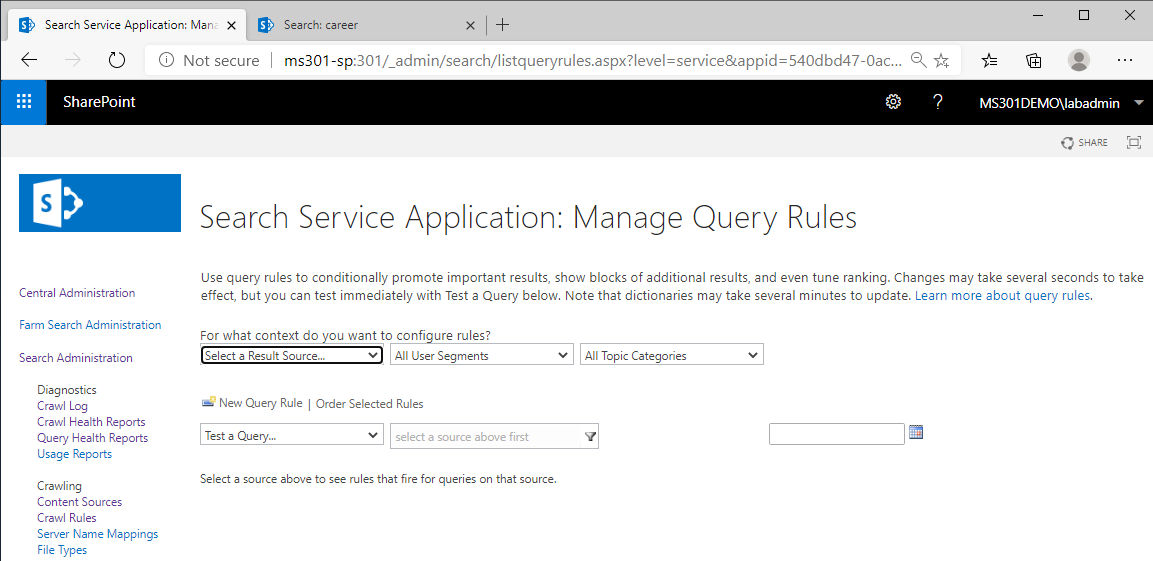
Managing query rules
A query rule is a set of conditions and actions that help fulfill the user's search intent. Query rules allow you to promote or highlight certain types of resultsbased on keywords, phrases, or content types. You can define query rules for the tenant, a site collection, or a site, and they can be applied to one or more result sources.
In the following example, we're going to create a search query to send specific terms to the result source we created in the previous section.
To create a query rule, follow these steps:
- Navigate to theManage Query Rulespage for a site, site collection, or the tenant:
- For either a site collection or a site, navigate to the site, click the gear icon, select Site information, select Site settings, and then select View all site settings. Locate either Search Query Rules (site collection) or Query Rules (site).
- For the farm, this is located in Central Administration (Application Management | Manage service applications|Search Service Application | Query Rules).
- Select a result source for the new query rule from the dropdown labeledSelect a Result Source:
- ClickNew Query Rule.
- On theAdd Query Rulepage, enter aname for the query rule.
- Click to expand theContextarea.
- In theContextsection, select a result source. By default, the result source that you chose in the dropdown earlier is selected, but you can add more result sources or modify the ones that are already present. You can change it to all result sources by selectingAll sources, or you can add additional results sources by clickingAdd Source.
- In theContextsection, you can also choose to restrict the query rule to a category by selectingAdd category.
- In theContextsection, you can restrict the query rule to a user segment by selectingAdd User Segment.
- In theQuery Conditionssection, configure a condition:
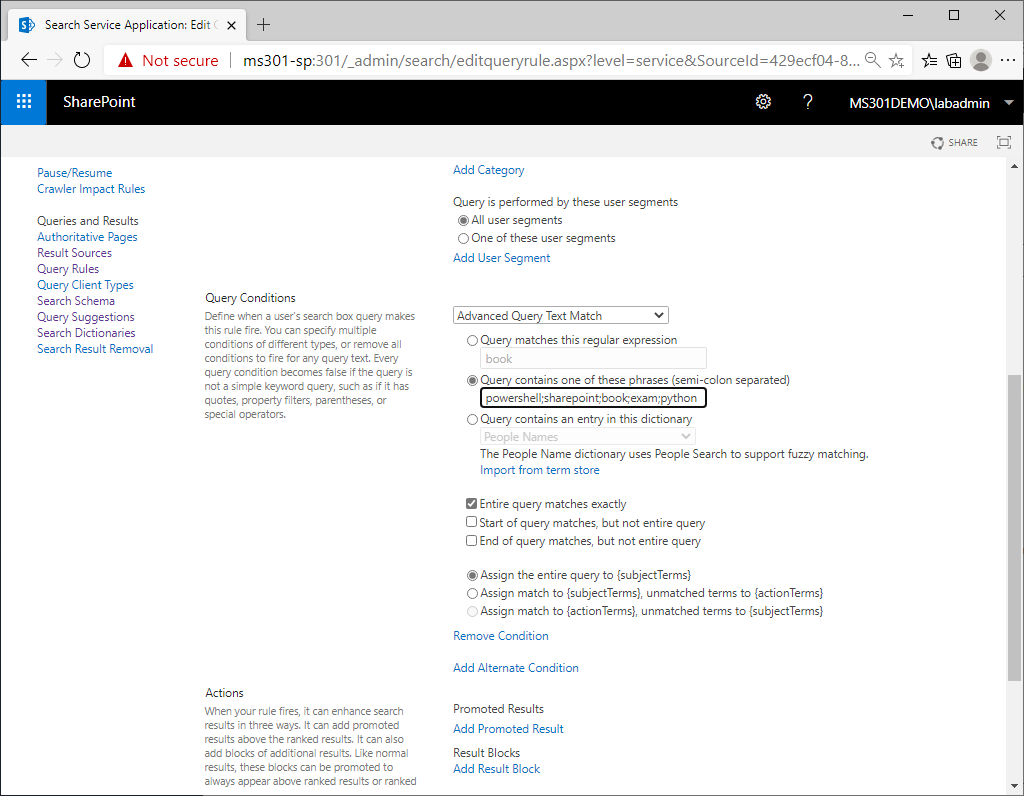
- In theActionsarea, specify the action to take. In this case, we're going to promote a few results (in previous versions of SharePoint, this was calledBest Bets). Promoted results are links to content designed to drive traffic to specific sites based on the administrator's goals. ClickAdd Promoted Resultand specify a name for the result in theTitlefield and then a URL. Then, click Save.
- Under the Actions area, you can also add additional result blocks to use other result sources:
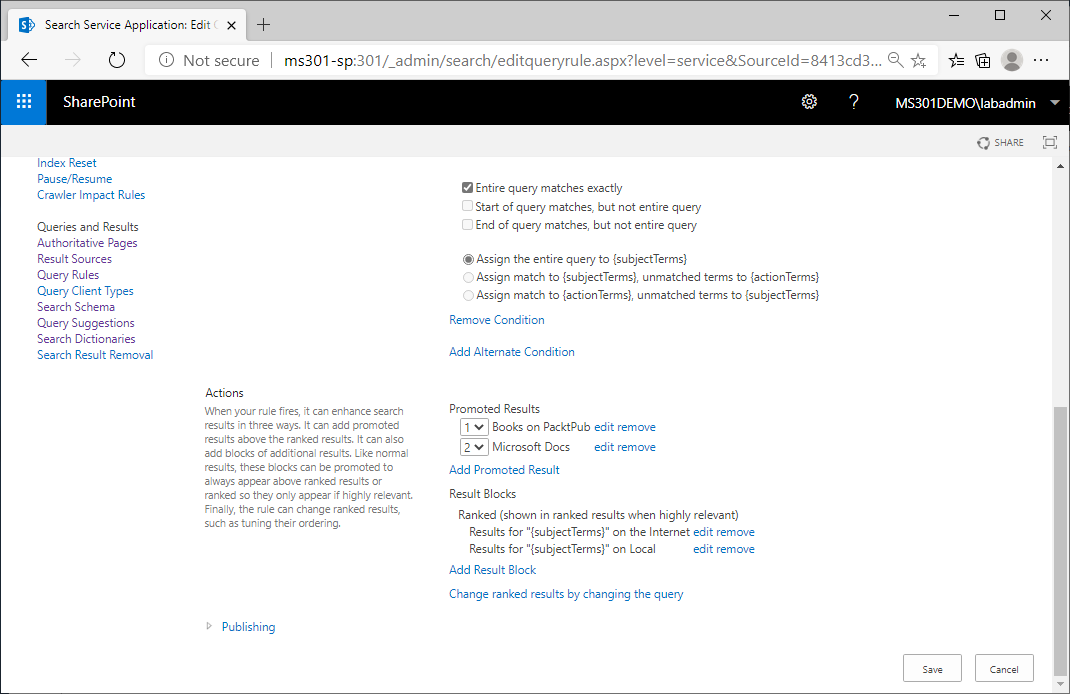
- If you want to apply the rulefor a limited amount of time, expandPublishingand select start and stop dates.
- ClickSave.
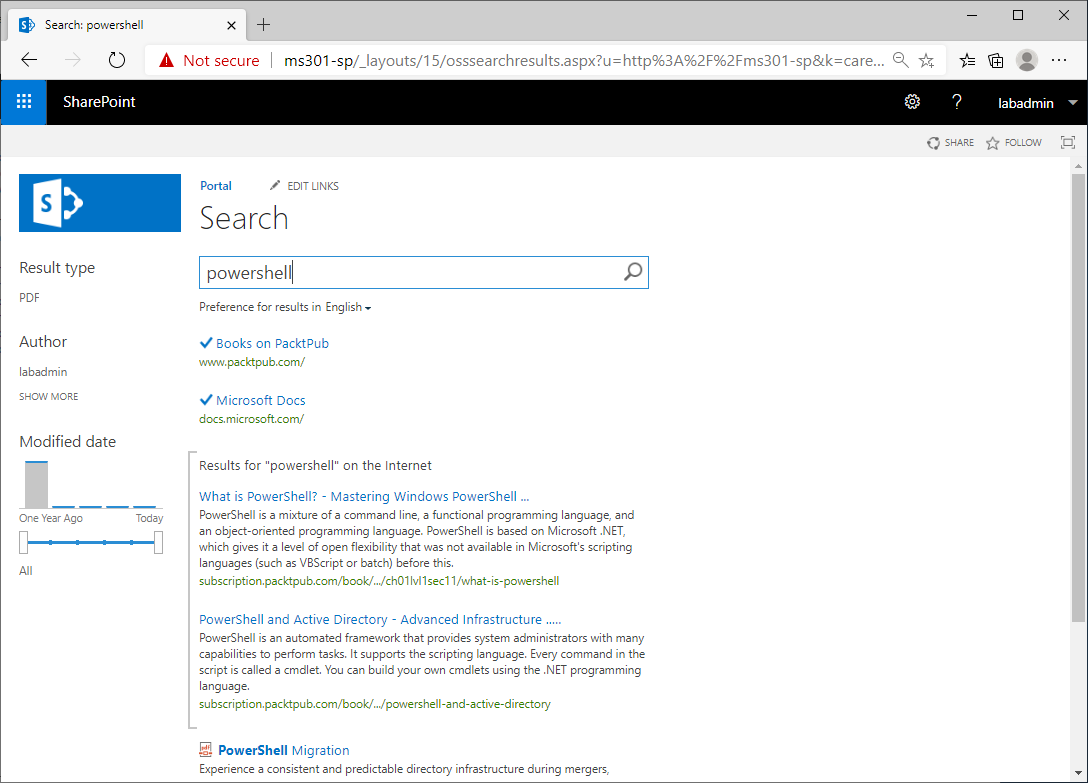
The next time a user conducts a search that matches your query rule, the promoted result will appear at the top. In this case, we created a promoted result based on the powershell keyword. To see the promoted result, you can go to a site and perform a search. If you use the keywords specified in the query rule, you'll generate a hit, as shown in the following screenshot:
Now that you've learned how to manage some of the result source capabilities, we can start looking at configuring the result output.
Configuring search and result output
In this section, we'll review some of the configuration possibilities for the Search Web Part, as well as the result types and display templates. These options will help you set the query and display parameters for searches submitted on the SharePoint farm.
You can customize the search experience further by modifying the properties of the various web parts that are used to input search terms and display the results, including the following:
- Content Search Web Part
- Search Results Web Part
- Search Results Query
- Search Results Display Template
- Search Results Settings
- Search Results Refinement
Let's examine each of these.
Content Search web part
The Search Box is the web part that you normally think of for search: it's an input text box like you'd see on an internet search engine. The Search Box web part is displayed on the default home page, as well as the default results pages. You can update the settings for the search box's output display, query suggestions, enable or disable links for preferences or advanced search, or the actual template that's used to display the web part. In the following examples, we're going to customize an enterprise search site. To create one, create a new site collection using the Enterprise Search template.
To modify the Search Box web part, follow these steps:
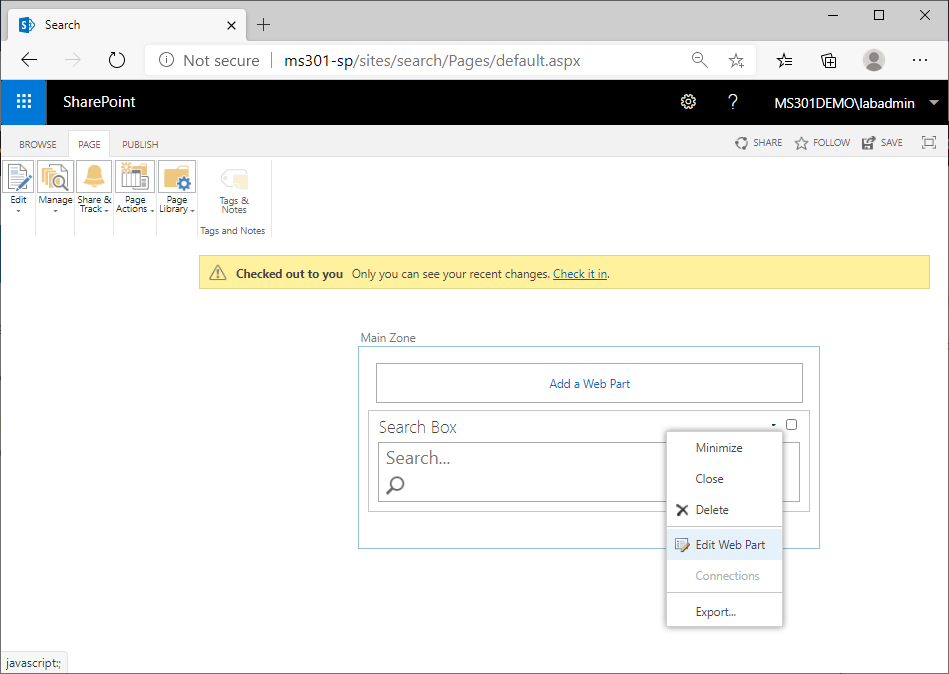
- While logged in as a user with admin rights, navigate to an existing Search Center page (if you don't have a search center, you can add the web part to any page), click the gear icon to expand the Settingsmenu, and select Edit Page.
- Select the Search Boxweb part, select the down arrow that appears, and click Edit Web Part:
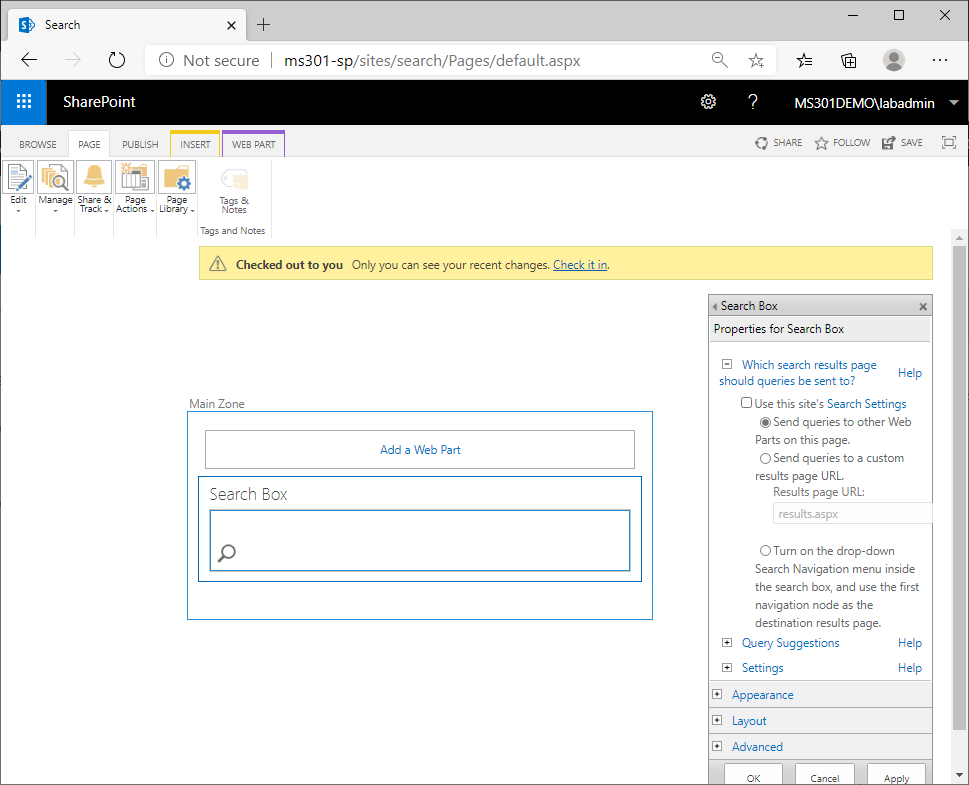
- Under Properties for Search Box, you can configure the following:
- Query destination, which will either be the current page, a custom URL, or a navigation node
- Enable or disable query suggestions for content and names
- Additional settings for displaying preferences, advanced search links, and page templates:
- UnderAppearance, you can configure the following:
- The name of the search box
- Fixed height and width
- Box chrome (border) styling
- Under Layout, you can configure the following:
- Whether the box is hidden
- Text direction
- Under Advanced, you can modify the following:
- Allowing minimize, close, and hide functions
- The title
- The description
- External help
- URL link
- Audience scoping
- When you've finished modifying these settings to meet your requirements, click OK.
- If the page displays a message stating that it is Checked out, click the link to Check it in.
- If the page displays a message stating that it needs to be published, select Publish.
Now that you've configured the search box, let's look at the Search Results page.
Search Results web part
The Search Results web part is used to display the output of searches in the classic search. It provides the formatting that's necessary for the preconfigured search verticals (People, Everything, Videos, and Conversations). In addition, the Search Results web part also sends content to the Refinement and Search Navigation web parts.
The following areas of the Search Results web part can be configured:
- Search Results query
- Search Results display template
- Search Results web part settings
We'll briefly examine all three areas. For all of the modifications, you'll need to edit the Search Results web part. Let's get started:
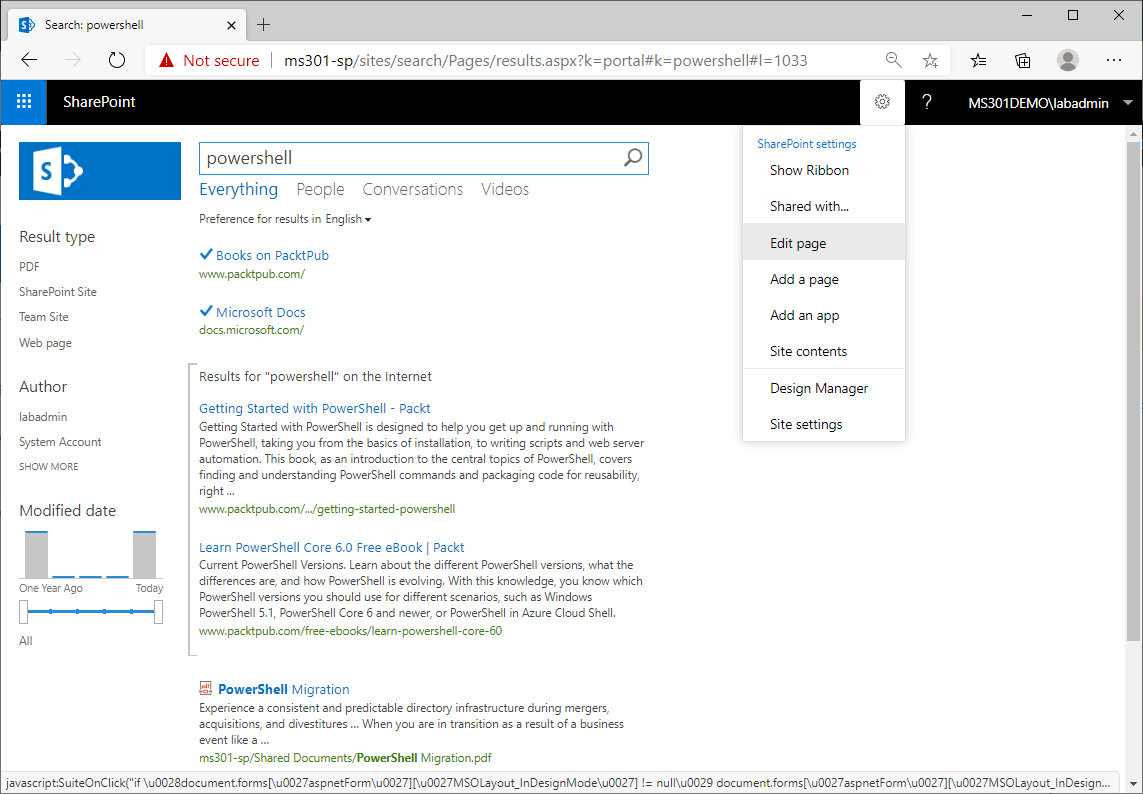
- Navigate to the Search Resultspage. You can do this by launching classic search and then entering any search criteria. The default results page will be displayed.
- Select the gear or Settingsicon and select Edit page:
- Select the Search Resultsweb part, click the drop-down arrow, and select Edit Web Part.
You can use this as the starting point for the next several configuration areas.
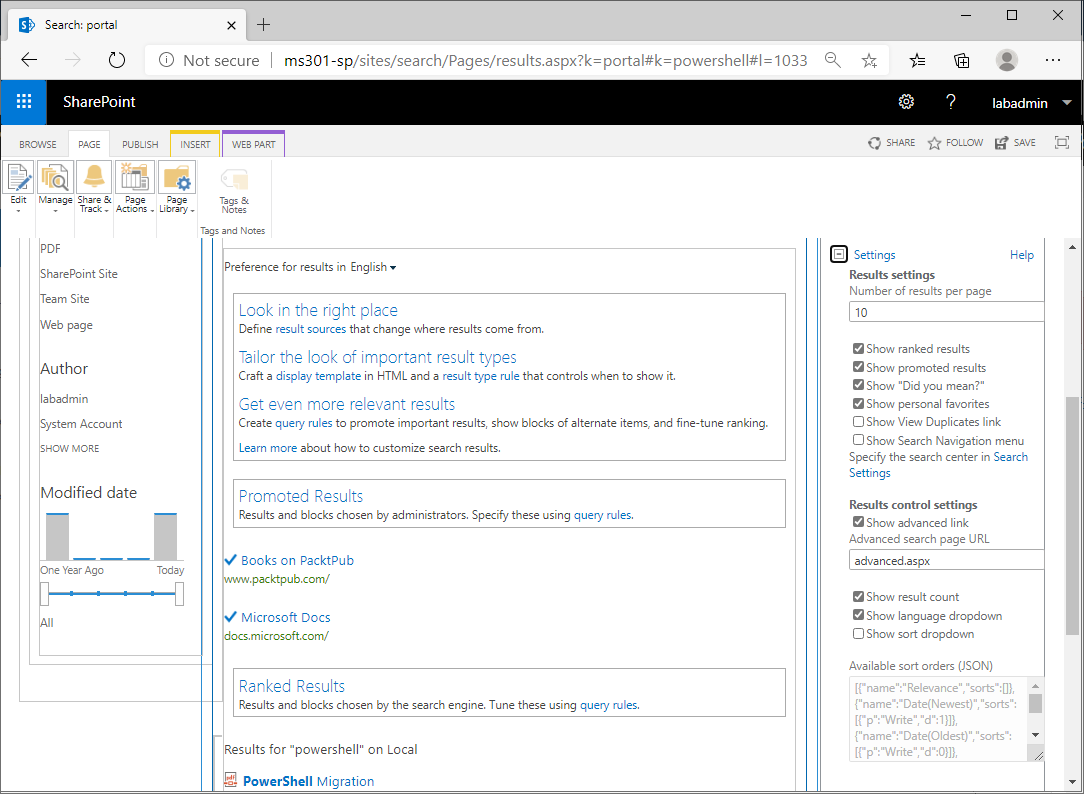
Search Results query
The Search Results query is a piece of configuration that handles how the Search Results web part processes the search. The token variable, {searchboxquery}, passes the input from the Search Box web part into the Search Results web part. On the Properties page of the Search Results web part (right-click Search Results | Edit Web Part), you can modify the settings that are available, as shown in the following screenshot:
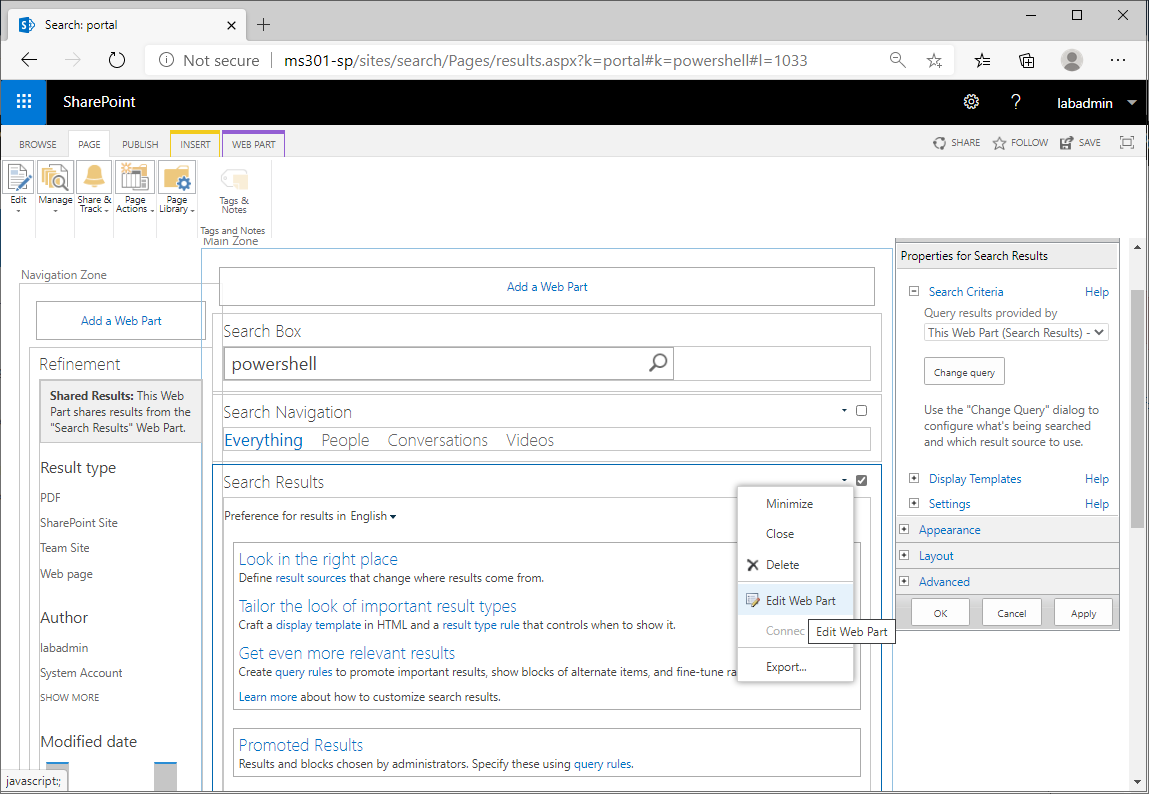
The Change query button under Search Criteria allows you to add additional query parameters, including result sources to use for processing queries in this search. Inside this dialog box, you can structure advanced queries using the Kusto Query Language (KQL) or quick queries using simple radio buttons and drop-down selectors. You can also add refiners (properties that are used for grouping, sorting, or categorizing content) and configure settings to remove duplicates, rewrite URLs, and whether or not you want to use the site's query rules.
Search Result type display template
By configuring display templates, you are controlling the display formatting of items. The main options are to let the result type determine the display options or to use a single template to format the display. Display templates show data from the managed properties of the result set, such as the following:
- File type
- Author
- Title
- Path
- Document summary
- Preview image
Display templates are divided into three categories:
- Control display templates: This template contains the structure of the results, such as where headings go, numbering, and navigation buttons.
- Item display templates: The item display template contains the managed properties whose data will be presented.
- Hover panel display templates: As the name indicates, the hover panel display template contains configuration information for the preview that's displayed when the mouse hovers over the result.
You can configure result types for a collection or a site by navigating to the settings for the site or collection and then selecting Result Types under the search area. Once you're in the Result Types area, you can configure display types for particular data types, as shown in the following screenshot:
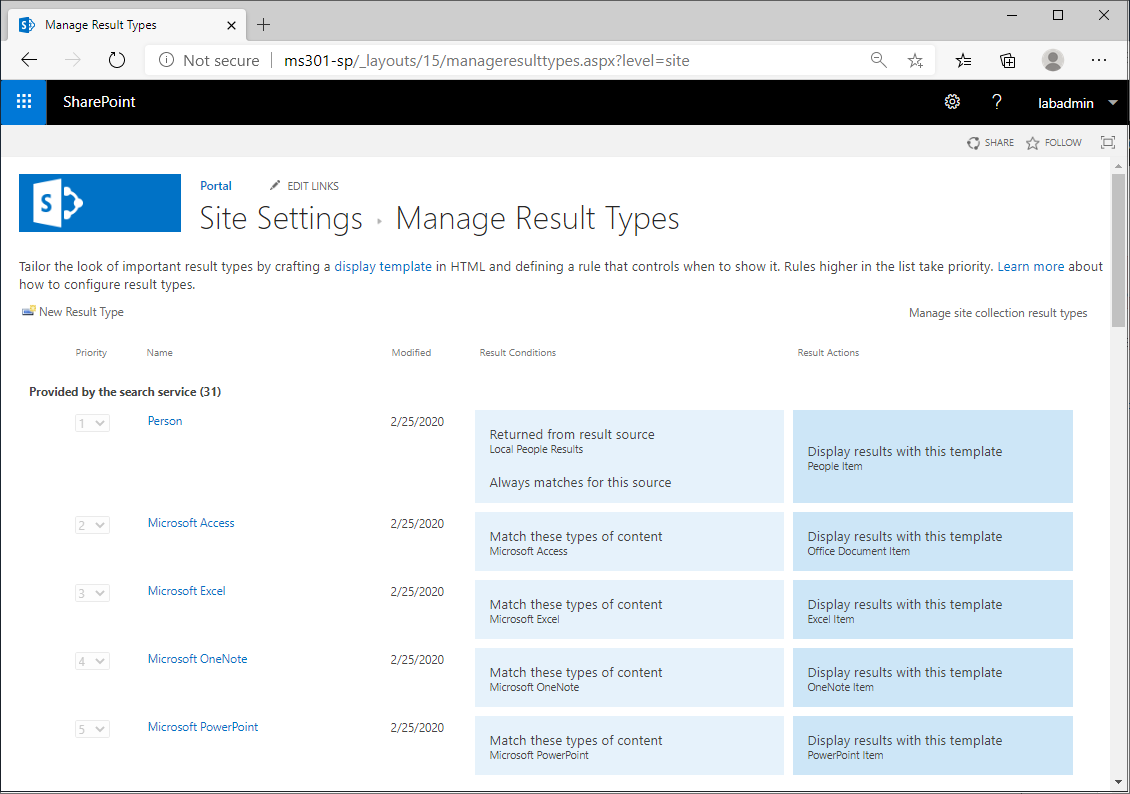
For more information on configuring display templates beyond the MS-301 exam, please see https://docs.microsoft.com/en-us/sharepoint/use-result-types-and-display-templates.
Search Results settings
The Settings suboption allows you to configure the number of results that are returned per page, whether to display links to the advanced search, the result counts, whether to display the sort option, if the user's OneDrive site is included in the result's sources, and whether you want to display ranked or promoted results, as shown in the following screenshot:
For more detailed descriptions of all of the options available for the Search Results web part, see https://support.office.com/en-us/article/change-settings-for-the-search-results-web-part-40ff85b3-bc5e-4230-b1dd-f088188e487e.
Search Results Refinement
The Refinement web part is used to configure the refining, categorization, sorting, and grouping options for search results. You can use either a managed navigation term set or configure a list of refiners with the Choose refiners... button. The available refiners can be seen in the following screenshot:
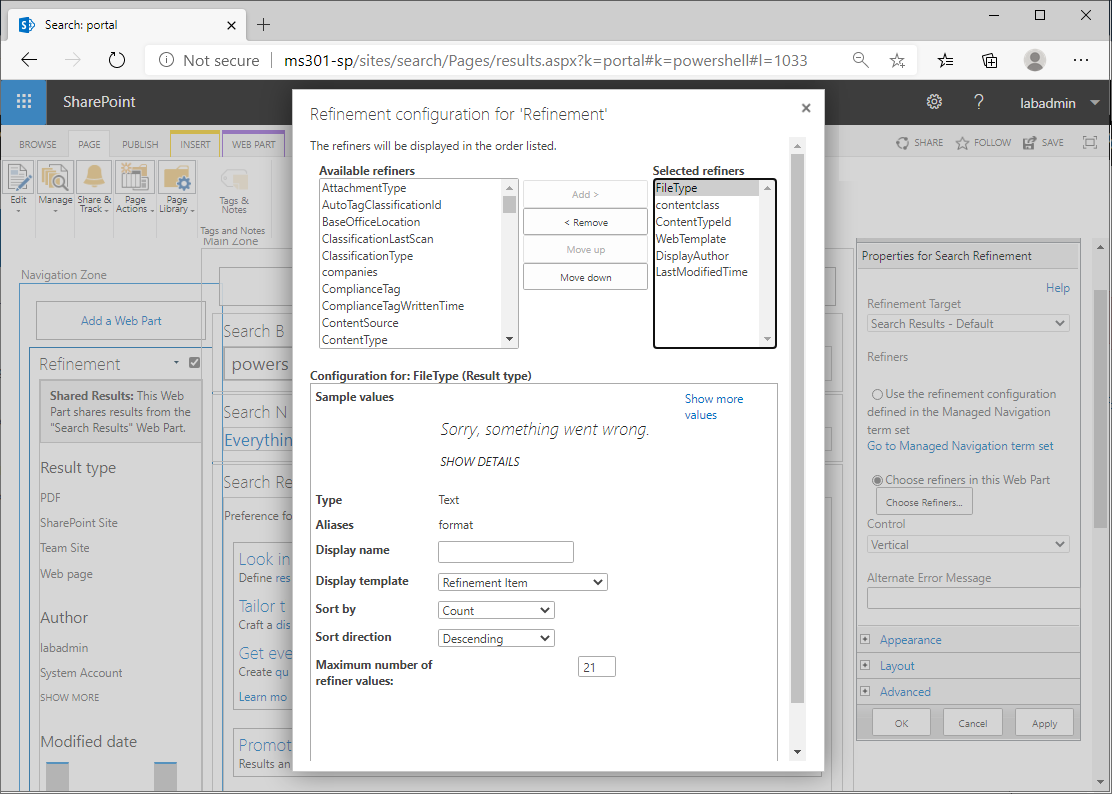
Search refinement will enable users to filter content based on selectable values, giving them more control over the final results that are displayed.
We'll learn how to configure search farms in the next section.
Configuring search farms
For organizations that rely on managing content through localized or departmentalized SharePoint farms or organizations that have millions of documents, it may be necessary (or desirable) to configure and deploy farms that are only responsible for handling search functions. In Chapter 2, Planning a SharePoint Farm, and Chapter 3, Manage and Maintain a SharePoint Farm, we discussed basic MinRole farm architectures. In some enterprise scenarios, though, it may be necessary to dedicate multiple servers to processing and servicing search requests for your organization.
For these scenarios, you can start with the pre-built scenarios the Microsoft provides:
|
Volume of content (SharePoint 2013) |
Volume of content (SharePoint 2016) |
Sample Search architecture |
|
Up to 10 million items |
Up to 20 million items |
Small search farm |
|
Up to 40 million items |
Up to 80 million items |
Medium search farm |
|
Up to 100 million items |
Up to 200 million items |
Large search farm |
|
Not supported |
Up to 500 million items |
Extra large search farm |
Microsoft's reference architectures are designed to be deployed as virtual machines (VMs), with two VMs per host, with the exception of database servers (either on physical hardware or 1:1 virtual machine:physical host). The following table lists the per-role requirements for each farm:
|
Small Search Farm |
||||
|
Server Role |
Hosts |
Storage |
Memory |
CPU |
|
Application server that has query processing and index components |
A, B |
500 GB |
32 GB |
1.8 GHz 8x cores |
|
Application server that has crawl, search administration, analytics, and content processing components |
A, B |
200 GB |
8 GB |
1.8 GHz 4x cores |
|
Database server that has all search databases (physical or single VM on a host) |
C, D |
100 GB |
16 GB |
1.8 GHz 4x cores |
|
Medium Search Farm |
||||
|
Server Role |
Hosts |
Storage |
Memory |
CPU |
|
Application server that has query processing and index components |
A, B, C, D |
500 GB |
32 GB |
1.8 GHz 8x cores |
|
Application server that has an index component |
A, B, C, D |
500 GB |
32 GB |
1.8 GHz 8x cores |
|
Application server that has analytics and content processing components |
E, F |
300 GB |
8 GB |
1.8 GHz 4x cores |
|
Application server that has crawl, search administration, and content processing components |
E, F |
100 GB |
8 GB |
1.8 GHz 4x cores |
|
Database server that has all search databases (physical or single VM on a host) |
G, H |
400 GB |
16 GB |
1.8 GHz 4x cores |
|
Large Search Farm |
||||
|
Server Role |
Hosts |
Storage |
Memory |
CPU |
|
Application server that has query processing and index components |
A, B, C, D, E, G, H |
500 GB |
32 GB |
1.8 GHz 8x cores |
|
Application server that has an index component |
A, B, C, D, E, F, G, H, I, J |
500 GB |
32 GB |
1.8 GHz 8x cores |
|
Application server that has analytics and content processing components |
K, L, M, N |
300 GB |
8 GB |
1.8 GHz 4x cores |
|
Application server that has crawl, search administration, and content processing components |
K, L |
100 GB |
8 GB |
1.8 GHz 4x cores |
|
Database server that has search databases (physical or single VM on a host) |
O, P, Q, R |
400 GB |
16 GB |
1.8 GHz 4x cores |
|
Extra Large Search Farm |
||||
|
Server |
Hosts |
Storage |
Memory |
CPU |
|
Application server that has an index component |
A-X |
500 GB |
32 GB |
1.8 GHz 8x cores |
|
Application server that has query processing and index components |
Y, Z |
500 GB |
32 GB |
1.8 GHz 8x cores |
|
Application server that has crawl, search administration, or content processing components |
AA-AF |
100 GB |
8 GB |
1.8 GHz 4x cores |
|
Application server that has analytics processing components |
AG, AH |
300 GB |
8 GB |
1.8 GHz 4x cores |
|
Database server that has search databases (physical or single VM on a host) |
AI-AL |
400 GB |
16 GB |
1.8 GHz 4x cores |
After installing and configuring the search farm with the SharePoint Products and Configuration Wizard, you'll need to go through additional steps:
- Configuring trust for Search
- Configuring a Remote SharePoint results source
We'll look at those steps briefly here.
Configuring a Trust for Search
In this section, we'll look at the security and authentication configurations necessary to enable the enterprise search farm (the receiving Farm) to be able to receive, process, and return the results of queries from the content farm (the sending Farm).
To configure the receiving Farm to trust the sending Farm, follow these steps:
- On a server in the receiving Farm, launch SharePoint Management Shell.
- Run the following script in the SharePoint Management Shell from any server in the receiving Farm, updating the-Nameand-MetadataEndPointparameters with an appropriately chosen name in the-Nameparameter and the address of a web app in the Sending Farm:
          $i = New-SPTrustedSecurityTokenIssuer -Name "SendingFarm" -IsTrustBroker:$false -MetadataEndpoint "https://<SendingFarm_web_application>/_layouts/15/metadata/json/1"New-SPTrustedRootAuthority -Name "SendingFarm" -MetadataEndPoint https://<SendingFarm_web_application>/_layouts/15/metadata/json/1/rootcertificate


          $realm = $i.NameId.Split("@")
- Then, for each web application in the receiving farm that hosts content you want to search for, run the following command, replacing the value for<ReceivingFarm_web_application>:
          $s1 = Get-SPSite -Identity https://<ReceivingFarm_web_application>


          $sc1 = Get-SPServiceContext -Site $s1


          Set-SPAuthenticationRealm -ServiceContext $sc1 -Realm $realm[1]


          $p = Get-SPAppPrincipal -Site https://<ReceivingFarm_web_application> -NameIdentifier $i.NameId
At this point, the authentication has been configured to allow the sending Farm to be able to access the receiving Farm.
Configuring a Remote SharePoint results source
In this configuration process, you'll use the steps in the Managing result sources section to create a Remote SharePoint results source on the Sending Farm that uses Remote SharePoint as the protocol, specifying the enterprise search farm as the remote SharePoint URL.
For more information on configuring a results source, see the Managing result sources section earlier in this chapter.
Next, we will walk through modifying the topology that Search uses.
Managing the search topology
Every SharePoint farm starts with a single server. If you are expanding your SharePoint infrastructure using one of the design patterns (such as the one of the Search farm architectures) or your own schematic, you'll need to configure which components go where.
Managing the search topology is how you do that. In these next few sections, we'll review how to update or change the search topology based on your goals.
Prerequisites
Before we begin, you'll need to ensure that the following prerequisite configurations have been made:
- SharePoint Server is already installed on all of the servers that you want to use as part of your topology.
- You've mapped out which services will be installed on which hosts.
- Ensure that no crawls have been started and the index has no content in it (you can verify this through Application Management | Manage Service Applications | Search Service Application | System Administration | System Status; Searchable Items should display 0).
For the purposes of configuring an example, we'll look at the Small Search Farm, as described in the Configuring search farms section:
| Search Server A ("ServerA") | Search Server B ("ServerB") | Search Server C ("ServerC") | Search Server D ("ServerD") |
| Admin component 1 | Query processing component 1 | Admin component 2 | Query processing component 2 |
| Crawl component 1 | Index component 1 | Crawl component 2 | Index component 2 |
| Content processing component 1 | Content processing component 2 | ||
| Analytics processing component 1 | Analytics processing component 2 |
Once we've done this, we can start configuring.
Configuring an enterprise search service instance
To start the configuration, you'll need to specify the servers you wish to start and configure the service on. Follow these steps:
- On a server in the farm you wish to configure, launch an instance of the SharePoint Management Shell.
- Identify the servers (in this instance, we're using the server names from the table in the previous section) that will be used and configure a variable with their identities:
          $hostA = Get-SPEnterpriseSearchServiceInstance -Identity "ServerA"


          $hostB = Get-SPEnterpriseSearchServiceInstance -Identity "ServerB"


          $hostC = Get-SPEnterpriseSearchServiceInstance -Identity "ServerC"


          $hostD = Get-SPEnterpriseSearchServiceInstance -Identity "ServerD"
- Start the search service on those servers:
          Start-SPEnterpriseSearchServiceInstance -Identity $hostA


          Start-SPEnterpriseSearchServiceInstance -Identity $hostB


          Start-SPEnterpriseSearchServiceInstance -Identity $hostC


          Start-SPEnterpriseSearchServiceInstance -Identity $hostD
- Create a new search topology:
          $ssa = Get-SPEnterpriseSearchServiceApplication


          $newTopology = New-SPEnterpriseSearchTopology -SearchApplication $ssa
- Add the new components to the topology:
New-SPEnterpriseSearchAdminComponent -SearchTopology $newTopology -SearchServiceInstance $ServerA;
New-SPEnterpriseSearchCrawlComponent -SearchTopology $newTopology -SearchServiceInstance $ServerA;
New-SPEnterpriseSearchContentProcessingComponent -SearchTopology $newTopology -SearchServiceInstance $ServerA;
New-SPEnterpriseSearchAnalyticsProcessingComponent -SearchTopology $newTopology -SearchServiceInstance $ServerA;
New-SPEnterpriseSearchQueryProcessingComponent -SearchTopology $newTopology -SearchServiceInstance $ServerB;
New-SPEnterpriseSearchIndexComponent -SearchTopology $newTopology -SearchServiceInstance $ServerB -IndexPartition 0;
New-SPEnterpriseSearchAdminComponent -SearchTopology $newTopology -SearchServiceInstance $ServerC;
New-SPEnterpriseSearchCrawlComponent -SearchTopology $newTopology -SearchServiceInstance $ServerC;
New-SPEnterpriseSearchContentProcessingComponent -SearchTopology $newTopology -SearchServiceInstance $ServerC;
New-SPEnterpriseSearchAnalyticsProcessingComponent -SearchTopology $newTopology -SearchServiceInstance $ServerC;
New-SPEnterpriseSearchQueryProcessingComponent -SearchTopology $newTopology -SearchServiceInstance $ServerD;
New-SPEnterpriseSearchIndexComponent -SearchTopology $newTopology -SearchServiceInstance $ServerD -IndexPartition 0
- Activate the newly created topology with the following command:
Set-SPEnterpriseSearchTopology -Identity $newTopology
- Review the output of Get-SPEnterpriseSearchTopology -SearchApplication $ssa -Text to ensure that the components are active.
The search topology has been created and made active. You can also perform other activities, such as viewing or cloning a search topology, which we'll look at next.
Performing other search topology updates
If you need to change the configuration of your search farm, unfortunately, you cannot do so to a directly running topology. You must first clone your topology, make any updates to the clone, and then activate the clone. Here are some examples of activities.
Viewing the current active topology
You can view the makeup of the current active topology as follows:
- Launch an instance of SharePoint Management Shell.
- Run the following commands:
          $ssa = Get-SPEnterpriseSearchServiceApplication


          $active = Get-SPEnterpriseSearchTopology -SearchApplication $ssa -Active


          Get-SPEnterpriseSearchComponent -SearchTopology $active
Review the active components:
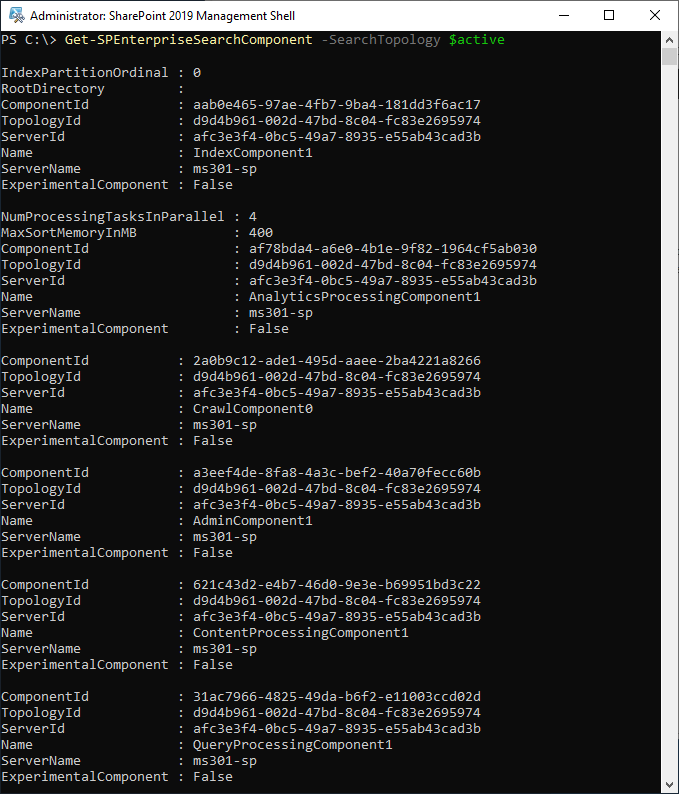
The output will display a list of components associated with the topology, including which servers each component is active on.
Cloning
Cloning the active search topology captures a copy of the current topology in a variable that you can make modifications to.
To clone the active search topology, do the following:
- Launch an instance of SharePoint Management Shell.
- Run the following commands:
          $ssa = Get-SPEnterpriseSearchServiceApplication


          $active = Get-SPEnterpriseSearchTopology -SearchApplication $ssa -Active


          $clone = New-SPEnterpriseSearchTopology -SearchApplication $ssa -Clone -SearchTopology $active
The cloned topology, stored in $clone, can be modified and activated.
Adding a component
Using the syntax in the Configuring an enterprise search service instance section, you can add additional components to servers in your cloned topology. You'll need either a new or existing Search Service Instance deployed to be able to add a component.
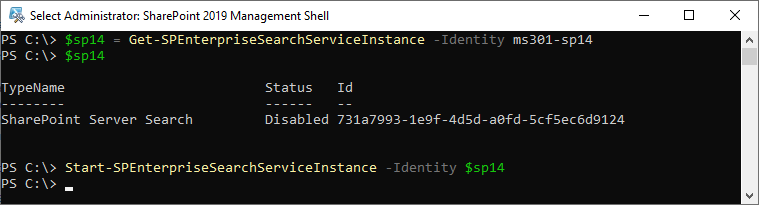
In this example, we'll start a new search instance on an existing SharePoint Server using Get-SPEnterpriseSearchServiceInstance and Start-SPEnterpriseSearchServiceInstance:
Once you have a search instance you wish to add components to, follow these steps:
- Identify which search components to enable. In this example, we'll add a Crawl component. You could also add other components such as Analytics, Query Processing, Search Admin, or Content Processing.
- With the results of Get-SPEnterpriseSearchServiceInstancefor the target server saved in a variable, run the following command (where $<host> is the variable containing the new search service instance):
New-SPEnterpriseSearchCrawlComponent -SearchTopology $clone -SearchServiceInstance $<host>
The component will be added to the cloned configuration. To complete the update, you'll need to activate the topology.
Removing a component
To successfully remove a component from a cloned search topology, you'll need to perform the following steps:
- Capture and clone the current topology using the following commands:
          $ssa = Get-SPEnterpriseSearchServiceApplication


          $active = Get-SPEnterpriseSearchTopology -SearchApplication $ssa -Active


          $clone = New-SPEnterpriseSearchTopology -SearchApplication $ssa -Clone -SearchTopology $active
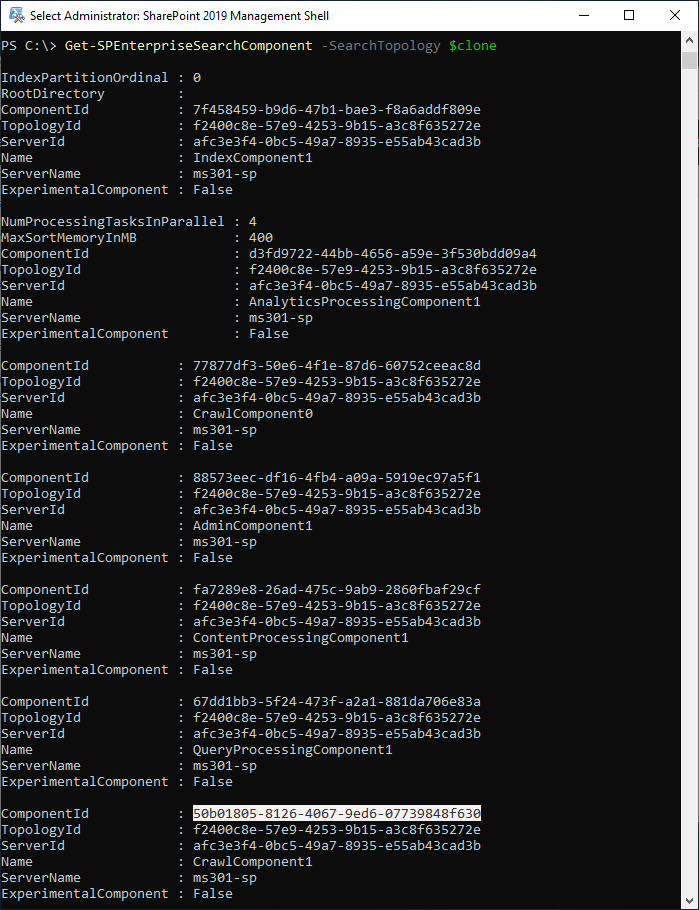
- Review the components in $clone, identifying the clone you want to remove by passing the value into the Get-SPEnterpriseSearchServiceComponent cmdlet:
- Remove the object using the following command:
Remove-SPEnterpriseSearchServiceComponent -Identity <ComponentID> -SearchTopology $clone
With that, the search component has been removed from the cloned topology.
Activating a search topology
After making modifications to the cloned search topology, you need to activate the cloned topology. To do so, use the following syntax:
Set-SPEnterpriseSearchTopology -Identity $clone
The updated search topology is now active.
In the next section, we'll review troubleshooting performance issues.
Troubleshooting search
Search issues can be broken down into two areas: performance and unexpected results. In this section, we'll look at some steps and resources for helping deliver good performance from your search environment, as well as ensuring that the delivered search results reflect the expected search results.
Performance
Search performance is a function of the disk, processor, and memory constraints of the servers performing either crawls or retrieving results. From a crawling perspective, enabling continuous crawling is a resource-intensive task. If you have enabled this on one or more content sources, you may need to scale the resources or number of servers using one of the predefined architectures under the Configuring search farms section of this chapter. You'll need to plan for the number of items you have in your corpus. If you're experiencing slow search and crawl performance with your current deployment, you'll likely need to increase the number of servers running search components.
You can review crawling performance with Crawl Health Reports. On the Search Service administration page, select Crawl Health Reports. The following screenshot shows an example of the CPU and memory load graph for the server that may be overutilized (or needs additional resources to be added to it):
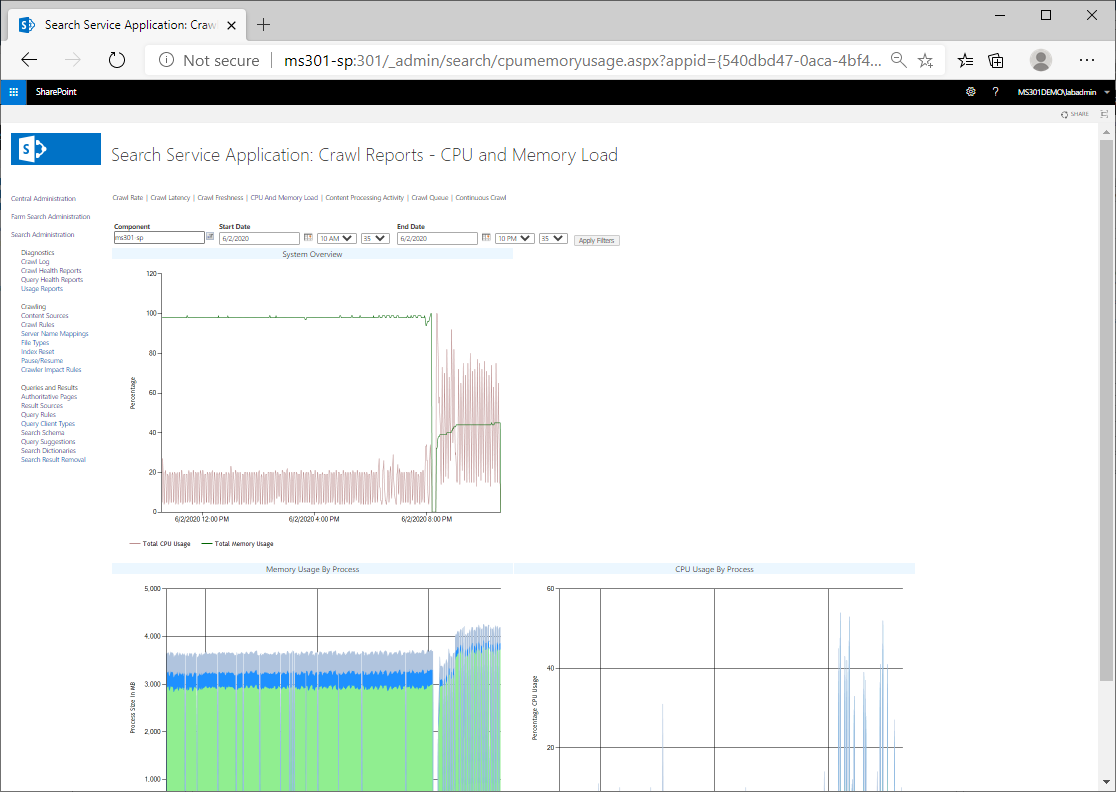
The logs and performance graphs can be used for resource planning and helping determine where performance issues exist.
Crawl completeness
If search results don't contain information thatshould be there, you may have an error that needs to be resolved with the crawler or the content that has been placed in a site. To do this, you can search the crawl log.
You can navigate to the crawl log from Central Administration (Central Administration | Application Management | Manage Service Applications | Search Service Application | Crawl Log):

The log will show results for successful, warning, error, and deletion actions. You can click on the number in the related column for a content source to view the details. In the following screenshot, you can see various warnings:
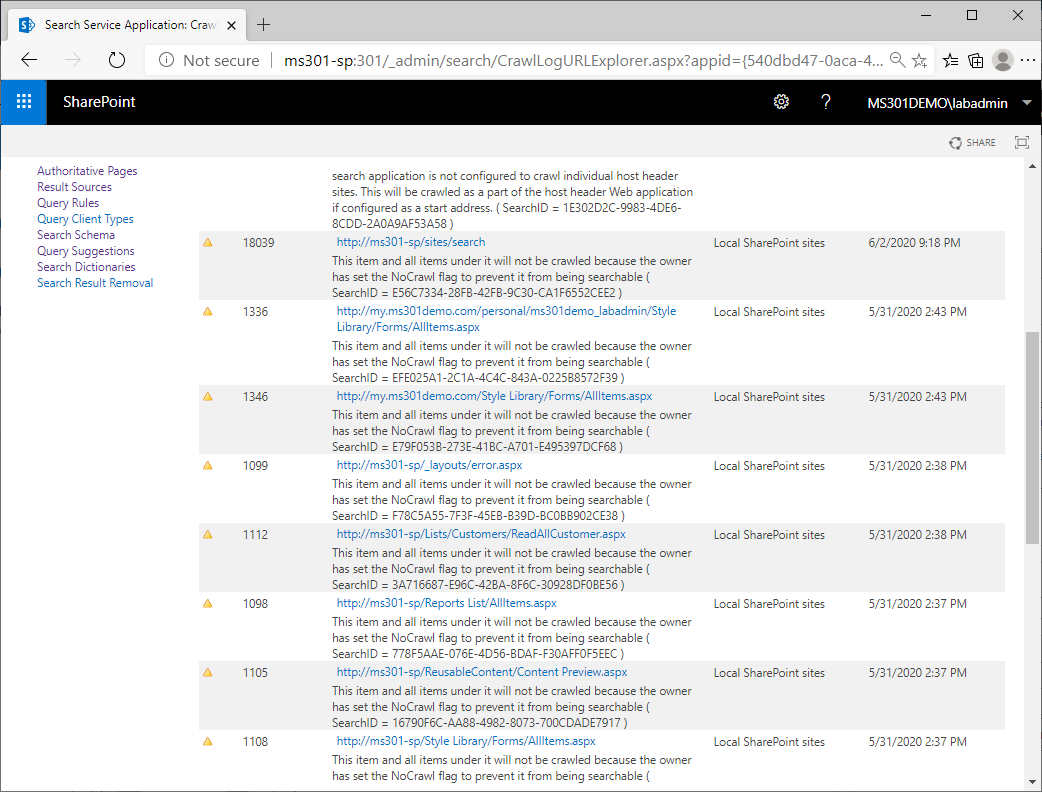
Select the appropriate link to retrieve the individual document or URL returning the error. Warnings and errors may be generated for many types of issues, including performance, data corruption, or security.
Summary
In this chapter, we covered how to configure and manage queries and result sources, as well as the search schema and the different ways they can be used in both SharePoint classic and modern designs. We configured enterprise search features, including taxonomy and keywords, and examined the properties and options for the enterprise search web parts. Finally, we spent some time reviewing the report generation capabilities of the service.
In the next chapter, we will learn about the monitoring and service availabilities of the SharePoint Online service.
Questions
Use the following questions to test your knowledge of this chapter. You can find the answers in Chapter 16,Assessment Answers:
- You need to review the CPU and memory load of the SharePoint crawl process. What should you do?
- Assign Term Store Administrator permissions.
- Open the Crawl Log.
- Open the Crawl Health Reports.
- Open the Crawl Rules.
- You are the SharePoint administrator for your organization. You need to configure Search so that common terms are suggested. What should you do?
- Configure Query Spelling Inclusions.
- Configure Query Suggestions.
- Configure Query Spelling Exclusions.
- Configure Query Rules.
- What of the following options are the three default search verticals for Enterprise Search?
- Videos
- People
- Conversations
- Documents
- You use _____________ to highlight or promote specific content.
- Enterprise Keywords
- Search Verticals
- Query Rules
- Term Stores
- SharePoint Search indexes ________ properties.
- Crawled
- Managed
- 26
- Statistical
- You are the SharePoint administrator for your organization. The Human Resources Manager reports that their team has been getting a lot of requests for the link to the Time Off application and would like you to configure Search so that the Time Off application shows up at whenever someone queries SharePoint for "time off" or "vacation." What should you configure?
- Promoted result
- Result source
- Managed property
- Search dictionary
- You create a new managed property, but when you attempt to search with it, no data is returned. What is a likely solution to this?
- Configure a crawled property to map to the managed property.
- Create an Enterprise Search Center.
- Create a Basic Search Center.
- RunUpdate-SPProperties.
- Select the three types of display templates.
- Refiner display templates
- Control display templates
- Item display templates
- Hover panel display templates
- You are the SharePoint administrator for your organization. The Product Manager wants to pre-populate Search with the names of products so that they start appearing automatically when users begin typing in a query. What should you configure?
- Dictionaries
- Suggestions
- Refiners
- Alternate Data Mappings
- You have determined that you need to update the search topology by adding an additional crawling component. Which four commands from the following list do you need to execute to complete this task?
- New-SPSearchTopology
- New-SPSearchTopology -Clone
- New-SPEnterpriseSearchTopology
- New-SPEnterpriseSearchTopology -Clone
- New-SPSearchServiceInstance
- New-SPEnterpriseSearchServiceInstance
- Set-SPSearchTopology
- Set-SPEnterpriseSearchTopology
- You are the SharePoint administrator for your organization. You made an update to the search topology, but it isn't active yet. What is the final command you need to run to activate the new search topology?
- Update-SPEnterpriseSearchToplogy
- Activate-SPEnterpriseSearchTopology
- Set-SPEnterpriseSearchTopology
- Reset-SPEnterpriseSearchTopology