
In Chapter 2, Planning a SharePoint Farm, you learned how to plan and design SharePoint Server 2016- and 2019-based farms. Selecting a farm topology using MinRole will help you to lay the foundation for a successful deployment. However, that's just the beginning.
Up to this point, we've discussed concepts of farms, roles, sites, and service applications but haven't really seen them up close or gone into the configuration. In this chapter, however, we're going to start configuring components to make the SharePoint Server farm useful.
We're going to address the following topics:
- Configuring and maintaining core infrastructure to support a SharePoint deployment
- Deploying and configuring service and web applications
- Planning and configuring OneDrive/My Site access
- Planning and configuring user profiles
- Monitoring
- Updating SharePoint Server and validating the installation
- Selecting an upgrade path for version to version upgrades in on-premises SharePoint deployments
- Managing SharePoint workflows
- Configuring a content type hub
- Troubleshooting performance issues
- Configuring SMTP authentication for a SharePoint farm
It's a lot of ground to cover, so let's get started!
Configuring and maintaining core infrastructure to support a SharePoint deployment
From an infrastructure perspective, the MS-301 exam primarily focuses on using MinRole-based farm topologies. MinRole is new to SharePoint Server 2016 and later. If you're not quite sure what MinRole is, please review Chapter 2, Planning a SharePoint Farm, for information on MinRole server roles and what services comprise each role.
When discussing the term core infrastructure as it relates to SharePoint Server, we're going to look at a few key areas:
- Server management from Central Administration
- SQL Server
- Distributed Cache
Server management from Central Administration
SharePoint configuration and management tasks are initiated within the Central Administration site. To easily access it, launch the Central Administration link in the Start Menu on a server with SharePoint installed. You can also access it from any device by navigating to a server hosting the Central Administration site with a web browser.
After launching the Central Administration site, you'll see the configuration, management, and monitoring options available, as shown in the following screenshot:

Under System Settings, there are four core settings areas to examine:
- Manage servers in this farm
- Manage services in this farm
- Manage farm features
- Configure alternate access mappings
We'll briefly look at each of those areas.
Managing servers in this farm
This page displays general information about the server farm, including information about the configuration database, servers that are members of the farm, and what role configuration they are using:

Clicking on the server name in the Server column will show the status of each of the services on the server. Clicking Remove Serverwill guide you through the process of removing a server from the farm.
Managing services in this farm
Selecting the Manage services in this farm option will display a page listing all of the services across the farm, as the following screenshot shows:

The Auto Provision column the current configuration status of the service across the farm. If a service has Yes in this column, it means that service instances for this role will be enabled and started on the appropriate MinRole-enabled servers in the farm. If a service has No under the Auto Provision column, then the service will be disabled on MinRole-enabled servers in the farm.
The Actioncolumn displays tasks that can be performed for a given service. A service's auto-provisioning status can be enabled or disabled via this column. Additionally, services that support service applications can be managed.
The Compliant column displays whether the service matches the expected configuration across all servers in the farm. If a server's existing configuration is out of compliance, a link to fix it will be displayed.
Exploring Manage Farm Features
The Manage Farm Features page displays SharePoint-wide features that can be activated or deactivated, as shown in the following screenshot:

The following features can be enabled or disabled on this page:
|
"Connect to Office" Ribbon Controls |
Access Service Add Access Application Feature Stapler |
|
Access Services 2010 Farm Feature |
Access Services Farm Feature |
|
Cloud Video Thumbnail Provider |
Data Connection Library |
|
Excel Services Application View Farm Feature |
Excel Services Application Web Part Farm Feature |
|
Farm Level Exchange Tasks Sync |
Global Web Parts |
|
Office.com Entry Points from SharePoint |
Office Synchronization for External Lists |
|
SharePoint Server to Server Authentication |
Site Mailboxes |
|
Social Tags and Note Board Ribbon Controls |
Spell Checking |
|
User Profile User Settings Provider |
Visio Process Repository |
|
Visio Web Access |
While the MS-301 exam doesn't dive deep into the specific features to enable or disable on the Manage Farm Features page, it's important to know that services can be enabled and disabled on this page.
Configuring Alternate Access Mappings
Alternate access mappings are used to direct or redirect users to the correct URLs for sites and applications. Alternate access mappings allow administrators to segment traffic into zones, based on the incoming URL. The configuration page for Alternate Access Mappings is displayed in the following screenshot:

For example, you may have a SharePoint site called Products listing your organization's products. This site could be available to both internal and external users. Your internal users may reach the Products by browsing to http://server/products, while the extranet or partner organization users may reach the same content by going to http://www.yourcompany.com/products. One of the reasons you might use an alternate access mapping is to use different authentication providers to check and grant access to the site.
The Alternate Access Mapping feature is still available in both SharePoint Server 2016 and 2019 but has been de-emphasized.
SQL Server
In Chapter 2, Planning a SharePoint Farm, we reviewed some of the database server requirements and recommendations for planning the SQL-server related tasks for SharePoint Server.
SQL Server is used by SharePoint for storage of the following types of data:
- Server and farm configuration
- Content such as document libraries and files, list data, web part information, user profile information, or data related to SharePoint web applications
- Service application data
Databases used to support SharePoint Server farms are typically created during the SharePoint Products Configuration Wizard. Microsoft does not support directly querying or modifying SharePoint Server databases. Only SharePoint applications and supported APIs should be used to communicate with the databases.
Distributed Cache
Introduced in SharePoint Server 2013, the Distributed Cache service provides in-memory caching services for many farm features. The Distributed Cache service is built on Windows Server AppFabric. It's important to note the following about the Distributed Cache service:
- The supporting service AppFabric Caching Service should not be administered directly in the Services control panel.
- You should never launch the applications located in the AppFabric for Windows Server folder unless instructed to do so by Microsoft support.
- You should not attempt to implement additional security controls for AppFabric.
The following SharePoint Server features depend on the Distributed Cache service:
- Microblog Features and Feeds
- Login Token Cache
- Activity Feed Cache
- Activity Last Modified Time Cache
- OneNote Throttling
- Access Cache
- Search Query Web Part
- Security Trimming Cache
- App Access Token Cache
- View State Cache
- Default Cache
There are some administrative tasks you may need to perform with the Distributed Cache service:
- Stopping or starting the Distributed Cache service
- Changing the memory allocation for the Distributed Cache service
- Adding or removing a server in a Distributed Cache cluster
- Changing the service account of the AppFabric caching service
- Performance tuning
- Repairing a cache host
We'll look at the supported methods for doing each of these previously listed tasks.
Stopping or starting the Distributed Cache service
The Distributed Management may need to be stopped or managed during upgrades. The cache service can be stopped or started using Central Administration. To do that, follow the steps given here:
- Launch Central Administration and select Application Management.
- In Service Applications, click Manage Services on Server.
- On the Services on Server page, find the Distributed Cache service.
- Under the Actioncolumn, click Stop to stop the Distributed Cache service (if it is running) or click Start to start the service (if it is not currently running).
However, if the cache host is a member of a Distributed Cache cluster, use the process detailed under the Adding or removing a server in a Distributed Cache cluster section.
Adding or removing a server in a Distributed Cache cluster
If you need to perform maintenance activities on a server that is part of a Distributed Cache cluster, you can stop or start the Distributed Cache service using the SharePoint Management Shell. Follow the steps given here:
- Launch the SharePoint Management shell on the Distributed Cache cluster node to administer.
- Run Add-SPDistributedCacheServiceInstance to add the server to the cache cluster and start the service or Remove-SPDistributedCacheServiceInstance to remove the server from the cluster and stop the service.
Removing a Distributed Cache cluster host unregisters the service from the server, so it will no longer appear. Adding the server back to a cluster will re-register the service.
Changing the memory allocation for the Distributed Cache service
When configuring SharePoint Server, the Distributed Cache service is automatically allocated 10% of the server's physical memory. If you install or remove memory in a Distributed Cache host or if the server is configured to be a dedicated Distributed Cache server, you may need to update the configuration for the Distributed Cache service.
When calculating the amount of memory to allocate, use this formula:
((Total Physical Memory - 2GB) / 2) * 1024
For example, if your server has 24 GB of physical memory, we get the following:
((24 - 2) /2 ) * 1024 = 11,264 (11 GB)
A maximum of 16 GB can be allocated to the Distributed Cache service on a cache host.
Viewing cache configuration
To view the existing configuration, follow these steps:
- Launch SharePoint Management Shell on a server configured with the Distributed Cache role.
- Run the following cmdlets:
          Use-CacheCluster


          Get-AFCacheHostConfiguration -ComputerName $Env:ComputerName -CachePort "22233"
The console will display the current cache configuration.
Configuring the cache
If you change the amount of memory installed in a server, you will need to update the cache configuration to take advantage of it. To update the configuration, follow these steps:
- Launch Central Administration.
- Stop the Distributed Cache service on all hosts by selecting Services on Server and then Stop under actions for the Distributed Cache service.
- Launch the SharePoint Management Shell on a server configured with the Distributed Cache role.
- Run the following cmdlet (where <value>is the size in megabytes):
Update-SPDistributedCacheSize -CacheSizeInMB <value>
- From Central Administration, select Services on Server and then Start under actions for the Distributed Cache service.
The configuration cmdlet only needs to be run once. All servers will use the same setting.
Changing the service account of the AppFabric caching service
When a SharePoint Server farm is initially configured, the SharePoint Products Configuration Wizard sets the service account for many services, including the AppFabric Caching service, to the farm service account. Due to the security requirements of your organization, it may be necessary to change this to a different account (such as a SharePoint managed account). To do so, use the following process:
- On an Active Directory Domain Controller (or a computer with the Remote Server Administration Tools installed), launch Active Directory Users and Computers.
- From Active Directory Users and Computers, create a new domain user account.
- Launch the SharePoint Management Shell.
- Create a new SharePoint Managed Accountusing the following process (entering DOMAINusernameandpasswordof the account created instep 1):
          $Credential = Get-Credential


          New-SPManagedAccount -Credential $Credential
- Set the Distributed Cache service to use the new SharePoint Managed Account:
          $Farm = Get-SPFarm


          $CacheService = $Farm.Services | ? {$_.Name -eq "AppFabricCachingService"}


          $ManagedAcount = Get-SPManagedAccount -Identity $Credential.UserName


          $cacheService.ProcessIdentity.CurrentIdentityType = "SpecificUser"


          $cacheService.ProcessIdentity.ManagedAccount = $ManagedAccount


          $cacheService.ProcessIdentity.Update()


          $cacheService.ProcessIdentity.Deploy()
The Distributed Cache service will be updated to use the new account. In farms where there is more than one Distributed Cache server, stop the Distributed Cache service on all other Distributed Cache hosts.
Performance tuning
While understanding the specific performance tuning variables and values is out of scope for the MS-301 exam, it is important to know that they can be viewed and modified using the Get-SPDistributedCacheClientSetting and Set-SPDistributedCacheClientSetting cmdlets, respectively. For more information on specific performance tuning values, see https://docs.microsoft.com/en-us/sharepoint/administration/manage-the-distributed-cache-service#fine-tune-the-distributed-cache-service-by-using-a-powershell-script.
Repairing a cache host
At some point, a Distributed Cache host may enter a non-function or non-responsive state and its health status will trigger an alert in the Health Rules in Central Administration. If this happens, it may be necessary to remove and restore the Distributed Cache Host. To do so, log in to the non-functioning Distributed Cache host and follow these steps:
- Launch an elevated SharePoint Management Console prompt.
- Run the Remove-SPDistributedCacheServiceInstance cmdlet.
- Run the Add-SPDistributedCacheServiceInstance cmdlet.
For more detailed information on configuring the Distributed Cache service, see https://docs.microsoft.com/en-us/sharepoint/administration/manage-the-distributed-cache-service.
Now that you've seen where to administer SharePoint Server at a high level, we'll start configuring service applications.
Deploying and configuring service and web applications
In SharePoint Server terminology, web applications are the constructs used to provide the configuration and hosting infrastructure for SharePoint site collections. Each web application starts with an Internet Information Services (IIS) website. Each individual web application is connected to its own IIS website (using either a unique or a shared application pool). Frequently, each IIS site is configured with a unique domain namespace, which can be both used for application structuring and topology as well as a security measure to mitigate cross-site scripting attacks.
Each web application has at least one content database associated with it. SharePoint Server 2016 and SharePoint Server 2019 both support up to 20 web applications per farm. Since each web application has an IIS site associated with it, you can only have one (by default) that answers on port 80 or 443. In previous versions of SharePoint Server, you could accomplish hosting multiple applications on a single port by using host headers or alternate access mappings.
While these methods are still supported, Microsoft currently recommends using host-named site collections moving forward unless absolutely necessary, as that is the underlying technology being deployed and supported in SharePoint Online. Host-named site collections allow you to assign unique DNS names to site collections (such as http://intranet.fabrikam.com, where the intranet is the hostname assigned to the site collection), as opposed to using a longer path to the site collection (such as http://fabrikam.com/sites/intranet).
For host-named-based site collections, Microsoft currently recommends an architecture similar to the following as best practice:

While web applications are used generally to provide a framework for users to interact with data, service applications are used to share features and capabilities across web applications or farms. Examples of service applications include the following:
- Managed Metadata
- Secure Store
- PerformancePoint
- User Profile
These capabilities allow developers and administrators to leverage common data and configurations across a farm or organization.
We'll examine tasks for creating and configuring a web application next.
Creating a web application
While Microsoft recommends creating host-named site collections moving forward (it's the technology used to support SharePoint Online), the Central Administration interface does not yet support doing it. Creating host-named site collections requires PowerShell to complete.
Before beginning, you'll need to make sure you havemet the following prerequisites:
- Ensure the account you are using has the securityadmin fixed server role on the SQL server instance hosting SharePoint.
- Ensure the account you are using has the db_owner fixed database role on all databases that are to be updated (such as master and the SharePoint_Configdatabases).
- Ensure the account you are using is a member of the Administrators group on the server where you are performing the task.
- Select a name for the web application (in the following example, we're going to use the name, MS301 Demo Web App).
- Create or select an existing SharePoint Managed Account (you can refer to the steps in Chapter 2, Planning a SharePoint Farm, for configuring a managed account).
- Ensure no existing website or application is listening on the port specified.
Once you have met the prerequisites, you can follow these steps to create a basic web application that will be used to host your site collection. We'll be using the previous reference architecture diagram as a guide:
- Launch theSharePoint Management Shell.
- Run the following command (replacing the parameter values with ones valid for your environment) to create the web application:
          $WebAppPparams = @{


          Name = 'MS301 Demo Web App'


          Port = 80


          ApplicationPool = 'MS301AppPool'


          ApplicationPoolAccount = (Get-SPManagedAccount "MS301DemoSPFarmServices")


          AuthenticationProvider = (New-SPAuthenticationProvider -UseWindowsIntegratedAuthentication)


          }


          New-SPWebApplication @WebAppParams
If you have an existing application using port 80 on this server, you'll receive an error configuring the web application and will need to either change the port, add an interface to the server, or remove the existing configuration.
Once completed, the web application should be visible in the Central Administration interface by navigating to Central Administration | Application Management | Manage Web Applications:

After the web application has been created, you can move on to creating the site collections.
Creating a root site collection
Creating the root site collection will allow you then create sites with unique names. A root site collection is required for any deployment as well as crawling content. The root site collection must have the same URL as the web application. At this time, SharePoint prevents creating a host-named site collection with the same URL as a web application, so you'll need to create it as a path-based site collection.
Using the previously created web application configuration, we're going to create the root site collection:
- Launch the SharePoint Management Shell.
- Run the following command (replacing the parameter values with ones that are valid for your environment) to create the root site collection:
          $SiteParams = @{


          Url = "http://$($env:COMPUTERNAME)"


          Name = "Portal"


          Description = "Portal root site collection"


          OwnerAlias = "ms301demolabadmin"


          Language = "1033" # English


          Template = "STS#0" # Team site template


          }


          New-SPSite @SiteParams
After a few moments, the site collection should be created.
Creating host-named site collections
Now that all of the underlying application infrastructures have been completed, you can create the host-named site collections. As previously mentioned, host-named site collections cannot yet be created in the Central Administration user interface, though path-based configurations are supported.
New host-named site collections are created with the New-SPSite -HostHeaderWebApplication syntax. Be careful! The cmdlet name is a little misleading. Host headers typically refer to a web server configuration, but you are not configuring IIS host headers.
As you begin using the reference architecture as a guide, you can follow these steps to create the host-named site collections:
- In your organization's DNS console, add a CNAME record for each URL pointing to the hostname of the SharePoint farm. In our example, we're going to create host-named site collections for intranet.ms301demo.com and engineering.ms301demo.com, so we'll need CNAME records that map those names to the existing web application (webapp.ms301demo.com).
- Launch the SharePoint Management Shell.
- Run the following command (replacing the parameter values with ones valid for your environment) to create the host-named site collections:
          $Sites = @(@{Url="intranet.ms301demo.com";Name="Intranet"},@{Url="engineering.ms301demo.com";Name="Engineering")


          $HostNamedSiteParams = @{


          HostHeaderWebApplication = ((Get-SPWebApplication "MS301 Demo Web App").Url)


          OwnerAlias = "ms301demolabadmin"


          Language = "1033" # English


          Template = "STS#0" # Team site template


          }


          Foreach ($Site in $Sites) { New-SPSite @HostNamedSiteParams -Name $Site.Name -Url "http://$($Site.Url)" }
After the site collections have been created, you can navigate to them and add additional subsites and content as appropriate:

Now that you understand how web applications are created and used, we'll look at using them to host applications and services. Next, we will begin exploring the User Profile service.
Planning and configuring user profiles
The User Profile service is used by SharePoint Server to store data about users. It's required for My Sites and OneDrive, social networking features such as tagging and newsfeeds, creating and managing audiences and organizational charts, and delivering user profile information to other services or web applications (either on the local farm or connected farms). The User Profile service is also used by servers for accessing resources on behalf of users in server-to-server authentication scenarios as well as in SharePoint Hybrid scenarios.
The User Profile Service has a dependency on the Managed Metadata service application (you'll learn how to configure the Managed Metadata service in Chapter 7, Planning and Configuring Managed Metadata) as well as a My Site collection.
In this section, we'll look at an overview of some of the planning tasks for the User Profile service, and then we'll configure the User Profile service application.
Planning for user profiles
User profile data can be gathered from a variety of different data sources, including Active Directory, third-party business systems, scripting, or manual entry by end users. It's important to note that user profiles are different than user accounts. The SharePoint user account store is used to manage security and access controls to various parts of the platform. The user profile is informational in nature and used to organize data about the users and their relationships to other data entities.
In SharePoint Server 2016 and later, data is typically ingested into the User Profile service through a process called synchronization. You can import data into a user profile using Active Directory Domain Services Import or with Microsoft Identity Manager 2016.
Planning for a successful User Profile service deployment will involve the following steps:
- Identifying what data will be collected: This could include basic information such as name or job title and organizational data such as a manager or team members, as well as more detailed data such as years in their current role or skills.
- Identifying which properties will be public or private: If the User Profile service application is used to store data of a more private nature (such as performance review metrics), you may want to flag that data as being only available to the user themselves.
- Identifying what sources will be used to contribute data: Most organizations will synchronize some data from Active Directory, though they may have other internal application sources (such as human resources or payroll application) that may contain additional data points to be included.
- Determining how profile properties will be used for any applications or personalization policies: Mapping out the requirements of applications will be critical to knowing whether data needs to be included in the SharePoint User Profile service.
Each organization's requirements will be different, balancing the amount of data collected with how it will be used and what will be visible to other people in the organization.
Next, we'll create the User Profile service application.
Creating a User Profile service application
If the User Profile service hasn't already been created in your SharePoint farm, you can use the following steps to build it:
- Launch Central Administration.
- Navigate to Application Management, and then select Manage service applications in the Service Applications section.
- On the ribbon, in the Create grouping, click New and then select User Profile Service Application:

- Configure the settings for the User Profile Service application:

- In theApplication Poolsection, either choose an existing application pool or select Create a new application poolto create a new one.
- In the Profile Databasesection, enter the name of the database server you want to host the User Profile service application database, enter a value for the name, and select an authentication type (Windows authentication is recommended). If you will be using SQL Database Mirroring, configure the Failover Server option.
- In the Synchronization Databasesection, enter the name of the database server you want to host the User Profile service application synchronization database, enter a value for the name, and select an authentication type (Windows authentication is recommended). If you will be using SQL database mirroring, configure the Failover Serveroption.
- In the Social Tagging Databasesection, enter the name of the database server you want to host the User Profile service application social tagging database, enter a value for the name, and select an authentication type (Windows authentication is recommended). If you will be using SQL database mirroring, configure the Failover Server option:
-
- Leave the My Site sections blank for now.
- In the Site Naming Format section, select a method for naming new personal sites.
- In the Default Proxy Groupsection, leave the default option selected.
- In the Yammer Integration section, select whether or not to use Yammer for social features. This will require an Office 365 tenant with an active Yammer subscription.For this exercise, select the Use on-premise SharePoint social functionality option.
- Click Create.
Once the User Profile Service has been created, we can move on to customizing.
Extending user profiles
If your organization needs to keep track of data or information as part of the user profile that is not part of the default user profile dataset, you can customize the User Profile service with additional properties. These properties may be used for reporting, creating and managing audiences, or integration into other applications.
To add, delete, or modify a user profile property, follow these steps:
- Launch Central Administration.
- Click Application Management, and then select Manage service applications.
- Click on the User Profileservice application.
- In the People section, select Manage User Properties:

- To add a property, click New Property. To edit or delete a property, select the property in the list, and then select Edit or Delete:

- When adding a property, fill out the values (Name, Display Name, and Description). If you have additional language packs installed, you can click Edit Languages to edit how properties are displayed to the end user. Values for Name must comply with the URI schema name specification in RFC2396 (alpha-numeric, start with a letter, can include symbols ., +, or -, and must not have spaces):

- When adding a property, under Property Settings, select a Type. The type cannot be changed when editing; if you need to change the type of a property, you'll need to delete the property and start over.
- In the Policy Settings section, select whether the policy is required and its privacy settings, as well as whether you want the user to be able to override the configuration.
- In the Display Settings section, choose where the property is displayed (user profile page, Edit Details page, or newsfeed).
- In the Search Settings section, choose whether the property should be indexed or aliased. Aliased properties are treated equivalent to the username when performing searching. The availability of the Alias checkbox depends on the privacy setting for the property being set to Everyone (public). If you mark a property as Indexed (default), it will become part of the People search scope schema and will be crawled.
- If you have connected data sources (such as an HR application or a Business Data Connectivity (BDC) service), you can create a mapping between the data source and the User Profile service. (Note: BDC sources only support Import, while other connected data sources also support Export).
- Click OK to finish creating the profile property.
At this point, you've seen how to configure the user profile service and extend it with additional properties. Next, we'll look at importing data from Active Directory.
Configuring user profile synchronization
The User Profile service, as previously mentioned, is used to information about the user. By default, it has no data associated with it. You'll need to connect one or more data sources to it.
In this next section, we'll walk through configuring SharePoint Active Directory Import, which is the most common method for getting user data into the User Profile service.
Configuring SharePoint to use Active Directory
The first step in this process is to update the User Profile service to use Active Directory. Follow these steps:
- Launch Central Administration.
- Click Application Management and then select Manage service applications.
- Click the User Profile Service and then select Manage in the Operationsgroup on the ribbon.
- Under Synchronization, select Configure Synchronization Settings:

- Select the Use SharePoint Active Directory Import radio button and click OK:

The User Profile service application will now use the native Active Directory import.
Creating a synchronization connection
At this point, the User Profile service has been prepared for Active Directory import. The next task is to connect the User Profile service to one or more Active Directory environments.
The core prerequisite for configuring synchronization is a service account. Configuring a synchronization connection requires an Active Directory user account with Replicating Directory Changes permission delegated. Most SharePoint Server services cannot use a Managed Service Account or Group Managed Service Account and must use a normal user account.
Follow these steps to set up an account with the correct permissions and configure the synchronization connection:
- On a server with the Active Directory Remote Server Administration Tools, launch an elevated PowerShell session.
- Run the following command, substituting the appropriate values for the domain and user account:
          $SamAccountName = "sps-adimport-svc"


          $Name = "SharePoint Active Directory Import"


          $Password = ([System.Web.Security.Membership]::GeneratePassword(15,2))


          $SecurePassword = ConvertTo-SecureString -AsPlainText $Password -Force


          New-ADUser -DisplayName $Name -SamAccountName $SamAccountName -Name $Name -AccountPassword $SecurePassword -Enabled $True


          $RootDSE = Get-ADRootDSE


          $DefaultNamingContext = $RootDSE.defaultNamingContext


          $ConfigurationNamingContext = $RootDSE.configurationNamingContext


          dsacls $DefaultNamingContext /G "$($SamAccountName):CA;""Replicating Directory Changes"$RootDSE = Get-ADRootDSE


          $DefaultNamingContext = $RootDSE.defaultNamingContext


          $ConfigurationNamingContext = $RootDSE.configurationNamingContext


          dsacls $DefaultNamingContext /G "$($SamAccountName):CA;""Replicating Directory Changes"


          "$($env:USERDOMAIN)$($SamAccountName)"


          "$($Password)"
- Save the username and password values for later.
- Launch Central Administration.
- Click Application Managementand then select Manage service applications.
- Click the User Profile Serviceand then select Managein the Operationsgroup on the ribbon.
- In Synchronization, select Configure Synchronization Connections.
- Click Create New Connection:

- In the Connection Name section, enter a name to uniquely identify this directory connection.
- In Type, ensure Active Directory Import is selected.
- In Connection Settings, enter the fully-qualified domain name and set Windows Authentication as the authentication type.
- Using the values saved in step 3, populate the Account name and Password fields:

- Ensure the Port value is set to 389. Active Directory, by default, listens on port 389, so you'll likely just leave this as is. If you want to use SSL to perform the synchronization, you will need to export the certificate from a domain controller and import it to the synchronization server before completing this task (or you can return to this connection later and update it).
- Select filtering options. You can whether or not to filter disabled accounts with the Filter out disabled users checkbox as well as specify an LDAP query to more narrowly scope objects.
- Under Containers, select which organizational units to synchronize. Clicking the Populate Containers button to retrieve the organization units for the selected domain, and then select click the selection box next to the name of the organizational unit to include it in synchronization:

- Click OK.
The synchronization connection should be configured and should be listed on the Synchronization Connections page.
Mapping user profile properties
By default, user profile properties are mapped to corresponding AD attributes. However, there may be times when you need to update the default mappings or define mappings for custom properties.
To modify or update the mapping of user profile properties, follow these steps:
- Launch Central Administration.
- Click Application Managementand then select Manage service applications.
- Click the User Profile Serviceand then select Managein the Operationsgroup on the ribbon.
- Under People, select Manage User Properties.
- Select a property to edit, and then click Edit.
- Scroll down to the Property Mapping for Synchronizationto remove mappings or the Add a New Mapping section to add on.
- Click OK when finished.
There are a handful of default mappings that are not displayed in the User Interface. They are as follows:
|
Active Directory attribute |
User profile property |
|
department |
Department |
|
displayName |
PreferredName |
|
dn |
SPS-DistinguishedName |
|
givenName |
FirstName |
|
|
WorkEmail |
|
manager |
Manager |
|
msDS-PhoneticDisplayName |
SPS-PhoneticDisplayName |
|
msDS-PhoneticFirstName |
SPS-PhoneticFirstName |
|
msDS-PhoneticLastName |
SPS-PhoneticLastName |
|
msDS-SourceObjectDN |
SPS-SourceObjectDN |
|
objectSid |
SID |
|
physicalDeliveryOfficeName |
Office |
|
proxyAddresses |
SPS-ProxyAddresses |
|
sAMAccountName |
UserName |
|
sn |
LastName |
|
telephoneNumber |
WorkPhone |
|
title |
SPS-JobTitle |
|
wWWHomePage |
PublicSiteRedirect |
If you have added custom properties or want additional data source mappings, edit the property mappings. Once you have made your edits, you'll need to synchronize the profiles.
Running a manual profile synchronization
The profile synchronization process is used to import data from connected directories. You can use these steps to initiate a manual profile synchronization:
- Launch Central Administration.
- Click Application Managementand then select Manage service applications.
- Click the User Profile Serviceand then select Managein the Operationsgroup on the ribbon.
- Under People, select Start Profile Synchronization.
- Select the Start Full Synchronizationradio button and then click OK:

Most of the time, incremental synchronization is sufficient. However, if you add properties or update mappings, you'll need to run a full synchronization.
After you have run a profile synchronization, you can view a user's profile properties to make sure data was imported successfully. To navigate to a user's profile, on the Manage Profile Service page under the People section, select Manage User Profiles. You can search for a profile and view its data:

Once you have confirmed that user profile data has been successfully imported, you can configure a profile synchronization schedule.
Scheduling profile synchronization
As we learned in the previous section, profile synchronization imports data from the connected directory data source to the appropriate mapped attributes. Manual synchronization is just that—a manual, one-time process. To keep your User Profile service updated with the latest data, you'll want to configure a regular synchronization job.
To configure the synchronization schedule, follow these steps:
- Launch Central Administration.
- Click Application Managementand then select Manage service applications.
- Click the User Profile Serviceand then select Managein the Operationsgroup on the ribbon.
- Under People, select Configure Synchronization Time Job.
- Select a time increment (minutes, hours, days, weeks, or months), and enter a numeric value:

- Scroll to the bottom of the page and click OK.
The User Profile service application has been configured and is available to import and store data associated with users from a variety of sources. In the preceding section, it was configured to import from Active Directory.
Next, we'll begin planning and configuring My Site (also known as OneDrive).
Planning and configuring OneDrive/My Site access
From an architecture perspective, the My Sites or OneDrivefeature is really a specialized site collection that hosts individual user SharePoint sites. It has a specific template (the My Site Host template) and is used to store personal files and content. You can think of it as a potential replacement for standard file share-based home directories.
My Sites and the User Profile service have interdependencies: a My Sites site collection is required for the User Profile service (which we'll get to in the next section), the My Sites requires a User Profile service application, and the User Profile service requires assigning a My Sites collection as part of the configuration. My Sites also requires a Managed Metadata service application (you can learn more about the Managed Metadata service application in Chapter 7, Planning and Configuring ManagedMetadata).Configuring My Sites requires a little bit of back-and-forth with the User Profile service application.
A My Site host site collection can be created during the initial SharePoint Server setup and configuration. If it's been created, Microsoft recommends deleting that site collection, using a new web application dedicated to hosting My Sites, and then creating a new site collection in that web application. This provides the best option for performance, scalability, and security.
In this section, we'll look at common My Sites configuration tasks:
- Creating a My Sites collection
- Updating the User Profile service application
Creating a My Sites collection
As the Microsoft recommendation is to create a separate web application for My Sites, we'll walk through those steps. The prerequisites for this process will be as follows:
- You need an additional IP address assigned to each server that will be hosting My Sites.
- A DNS: A record representing each of the IP addresses that will be associated with My Sites is needed. In this example, we will add a DNS A record to map the name my to 10.0.0.6.
Once you have met the prerequisites, you can follow these steps to create the My Sites site collection and enable self-service provisioning for users:
- Create a DNS A record for your My Sites host.
- Launch Central Administration.
- Click Application Management and then select View all site collections. If a My Sites collection has been configured, delete it.
- In this example, we're going to host My Sites on a separate IP address on the same server so we don't have to deal with host headers or alternate access mappings. You can use a script like this on each of your servers that will host My Sites, replacing the IP address and the DNS name for the host header in New-IISSite -BindingInformation:
New-Item -Path C:InetPub -Name MySites -ItemType Directory
New-IISSite -Name "My Sites" -PhysicalPath "C:InetPubMySites" -BindingInformation "10.0.0.6:80:my.ms301demo.com"
- Create a new web application to host the site collection. In Central Administration, click Application Managementand then select Manage web applications.
- On the ribbon, select New. Fill out the values of the web application. For this example, we'll use the newly created website,My Sites,by selecting it in the IIS Web Sitesection. If you don't have an SSL certificate already bound to the site, you won't be able to configure SSL, but you can come back and update the web application afterward:

- In the Public URLsection, enter the DNS name you're going to assign to this My Sites instance.
- In the Application Poolsection, select the Create new application poolradio button, enter a name, and select a security account (like we did for the farm service account). You can create and register a new managed account as well:

- In the Database Name and Authenticationsection, enter the database server and database name you wish to use and choose an authentication type.
- Scroll to the bottom of the page and click OK.
- Once the web application has finished provisioning, click the Create Site Collection link:

- Enter a value for the Title and Description of My Sites.
- In the Web Site Address section, the URL you selected earlier for the My Site host should be displayed. Leave the drop-down menu for the path selected as / (as a root site collection is necessary for self-service site provisioning later).
- In the Template Selection section, select the Enterprisetab and then select My Site Host:

- In the Primary Site Collection Administrator section, specify a name for the owner of the site collection in domainusername format.
- Click OK to begin provisioning.
- Note the path where the site collection was created and click OK:

- Select the new My Sites web application form the list of web applications so that it is highlighted.
- On the ribbon, in the Manage group, select Managed Paths.
- In the Add a New Path section, type the name of the path you want to append to the My Sites URL namespace. For example, if you want a user's My Site address to be http://my.domain.com/personal/<username>, enter personal in the textbox. Click Add Path when finished, and then click OK:

- On the ribbon, in the Securitygroup, select Self-Service Site Creation:

- In the Site Collectionsection, select the On radio button. Leave the Hide the Create site command radio button selected:

- Scroll to the bottom of the page and click OK.
- On the ribbon, in the Policy group, select Permissions Policy:

- Click Add Permission Policy Level.
- In the Name and Description section, add a name and, optionally, a description.
- In the Permissions section, scroll to the Site Permissions subsection and select the checkbox in the Grantcolumn for Create Subsites - Create subsites such as team sites, Meeting Workspace sites, and Document Workspace sites:

- Scroll to the bottom of the page and click Save.
- On the Manage Permissions Policy Levels dialog, click OK.
- On the ribbon, in the Policy group, select User Policy.
- Click Add Users:

- Under Zones, select (All Zones) and click Next.
- In the Choose Users section, add the users for whom you want to enable self-service My Sites provisioning. For most organizations, this will be All Users. To select all users, click the Browse icon:

- Select All Users, select Everyone, and then click the Add -> button. Click OK when finished:

- In the Choose Permissions section, select the self-service site creation policy you previously created, and then click Finish:

- Note that the policy has been added. Click OK:

At this point, the My Sites host and site collection have been created and permissions have been assigned.
To finish this configuration, we'll need to update the User Profile service application.
Updating the User Profile service application
After the My Site host site collection has been configured, you'll need to update the My Site settings in the User Profile service application to complete the configuration. These settings are necessary to ensure that the User Profile service application is aware of the correct My Site host collection settings.
To update the User Profile service application, follow these steps:
- Launch Central Administration.
- Click Application Management, and then select Manage service applications.
- Select the User Profile service that you previously created so that it is highlighted.
- On the ribbon, in the Operationssection, choose Manage.
- Under My Sites Settings, click Setup My Sites:

- If you have a Search Center configured, you can enter the URL under the PreferredSearch Center section. You can learn more about configuring Search in Chapter 8, Manage Search.
- In the My Site Host section, enter the URL of the My Site host site collection (step 17 in the previous section).
- In the Personal Site Location section, enter the managed path that you created (step 20 in the previous section). Be sure to exclude both leading and trailing slash characters:

- Under Site Naming Format, choose an option for generating the users' My Site path.
- If you are configuring SharePoint Server 2016, you can set the Language Options to allow the user to set the default language for their My Site. SharePoint Server 2019 defaults to the installation language for SharePoint.
- In the Read Permission Level section, you may need to select names and click the Resolve icon to update them.
- Under the Newsfeedsection, you can enable or disable activities in the My Site newsfeed.
- In the Email Notificationssection, you can enter a reply address for system-generated emails.
- In the My Site Cleanup section, leave the Enable access delegation checkbox selected. When a user is off-boarded and their profile is deleted, this setting configures the user's manager (as listed in Active Directory) to receive access to their site. You can also specify an additional secondary owner for situations where a user's manager cannot be determined.
- Under the Privacy Settings section, configure whether you want a user's My Site profile data to be public (followers and following, social tagging, birthdays, job title, blog posts, and other activities). If you make the sites public by default, users will still have the ability to update what things they want to be shared.
- Click OK.
After this step has finished, the integration between My Sites and the User Profile service application is complete.
Next, we will discuss some of the monitoring capabilities of SharePoint Server.
Monitoring
As part of the management of a SharePoint Server environment, you'll need to review data about the performance and statistics. Configuring the various logging options and reviewing the output periodically will help you to understand how the environment is being used as well as anticipate needs for growth and detect potential issues.
In this section, we'll look at the SharePoint Health Analyzer, usage data, and diagnostic logging.
Monitoring farm Health Analyzer reports and resolving issues
The SharePoint Health Analyzer is a tool that is used to check for potential issues, including general configuration, performance, and usage. Using pre-defined rules that target security, performance, configuration, or availability, you can get a detailed report on the overall status of a farm.
When one or more servers, applications, or other entities exceeds thresholds defined by the rules, an alert may be displayed on the Central Administration dashboard, as shown in the following screenshot:

To view the conditions that are responsible for generating the error, you can click the link to View these issues. The health report will display the category, along with information on which services generated the report and which servers may be affected:

Each item in the list can be clicked and will display additional information regarding the rule that generated the error as well as potential remedies, as shown in the following screenshot:

You can follow the steps listed under the remedy section to resolve the issue. After you have resolved the issue, you can click the Reanalyze Nowbutton in the Health group on the ribbon to test and verify the solution.
Configuring Health Analyzer rules
Depending on your business or organizational needs, you may find it necessary to adjust, enable, or disable particular Health Analyzer rules. To update the parameters for a particular rule, follow these steps:
- Launch Central Administration.
- Select Monitoring, and then select Review rule definitionsunder Health Analyzer:

- Select a rule to modify and click on it:

- Click Edit item on the ribbon to customize the rule. Click Save when complete, or click Cancel to discard the changes to the rule.
Each rule has several configurable fields:
- Title: The title is the description displayed in the health analyzer.
- Scope: Manage what server or servers to run the rule against.
- Schedule: Rules can be run hourly, daily, weekly, monthly, or on-demand.
- Enabled: Choose Yes or No to determine whether the rule runs.
- Repair Automatically: Some rules have built-in tasks that they can run to attempt to self-heal the problem. You can enable or disable this functionality. If a rule does not have any repair actions, this setting is ignored.
- Version: You can change the version number of the rule to indicate changes you've made to any of the configurable options.
While the preceding properties can be updated, the actual rules cannot be modified.
Configuring the Health Analyzer timer job
SharePoint Health Analyzer runs on a schedule, controlled by a timer job. You can manage the schedule using the following process:
- Launch Central Administration.
- Select Monitoring, and then select Configure usage and health data collectionunder Reporting:

- Under the Usage Data Selectionsection, select Enable usage data collection:

- Scroll down to the Health Data Collection section and right-click the Health Logging Schedule link to the timer job definitions page in a new tab:

- Scroll to the Health Analysis jobs, and then click the individual job to edit the schedule:

- After you've updated the schedule on a particular job, click OKand close this tab.
- Go back to the Configure usage and health data collection page and click OK to save any changes.
Monitoring storage usage for SharePoint
Usage reports are available for SharePoint sites and site collections. The usage reports can be used to show you what parts of a site are taking up space, both in real numbers and as a percentage of the site.
To access a storage metrics report for a site or site collection, follow these steps:
- Navigate to a site.
- Click the Gearicon, and then select Site settings:

- In the Site Administration section, select Storage Metrics.
- Review the storage metrics data:

You can use the SharePoint storage reports in conjunction with reports from the SQL database infrastructure to estimate growth needs for capacity planning.
Configuring diagnostic logging
Diagnostic logging can be used to gather detailed information about the configuration, performance, and metrics of a SharePoint Server environment.
When configuring diagnostic logging, you can set the threshold for the detail level for data written to the server event and trace logs. The following tables describe the levels of logging available:
Event Log Detail Levels
|
Level |
Definition |
|---|---|
|
None |
No logging is captured. |
|
Critical |
This is a serious error, resulting in a major failure. |
|
Error |
This is an urgent condition that requires investigation. |
|
Warning |
A potential problem or issue might require attention. Warnings should be tracked for any patterns. |
|
Information |
No action is required. |
|
Verbose |
This is a detailed information level for messages. |
Trace Log Detail Levels
|
Level |
Definition |
|---|---|
|
None |
No trace logs are captured. |
|
Unexpected |
This includes messages about events that cause solutions to stop processing. With this setting, the log will include events tagged at the Unexpected, Exception, Assert, and Critical levels. |
|
Monitorable |
This includes messages about all unrecoverable events that limit functionality but do not stop the application. With this setting, the log also includes events that the Unexpected setting records. |
|
High |
This includes messages about events that are unexpected but that do not stop the processing of a solution. This setting also includes all events that the Monitorable setting records. |
|
Medium |
This level records all high-level information about system operations. This level also includes all events that the High setting records. It is the most common setting when beginning troubleshooting operations. |
|
Verbose |
When set to this level, the log includes most actions about operations in the system. This level is typically used only for debugging in a development environment. With this setting, the log will also include all events that the Medium setting records. |
|
VerboseEx |
This level is only configurable through theSet-SPLogLevelPowerShell cmdlet and includes very low-level diagnostic data. This level should only be used in a development environment. This log level includes everything from the Verbose setting as well. |
To configure diagnostic logging, follow these steps:
- Launch Central Administration.
- Click Monitoring, and then, in the Reporting section, select Configure diagnostic logging.
- Expand the list of categories and select one or more to enable logging. Scroll down and select the threshold of what log level to report for both the event and trace logs:

- Under Event Log Flood Protection, select the Enable Event Log Flood Protection checkbox to limit logging duplicate events that show.
- Under Trace Log, enter a path to store the trace logs, a length of time to store the logs, and a limit for consuming disk storage. Microsoft recommends you limit the amount of trace log data you retain to prevent from filling up the disk.
- Click OK to complete the configuration.
After logging has been configured, you can begin monitoring the event log. The log file path will store the trace logs and the event log will store application events that are raised.
Next, we'll look at how to properly deploy updates to the SharePoint environment.
Updating SharePoint Server and validate the installation
At some point, every SharePoint Server farm needs to have maintenance tasks performed, such as updating with a newer service pack or cumulative update. These updates typically provide security enhancements or new features and capabilities.
Updating SharePoint Server farms can require multiple steps, including two separate types of update files:
- Public updates, which are language-independent updates
- Language dependent patch, which contains language-specific updates
While the public updates are typically released monthly, the language dependent patch may not be. When performing a public update, it's necessary to re-run the most recent language update patch to ensure that all components continue to function correctly.
Upon the release of software updates, you'll need to distribute the binaries (both the public update and the most recent language patch) to each server in the farm. There is not a specified server order—SharePoint updates are backward compatible to allow updated servers in the farm to co-exist with servers that have yet to be updated. It is not recommended to run in such a configuration for extended periods of time, though.
The steps for performing updates on farms with and without high availability are different. Regardless of which farm topologies have been deployed, it's recommended to validate the updates and the process against a test environment before deploying to production.
While there are several different ways to approach the update cycle, including both complete installation/update cycles with downtime, staged update processes that reduce downtime (but don't eliminate it), or zero-downtime approaches with highly available farms, we'll focus on the most direct process, called the in-place method without backward compatibility.
For our reference environment, we'll use the Small High-Availability MinRole server farm from Chapter 2, Planning a SharePoint Farm, as depicted in the following diagram:

To perform the update, follow these steps:
- Instruct users that the farm will be unavailable for the duration of the update.
- Remove all Front-end & Distributed Cache servers from any load-balanced configuration.
- On a server that runs Search components (in this case, one of the Application & Search servers), launch the SharePoint Management Shell and run the following command to pause Search:
          $ssa=Get-SPEnterpriseSearchServiceApplication


          Suspend-SPEnterpriseSearchServiceApplication -Identity $ssa
- On each server that hosts one or more Search components, stop the following services (in this order):
-
- SPTimerV4
- OSearch16
- SPSearchHostController
- Run the update executable on the Application & Search server hosting Central Administration.
- Run the update executable on the remaining Application & Search servers.
- On each server that hosts one or more Search components, start the following services (in this order):
- SPSearchHostController
- OSearch16
- SPTimervV4
- Verify all search components are active using the following command inside the SharePoint Management Shell:
Get-SPEnterpriseSearchStatus -SearchApplication $ssa | where {$_.State -ne "Active"} | fl
- Resume the Search Service by running the following command inside the SharePoint Management Shell:
Resume-SPEnterpriseSearchServiceApplication -Identity $ssa
- Log on to the first Front-end & Distributed Cache server.
- Run the update executable on the first Front-end & Distributed Cache server.
- Run the update executable on the remaining Front-end & Distributed Cache servers.
- Run the SharePoint Products Configuration Wizard on the server hosting Central Administration. This will upgrade the configuration database and the content databases.
- Run the SharePoint Products Configuration Wizard on the remaining Application & Search servers.
- Run the SharePoint Products Configuration Wizard on the first Front-end & Distributed Cache server.
- Run the SharePoint Products Configuration Wizard on the remaining Front-end & Distributed Cache servers.
- Re-add the Front-end & Distributed Cache servers to any load balancer configuration.
At this point, the farm has been updated.
You can further validate the success of the installation by reviewing the event logs. If errors occurred preventing updates, you can resolve the underlying conditions and resume or re-run the update as necessary.
For more complex update scenarios including zero downtime methods, see https://docs.microsoft.com/en-us/sharepoint/upgrade-and-update/install-a-software-update.
We'll expand the updated methodology to upgrades in the next section.
Selecting an upgrade path for version to version upgrades in on-premises SharePoint deployments
If your SharePoint Server environment is not yet running on the 2019 platform, you will need to plan for an upgrade. If you are running SharePoint Server 2016, you may be able to perform a database-attach upgrade from 2016.
If you are migrating from SharePoint Server, the process is similar, but you'll need to perform a two-step migration (from SharePoint Server 2013 to SharePoint Server 2016, and then again from SharePoint Server 2016 to SharePoint Server 2019).
While it's important to be familiar with the general upgrade path requirements, the MS-301 exam does not spend a lot of time focusing on it.
The following diagram depicts the high-level steps necessary to upgrade from SharePoint Server 2013 or 2016 to SharePoint Server 2019:

Depending on the size of the SharePoint farm and its activity level, organizations may also decide to opt for configuring SharePoint Hybrid environments and provisioning new workloads to SharePoint Online or migrating altogether. You can learn more about SharePoint Hybrid in Chapter 9, Overview of SharePoint Hybrid. You can also learn more about migration options beginning from Chapter 14, Overview of the Migration Process.
Managing SharePoint workflows
SharePoint workflows are automation processes built on top of the Windows Workflow Foundation. The SharePoint Workflow Manager Platform is primarily developed with SharePoint Designer 2013, though Visual Studio can also interact to some degree with workflows.
SharePoint Designer 2013 is the last version of the designer platform. It can connect to SharePoint Server 2013, 2016, and 2019 platforms as well as SharePoint Online.
Microsoft recommends utilizing the Power Automate platform for future workflow development. The Power Automate platform can connect to SharePoint Server environments using a data gateway. You can learn more about data gateways in Chapter 13, Implement a Data Gateway.
SharePoint Workflow Manager is not installed with SharePoint Server and must be downloaded separately. Workflow Manager requires both the App Management and Subscription Service applications to be provisioned. In the following sections, we'll look at the configuration steps for Workflow Manager.
Planning and configuring Workflow Manager
Workflow Manager can be installed on SharePoint farm servers, though it does not have to be. In this section, we will focus on configuring Workflow Manager on a server that is part of the farm.
Configuring prerequisites
Installing the Workflow Manager requires some prerequisites, such as creating service accounts and security controls. To configure the prerequisites, follow these steps:
- On an Active Directory Domain Controller or computer with the Remote Server Administration Tools, create an account for the workflow setup, such as WorkflowSetup. Note the password for later use.
- Create an account for the workflow setup, such as WorkflowSvc. Note the account name and password for later use.
- Create a security group for the workflow administrators, such as Workflow Admins.
- Next, you'll need to add the SharePoint Server service accounts and workflow admin account and set up accounts to the Workflow Admins group you created in step 3.
- Next, log in to the server that is running SQL Server and launch SQL Server Management Studio.
- Navigate to Security and then right-click and chooseNew Login:

- Search to locate and select the WorkflowSetupaccount you created in step 1:

- Select the Server Roles page, select the sysadmin checkbox, and click OK:

- Finally, on the server where you are installing Workflow Manager, add the WorkflowSetup account to the local administrator's group.
Next, we'll begin the configuration of Workflow Manager.
Installing Workflow Manager
To install and configure Workflow Manager, use the following steps.
- Log in to the server where you're going to install Workflow Manager as the WorkflowSetup account (or a farm admin account, if you didn't create the WorkflowSetup account). Download the Microsoft Web Platform Installer from https://www.microsoft.com/web/Downloads/platform.aspx.
- Click the Start menu and launch the Microsoft Web Platform Installer.
- In the search box, type Workflow manager. Select Workflow Manager 1.0 Refresh (CU2)from the list and click Add:

- Click Install.
- Accept the license terms and click Install.
- Click Continue to launch the configuration wizard.
- ClickConfigure Workflow Manager with the Default Settings (Recommended):

- Enter the SQL server name if necessary and click Test Connection.
- Under Configure Service Account, update the user ID and password to that of the Workflow Serviceaccount you created previously. If you do not have an SSL certificate installed on the server, select the Allow Workflow management over HTTP on this computerbox:

- Certificate Generation Key, enter a value that will be used when you join additional workflow servers.
- Click the right arrow to proceed to the confirmation screen.
- Review the configuration. Optionally, click Copy to copy the settings to the clipboard and save them:

- Click the checkmark to begin the installation:

- Review the installation log for any important messages and click the Checkmark to close the installer.
Next, we'll install the Workflow Manager client on all servers that will participate with Workflow Manager.
Installing the Workflow Manager client
On each server in the SharePoint farm, download and install the Workflow Manager client. You'll need to add the Workflow Setup account you created previously to the local Administrators group on each server.
Once you have met the prerequisites, you can use these steps to install the workflow client and join the farm:
- Download the client at https://go.microsoft.com/fwlink/p/?LinkID=268376. Be sure to just select the workflow client:

- Launch the download and complete the Web Platform Installer. At the end of the installation process, click Continue.
- Click Join an existing Workflow Manager Farm:

- Enter the SQL server that Workflow Manager is configured to use, click Test Connection, and then click the Next arrow:

- If the connection is successful, the service account name will automatically populate. Enter the password for the service account and then the Certificate Generation Key. Click the Next arrow when finished:

- Select the option to use the same credentials on the Service Bus page. If you customized the original installation, you can enter the appropriate credentials for the Service Bus. Click the Next arrow when complete:

- Verify the settings and click the Checkmark to begin the configuration.
- Verify that the installation has completed successfully.
The additional server has joined the Workflow Manager farm. In the next section, we'll connect the Workflow Manager farm to the SharePoint farm.
Connecting to SharePoint
The final step is making sure Workflow Manager is available for use with SharePoint. To do so, use the following steps on the server where Workflow Manager is installed:
- Launch SharePoint Management Shell.
- Run the following command to get the Workflow farm and port:
$WorkflowUri = (Get-WFFarm).Endpoints[0]
- Run the following command to register the farm with SharePoint, replacing <site> with a site collection where you want to use Workflow Manager:
Register-SPWorkflowService -SPSite https://<site> -WorkflowUri $WorkflowUri
The Workflow farm should now be registered with SharePoint, allowing you to create and manage workflows.
Next, we'll look at some troubleshooting tasks for Workflow Manager.
Troubleshooting
Sometimes, when attempting to join a Workflow Manager farm, you may run into the issue depicted in the following screenshot:

This error indicates that the account you're attempting to configure Workflow Manager with is not a member of the Workflow Manager Service Bus users. You can check by using the Get-SBNameSpace command from the SharePoint Management Shell:
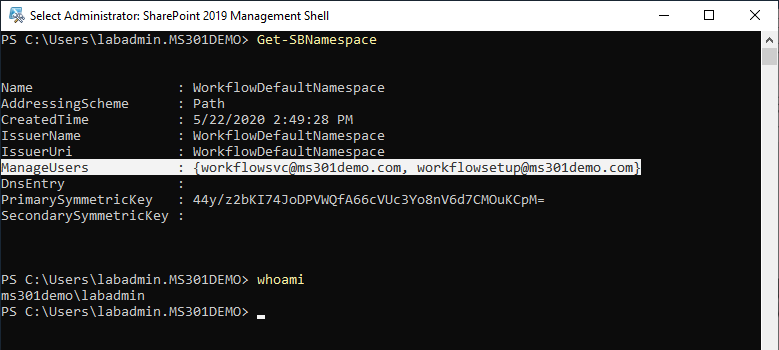
To resolve this issue, you can log off the server and log back in as one of the users listed under ManageUsers or update the users with the following command:
          [array]$ManageUsers = (Get-SBNameSpace -Name WorkflowDefaultNamespace).ManageUsers


          $ManageUsers += "[email protected]"


          Set-SBNameSpace -Name WorkflowDefaultNamespace -ManageUsers $ManageUsers
The screen output should show that the ManageUsers parameter has been updated:

You can then re-run the Join an Existing Workflow Manager Farm task.
Next, we will learn about configuring a content type hub for SharePoint Server.
Configuring a content type hub
In SharePoint Server, a content type is a definition or a reusable collection of metadata, workflows, and other properties and settings for items in a SharePoint list or library. The benefit of a content type is that it allows you to manage settings for a class of information in a centralized way and reuse those parameters across a site.
A content type defines the following attributes of an item stored in SharePoint:
- Document templates (for document content types)
- Properties associated with the type
- Metadata associated with the type
- Information management policies associated with the type
- Workflows that can be started based on the type
- Custom features
A content type can be associated with a site or a library. When you associate a content type with a library or list, users can select that content type when creating new items. The content type can be used to guide users to specify certain properties of a document in a templated fashion or instantiate a workflow based on the item type.
Content types are local to the site where they are created. This is where a content type hub becomes important: it is a special site collection that's used to store content types and site columns. Content types can be used across site collections to drive uniformity and standardization.
In these upcoming sections, we'll prepare the prerequisites and then create and configure a content type hub.
Configuring prerequisites
Before creating a content type hub, you need to meet the prerequisites:
- A managed metadata service
- A site collection with the Team Site template
For information on configuring a managed metadata service, you can follow the process outlined in Chapter 7, Planning and Configuring Managed Metadata.
For information on creating and configuring a site collection, refer to Chapter 5, Manage Site Collections.
Setting up a content type hub
Once you have met the prerequisites for creating a content type hub, you can proceed with configuring the content type hub itself:
- Launch a browser and navigate to the content type hub site collection.
- Click the Gear icon, and then click Site information:

- On the site information panel, select View all site settings.
- Under Site Collection Administration, select Site collection features.
- Locate the Content Type Syndication Hub feature and click Activate:

- Click the browser's Back button to go back to the Site settings page.
- In the Web Designer Galleriessection, select Site content types.
- Click Create to create a new content type:

- Fill out the fields as desired. For example, you can set List Content Types under Select parent content type fromand then select Item as the Parent Content Type. In this example,Custom Content Typehas been selected as the type group:

- Click OK when finished.
- The creation process will redirect to the properties of the newly created content type, where you can edit the particular details:

- From this point, you can click Add from new site column to create new fields for this content type for Add from existing site columns to link existing columns to this content type.
Next, we'll configure a managed metadata service to consume this content type hub.
Configuring a Managed Metadata service
To configure a managed metadata service, follow the steps given below:
- In a separate browser tab, launch Central Administration.
- Navigate toApplication Management | Manage service applications.
- Highlight the Managed Metadata Service row and then click Properties:

- Locate the Content Type Hubsection and enter the URL of the content type hub site collection:

- Click OK.
- Click the Managed Metadata service sub-item and select Properties.
- Select the Consumes content types from the Content Type Hub Gallery at <site> checkbox and click OK:

- Select the browser tab that has the content type you just created.
- Select Content Type Settings | Manage publishing for this content type:

- Select the Publish radio button and then click OK.
- Select the browser tab where you had Central Administration open. Click Monitoring | Review job definitions.
- Click on each of the content type hub jobs and then click Run to initiate the timer jobs to publish.
- On a site where you will use the content type, navigate to Site Settings, and click Content Type Publishing.
- Under the Refresh All Published Content Types section, select the Refresh all published content types on next update checkbox and click OK. The sample content type that was created previously should show up as a Subscribed Content Type:

The content type will now be available for use on the site.
Troubleshooting performance issues
Since much of SharePoint Server's activity is storing or retrieving data from SQL Server, most performance troubleshooting and improvement tasks will rely on troubleshooting the underlying SQL environment.
Core recommendations for improving the performance of a SharePoint farm include the following:
- Ensuring an appropriate amount of frontend and distributed cache servers are deployed with adequate amounts of memory
- Validating the storage architecture for SQL is adequate for the number of read/write IOPS
- Validating all servers in the farm have adequate memory configurations using system performance monitoring for memory utilization and memory paging operations
For detailed recommendations on configuring SharePoint and SQL for best performance, see Chapter 2, Planning a SharePoint Farm.
Configuring SMTP authentication for a SharePoint farm
A feature new to SharePoint Server 2019 is SMTP authentication. In previous versions of SharePoint Server, servers in the farm could only send messages through an existing anonymous SMTP relay. With SMTP authentication, servers can log in to a solution and send mail directly (such as through Exchange Online Protection or other systems).
SMTP authentication requires two configuration tasks:
- Configuring an application credential key on each server in the farm
- Configuring outgoing email for the farm
To configure SMTP authentication, follow these steps on each server in the farm:
- Choose an application credential key to use for the farm. This key will be used to encrypt and decrypt the stored password. This key must be the same on all servers.
- Launch the SharePoint Management Shell.
- Run the following PowerShell commands, replacing the <ApplicationCedentialKeyValue>value with the application credential key you chose in step 1:
          $data = "<ApplicationCredentialKeyValue>"


          $key = ConvertTo-SecureString -String $data -AsPlainText -Force


          Set-SPApplicationCredentialKey -Password $key
Once it has been completed, you can configure outgoing email on the farm with these steps:
- Launch Central Administration.
- Select System Settings and then, under E-Mail and Text Messages (SMS), select Configure outgoing e-mail settings:

- Under the Mail Settings section, enter the fully-qualified server name or IP address for outbound mail in the Outbound SMTP Serverbox.
- Enter the port the specified server uses. If no port is specified, SharePoint Server will use a default of port 25.
- Enter the values for From address and Reply-to address that will be used for outbound messages.
- Select an appropriate character set. The default is for English-based systems is 65001 (Unicode UTF-8), but depending on the configured language for your system, you may need to choose another character set.
- Under the Mail Security section, select the Authenticated radio button, and then enter the appropriate credentials.
- If your outbound server requires it, select the Yes radio button to enable TLS:

- Click OK to save the configuration.
If you are specifying a From address that is different than the credentials you use under the Mail securitysection, you'll need to ensure that the selected credential has been granted Send-As permissions for the address specified in the Fromaddress.
You can test your configuration using PowerShell with a script similar to the following:
Add-PSSnapin Microsoft.SharePoint.Powershell
$Url = (Get-SPSite -Limit 1 -wa sil).Url
$Web = (Get-SPWeb $Url)
While ($To -eq $null) { $To = (Read-Host "Enter recipient email:") }
$Subject = "Test SharePoint Server Authenticated Submission"
$Body = "This is a test of the SharePoint Server 2019 Email with Authenticated Submission"
$Send = [Microsoft.SharePoint.Utilities.SPUtility]::SendEmail($Web,0,0,$To,$Subject,$Body)
If successful, the specified recipient should receive an email with the subject: Test SharePoint Server Authenticated Submission.
Summary
In this chapter, you learned a lot of concepts, including how to plan for and configure Distributed Cache, the User Profile service application, My Sites, Workflow Manager, web applications, and a content type hub. Each of these areas is fundamental to the performance and usability of a farm. Many of the configurations are only performed once, but they must be done correctly to ensure the farm has a good foundation.
One of the most important topics covered was configuring My Sites and the User Profile service—these two services are critical for helping end users get the most value out of SharePoint Server. The SharePoint User Profile service can be used to aggregate data from many systems and use that data to build a robust interface for users to interact with their personal data. The User Profile service and My Sites applications are interconnected, so when you make modifications to one, you have to be aware of implications on the other.
You also learned best practices around configuring host-named site collections, which is Microsoft's recommended architecture moving forward.
Finally, you learned about configuring a feature new to SharePoint Server 2019—authenticated SMTP for delivering messages to users.
In the next chapter, you'll learn about implementing authentication mechanisms for SharePoint Server, allowing you to provide security and access control to sites and applications.
Questions
Use the following questions to test your knowledge of this chapter. You can find the answers in Chapter 16, Assessment Answers:
- You are the administrator of a SharePoint Server 2016 farm. You need to configure outbound SMTP. What option do you have available?
- Authenticated SMTP
- Anonymous SMTP
- SMTPAuth
- OAuth
- Your organization's records management office wants you to configure a feature to allow for consistent metadata application across all sites in your SharePoint farm. Which feature should you configure?
- Cross-site publishing
- Workflow Manager
- Content type hub
- Web Application Foundation
- You are preparing to configure the User Profile service to synchronize data from Active Directory. Which two methods can you use?
- SharePoint Active Directory Import
- SharePoint Active Directory Synchronization
- Microsoft Information Manager
- Microsoft Identity Manager
- You have configured the User Profile service application, but no data from Active Directory has been imported into the service yet. What should you do?
- Run an Azure Active Directory Connect incremental synchronization.
- Flush the Distributed Cache.
- Create a new web application for the User Profile service application.
- Create a synchronization connection to run a profile synchronization.
- You manage a SharePoint Server farm. The root site collection has a URL of http://intranet.fabrikam.com. You install and configure Workflow Manager the workflow.fabrikam.com server. Workflow administrators report that they are unable to create workflows using SharePoint Designer. Which command should you run?
- Set-SPWorkflowConfig -Webapplication http://sharepoint.fabrikam.com DeclarativeWorkflowsEnabled $true
- New-SPWorkManagementServiceApplicationProxy -Name 'Work Management Service Application Proxy'
- New-SPWorkManagementServiceApplication -Name 'Work Management Service Application' ApplicationPool 'SharePoint Web Services Default'
- Register-SPWorkflowService -SPSite http://sharepoint.fabrikam.com -WorkflowHostUri http://workflow.fabrikam.com:12291
- You manage a SharePoint Server farm. You have configured the User Profile service and have added a new attribute mapping for users. However, users are reporting that they cannot see the new attribute in their profile. You need to ensure that the attribute is available for users to update. What action should you perform?
- Full crawl
- Full profile synchronization
- Incremental crawl
- Incremental profile synchronization
- You have recently added 32 GB of additional memory to the servers running the Distributed Cache role, but you discover the servers are only using 3 GB of memory. You need to ensure that the Distributed Cache servers use at least 8 GB of memory for caching requests. Which three steps must you perform in order?
- Start the Distributed Cache service on all servers with the Distributed Cache role.
- From a server with the Distributed Cache role, run Update-SPDistributedCacheSize -CacheSizeInMb 16384.
- From a dedicated Central Administration server, run Update-SPDistributedCacheSize -CacheSizeInMb 16384.
- Stop the Distributed Cache service on all servers with the Distributed Cache role.
- From any server in the farm, run Add-SPDistributedCacheInstance.
- From any server in the farm, run Remove-SPDistributedCacheInstance.
- You are currently using the SharePoint Active Directory Import to synchronize user data into the User Profile service. You need to prevent disabled users from being imported into the SharePoint User Profile service. What should you do?
- Configure the Profile Import Connection to filter disabled users.
- Update the msExchHideFromAddressListsEnabled property disabled Active Directory users to True.
- Grant the Replicating Directory Changes permissions to the service account for the User Profile service.
- Remove the Replicating Directory Changes permission from the service account for the User Profile service.
- You plan to install a Cumulative Update (CU) on the farm. Immediately after applying the update, you return the servers to service and users begin reporting errors. What step should you run?
- Re-install the update on all servers.
- Restart the Distributed Cache service.
- Run the SharePoint Products Configuration Wizard.
- Run Update-SPContentDatabase.
- You manage a SharePoint Server farm. You have the following three types of document libraries: expense reports, purchase orders, and invoices. Each document in the libraries has an associated project code and cost center. You need to ensure that when users check in documents that they are associated with a project code and cost center. The solution must minimize administrative effort. What should you include in the solution?
- Managed properties
- Content types
- Content promotion
- Cross-site publishing
- You manage a SharePoint Server farm. You need to ensure that only errors from SharePoint Server are logged in the Event Viewer. What should you configure?
- Usage and Health Data
- Diagnostic Logging
- Trace Log
- Event Throttling
- You administer a SharePoint Server farm and need to configure a new User Profile service application. What should you do first?
- Run the SharePoint Products Configuration Wizard.
- Run the SharePoint Hybrid Configuration Wizard.
- From Central Management, open Application Management | Manage service applications.
- From Central Administration, open Application Management | Manage service applications.
- From Central Management, open Application Management | Manage web applications.
- From Central Administration, open Application Management | Manage web applications.
- You administer a SharePoint Server farm and need to configure Workflow Manager. What should you do first?
- Download and run the Web Products Installer.
- Run the SharePoint Products Configuration Wizard.
- Run the SharePoint Hybrid Configuration Wizard.
- From Central Administration, open Application Management | Manage service applications.