
In the previous few chapters, you learned about configuring various SharePoint Hybrid services, such as search. We're going to continue building on those concepts with data gateways. A data gateway, in Microsoft terminology, is a service that can be used to provide cloud-based Power Platform and Azure services with access to on-premises data sources, such as SharePoint Server or SQL Server.
A data gateway allows organizations to keep services or applications in their own managed infrastructure while providing access to that data via a secure connection. It can be seen to act in a similarway to a reverse proxy, providing secure access to on-premises resources. In the following diagram, you can see how the data gateway works between the Power Platform services and dashboards in Microsoft 365 and on-premises data sources:

In this chapter, we'll focus on the following areas:
- Planning the implementation of an on-premises data gateway
- Installing and configuring an on-premises data gateway
- Managing an on-premises data gateway
- Troubleshooting common issues
Let's get started!
Planning the implementation of an on-premises data gateway
Microsoft allows organizations to configure data gateways in two modes:
- Standard mode: This is the default data gateway configuration mode. It allows multiple users to connect to multiple data sources.
- Personal mode: This data gateway configuration mode allows just a single user to connect to data sources. The configuration cannot be shared with others. This mode can only be used for Power BI.
For the purposes of the MS-301 exam, we're going to focus on the standard mode on-premises data gateway configuration.
In the following sections, we will examine the prerequisites and requirements for the successful installation and configuration of a data gateway.
Server and software requirements
In order to configure a data gateway, the target computer must meet certain minimum requirements. Microsoft has also published some recommended requirements:
|
Configuration type |
Notes |
|
Minimum requirements |
.NET Framework 4.6 (gateway release August 2019 and earlier) |
|
Recommended configuration |
An 8-core CPU 8 GB of memory A 64-bit version of Windows Server 2012 R2 or later Solid State Drive (SSD) storage for spooling |
The Microsoft documentation does not currently list a specific minimum memory requirement for a data gateway installation. The minimum system memory requirement for Windows 8 64-bit edition is 2 GB. The minimum system memory requirement for Windows Server 2012 R2 is 512 MB.
In addition to the preceding requirements table, there are some other considerations for installing the gateway:
- Gateways are not supported on Windows Server Core installations.
- Gateways cannot be installed on Active Directory (AD) domain controllers.
- Gateways that use Windows authentication should be installed on a computer that is a member of the same AD domain as the data sources it will be used to access.
- A computer can only have one standard gateway configured on it.
It's not recommended to install a gateway on computers with intermittent accessibility (such as laptops or computers that can be disconnected from the internet) or computers that use wireless network adapters to connect to the internet.
Next, we'll look at the networking requirements.
Networking requirements
The purpose of the data gateway is to provide a conduit from your on-premises data to services in Office 365, such as Power Automate and Power BI. You must plan for and ensure proper communication and connectivity in order to utilize a data gateway. The networking requirements can be divided into two parts: endpoints and proxy servers. We'll address each of these now.
Endpoints
Endpoints refer to any data source or service that you're connecting to. The computer(s) hosting data gateways must be able to communicate with on-premises data sources over the appropriate ports. Additionally, the computer(s) hosting the data gateway must be able to communicate with the following Microsoft endpoints:
| Domain names | Outbound ports | Description |
|---|---|---|
| *.download.microsoft.com | 80 | Used to download the installer. The gateway app also uses this domain to check the version and gateway region. |
| *.powerbi.com | 443 | Used to identify the relevant Power BI cluster. |
| *.analysis.windows.net | 443 | Used to identify the relevant Power BI cluster. |
| *.login.windows.net, login.live.com, and aadcdn.msauth.net | 443 | Used to authenticate the gateway app for Azure AD and OAuth 2. |
| *.servicebus.windows.net | 5671-5672 | Used for Advanced Message Queuing Protocol (AMQP). |
| *.servicebus.windows.net | 443 and 9350-9354 | Listens on the service bus relay over TCP. Port 443 is required to get Azure Access Control tokens. |
| *.core.windows.net | 443 | Used by dataflows to write data to Azure Data Lake. |
| login.microsoftonline.com | 443 | Used to authenticate the gateway app. |
| *.msftncsi.com | 443 | Used to test internet connectivity if the Power BI service can't reach the gateway. |
| *.microsoftonline-p.com | 443 | Used to authenticate the gateway app for Azure AD and OAuth 2. |
| dc.services.visualstudio.com | 443 | Used by AppInsights to collect telemetry. |
The data gateway requires outbound connectivityonly. No inbound firewall rules need to be configured.
Proxy servers
A lot of organizations require intermediary devices, such as proxy servers, to control access to internet services. If your organization requires a proxy server to connect to the internet, the best practice is to request an exception for the server(s) hosting the data gateway to be excluded from the proxy configuration.
However, this may not be possible. In the event that you cannot bypass the proxy for connections to the internet, you may need to request credentials to be used by the gateway service.
As previously noted, data gateways are not recommended for installation on computers with wireless internet connectivity.
Security and credentials
In order to install and configure the gateway, you will need to be a local administrator on the computer where the software will be configured. Additionally, standard gateways require administrative access (such as the Power Platform service admin or global admin roles) to the Power Platform data gateway configuration pages.
The data gateway service is configured with a local account called NT SERVICEPBIEgwService. You can change this to a domain user account or a Managed Service Account (MSA). If your organization requires periodic password changes as part of its security policy, you may want to configure the data gateway service to use an MSA.
High-availability requirements
Data gateways can be configured in a cluster to allow fault tolerance when accessing on-premises data sources. Since a computer hosting a data gateway can only have a single standard gateway configured on it, you'll need a second computer if you want to configure a cluster.
Recovery key
The primary purpose of a recovery key is to encrypt credentials for use with Office 365. The recovery key is necessary when you need to take over, restore, or move the gateway. In older versions of the gateway software, it could not be changed. Newer versions, starting with November 2019 (3000.14.39), support changing the recovery key. To change the recovery key, you will need access to the previous recovery key.
All recovery keys should be recorded for safekeeping in the event that it is needed for maintenance or disaster-recovery operations.
Now that we've gone over the requirements, we can proceed with installing a data gateway.
Installing and configuring an on-premises data gateway
In order to start accessing and visualizing your on-premises data, you'll need to install a gateway. Installing and configuring a gateway involves several steps:
- Configuring the networking
- Downloading and installing the software
Use the following process to download, install, and configure the data gateway software.
Configuring networking
There are two sets of networking requirements—a data gateway to the internet and a data gateway to on-premises data sources. You'll need to configure both.
The previous section detailed the outbound network connectivity requirements. You'll need to work through your organizational change-control process to allow connectivity from the computer(s) hosting the data gateway software to the required endpoints. To access on-premises datasets, you'll need to ensure the data gateway can communicate with on-premises application and database servers. Making these configuration changes is beyond the scope of the MS-301 exam, but it's important to know that your organization may require changes in order to successfully deploy and configure a data gateway.
If you need to configure additional settings (such as a proxy server), you will need to edit the configuration after the data gateway has been installed. Use the following sections to update the configuration after installation.
Configuring a proxy server
The proxy server configuration is maintained in two files outside the data gateway desktop application. The files that may need to be modified are C:Program FilesOn-premises data gatewayenterprisegatewayconfigurator.exe.config and C:Program FilesOn-premises data gatewayMicrosoft.PowerBI.EnterpriseGateway.exe.config.
If manual proxy configurations are required, both files must be edited to contain the same data. If you have updated other .NET application configuration files before, the format will be familiar:
<system.net>
     <defaultProxy useDefaultCredentials="true" />
</system.net>
A common update may be to configure specific proxy server settings. In the following example, a proxy server of 10.0.0.80 is used with port 8080:
<system.net>
     <defaultProxy useDefaultCredentials="true">
         <proxy
             autoDetect="false"
             proxyaddress="http://10.0.0.80:8080"
            bypassonlocal="true"
             usesystemdefault="true"
         />
     </defaultProxy>
</system.net>
After updating the configuration, you may need to restart the data gateway service.
Configuring proxy server authentication
If your proxy requires Windows authentication, it is recommended that you configure the data gateway application to use a domain account.
After updating the configuration, you may need to restart the data gateway service.
Next, we'll review the steps for installing the data gateway software.
Downloading and installing the software
Once the server and software networking prerequisites have been met, you can proceed with downloading and installing the data gateway application:
- On the computer where the data gateway will be installed, open a web browser and navigate to https://go.microsoft.com/fwlink/?LinkId=2116849.
- When prompted, save the file.
- After the download is complete, open the file and run it.
- Accept the default location installation (per the Microsoft documentation). Select the checkbox to agree to the terms of use, and then click Install.
- Once the initial software installation is complete, use an administrative credential to sign in to the Office 365 tenant.
- Select the Register a new gateway on this computer radio button and click Next:

- Create a name for your data gateway, enter a recovery key to be used in the future (for recovery operations or for creating a gateway cluster), select a region (if desired), and click Configure:

- Review the app notifications, if any. Click Close to close the On-premises data gateway app:

The data gateway has been installed and is ready to use.
Creating a cluster
If you have determined that your server has high-availability needs for the data gateway, you can configure a cluster. To add an additional node to create a gateway cluster, take the following steps:
- On the computer where the data gateway will be installed, open a web browser and navigate to https://go.microsoft.com/fwlink/?LinkId=2116849.
- When prompted, save the file.
- After the download is complete, open the file and run it.
- Accept the default location installation (per the Microsoft documentation). Select the checkbox to agree to the terms of use, and then click Install.
- Once the initial software installation is complete, use an administrative credential to sign in to the Office 365 tenant.
- Select the Register a new gateway on this computerradio button and click Next.
- Select a name for the gateway and select the Add to an existing gateway cluster checkbox. In the Available gateway clusters drop-down list, select the primary node or primary gateway (the first gateway you installed).
- In the Recovery key box, enter the value used for the recovery key when creating the gateway.
- Click Configure.
The data gateway cluster has been installed and is ready to use.
Installation, however, is only the first part of the process. Once the gateway has been installed, you will need to manage the configuration to add data sources and make them available to Office 365. In the next section, we'll review common configuration tasks for data gateways.
Managing an on-premises data gateway
Now that a data gateway has been installed, you can configure data sources to be used with Office 365 Power Platform applications, as well as update the settings for the gateway. In this section, you'll learn how to do the following tasks:
- Add a data source.
- Add a gateway admin.
- Change the gateway service account.
- Change the recovery key.
- Monitor a data gateway.
Use the procedures in the following sections to perform maintenance and management tasks for the data gateway.
Adding a data source
In order to make data available to Office 365 Power Platform services, you'll need to configure one or more data sources. To manage data sources, follow these steps:
- Log in to the Power BI admin center (https://app.powerbi.com/admin-portal).
- Select the gear icon, and then select Manage gateways:

- Select the gateway to which you want to add a data source and then click on the Add data sources to use the gateway link:
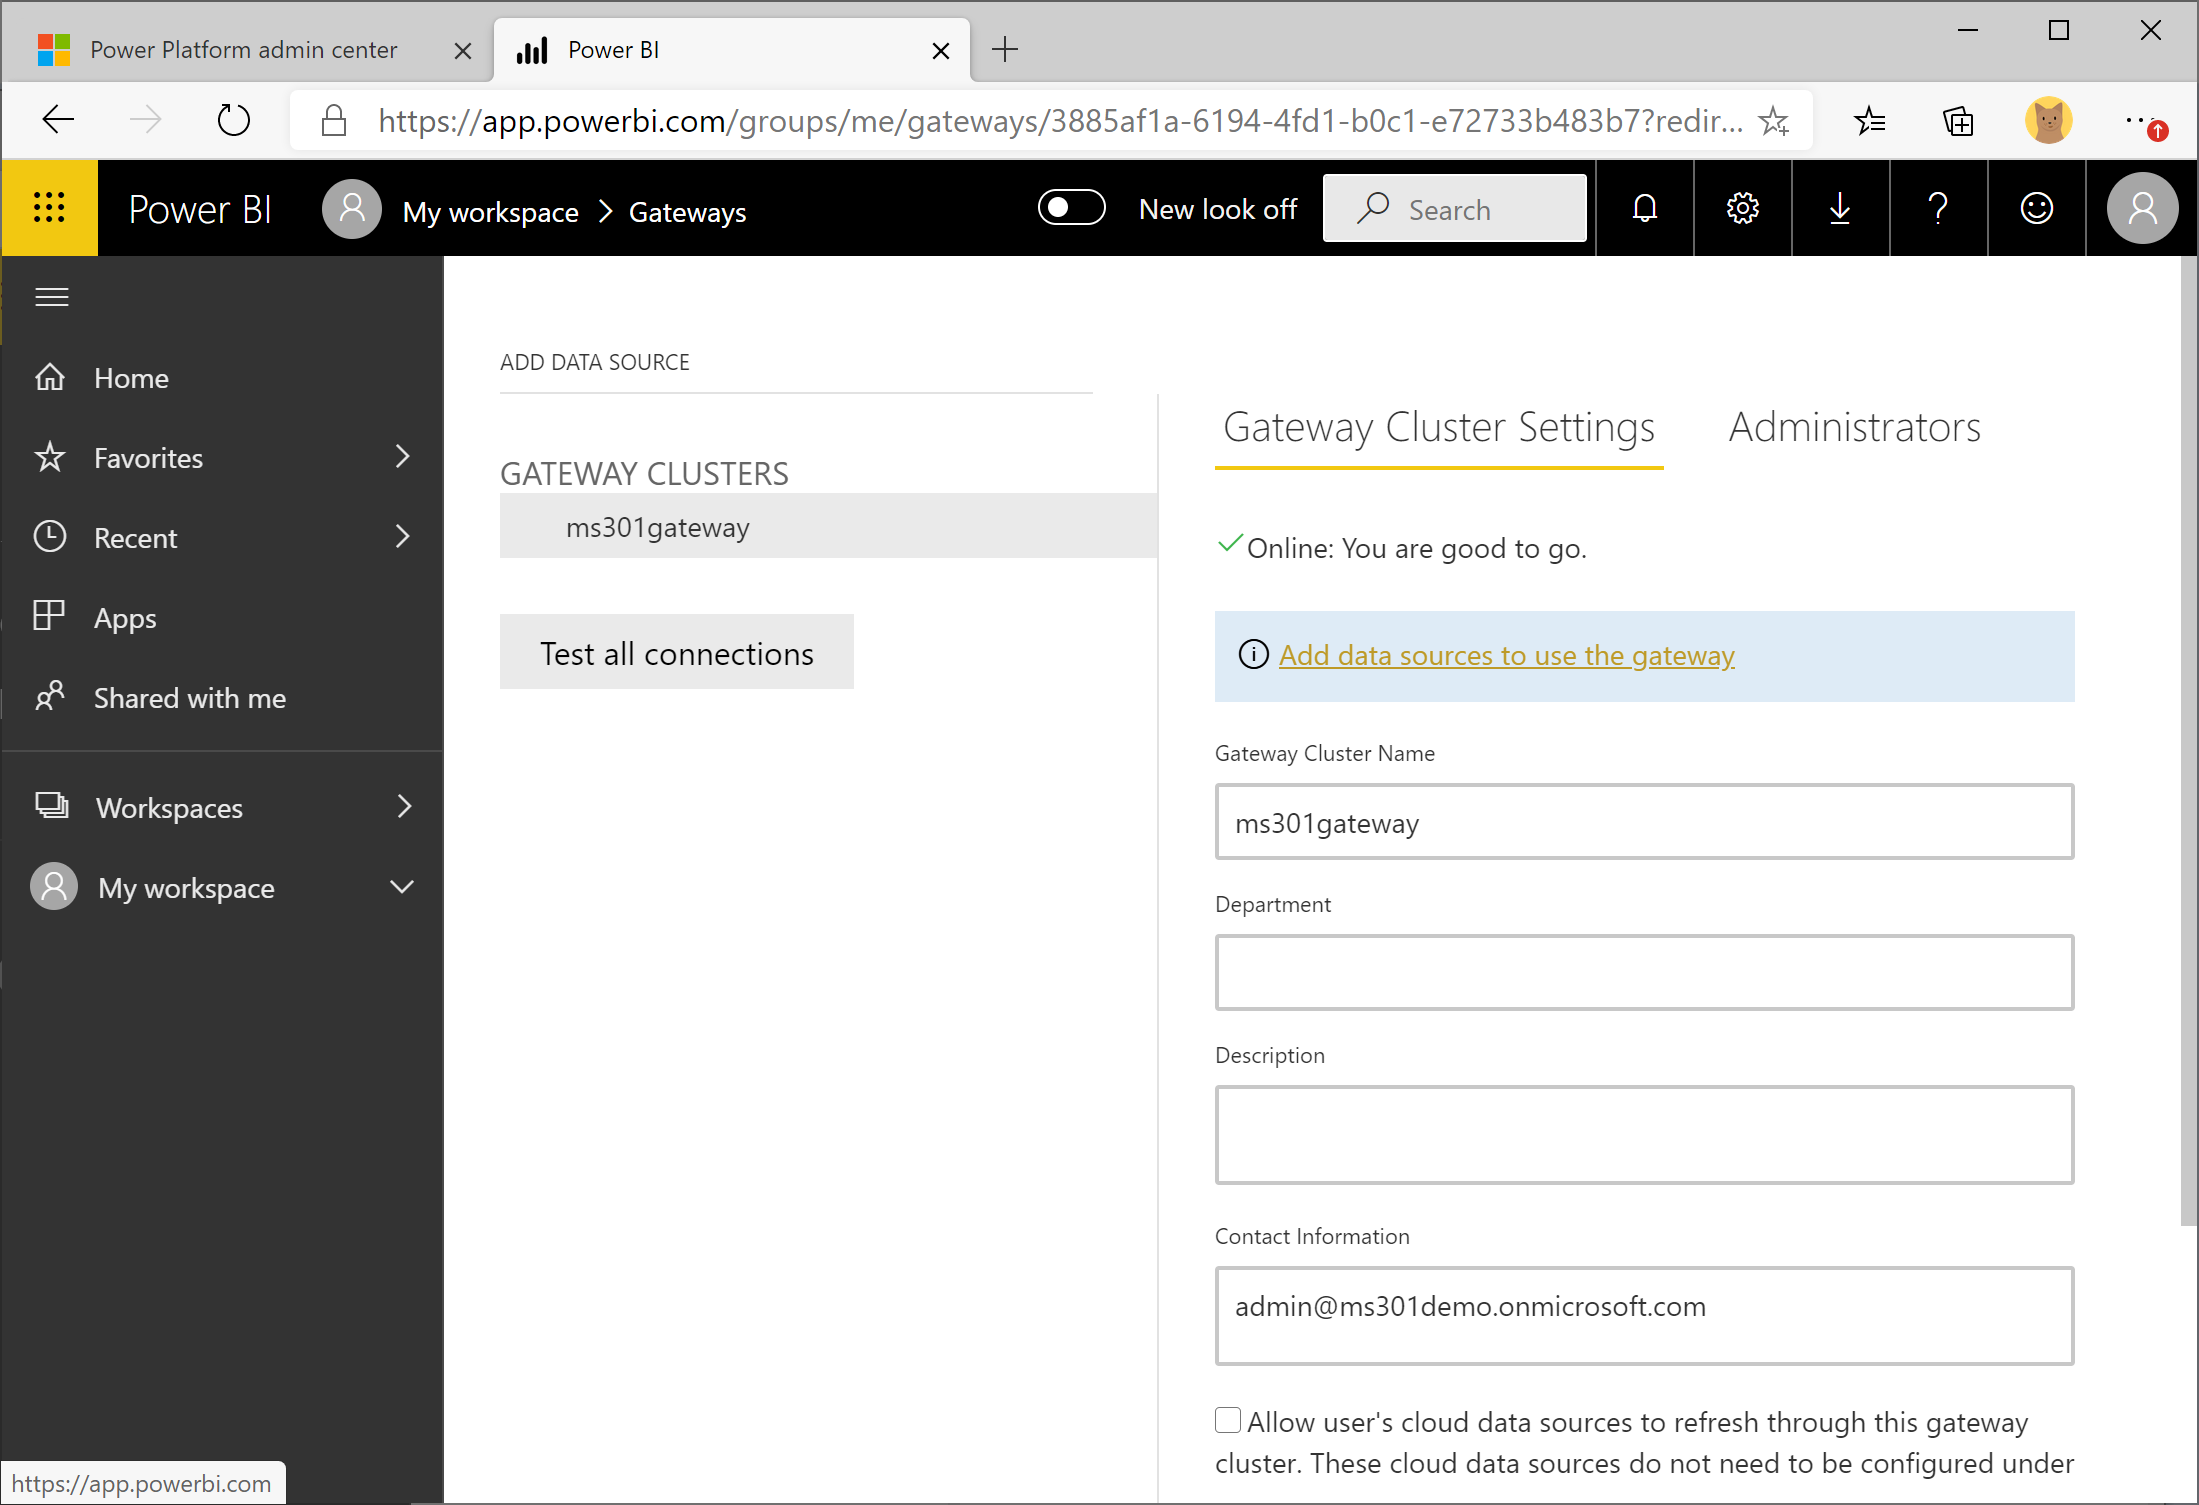
- Enter a name into the Data Source Name field. Select a type and, depending on the data source type, add any additional information (such as a resource URL, an authentication method, or credentials) and click Add:

- Once the connection is successful, select the Users tab to configure any additional users for this data source:

Any data sources that you add through this interface will be available throughout the Power Platform ecosystem.
Adding a gateway admin
By default, if you install and configure a gateway, you are made an administrator of the gateway. There may be, however, a need to delegate or add additional individuals to administer the gateway. The option to manage gateways will not be available unless you have either installed a gateway or been added as an administrator of an existing gateway.
You can add additional administrators by taking the following steps:
- Log in to the Power BI admin center (https://app.powerbi.com/admin-portal).
- Select the gear icon, and then select Manage gateways.
- Select the gateway to manage and click on the Administratorstab. Start entering the name or address of the user you wish to add as an administrator and click Add:

The selected user can now administer the gateway.
Changing the gateway service account
If you need to change the data gateway service account (for example, to resolve proxy authentication errors or to implement an MSA), you can use the On-premises data gateway application to do so.
You can configure the gateway to use either a normal user account or an MSA. You'll see how to do both in the following sections.
Updating the data gateway service to use a group MSA
You might use an MSA if your organization has specific security requirements (such as changing passwords at intervals). MSAs help achieve these organizational roles by allowing the system to maintain and automatically roll over the password, much like how domain computer account passwords are updated.
In this example, we'll configure a new group MSA and then configure the data gateway to use it.
Creating a group MSA
Before you can configure the data gateway to use an MSA, you need to create the account. If you will be configuring a data gateway cluster, you may want to consider using a group MSA (as opposed to a standard MSA) so that multiple computers can use the same service account.
(Get-ADObject (Get-ADRootDSE).schemaNamingContext -properties objectVersion).objectVersion
If the value is less than 52, you will need to update the schema using Adprep.exe from Windows Server 2012 or later.
To configure a group MSA, follow these steps:
- On the computer hosting the data gateway, log in as an administrator with privileges to administer the domain.
- Launch an elevated PowerShell console session.
- Run the following cmdlet to install the AD Remote Server Administration Tools(RSATs) if they are not already present:
Install-WindowsFeature RSAT-ADDS
- Run the following cmdlet to configure a KDS root key (if one is not already configured):
Add-KdsRootKey -EffectiveImmediately
- Run the following command to create the group MSA. In this example, the name I'm going to use for the service account is ms301dg-svcand the computer hosting the data gateway where this service account will be used is ms301-sp. For theDnsHostNameparameter, I simply used the name of the service account and appended the domain suffix.
Typically, when creating group MSAs, you don't need to configure a password. As of the time of writing, the data gateway service app configuration does not support configuring a group MSA natively from the app, so we'll go through a few extra steps to do so later:
New-ADServiceAccount -Name "ms301dg-svc" -PrincipalsAllowedToRetrieveManagedPassword ms301-sp$ -DnsHostName ms301dg-svc.ms301demo.com -Enabled $True
Next, you'll need to add the service account to the computer hosting the data gateway:
Install-ADServiceAccount -Identity ms301dg-svc
Now, you've created and installed the group MSA on the computer hosting the data gateway. In the next section, we'll configure the data gateway to use a new account.
Configuring the service
You can take these steps to change the service account used by the on-premises data gateway and configure the service to use a group MSA:
- On the computer hosting the data gateway and launch the Services applet (services.msc).
- Locate the On-premises data gateway service option and double-click on it:

- Update the service name to the domain user account for the group MSA that you wish to use, and then click OK:

- When notified that the Logon On As A Service right has been granted, click OK.
- Click OK again to acknowledge that the service has to be stopped and restarted manually.
- Restart the service.
- Launch the On-premises data gatewayapp. When prompted, sign in as an administrator of this data gateway:

- Select the Migrate, restore, or takeover an existing gateway option and click Next:

- Enter the recovery key and click Configure:

- Wait as the gateway is recovered.
- Confirm that the process has completed successfully. Click Close.
The update process is complete.
Updating the data gateway service to use a domain account
You can take the following steps to change the service account used by the on-premises data gateway and to configure the service to use a normal user account:
- On the computer hosting the data gateway, launch the On-premises data gateway app and select Service Settings:

- Under Gateway service account, select Change account.
- In the dialog box, click Change account to confirm that you want to change the account.
- Enter the name of your account in the DOMAINusername form. Enter the password and click Configure:

- Wait as the gateway is updated:

- When prompted, sign in as an administrator of this data gateway.
- Select the Migrate, restore, or takeover an existing gatewayoptionand click Next:

- Enter the recovery key and click Configure:

- Wait as the gateway is recovered.
- Verify that it has completed successfully and click Close.
The update process is complete.
Changing the recovery key
The recovery key can be changed from the On-premises data gatewayapp configuration. To change the key, follow these steps:
- From the computer that has the data gateway installed, launch the On-premises data gatewayapplication.
- Select the Recovery Keys tab and then select Set a new recovery key.
- Select a data gateway. If you are updating the recovery key for a cluster, you need to select the primary instance. Enter the old key and the new key, and then click Configure:

- After it has been updated, the screen will show that your data gateway has both a recovery key and a secondary (legacy) recovery key:

- If you have a data gateway cluster, you will need to uninstall and perform a recovery on each of the gateway cluster nodes.
Edit each data connection (open and then save) to update the connection with the new recovery key.
Monitoring a gateway
While tasks such as monitoring a data gateway's performance currently don't appear on the MS-301 exam (as this feature is still in public preview), it is important to understand what capabilities are available.
Enabling gateway performance monitoring
Gateway performance can be monitored by enabling performance-logging capabilities in a configuration file. To enable the performance logging features, update C:Program FilesOn-premises data gatewayMicrosoft.PowerBI.DataMovement.Pipeline.GatewayCore.dll.comfig with the following values:
- Configure the QueryExecutionReportOn setting toTrueto enable additional logging for queries executed using the gateway. This option creates the Query Execution Report and Query Execution Aggregation Report files:
<settingname="QueryExecutionReportOn"serializeAs="String"><value>True</value></setting>
- Configure the SystemCounterReportOn setting toTrueto enable additional logging for memory and CPU system counters. This option creates the System Counter Aggregation Report file:
<settingname="SystemCounterReportOn"serializeAs="String"><value>True</value></setting>
- Update the values in the following table accordingly:
| Setting | Description | Notes |
| ReportFilePath | Determines the path where the three log files are stored | The default configuration stores the report data in the user profile app data directory for the PBIEgwService service account. If you change this service account, you should update the path accordingly. |
| ReportFileCount | Determines the number of log files of each kind to retain | The default configuration is to retain 10 log files. |
| ReportFileSizeInBytes | Determines the size of the file to maintain | The default value is 104,857,600, or approximately 100 MB. |
| QueryExecutionAggregationTimeInMinutes | Determines the number of minutes for which the query execution information is aggregated | The default value is 5 minutes. |
| SystemCounterAggregationTimeInMinutes | Determines the number of minutes for which the system counter is aggregated | The default value is 5 minutes. |
- After any changes to the configuration file are made, restart the gateway service.
You should begin seeing files in the location specified in the ReportFilePath value.
Enabling query logging
You can also troubleshoot slow-performing queries by enabling additional logging in the data gateway app.
To enable query logging, take the following steps:
- On the computer hosting the data gateway, launch the On-premises data gateway app and select Diagnostic.
- Enable the slider for Additional loggingand click Apply:
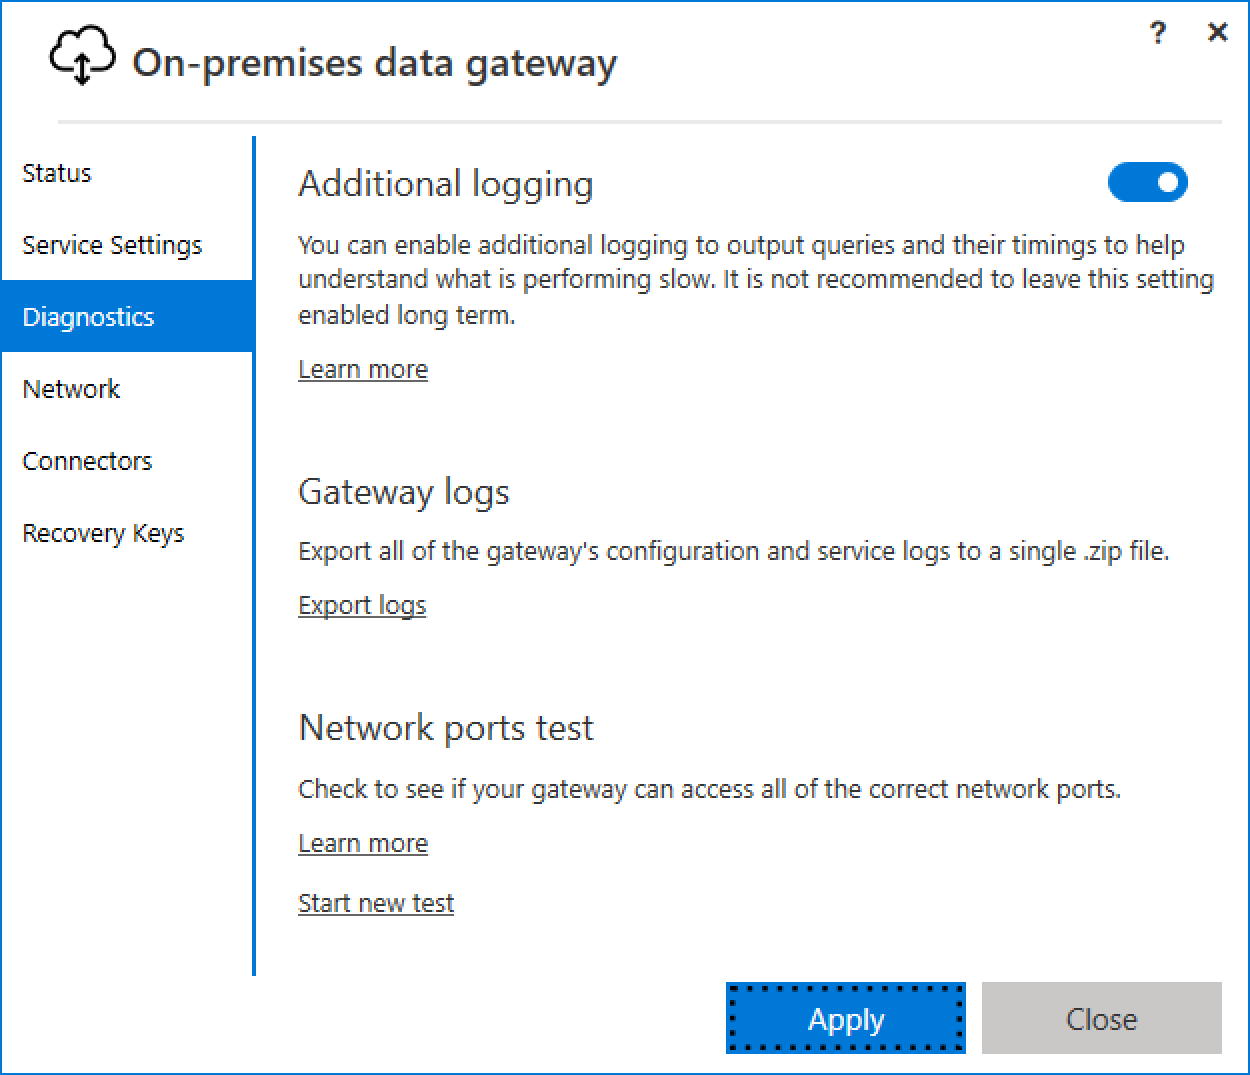
- When prompted, click on Apply and restart to apply the settings and restart the gateway.
For more information on monitoring and visualizing a data gateway's performance using a Power BI template, refer to https://docs.microsoft.com/en-us/data-integration/gateway/service-gateway-performance.
Next, we'll look at how to troubleshoot some common issues.
Troubleshooting common issues
From time to time, it may become necessary to troubleshoot errors that occur in the data gateway. You can use the following procedures to resolve installation or functionality errors.
Communication errors
If changes are made to the network, you may experience communication issues. You can use the Network ports test option under the Diagnostics tab of the On-premises data gatewayapp to determine whether the data gateway can reach all of the necessary network endpoints:

You can select Start new test to test the network communication to the internet from the data gateway.
If your network requires a proxy server to communicate with the internet, you may need to request a bypass for the service or configure the data gateway to use a specific user identity. You can use the steps under Configure Proxy Server Authentication to perform the necessary configuration changes.
Installation errors
If you are unable to install or update the data gateway app, you may need to perform installation troubleshooting. You may encounter aFailed to add user to group. (-2147463168 PBIEgwService Performance Log Users) error.
This error typically occurs if you are attempting to install the gateway on an AD domain controller. The data gateway service cannot be installed on a domain controller.
You may encounter a File in use error if you have on-access antivirus scanning configured on the computer where you are attempting to install the data gateway. Disable the antivirus software during the installation.
A You are trying to reinstall a version already installed on the machineerror occurs if you are installing a version of the gateway service that is already installed. If you need to reinstall the current version, uninstall the existing gateway first:

If you encounter any different errors to these, you may need to open a support ticket with Microsoft to get their assistance in its resolution.
Log sources
There are two main places to review log files for the data gateway.
First, you can use the Diagnostics tab of the data gateway app to export diagnostic logs. The logs are saved to the desktop of the logged-in user in a folder called ODGLogs. This logs folder contains individual log files for software installation setup components, network configuration, computer environment, and the initial configuration.
You can also review the log item data in the event viewer. To view events logs for the gateway, follow these steps:
- On the computer with the data gateway installation, launch Event Viewer.
- Expand Event Viewer | Applications and Services Logs and select On-premises data gateway service:

Reviewing the data in the previously shown log sources should help you resolve any issues. If you are unable to resolve an issue, contact Microsoft support.
Summary
After reading this chapter, you should be able to install and configure a data gateway, as well as perform common administrative tasks such as adding a data source, adding administrators, and changing the service account. We covered the networking requirements for the data gateway and the tools necessary to troubleshoot common installation problems. You should be able to successfully administer the data gateway and allow Office 365 services such as Power BI and Power Automate to connect to your on-premises data sources.
In the next chapter, we will introduce some basic concepts and planning for migrating on-premises SharePoint data to SharePoint Online.
Questions
Use the following questions to test your knowledge of this chapter. You can find the answers to them in Chapter 16, Assessment Answers:
- You are responsible for configuring a data gateway for your organization. When you log in to the web portal, the Manage gateways option is not available. What are the two likely reasons for this?
- You have not been assigned as an administrator of an existing gateway.
- The data gateway cannot communicate with the internet.
- The recovery key has not been set.
- You have not installed a data gateway yet.
- Which two activities require the use of a recovery key?
- Moving a gateway to a new computer
- Adding a data source
- Recovering a damaged gateway
- Recovering a data source
- You are responsible for administering a data gateway. You have been given a business requirement to ensure that Power BI reports can be run using on-premises data sources in the event that the data gateway fails or is offline. What should you do?
- Implement a secondary data agent.
- Configure a data gateway cluster.
- Use a Network Load Balancing (NLB) cluster.
- Configure SQL AlwaysOn.
- Which two activities require the use of a recovery key?
- Changing the recovery key
- Editing a data source
- Taking ownership of a gateway
- Deleting a data source
- After changing the recovery key for a data gateway, what action should you perform?
- Restart the gateway.
- Edit the data sources using the gateway to update the recovery key.
- Nothing.
- Update the administrators in the admin portal.
- You are responsible for deploying a new data gateway. What network communications do you need for successful deployment and configuration?
- Inbound port 443
- Outbound port 443
- Inbound ports 5761 and 5762
- Outbound ports 5761 and 5762
- You need to configure your data gateway to use a proxy configuration. Where should you make this change?
- In the on-premises data gateway app
- In the .NET configuration files for the on-premises data gateway app
- In the Power Platform admin portal
- In the Power BI portal
- You need to enable performance logging for the data gateway. Where you should make this change?
- In the on-premises data gateway app under Diagnostics
- In the .NET configuration files for the on-premises data gateway app
- In the Power Platform admin portal
- In the Power BI portal
- You need to enable query logging for the data gateway. Where should you make this change?
- In the on-premises data gateway app under Diagnostics
- In the .NET configuration files for the on-premises data gateway app
- In the Power Platform admin portal
- In the Power BI portal
- Several users report that Power BI queries are taking much longer than expected. What should you enable?
- Network monitoring
- Gateway performance monitoring
- Additional query logging
- The Power Platform diagnostic module