Since COM components can be created in a number of high-level programming languages, such as Visual C++, Java, and Visual Basic, if you are proficient in any of these languages, you can create your own custom COM components (or COM objects, as they are sometimes called). For an object to be considered a COM object (and therefore to be able to be instantiated from the wide range of development tools and programming languages), it must follow certain guidelines. These low-level guidelines are far past the scope of this book, and will not be discussed in detail.
Thankfully, high-level programming languages ensure that most of these low-level implementation details are taken care of for you. For example, when creating a COM component in Visual Basic, these low-level details can be completely ignored, and the developer can focus on creating classes that will be translated into full-fledged COM components by Visual Basic.
This book also refrains from stepping through the process of creating a COM object with any programming language. There are already several great books on the topic. If you are looking for an entire book dedicated to building COM objects in various languages, let me recommend Shelly Powers’s Developing ASP Components (O’Reilly), which shows how to create components in Java, Visual C++, and Visual Basic in great detail.
What this book does focus on is a particular type of custom COM component, one used to ensure business logic integrity.
Custom COM components usually fall into one of two categories:
Components that provide some type of added functionality to the web site
Components that define the business logic a site must abide by
The two Microsoft COM components we examined earlier in this chapter were both examples of COM components that provided added functionality. The Ad Rotator component provided a generic advertising banner rotation system, while the Content Linker provided a simpler means for adding and updating content to a large web site. In Chapter 8, we’ll look at a number of commercially available COM components that also fall within this category.
The second category of custom COM components is not nearly as glamorous as the first, but in large web sites, is incredibly important. Pause for a moment and think of any large e-commerce web site. When purchasing an item from that site, a number of complicated transactions must occur: taxes must be computed; credit card balances must be checked; orders must be sent to the warehouse via some mechanism. Now, imagine that all of these complicated transactions were handled by logic in each ASP page from which a user could purchase an item.
While ASP may be able to handle such complex business rules, it would not be wise to place complicated business rules within an ASP page, for a number of reasons. Imagine, for a moment, that all the business rules were hardcoded into the applicable ASP pages. What would happen if a tax law changed, requiring the taxes to be calculated differently? Since the tax calculations were hardcoded into a number of ASP pages, a developer must hunt through the site, making the needed changes. The more changes the developer is required to make, the more likely he is to miss a needed change or commit a typo, resulting in a tax-calculation error.
As we’ve seen throughout this book, complex tasks become incredibly simpler when the task is wrapped inside of a class. With a class, the end developer can treat the class like a black box and not worry about how the black box performs its tasks. With classes, the responsibility for a particular task is removed from the developer and placed squarely on the shoulders of the class. Custom COM components that handle business logic provide a similar black box interface.
In an e-commerce web site, business logic might include tax information, credit card handling, shipping procedures, and mechanisms to notify complementary computer systems (such as sending an order to the warehouse, which might use a different computer system). If changes occur in the business logic, only the custom COM component’s code needs to be modified. All the ASP pages using the COM component are unaware of the business logic changes that occurred.
Custom COM components responsible for business logic also provide a level of abstraction between an ASP page and the database. In a large, data-driven web site that does not use COM objects for business logic, when some piece of information needs to be committed or retrieved from the database, the ASP page is responsible for executing the SQL statement. In this book, we’ve looked at several examples of using the ADO objects to insert, update, and delete database records.
However, in a large site with several developers and a complex data model, having the ASP pages handle database transactions is asking for trouble. Since similar database actions are taken on various ASP pages, there are bound to be typos or mistakes, resulting in database or ASP errors. Granted, stored procedures could be used to help alleviate this problem, but what happens if the data model is changed? Those ASP pages that reference tables that no longer exist or have been altered need to be fixed to reflect the changes in the data model.
On a large web site, where there may be hundreds of ASP pages, such a data model change can be a logistical nightmare. When custom COM components are involved, the ASP pages make calls to the COM component; it is then the responsibility of the component to make the appropriate database access calls. That way, if there is a data model change, only the custom COM object needs to be modified; the ASP pages that reference the COM component can go unchanged!
Custom COM components can therefore encapsulate the database and
business logic, providing a black box for ASP pages to use. Custom
COM components
make up the middle layer of a three-tiered web
site
. A three-tiered web site is one that
consists of three parts, each distinct from one another and
responsible for a unique set of tasks. The three tiers, which are
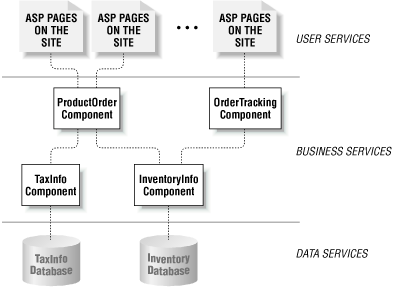
illustrated in Figure 7.6, include:
A Data Services tier, which includes data storage tools, such as databases.
A Business Services tier, which includes components that contain business logic information.
A User Services tier, which contains the front end of the application that is presented to the user.
Tip
For a more detailed explanation of the motivation behind and the advantages of a three-tiered client-server application, be sure to read “Building Three-Tiered Client-Server Business Solutions,” a Microsoft white paper available at http://www.microsoft.com/TechNet/Analpln/3tierwp.asp.
Imagine the steps that occur when a user visits an order-tracking
page in a three-tiered e-commerce web site. When a user enters his or
her ordering specifics, the ASP page creates an instance of the
OrderTracking component (see Figure 7.6). This component may interact with other
custom COM components (such as the InventoryInfo
component). The order-tracking ASP page, though, is not concerned
with how the OrderTracking component provides the
order information details.
As illustrated in Figure 7.6, the
OrderTracking component performs some calculations
and then requests information from the
InventoryInfo component. This component grabs the
requested information from the Inventory database, which is in the
Data Services tier.
Using custom COM components also makes for easier-to-read, simplified ASP code. Imagine the several lines of cryptic ASP code that would be needed to handle a sale from an e-commerce web site. Using custom COM components that assume responsibility for the business logic, the ASP code would be greatly simplified to something like:
'Instantiate the object
Dim objBuySomething
Set objBuySomething = Server.CreateObject("Product.Purchase")

'Set the properties
objBuySomething.ProductID = 458734582
objBuySomething.Quantity = 1
objBuySomething.CreditCardNumber = 1234432112344321
objBuySomething.AddressLine1 = ...
'...

'Now that all the properties have been set, make the purchase
objBuySomething.PurchaseOne of the major advantages of COM components is they can be used by a vast array of high-level languages and programming tools. This enables developers to create a single COM component that can be used in a wide array of situations. This fact is especially useful when creating custom COM objects to encapsulate business logic.
In Section 7.4.1, we looked at how to wrap the business logic involved in an e-commerce web site into a set of COM objects. These COM objects housed business logic like sales tax information, and were used as a layer of abstraction between the ASP pages and the data store.
Might there be other applications besides an ASP web site that need access to these business rules? For example, imagine that besides having an e-commerce site, the company also takes orders over the phone. Employees using a simple Visual Basic program would likely fill these phone orders. This Visual Basic program would need to adhere to the same business logic rules that customers shopping on the web site follow. Therefore, the custom COM components developed for the e-commerce site could also be used in the phone-ordering program.
Despite the performance and reusability advantages of custom COM components written in a high-level programming language in your ASP pages, such COM components suffer a couple of shortcomings that make them difficult and annoying to use.
For starters, ASP pages are not written in the existing programming languages that can create compiled COM objects. While this may seem irrelevant, imagine that you already have a complex routine written in VBScript in an ASP page that performs the business logic your site needs to adhere to. To put this in, say, a Visual Basic COM object, you must translate the VBScript to Visual Basic syntax. While such a translation may be light work, what if you wrote your ASP code in JScript or PerlScript, or if you needed to create your COM component using Java or Visual C++? Such a translation would be exceedingly difficult.
Another shortcoming of COM components occurs when you need to make a change to an existing component that’s currently in use. Making a change requires, at minimum, recompilation and reregistration of the component, and at worst, a restart of the web services. Anyone who’s developed COM components with a high-level language is far too familiar with this annoyance.
To address these shortcomings, Microsoft offers Windows Script Components (WSC), which, as the name implies, are COM components created with script as opposed to a high-level programming language. Since Windows Script Components can be created using any ActiveX scripting engine, you can simply cut and paste your ASP code and create a COM component, regardless of what scripting language you used to create your ASP page! Also, since these are scripts, no lengthy recompilation process is needed when changes need to be made to an existing component.
Warning
Once you create a COM object and make it publicly available, any future changes made to the object must not break existing code. If you need to make changes to a COM object that will cause existing code to break, it is essential that you create a new component rather than alter the existing one.
To be able to create COM components with script, you must download and install the Windows Script Component from Microsoft’s Script site, http://www.microsoft.com/msdownload/vbscript/scripting.asp. Windows Script Components are simple text files and must be created using a predefined XML format. Rather than forcing developers to fully learn the rather terse XML format, Microsoft provides a freely available Windows Script Component Wizard. In this section we’ll look at how to create Windows Script Components using this wizard.
For starters, you’ll need to get yourself a copy of the Windows Script Component Wizard from the Microsoft Scripting Site, http://msdn.microsoft.com/scripting. At the time of this writing, the wizard was directly available at http://msdn.microsoft.com/scripting/scriptlets/wz10en.exe.
For this example, let’s create a COM component that would be
similar to a compiled custom COM component. Assume we have a database
table named Employee that has the following
columns:
-
FirstName The employee’s first name
-
LastName The employee’s last name
-
Salary The employee’s salary
-
BirthDate The employee’s date of birth
Our COM component will contain a property for each column in the
Employee table and a single method, AddEmployee,
that will add a new row to the Employee table. The
COM component will apply some business logic, ensuring that the
employee is over 18 years of age and that the
Salary is greater than or equal to $25,000. By
placing this database insertion into a component, we are
encapsulating the database complexity from the ASP developer. The
developer does not need to concern himself with the structure of the
Employee table or worry about adhering to any
business rules.
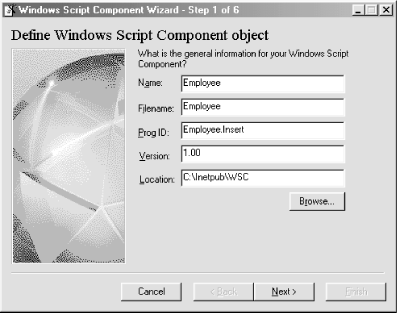
Now let’s create our Windows Script Component! Once the Windows Script Component Wizard has been downloaded and installed, start the wizard by going to Start → Programs → Microsoft Windows Script → Windows Script Component Wizard. The first step of this six-step wizard prompts for the name and ProgID of your component, as well as the version and filename for the script file.
Tip
The ProgID is what you will use in an ASP page to instantiate the Windows Script Component:
DimobjInstanceSetobjInstance= _ Server.CreateObject("ProgID")
Let’s name our component Employee and give it a ProgID of
Employee.Insert. A screenshot of the first page of
the Windows Script Component Wizard can be seen in Figure 7.7.
In Step 2 of the wizard, we are asked to specify the scripting language to use, as well as what special implementations to support. To have access to the built-in ASP objects, be sure to select the “Support Active Server Pages” option. Note that the Error checking and Debugging options have been disabled. These should be enabled only when in the development stages of the component, and not when the component is ready to be publicly used. If selected, the Error checking option will display error messages interactively; if the debugging option is selected, the Microsoft Script Debugger can be launched when an error occurs.
Figure 7.8 shows what Step 2 of the wizard should look like.

Figure 7-8. In Step 2 of the wizard, specify the scripting language that you wish to use and whether to implement ASP support
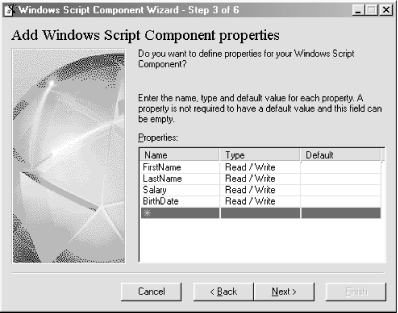
Step 3 prompts for the
properties of the
component and allows us to define whether the property is read/write,
read-only, or write-only, as well as to set the property’s
default value. For this example, we need a read/write property for
each database column in the Employee table. Figure 7.9 provides a screenshot of Step 3 of the Windows
Script Component Wizard.
Step 4 prompts for the component’s methods. Since we will only have one method, AddEmployee, there is only one entry here. Furthermore, this method expects no parameters, since there is a property for each database column; therefore, the parameters entry is left blank for the AddEmployee method. A screenshot of Step 4 of the wizard can be seen in Figure 7.10.

Step 5 of the wizard prompts for any events for the component. For this example, we will not add any events, so proceed on to the next step. Step 6, which is the final step in the wizard, provides summary information. Once you’ve checked to make sure everything is in order, go ahead and click Finish. This will create a shell for the Windows Script Component. It is now up to us to fill in the code for the AddEmployee method. The wizard has already written the rest of the component’s code for us!
The generated Windows Script Component file contains several
sections. Take a moment to look at the component’s
source. At the start of the
document there is the XML
tag, since Windows Script
Components are XML-formatted documents:
<?xml version="1.0"?>
The remainder of the file’s contents are placed within a
<component> ...
</component> block.
The first tag in the <component> tag is the
<?component?> tag. This tag indicates
whether or not the component supports error checking and debugging.
The <?component?> tag has the following
form:
<?component error="boolean" debug="boolean" ?>
Tip
If error checking and debugging were not selected in Step 2 of the wizard, as was the case in our example, then this tag will not exist. For completeness, feel free to add it in:
<?component error="false" debug="false" ?>
Next, a <registration> tag defines the
description of the class, its ProgID, ClassID, and version number.
Note that except for the ClassID, these values were entered into Step
1 of the wizard:
<registration
   description="Employee"
   progid="Employee.Insert"
   version="1.00"
   classid="{b31aab60-1fb8-11d4-8013-0000216d54d6}"
>
</registration>
The next block of code defines what properties and methods are
public. Public properties and methods in a Windows Script Component
are synonymous to public properties and methods in a VBScript class.
Also note that each of the properties is marked as both read and
write with the <get/> and
<put/> tags:
<public>
   <property name="FirstName">
      <get/>
      <put/>
   </property>
   <property name="LastName">
      <get/>
      <put/>
   </property>
   <property name="Salary">
      <get/>
      <put/>
   </property>
   <property name="BirthDate">
      <get/>
      <put/>
   </property>
   <method name="AddEmployee">
   </method>
</public>
Next, the <implements> tag is used to
indicate that this component has access to the built-in ASP objects:
<implements type="ASP" id="ASP"/>
The remainder of the file is a <script>
block that contains the actual code for the component (in this case,
VBScript code). Note that the <script> block
is immediately followed by a funky-looking
<![CDATA[
tag, and right before the closing script tag, its ending
]]> tag. This is a special XML reference
indicating that the text between the <![CDATA[
and ]]> tags is source code and not to be
interpreted by the XML parser. If the <
Once the component is registered, you can create an instance of the
object in an Active Server Page (or in a Visual Basic, Visual C++, or
Java program). Also, if you ever need to alter the component, all you
need to do is simply edit the appropriate .wsc
file! There is no complicated unregistering/reregistering as there
can be with compiled COM objects, and you don’t need to stop
and restart the web services when making changes to an existing
Windows Script Component.
Example 7.14 provides a quick example of how to use
the Windows Script Component we just created within an ASP page. Note
that instantiating and using a
Windows Script Component is identical to instantiating and using a
compiled COM component. The ASP developer does not need to concern
herself with whether the COM component was created as a binary or is
in script form. Note that an instance of the Windows Script Component
we just created is instantiated using the ProgID that we specified in
Step 1 of the wizard (Employee.Insert).
Example 7-14. Using a Windows Script Component Is Identical to Using a Classical, Binary COM Component
<% @LANGUAGE="VBSCRIPT" %>
<% Option Explicit %>
<%
  'Create an instance of the Employee.Insert Windows Script Component
  Dim objEmployeeInsert
  Set objEmployeeInsert = Server.CreateObject("Employee.Insert")

  'Set the Employee.Insert properties
  objEmployeeInsert.FirstName = "Scott"
  objEmployeeInsert.LastName = "Mitchell"
  objEmployeeInsert.Salary = 78000
  objEmployeeInsert.BirthDate = "8/1/78"

  objEmployeeInsert.AddEmployee          'Add the employee to the database

  Set objEmployeeInsert = Nothing        'Clean up!
%>Since Windows Script Components are interpreted scripts as opposed to compiled binary files, they will obviously suffer from poor performance when compared to binary files. Therefore, if you expect your site to have many concurrent users, it is best to stick with binary COM objects.
Also, since classical COM components are created using high-level languages, chances are you will be developing them using a mature development environment. With Windows Script Components, however, you will likely be using a development tool like Notepad to edit the component! While this is not a huge issue when dealing with a single, small component, imagine that you needed to develop a slew of large, robust, interactive components. Managing these large, interrelated files using Notepad would be difficult, at best, especially if a team of developers were working on the project.
Tip
A side benefit of compiled COM components is the source is hidden from prying eyes. Developers creating COM components for sale would want to make sure that the final COM component product is in binary form so that those purchasing the components cannot share the component’s source code with other potential customers.
The advantages Windows Script Components have over compiled COM components include the ease in making changes to existing components and the ability to dump ASP code into a component with little or no translation. Windows Script Components should be used as a stepping-stone to compiled COM objects. For example, in the development stages, use Windows Script Components. During development, you’ll enjoy being able to quickly make changes to existing, in-use components. As the project grows larger and moves toward shipping, be sure to move the components to a compiled, binary form, where they’ll benefit from improved performance.
Personally, I find Windows Script Components to be very neat and cool. In smaller projects, I have a hard time convincing myself that the advantages of using COM objects outweigh the burdens involved in needing to make changes to the COM object as the project progresses. Since altering an existing COM object requires recompilation and reregistration, it’s much easier to not use components. With Windows Script Components, however, that is no longer true! Also, I find it really cool that you can grab a snippet of useful ASP code and quickly stick it into a Windows Script Component, creating a COM component from working ASP code with little or no translation .