
Chapter 8. Managing Decisions
In the previous chapter, you created the forms used in the New Vacation Request process of the Tahiti application, and ran the process to validate the simple case of a request submission followed by the approval step.
This chapter shows you how to structure a process diagram when the business logic contains branches and joins. Branches and joins are managed in the process using gateways. Conditional branches use data: back in the first iteration of your process diagram, you added an exclusive gateway for the point where the process branches depending on whether the manager approves a vacation request. Now that the data model is defined, you can specify the condition on the flows out of this gateway. In this chapter, you will learn about the other most useful gateways, and the best practice for structuring a diagram containing gateways.
Gateway Types
The BPMN2 standard defines these types of gateway: Exclusive, Event-Based, Parallel Event-Based, Inclusive, Complex, and Parallel.
The three most useful gateways are Exclusive, Inclusive, and Parallel, and these are implemented in Bonita BPM. You can mimic the behavior of the other types of gateway by using the appropriate combination of these three.
Exclusive Gateway
An exclusive gateway is an OR decision point:
- A diverging exclusive gateway creates alternative paths. It has one inbound flow, and any number of outbound flows. Only one outbound flow is followed. One outbound flow is designated as the default, and the others have a condition defined. The outbound flow conditions are evaluated in a preset order, and the process continues along the first flow where the condition is met.
- A converging exclusive gateway merges alternative paths. It has any number of inbound flows and one outbound flow. The outbound flow is activated when the first inbound flow reaches the gateway. There is no synchronization. There is no condition on the output flow. Inbound flows that arrive subsequently trigger duplicates of subsequent tasks. If this is not what you want, you can use another exclusive gateway to direct subsequent flows to an alternate path.
Inclusive Gateway
An inclusive gateway is an AND decision point:
- A diverging inclusive gateway creates parallel paths. It has one inbound flow and any number of outbound flows. An outbound flow can have a condition. The conditions for all the outbound flows are evaluated, and the process continues along all the flows where the condition is met. You can define a default flow that is taken if no outbound flow condition is met. If there is no condition on a flow, it is always taken.
- A converging inclusive gateway merges parallel paths. It has any number of inbound flows and one outbound flow. When processing has reached the gateway along all the active inbound flows, the process continues along the outbound flow.
Parallel Gateway
A parallel gateway is a synchronization point at the start or end of multiple parallel branches:
- A diverging parallel gateway creates parallel outbound flows. There can be any number of outbound flows, and they are all followed when the gateway is activated.
- A converging parallel gateway is a synchronization point. The gateway is activated when processing on all inbound flows has arrived.
A parallel gateway can have multiple inbound flows and multiple outbound flows, making it both diverging and converging.
You must always close parallel flows with a parallel gateway.
Best Practice
To avoid problems when debugging or mainting diagrams that contain gateways, we recommend that you follow these guidelines:
- Every point where a process branches should have a matching join. This makes it clear in the diagram where the alternate or parallel flows end. It also makes execution more efficient, and makes it easier to troubleshoot errors in flow during development or in production.
- Every gateway should have a name. Use clearly related names for the corresponding branch and join gateways. For example, in the Tahiti diagram, there is a branching exclusive gateway called Request approved?. The corresponding join gateway could be called request approved join.
- You can choose not to display all the names on the diagram. Display the names of branching exclusive gateways and inclusive gateways. The others are less useful in the diagram, though essential for troubleshooting.
- Name an exclusive gateway with a question.
- Conditions on branching gateways should be coherent sets; for example, a yes or no decision. The decision could be complex, but should depend on a single idea, possibly even a single variable. For example, if a branch directs flow to an on-call support manager, you can have a set of conditions: is it a weekend, is it a public holiday, is it out of hours. These all depend on a timestamp. Avoid using sets of conditions that mix unconnected ideas.
- Always define a default outbound flow for an exclusive gateway. Always define a default outbound flow (or an outbound flow with no condition) for an inclusive gateway.
Update the Diagram
You need to make the following changes to the diagram:
- Specify operations to update the
vacationRequestwith the information submitted in the form. - Specify the condition on the yes flow out of the Request approved? gateway, to resolve the validation error.
- Modify the no flow after the Request approved? gateway so that the notification tasks are done in parallel.
- Join the alternate flows after the Request approved? gateway, so that the end of the conditional flow is clear and the flow is closed.
It is easier to make the changes to flows if you start with the smallest loops and work outward.
The following sections explain how to update the diagram.
Add Operations to Update the vacationRequest
There are three attributes in the vacationRequest to update after a request is reviewed: status, comments, and reviewerBonitaBPMId. The status and comments are returned from the form in the contract. The reviewerBonitaBPMId is the ID of the person who performed the review task, so it is known to the Bonita BPM system.
You need to define operations to update the vacationRequest using the relevant information from the contract and the system. Follow these steps:
- In the Tahiti-NewVacationRequest diagram, select the Review request task and go to the Details panel, Execution tab, Operations pane.
-
Specify the operation to update the
statusattribute:- Click Add.
- In the Select target box, double-click
vacationRequest. - Click “Takes value of” and then from the Operator type menu choose “Use a Java method.”
- In the list of methods, choose
setStatus, and then click OK. - Click the pencil icon beside the righthand box. This opens the expression editor.
- In the Expression type list, choose Contract input, then in the Name box select
statusContract, and click OK.
-
Specify the operation to update the
commentsattribute:- Click Add.
- In the Select target box, double-click
vacationRequest. - Click “Takes value of” and then from the Operator type menu choose “Use a Java method.”
- In the list of methods, choose
setComments, and then click OK. - Click the pencil icon beside the righthand box. This opens the expression editor.
- In the Expression type list, choose Contract input, then in the Name box select
commentsContract, and click OK.
-
Specify the operation to update the
reviewerBonitaBPMIdattribute:- Click Add.
- In the Select target box, double-click
vacationRequest. - Click “Takes value of” and then from the Operator type menu choose “Use a Java method.”
- In the list of methods, choose
setReviewerBonitaBPMId, and then click OK. - Click the pencil icon beside the righthand box. This opens the expression editor.
-
In the Expression type list, choose Script, set the script Name to getPerformerId, and enter this script:
returntaskAssigneeId; - Make sure the Return type is set to java.lang.Long, and then click OK.
You have now defined the operations to update the attributes of the vacationRequest. You can now define conditions that use these attributes, specifically the status of the request.
Add Flow Conditions
The Request approved? gateway has two outgoing flows, one for yes and one for no. The no flow is the default. The yes flow is taken if the vacation request is approved, that is, if value of the status attribute of the vacationRequest is approved.
To make the no flow the default:
- Select the no flow out of the gateway.
- Go to the Details panel, General tab, General pane.
- Check the Default flow box.
To define this condition on the yes flow:
- Select the yes flow out of the gateway.
- Go to the Details panel, General tab, General pane.
- Next to Condition, check Use expression.
- Click the pencil icon next to the text field. This opens a popup where you specify the condition.
- In the Expression type list, click Script.
- Enter a name, isApproved.
-
In the center box, enter this script:
returnvacationRequest.status=="approved" - Click OK.
The condition is defined. To check that it is correct, go to the Details panel, Validation status tab, and click Refresh. If the condition is correctly defined, there will be no validation error listed for the gateway.
Make the no Flow Parallel
When a manager refuses a vacation request, there are several service tasks that follow: notifying the employee and HR and updating the empoylees’ available vacation. All of these tasks must be completed before the flow ends, so parallel flows are needed. You need to add a diverging gateway after the Request approved? gateway, with one flow for each task, and then add a converging gateway to join the flows after the service tasks. There is no decision at the diverging gateway because both flows must be followed, so use a parallel gateway. Follow these steps:
- Go to the palette and find the icon for the parallel gateway.
- Drag the icon onto the whiteboard and drop it on the no flow. This automatically inserts the gateway in the flow. Call the new gateway after refusal branch. It is created with an outbound flow to the Notify employee request refused task.
- Select the flow out of the Notify employee request refused task and delete it.
- Add a flow from the after refusal branch gateway to the Credit days from refused request task.
- Add a flow from the after refusal branch gateway to the Notify HR request refused task. You should now have three flows out of the after refusal branch gateway.
- Add a second parallel gateway to the diagram. It does not matter where this gateway is, but to keep the diagram tidy, put it in the Manager lane. Call the gateway after refusal join, so that it is clear this is the end of the parallel flows created by the after refusal branch gateway.
- Add flows from the Credit days from refused request, Notify employee request refused, and Notify HR request refused tasks to the after refusal join gateway.
- Delete the flow from the Notify HR request refused task to End2.
- Move the end icon to the Manager lane, beside the after refusal join gateway.
- Add a flow from the after refusal join gateway to End2.
-
Hide the names of the after refusal branch and after refusal join gateways. For each gateway:
- Select the gateway.
- Go to the Details panel, Appearance tab.
- Uncheck the Display name box.
The flow following the refusal of a vacation request is now parallel.
Close Flows from Request approved?
In logic terms, the Request approved? gateway is the start of an “if” statement. The flows from the Request approved? gateway diverge and currently lead to two separate end points. In this section, you will add a gateway to indicate the end-if point where the alternate flows join. Follow these steps:
- Drag the exclusive gateway icon from the palette and drop it on the flow between the after refusal join gateway and End2.
- Name this gateway request approved join.
- Delete the End1 end point.
- Add a flow from the Notify employee request approved task to the request approved join gateway.
- Select the request approved join gateway, go to the Details panel, Appearance tab, and hide the gateway name.
The flow is now closed, and the diagram has a single end point. Change the name of the end point by selecting End2 and specifying a new name, New Vacation Request End, in the Details panel, General tab, General pane. You can hide the name using the Appearance tab.
The diagram is functionally correct but not tidy. It is a good idea to rearrange the icons and flow to improve the diagram usability, to make future changes and maintenance easier.
Updated Diagram
After these updates and some tidying, the diagram looks like Figure 8-1:
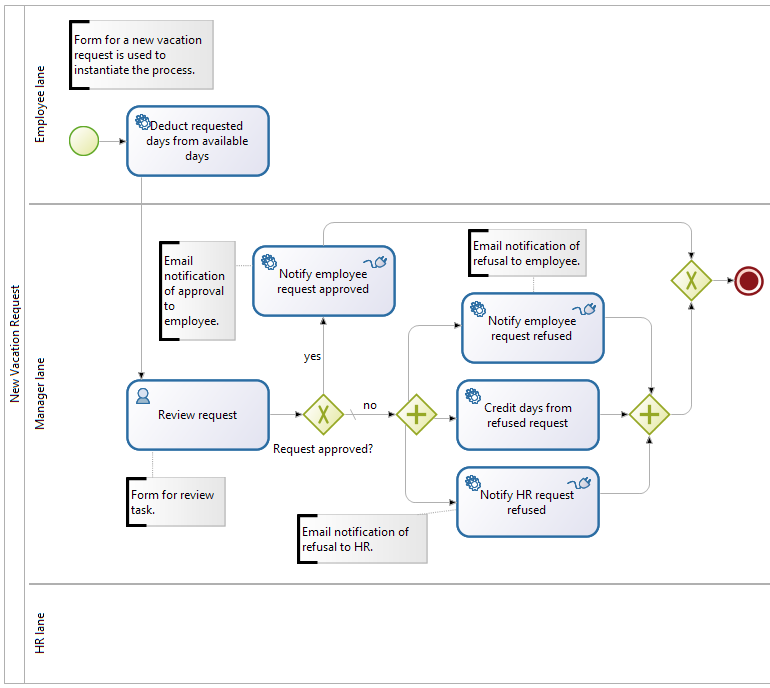
Figure 8-1. Diagram updated to close flows
Summary
You have updated the diagram to properly manage the consequences of decisions, using gateways to branch and join flows, and have defined a condition at a gateway using the data model you defined in the previous chapter. The diagram is now complete for the typical process flow.
The next chapter explains how to add checks into the process flow so that if there is a delay the task is escalated, and how to handle exceptions when something happens that you cannot plan for.