
Chapter 11. Managing Interruptions
An interruption is a human intervention to change the normal flow of a business process. The Tahiti application needs to handle modification or cancellation of a vacation request. These are interruptions triggered by an employee. You will enable a user to modify a pending vacation request, and to cancel a pending or approved vacation request. The user’s manager must approve cancellation of a request that has already been approved. If a user wants to modify an approved request, they can cancel the approved one and submit a new request. This chapter explains how to extend the Tahiti application so that employees can modify a pending vacation request, or cancel a request.
Modify a Request
A user can modify a pending vacation request. In the Tahiti application prototype page that you have created, when the user selects a pending vacation request, a button marked Modify Vacation Request appears, together with fields to change the dates and duration of the vacation request. A user can only change a pending request, so there is no manager review step.
In this section, you will:
- Update the Tahiti vacation management application page so that the user can change the details of a pending request in the page, then submit the change.
- Create a new process definition, Tahiti-ModifyPendingVacationRequest, which is launched when the user submits an update to a request.
Add Modify Option to the Application Page
This section explains how to add fields to the Tahiti application page that the user can use to modify a pending vacation request. The user modifies the vacation request in the application page, then clicks a button to submit the change. There is no need for a separate form for updating the request. It is more efficient for the user to make the change directly in the application page.
Follow these steps:
- Open the TahitiVacationManagement page in the UI Designer.
- Create an External URL variable called
processModifywith the following value:
../API/bpm/process?s=Modify Pending Vacation Request &p=0&c=10&o=version&f=activationState=ENABLED -
Create a JavaScript expression variable called
urlStartModifyProcesswith the following value:// Return the API URL to instantiate the modify vacation request// processif($data.processModify&&$data.processModify.length>0){return"../API/bpm/process/"+$data.processModify[$data.processModify.length-1].id+"/instantiation";}else{returnnull;} -
Add a Text widget with the following properties:
Text To modify the selected vacation request, update the details in the selected request line, and then click <b>Modify selected vacation</b>. Hidden Bind to selectedRow.copy.status!=="pending” -
Move the “Modify selected vacation” button into a row beside the Text widget that you have just added, and update the following properties:
Disabled no Action POST URL to call {{urlStartModifyProcess}} Data sent on click Bind to {"vacationRequestIdContract”: selectedRow.copy.persistenceId_string, “startDateContract”: selectedRow.copy.startDate, “returnDateContract”: selectedRow.copy.returnDate,"numberOfDaysContract”:selectedRow.copy.numberOfDays} Target URL on success /bonita/apps/tahiti/index/ -
Add an Input widget with the following properties:
CSS classes visibility: hidden Value Bind to urlStartModifyProcess
To modify a request, the user selects the request in the table. The information in the selected row is copied to the Start date, Return date, and Number of days widgets. If the status of the selected request is Pending, the “Modify selected vacation” button appears. The user updates the dates and number of days, then clicks the button. Clicking the button triggers an API call that starts an instance of the process to modify the vacation request. The next section explains how to define this process.
Create the Tahiti-ModifyPendingVacationRequest Process
To create the process that enables users to modify a vacation request, you need to do the following:
- Create the diagram to specify the process flow and tasks
- Specify the contract that defines what information the process requires
- Specify the variables used in the process
- Specify the operations that are used to update these variables and the vacation business data
Create the diagram
Create a new diagram called Tahiti-ModifyPendingVacationRequest. Name the pool Modify Pending Vacation Request. The pool needs to contain an Employee lane, which is created by default. In this lane, add:
- A start event
-
Service tasks named
- Find vacation available
- Update vacation available
- Update vacation request
- An end event
Your diagram should look something like Figure 11-1.
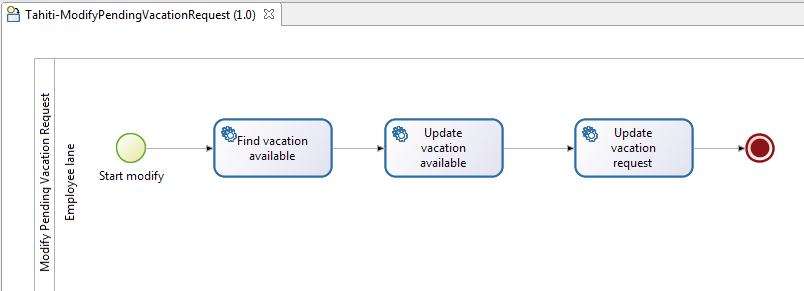
Figure 11-1. Process for modifying a vacation request
There is no need for a review step, because the pending request is already the subject of an instance of the process to review a new vacation request. When the manager reviews the request, she will see the updated information. You do not need to create an instantiation form because the process is started by an API call that provides all the data that is needed.
When you view the validation status, there are warnings about forms that are not defined. To remove the flag warning that no instantiation form is defined, select the pool, go to the Details panel, Execution tab, Instantiation form pane, and check “No form.” You can do the same to remove the warning that no Overview page is defined.
Specify the contract
For Modify Pending Vacation Request, the process contract contains these inputs:
| Input name | Type | Description |
|---|---|---|
| vacationRequestIdContract | TEXT | The ID of the edited vacation request. |
| startDateContract | DATE | The new value for the first day of vacation. |
| returnDateContract | DATE | The new value for the day the requester returns to work. |
| numberOfDaysContract | INTEGER | The new value for the number of days of vacation, not including nonworking days. |
- Select the pool.
- Go to the Details panel, Execution tab, Contract pane.
-
In the Inputs tab, specify the attributes required. For each one:
- Click Add.
- Specify the name of the input in the Name column.
- Select the Type.
- Add a Description.
- Ignore the Multiple column, which is not relevant for this contract.
Specify the variables
- Select the pool and go to the Details panel, Data tab, Pool variables pane.
-
Add a business variable,
vacationRequest, as follows:- Beside the Business data list, which is empty, click Add. The New variable popup opens.
- Enter the variable name,
vacationRequest. - Set the Business Object to
VacationRequest. - In the Default value field, click the pencil icon. This opens the expression editor in a popup.
- Set the Expression type to Query.
- In the Business Object drop-down list, select
VacationRequest. -
In the Queries drop-down list, select
findByPersistenceId. The query is displayed in the Query content box. You do not need to change this. However, for the query to work, you need to define a script that converts the ID from a String (the type used by the contract) to a Long (the type needed for the search query parameter). Do this as follows:- In the Parameters box, click in the Value column on the right of the
persistenceIdparameter. - Click the pencil icon. This opens another expression editor popup.
- Set the Type to Script.
- Enter the script name, stringToLong.
- Enter the script content by copying this:
returnLong.valueOf(vacationRequestIdContract) - You do not need to specify the return type because the default value is correct for this variable.
- Click OK to close the expression editor.
- In the Parameters box, click in the Value column on the right of the
- Click OK to close the definition of the query.
- Click OK again to validate the definition of the default value, and then click Finish to save the definition of the variable.
-
Add a business variable,
vacationAvailable, as follows:- Beside the Business data list, click Add. The New variable popup opens.
- Enter the variable name,
vacationAvailable. - Set the Business Object to VacationAvailable.
- Leave the Default value field empty.
- Click Finish.
-
Add the process variables
numberOfDays(Integer),startDate(Date), andreturnDate(Date) as follows:- Beside the Process variables list, click Add. The New variable popup opens.
- Enter the variable name.
- Set the type.
- Set the Default value using the drop-down list to the matching contract input.
- Click Finish & Add to add the next variable, or Finish when you have added the three variables.
Operations
Now you need to define operations to update the counter of available days for the requester and to update the pending request:
-
Select the Find vacation available step, go to the Details panel, Execution tab, Operations pane and define an operation to initialize the
vacationAvailablebusiness variable:- Click Add.
- In the lefthand box, click the down arrow and then double-click
vacationAvailable. - Click the pencil icon beside the empty righthand box. This opens the expression editor.
- In the Expression type list, choose Query.
- In Business Object drop-down list select
VacationAvailable. - In the Queries drop-down list, select
findByBonitaBPMId. The query is displayed in the Query content box. - In the Parameters box, click in the Value column on the right of the
persistenceIdparameter. - Click the pencil icon. This opens another expression editor popup.
- Set the Type to Java.
- In the Name box, select
vacationRequest. - In the “Browse your Java object” box, select
VacationRequest - getRequesterBonitaBPMId. - You do not need to specify the return type because the default value is correct for this variable.
- Click OK to close the expression editor.
- Click OK to close the definition of the query.
-
Select the Update vacation available step, go to the Details panel, Execution tab, Operations pane and define an operation to update the
daysAvailableCounteraccording to the modification made by the requester:- Click Add.
- In the lefthand box, click the down arrow and then select
vacationAvailable. - Click “Takes value of,” then in the popup choose “Use a Java method,” select
setDaysAvailableCounter, and click OK. - Click the pencil icon beside the empty righthand box. This opens the expression editor.
- In the Expression type list, choose Script.
- Set the script name to
calculateNewDaysAvailableCounter. -
Enter this script:
vacationAvailable.daysAvailableCounter+vacationRequest.numberOfDays-numberOfDays - Set the Return type to java.lang.Integer.
- Click OK.
-
Select the Update vacation request step, go to the Details panel, Execution tab, Operations pane and define an operation that uses the value of the process variable that stores the modification made by the requester to update the
numberOfDays:- Click Add.
- In the lefthand box, click the down arrow and then double-click
vacationRequest. - Click “Takes value of,” then in the popup choose “Use a Java method,” select
setNumberOfDays, and click OK. - In the righthand box, click the down arrow and then select
numberOfDays.
- Repeat the previous step to define an operation to update the
startDateand an operation to update thereturnDate.
This completes the definition of the process to modify a pending vacation request.
Cancel a Request
When a user cancels a vacation request before it is approved, the process that was previously started to approve the request must be stopped. If the request is already approved, the manager needs to approve the cancellation, in case the employee is not using up vacation days correctly.
The starting point for cancelling a vacation request is the vacation statement that you created in “Create the Application Prototype” and updated in the previous section to enable pending requests to be modified. The employee selects a vacation request in the table and clicks the Cancel button, which starts the cancellation process.
In this section, you will:
- Update the Tahiti vacation management application page so that the user can request cancellation of a pending or approved request in the home page.
- Create a new process definition, Tahiti-CancelVacationRequest, which is launched when the user submits a cancellation request.
- Modify the Tahiti-NewVacationRequest process to handle cancellation of a pending request.
- Create the form used by a manager to review a cancellation request and approve or refuse it.
Add a Cancel Option to the Application Page
This section explains how to add a button to the Tahiti application page that the user can use to cancel a vacation request. A request can be cancelled if it is pending or approved. The user selects the vacation request in the application page, then clicks a button to submit the cancellation request. There is no need for a separate cancellation form. It is more efficient for the user to make the change directly in the application page.
A request that is pending is cancelled immediately when the user clicks the Cancel button. For an approved request, manager approval is needed, so the vacation request goes into a special state, processing cancellation, until the cancellation is approved or refused.
To update the application page, follow these steps:
- Open the TahitiVacationManagement page in the UI Designer.
- Create a new External API variable called
processCancel, with the following value:../API/bpm/process?s=Cancel Vacation Request&p=0&c=10&o=version&f=activationState=ENABLED -
Create a new JavaScript expression variable called
urlStartCancelProcess, with the following value:// Return the API URL to instantiate the cancel vacation request// processif($data.processCancel&&$data.processCancel.length>0){return"../API/bpm/process/"+$data.processCancel[$data.processCancel.length-1].id+"/instantiation";}else{returnnull;} -
Add a Text widget with the following properties:
Text To cancel the selected vacation request, click <b>Cancel selected vacation</b>. If the request is already approved, a cancellation request will be sent to your manager. Hidden Bind to !(selectedRow.copy && selectedRow.copy.status!=="refused”) -
Move the “Cancel selected vacation” button into a row beside the Text widget that you have just added, and set the following properties:
Disabled no Action POST URL to call {{urlStartCancelProcess}} Data sent on click Bind to {"vacationRequestIdContract”: selectedRow.copy.persistenceId_string} Target URL on success /bonita/apps/tahiti/index/ -
Add an Input widget with the following properties:
CSS classes visibility: hidden Value Bind to urlStartCancelProcess
You now have the final version of the Tahiti application page. Export it by clicking the Export icon in the top bar. This creates a .zip archive that you will deploy later, in “Update the Application”.
Define the Tahiti-CancelVacationRequest Process
You need to define a process to handle the cancellation request. It checks whether the request to be cancelled is pending or approved. If it is approved, it presents the manager with a form to review the cancellation. If the request is pending, it sends a message to the active New Vacation Request process to cancel the request. You need to update the New Vacation Request process to receive the message and take the actions needed to cancel the request.
To create the cancellation process, you need to do the following:
- Create the diagram for the new process
- Specify the variables used in the process
- Specify the actors for the lanes
- Configure the communication between the new process and the New Vacation Request process
- Define conditions that determine the correct flow
- Update the status of the vacation request
- Update the number of available vacation days for the user when a request is cancelled
The following sections explain how to do this.
Create the diagram
- Create a new diagram called Tahiti-CancelVacationRequest.
- Rename the pool Cancel Vacation Request.
- The Employee lane is added by default, so you do not need to change it. Add a lane called Manager lane.
- Create the process flow shown in Figure 11-2. There is a human task where the manager reviews the cancellation request, and there are several service tasks where data is updated. There is one new diagram element that you have not seen before, a throw message event. The error indicators are reminders to complete the configuration, which you will do this later in this chapter.

Figure 11-2. Cancel a vacation request
Specify the contract
For Cancel Vacation Request, the process contract contains only one input, vacationRequestIdContract. To define the contract:
- Select the pool and go to the Details panel, Execution tab, Contract pane.
- Click Add.
- Specify the name of the input,
vacationRequestIdContract, in the Name column. - Leave the Type set to the default value, text.
- Add a Description: The id of the vacation request to be cancelled. This will be displayed in the process form as a hint on how to complete the corresponding form field.
- Ignore the Multiple column, which is not relevant for this contract. For review cancellation, the step contract contains one input,
cancellationApprovedContract. To define the contract:- Select the Review cancellation step and go to the Details panel, Execution tab, Contract pane.
- Click Add.
- Specify the name of the input,
cancellationApprovedContract, in the Name column. - Set the Type to Boolean.
- Add a Description: The manager decision about vacation request cancellation.
- Ignore the Multiple column, which is not relevant for this contract.
Specify the variables
- Select the pool and go to the Details panel, Data tab, Pool variables pane.
-
Add a process variable,
cancellationApproved, as follows:- Beside the Process data list, which is empty, click Add. The New variable popup opens.
- Enter the variable name,
cancellationApproved. - Set the type to Boolean.
- Click Finish.
-
Add a business variable,
vacationRequestToCancel, as follows:- Beside the Business data list, which is empty, click Add. The New variable popup opens.
- Enter the variable name,
vacationRequestToCancel. - Set the Business Object to
VacationRequest. - In the Default value field, click the pencil icon. This opens the expression editor in a popup.
- Set the Expression type to Query.
- In the Business Object drop-down list, select
VacationRequest. -
In the Queries drop-down list, select
findByPersistenceId. The query is displayed in the Query content box. You do not need to change this. However, for the query to work, you need to define a script that converts the ID from a String (the type used by the contract) to a Long (the type needed for the search query parameter). Do this as follows:- In the Parameters box, click in the Value column on the right of the
persistenceIdparameter. - Click the pencil icon. This opens another expression editor popup.
- Set the Type to Script.
- Enter the script name,
stringToLong. -
Enter the script content by copying this:
returnLong.valueOf(vacationRequestIdContract) - You do not need to specify the return type because the default value is correct for this variable.
- Click OK to close the expression editor.
- In the Parameters box, click in the Value column on the right of the
- Click Finish.
- Click OK to close the definition of the query.
- Click OK again to validate the definition of the default value, and then click Finish to save the definition of the variable.
-
Add a business variable,
requesterVacationAvailable, as follows:- Beside the Business data list, click Add. The New variable popup opens.
- Enter the variable name, requesterVacationAvailable.
- Set the Business Object to
VacationAvailable. - Click Finish.
Now specify how the cancellationApproved variable is updated with the manager’s decision. This is done with an operation on the Review cancellation human task, as follows:
- Select the Review cancellation task go to the Details panel, Execution tab, Operations pane, and click Add.
- In the Select target box, double-click
cancellationApproved. - Leave the operation type set to the default, “Takes value of.”
- In the righthand box, double-click
cancellationApprovedContract.
Configure actors
An actor defines who can carry out the tasks in a lane. For the Employee lane, the Employee actor is specified by default so you do not need to do anything. For the Manager lane, configure an actor and actor filter as follows:
- Select the Manager lane and go to the Details panel, General tab, Actors pane.
- In the “Select an actor” drop-down list, select the Employee actor.
- Select the Review cancellation task, and then click Set beside “Actor filter.”
- In the popup, select “Initiator manager,” and then click Next.
- Enter a name for this actor filter, cancellationRequesterManager, then click Next.
- Make sure that the “Assign task automatically” box is checked, and then click Finish.
Configure the communication between the processes
Configure the Send message to cancel request throw message event. This event sends a message to the New Vacation Request process that is in progress for the vacation request that the user wants to cancel. Follow these steps:
- Select the throw message event, Send message to cancel request.
- Go to the Details panel, General tab, Messages pane.
- Click Add. The Add message popup opens.
- Enter a name, cancellationMessage.
- Enter a description: Message to cancel a vacation request.
- Specify the Target pool by double-clicking “New Vacation Request” from the dropdown list.
- Specify the Target element by typing Catch cancellation message. You will add the catch message event to the Tahiti-NewVacationRequest later in this chapter.
- Go to the “Correlation between instances” tab. A correlation key guarantees that the message is sent to the correct instance of the other process.
- Check the “Use key-based correlation” box.
- Click Add.
- In the Correlation key field, type
requestId. - In the Correlation value field, click the pencil icon. This opens the expression editor.
- In Expression type choose Java, in the Name box select
vacationRequestToCancel, and in “Browse your Java object” selectVacationRequestgetPersistenceId. - Click OK.
- Click Finish.
Define flow conditions
This section explains how to set flow conditions on the gateways in the Tahiti-CancelVacationRequest process diagram:
-
Set conditions on the outbound flows of the Status of request gateway:
-
Select the Pending flow, go to the Details panel, General tab, General pane, and select “Use expression.” Click the pencil icon to open the expression editor. Create a Script expression called
isRequestStatusPendingwith the following content:returnvacationRequestToCancel.status=="pending" -
Select the Approved flow and click “Use expression.” Click the pencil icon to open the expression editor. Create a Script expression called
isRequestStatusApprovedwith the following content:returnvacationRequestToCancel.status=="approved" - Select the other flow, and configure it to be the default (check the Default flow box). This will catch any requests with a status that is neither Pending nor Approved, reducing the risk of errors, or of duplicating a cancellation request.
-
-
Set conditions on the outbound flows of the Cancellation approved? gateway:
- Select the Yes flow and click “Use expression.” In the drop-down list, select the
cancellationApprovedvariable. - Select the No outbound flow and make it the default.
- Select the Yes flow and click “Use expression.” In the drop-down list, select the
- Check that the conditions are correctly set by going to the Validation status tab and clicking Refresh. The error indicators should be removed from the diagram.
- Optionally, hide the labels on flows, to make the diagram easier to read.
Update the status of the vacation request
When a cancellation request for an approved vacation request is being processed, there are the following changes to the vacation request status:
- For any vacation requests that the user wants to cancel, the status is set to processing cancellation to indicate that a cancellation is in progress.
- If cancellation is refused, the status is set back to approved.
- If cancellation is approved, the status is set to cancelled.
The service task Set vacation request status to “processing cancellation”, which is in the flow for handling cancellation of a request that is already approved, changes the request status to indicate that a cancellation is in progress. Follow these steps:
- Select the task and go to the Details panel, Execution tab, Operations pane.
- Click Add.
- In the Select target box, double-click
vacationRequestToCancel. - Click “Takes value of” and then from the Operator type menu choose “Use a Java method.”
- In the list of methods, choose
setStatus, and then click OK. - Click the pencil icon beside the righthand box. This opens the expression editor.
- In the Expression type list, choose Constant, then in the Value box type processing cancellation, and click OK.
Next, update the vacation request status for a request when the manager refuses the cancellation. Select the Reset vacation request status to approved service task, then follow the same steps as for the Set vacation request status to “processing cancellation” but for this task set the status to approved.
Finally, update the vacation request status for a request when the manager approves the cancellation and when a pending request is cancelled. Select the Update vacation request status service task, then follow the same steps as for the Set vacation request status to “processing cancellation” but for this task set the status to cancelled.
Update the number of available vacation days
Update the number of days of vacation that the user has after a successful cancellation. This is done in two service tasks, Get vacation available, which gets the current number of available days, and Credit vacation available, which updates this total by adding the number of days that were assigned in the cancelled vacation request.
First, configure Get vacation available, as follows:
- Select the task, go to the Details panel, Execution tab, Operations pane, and click Add.
- In the Select target box, double-click
requesterVacationAvailable. - Leave the operation type set to the default, Takes value of.
- Click the pencil icon beside the righthand box to open the expression editor.
- In the Expression type list, choose Query.
- In the Business Object menu, choose
VacationAvailable. This automatically sets the Query tofindByBonitaBPMId. The query definition is displayed. -
In the Parameters box, the query parameter,
bonitaBPMId, is listed. You need to specify the value for this, which you do with another expression:- Click in the Value field to activate it, then click the pencil icon at the right-hand side.
- In the new expression editor, set the Expression type to Java, choose
vacationRequestToCancelfrom the Name list, choosegetRequesterBonitaBPMIdfrom the object tree, and then click OK.
- The query definition is now complete, so click OK again. You have now defined an operation to retrieve the number of days of vacation available to the user.
Next, configure Credit vacation available, as follows:
- Select the task, go to the Details panel, Execution tab, Operations pane, and click Add.
- In the Select targe box, double-click
requesterVacationAvailable. - Click “Takes value of” and then from the Operator type menu, choose “Use a Java method.”
- In the list of methods, choose
setDaysAvailableCounter, and then click OK. - Click the pencil icon beside the righthand box. This opens the expression editor.
- In the Expression type list, choose Script.
- Set the script name to resetVacationAvailable.
-
Enter the following script:
requesterVacationAvailable.daysAvailableCounter+vacationRequestToCancel.numberOfDays - Check that the Return type is set to
java.lang.Integer, then click OK to save the definition.
This completes the diagram for the cancellation process.
Update the Tahiti-NewVacationRequest Process
Next, update the Tahiti-NewVacationRequest process to receive the cancellation message from the Tahiti-CancelVacationRequest process and delete the pending request. Follow these steps:
- In the New Vacation Request pool, select the reviewRequest task.
- In the context menu, click the symbol to add a boundary event.
- From the list of icons, choose the catch message icon. This adds a catch message boundary event to the reviewRequest task.
- Select the catch message boundary event to display its context menu.
- Drag the circle icon to create a terminate end event called end when request cancelled.
-
Select the catch message boundary event again, and configure it:
- Go to the Details panel, General tab, General pane.
- Set the event name to Catch cancellation message and hide the label (set this in the Appearance tab).
- In the Catch message field, specify the name of the message. Do this by typing cancellationMessage in the drop-down list.
- Go to the Correlation pane and click Add.
- In the first column, type requestId.
- In the second column, click the pencil icon. The expression editor opens.
- Set the Expression type to Java.
- Select the
vacationRequestobject in the Name column, then in the “Browse your Java object” box, clickgetPersistenceId(). - Click OK.
This completes the update to the New Vacation Request pool, and in particular to the reviewRequest task. When you have finished, this part of the diagram should look something like Figure 11-3:

Figure 11-3. The updated reviewRequest task with boundary events
Create Cancellation Process Forms
This process is started by an API call when an employee submits a cancellation request. The request contains all the information that is needed, so there is no instantiation form. To remove the flag warning that no form is defined, select the pool, go to the Details panel, Execution tab, Instantiation form pane, and check No form. You can do the same to remove the warning that no Overview page is defined.
You do need to create the form that the manager will use to review cancellation requests for previously approved vacation requests. This form needs to return the manager’s decision to the process, so this is stated in the contract. It also needs to present the manager with the information needed to make the decision; that is, the details of the vacation request and the number of unbooked vacation days that the user has.
To create the contract and the default form, follow these steps:
- In the Tahiti-CancelVacationRequest diagram, select the Review cancellation task.
- Go to the Details panel, Execution tab, Contract pane.
- Click Add to add an input to the contract.
- In the Name column, type
cancellationApprovedContract. - Set the type to Boolean.
- Do not check the box in the Multiple column.
- Optionally, enter a Description.
- In the top-right of the Details panel, click the UI Designer icon to create the form.
- When the form opens in the UI Designer, change the name to cancellationReviewForm.
The form that is created automatically contains only two widgets: one to capture whether or not the reviewer approves the cancellation, and the other a Submit button. To make the form useful you need to define some variables and add widgets to display information about the user who is requesting the cancellation and about the request that is to be cancelled.
Adding variables to the cancellation review form
This section explains how to add the variables that are necessary for the cancellation review form. Follow these steps:
- Add an External API variable called
vacationRequestBusinessDatawith the API URL../{{context.vacationRequestToCancel_ref.link}}. This variable uses the reference to the request to be cancelled that is provided automatically in the context, and retrieves the request details. - Add an External API variable called
requesterwith the API URL../API/identity/user/{{vacationRequestBusinessData.requesterBonitaBPMId}}. This gets the ID of the user requesting the cancellation. - Add an External API variable called
requesterCurrentDaysAvailablewith the API URL../API/bdm/businessData/com.company.model.VacationAvailable?q=findByBonitaBPMId&p=0&c=1&f=bonitaBPMId={{vacationRequestBusinessData.requesterBonitaBPMId}}. This uses therequesterBonitaBPMIdfromvacationRequestBusinessDatato get the current number of available days of the requester.
Adding widgets to the cancellation review form
Now you can add widgets to the form to display the information about the user and the request using the variables that you have just defined. Follow these steps:
- Add a Title widget with a title for the form, Vacation Cancellation Request.
- Add a Text widget containing information to explain the form to the manager. In the Text property, enter the following: This is a request from {{requester.firstname}} {{requester.lastname}} to cancel a vacation that has already been approved. This employee currently has {{requesterCurrentDaysAvailable}} vacation days available. If you approve this cancellation, this will increase by {{vacationRequestBusinessData.numberOfDays}} days.
This text uses the variables that you have defined to present the manager with information about the user requesting the cancellation, including the number of days of vacation they currently have and would have if the cancellation request is approved. - Add a Title widget for this part of the form. Set the Title level to 4 and enter this text: Details of request to be cancelled:.
-
Add widgets to present the details of the request that the user wants to cancel. Put the three widgets that display the request details on the same line.
Start date:
Widget type Datepicker Width 4 Read-only yes Label Start date Value vacationRequestBusinessData.startDate Return date:
Widget type Datepicker Width 4 Read-only yes Label Return date Value vacationRequestBusinessData.returnDate Number of days:
Widget type Input Width 4 Read-only yes Label Number of days Value vacationRequestBusinessData.numberOfDays -
Add a Radio buttons widget called Decision for the reviewer to specify whether they approve or refuse the cancellation request. Set the properties as follows:
-
Set the Available values property to:
[{"display":"Approve cancellation","value":true},{"display":"Refuse cancellation","value":false}] - For the Selected value, go to the Decision widget that was created automatically and copy the value from the Value property. Paste this into the Selected value property for the Radio buttons widget.
- Set the Displayed key property to display and Returned key to value.
-
- Remove the Decision widget that was added automatically, because you have replaced it with the Radio buttons widget.
- Preview the form and adjust the widget layout if necessary.
You have now created the form that managers will use to review cancellation requests.
Testing Modify and Cancel
To test the processes and updated pages, follow the steps in Chapter 10, but this time deploy all the processes, as well as the new TahitiVacationManagement page.
Summary
In this chapter, you have updated the Tahiti application to enable users to modify and cancel vacation requests, and added the process required to handle these changes. You have now created three diagrams, Tahiti-NewVacationRequest, Tahiti-ModifyPendingVacationRequest, and Tahiti-CancelVacationRequest, and downloaded a process to initialize data for testing.
In the next chapter, you will configure service tasks to send email and update calendar events during these processes.