Chapter 3
The Immersive Experience
In this chapter we are exploring the components of the overall immersive experience. We will start off by breaking down how to make 3D shapes, then we will make those shapes user friendly and easy to interact with, and finally we will look at how those interactions can engage our full sensory system. Here is what we will be covering:
THE WORLD IN 3D By breaking the complex down into smaller pieces and looking at additive and subtractive methods, we’ll see that creating 3D models is actually more elementary than you may have thought.
AFFORDANCES How we interact with physical objects in our real world can and should inspire how we interact with digital objects in a virtual world.
MULTIMODAL EXPERIENCES With so many different ways for a user to experience XR, it makes sense to engage the user in as many modes as they are used to in their physical world.
The world in 3D
You are already an expert in three-dimensional design. I can tell you this confidently, because you live in it. Because of this, you have a deeper understanding of 3D than you do of 2D. Most designers have to train themselves in how to make a flat icon, how to take something that is complex and simplify it to simple geometric shapes. Of course, this doesn’t change the fact that it is hard to create something in three dimensions using a computer that has only two. Our understanding of 3D space through experience will allow us to know if we are designing for it correctly. Though there will be some challenges along the way, if you break them down, the process becomes more approachable. To start, shapes remain the essence of objects, and in 3D we work with the same shapes you are used to, but they become volumetric. A square becomes a cube. A circle becomes a sphere. A line becomes a cylinder. These are your primitive shapes (FIGURE 3.1).
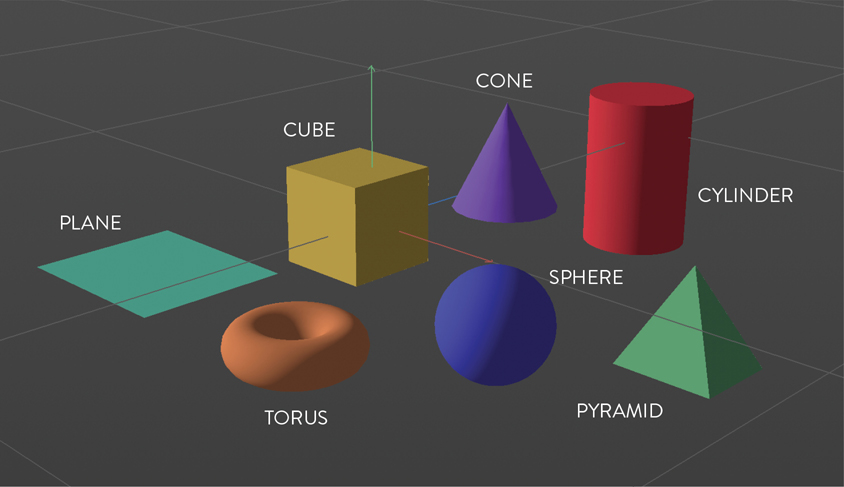
FIGURE 3.1 Primitives. The building blocks of 3D models start with these basic volumetric shapes.
Primitives Three-dimensional geometric shapes that can be added, subtracted, and combined to make more complex shapes.
You can use these basic 3D shapes to build other shapes, just as you have probably done in your 2D practices. The use of additive and subtractive techniques can help you make more complex shapes more easily. The table in FIGURE 3.2 was created out of cubes, and only cubes. How many cubes do you think it used? 5? 6? 280? Any of these answers could be correct, and the number could be even higher. It all depends on how you build it and how you subdivide it for ultimate complexity and control of the details. When you view a 3D form in its entirety, it may seem complex, but at its core, it’s made of the familiar basic shapes (FIGURE 3.3).

FIGURE 3.2 Cubical Table. This table was created using only cubes inside of Adobe Dimension. How many cubes can you identify?
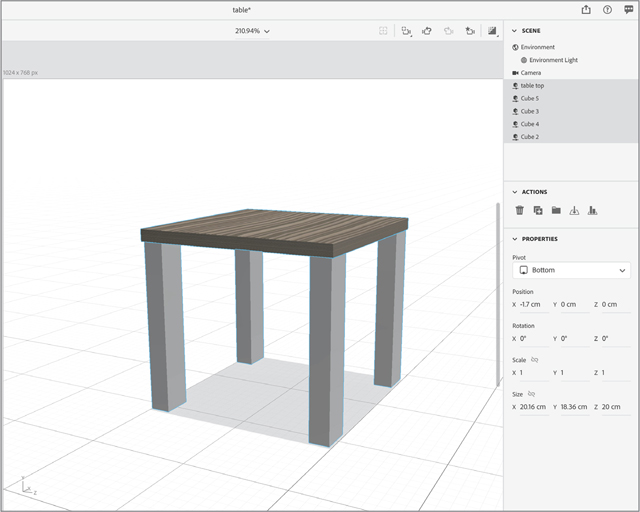
FIGURE 3.3 Cubical Table Breakdown. This table was created from five cubes, one for the top (named table top) and one for each of the table legs (named Cube 2, Cube 3, and so on). In this example, the table was created using the least number of shapes; however, the legs could have been created by stacking multiple cubes on top of one another if more individual breakdowns had been needed within the structure of the model.
Primitive shapes are defined using a three-dimensional coordinate system that represents width, height, and depth. Locations in the system are represented through x, y, and z coordinates, both positive and negative. The x-axis is horizontal with coordinate values increasing from left to right. The y-axis is vertical with coordinates moving up (increasing) and down (decreasing). Two-dimensional images include those two axes only, but in 3D the addition of the z-axis adds coordinates indicating depth: forward and back (FIGURE 3.4). This also includes the use of volume as it extrudes a shape in all directions, including z-space. All together the three axes are called the coordinate axes.
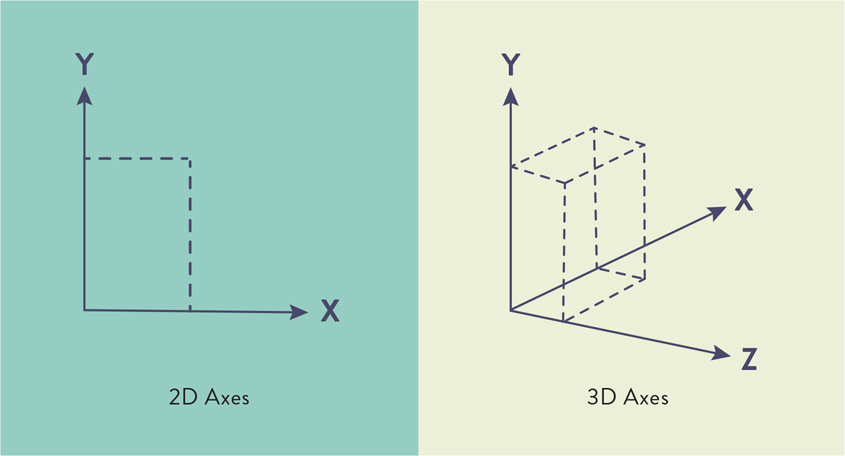
FIGURE 3.4 2D and 3D Axes. The visual difference between 2D using x and y coordinates and 3D using x, y, and z coordinates.
Coordinate axes The three number lines, all crossing at a central origin, used to reference the position of every point in a 3D space. The x-axis, y-axis, and z-axis define the three coordinates, x, y, and z, used to identify the position of a point.
As you are designing for 3D you will need to start to understand some of the additional properties of a model. Instead of just working with the fill and stroke of a shape, the attributes expand to designing an entire scene. This process has similarities to photography in many ways. You need a scene, you need a camera that you can move around to capture the shot, you need light, and you need to consider the overall composition. After capturing a photograph, you need to process it—often by moving the image file from the memory card inside the camera to your computer. The equivalent in 3D is the rendering process, which creates the final file for use in an illustration, animation, or an XR experience. Because some of the terms in this process might be new, let’s look at each of them one by one.
Splines
In addition to primitives, you can use custom paths which allow you to create organic shapes and then make them volumetric. Most 3D programs create curves using splines. If you have worked in Adobe After Effects, these are the equivalent of paths. The process starts with creating the spline and adding extrusion to generate geometry. This results in custom 3D shapes. This concept might be familiar if you relate it to using the Pen tool to create Bézier curves, which you may know from Adobe Illustrator or other vector-based programs. For many designers who are comfortable with the Pen tool, working with anchors and paths, and adjusting the angle of a curve with each anchor point, creating and extruding splines will be a comfortable space in the beginning. In fact, some 3D programs, such as Cinema 4D (Maxon) allow you to import paths directly from Adobe Illustrator.
Spline A 3D curve made up of at least two points. With these you are able to create the skeleton structure of a form using any combination of curved and straight shapes.
Extrusion A method of expanding a 2D path or spline into 3D space by adding vertices and edges along the z-axis.
Combining splines with various generator methods enables you to expand what you create beyond the basic geometric shapes (FIGURE 3.5). I highly suggest getting comfortable using all the primitive shapes first, however. Once you can start to see how you can use the foundational primitives to add more complex shapes, then you might be ready to try using splines.
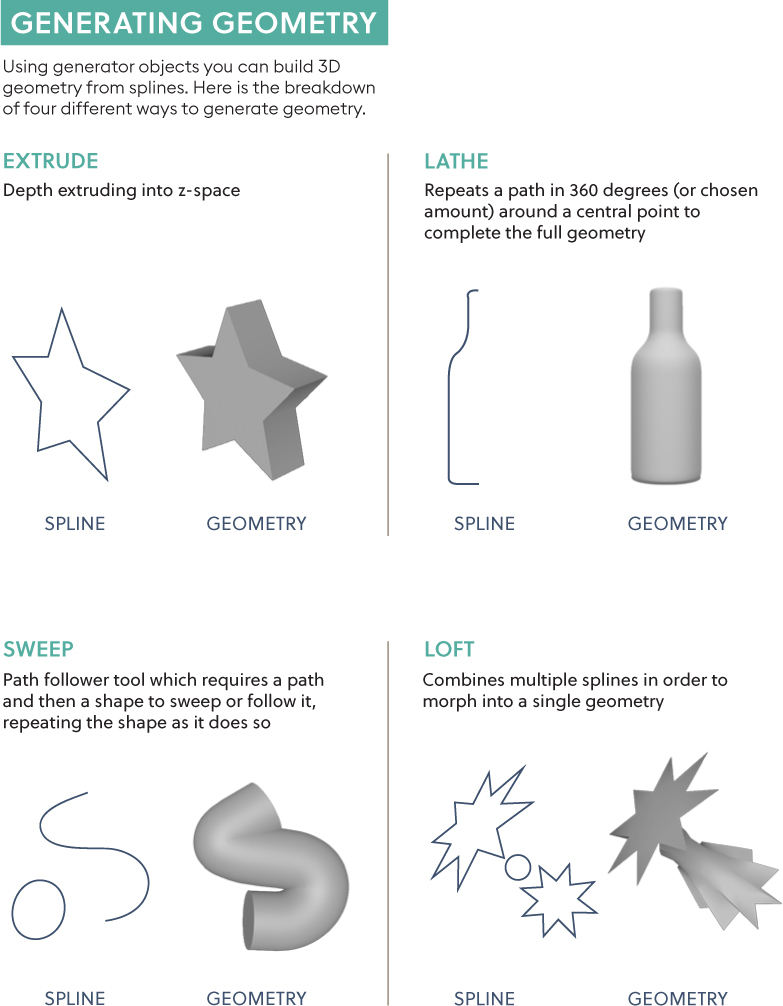
FIGURE 3.5 Generating Geometry. Four generators that can be used to create geometry from spline paths.
Mesh
Working with 3D shapes might be a trip back to your elementary geometry classes. But the good news is that they haven’t changed since then, so what you recall about those days is still quite relevant. 3D shapes are made up of points, edges, and faces. It is the relationship of all those elements collectively that make a mesh. This mesh is the visible representation of the 3D form. For example, you can create a 3D mesh of a cube or a sphere.
Mesh Collection of points, edges, and faces that make up an object.
The relationship between the elements of the mesh help define the shape and the overall form. The point where two or more edges meet is called a vertex. When you have more than one, you call them vertices (FIGURE 3.6).

FIGURE 3.6 Vertices. Highlighting the seven vertices that can be seen on this 3D cube.
Vertex Point where two or more line segments meet to create, in essence, a corner.
When multiple points and edges close a complete shape, they create a polygon. Triangles, squares, rectangles, and pentagons are all examples of polygons. Multiple polygons help form the full, complete 3D shape. If you are making a cube, then each polygon you create would be a square. So, to create the full cube, you would have six polygons (that are squares) in total. As you increase the complexity of shapes, you will also increase the number of polygons needed to create each one. However, the number of polygons that’s advisable to use depends on where you will be using your model. The more polygons you have, the smoother your model will appear, so it would make sense to add as many as you need to make it look the best.
The tradeoff to remember, however, is that high polygon counts require a lot of processing power to manipulate. In other words, the more polygons you use, the greater the chance of negatively impacting the speed and quality of the model’s loading time (FIGURE 3.7). This is even more important in XR. If you are creating an animation for a film, then you want the highest quality images because the playback won’t be affected as much. In XR, however, the processing power is limited, especially in mobile AR and WebAR where the experience typically relies on the processors in your phone. So, the more efficient you can make your shape, using as few polygons as needed, the faster the load time of your XR experience and the more optimized the performance will be for the user. If your file size is too large, the object may never even show up—often there is no warning provided as to why. To help you avoid this frustration, it is better to think efficiently from the beginning. Just as an image that has not been optimized for the web can cause page loading failures and delays, the same is true for 3D models in AR.
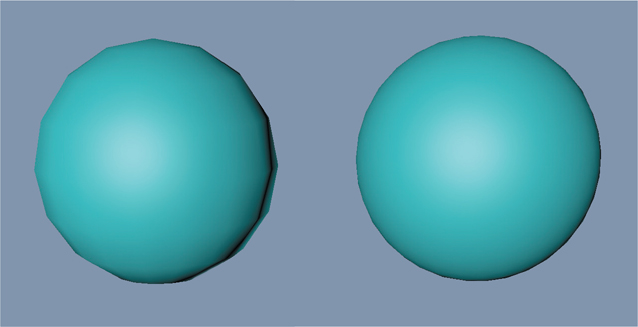
FIGURE 3.7 Polygons. The left sphere has 16 segments; the right sphere has 31 segments. The more segments, the more polygons and the smoother the edges of the shape. However, the more polygons, the larger the file size too.
Material
Once you have a mesh created, you likely have a bunch of gray shapes, looking like clay. It will not look too exciting yet—not until you start to create more physical qualities to it. The first place to start is with materials. These are all the physical properties that you add over the full mesh. If you think of your mesh as the structure, or the body, then the materials are like the clothes or upholstery that you drape over it and that take on the same shape as the structure. Materials are essentially the properties that you can add on top of the object that will determine how it looks. Just like materials in the real world, these digital materials determine how light interacts with the different surfaces, how the color looks, and what the texture looks like. Materials can be transparent, opaque, or reflective, for example.
Material Physical properties added to an object to determine how it will appear in an environment.
Materials that include a texture are a bit different from your standard material, because they use an image wrapped around the skin of a 3D object. You can apply and layer multiple materials such as wood, brick, or concrete, just to name a few. However, you can apply only one texture. Textures work only when they are added to a material. So, you can’t have a texture without defining how that texture will be seen on an object.
Texture A flat 2D image that is wrapped on an object using a material.
Another way to add an image to the surface of your model is through the use of a UV map. This flattens a 3D model’s x, y, and z coordinates into a 2D tile. The name UV doesn’t stand for anything, but is instead used methodically. The x-axis translates to the U, the y-axis translates to the V, and then some maps also use the z-axis, or depth, represented as W.
Tip
A material can offer more detail on a model versus creating a more complex polygon shape and will have a faster load time.
Ordered alphabetically, the use of the letters U, V, and W is to create a distinction between the use of x, y, and z for coordinates. These UV maps are flattened 2D representations of 3D space. You can use an image, such as a design or a photo of Earth, and wrap it around the shape of the mesh, such as a sphere (FIGURE 3.8). This will make a sphere look like the Earth. Similarly, you can use image textures to create fast mockups of products to see how a design will look on a 3D object. For designers, it is common practice to create these UV maps in Adobe Photoshop, Adobe Illustrator, or similar applications, and then import the final image to wrap around the object using a 3D program.

FIGURE 3.8 UV Mapping. The top image shows the 2D UV map, and the bottom image shows that image wrapped around the 3D model to illustrate Earth.
To take more control of the appearance of your model, you can also add shader information to a material. This holds data about the object’s appearance. As the name implies, shaders can change the appearance of darks and lights using gradients, or even by creating custom shading. These can also be used to create effects that make the object look glitchy, electric powered, or even change colors. Once you start getting more comfortable working with your 3D models, materials, and textures, you can venture into the use of shaders to get a more custom or stylized look to your models.
Camera
Your eyes are a camera looking at the scenes in your physical world. If you start to think like that, then the idea of the camera view is in essence where you are looking within a provided space. In video or film you have control where each person is looking when. This is not true when working with an individual 3D model, but you can set up a fixed viewpoint that determines how people will see an object. You set the perspective, which will be how people will first see the model when they place it onto a physical object using AR. There is an option to create a fixed view using a camera to ensure that users always see the object a certain way no matter where the user looks or moves. If you don’t have a fixed view, then a user may have full control to view the object from all angles as they choose. You can think of the camera as the viewpoint to an object or a scene. Varying camera views can be seen across the bottom of FIGURE 3.9.

FIGURE 3.9 Picnic Brunch. 3D software was used to create a printed poster advertisement, as well as a short animation for promotion of Picnic Brunch on Instagram. The goal of the project was to highlight different settings where one could brunch, other than a fancy restaurant (hence “Brunch Anywhere”). When COVID-19 hit, everything shut down, so places like apartments and balconies became the focus of the campaign. The image on the top left shows the completed rendered image. The top right shows the full scene before materials and textures were added. The bottom thumbnails show the varying camera views throughout the 3D scene.
Designer, illustrator, and animator: Jared Schafer; Creative director: Paul Engel; Executive producer: Brendan Casey
Light
Light is the essence of how you visually experience the world. To see any object or scene you create, you need to have some light on it. You can determine the qualities and characteristics of the light you add. As you need light to make a photograph, you need light to see and understand a 3D scene.
In XR, light becomes an essential part of the scene. It isn’t just that the light can brighten some areas and darken others, but rather that it feels like it belongs in that space. This is such an important topic that we will be exploring it more in Chapter 11, “Color for XR.” But for the moment, look around you, wherever you are, and whatever time of day it is. Look for shadows. Notice where they are, what direction they go, how dark they are. If you were to add another object into that same space, it would need to have a shadow that mimicked the others to appear realistic. Just as with a photo illustration, where you make selections from multiple photographs and composite them into one image, you need to create a universal light source. Each element should have shadows in similar directions based on the placement of the perceived placement of the light.
Tip
Remove all materials from your object when you are designing your lighting. The materials can change the way you perceive the light and even the color of the light. Once your lighting is set, then you can reapply your materials.
The good news is that there is some great computer vision technology that you can use to assist with this. However, you still need to know how to create multiple lighting setups. This includes understanding environmental versus directional lights. Sunlight creates stronger and deeper shadows than an artificial directional light in a scene. We know this from experiencing light; the next challenge is re-creating it in a digital environment. We will explore much more about lighting and break down the different kinds of lighting, both default and manual options, in Chapter 11.
Scene
When you create for 3D, you are designing a full scene. This may feel like a lot during your transition from designing for a single paper or screen to designing an entire scene. So, just like everything else, do this gradually. Work on creating a single primitive first. Then work on creating more complex objects using only primitives, after which you can explore creating more organic shapes. From there, you can add lighting to mimic the kind of space you are envisioning. At this point, you will have a lot of gray shapes that may be well lit but not too exciting. Take it to the next step by adding materials and textures. Once you have all of these set, you can start looking at the bigger picture. This includes the camera and the environment.
The environment is the space that surrounds a 3D object and contains the lighting and ground plane. In the case of VR, the environment will be a key component to creating the digital space people will walk through. When you think of the environment, think of creating a diorama (FIGURE 3.10). As you may recall from your childhood school projects, a diorama is a miniature replica of a larger 3D scene. They are very helpful for making a visual prototype of a scene. In Chapter 5, “Creating the Prototype,” we will be talking all about prototyping and its benefits for the design process. As you think of designing the environment, it may help you to picture a small box scene, as you would make for a diorama. At a minimum you need to have a floor. This is where all the objects will be anchored. Even if you are creating only one 3D model, you still need to identify the location of the floor, which is shown by the value of the x-axis, the horizontal coordinate. If you would like something to touch the ground, then you need to position it accordingly. If you would like it to float above the ground, then you need to adjust your y-axis coordinate to lift the object up. The ground location will help set the relationship of the object itself to its environment. The visual feedback that confirms this will be the placement of the shadows created by the lighting and where the shadows fall. All the different elements are coming together.
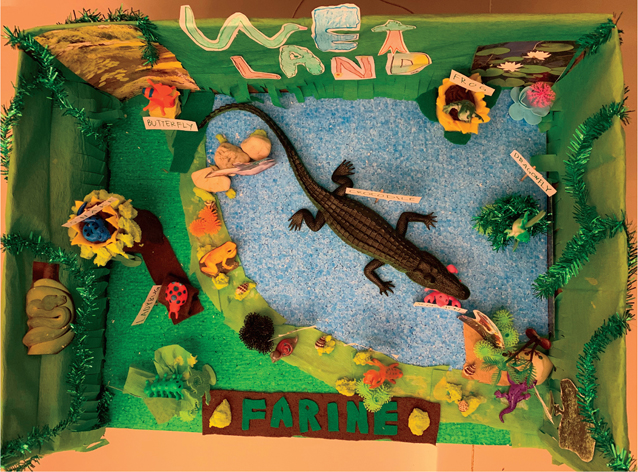
FIGURE 3.10 Diorama. Top-view of fourth-grader’s wetland diorama science project.
Photographer: Ira Susana for Shutterstock
For AR, you may only need to identify this ground plane and the object. However, for VR, you may need to design the full space. This could include a ceiling or a sky and possibly walls. You can create these with flat images or through the layering of more 3D models to develop the full space. Remember the diorama; you want to create all the different elements to re-create the space using your x, y, and z coordinates. Each element should be oriented in the space just as it appears in the miniature replica.
This is where you can lean on your skills in composition and layout. Finding a visual balance in 3D space will take some time and really lots of trial and error. The more you design spatial compositions, the more you will see how you can lean into your skills: your understanding of visual weight and balance from other design mediums. We will be exploring this in depth as we discuss creating a hierarchy and understanding the theories of perception later in the book.
Just to recap, your full 3D scene includes:
Objects with materials and textures
Environment
Lighting
Camera(s)
When you have all of these ready to go, then you can move to the final stage of rendering.
Render
When you are working within 3D software, it is important to know that what you are looking at as you work may not exactly match the final version. Once you create your full model and scene, then you need to render it. 3D rendering is the process of interpreting your 3D content to a form you can share with your audience (FIGURE 3.11). While many programs have render previews, these often are not high quality and as a result don’t show an accurate visual of the materials and lights. It isn’t until you do a full render, that you, in essence, export your final model or scene. Some programs offer an option to do a lower resolution render, which I would recommend doing to check the result of major edits and changes in lights, materials, and environmental decisions.

FIGURE 3.11 The Internal Structure of Jupiter. The fully rendered 3D model within the Star Walk 2 app.
Designer: Vito Technology
3D rendering Conversion of a 3D model into a 2D image that can be displayed on a screen.
With AR and MR, the need for rendering has greatly increased, as models need to be seen changing in real time in the user’s experience. This has pushed programs to use a real-time rendering engine. Unity and Blender both offer this option. Blender is free and open-source 3D software that uses an EEVEE real-time renderer. Unity offers a Sprite Render that allows you optimize for different software. For a higher quality, there is high-definition render pipeline (HRDP), and specifically for mobile use there is a lightweight render pipeline (LWRP). Vectary provides a real-time rendering process within a web-based program. This is called physically based rendering (PBR), which computes lights, shadows, and reflections in real time. It is reliant on your internet speed and connection to work, as it is a web program.
Other popular 3D modeling programs for designers are Cinema 4D and Adobe Dimension. The one nice thing about Adobe Dimension is that you can work with Adobe Photoshop and Illustrator to create your own custom models from 2D shapes. Rendering from Adobe Dimension also allows you to select a Photoshop export instead of just the 3D model.
3D files
The purpose of a 3D file is to store all the information about the 3D models, including the overall shape geometry. Some 3D file types include only the data as it relates to the shape itself, while others also include properties, such as materials, scene elements, and animations. Because each of these properties adds to the complexity of the model, they also increase the file size.
With XR, file size is an important issue that you need to pay attention to. Depending on the device you are designing for, the file size limitations may change. For mobile AR and WebAR, you need to optimize the object to reduce how much processing of the image is needed on a mobile phone. We have talked about how more complexity needs more processing, which needs more power, which creates heat. Because you can’t have an HMD that produces a lot of heat while it’s worn on the face, you must be thoughtful of how much processing is needed to display your designed models.
The best way to reduce file size is to reduce your polygon count. You are trying to achieve a balance between the appearance of the model and the performance. More complex shapes will affect the load time and possibly slow down the experience for the user. If your computer can’t process the full file, it will often glitch or even crash the program, which can be frustrating to you and if you are working with a developer. This can be even worse for the users. So, as you build, you need to plan for the technology you want to use. It is fun to play around with materials and shaders, but you don’t want them to interfere with the overall goal of the experience by increasing file size and reducing performance. VR experiences that require tethering to a high-powered PC allow you to off-load this processing, but as VR becomes more mobile as well, the same considerations will apply.
There are a number of file formats that you can use in the 3D world (FIGURE 3.12). The kind of format you end up using is reliant on what software you work with. It is important to know which file format you will need to add a model to your XR experience and then work backward from there. Each program will render different file formats, so you could choose your 3D program accordingly, or you could use a file convertor. If your file isn’t too large, you could try a web-based format converter, such as meshconvert.com. To convert larger, more complex files, you will need a desktop application, such as Spin 3D (NCH Software). File conversion will add more time to your process, so account for that if you plan on needing to convert files based on the software you choose.
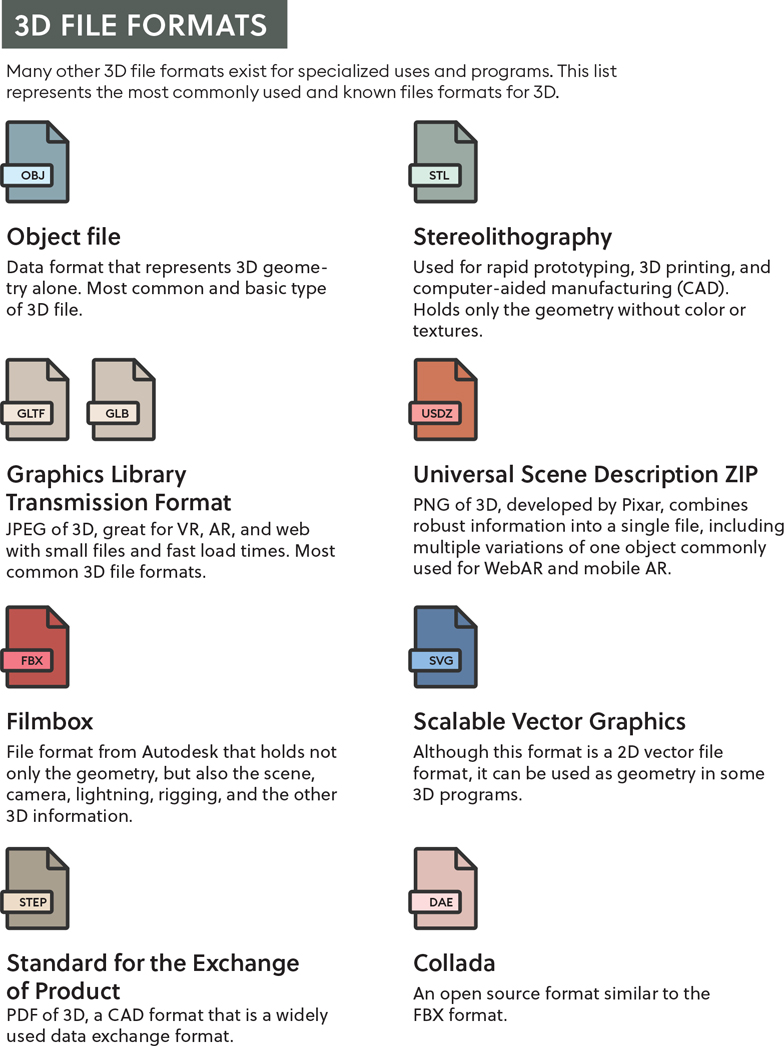
FIGURE 3.12 3D File Formats. The most commonly used 3D file formats broken down.
Note
If you are designing for WebAR, Chrome, or a Google product, it is suggested you use GLTF or GLB.
How do you choose the best file format with so many choices? Well, the loading speed and quality or resolution capabilities are your best bet, especially for mobile AR, where the current processing capabilities are still pretty limited. If you are designing for iOS using ARKit, it is encouraged that you use a USDZ format. This is just one example of why there are so many different file formats for 3D, as the industry is divided based on the other companies they currently support or are connected to in some way.
One way to speed up your creation of a 3D assets is to purchase a license to use one that is already made. These are some places you can purchase and download 3D models and textures:
TurboSquid
Sketchfab
Google Poly
Adobe Creative Cloud and Mixamo
Unity Asset Store
Tip
If you are looking for a more universal option for your download, then I suggest FBX models as they can easily convert it to a GLTF or a USDZ file.
As you explore these options, you will see that you can apply filters to narrow your search based on the program you are using to create and render your models or on the file format you are looking for.
Affordances
When you approach a door, how do you know the correct way to open it? When you approach a handle, you start to sense the intended behavior from the design of the object. You make that connection. The shape of the style of the handle should imply the options for interaction: up or down, push or pull, or twist. If you see a handle on a door, it is implied that it needs to be pulled. If you see a flat plate, that signals the need to push. Designing something with specific properties that drive a behavior for a specific interaction is called designing for affordance. The term affordance was first used by the perceptual psychologist James J. Gibson in his 1966 book, The Senses Considered as Perceptual Systems.1
Affordance Physical properties of an object or environment that indicate its functionality.
1 Gibson, J.J. (1966). The senses considered as perceptual systems. Houghton Mifflin.
When the design of the object interferes with the way we interact with it, then it causes frustration. In FIGURE 3.13, the handles that are closest look as though they should be pulled toward you. However, the doors work only when pushed as you can see in the second set of doors leading outside. The second set of doors is more accurately designed to help indicate the intended interaction needed.

FIGURE 3.13 Door Handles. Door handle design implies that the closest doors should be pulled; however, a user will be disappointed to find that they don’t move. In fact, the closest doors need to be pushed just like the second set of doors, even though they have differing affordance properties
You should design objects so that they help afford, or communicate, their intended interactions. This can avoid the user becoming frustrated that they cannot achieve their goal, such as to open a door. Have you ever had to teach a child how to use LEGO bricks? If you lay a pile of them on the floor, children will instantly start building and connecting, without any instruction. The opposing male and female surfaces provide visual directions that our brain can understand without any labeling needed.
We cannot discuss affordance without referencing Don Norman’s breakthrough book, The Design of Everyday Things (1988). Norman explains how the book covers everyday things:
focusing on the interplay between technology and people to ensure that the products actually fulfill human needs while being understandable and usable.
This is an area where the roles of industrial designers, interaction designers, and experience designers overlap. We strive to create objects that don’t require complicated instruction and labeling to understand how to use them. Norman’s introduction of this concept in the design fields has had immeasurable impact on how we look at computer-human interactions. The concept has a deep connection to psychology, as well as the understanding of how humans perceive physical objects. This understanding is a core fundamental needed for designing 3D in digital space, especially as we work toward designing worlds where our digital designs will be augmented to our physical world.
Real
As you are exploring your 3D design skills, it is important to look at the overall form—but at the same time, you want to consider the function. If you are creating an object that you expect people to rotate or turn, how will you indicate that behavior in the overall design? You should consider how the design will afford the best interaction. The best interactions happen when they are successful. Norman describes these as real affordances, as they are actual properties of the object or environment itself. These don’t require a previous understanding or knowledge of how something works, because the design indicates the proper interaction. Examples of this are mugs, teapots, and scissors. These don’t require any instruction or labels for people to use them correctly. They lend themselves to, and are designed for, just one function. If you look at a mug, there is only one handle, which is shaped for your hand; without any other option of where to grasp, what do you do? You wrap your hand around the handle and pick it up. The physical property of the handle means that it is real.
Perceived
In contrast to real affordances, perceived affordances may be more ambiguous. In this case, the affordance is not communicated through a physical property but rather through a user’s previous experience and interactions (FIGURE 3.14). Perceived affordance is something that you use in digital interactions and especially in computer interface design.

FIGURE 3.14 Affordance. Real affordance is shown on the left with the handle of the mug providing visual guidance on how to pick it up. Perceived affordance is shown on the right with the keyboard, trackpad, menu icon, and buttons which you know how to interact with because of your previous experiences.
When you arrive on a website, you look for a menu, and possibly even a hamburger menu icon, because you have learned that is the best way to navigate your way through a website. There isn’t a physical property to the site design that teaches you this. It is reliant on your previous knowledge and experience of being on other websites that you can find your way around. It is important, where relevant, to follow widely accepted computer-human interface guidelines. You will be sure to tap into what the user already expects and knows about an interaction. However, when you consider adding an icon into the user interface, you may decide that adding a tool tip or visual hint might be needed; see Chapter 7, “The UI of XR.” Consider what is required to ensure a positive user experience, especially as many XR users may be new to the experience.
To guide the user to interact with a digital 3D object in immersive scene, consider how you can add visual properties to offer hints to the user to ensure a proper and successful interaction. Some properties to consider:
Shadow can add an understanding of depth.
Guides inside or outside the object help show it can be selected.
Icons can indicate the motion, such as move, rotate, scale, select.
Feedback can provide additional information that communicates the interaction to the user through a variety of different senses, including sound, touch, or visual change.
What can it do?
If you are starting to get a better sense of affordances and how impactful your design choices are in assisting a user, it is also important to consider what kind of interactions are associated to each element. What it can do and how people will interact with it should greatly influence the design. For each element, identify its possible actions. The categories are:
Static: An object or element that does not move and cannot be interacted with, although could possibly be viewed from different perspectives
Animated: An object or element that moves in a sequential motion over a specific amount of time
Dynamic: An element that can change based on interactions or inputs from a user or over time
Interactive: An element that the user can control, manipulate, and interact with
Metric: An element that changes based on a mathematical calculation or algorithm
As you explore how to mimic the usability of physical objects in digital space or blended realities, research best practices by simply being aware of your own experiences in your everyday interactions. Be aware of the simplicity or complexity of objects, as well as the positive or negative experiences you have with them. There is always a design solution in any difficult interaction that you find throughout your daily tasks that might inspire your next XR experience. These real-world interactions engage our senses on multiple levels. As you become more aware and research your interactions, also notice the sensory experience.
Multimodal experiences
What was one of your biggest fears as a child? According to the Bradley Hospital in Providence, Rhode Island, whose expertise is in mental healthcare for children, the second most common fear is the fear of the dark. Number one is monsters. Both connect to a fear of the unknown and trying to determine what is real and what isn’t. Why is one of the most common fears, especially for children, being afraid of the dark? What about the dark makes things scarier?
A lot of the research discusses the connection to separation anxiety; being separated from their caregiver makes the child more on edge, with the added factor of the darkness. A room is the same in the day and night. The difference is that the child can’t easily see their full environment in the dark, and their fear of the unknown, because their sight is limited, becomes heightened. All of this fear comes from a change in how and what they can see. If a child can’t see what is around a corner, under a bed, or in a closet, then their imagination will come up with a story. The fears of a child who is blind may not be as focused on what they see, even if they can sense darkness and light. They may have more anxiety when other senses are restricted in some way. If they can’t hear what is happening around them, either because of sound being restricted or a loud sound overpowering all other sounds, then this may cause a similar sense of fear.
Our senses have a deep impact on our experiences. We are so used to them that we may not even realize how much we rely on them. It is when one of our senses is limited in some way that it creates a break in our equilibrium, and it causes fear. Although we often think of our senses as separate, they are actually highly connected and reliant on one another. We are so accustomed to how our senses work in harmony together, such as what we see, hear, and feel, that we really only notice when there is a breakdown in the system.
As you design for XR, you are designing a sensory experience, with information and feedback available from multiple modalities, engaging multiple senses at once. If the balance between the different sensory inputs is off, then the user will likely react to it. This is the same reaction a child has when they have to walk around their bedroom in the dark. Without being able to see the room as they usually do, everything looks scarier, they question every sound, and as they feel their way through the dark, they jump at any unexpected thing they feel under their feet. This could be your user’s experience in the new unknown world you invite them to enter. However, if you use the physical world as inspiration for how certain senses are engaged and mimic these in an immersive experience, that balance will provide comfort to the user. The key is making an emotional connection, one that the user may not even realize is happening. Creating something with these visceral qualities is easier said than done. To do so, you have to understand how our senses work so you can successfully design for them. This does not mean just knowing what our senses are, but rather our perception of our senses and how they work together.
Visual
The first sense that you may think of, especially as a designer, is our sense of sight. This is our visual ability to interpret the surrounding environment and is reliant on perceiving the waves of light that reflect off objects in order to see them. This is also how we see color, the visual spectrum also referred to as the human color space. It is important to understand how our visual perception influences our immersive experiences. In Chapter 8, “Human Factors,” we discuss further how our brains perceive the elements in a design and in an environment. But for the moment, consider the user’s point of view and feeling of presence—the sense that they are actually in the space they see—both have an important impact on their relationship with an experience. In VR, you want the user to believe they are in the virtual world they have entered. If that world defies gravity, then all the visuals should reflect that. If you want to show what it looks like to have a migraine, as Excedrin did in a VR ad campaign, then having a first-person point of view is essential to see what someone might see and experience with a migraine. If you want someone to be able to walk through a historical place, that may be best experienced from a second-person viewpoint, where the story can be told to you. You want to choose the point of view that makes the most sense for the content.
Presence The feeling that you are actually in an environment.
Another visual consideration is where the viewer is looking. Gaze input allows a scene to react to where the user looks. This can customize the experience, but can also help to optimize the amount of processing power the experience needs. If you know what a user can see, then you can refresh that view at a faster rate than the rest of the scene to help optimize the use of memory on a device. It can also be an opportunity to have interactive elements stand out in a way that helps to guide the user to the next step in the experience. To understand where a user is looking, eye-tracking sensors are installed on many head-mounted displays. These can assist the user with conscious and unconscious interactions and movements. With a 360-degree experience, there can be times when a user is looking or facing the “wrong” direction. If you know where the user is looking and where they are supposed to be looking instead, then you can create a visual to guide them, with a path or arrow, for example, to the view that enables them to continue.
Visual perception is multifaceted and an essential foundation of all design, so we will continue to talk about the best practices and tips that you can use to create robust visual experiences for users. These are just the main components that you need to understand for now, as they relate to creating a multimodal experience.
Auditory
Sound design is a skill that is more and more essential to the designers of today. A good understanding of best audio practices, even understanding optimal sound levels, is a great skill that can be used in many different kinds of design. From interaction design to motion design, and of course XR, sound plays an important role in storytelling and the experience. Again, it isn’t just that you want to include sound. It is important to understand our ability to perceive sounds. Part of the ear, called the cochlea, detects vibrations and then processes these sound waves into a more readable format, brain signals.
Sound plays an important role in how we understand our environment, especially as we move through a space. Our proximity to a sound changes the experience of it. If you hear something that is loud from far away, you can tell both that it is loud and that it is coming from a distance. Sounds change as we move. Sound that mimics the audio in our physical world has to be spatial as well. Sounds cannot just be coming from one direction. If you have ever watched a movie in surround sound versus having just two speakers on either side of the screen, then you know the emotional impact of this difference. With sound surrounding you, you feel as if you are there in the same scene as the characters of the film. In XR we will use ambisonics to create and share 3D sound. There is so much to discuss and explore around this topic that we will be spending all of Chapter 12, “Sound Design,” diving into how to design a full auditory experience.
Ambisonic A three-dimensional spherical audio format.
Olfactory
Smell is something that holds strong memories. Think of the smell of spring rain, or the cologne or perfume of someone you are close to. Even our own homes have distinct smells: We associate certain smells with people we visit often. Although smell may not be something that you think of when you consider digital experiences, it is something that some in the field are researching and have begun testing.
Understanding the powerful connection of smell and experiences, the Imagineering Institute in Nusajaya, Malaysia, has created 10 digital scents including fruity, woody, and minty. The research in this area has proven beneficial. The activation of our senses enhances the full immersion of an experience, specifically for VR and AR, and our sense of smell has a large role in that. While this technology is nowhere near ready to be used, the Imagineering Institute’s research is important because of the potential digital scents have for XR. It is plausible that in the future, using AR, you might be able to see and smell a restaurant’s dish from home before you decide to order takeout.
Haptic
One of the downsides of touch screens is that they are so smooth and flat; they don’t offer any tactile feedback to the user. To help overcome this challenge, haptic technology was invented to re-create the feeling of touch through the use of vibration or motion feedback. The term haptic refers to nonverbal communication, such as a handshake, high-five, or fist bump in our physical world. Can you think of any interactions on a smartphone that provide a haptic response? You may remember feeling a vibration when you delete something or when you selected something incorrectly. It is more common for us to remember the feedback that had a negative connotation, as the vibration is typically stronger. Digital haptics reinforce an action, the cause, that make a reaction, or effect, occur. Not all haptics are the same. The intensity of the haptic should reflect the action itself, and if done right, the user may not even realize that the haptic occurred.
Depending on the software and devices you are designing for, you may need to use specific software to design this haptic feedback. For example, Interhaptics offers a pair of applications to help create realistic interactions (Interaction Builder) and haptics (Haptic Composer) for XR. With Haptic Composer, you can create haptic material visually (FIGURE 3.15). For example, if you turn on the flashlight on an iPhone, there is a haptic response. (Go check it out now, if you don’t believe me.) You may not remember this, but when you are aware of it and pay attention, you will start to see how many places you receive this touch response in your interactions. The goal is to re-create experiences in the digital world to work similarly to our physical world, so if done right, haptics aid so well in communicating that they become natural. They use a combination of touch and also proprioception, which we will explore next.

FIGURE 3.15 Haptic Composer from Interhaptics. To design haptics, you create an asset (haptic material) within the Haptic Composer, which stores the representation of haptics in four perceptions (vibration, textures, stiffness, and thermal conductivity).
Images: Interhaptics
Haptics in XR are typically found in hand controllers, which can provide subtle feedback to the user that they have moved digital objects successfully. If you are designing for mobile AR, you can use the haptic technology already built into the phone. This sense of haptic response has been built into game controllers such as Sony’s PlayStation 5, which is pushing the boundaries of what is possible in haptic design to create responsive sensations for the players.
Though this feedback can enhance the overall experience, it can cause some problems for the users that you will want to consider. For example, suppose you are using mobile AR and your experience is using video capture, sound capture, and possibly the internal gyroscope. In this situation, the shake of the haptics could provide unwanted, excessive feedback. If a phone is handheld, most of the vibration is absorbed with the hand, but the sound and motion could still be picked up in the video recording. If the phone is on a hard surface, then the haptic sound might be much louder. This is why you may feel the feedback when you select the camera on your phone, but not when you take a photo or tap Record.
It is important to use haptics cohesively. You want to make sure that the level of vibration matches the motion, but you also want to make sure that similar interactions receive the same level of feedback. This will communicate the similarity of the actions to the user, just as designing buttons in the same color and size groups them together visually. People will start to connect more intense feedback as negative, so every time you use that somewhere else, they will think that they have done something incorrect.
Communication requires an exchange of meaning, and even though this is a nonverbal form, haptics still communicate messages to the user. Using this technology can go a long way in providing instant feedback to the user about their actions.
Proprioceptic and kinesthesic
Close your eyes, and try to touch your index finger to your thumb. Try it on both hands. If you don’t see your fingers, how can they find one another? They can find each other because of proprioception, the sense from within. Often referred to as the sixth sense, the perception of the user’s position is an essential component for immersive experiences. It is one thing to be looking at a digital environment, but it brings it to a much higher level if you react to the changes in the environment as if you are there.
Proprioception The perception and awareness from within of the position and movement of the body.
As you put on an HMD, you will be relying on your internal senses to help you use a hand controller, make hand gestures, and move—even while you can’t see your physical body.
In addition to proprioception, our kinesthetic sense also doesn’t rely on information from the five senses, and these two work together in sequence. Once you have an awareness of where your body is, thanks to proprioception, the kinesthetic sense helps you to actually move. If you can feel where your feet are, you use kinesthesia to walk, run, or dance.
Kinesthetic The sense that enables movement of the body in conjunction with the awareness of the position of muscles and joints.
It is important to know that our bodies are using more than just our five main senses in an immersive experience. It isn’t imperative that you understand how proprioception works, but it is important to understand what it is. You need to be able to use these senses to your advantage as you design to ensure that people can actually interact with an environment and move through it, even if they are not able to see their hands and feet.
It all makes sense
Creating a multimodal experience truly makes sense. (Get it?) In XR, multimodal, or multi-sensory, is the combination of visual, auditory, tactile, sometimes even smell, and proprioceptors to create a fully immersive experience. Multiple modalities are used effectively within many different industries, from transportation to education. If you listen to a podcast, you can hear someone talking, a single modality, but you don’t see their body language as you would in an in-person lecture or even a virtual webinar. If an in-person speaker uses visuals as they speak, then they are using a variety of modes to communicate the message. The words that they speak, the tone of their voice, their body language, and the visuals they show all work together to help you, as the viewer, comprehend a message. The wider the variety of modes that are used, the more ways that you can connect and engage with the information being shared, both verbally and nonverbally, and the more engaged and connected you will become with the experience. If someone talks about a story while showing you an image that you find disturbing in any way, your whole body will react to it. The level of connection to the experience will change the user’s response too.
Our somatosensory perception translates all these stimuli and combines them to define what the body senses, and therefore knows, on a multidimensional level. This helps you understand what is happening around you and inside you at the same time. All of this happens within the parietal lobe in the back of the brain, which helps us combine our senses to understand spatial information. I know that’s a lot of brain science, but now you know why our perception works the way it does. To simplify matters, just remember: The more senses you stimulate in an experience, the better the user will understand the space and the more emotionally connected they will be to it.
Somatosensory perception The cohesive awareness of what is going on inside you and all around you through sensory stimuli.
As we create XR experiences, we look to our real-world experiences to inform the virtual and augmented worlds. In our physical spaces, communication is multimodal. You can read an emotion of someone from across the room just from looking at their facial expressions. You can show someone where something is by pointing in a direction or can reinforce instructions you are speaking by using gestures. Communication uses a wide range of input modalities, so you want to include these in your digital worlds too.
Accessibility
Just as shortsighted as it would be to have the office for disabilities services on the second floor of a building without an elevator (yes, this has actually happened), it would be equally crazy to not use opportunities to engage a variety of senses in your experience to make it more accessible.
When it comes to accessibility in XR experiences, doing nothing isn’t an option. The truth is that a little can go a long way. The subtle vibration of a device can provide great feedback to the user without needing to make any sound. This benefits those who are hard of hearing or deaf, but also those who have the sound turned off because they are in a public space. It is important to understand that people will need different accommodations for different reasons throughout the day, at different locations, and even throughout different times of their life. Those with any of the many varieties of cognitive, physical, and psychological challenges can benefit from an experience that engages more than sense. Our needs may vary from a permanent disability to a temporary challenge created by a specific environment. If there is any part of the experience that can only be understood through hearing, then you could be excluding part of your audience. One way to help make the experience individualized to accommodate the needs of each user is to offer a setting that can be adjusted at any point in the experience. There may be times when a user may be in a louder physical space and might elect to have closed captioning turned on during that time. Or if a person would like to always have captioning on, they can do that too. But if you don’t include this as an option, you are excluding people from using the experience.
As you work to create multimodal experiences, consider how the user experiences each part of it. If there are any areas that are too reliant on only one input type, then that is an opportunity to expand the sensory experience to make it a more immersive experience and more accessible to the wide needs of users. This is just the beginning of this very important topic. Check out Chapter 6, “The UX of XR,” to see how you can make reality more accessible with your design choices.
Experience design
Throughout this chapter we have been looking at foundational elements of the immersive experience. Starting with some of the new vocabulary and workflow of working within a 3D rendering program, moving on to understanding how to create the best interactions with those elements, and then looking at how much our senses are a part of the experience. All of these elements need to be designed in harmony to create a positive experience for the user. Now that we have set the foundation of what the capabilities of technology are as well as explored some of the introductory concepts to designing for XR, it is time to start going through each step of the design process, starting with coming up with your next big idea.
Design Challenge
3D MODEL
For this challenge you will need a couple supplies:
Marshmallows (small ones work best, but you can use whatever you have)
Toothpicks
If you don’t have one or both of these, then you can be creative with substituting other options. Instead of marshmallows, you could use clay, modeling dough, dried or fresh fruit, gummy bears—anything soft. Instead of toothpicks, you could use cotton swabs, craft sticks, pencils, branches—anything that you have a lot of and that is long and thin.
Once you collect your supplies, it is time to get to work. To start, select a primitive shape—cube, prism, cone, or cylinder—to create. You will use your marshmallows as the vertices to hold together your toothpicks, which will act as the edges. Start by completing one face (one polygon) of the shape. For example, if you are building a cube, then create a square as the first face. From there, build out your full cube using your supplies. This first round is just to help your brain understand how to put a 3D shape together. For a bigger challenge, find three objects around you and create three separate marshmallow models to represent them.
Be creative. The only rules are that you use only your marshmallows and toothpicks and that the objects must be full 3D models. See if you can challenge yourself to use as few polygons as possible to create the shapes.
(Oh, and don’t forget to save some extra marshmallows for a snack after all that hard work!)

Designer: Lucinda Strol