
Device management
Sending telemetry data, device to cloud (D2C)
Querying data from IoT Hub
Sending responses to devices, cloud to device (C2D)
Storing data
Analyzing data
Managing IoT Hub
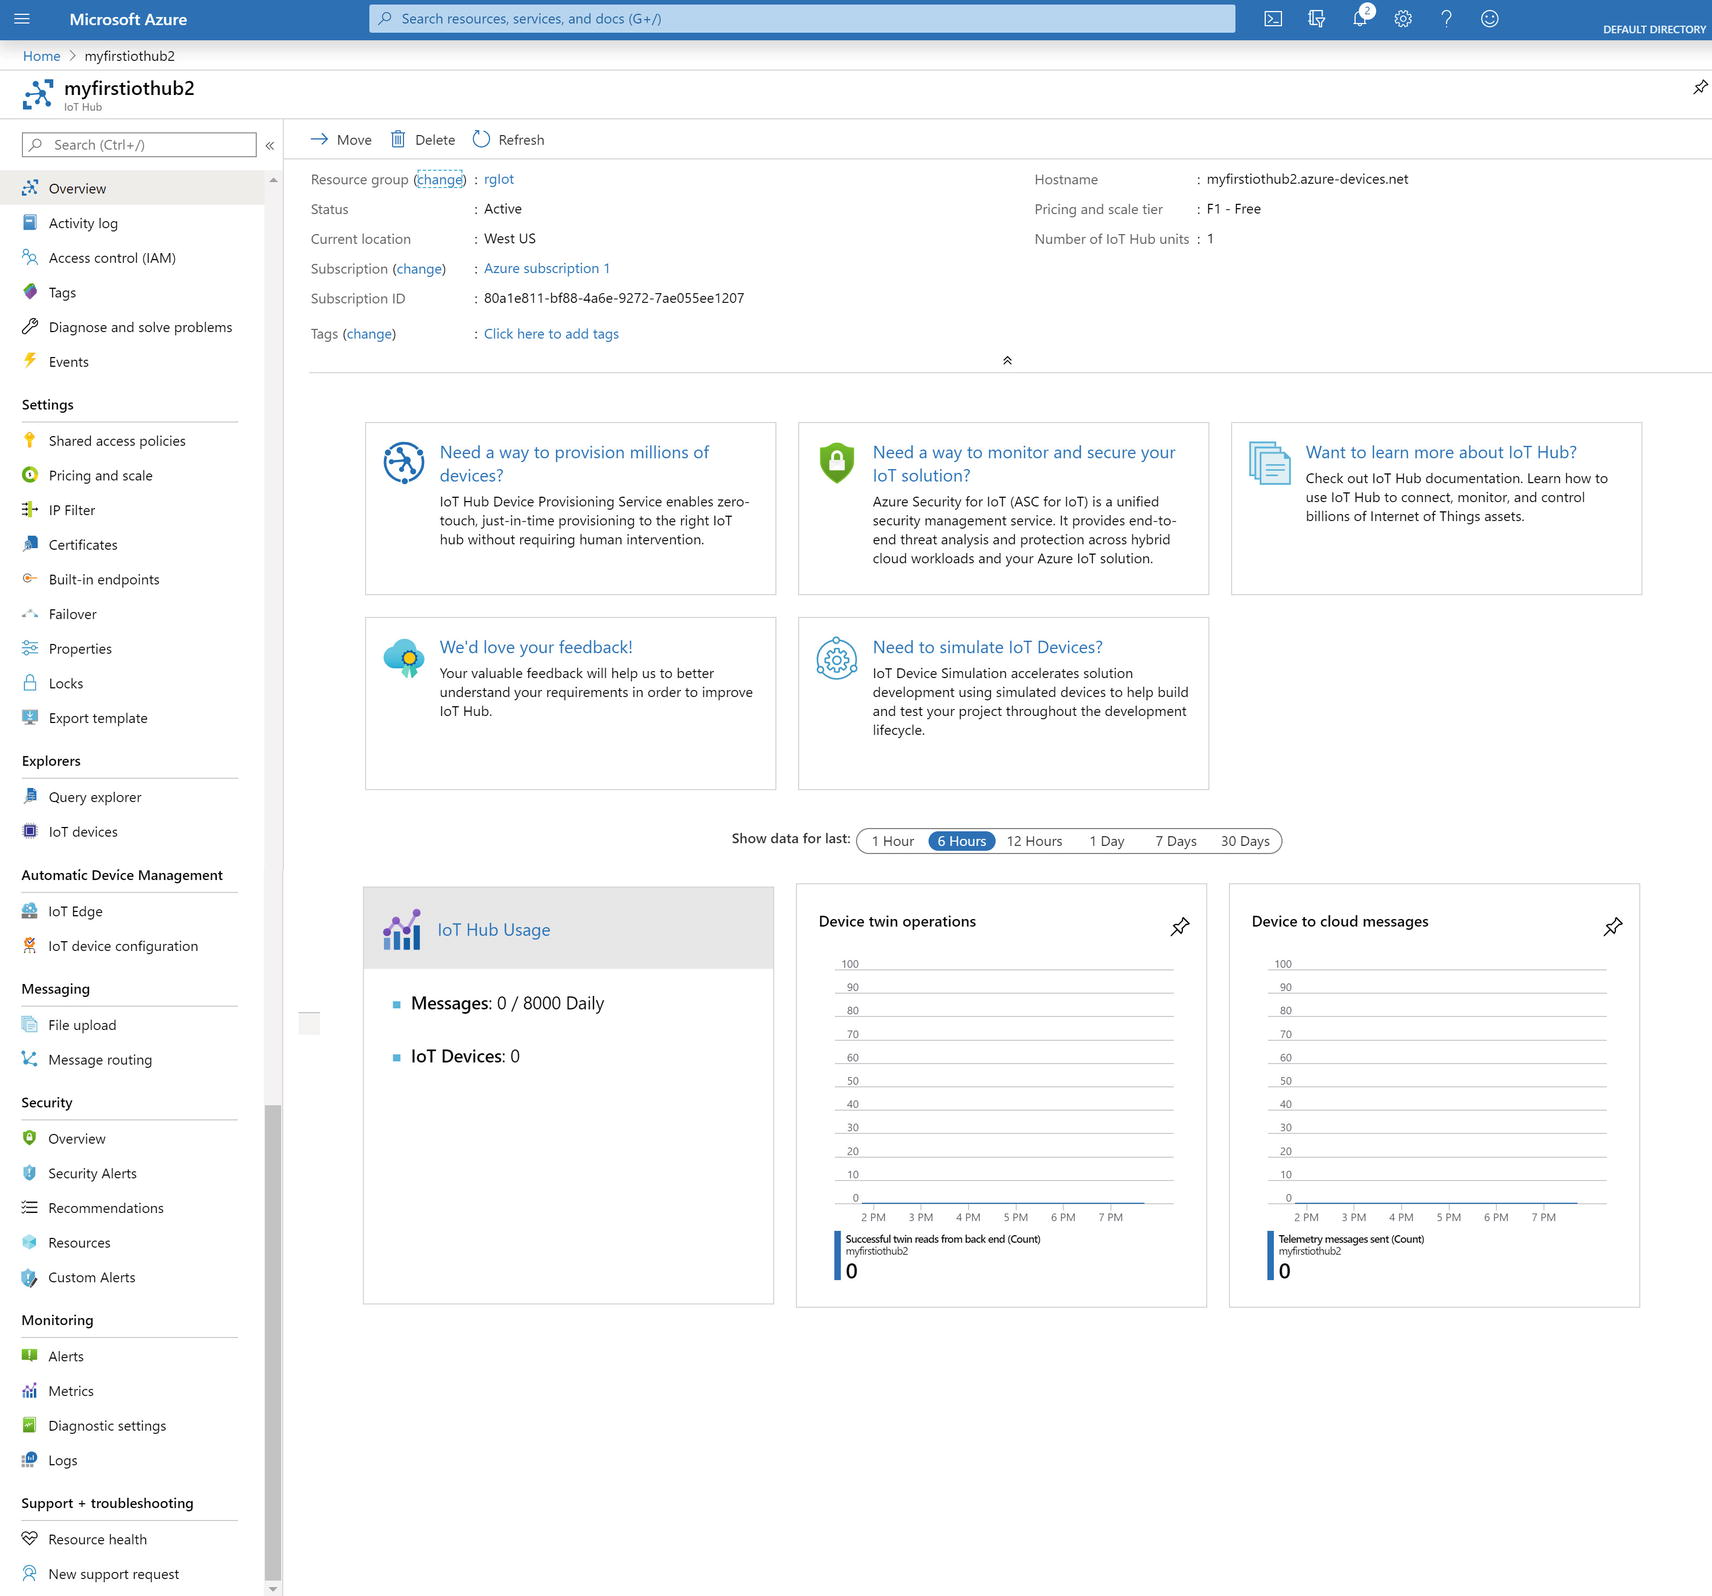
Azure IoT Hub Overview page
Overview
The IoT Hub Overview page gives you a quick summary about the resource group and region under which you created the IoT Hub, hostname, and a DNS endpoint you will use to connect from an SDK and configure in sensors, the pricing tier you selected, number of devices you registered, and number of messages you consumed. It also includes charts showing you message patterns.
Shared Access Policies
Under Shared Access Policies , you can grant any combination of permissions to access the endpoints. By default, the policy iothubowner has Admin-level rights. You can perform actions related to devices as well as messages, whereas with service and device you can only perform actions related to messages and devices, respectively. There are two more policies, registryRead and registryReadWrite. The device management component uses the registryReadWrite policy.
Actions related to messages include receiving device-to-cloud messages, sending cloud-to-device messages, retrieving the corresponding delivery acknowledgments, delivery acknowledgments for file uploads, and communication and monitoring endpoints.
Actions related to devices include sending device-to-cloud messages and receiving cloud-to-device messages, performing file uploads from a device, and monitoring device-facing endpoints.
Security is most important thing. I highly encourage you to use IP Filter to specify valid IP address ranges that the IoT Hub will accept.
Built-In Endpoints
Each IoT hub comes with a built-in Event hub to store system and device messages with a default retention period of one day. You can only change this retention period to the maximum of seven days at the time of creating IoT Hub. You can use the given connection string to read messages from the Event hub from your favorite tool. Once you create any custom endpoint from the Message Routing menu option under Messaging, messages are only delivered to the built-in endpoint if they don’t match any query.
Query Explorer
We use Query Explorer to retrieve information regarding device twins and jobs, as well as message routing via query languages like SQL.
IoT Devices
We use IoT devices to view, create, delete, and update devices in your IoT Hub. This was not available initially when IoT Hub launched. The only option to register a device is via an SDK. This is a helpful tool for managers not familiar with coding who still would like to manage devices.
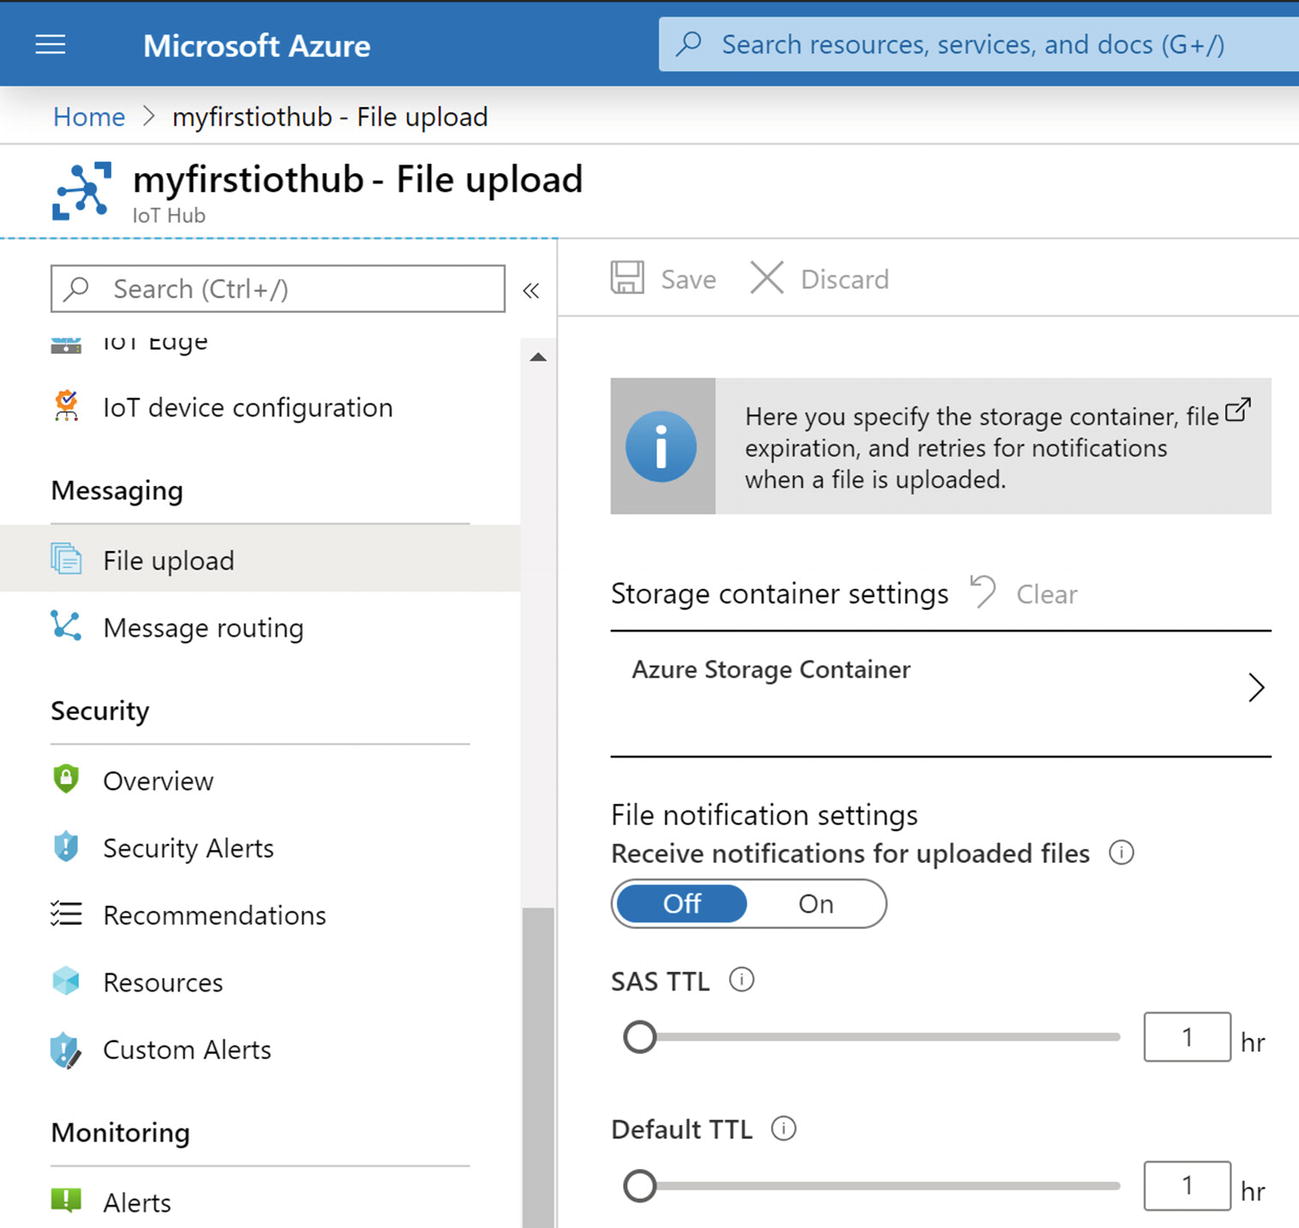
File Upload
When a device is sending unstructured data like large files with images or videos, you first need to enable file upload notifications and configure the storage from this menu option.
Message Routing
Referring back to our architecture diagram in Chapter 3, message routing becomes very important when you have multiple data destinations for the telemetry data generated from your IoT devices. If you have multiple data channels like Event Hub, Service Bus Queue, and Service Bus Topic, and would like different message to go to different Azure services, then you can configure that here. The message to the Azure service endpoint is many-to-many; that is, a message can reach one or more Azure services for further processing or storage. If you don’t define any message route, then messages are sent to the default endpoint (i.e., Event Hub).
The maximum message size supported is 256 KB, but the messages are metered in 4 KB blocks; for example, a message of 15 KB will count as four messages. In our case we created IoT Hub under the Free tier, so the messages are metered in 0.5 KB blocks; for example, a message of 15 KB will count as 29 Messages. Up to 10 custom endpoints and 100 routes can be created per IoT Hub.
Device Management
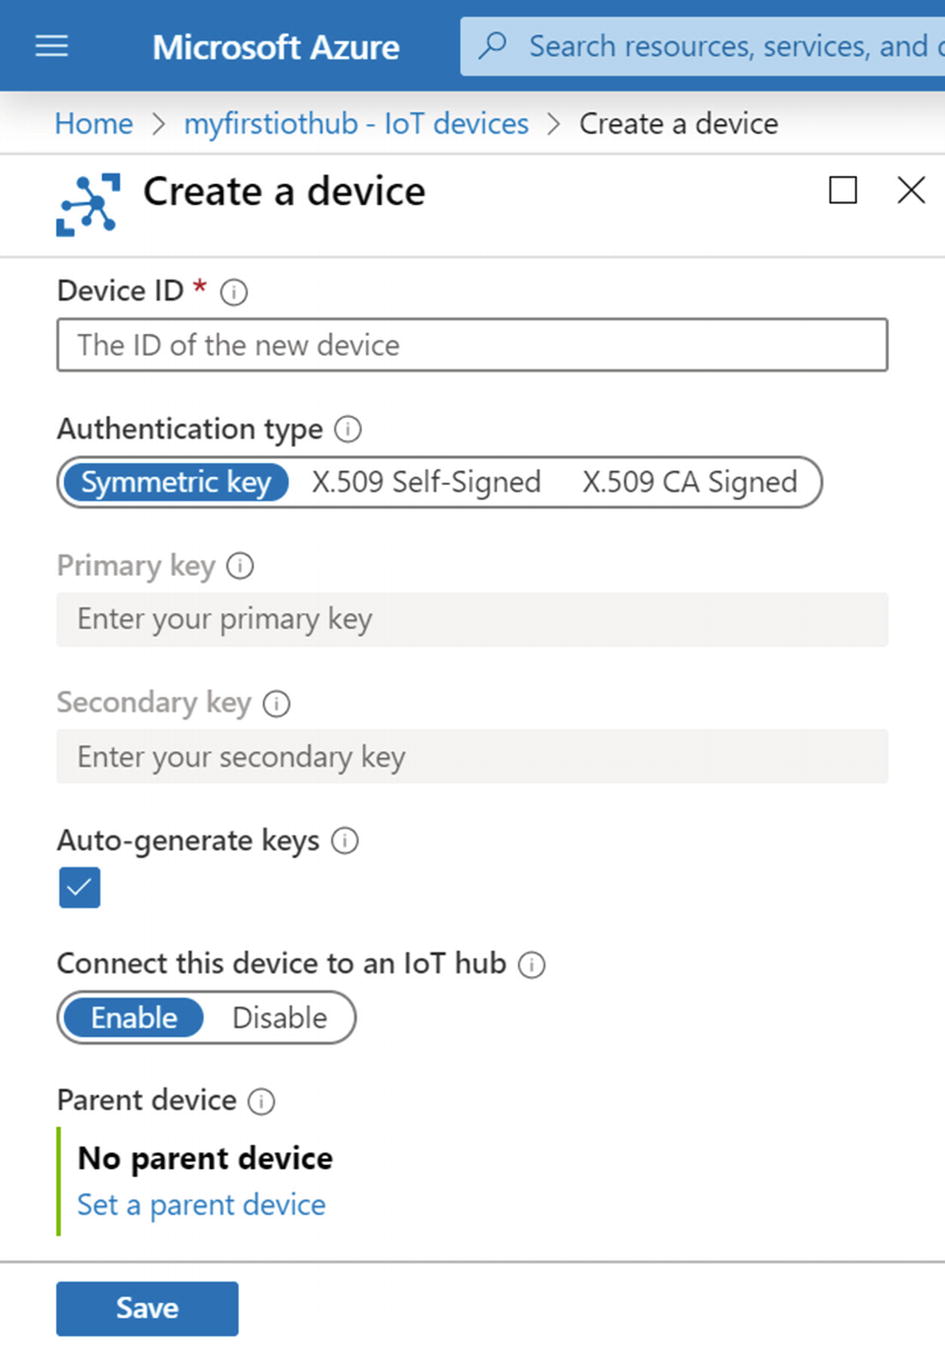
Registering a new device
To create a device on this screen, enter a Device ID value, a case-sensitive alphanumeric string (up to 128 characters long) that can contain certain special characters like - . + % _ # * ? ! ( ) , = @ $ and ‘. Click Save to create a device identity for your IoT Hub. The primary and secondary keys are created for you. Under Explorer, return to IoT Devices, then select the device you just created. You will see a symmetric key and connection string for that device.
Wait for the command to run. Congratulations! Your second device is registered.
Let’s perform the same action from an SDK. No matter which SDK you choose, the steps will be same. To get the IoT Hub connection string go to shared access policies, click iothubowner. As shown in Figure 4-3, the Shared Access Policies page, copy the Connection String—Primary Key.
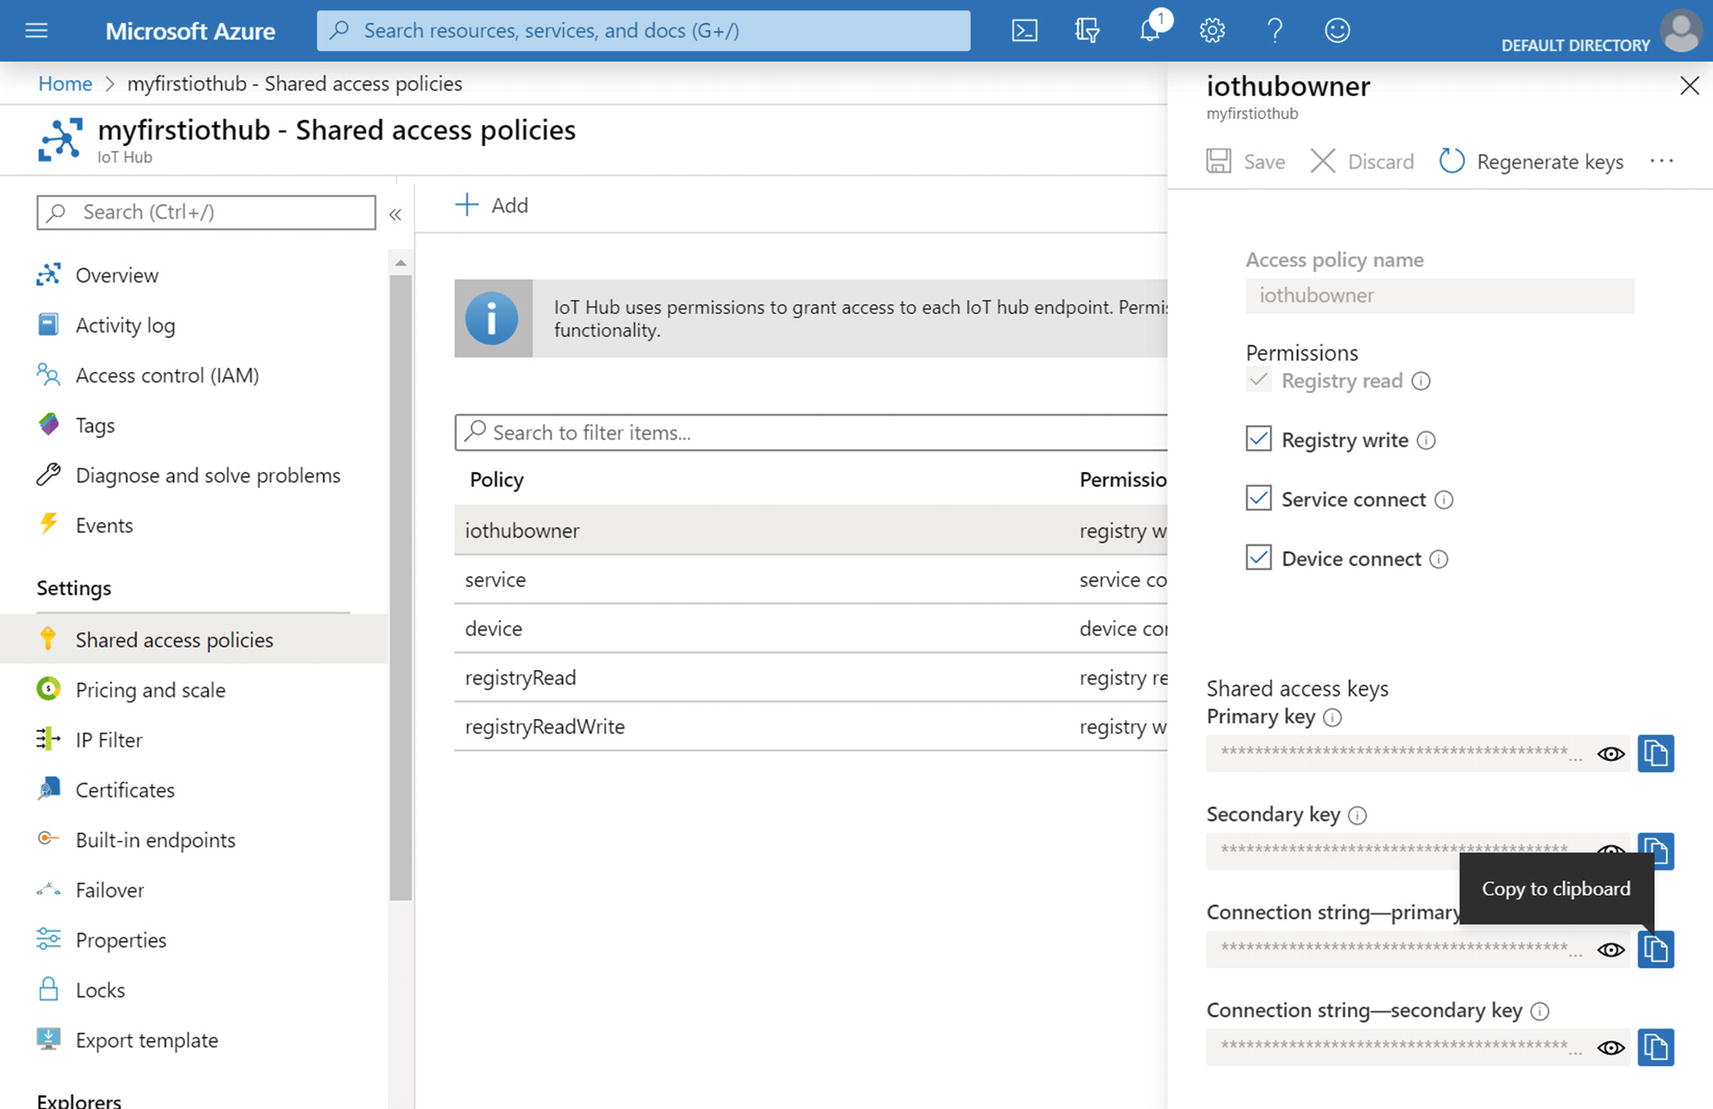
Copying the connection string from the shared access keys
In Microsoft Visual Studio, create a new console (.Net Core) project called IoTProject. To register a device using Azure IoT Hub Service SDK for .NET, you need to install Microsoft.Azure.Devices nuget.
Execute and go back to Azure Portal. Under Explorer, click the IoT Devices menu option. Congratulations! Your device is registered.
This is a simple demo, but security should be our priority; therefore, the connection string of the iothubowner is not to be shared inside your client apps. Save it in Azure KeyVault and access the string from KeyVault in your program.
Sending Telemetry Data Device to Cloud (D2C)
Stream Structural Data
We have a registered device in our IoT Hub ; now let’s send a D2C message to the IoT Hub. All we need is this simple code example. For this action, we need the Device SDK for Azure IoT Hub. Install the Microsoft.Azure.Devices.Client nuget. You can use any connection string from shared access policy.
Allow the code to execute . Congratulations! You sent D2C structured telemetry data to your IoT Hub.
I chose http1, but with .Net SDK you can choose any transport protocol from Amqp, Amqp_Tcp_Only, Amqp_WebSocket_Only, Mqtt, Mqtt_Tcp_Only, and Mqtt_WebSocket_Only. If you created a Project Type UWP (Universal Windows Platform) app, then currently Amqp and Mqtt are not supported. If you are using another SDK like Java or Python, then choose the transport protocol accordingly.
Stream Nonstructural Data
Enabling File Upload configuration
Again, I chose http1.
Wait for the code to run. Congratulations! You sent D2C unstructured data to your IoT Hub.
Wait for the command to run .
Wait for the command to finish. Depending on the file size, this can take few seconds. Congratulations! You sent D2C structured and unstructured data to your IoT Hub from a registered device.
IoT Hub Query Explorer
The IoT Hub Query Explorer menu option provides an SQL-like language to query devices and jobs. All commands are executed on the device registry with FROM clause on devices. This is the table name (aka collection name) in IoT Hub. You can use a regular WHERE clause on deviceid, as well as tags you configured for that device.
Select Query Explorer under your IoT Hub. Type the following queries in the execution window and output will appear in the result window. By default, Device Twin is selected under the Collections drop-down list. To query jobs, change the selection to Jobs. Device twin is the name of document that keeps device state information; for example, metadata, configurations, and conditions. Azure IoT Hub internally maintains a device twin document for each device. Jobs is another collection inside the device twin JSON document that contains the information of the operations executed on the device. When you select Jobs from the Collections drop-down list, the query runs on device.jobs.
The following are some sample queries demonstrating the power of the Query Explorer.
Notice some elements that the system maintains and allows you to query on, like status, connectionState, lastActivityTime, capabilities.iotEdge, and cloudToDeviceMessageCount.
So far, we have only executed queries in Query Explorer, but SDKs allow us to do the same in a programming way. All we need is this simple code example. For this action, we need Services SDK for Azure IoT Hub. Install the Microsoft.Azure.Devices nuget. You can use any connection string from shared access policy.
The second parameter in CreateQuery is page size, and it is of type nullable int. Notice that I am passing 10 here. I recommend always giving some small number (1–100) in case you have hundreds of devices. GetNextAsTwinAsync is designed and capable of retrieving any remaining result set.
Send Response to Device, Cloud to Device
When your temperature device senses a value greater than 75°, you need to invoke the start method in your air conditioner over the HTTP protocol. IoT Hub provides fully managed bidirectional communication between solutions and devices. C2D messages are important for any IoT device, which are waiting for some action or for maintenance of devices like firmware updates or configuration management. Such messages are also known as command and control messages.
The C2D message goes to a device-specific endpoint and an acknowledgment is sent by the device to the cloud. C2D is available on all protocols.
Wait for the code to run. Congratulations! You sent C2D structured telemetry data to your IoT Hub.
Storing Data
By default, messages are stored in the built-in Event Hub that comes with IoT Hub. In addition, IoT Hub exposes the messages and events built-in endpoint for your back-end services to read the D2C messages. Depending on your retention policy, messages can be stored in the built-in Event Hub for further processing from one day to a maximum of seven days. Technically speaking, the built-in Event Hub is compatible with any Azure services like Azure Function, Stream Analytics, Apache Storm and Spark, and Azure Databricks. Additionally, you can create custom endpoints to route messages.

Message and event storage and processing architecture
IoT Hub comes with a built-in Event Hub, but you might need to route your messages to multiple Event Hubs for further processing. The built-in Event Hub is not from other Azure services like the Logic app (discussed in the next section). Routing messages to customer endpoints like Event Hub is handy to customize retention policy, route messages to multiple event hubs, and process them separately based on business logic.
Azure Service Bus acts as a messaging backbone that connects any devices, applications, or services running to any other applications or services in the cloud and transfers data between them. Queues work based on a one-to-one communication model. Topics in Service Bus work as a one-to-many communication model. Each queue acts as a broker that stores the sent messages until they are collected by the receiver. Subscribers of the topic can apply filters to get only targeted messages. Depending on your retention period requirements, Message Replay and Time to Live of the message Service Bus could be a good choice.
Microsoft Azure offers Azure Storage, which provides storage that is highly available, secure, durable, scalable, and redundant. There is no physical limitation on storage capacity. For example, Azure Blob storage can store large amounts of nonstructured data, and Blob storage can be used to present data publicly or to store data privately. Storage was the most liked endpoint type for message routing because it makes it super simple to build a cold-path analytics pipeline. for example, Azure Data Lake Storage Gen v2 provides a robust and cost-effective way to store massive amounts of data on the existing Azure Blob storage platform and is fully compatible with numerous analytic platforms, such as Hadoop, Azure Databricks, and Azure SQL Data Warehouse.
Analyzing Data
Now that we have data coming from our registered devices and landing in the Azure cloud, it is time to explore possible options for processing and analyzing those data. My goal here is to explore all the possible options from a bird’s-eye view. You should get insight into how to deploy them. In upcoming chapters, we will be exploring some of these services in depth and learning how we can use them in our IoT project.
As data coming from IoT devices could be structured as well as unstructured streams, we need to explore services based on data type. Let’s start with the most commonly used streaming service, Azure Stream Analytics.
Azure Stream Analytics
Azure Stream Analytics is a fully managed serverless (PaaS) in-memory and real-time data analytics and event processing engine. It is designed to run transformation queries against streaming data coming from multiple sources like IoT Hubs, Event Hubs, and Azure Blob storage. Azure Stream Analytics can be deployed in Azure or at the edge in containers deployed to devices.

IoT data processing architecture usign Azure Stream Analytics
At the time of writing, Reference data can come only from Blob storage. Reference data are any data you need to correlate, look up, and expand data with a basis like converting IDs into meaningful names.
The primary job of Azure Stream Analytics is to correlate data from multiple sources, filter out bad data or data of no use, transfer data, aggregate the data, and finally analyze the data to generate meaningful results for further triggers or actions. All transformation is written in SQL-like language.
The final result is call output, and Azure Stream Analytics can output results with ultra-low latencies to various Azure services; it can store output in SQL Database and Cosmos DB, can store output in Azure Storage and Azure Data Lake Gen1 Storage, can feed output for further processing to Service Bus Topic/Queue and Azure functions, or simply create a data source for a real-time dashboard in Power BI. Each of the outputs is strategically provided for every kind of organizational need.
Azure Stream Analytics is billed by streaming unit, which is a blend of computing, memory, and throughput .
Azure Time Series Insights
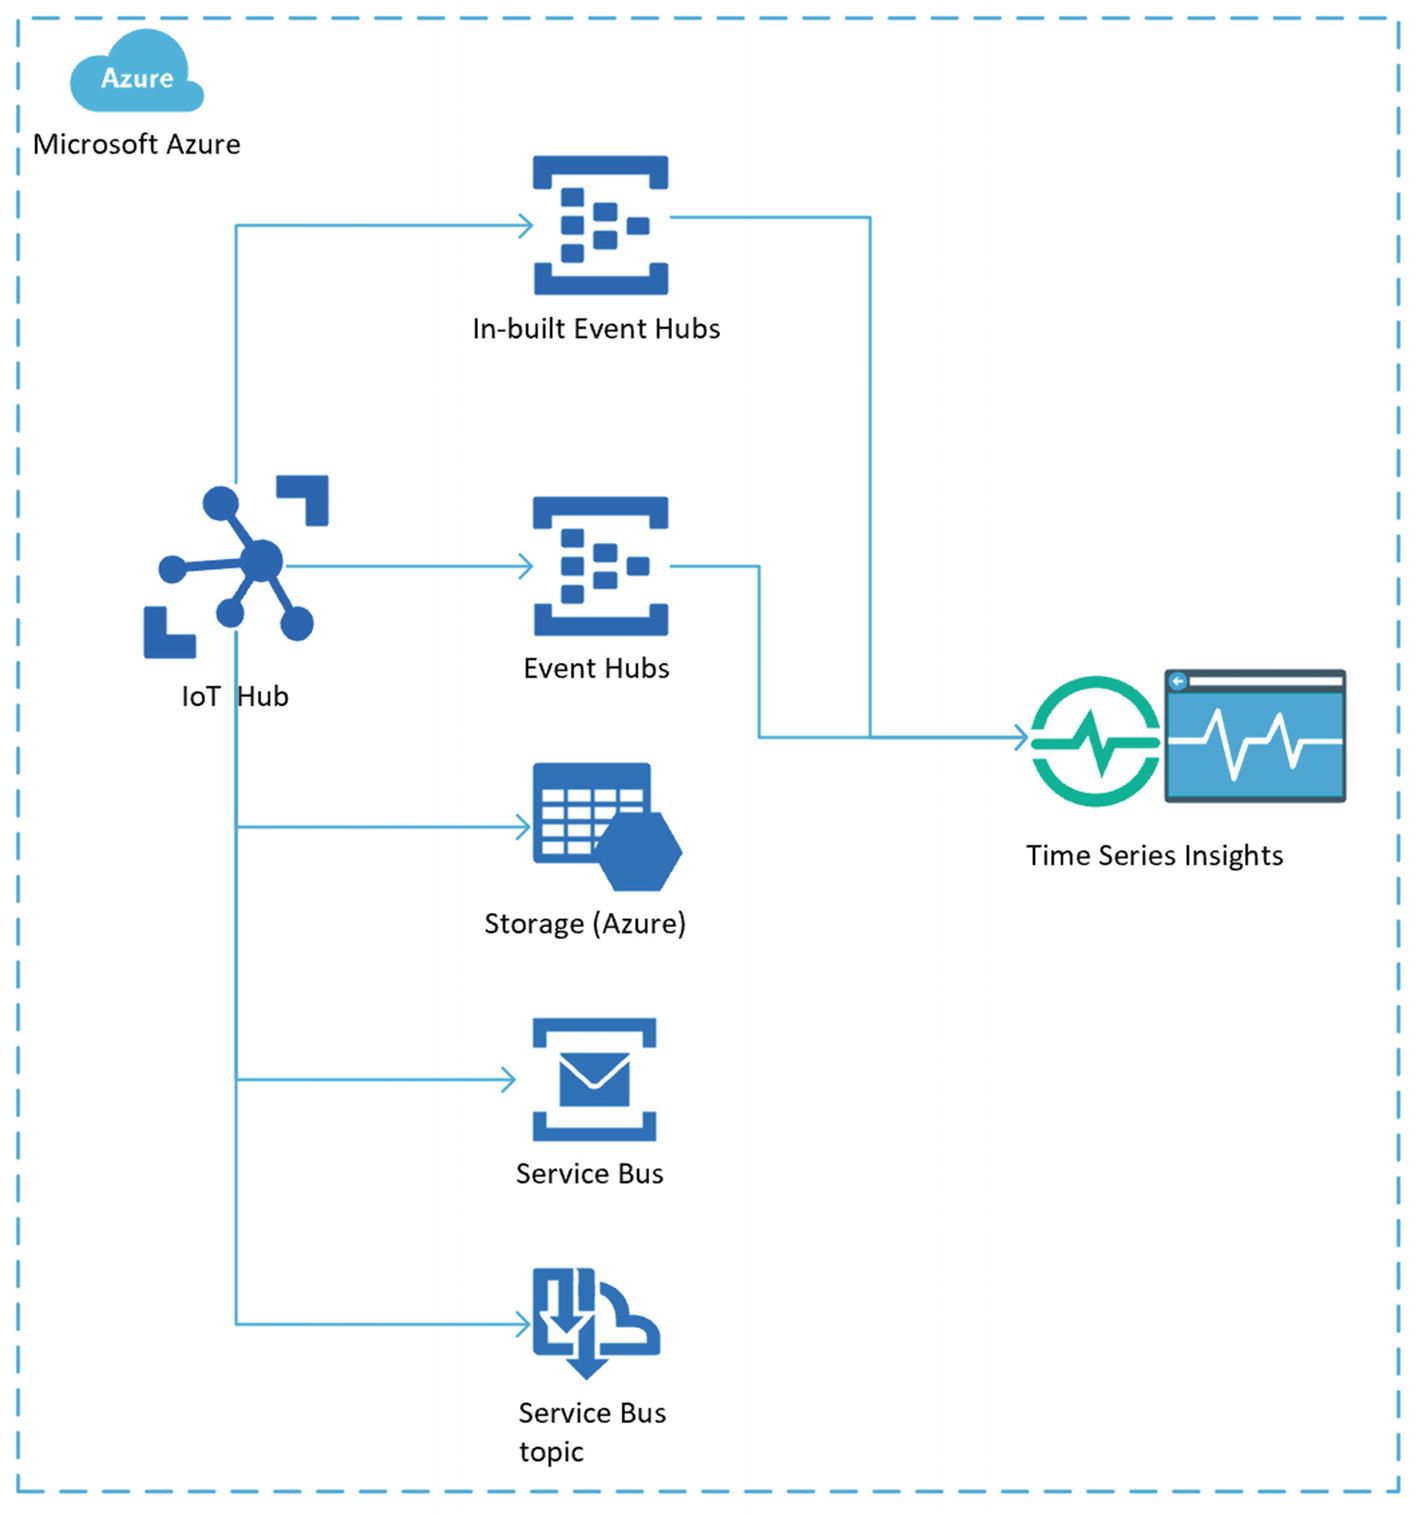
IoT data processing architecture using Azure Time Series Insights
There is always a point of discussion that TSI is used to look back, for root cause analysis, to detect anomalies, or to flag low and high values. Technically, though, you predict the future and perform model forecasting. You can apply perspective views and discern patterns when performing root cause analysis. Manufacturers are using the TSI analytical system for device monitoring and predictive maintenance.
This is different from Stream Analytics, first, because it doesn’t require any coding knowledge, like writing scripts and functions in SQL-like language. Second, you don’t always need to transform and preprocess data before visualization. Due to that second difference, a third difference is the cost. Finally, the time you can store data ranges from from 1 to 400 days in warm storage and up to 120 days in cold storage.
TSI recently introduced a new pricing model , whereby the customer is billed by the amount of data processed (i.e., cost per data processing unit). TSI still supports previous Tier S1 and S2 for 1 million and 10 million events per day per instance, respectively. Customers can also configure tiers with higher capacity.
Logic App and Function App

IoT data processing architecture using Logic app and Function app
Logic app is a logic workflow consisting of activities. To normal users it looks like a data flow diagram in Microsoft Visio with bunches of boxes connected with each other, called actions. Logic app has only one entry point and can be triggered via HTTP request. It can be scheduled like a service to execute at predefined intervals. Another advantage of Logic app is scaling. When the number of requests increases above a set threshold, Logic app instances will increase. It provides a run history to examine specific runs in full detail.
Function app requires developer skills, and code is deployed as a small piece of meaningful and reusable methods. Azure functions are microservices based on the single responsibility principle, which can be easily shared across services. You can choose any language from .Net Core, Node.js, Python, Java, or PowerShell commands. You can see an execution history from a monitor tab. Consider using Logic app first until your requirements can be met, but if your requirement is to write your own code with much flexibility, then use Azure Function. Please note that the more code you write, the more responsibility you have.
Both Logic app and Azure Function use consumption-based billing and there is no upfront cost. Additionally, Function app can run on the App Service plan.
Power BI
Power BI is a business analytics service by Microsoft that aggregates, analyzes, and visualizes data. Users can share data, reports, and dashboards with other users directly through e-mail. PowerBI is powered with built-in charts, graphs, and various types of business visualization managers need day to day. Users can use custom R and Python scripts and ArcGIS maps for custom visualization.
Unfortunately, PowerBI cannot use IoT Hub directly for real-time visualization. You need another Azure service like Stream Analytics, Azure Function, CosmosDB, Table Storage, SQL Database, and others. The only possible option to connect PowerBI to IoT Hub directly is via Azure.
Azure Machine Learning and Cognitive Services
I include Machine Learning and Cognitive Services due to their capability to work with semistructured data. In the case of IoT Edge devices or IoT devices generating semistructured data like audio and images, they can process information using AI models. Azure Machine Learning is a cloud predictive analytics PaaS offering used to train, deploy, and manage machine learning models. Similarly, you can build custom image classifiers and deploy them using Custom Vision Service.
Both of these services encompass a tremendous range of industrial applications, such as predictive maintenance and anomaly detection. Custom Vision can be used for functions like visual inspection of machine parts, identifying tools on a manufacturing floor, and detecting parts on an assembly line. Similarly, Machine Learning can detect anomalies and indicate predictive maintenance for an engine based on audio signals.
In previous chapters we talked about Edge devices. IoT Edge brings computing capabilities to devices locally to process data in real time and prevent security breaches. Microsoft has made it easy to run machine learning models by allowing developers to import Azure Machine Learning models in a module. For example, Custom Vision Service can be used to train a model and deploy it over IoT Edge.
Summary
This chapter has explored some of the fundamental methods of Azure IoT Hub. To start with, we registered devices using various methods. Later in this chapter we focused on sending D2C and C2D messages. Now that you’ve gone through the process of sending messages, think about how you can use this, which type of data (structured or semistructured) you need, and how you want to analyze it.
Finally, at the end of this chapter, I provided the various IoT architectures for processing and analyzing data generated from the devices. In the next chapters, we will look at examples of each of them to build a full end-to-end solution for your industry.
Now, you have the opportunity to configure Stream Analytics, Time Series Insight, Logic app, and Function app in your Azure subscription. You might require other Azure or non-Azure services that allow you to monitor and perform long-term analysis on top of device data. Your IoT architecture should drive rich analytics capabilities across vast areas of crucial enterprise functions, such as operations, customer care, finance, sales, and marketing.