
In an earlier section, we witnessed deployment features such as multi-service, multi-region, extensible, and idempotent provided by ARM. ARM templates are primary means of provisioning resources in ARM. ARM templates provide implementation support for ARM deployment features.
ARM templates provide a declarative model through which resources, their configuration, scripts, and extensions are specified. ARM templates are based on JavaScript Object Notation (JSON) format. They use the JSON syntax and conventions to declare and configure resources. JSON files are text-based, human friendly, and easily readable files. They can be stored in a source code repository and have version control. They are also a means to represent Infrastructure as Code that can be used to provision resources in an Azure resource group again and again, predictably, consistently, and uniformly. A template needs a resource group for deployment. It can only be deployed to a resource group and the resource group should exist before executing template deployment. A template is not capable of creating a resource group.
Templates provide the flexibility to be generic and modular in their design and implementation. Templates provide the ability to accept parameters from users, declare internal variables, help in defining dependencies between resources, link resources within same or different resource groups, and also execute other templates. They also provide scripting language type expressions and functions that make them dynamic and customizable at runtime.
A bare minimum template that actually does nothing is shown here:
{
    "$schema":
    "http://schema.management.azure.com/schemas/2015-01-01/
    deploymentTemplate.json#",
    "contentVersion": "1.0.0.0",
    "parameters": {
    },
    "variables": {
    },
    "resources": [
    ],
    "outputs": {
    }
}
A template has four important sections-parameters, variables, resources, and outputs. In the preceding template, there are no defined parameters, variables, resources, or outputs. Resources is the only mandatory JSON section while the rest are optional. The schema element defines the Uniform Resource Identifier (URI) that contains the model a template should be bound and adhered to. It contains the definition for all elements that can be defined in a template. The model itself contains references to all Azure resource schema that can be defined in a template. Schemas help at the design time validation of the template. Each template has a contentVersion element. This element defines the version of the template. Template version numbers are used when invoking and executing nested templates. The parameter, variable, and output sections are JSON objects while the resources section is a JSON object array that can contain multiple JSON objects each representing a resource.
Parameters help to create generic and customizable templates. Parameters are defined in templates where the values are provided by the user as arguments as part of deployment. This encourages the use of the same template for multiple different environments such as development, test, production, and other types of environments. Multiple parameters can be defined in a template. Let's look at a sample parameter definition containing two parameters - firstParameter and secondParameter. The first parameter is of string type and can hold any one of two allowed values. The default value is FirstValue and has maxLength and minLength as validators. Metadata helps in adding additional context and information. Description is added as part of the firstParameter metadata. Similarly, secondParameter is of int type with validators on acceptable values, minimum values, and maximum values:
"parameters": {
        "firstParameter": {
            "type": "string",
            "allowedValues": [
                "FirstValue",
                "SecondValue"
            ],
            "defaultValue": "FirstValue",
            "maxLength": 20,
            "minLength": 10,
            "metadata": {
                "description": "My first parameter"
            }
        },
        "secondParameter": {
            "type": "int",
            "allowedValues": [
                10,
                20
            ],
            "defaultValue": 10,
            "maxValue": 20,
            "minValue": 10,
            "metadata": {
                "description": "My second parameter"
            }
        }
    }
Templates provide attributes for defining parameters as shown in code. The explanation of these attributes are mentioned in the following table:
|
Attribute Name |
Data type |
Mandatory |
Description |
|
|
A valid value from a given list. See description for valid values |
Required |
Valid data types are string, secureString, int, bool, object, secureObject, and array. |
|
|
Depends on data type |
Optional |
Default values are used if the value is not provided. |
|
|
Array |
Optional |
Valid values can only be one of the provided values. |
|
|
Integer |
Optional |
Minimum value for int type parameter. |
|
|
Integer |
Optional |
Maximum value for int type parameter. |
|
|
Integer |
Optional |
Minimum length for string or array type parameter. |
|
|
Integer |
Optional |
Maximum length for string or array type parameter. |
|
|
Object |
Optional |
Can be any valid JSON object. |
Variables are similar to parameters but the values are defined internally, within the template itself, and are not provided externally by a user. The value of a variable is part of the variable declaration itself. Variables are declared once and should be unique within a template. They can be placed anywhere within a template where a JSON string is expected. They make templates dynamic, manageable, and changes can be done to it easily. The value of a variable is substituted during deployment at all places it's used in the template. Variables are of JSON object data type. Let's look at a sample definition of a variable as shown here:
"firstVariable": {
            "networkName": "FirstNetwork",
            "subnets": [
                {
                    "subnetName": "FrontEnd",
                    "subnetIPRange": "10.0.0.0/24"
                },
                {
                    "subnetName": "BackEnd",
                    "subnetIPRange": "10.0.1.0/24"
                }
            ]
        }
Resources are array types that can hold multiple resource declarations. Arrays in JSON are represented by square brackets [] and objects by wriggly brackets {}. Each resource is an object declaring its desired configuration. Each resource has two types of properties - properties that provide information to ARM about the name, type, version, and location of the resource and properties that configure the resource itself. The mandatory properties of a resource are as follows:
name: It represents the name of the resource instanceapiVersion: It specifies the version of the REST API to be used for provisioninglocation: Azure region of the resourcetype: The resource provider namespace along with resource type name for creating a resource instance
Each resource has its specific configuration requirements and they will differ from one resource to another. These configurations configure the resource and its inner working. Let's look at how to define resources in a template. There are two resource declarations in the resources section of the template.
The first resource instance is named storageaccount provisioned at the West Europe Azure region based on the resource provider, Microsoft.Storage and resource type, storageAccounts and its version is 2015-06-15.
"resources": [
        {
            "type": "Microsoft.Storage/storageAccounts",
            "name": "storageaccount",
            "apiVersion": "2015-06-15",
            "location": "West Europe",
            "properties": {
                "accountType": "Standard_LRS"
            }
        },
        {
            "apiVersion": "2015-05-01-preview",
            "type": "Microsoft.Network/publicIPAddresses",
            "name": "myPublicIPAddress",
            "location": "West Europe",
            "properties": {
                "publicIPAllocationMethod": "Static",
                "dnsSettings": {
                    "domainNameLabel": "mypublicipaddress"
                }
            }
        }
    ]
The first resource instance is named myPublicIPAddress provisioned at the West Europe Azure region based on the resource provider, Microsoft.Network and resource type, publicIPAddresses and its version is 2015-05-01-preview. Both the resources have a properties element which describes the resource-specific configurations. The StorageAccounts resource type has dependency on the accountType property which defines whether the storage account should be Locally redundant, Zone redundant, Geo redundant or Read-access Geo redundant. Similarly, PublicIpAddresses resource type has dependency on the allocation method which can be dynamic or static. dnsSettings provides a DNS name to the public IP address.
Outputs represents the return values from templates as the result of executing or deploying them. The outputs section can be customized to contain multiple objects, each returning values. Each object in the outputs section has two properties - the type of return value and the value of return type. type refers to data types which we saw in the previous section and value refers to the actual data or object returned by the template. The output section is executed and returns a value only if the template was executed and deployed successfully. Let's look at how to define outputs in a template:
"outputs": {
        "myOutput": {
            "type": "string",
            "value": "Resource Group deployed successfully !!"
        }
    }
In the code listing, a single output; myOutput is defined. It is of string type and will return the text on successful execution of the template.
ARM extends JSON by adding additional features in terms of expressions and functions. These are not available in JSON out-of-the-box and Microsoft added them to make templates dynamic and customizable. Expressions and functions are evaluated at deployment and they help in adding scripting language semantics to templates. Expressions are defined using square brackets and can appear anywhere a JSON string is expected in a template. The return value from an expression is always in JSON format.
There are numerous functions provided by ARM templates and can be categorized into string functions, numeric functions, array functions, deployment functions, and resource functions.
- Numeric functions help when working with integers such as adding, subtracting, and dividing numbers.
- String functions help when working with string literals like concatenation of strings, splitting of strings into arrays, replacing a part of a string, getting substrings from original strings, and more.
- Array functions help in working with array values in a template such as concatenating two arrays, splitting an array, retrieving sub-elements of an array, and more.
- Deployment functions help in getting values from variables, parameters, and more.
- Resource functions help in working with resources like getting their ID, current location and subscription, getting properties of resources, and more. Some of the important resource functions are reference, resourceId, subscription, and resourceGroup. For a complete list of functions available for templates visit the following URL: https://azure.microsoft.com/en-in/documentation/articles/resource-group-template-functions/#resource-functions
Resources can be nested within other resources. However, both the parent and the child resource should support nesting. Not all resources can be nested. Examples of nested resources are PowerShell extension resources within a virtual machine parent resource. Other examples of nested resource are Service Bus queues, relays and topics resource and they should reside within a Service Bus namespace resource. Nesting means that the child resource is part of a parent resource although the declaration of child resources in a template can be within the parent resource or outside of it. There is a special naming consideration to be taken care of while declaring a child resource outside of a parent resource. It is important to note that contained resources are dependent on the parent resource and cannot exist without it.
Some examples of expressions and functions are shown for better understanding:
- Concatenating two strings
[ concat( 'String 1', 'string2' ) ]
- Adding two numbers
[ Add ( 10, 20 ]
Let's look at a complete ARM template consisting of parameters, variables, resources, and output. This template also uses expressions and functions. The purpose of this template is to provision an Azure storage account. This template takes in one storageAccountName parameter of string type. Storage names must be a minimum of three characters and cannot be more than 24 characters in length. A couple of variables; storageApiVersion and storageAccountType are defined with valid values. The resources section declares a single resource. The value for the resource name is derived from the storageAccountName parameter. The resource provider is Microsoft.Storage and resource type is storageAccounts. The value for apiVersion is retrieved from the storageApiVersion variable and the value for storage account resource-specific accountType property is retrieved from the storageAccountType variable. The storage account is provisioned at the same location of resource group itself. ARM provides the resourceGroup function for retrieving the current resource group on which the deployment is in progress. Finally, the outputs section outputs the status of successful execution of deployment:
{
    "$schema":
    "http://schema.management.azure.com/schemas/2015-01-01/
    deploymentTemplate.json#",
    "contentVersion": "1.0.0.0",
    "parameters": {
        "storageAccountName": {
            "type": "string",
            "minLength": 3,
            "maxLength": 24,
            "metadata": {
                "Description": "Storage account name"
            }
        }
    },
    "variables": {
        "storageApiVersion": "2015-06-15",
        "storageAccountType": "Standard_LRS"
    },
    "resources": [
        {
            "type": "Microsoft.Storage/storageAccounts",
            "name": "[parameters('storageAccountName')]",
            "apiVersion": "[variables('storageApiVersion')]",
            "location": "[resourceGroup().location]",
            "properties": {
                "accountType": "[variables('storageAccountType')]"
            }
        }
    ],
    "outputs": {
        "TemplateOutput": {
            "type": "string",
            "value": "[concat(parameters('storageAccountName'),' storage account was successfully created!!')]"
        }
    }
}
We will use this template in subsequent section for deployment to the Azure resource group.
Working with ARM templates requires tools for both authoring and deployment.
ARM templates are simple text-based JSON files. They can be authored using any text-based editor however, for faster and easy authoring, IntelliSense support for template and its resource configuration, Visual Studio Code, or Visual Studio 2013/2015 can be used. Visual Studio provides a rich interface, project template, IntelliSense, and deployment script for templates. This book uses Visual Studio 2015 for authoring of all ARM templates.
Although templates can be authored manually through the Azure portal, it is not recommended as it is error prone and time consuming to author templates from there.
In this book, we will use Visual Studio 2015 for authoring ARM templates. See the following steps for creating a template:
- The first step is to install Visual Studio 2015 community edition on the development box. The development environment contains Windows server 2016 technical preview operating system. This is because Windows 10 does not yet support Windows Containers and Docker. Eventually, when Windows 10 starts supporting Windows Container and Docker, it should be used as a development platform. Visual Studio community edition is available from https://www.visualstudio.com/en-us/downloads/download-visual-studio-vs.aspx. Click on Download Community Free button to start downloading Visual Studio. This is shown here in Figure 2:
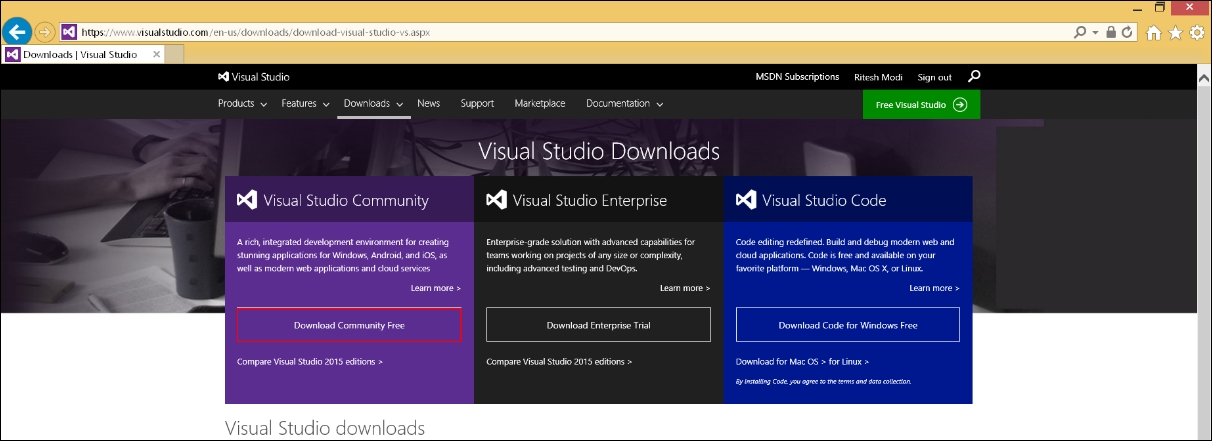
Figure 2: Visual Studio site for downloading the community edition
- A setup file is downloaded and executed. It will prompt a window asking for installation location and type of installation. Accept Default and click on Install. This is shown in Figure 3:
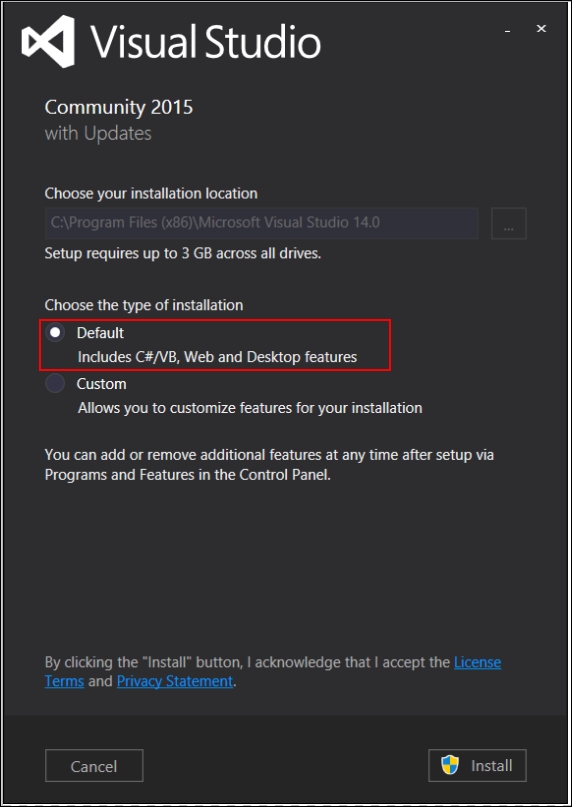
Figure 3: Installing Visual Studio 2015 community edition
- After Visual Studio is installed, Azure tools for Visual Studio should be installed. The installer is available at https://azure.microsoft.com/en-us/tools/ shown in Figure 4. Click on the button, Download Azure Tools for Visual Studio:
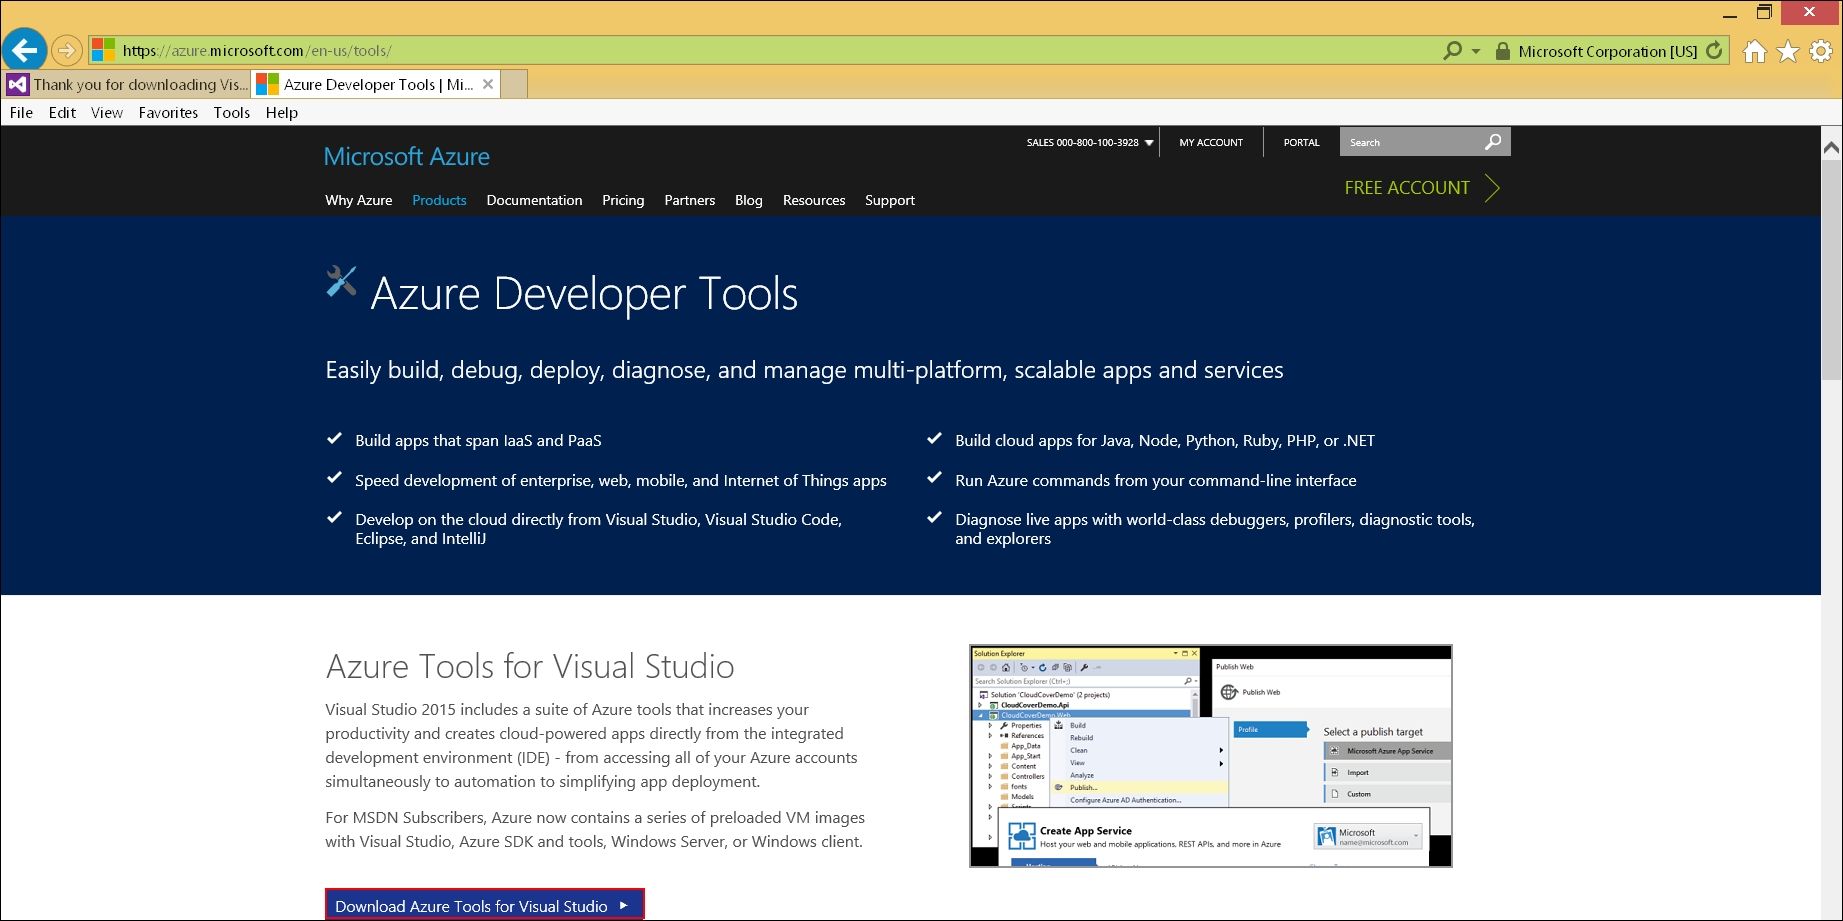
Figure 4: Site for Azure Tools for Visual Studio
- This will invoke a Web Platform Installer for installing Microsoft Azure SDK for .NET(VS 2015) as shown in Figure 5. Click on the Install button to install Azure tools. Another prompt to accept the license agreement is shown. Click Accept to start the installation of tools. This will also install Visual ARM Visual Studio template for authoring ARM templates:

Figure 5: Web Platform Installer
- Open Visual Studio and select New Project | Azure Resource Group from the Cloud category. Name the project MinimalTemplate, provide
C: emplatesas location, the Solution name defaults to the name of the project (you can change the solution name to a different name from the project name) and click OK as shown in Figure 6: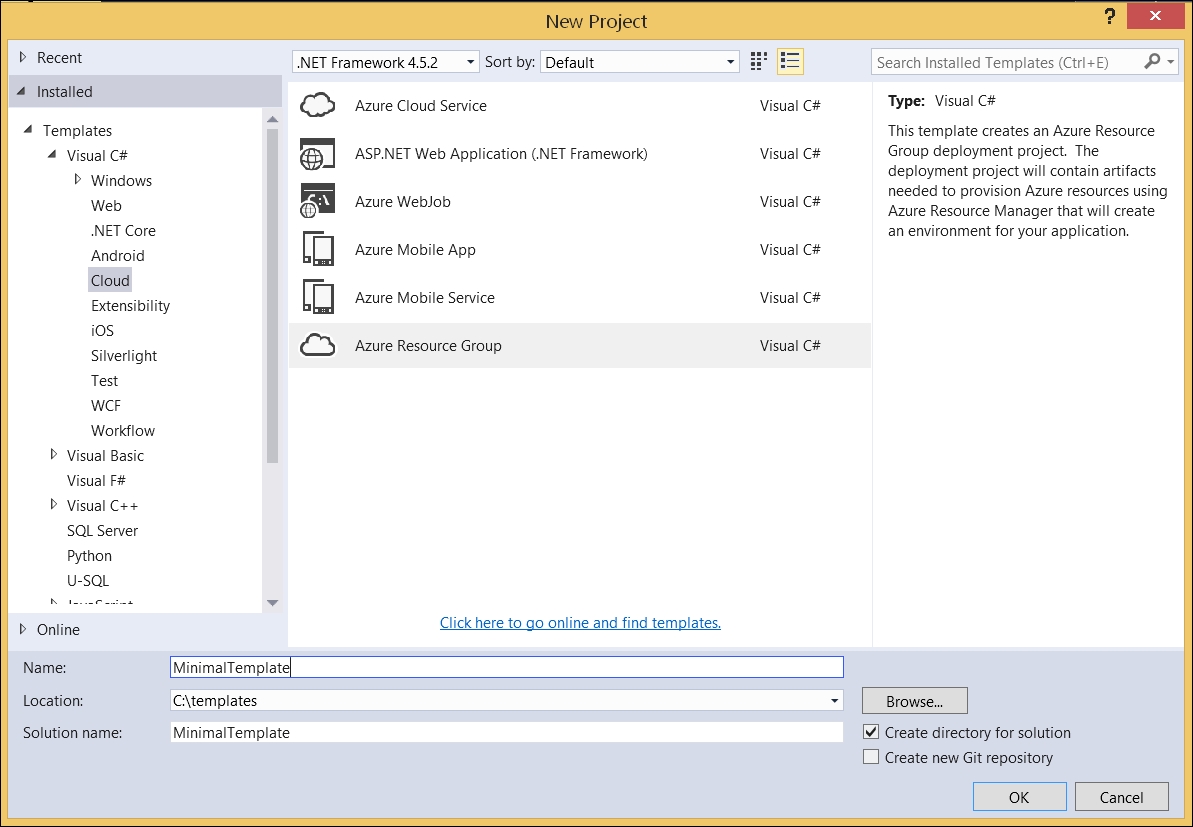
Figure 6: Visual Studio project creation for Azure Resource Group
- Select Blank Template from the list of templates and click OK as shown in Figure 7. This will create a solution and Azure Resource group project within it:

Figure 7: Selecting Blank Template for project
- The resultant Blank Template is shown here in Figure 8:
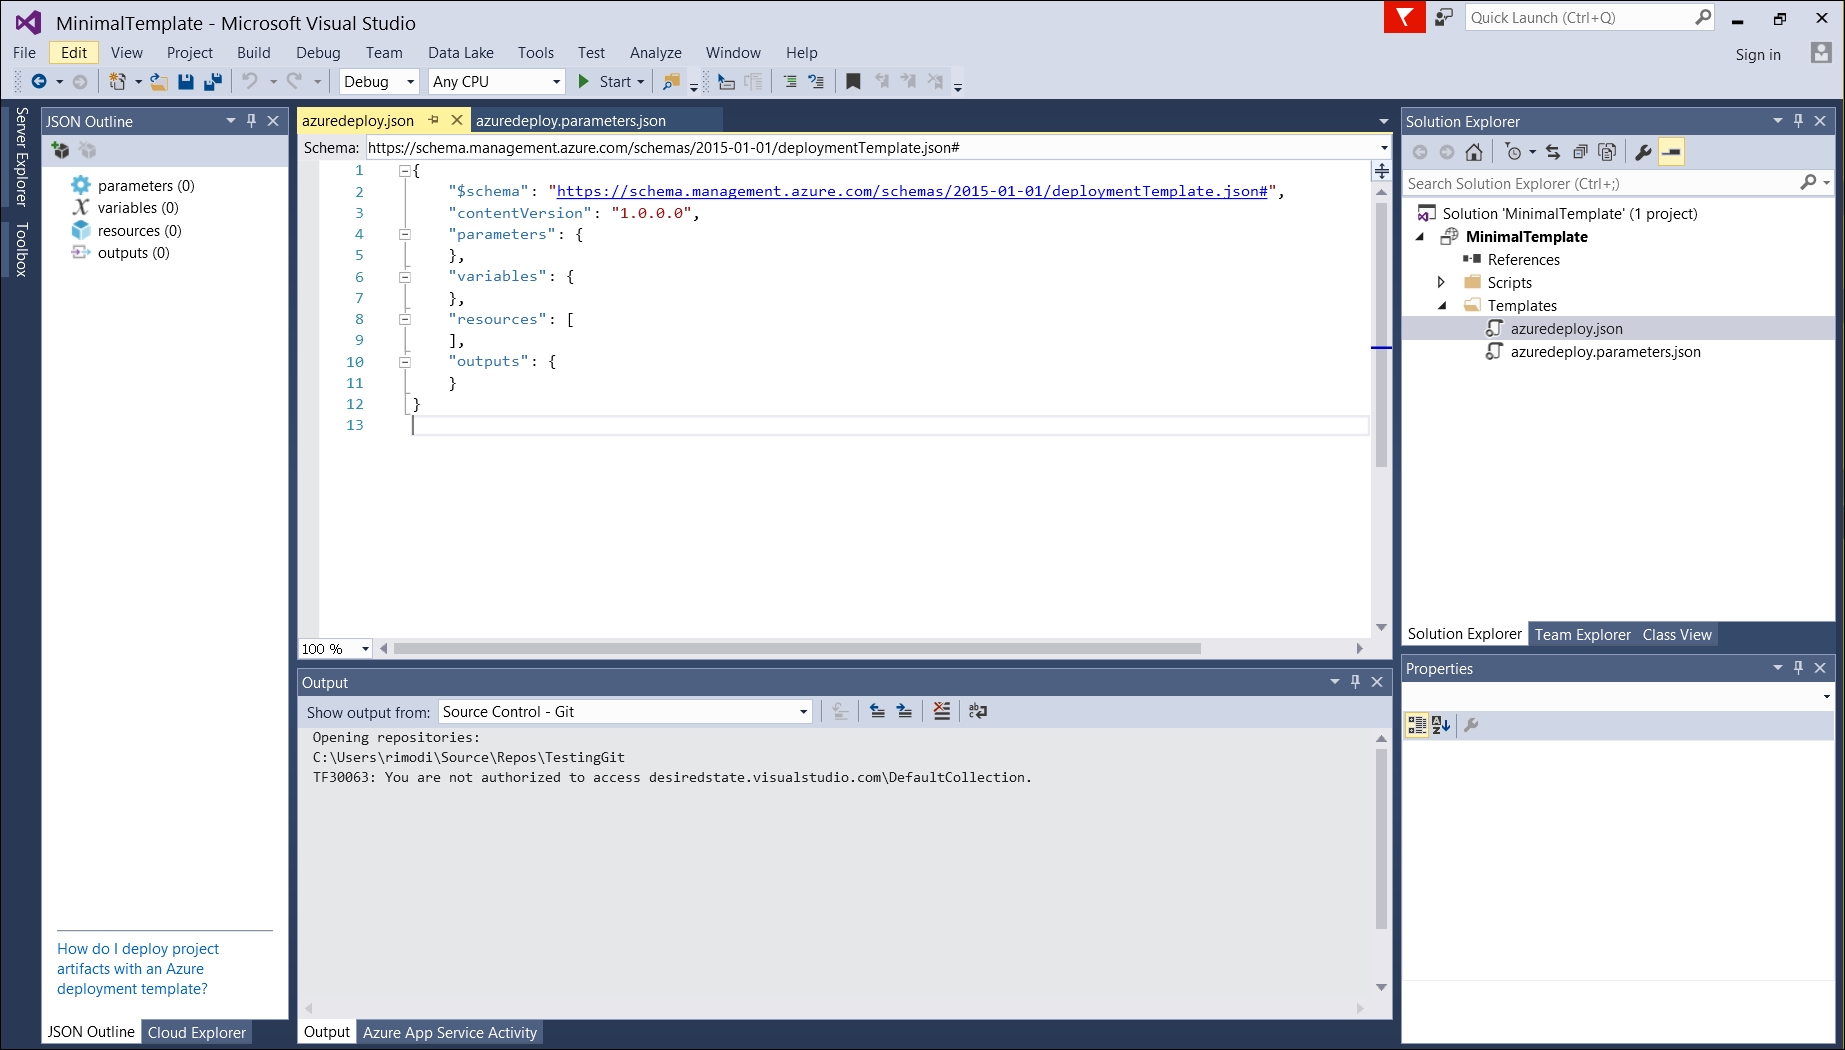
Figure 8: An empty blank Azure Resource Group Template
- Modify the
azuredeploy.jsonfile to reflect the minimal template we created earlier in this chapter as shown in Figure 9 and save the entire project: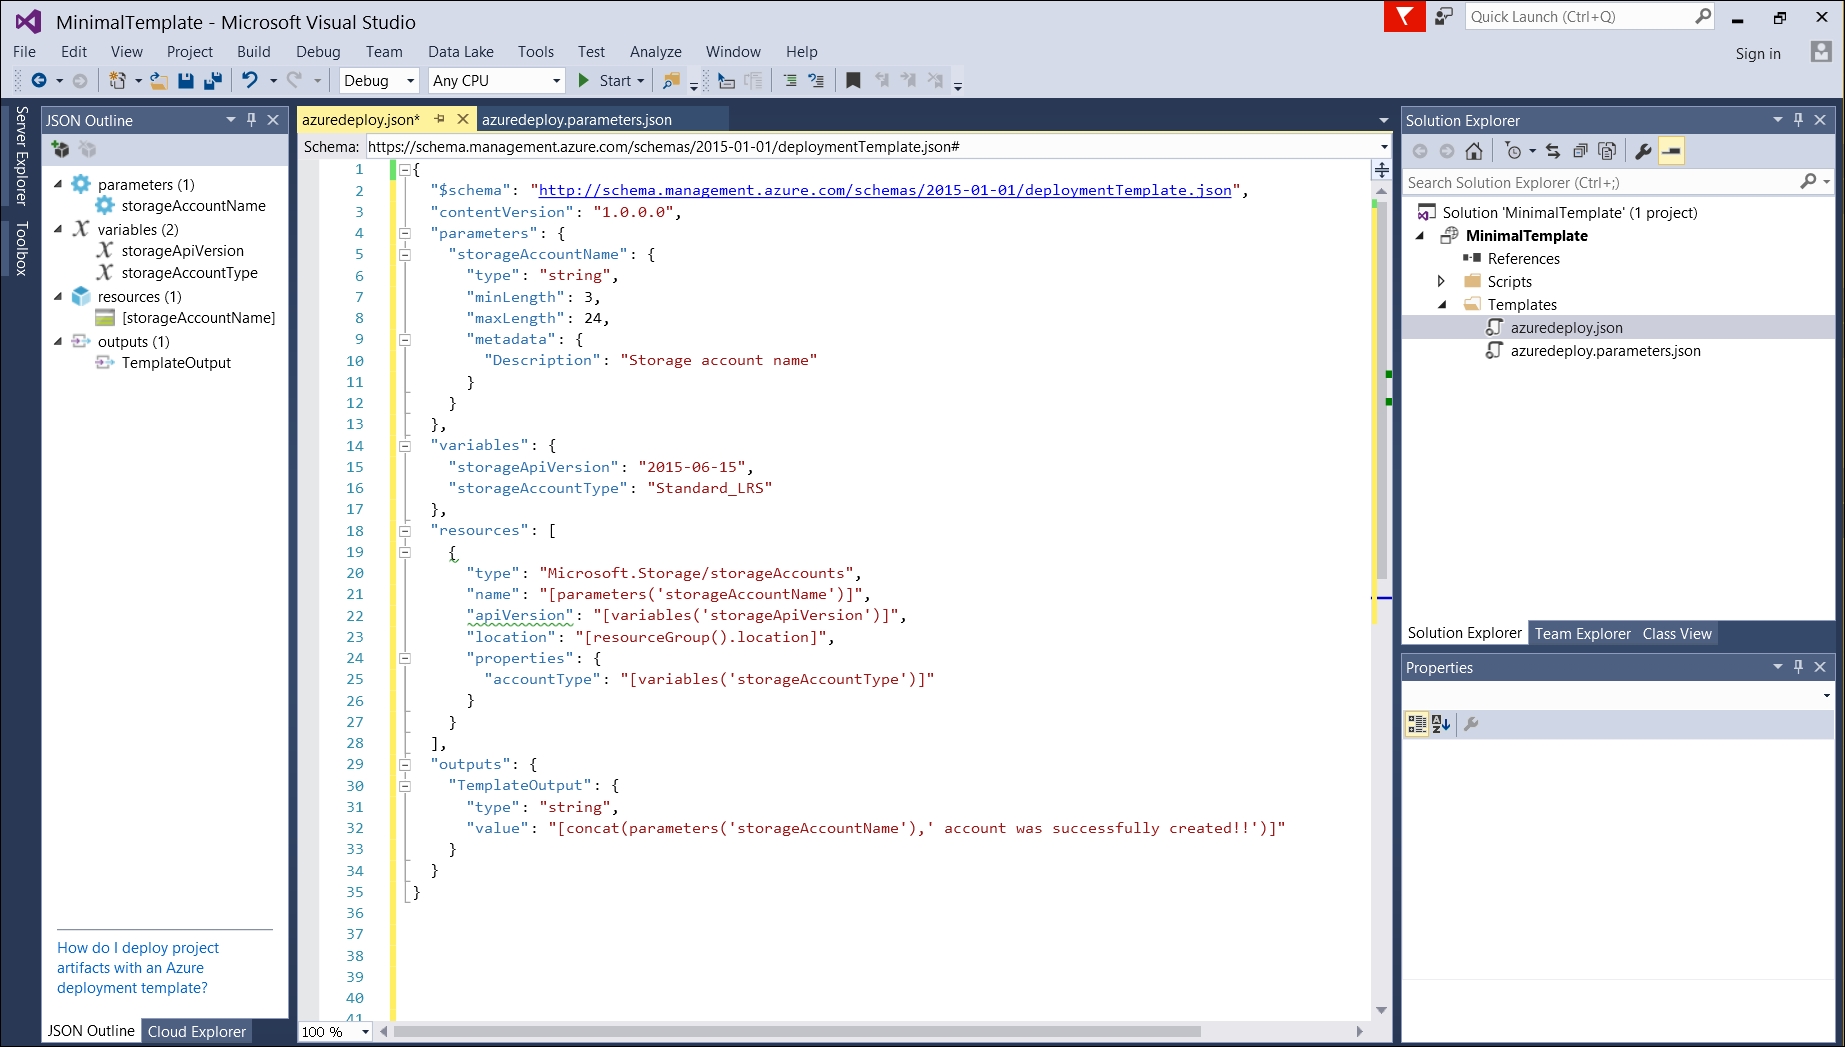
Figure 9: Minimal Template in Visual Studio
- More resources can be added to template by using the JSON Outline pane. It has an Add Resource button that can be used for the same. Later, we will deploy this template using PowerShell in this chapter.
Templates can be deployed to a resource group in multiple ways, prominent among them are:
- PowerShell
- Azure command-line interface
- REST APIs
- Azure portal
This book uses PowerShell and the Azure Resource Manager module for deploying ARM templates to resource groups. We will look into steps for using PowerShell for deployment of templates when we discuss PowerShell in detail in the next section.
PowerShell allows two modes of deployment of templates. They are as follows:
- Incremental
- Complete
Incremental deployment adds resources declared in the template that don't exist in a resource group and leaves resources unchanged in a resource group that are not part of a template definition, leaves resources unchanged in a resource group that exist in both the template and resource group with the same configuration state.
Complete deployment on the other hand, adds resources declared in a template to the resource group, deletes resources that do not exist in the template from the resource group, and leaves resources unchanged that exist in both the resource group and template with the same configuration state.