


Building a rich front-end application by using React and ES6
This chapter guides you through building an interactive and rich client-side application by using React. The app demonstrates the use of React components. It uses the Fetch API with ECMAScript 6 (ES6) to communicate with Node.js back-end services that call the IBM Watson Natural Language Understanding service to extract the authors of online articles that are selected by the user.
The sample application demonstrates the integration of the React front-end application with server-side Node.js services.
This chapter contains the following topics:
4.1 Getting started
To start, read the objectives, prerequisites, and expected results of this chapter.
4.1.1 Objectives
By the end of this chapter, you should be able to accomplish these objectives:
•Clone an IBM Cloud application.
•Use React to create interactive web pages.
•Use the Fetch API to interact with back-end web services.
•Understand the following concepts of ES6:
– Classes.
– Arrow functions.
– Promises.
4.1.2 Prerequisites
Before you start, be sure that you meet these prerequisites:
•Basic JavaScript skills
•Basic HTML 5 skills
•An understanding of Cloud DevOps basic concepts
•An understanding of Git basic concepts
•Access to a web browser: Google, Chrome, or Mozilla Firefox
4.1.3 Background concepts
In this exercise, you use ES6, React, and Bootstrap to build the front-end application. This section briefly introduces the concepts used.
ECMAScript 6
Most modern UI frameworks and new JavaScript APIs require an understanding of ES6. This exercise uses the ES6 Fetch API to call back-end services, classes to create the React Component, and the arrow function to simplify the code.
In 2015, the European Computer Manufacturers Association (ECMA), released a new version of the JavaScript standardization (ES6), which was considered a significant upgrade to the JavaScript language, since the standardization done in 2009, which was called ES5. ES6 introduced a set of new features and syntactic sugar, to JavaScript language.
|
Syntactic sugar: Syntactic sugar is a term used in programming languages to define the syntax introduced to make writing the code easier. It does not add new features. For example, sum = sum +1; //The syntactic sugar is sum++;.
Both syntaxes are still valid and perform the same functions.
|
This chapter covers only four ES6 features:
•let keyword
let is a keyword used to refer to a variable. It is similar to the var keyword, but the main difference is that the variable defined with let is visible only within the scope it is defined in. In contrast, var can be accessible outside its defined scope. Example 4-1 shows the difference between the var and let keywords:
Example 4-1 Difference between var and let keywords
for (var i = 0; i < 10; i++) {
console.log(i);
}
// The variable i is accessible here, although it was defined inside the for loop.
console.log(i);
for (let k = 0; k < 10; k++) {
console.log(k);
}
// The following line is invalid, because k is not accessible outside the for loop.
console.log(k);
•Classes
ES5 already included object-oriented and inheritance capabilities provided by prototype. ES6 introduces the class syntax, which is a syntactic sugar to make it easier to program.
Example 4-2 shows how to define a class by using prototype in ES5. Notice that in ES5 a class is defined by using the function keyword, which is confusing.
Example 4-2 Defining a class by using prototype in ES5
function Rectangle(x, y) {
this.x = x;
this.y = y;
}
Rectangle.prototype.draw = function() {
// your rectangle drawing code goes here
}
// Initialize Rectangle.
var rect = new Rectangle(2,3);
Example 4-3 shows how to define a class in ES6 by using the class syntax. This approach eliminates the confusion and is better aligned with object-oriented programming syntax.
Example 4-3 Defining a class using ES6 syntactic sugar
class Rectangle {
constructor(x, y) {
this.x = x;
this.y = y;
}
draw() {
// your rectangle drawing code goes here
}
}
let rect = new Rectangle(2,3);
•Arrow function
Classical JavaScript function syntax does not provide flexibility for defining a function with just one statement when compared to defining a function with a longer body. Regardless of the number of statements in the function, you always must enter function () {}. The arrow function simplifies the syntax for a simple single-line function.
Example 4-4 shows a simple function definition in ES5.
Example 4-4 Defining the add function in ES5
var add = function(a, b) {
return a + b;
}
console.log(add(3, 4));
Example 4-5 shows the same function with a simplified arrow syntax in a single line.
Example 4-5 Same example with ES6
let add = (a, b) => a + b;
console.log(add(3, 4));
•Promises
Promises are a compelling alternative to callback functions when dealing with asynchronous code. Unfortunately, promises can be confusing. However, significant work has been done to bring out the essential advantages of promises in a way that is interoperable and verifiable.
|
Note: There are several promises libraries, but the one introduced in ES6 is based on the Promises/A+ specification. For more information, see Promises/A+ at https://promisesaplus.com/.
|
The core component of a promise object is its then method. then takes two optional callback functions as arguments (fulfillment value and rejection reason). The then method is how you get the return value (known as the fulfillment value) or the exception thrown (known as the rejection reason) from an asynchronous operation.
Example 4-6 shows calling an asynchronous function and handling the returned promise by using two callback functions, which are called onFulfilled and onRejected in this example.
Example 4-6 Promises with ES6
var promise = doSomethingAync()
promise.then(onFulfilled, onRejected)
Example 4-7 and Example 4-8 illustrate the difference between handling callback functions in ES5 and ES6..
Example 4-7 shows a sample code written in ES5 to read a file. It uses asynchronous callback functions to process the file and handle the error.
Example 4-7 Reading files and handling errors in ES5
readFile(function(err, data) {
if (err) {
console.error(err);
}
console.log(data);
});
With ES6 promises, the code looks like in Example 4-8.
Note that the data argument in console.log and the err argument in console.error do not need to be specified. The code can be simplified as shown in the example because the interpreter implicitly passes the argument to functions that accept only one parameter.
Example 4-8 Reading files and handling errors in ES6
var promise = readFile()
promise.then(console.log, console.error)
You can pass the promise around and anyone with access to the promise can consume it using then regardless whether the asynchronous operation has completed or not. You are also ensured that the result of the asynchronous operation will not change for any reason because the promise will be resolved only once (either fulfilled or rejected).
|
Note: It is helpful to think of then not just as a function that takes two callbacks (onFulfilled and onRejected in this example), but as a function that unwraps the promise to reveal what happened from the asynchronous operation. Anyone with access to the promise can use then to unwrap it.
|
React concepts
In this exercise, you use React to build a client-side application that takes the URL of an article published on the internet as input from the user and communicates asynchronously with a back-end Node.js service to extract the author of the article.
React is a framework for building client-side dynamic web applications. React uses dynamic data binding and virtual Document Object Model (DOM) to extend HTML syntax and to eliminate the need for code that keeps the UI elements synchronized with the application state. This code, sometimes referred to as glue code, serves solely to synchronize the state of the UI components with changes in the back-end application. It does not add business value capabilities to your solution. React saves you the time and effort needed to create this code.
Some of the basic concepts of React applications are as follows:
•Virtual DOM
HTML pages use what is called DOM to render, traverse, and update UI elements in a responsive way. JavaScript code traverses the DOM tree to create, update, or hide HTML components. JavaScript traverses the DOM by using browser-specific application programming interfaces (APIs).
Sometimes this approach creates compatibility issues across browsers. Also, some browsers implement the function more efficiently than others. For example, you might experience better performance when using Chrome to access a website compared to another browser.
Figure 4-1 shows the DOM of the HTML page for the Watson Author Finder application developed in Chapter 3, “Creating your first Express application” on page 53.
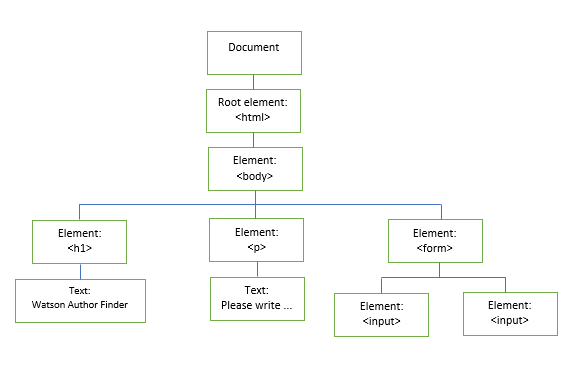
Figure 4-1 DOM of the HTML page for the Watson Author Finder application
Example 4-9 shows the HTML code represented by the DOM in Figure 4-1.
Example 4-9 Code snippet: HTML code for application Watson Author Finder
<html>
<body>
<h1 style="color:blue;">Watson Author Finder</h1>
<p>To get information about the author of an article, enter the URL of that article.</p>
<form action="author" method="post">
<input type="text" name="url"/>
<input type="submit" value="Submit"/>
</form>
</body>
</html>
React addresses this issue by using the concept of virtual DOM to provide an abstraction of the HTML DOM. With this approach, the responsibility for traversing the virtual DOM lies on the React framework, which makes it independent of the browser.
Example 4-10 shows the same HTML code written in React. Note the following in the code:
– The AuthorCheckForm class is equivalent to the <form> tag.
– The InputUI class is equivalent to the content of the form.
Example 4-10 HTML code in Example 4-8 written in React
class AuthorCheckForm extends React.Component {
constructor(props) {
super(props);
}
render() {
return (
<form action="author" method="post">
<InputUI label='URL'/>
</form>
)
}
}
class InputUI extends React.Component {
constructor(props) {
super(props);
}
render() {
return (
<div>
<a>
{this.props.label}
</a>
<input type="text" name="url"/>
<input type="submit" value="Submit"/>
</div>
)
}
}
•React components
React components are reusable pieces of the UI. Each component extends the React class component, which has lifecycle methods that describe the behavior of the component. Conceptually, components are like JavaScript classes. Your implementation can override the component lifecycle methods to specify the behavior of each reusable piece.
The component lifecycle methods are constructor() and render(). You initialize variables, including the state, in the constructor() method and write the HTML code in the render() method.
Another important property of the component is that it can be used to keep the state of the UI.
Example 4-11 shows the basic skeleton of a React component.
Example 4-11 React component
class InputUI extends React.Component {
constructor(props) {
super(props);
}
render() {
return (<p> hello world </p>)
}
}
•React components properties
A React component property is similar to an attribute in an HTML tag. In React, you use a custom tag to define component properties instead of using custom attributes for an HTML tag. In Example 4-12, the component is InputUI and the property is label.
•React element
The React element is similar to standard HTML tags, such as <h1>, <body>, and so on. The difference between React elements and HTML DOM elements is that React elements can also be used to render the components.
Example 4-12 shows a React element rendering the InputUI component.
Example 4-12 React element
<InputUI label='URL' />
Example 4-13 shows React element example for a standard HTML tag.
Example 4-13 React element
<input type="submit" value="Submit"/>
•React state
To make the React components dynamic, you initialize the state in the constructor() method and render the component data from the state. The state is updated by events, for example an Ajax response. React renders the components to display the updated state.
States and virtual DOM complement each other to achieve the high performance of React. React uses the virtual DOM to compute what the DOM of the final web page should look like after the state of some elements is updated. The calculations happen in-memory on the virtual DOM. The result of this algorithm is how the HTML DOM should look.
•JavaScript XML (JSX)
JSX simplifies code by enabling developers to write XML-like syntax in JavaScript code. JSX is commonly used in React, but current browsers do not support JSX out of the box. Writing code with JSX requires the use of the Babel JavaScript compiler (also known as transpiler) to convert JSX into JavaScript supported by the browsers.
Example 4-14 shows creating an element in React by using JSX.
Example 4-14 Creating an element by using JSX
var sum = 3+2;
<input type=”text” value={sum}/>
Example 4-15 shows creating the same element in React without using JSX.
Example 4-15 Creating the same element using JavaScript
var sum = 3+2;
React.createElement(“input”,{“type”:”text”,“value”:{sum});
As a developer, you can program in React with JavaScript without using JSX. However, JSX is currently the preferred language for React programmers.
Bootstrap
Bootstrap is an HTML, CSS, and JavaScript front end for developing responsive web pages.
Bootstrap uses a responsive grid layout. Each Bootstrap page is arranged into nested rows and columns. Each row holds exactly 12 columns. Classes are assigned to columns and used to determine the width of the column at different screen sizes. For example, div tag with class col-md-6 takes exactly half the screen width (6/12) on screens of medium size and larger. A div with both classes col-xs-12 and col-md-6 takes the full screen width on extra small and small screens, and half the width on medium and large screens.
For more information, see the Bootstrap documentation at this URL:
4.1.4 Expected results
Figure 4-2 shows the Author Finder application displaying the list of authors extracted from an article published on the CNN website.

Figure 4-2 React app Watson Natural Language Understanding Author Finder
Here is how it works:
1. The user enters the URL of an article that has one or more authors.
2. The user clicks Retrieve Author.
3. React sends a request to the Node.js web service by using the Fetch API.
4. The web service calls the Watson Natural Language Understanding service to parse the article and extract the authors.
5. The result is passed back to the React state, which renders it in a responsive grid.
4.2 Architecture
Figure 4-3 shows the components and runtime flow of the application.

Figure 4-3 Architecture
Figure 4-3 describes these steps:
1. In a web browser, the user navigates to the application URL:
2. The web browser sends a GET / request to the Node.js back-end application developed in Chapter 3, “Creating your first Express application” on page 53.
3. The Express framework in Node.js returns frontend/index.html.
4. The frontend/index.html page is returned to the user. The index.html page contains a form that has one text box and a Submit button. The text box is where the user enters the URL of an article.
5. The user enters the article URL and then clicks Submit.
6. The web browser sends a POST request to the /author route with the article URL passed in the body.
7. The Express framework in Node.js passes the article URL to the Watson Natural Language Understanding service. It also specifies that metadata should be returned.
|
IBM Watson Natural Language Understanding service: This service uses natural language processing (NLP) to analyze semantic features of a text. Watson Natural Language Understanding service has many features, such as concepts, categories, emotion, entities, keywords, metadata, and sentiment.
The feature used in this exercise is metadata. It retrieves document’s metadata, including the author name, title, RSS/ATOM feeds, prominent page image, and publication date.
|
8. The metadata for the article is returned by the Watson Natural Language Understanding service.
9. Node.js filters the metadata to return only the author names.
10. The authors of the article are returned to the user through the web browser.
4.3 Step-by-step implementation
The implementation involves the following steps:
1. Clone the express application from Git using the Delivery Pipeline.
2. Create your first React page.
3. Add a dynamic form to the page.
4. Add more components to the form.
5. Use the Fetch API to call the Node.js author service.
4.3.1 Log in to IBM Cloud
To log in to IBM Cloud, complete these steps:
1. Open the IBM Cloud console in your web browser:
2. Click Log in.
3. Enter your IBM Cloud ID (Figure 4-4).

Figure 4-4 IBM Cloud login
4. Click Continue.
5. Enter your password and click Log in.
6. Confirm that your IBM Cloud account page opens.
4.3.2 Clone the Express application from Git by using the Delivery Pipeline
This application builds on the code that you developed in Chapter 3, “Creating your first Express application” on page 53. If you successfully finished the application in Chapter 3, “Creating your first Express application” on page 53, you can skip to “Create your first React page” on page 106.
Complete the following steps to quickly deploy the application:
1. Open the following link:
2. On the page that opens (Figure 4-5), select the Delivery Pipeline tab. On the Delivery Pipeline tab, set the App name to vy102-XXX-react (replace XXX with your unique key). Keep all other settings unchanged and click Deploy.
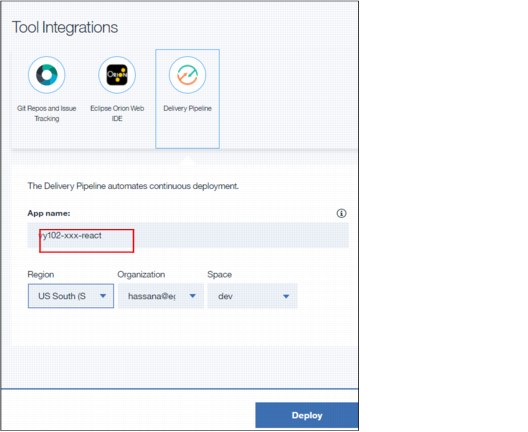
Figure 4-5 Create a Toolchain window

Figure 4-6 IBM Cloud toolchain: Select Eclipse Orion Web IDE
4. The Eclipse Orion Web IDE lists your project files (Figure 4-7). The source code from the application developed in Chapter 3, “Creating your first Express application” on page 53 is displayed in the online IDE because the new project was cloned from it.

Figure 4-7 Eclipse Orion Web IDE
– Change the application name and host on lines 10 and 11 to vy102-xxx-react. Replace xxx with your random key.
– If needed, change the domain based on your IBM Cloud region as shown in Table 4-1.
The exercises in this book were tested in the US South region. If you use another IBM Cloud region and face any problem, register for a new IBM Cloud account and select United States for country or region as described in Chapter 1.3.1, “Set up your IBM Cloud account” on page 4.
Table 4-1 IBM Cloud regions and domains
|
Region
|
Domain
|
|
US South
|
mybluemix.net
|
|
United Kingdom
|
eu-gb.mybluemix.net
|
|
Sydney
|
syd.mybluemix.net
|
|
Germany
|
eu-de.mybluemix.net
|

Figure 4-8 manifest.yml
6. Complete the following steps to configure the application to be deployed from Eclipse Orion IDE to IBM Cloud:
Figure 4-9 Eclipse Orion launch bar
b. In the Edit Launch Configuration window (Figure 4-10), keep all the settings as default and click Save. If your user is part of multiple organizations, choose the organization that has your email as its name. Note that application name and host values are defaulted from manifest.yml. If you change the host value, it overrides the value in manifest.yml.

Figure 4-10 Edit Launch Configuration
c. Deploy the application by clicking the play icon, Deploy the App from the Workspace, which is highlighted in Figure 4-11.
Figure 4-11 Eclipse Orion launch bar
|
Troubleshooting: If you get the error The app space binding to service is taken, delete the deployed app from your IBM Cloud dashboard. Then redeploy the app from Eclipse Orion by clicking the play icon (Deploy the App from the Workspace).
|
7. Wait for the deployment to complete. To make sure that your application is running, either click the Open the Deployed App icon (highlighted in Figure 4-12) or go directly to your default route:
https://vy102-xxx-react.mybluemix.net/
Figure 4-12 Eclipse Orion launch bar
4.3.3 Create your first React page
React is a JavaScript-based front-end web application framework that is used primarily to develop single-page applications. The single-page application is a web page that loads one HTML page, and dynamically updates it as the user interacts with the app.
The entire React application, including HTML views, JavaScript files, and CSS files, run on the browser. In this exercise, to make these components available to the browser, all the client-side files must be located under a single root folder and must be served by the Express framework by using the express.static() method.
|
Important: The application now uses two JavaScript frameworks: Express, which runs on the server side and React, which runs on the client side. From the perspective of Node.js, all the React code is a set of static text files that are passed to the browser without any processing. To avoid confusion between the client-side files and the server-side files, this exercise keeps all client-side files in a hierarchy inside the frontend folder.
|
Complete the following steps:
1. Start Eclipse Orion Web IDE for your application if it is not opened already.
2. Update the app.js file by adding the following lines after the initialization of the routes module:
//Serve the files in /frontend as static files
app.use(express.static(__dirname + '/frontend'));
The updated app.js file is shown in Figure 4-13.

Figure 4-13 The added lines in the updated app.js file
The code in app.js initializes the Express framework and sets it to listen to all HTTP requests. It also sets Express to use the /frontend folder as its static content root. This setting means that when the user tries to access any URL in the application, Express tries to find the file that matches that path inside the /frontend folder.
If a file is found, it is returned to the user. If no static file matches the path that is requested by the user, Express tries to match the path to one of the routes. If no routes match, error 404 is returned.
|
Note: Express tries to match static file paths first because the express.static() method is called in this code before the routes are registered. If the invocation order is reversed, Express checks the routes before looking up static files. In general, you should match static files before matching routes.
|
If the user does not specify a path, Express checks whether a file named index.html exists at the root of the /frontend folder. If that file exists, it is returned to users opening the domain without specifying a path. Essentially, the /frontend/index.html file is the home page, so the first order of business is to update that file to use React.
3. Create the folder frontend under the root of the project and create the file index.html inside it with the content shown in Example 4-16.
Example 4-16 Basic HTML page
<html>
<head>
<title>React JS - Author Finder</title>
</head>
<body>
</body>
</html>
4. Reference React, and Babel in your HTML. This reference can be done by inserting the script lines shown in Example 4-17 inside the <body> tag.
Example 4-17 Fetching required libraries
<!-- Loading the script in body is a recommendation to ensure faster loading,
putting all scripts at the header will cause the page to wait till all scripts loaded
Load React related files from internet -->
<script crossorigin src="https://unpkg.com/react@16/umd/react.production.min.js"></script>
<script crossorigin src="https://unpkg.com/react-dom@16/umd/react-dom.production.min.js"></script>
<!-- Load babel JavaScript compiler from internet -->
<script src="https://unpkg.com/[email protected]/babel.min.js"></script>
5. Update the /frontend/index.html file to reference bootstrap CSS from the Content Delivery Network (CDN). This update can be done by inserting the link line shown in Example 4-18 inside the <head> tag right after the </title> tag.
|
CDN: A CDN is a distributed system that hosts common CSS, JavaScript, and other web resources in a geographically dispersed group of servers so that the files are delivered to users from the server nearest to them.
|
Example 4-18 Fetching bootstrap stylesheets
<link rel="stylesheet" href="//netdna.bootstrapcdn.com/bootstrap/3.0.0/css/bootstrap.min.css"/>
6. Insert a simple HTML code that contains a <div> tag inside the <body> tag, right after the last </script> tag (Example 4-19).
The React component is rendered in the <div> tag with id=”root”.
Notice the use of col-sm-10, col-sm-offset-1, and text-center bootstrap classes.
Example 4-19 <div> tag in HTML code
<div class="container">
<div class="row">
<!-- You do not need to write much html code, you will
build the whole html on your JSPX code -->
<div class="col-sm-10 col-sm-offset-1 text-center" id="root">
</div>
</div>
</div>
7. With the /frontend/index.html file open in the IDE, press Alt + Shift + F to auto-format it. It should look like Example 4-20.
Example 4-20 Formatted /frontend/index.html file
<html>
<head>
<title>React JS - Author Finder</title>
<link rel="stylesheet" href="//netdna.bootstrapcdn.com/bootstrap/3.0.0/css/bootstrap.min.css" />
</head>
<body>
<!-- Loading the script in body is a recommendation to ensure faster loading,
putting all scripts at the header will cause the page to wait till all scripts loaded
Load React related files from internet -->
<script crossorigin src="https://unpkg.com/react@16/umd/react.production.min.js"></script>
<script crossorigin src="https://unpkg.com/react-dom@16/umd/react-dom.production.min.js"></script>
<!-- Load babel JavaScript compiler from internet -->
<script src="https://unpkg.com/[email protected]/babel.min.js"></script>
<div class="container">
<div class="row">
<!-- You do not need to write much html code, you will
build the whole html on your JSPX code -->
<div class="col-sm-10 col-sm-offset-1 text-center" id="root">
</div>
</div>
</div>
</body>
</html>
8. You no longer need the /views/index.html file because you replaced it with the /frontend/index.html file. Delete the /views/index.html file and all references to it, including the index.js route and the code registering it in the app.js file. To do so, complete the following steps:
a. Right-click the views folder and select Delete to delete the folder and the index.html file inside it.
b. Right-click the /routes/index.js file and select Delete to delete it.
|
Note: Delete the index.js file only. Do not delete the routes folder.
|
c. In app.js, locate and delete index = require('./routes'),. Do not delete var because it is still used to declare the author.
d. In app.js, locate and delete the app.use('/', index) line, along with the comment line before it.
Your app.js file should look like Figure 4-14.

Figure 4-14 Updated app.js
4.3.4 Add a dynamic form to the page
Now, add a simple form to the page. The form consists of a text box, a label, and a button. The user enters the article URL in the text box and then clicks the button so that React calls the Node.js back-end service to extract the author’s name.
For this step, create the form but do not call the Node.js service:
1. Under the frontend folder, create a folder called components. Create the components.js file in the components folder (Figure 4-15).

Figure 4-15 New components.js file
2. Inside the components.js file, create a class that extends React.Component as shown in Example 4-21.
Example 4-21 Code snippet: Class Container 
class Container extends React.Component {
constructor(props) {
super(props);
}
render() {}
}
3. Initialize the page state in the constructor by adding the code snippet from Example 4-22 to the constructor after the super(props) line.
Example 4-22 Code snippet: Class Container extends React.Component
this.state = {
url: '',
authors: [],
inputVal: ''
};
4. After the constructor, add the updateUrl() method to update its state. Also, add the getAuthor() method with no implementation for now. It will be implemented later to call the back-end service to retrieve the authors (Example 4-23).
|
Note: Format the code correctly after pasting, especially any wrapped around lines, and remove any unintentional line breaks in lines of code and comments.
|
Example 4-23 Adding the updateUrl() and getAuthor() methods
updateUrl(e) {
this.setState({
inputVal: e.target.value
});
}
// getAuthor uses the fetch function to retrieve authors
// from the REST service created in the previous exercise
getAuthor() {}
5. Replace the render () method with the code snippet in Example 4-24. It contains html tags to render the author name and the button.
|
Note: From this point on, do not use Shift + Alt + F to format the code in the components.js file. If you need to format the code, do it manually.
Eclipse Orion Web IDE does not currently support JSX syntax formatting that is combining HTML and JavaScript code. You can use other code formatting tools such as jsbeautifier at http://jsbeautifier.org/. Select the Support e4x/jsx syntax option of jsbeautifier if you will use this tool to format JSX code in the examples of this chapter.
|
Example 4-24 Override the render() method
// Render is the core function behind React components.
// It defines components and elements in XML format.
// This is only feasible if using JSPX and Babel JavaScript compiler.
render() {
return (
<div class="jumbotron text-center">
<h1>Author Finder</h1>
<div id='input-form' class='text-center'>
<input type="text" class="form-control input-lg text-center" onChange={e=>this.updateUrl(e)} placeholder="Enter URL of Article here!"/>
</div>
<br/>
<button type="button" class="btn btn-primary btn-lg" disabled = {this.state.inputVal.length===0} onClick={()=>{this.getAuthor()}}>Retrieve Author</button>
</div>
)
}
6. Add the code snippet in Example 4-25 at the end, after the brace } closing the Container class. This code updates the HTML DOM tree, with the new component, starting from the <div id="root"> element. The code inserts the Container component in the <div id="root"> element shown in Example 4-20 on page 109.
Example 4-25 ReactDOM.render
ReactDOM.render(<Container />, document.getElementById("root"));
7. Your code now should look like Example 4-26.
Example 4-26 Complete code for Container class
class Container extends React.Component {
constructor(props) {
super(props);
this.state = {
url: '',
authors: [],
inputVal: ''
};
}
updateUrl(e) {
this.setState({
inputVal: e.target.value
});
}
// getAuthor uses the fetch function to retrieve authors
// from the Rest service created in the previous exercise
getAuthor() {}
// Render is the core function behind React components.
// It defines components and elements in XML format.
// This is only feasible if using JSPX and Babel JavaScript compiler.
render() {
return (
<div class="jumbotron text-center">
<h1>Author Finder</h1>
<div id='input-form' class='text-center'>
<input type="text" class="form-control input-lg text-center" onChange={e=>this.updateUrl(e)} placeholder="Enter URL of Article here!"/>
</div>
<br/>
<button type="button" class="btn btn-primary btn-lg" disabled = {this.state.inputVal.length===0} onClick={()=>{this.getAuthor()}}>Retrieve Author</button>
</div>
)
}
}
ReactDOM.render(<Container />, document.getElementById("root"));
8. Update index.html to import the React Container component by adding the following line in the <body> tag after the last </script> tag, as shown Figure 4-16.
<script type="text/babel" src="./components/components.js"></script>
Note that the script type is text/babel, not JavaScript, to indicate to the browser that it needs the support of the Babel compiler to translate this page.

Figure 4-16 The /frontend/index.html file
9. Deploy the application by clicking the Play icon (Deploy the App from the Workspace). If you receive a pop-up message warning you that the application will be redeployed, click OK to confirm.
10. After the application deployment is complete, run the application by clicking the Open the Deployed App icon. The UI should look like Figure 4-17. Notice that the Retrieve Author button is disabled until the user starts writing in the text box.

Figure 4-17 Dynamic React form
4.3.5 Add more components to the form
Figure 4-18 represents the React components to be developed in this exercise.
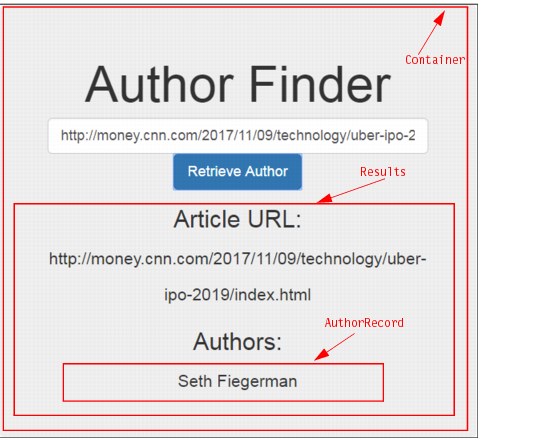
Figure 4-18 Component structure
In 4.3.4, “Add a dynamic form to the page” on page 110, you added an HTML form to the page as a React component called Container.
In this section, you will add the Results and the AuthorRecord components using these steps:
1. Open the /frontend/components/components.js file.
2. Copy the code snippet from Example 4-27 on page 116 into the components.js file, before ReactDOM.render(<Container />, document.getElementById("root")).
|
Note: Do not use SHIFT + ALT + F to format the code in the components.js file. If you need to format the code, do it manually.
|
Example 4-27 shows a new component called Results. It displays the Article URL, and the list of extracted author names.
Example 4-27 Code snippet: Results Component in components.js
// Results: is another React component
// that creates the list of AuthorRecords
class Results extends React.Component {
constructor(props) {
super(props);
}
render() {
if (this.props.hide) {
return null;
}
return (
<div class='form-inline'>
<div class="row">
<div class="col-xs-12 col-md-3">
<h2>Article URL:</h2>
</div>
<div class="col-xs-12 col-md-9">
{this.props.url}
</div>
</div>
<div class="row">
<div class="col-xs-12 col-md-3">
<h2>Authors:</h2>
</div>
<div class="col-xs-12 col-md-9">
<div class="row">
</div>
</div>
</div>
</div>
)
}
}
|
Note: If you see errors in the components.js file, ignore them. These errors are caused by combining HTML code with JavaScript code as this file follows JSX syntax.
|
3. Copy the code snippet from Example 4-28 into the components.js file after the render() method in the Results class.
Example 4-28 shows a helper method called renderAuthors() to iterate over the authors retrieved from the back-end service by using map().
Notice that the AuthorRecord is not defined in the file. You are going to define it in another file in the next section. This is one of the powerful features of React Component because putting the AuthorRecord in a separate file makes it a reusable component.
Example 4-28 Code snippet: renderAuthors()
/*
Notice that the AuthorRecord is defined in a separate file. This is a powerful feature of the React Component: Putting the AuthorRecord in a separate file and making it a reusable component.
*/
renderAuthors() {
/*
When developing a component, you should capitalize it.
Hence, you should use "AuthorRecord" instead of "authorrecord" to identify it as a component to React.
*/
let authors = this.props.authors;
return authors.map(a => {
return <AuthorRecord author = {a}/>;
});
}
4. Call the renderAuthors() method, within the div class=”row”. It is highlighted in bold in Example 4-29. Your final Results component should look like Example 4-29.
Example 4-29 Code snippet: Results component
// Results: is another React component
// It creates the list of AuthorRecords
class Results extends React.Component {
constructor(props) {
super(props);
}
render() {
if (this.props.hide) {
return null;
}
return (
<div class='form-inline'>
<div class="row">
<div class="col-xs-12 col-md-3">
<h2>Article URL:</h2>
</div>
<div class="col-xs-12 col-md-9">
{this.props.url}
</div>
</div>
<div class="row">
<div class="col-xs-12 col-md-3">
<h2>Authors:</h2>
</div>
<div class="col-xs-12 col-md-9">
<div class="row">
{this.renderAuthors()}
</div>
</div>
</div>
</div>
)
}
/*
Notice the AuthorRecord is defined in a separate file. This is a powerful feature of the React Component: Putting the AuthorRecord in a separate file and making it a reusable component.
*/
renderAuthors() {
/* When developing a component, you should capitalize it.
Hence, you should use "AuthorRecord" instead of "authorrecord" in order to identify it as a component to React.
*/
let authors = this.props.authors;
return authors.map(a => {
return <AuthorRecord author = {a}/>;
});
}
}
|
Note: The value of url and authors is retrieved from the state. Therefore, any event that updates state.url and state.authors causes the components to be rendered.
|
5. In the Container class below the <button> tag, add the Results element to render the Results component:
<Results url={this.state.url} hide={this.state.authors.length === 0} authors={this.state.authors}/>
This line includes the Results component element and these properties:
– url retrieved from state.url
– authors retrieved from state.authors.
Figure 4-19 shows the Results component added to the Container class.

Figure 4-19 Adding Results to the Container class
6. Create a file called authorrecords.js and place it in the components folder. authorrecords.js defines a new React component, but in a separate file.
|
Note: Do not use SHIFT + ALT + F to format the code in the authorrecords.js file. If you need to format the code, do it manually.
|
Example 4-30 Code snippet: authorrecords.js
//AuthorRecord : a component defined to hold author names
class AuthorRecord extends React.Component{
render() {
return (
<div class="row">
<div class="col-xs-12 col-md-6">
{this.props.author.name}
</div>
</div>
);
}
}
The code in Example 4-30 shows that you can define a component in a separate file, and use it in your web page. This approach allows you to reuse the component in another project by simply copying that file to your new project.
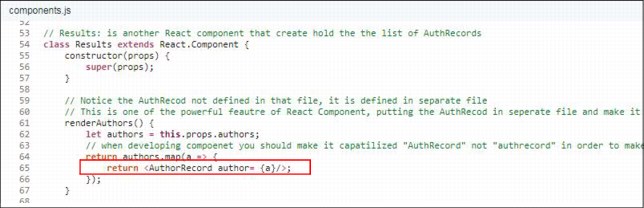
Figure 4-20 Rendering AuthorRecord in component.js
8. To make the new component AuthorRecord accessible to the other component, import authorrecords.js in index.html. In index.html, add the following line before importing components.js:
<script type="text/babel" src="./components/authorrecords.js"></script>
Your index.html file should look like Figure 4-21.

Figure 4-21 The /frontend/index.html file
4.3.6 Using the Fetch API to call the Node.js author service
React is a framework to implement the view components in the model view controller (MVC) architecture. To retrieve resources from the back-end server, you need to use another library. XMLHttpRequest is commonly used to call REST services, but in this example you will use the Fetch API. It is a new API that provides a flexible feature set. It returns a promise that resolves the Response, which makes calling REST services simpler.
|
You can use the Fetch API to call any REST API. All Watson APIs are exposed as REST services, which means that you can call the Watson Language Translator service, the Watson Natural Language Understanding services, or any other Watson service by using the Fetch API.
In this part, you will call the author service that you developed in Chapter 3, “Creating your first Express application” on page 53.
|
To call the author service that was developed in Chapter 3, “Creating your first Express application” on page 53, complete these steps:
1. Open /frontend/components/components.js to update the getAuthor() method.
2. In the Container class, in components.js, replace getAuthor() with the code snippet in Example 4-31.
Example 4-31 Code snippet: /frontend/components/components.js file
getAuthor() {
var myHeaders = new Headers();
myHeaders.append("Content-Type", "application/x-www-form-urlencoded");
fetch('/author', {
method: 'POST',
body: "url=" + this.state.inputVal,
headers: myHeaders
}).then(res => res.json())
.then(data => this.setState({
authors: data,
url: this.state.inputVal
}));
}
This code sends an asynchronous POST request to /author. In Chapter 3, “Creating your first Express application” on page 53, you created an Express route that handles such requests.
In Example 4-31 there are multiple then methods, which is called promises chaining. Because then returns a promise, it means that promises can be chained. This method is used to avoid nested callbacks.
The code snippet in Example 4-31 defines the HTTP method as POST and sets the path to /author. It also passes the URL that is entered by the user in the url field in the body, and sets the content type header to application/x-www-form-urlencoded.
3. Deploy the application using the Play icon (Deploy App from the Workspace) from the server toolbar. If a window with Stop and redeploy? Your application vy102-XXX-express will be redeployed is displayed, click OK.
4. After the deployment is complete, start the application by clicking Open the Deployed App from the server toolbar.
5. To test the application, enter the following web address into the URL text box:
The application now displays the complete list of authors (Figure 4-22).

Figure 4-22 Displaying the list of authors
6. Try resizing the window to be narrower (or open the application in your mobile device). Notice how the page responds by adapting its layout. The “Article URL” and “Authors” headings now appear above their respective results, as shown in Figure 4-23. This approach is called responsive design, and is made possible by using Bootstrap.

Figure 4-23 Mobile view
4.4 Exercise review
During this exercise, you achieved the following goals:
•Learned the basics of the React framework.
You built a basic React application that uses React components to interact with the user. It uses the Fetch API to communicate with the server.
•Learned the basics of ES6.
You used the class syntax, arrow functions, and promises with the Fetch API to call the back-end services
•Learned the basics of the Bootstrap framework.
You used the Bootstrap framework responsive grid system to create a responsive page that has different layouts on various screen sizes.
•Learned how to use Express to serve static files and resources.
You used the Express framework’s express.static service to serve all the files that are hosted in the /frontend folder.
•Used Git to clone an existing project.
You used Git to clone the source code from Chapter 3, “Creating your first Express application” on page 53 and used it as the basis for this exercise.
..................Content has been hidden....................
You can't read the all page of ebook, please click here login for view all page.