
Before we create a game within GameMaker Studio (GMS) , it is good practice to have your ideas detailed out on paper. I begin almost all my game projects on paper. Designing a game on paper gives you a clear picture of all the rules, systems, mechanics, and the interactions that can happen in a game. Prototyping on paper makes your ideas tangible, playable, easy to test, and changeable early on. Different people have different approaches to Game Design; I practice two different methods that work the best for me. During jams or when you are on a very tight schedule, you would go the tried and tested way of a game mechanics as a first approach. Here, you decide what the player is going to do in the game and then build other layers of information (backstory, the game world, non-playable characters, other interactions, etc.). The second approach that I take is to build out layers of information from a central premise (theme). This approach is slightly more time-consuming and not always successful, but the process brings a lot of clarity, depth, and understanding to the game you are building. For example, you want to build a game around the theme “Heist”; you start by asking questions to yourself about the theme and those involved in it. What is this game about: a heist. Who is stealing and what? From where? And why? Are they alone? If not, how do the others help? Where does the player get his “jobs” from? What motivates the player/avatar? Who are the antagonists? What motivates them?
The idea here is to build a system of interconnected information sets that eventually lead to a mechanic. In the above example, what is the game about gives you a rough idea of what the player does in the game? When you dig deeper by asking how, you are forced to think in that direction, making choices along the way—one outcome could have been that the player must avoid security systems to steal items from specific locations and escape. Answering one question then leads you to more questions—how does the player avoid security systems? What happens if an alarm is tripped? Do they steal one item or more? How does the player find them in these locations? How will the player escape? These questions bring more clarity to your design and point directly to mechanics, interactions, and features that need to be implemented.
Sketching the Game
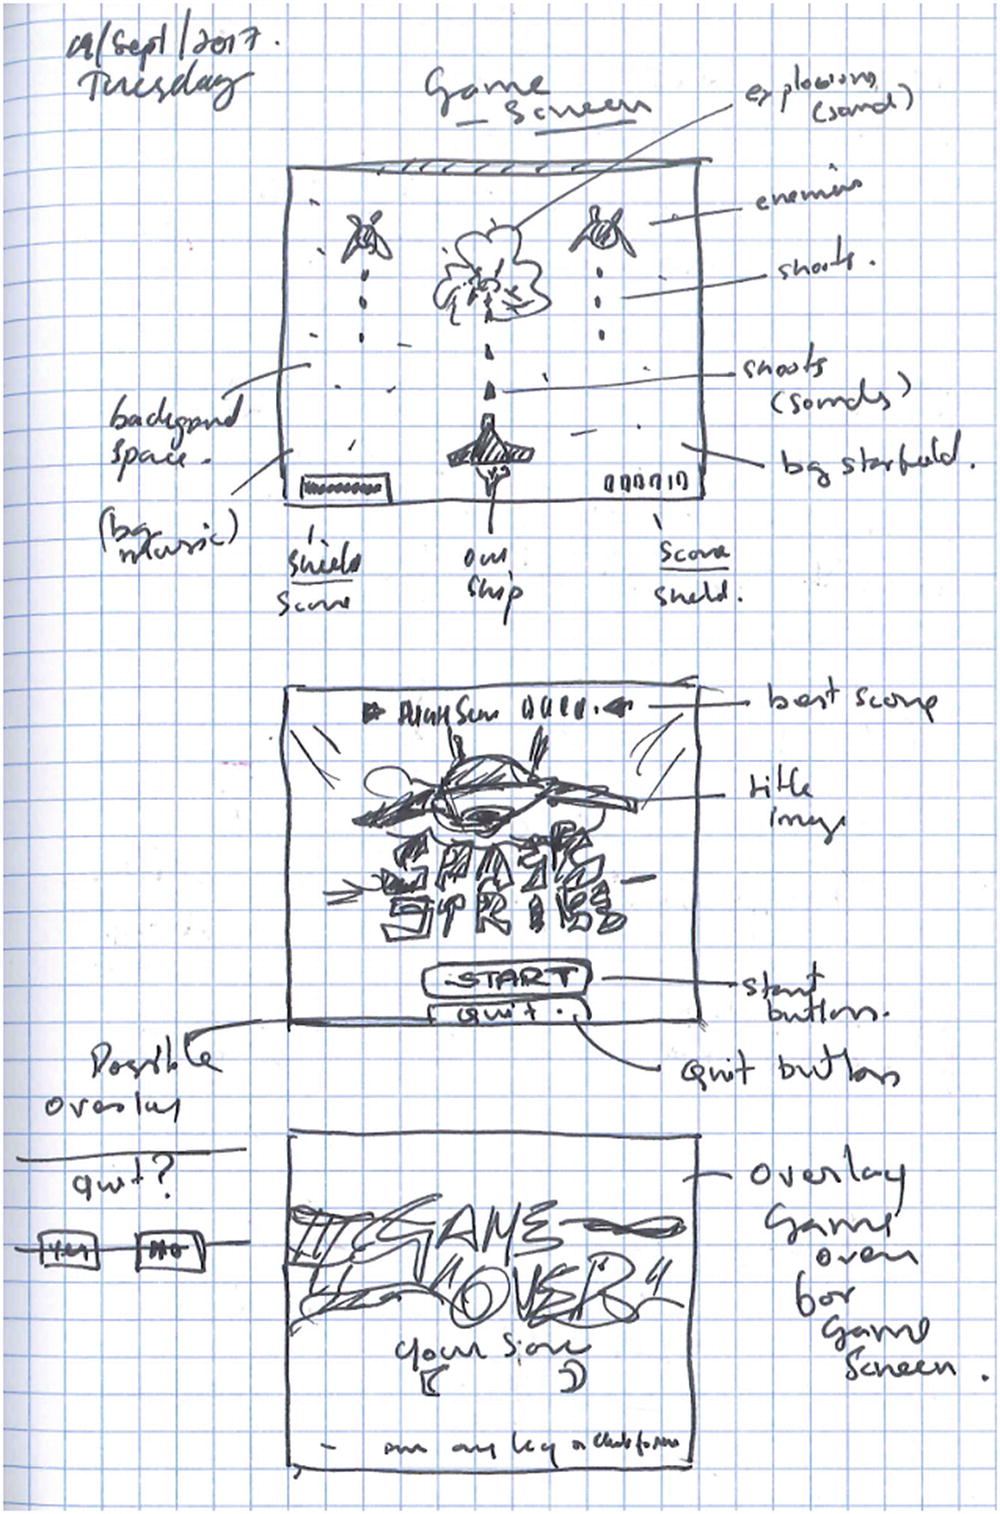
A peek into my notebook; a sketch of the whole game—title screen, game screen, and game over screen, all annotated with quick notes for future reference
Putting it Together

A diagramatic representation of our game and its components
Starting Our New Project
Let’s start by creating a new project using the GameMaker Language and resizing the room to 1024 pixels and 768 pixels for width and height, respectively, like we did in the previous chapter. Once that is done, let’s create the background image for the room. In the resources panel on the right side, right-click on sprites and then select Create Sprite. A new sprite called sprite0 is created and you can now see the sprite in your workspace.
On the left, you have the sprite’s name and other properties and functions.
On the right side toward the top, you see some animation controls and a timeline with one frame in it.
Toward the bottom, you see a preview of the image contained in that selected frame.

Resizing the new sprite for our title
For now, we have one frame and it is 64 pixels in width and 64 pixels in height and is empty (transparent). Since we created this sprite to be used as the title background for our game, let’s change its size. In the properties to the right you have our sprite’s name; let’s change that to sprTitleBackGround . It is good practice to name your assets with a prefix (in this case, spr, for sprite) so that you can have unique names for different kinds of assets and can easily differentiate between them.
The second thing we want to do is to change the size of the image. Right below where we changed the Name, the current Size of the image is shown; click the button here with arrows to four corners. In the new window that pops up, select Resize Canvas, and change the size of the image to 640 pixels and 480 pixels for width and height, respectively, and then click apply.
Now to edit our image. With the first frame of our sprite selected, click on the Edit Image button in the Sprite Editor. Clicking this button opens this sprite in the internal image editor.
Tip
At this moment, if you need more space to work with, you can quickly collapse and expand all the docked panels by hitting the F12 key on your keyboard. The same functionality is available as a button on the toolbar as well.

Our game running with a sprite for a background
Creating Objects and Their Instances
Now that our title screen is partially done, let’s add the main two buttons with which the player will interact: the Start button and the Quit button. For that we need to create objects. Objects are GMS’s way of storing items that go into the game; so once you create and store an object in your project, you add an instance of that object into a room simply by dragging and dropping it.
Let’s create an object now by right-clicking on Objects in the Resources Panel on the right. As soon as you hit Create Object, a new object is created for you and is brought to focus in the workspace. Similarly to the Sprite Editor, the Object Editor shows you the current object’s properties. Let’s rename this object to objBtnStart—short for object-Button-Start. We will use this as our Start button. You will notice that there is no sprite selected for this object. Without selecting a sprite for an object, that object will not be visible in the game (even when it is marked visible). It is also worth mentioning that an object without a sprite that is marked visible can have visual representations drawn to screen via the Draw and Draw GUI events.
Let’s give players something to see and click on; create a new sprite by clicking the plus button right above where it says No Sprite in the Object Editor. This instantly creates a sprite for you to edit. Like we did with the background, let’s change the name and size of the button sprite. We will call this sprite sprBtnStart and change the canvas width and height to 128 pixels and 64 pixels, respectively. For the time being, let’s just fill the image with a solid color of red and key in start using the text tool available in the Image Editor.
Once you are done editing, close the Image Editor and open the Room. From the Resources Panel drag and drop the newly created objBtnStart into the room (make sure you have the instances layer selected in the Room Editor). Let’s quickly do the same and create a new sprite called sprBtnQuit for the Quit button and add it to a new object called objBtnQuit . Once this is done, let’s add an instance of this object into the room.
Tip
At times, you will end up having to make many copies of both sprites and objects; to make your life a lot easier, you can duplicate almost everything in the Resources Panel by just right-clicking on the item you want and hitting Duplicate. Although if you see yourself creating too many duplicates, maybe it is a sign that parents, variables, or instance creation code should be used. Having a clear hierarchy will help manage and maintain your projects better as they grow bigger.
Our non-functional buttons in the running game
Working With Events
Games, as you know, are perpetually running applications—they are constantly doing something in the background, even if your players are not doing anything. Your game is constantly updating even when there is no user input; it could be updating physics, animating sprites, updating objects and their properties, drawing objects and their sprites to the screen, playing audio, dealing with user input from many devices, and more. With each update and when new information is processed, GMS2 sends out messages to anyone who wants to listen about these changes and updates. These happenings that GMS2 encounters are called events. For example, when the user presses a key on the keyboard, GMS2 finds out and tells anyone who is listening that a key press event has occurred. Similarly, when the player clicks with their mouse, a mouse click event for that specific mouse button is fired.
All objects can listen for events, some of which are specific to that object and its instance and some events that are global in nature. To clarify, an event like Create is fired when an instance of that object is created for the first time in a room; similarly, the Destroy event is called when the instance of that object is destroyed. Whereas, events like Room Start/End and Game Start/End are not particularly associated with the instance of any object, but all objects can listen for these events and get notified by the system when they occur.

Adding the Left Mouse Released Event to our button
Tip
show_debug_message(...) is a built-in debug function that we will use extensively in the chapters to come. It is a handy way to output data to the console when debugging.

Running the game and clicking the button
Now that we have the Quit button working, lets implement the code needed to quit the game. To quit a running game, GMS2 has a handy function: game_end() . Calling game_end() destroys all objects and rooms and exits the application. Since some platforms like iOS, Windows UWP, PS4, the Switch, and the browser targets handle how applications are closed, calling the game_end() function can cause an error and your game to crash. Hence, we need to check what platform we are on and then call this function.
Code for the Create Event in objBtnQuit
Code for the Create Event in objBtnStart
The os_type variable holds a value corresponding to the current platform on which the game is running. We check if we are on a valid platform that supports quitting the game and then show only the right button.
Now that we have a working Quit button, let’s do the same with our New Game button. The New Game button takes the player to a new session of out space strike game. Before we add any code to the New Game button, we need to create a new room. Let’s go ahead and create a new room by right-clicking on the Rooms List in the Resources Panel. In the Resources Panel, right-click on the newly created room and rename it to rmGame.
The room_goto() function takes one parameter, which is the number of the room or the name of the room as it appears in the Resources Panel. Run the game to see the Start button in action. Since we have no content in the new room, you will be greeted by an empty black room. In the next section, we look at adding more content and functionality into our game.
To view up to this point in the project, please open the file gms2_ch03_01.yyz.
Creating the Game
Since our goal is learning the interface, we won’t dwell too much on making the art but, rather, will import existing artwork. All the assets used in our game can be found in the assets folder along with the projects for Chapter 1.
Our first job is to create our player avatar. Let’s do so by creating a sprite and importing our player ship into GamerMaker Studio. To create a new sprite, you need to right-click on the sprites section in the Resources Panel, and then click on Create Sprite. Once the sprite has been created, it will come into focus in our workspace. Click the Import button on the Sprite Editor to import our player’s avatar spacecraft. Finally, rename the sprite to sprPlayer.
Once the right image has been imported into the sprite, we move on to create an object for the player’s ship. Create a new object and rename it to objPlayer and assign our newly created sprite for it (sprPlayer).
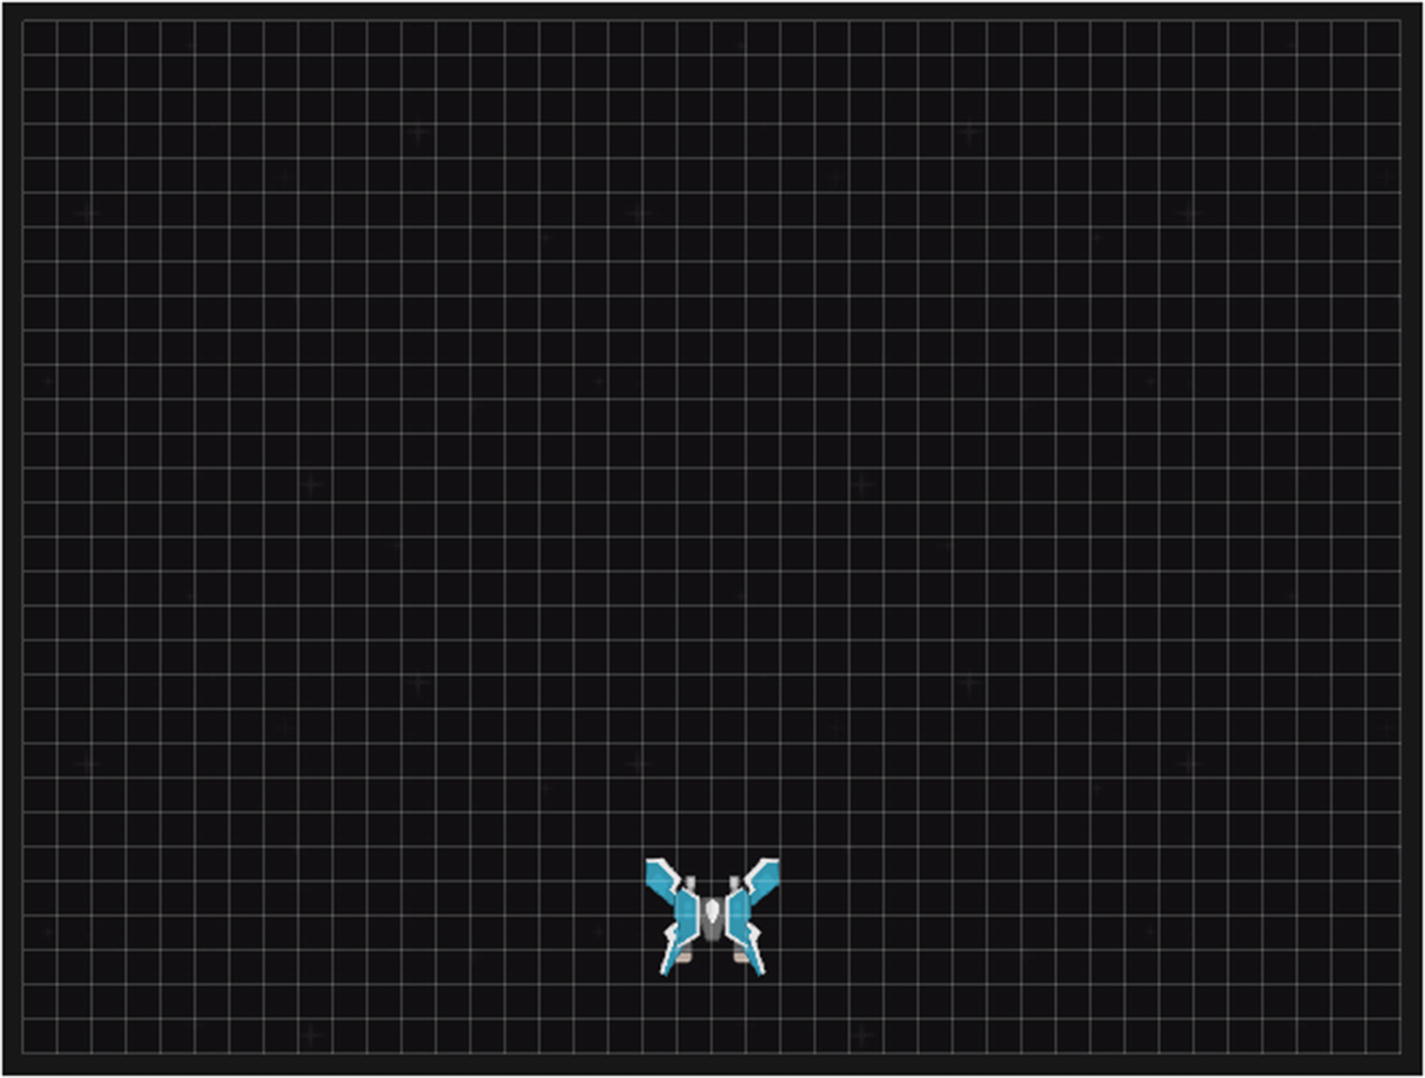
The player’s ship in the new room
Our next step is to make the player ship move according to the player’s input. For this game, we will only be using the mouse for both movement and firing bullets. We will also restrict the player’s movement to the horizontal (x) axis.
Run the game now and you will see that as you move the mouse, the ship also moves along the x-axis. Now that we have the ship moving, let’s add some firepower!
Firing Bullets
Firing and bullets are two different problems that we need to solve. Firing involves processing input from the player, firing (creating an instance of) a bullet and then waiting a fixed amount of time before firing again, if required. Bullets themselves are objects that, once created, will travel in a direction with a set speed. When they hit enemy players, they affect the enemy in some way and get destroyed.
Objects have a bunch of very useful properties that we can take advantage of—one of them being the vertical speed of that object. Once the vertical speed of that object has been set, it will start and continue to move vertically with each frame. Since we want this bullet to go upward, we have set its vertical speed to -20. Now that the bullet has been created, it is a matter of firing it.
Our bullets need to be fired when the player clicks the mouse left button and when the mouse button is held down. If the mouse button is held down, it needs to fire at a fixed interval. To achieve this, let’s add two events: one for Create and the next for Global Left Down.
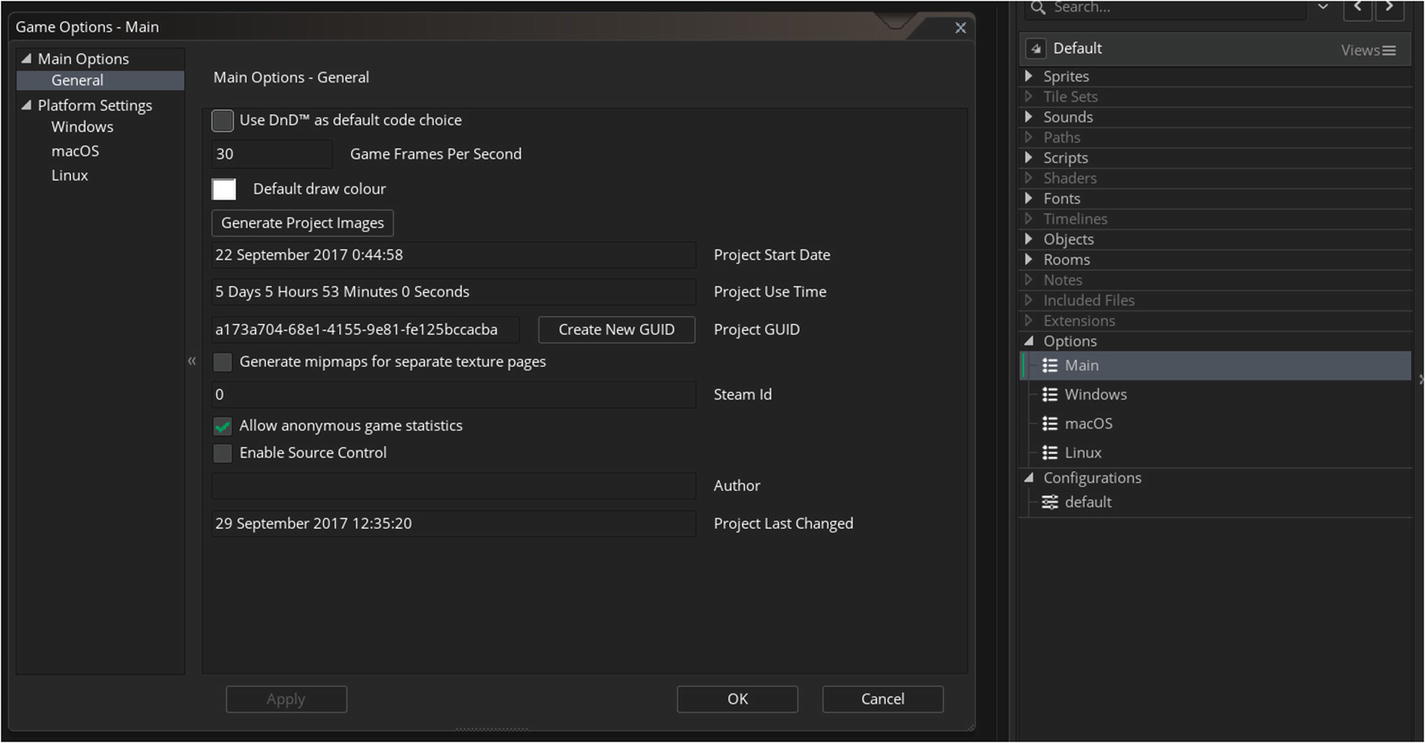
Main game options dialog, where our frame rate is currently set to 30 fps
When using instance_create_depth() , it takes an x- and y-parameter, which determine where the new instance of the object (obj) should be placed, and a depth at which the object should be created. Since all instances of objects must be created inside a layer, GMS creates and manages a layer if you use this function. This is an internally managed layer, and you have no access to this. We use the second function to explicitly create our laser instances in our primary Instances layer. The layer_id is the name of the layer we want this instance to be created in, passed in as a string. So, when the user clicks anywhere on the screen using the left mouse button, we create two instances of our objLaserBlue object at either side of the player where our two cannons are located. Once these instances are created, because of the vspeed we have set, they move upward with each passing frame.
Adding Sound to Your Shots

Creating a sound resource, loading an audio file, and previewing it
Hiding the Cursor
Before we move on to creating enemies we can shoot at, let’s do a bit of cleaning up. Right now, when you move the mouse cursor around, you can see that your ship follows it in the x-axis. The problem is your mouse cursor can be a distraction. Let’s hide the mouse cursor when we are playing the game.
Like the Create event in objects, the room also has a Create event. This event is called once when each room is created. As good practice and for ease of management, we will create a script resource and then call this script resource from our Room’s Create event.
window_set_cursor() takes in one parameter, which is what cursor to use. We pass in a system constant, cr_none, which tells GMS that we are not using a cursor. Now that we have the code in place, let’s execute this script when the room gets created.
Click the Creation Code button to see the code that gets executed when this room is created
We will call scrGameCreate() just like any other function from within the room’s Create event.
Now when we run the game and click on the Start button, the mouse cursor is hidden from us in the new room. At the onset, it might seem a bit too much to do these two extra steps, but in the longer run having all your scripts in one place makes for easy editing and management.
Going to Space

Setting our newly created sprite as the background for the room
Open rmGame and select the background layer-I have renamed mine to backgroud_space. As we did before, click on the button labeled No Sprite and select our newly created sprBg as the sprite to use. Since our background image is smaller than the room size, let’s set it so that the image can be tiled vertically and horizontally. To do this, check the two check boxes labeled Horizontal Tile and Vertical Tile. Now that we have them tiled, let’s animate them! GMS lets you set a horizontal and vertical speed for its background layers. Let’s change Vertical Speed to 5 so that the background moves from top to bottom. Run the game now and you will see that we are now flying through space. Feel free to play around with the horizontal and vertical speed components to see what happens.
Right below where we hid the mouse cursor, we use the layer_get_id() function to get the id for our background layer, here called Background_space . Once we have the id for the layer, we use that id to get the id associated with the background for the layer. We can then use one of the many layer_background_* functions to manipulate the background. Here we need to randomly change the index of the background. Our sprite contains four frames, and these subimages are indexed from 0 to 3, which makes four images. By default, the first image in the sprite is used. We use the irandom() function to generate a number between 0 and 3 (inclusive) and then use the layer_background_index() function to set the index of the background. Now, every time you start the game, it will have a different background.
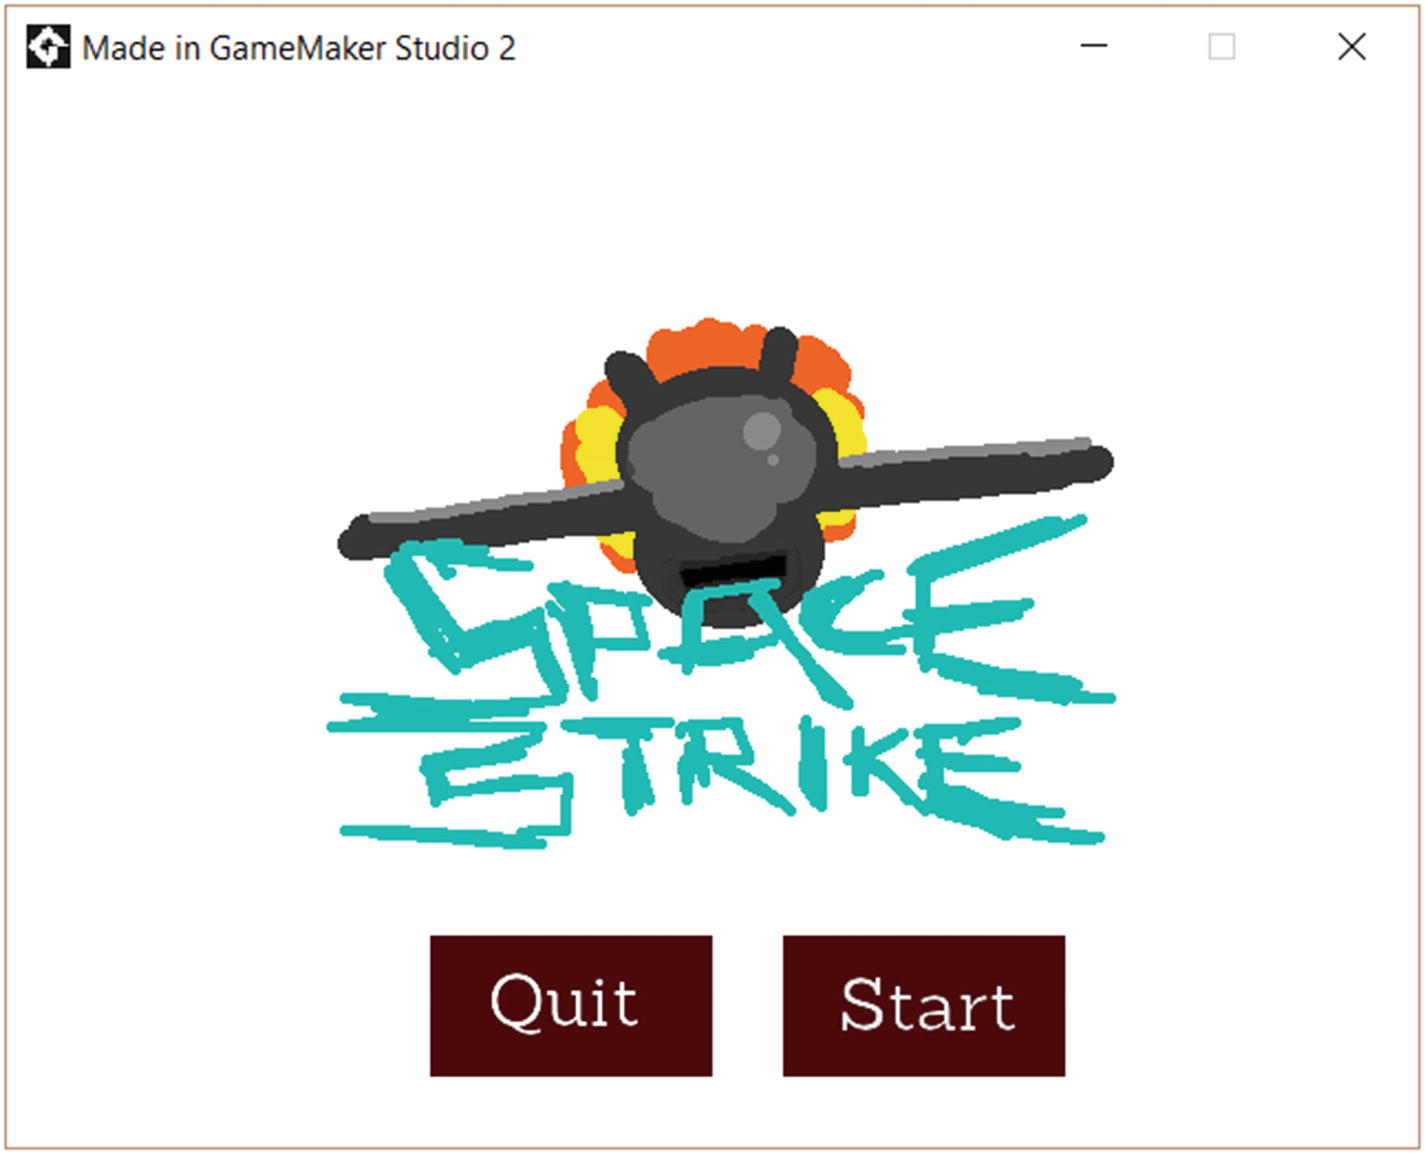
Upgrading the Main Menu

Our new main menu and buttons on the left. The player on a random space bg moving and shooting. To view up to this point in the project, please open the file gms2_ch03_02.yyz.
What this essentially does is when the player moves the mouse cursor over an instance of the button object, we swap the current subimage with the second one (here with the index 0). When the mouse leaves, then we swap back to the initial frame of the image. Repeat the same with objBtnQuit, and we are good to go.
To view up to this point in the project, please open the file gms2_ch03_02.yyz.
Handling Enemies
Now that we can shoot, let’s add some targets to shoot at. What we will do in this section is to add enemy sprites and objects, make our lasers collide with them, destroy the enemy sprites and replace them with an explosion, add sounds for those explosions, update the player’s score for destroying each enemy, and finally have a mechanism in place to spawn multiple enemies automatically.
Let’s jump right in and create a new sprite from the Resources Panel; once the sprite is created rename it to sprEnemy01 and use the Import button to import an image from the assets folder—enemies/ spaceShips_003.png. Once the image is in place, add a new object to our resources. Once the object is created, rename it to objEnemy01 and associate our sprite to the object.

The enemy flying toward the bottom of the screen on the left and the enemy in the room on the right
Shooting the Enemy
We now have an enemy on the screen and we can shoot lasers. Putting them together, we now must add functionality to the enemy so that it can handle collisions with our lasers. Whenever the enemy collides with the laser we have fired, it should destroy itself, destroy the laser object that it was hit with, update the score, play a sound, and then play an explosion animation.
We will append our playerScore variable to the end of the script. To create a variable in the global scope, you use the word global followed by the dot operator and then a variable name you would want to use—in our case, playerScore. Initially, when the room starts, we set the playerScore global variable to 0. Every time an enemy gets hit with our lasers, we will add the enemy’s value to our score.
In the first statement, we increment the global variable global.playerScore with the points we get for shooting this ship. In the second and third statements, we destroy our ship along with the other object that collided with us—in this case, the built-in variable other contains the laser that hit the enemy ship.
Run the game and shoot the enemy to see both your bullet and the enemy disappear. This looks pretty good, but we should juice it up with some audio and an explosion animation. Let’s load a sound file for our explosion and create a new sprite for our animation. The sound folder inside assets contains a file called snd_boom_0.wav . Create a new sound resource and load this sound into it; once the sound is loaded, rename the newly created sound resource to sndEnemyHit. Create a new sprite for our explosion animation, rename this to sprBoom, and import all the images inside the effects folder in assets. Once the import is complete, set the speed of the animation to 30 frames per second. Create a new object resource called objBoom for our explosion object and add sprBoom as its sprite.
When the enemy is hit by our laser, we use the instance_create_layer() function to add the objBoom object at the current x- and y-position of the enemy ship. We go a bit beyond this as well. If we examine the instance_create_layer() or instance_create_depth() function, we can see that the function returns the id of the newly created object. This means that as soon as you create an object, you have access to it to do what you please.
When a new instance of objBoom is created we save its id to a local variable called boom. Through boom, we change the vertical speed of the newly created explosion animation. We do this to avoid a small visual discrepancy; since we are simulating moving forward and the enemy is moving backward, a sudden static animation on the screen stands out from the rest. To avoid this, we set the explosions vspeed.
Spawning Enemies
We have one enemy on the screen right now. It would be tempting to keep placing more and more enemies in the room, but at some point, it becomes a difficult exercise—the amount of variation that you can create reduces drastically after placing a small number on screen. To avoid this, we will create a factory that produces enemies constantly at a set interval.
Let’s start by creating an object from the Resource Panel and renaming it to objEnemySpawner . In the Object Editor, be sure to uncheck the box for visible. This will make sure that our spawner object itself will not be visible. You can go ahead and choose or make a sprite if you want so that you have a visual cue in the Game Editor. It is a good practice to have custom sprites for your invisible objects, as it becomes easier to find them in rooms and edit them. By default, an object without a sprite is represented by a question mark symbol inside a grey circle.

Setting up the spawner
Run the game to shoot some enemies and to see them spawn every 1.5 seconds.
Displaying Our Score
Every time we shoot an enemy, our global.playerScore global variable gets updated. All that is left to do is to show it to the player. To do this we will create an object and, using its draw event, draw the score onto the screen. Before we go ahead, install the two fonts provided in the assets UI/fonts folder. We will use one of these fonts to draw the text on the screen. But before we can use these fonts, make sure you install them on your computer. On Windows or a Mac, you can open the font file by double-clicking on them and clicking the Install button that is displayed in the window that opens.
To use the font we have installed, we need to create a font resource. Right-click on the Fonts section in the Resources Panel and select Create Font. In the Font Editor that opens in the workspace, rename the font to fntHUD. Then from the dropdown below, select one of the fonts we just installed-KenVector Future Thin. Change the size of the font to 14, and we are done. Now that the font resource is in place, let’s draw some text.
Before we draw the score, we use the formatting functions to set the font to fntHUD. We then set the vertical and horizontal alignment of the text, and finally we draw the text at the x- and y-location of our object itself. This means the text will be drawn where we place this object. The final parameter in draw_text() is the actual string to be drawn.

Shooting and scoring
Our Enemies Fight Back
In this section we will see the enemy fighting back, giving us a taste of their red lasers. We will also deal collision detection for both the lasers and the enemy ships. If we get hit with their lasers or bump into an enemy ship, we explode and it is game over. Our ship will explode like the enemy ships, and once that is done, we’ll move to the next room showing us a game over screen as well as our score. If our score is the same as or more than the high score for the session, then we tell the player that we have a high score and save it too.
In the Alarm 1 event, we create an instance of the objLaserRed object at the enemy ship’s x- and y-location using instance_create_layer(). We play the same laser firing sound we used for the player and then reset the alarm to fireSpeed. Run the game to see how your enemies now fight back.
Just like we did with the enemy object when it collided with our blue laser, we create an instance of the boom object, which has the explosion sound and animation. Then we destroy the laser we got shot with using instance_destroy() and passing the other (in this case the objLaserRed object). And then we destroy the ship itself.
If you run the game now, you will see that you are getting shot and destroyed, but the game keeps on going. Once your ship is destroyed, after the explosion is done, we need to take the user to a game over screen and present our score. To do this, let’s make a new room.
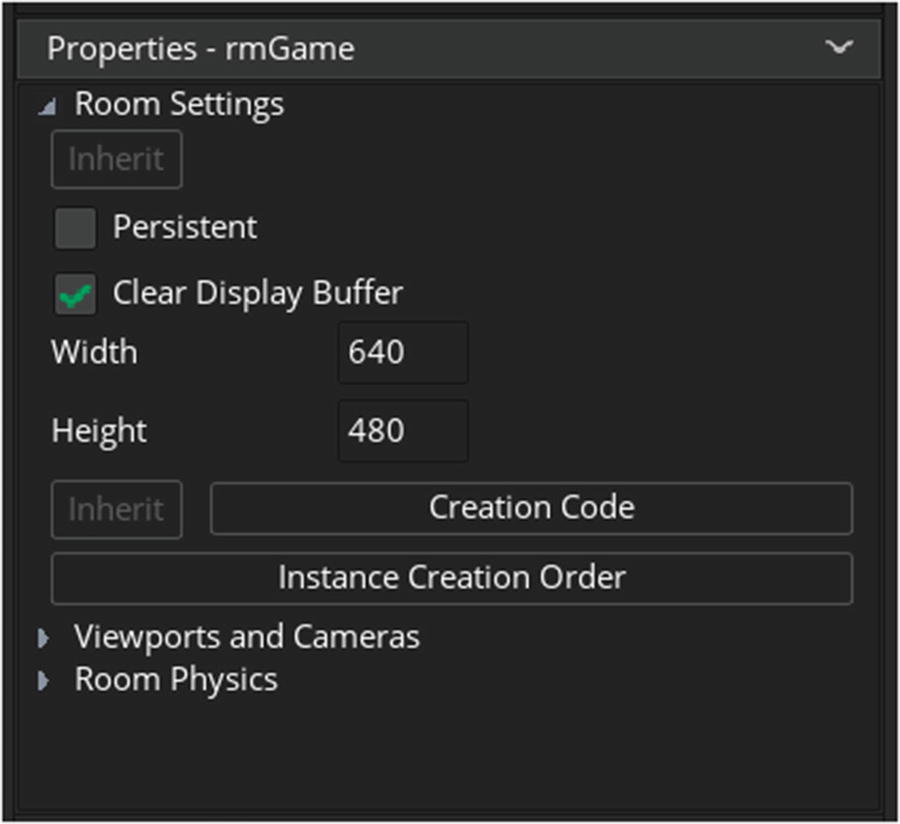
Create a new room and call it rmGameOver . Create a new sprite in the Resources Panel and load up the background image (bgGameOver.png) that we are going to use in this room from assets/UI folder. Once the image is loaded, set the sprite as the background for the room. If our newly created room is bigger than the other rooms, change the width and height of the room to 640 and 480 pixels, respectively, in the Properties Panel on the left in the Room Editor.
Now that we have a game over screen, let’s tell GMS to show it once our ship is destroyed. How can we achieve this? We want the game over screen to show up once our ship is destroyed and the explosion is done playing. We are using objBoom for the sound and explosion animation for both the player and enemy ships. If we make any changes to objBoom, they will affect not just us but also the enemies as well. Since we don’t want the game over screen to be shown when we shoot down enemies, let’s duplicate the objBoom and make a new object specially for the player.
In the Step event, we check if the animation has finished playing, and once it is done, we remove the instance of the explosion from the room using the instance_destroy() function. Once the instance is removed, we set our cursor to an arrow and then use the room_goto() function to go to the rmGameOver room.
Everything else remains the same, except for the last parameter passed to the instance_create function . Instead of objBoom, we pass in the newly created objBoomPlayer object. Run the game and see what happens when you get shot. You will see that once we get shot, the sound and the explosion animation are played and our new game over room is shown.
The code is very similar to our collision code with the laser, the only difference here is that instead of just destroying the other object with the instance_destroy() function, we add an extra step of creating an instance of the objBoom for the enemy ship. We do that using the with statement . As seen in the last chapter, the with statement is a special statement used to switch the scope of the code executed within its braces to be in the scope of the object passed to it. Here we switch the scope from the player object’s instance to the other instance (being an instance of objEnemy01). Once in the other instance’s scope, we create a new instance of objBoom at the x- and y-coordinates of the enemy. We also set the objBoom instance’s vspeed to the enemy ships vspeed. Once this is done, we destroy the enemy instance by calling the instance_destroy() function from within the scope of the with statement.
Our game over screen is functional; it tells people that the game is over. But, it would be better if we show what their score is, if they beat their high scores, and a way to get back to the main menu where they can either choose to play again or exit the game.
Let’s try to get that score and high score message on the screen. To do this, we need a way to store our high score. At the start of the session the high score is reset to 0. But with each session, the high score is set to the highest score the player has achieved. We need to declare a global variable to store this high score value.
Our first impulse is to add a global variable in the menu, but let’s create a new room to store and initialize all global variables that we need to create and initialize once across the game. This gives you access to one point where all initialization for the game can happen, and this will not change even if a menu might. Let’s add a new room called rmInit in the Rooms section in the Resources Panel. Once this is done, drag the newly created rmRoom item to the top of the list so that rmInit is the first room in the Rooms section. The first room in the Rooms section is the first room to be run by GMS. Let’s resize the room and add a script for the Create event for this room.
In the first line, we add the global variable called global.highScore and set its value to 0. In the second line, we tell GMS to go to the rmMenu room.
Tip
To quickly open rooms, scripts, sprites, or objects from code, click on the item’s name with the middle mouse button (wheel button) or select the item and then hit the F1 key.
Since we are keeping the object in the middle of the screen, we will change the horizontal alignment to fa_center from fa_left. We then check if the player’s current score is higher than or equal to the high score for this session. If the player’s score is higher, then we set our high score to the player’s current score and show a message whicthath tells the player that they have the new high score. If not, we just display the player’s current score.
To take us back to the main menu, let’s add a button. Let’s duplicate and existing button so that we can reuse all the events for the button. Once you duplicate a button, rename it to objBtnMenu . Open the object in the Object editor. Near the preview of the sprite, click on the New Sprite button. Once the Sprite Editor opens, rename the new sprite to sprBtnMenu and import two images from the assets/UI folder—btnMenu.png and btnMenu_over.png.
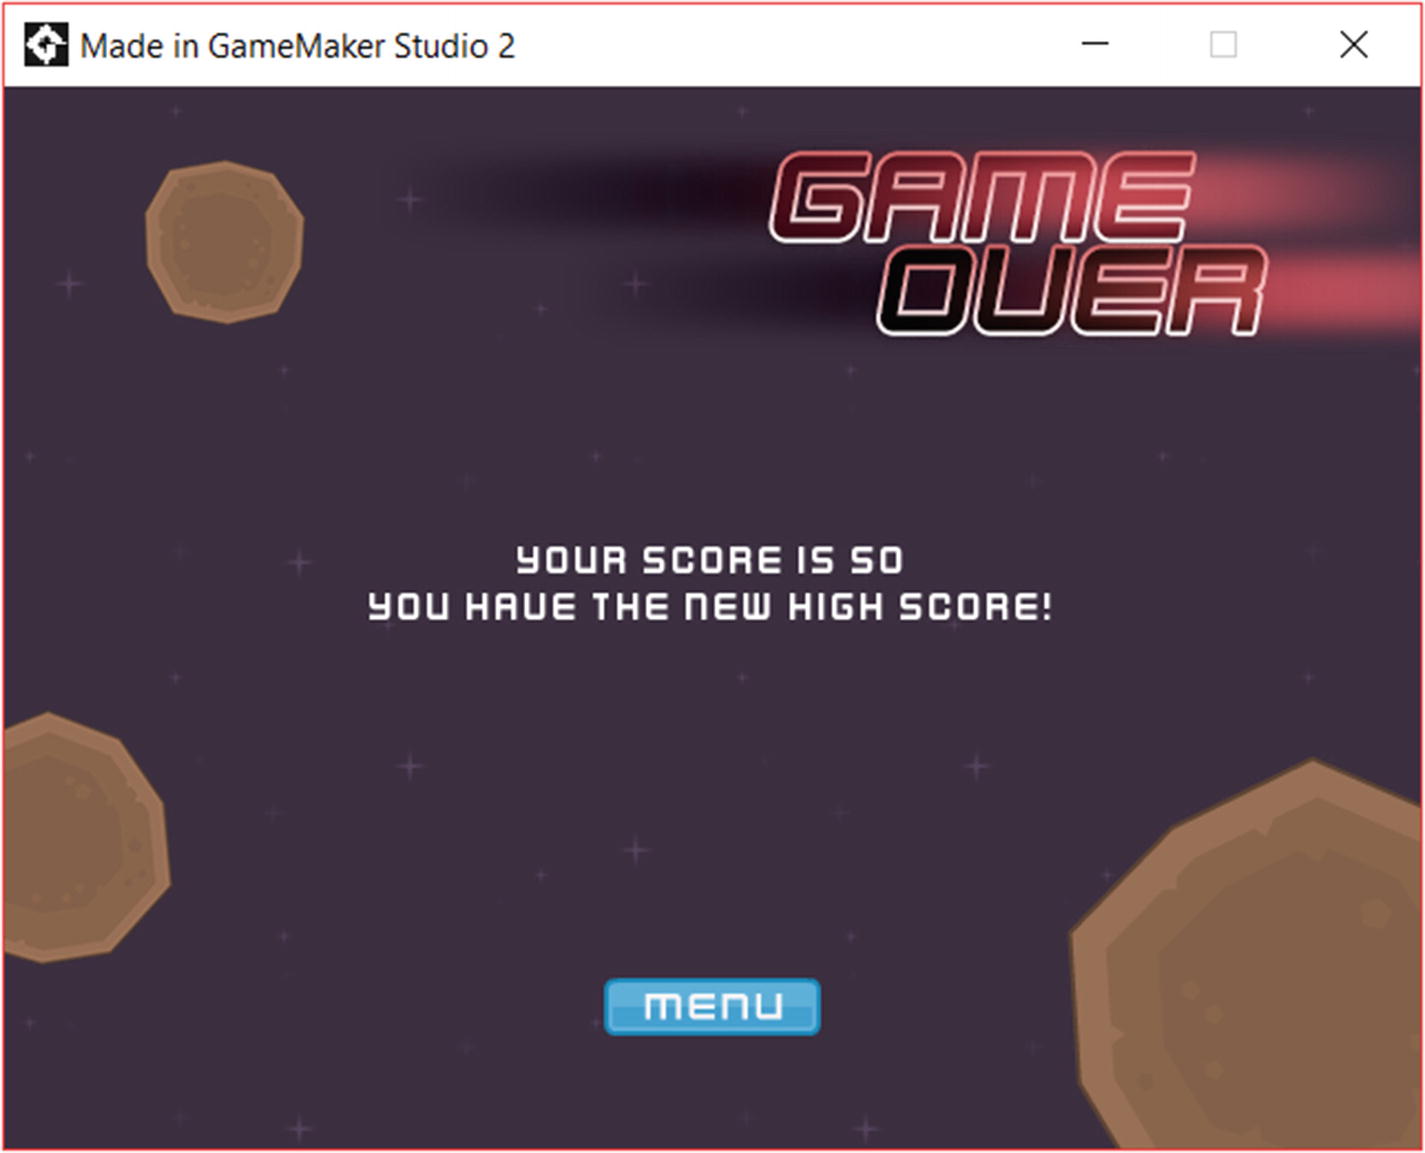
Game Over
Adding Music

Loading our background score
Click the button next to the name of the resource to load our music file. Navigate to the assets/sound folder and import the mp3 file titled Distant_Star.mp3. Once the file is loaded, we will edit some attributes of the new sound resource we have just created. Right below where we edited the name of the resource, you will see a section for the sound’s attributes. These decide how the sound resource should be treated when we export the game. We will set this to Compressed and Streamed, as our resource is going to be a large mp3 file, and we do not want to keep the file in memory, but rather decompress it and play it back in real time. Smaller resources like our explosion and laser firing sounds were kept as uncompressed, as they are smaller and do not take too much memory.
The only change here is the piece of code that tells GMS to play the audio. We use the audio_play_sound() function and pass it the sound resource that we want to play—in our case, the new sound resource we created with the mp3 file. The second parameter is the priority—we pass it to 100, telling GMS that this sound resource is off high priority. The third parameter tells GMS that this sound should be looped once it finishes playing, and that is it, we have finished our game!
Run the game to see it all in action. To view up to this point in the project, please open the file gms2_ch03_05.yyz.
Challenges
Make the game juicier by adding sounds when you hover over buttons. In this challenge, you are required to bring our dull menus to life by adding sound effects to the button interactions.
Add new enemy types that behave differently. In this challenge, you are required to add more enemy objects that behave differently from the enemy we currently have; the different enemies should have a different sprite as well as different behavior.
Add other elements like meteorites that interfere with both player and enemies alike. In this challenge, you are required to add elements in the game with which you can interact, like meteorites and satellites; players as well as enemies will need to avoid them to stay alive.