
Chapter 4. Building the Sample App
Having learned about Redux core concepts and how to connect our UI to the store, it is time to build an actual application to deepen our knowledge and understanding of the previous chapters. Follow along as we walk you through the steps required to build the example app.
Note: You can find the complete source code for the sample application at https://github.com/arturmuller/developing-a-redux-edge.
Application specification
Our application is going to be a small notes app, and our minimum viable product will — as the name suggests — only contain the bare minimum of functionality for now.
Actions
In order to create user interaction for our app, we need some actions that we can trigger in order to update our application state.
In our MVP these actions will be:
- Adding a new, empty note to the store.
- Updating an existing note in the store with new content.
- Removing a note from the store.
- Displaying a note in the details view.
- Clearing the detail view.
Views
The last two actions have already hinted at the fact that we also need some views for our application. But you may have guessed that too, because what good is an application if there is no UI to interact with it? Our application will use a simple master-detail layout:
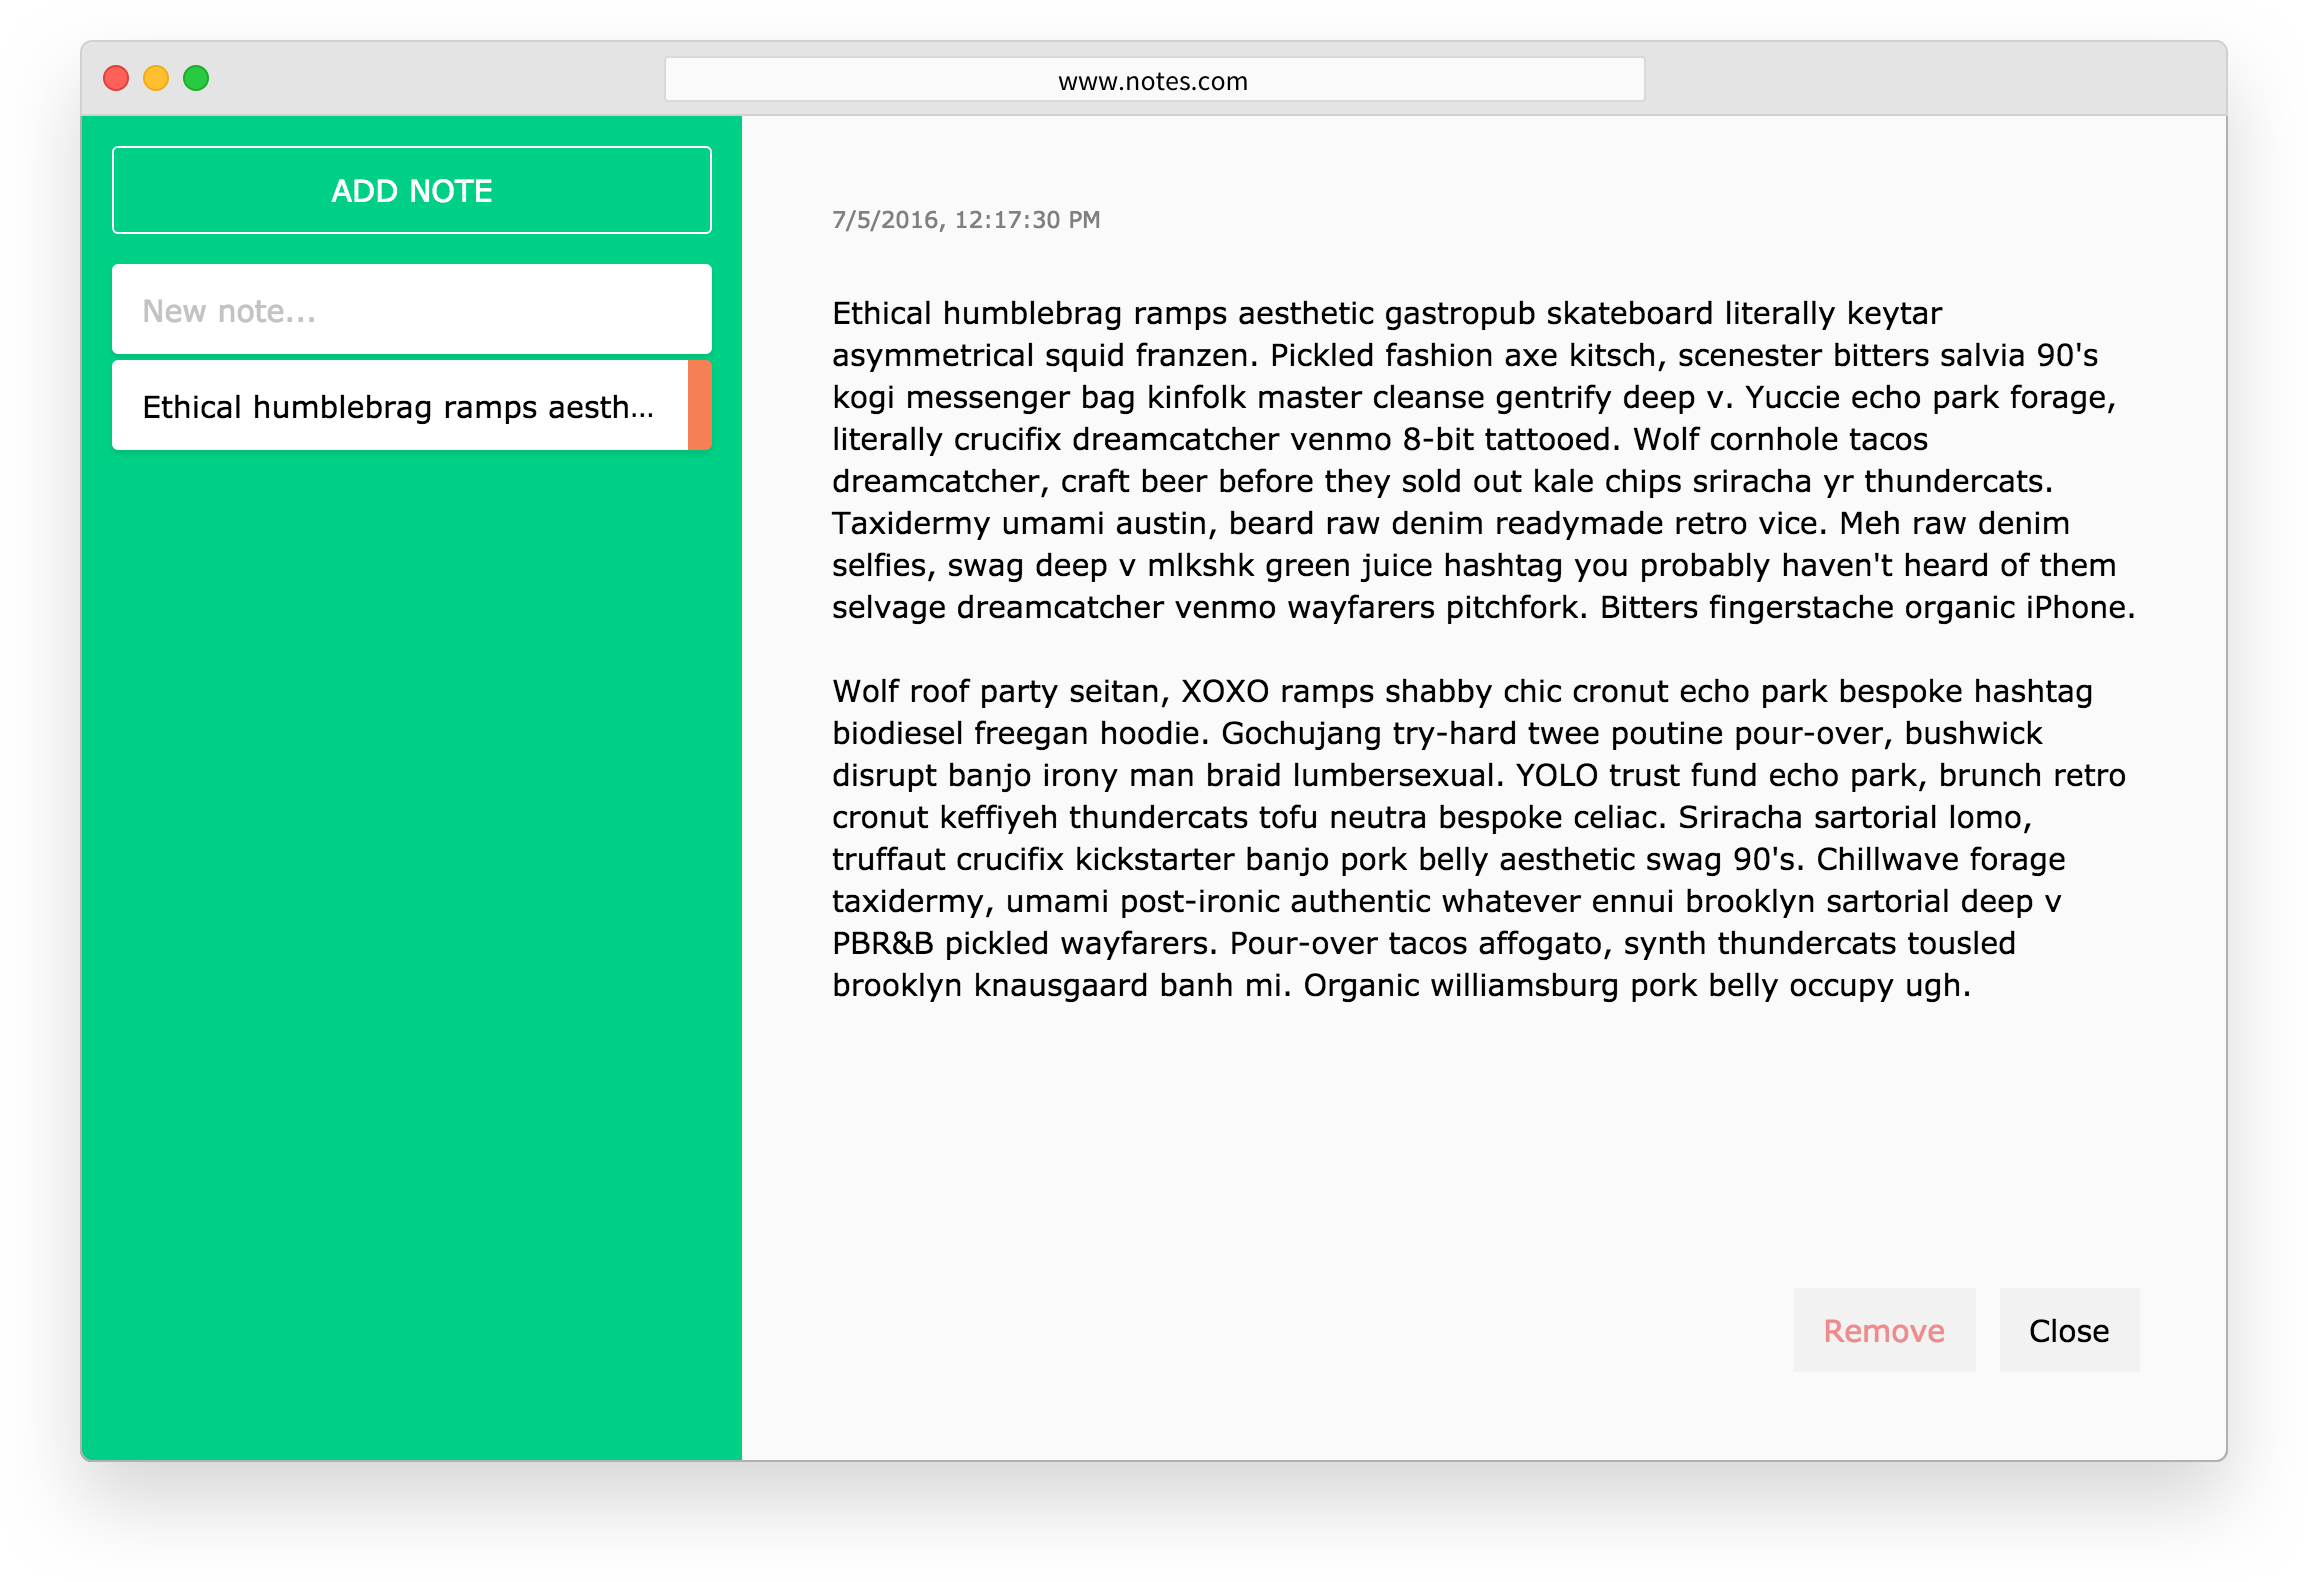
Notes list
The notes list is located on the left side of the screen. It shows a list of all notes that are residing in our store. In addition to that it also contains an “Add note” button, which allows you to create new notes.
Note detail
The detail view shows the content of a note and also doubles as an editor where you can modify the note’s contents. The “Remove” and “Close” buttons do exactly what it says on the tin. The former removes the note from our store and the latter clears the note from being displayed in the detail view.
Storage
For now we will store all of our state in memory on the client. Later on we will be looking into storing our notes on a remote server, but for the MVP we will keep things simple.
Setting up
Now that we have clarified our brief, let’s also go over our stack and methodology.
Methodology
We will be using Test Driven Development (TDD) to make sure our application is accurate, well modularized, and maintainable.
TDD is a popular software development methodology in which you write tests before you implement features. This has several benefits:
- Writing tests at the start essentially makes you create a specification of your desired features before you actually write the implementation. Once you actually write your application code, you will have a clear idea of what you want to build, which makes building it that much faster and fun.
- Because it is easier to write several small tests, instead of a single complex one, tests steer you toward small, focused modules. This prevents tight coupling, and smaller, composable modules are also easier to reason about.
- Tests serve as a living documentation of your application. This is a great benefit for maintainability. Once you start refactoring parts of your app, it is great to have a reference point with what exactly the intended purpose is of the given module, instead of having to guess purely based on the implementation.
Writing tests in Redux is really easy. Given how most of the time you work with pure functions, assertions become simple comparisons between actual and expected outputs of the tested module. It really doesn’t get much simpler than that.
Stack
In addition to Redux, we will use several other libraries to build our app.
Babel
It is entirely possible to write Redux apps in ES3/5 JavaScript, but ES6 (aka ES2015) introduces several handy additions to the language that make combining it with Redux particularly useful.
Babel is a JavaScript transpiler, which means it ‘translates’ our future JavaScript code to something any browser can understand.
For our application code, we will use Babel through a webpack’s babel-loader (see more below), and for our tests, we will use babel-register to transpile our code on the fly.
Babel allows for extensive configuration, but we are sticking to the basics: we want to use any feature that is a part of the ES2015 standard, React’s JSX syntax, and the experimental object-spread syntax. This setup can be found inside the .babelrc file in the root of our app directory.
Learn more about Babel here: https://babeljs.io/.
Webpack
Webpack will be used to bundle our entire codebase into a single app.js file, which can then be easily referenced from a <script> tag inside our static HTML index file.
Webpack is an incredibly powerful tool, but it can be easy to get lost in the options it offers. For the purposes of this book, the setup has been kept to a minimum:
constpath=require('path');// The `entry` option specifies where webpack should start crawling// our dependency graphconstentry=['./source/index'];// The `output` option specifies where the final bundled js file will be// placed, and how it will be called.constoutput={path:path.resolve(__dirname,'public/js'),filename:'app.js',};// The `resolve` option let's webpack know which file extensions should it// be looking at. Note that the empty string has to be included, otherwise// referencing external libraries (Eg: `import React form 'react'`) would// not work.constresolve={extensions:['','.js','.jsx'],};// webpack has a concept of loaders, which allow you to preprocess// files before webpack bundles them. By default, webpack only works with// ES5, so we will use Babel to transpile our code before letting webpack// do its thing.constscriptLoader={loader:'babel',include:path.resolve(__dirname,'source'),test:/.jsx$|.js$/,};// The `devtool` option helps us debug our code by enabling various// ways in which we can map the original source code to the bundled file.// 'eval' is the simplest and fastest option which, in case of an error,// will simply point you towards the module in which the error occurred.constdevtool='eval';// Finally, we export the entire config so that webpack can actually// use it!module.exports={entry,output,resolve,module:{loaders:[scriptLoader]},devtool,};
Find out more about Webpack here: https://webpack.github.io/.
Tape
Tape is a versatile, simple, and transparent testing library. It doesn’t rely on magical globals like describe or it, but it comes with its own assertions.
Just like any other library in your codebase, it is used by simply importing it. Absolutely zero hassle here. Tape outputs the tried and true TAP (Test Anything Protocol), which — even on its own — is very human-readable. If you want to sweeten to deal though, there is a whole legion of tools that consume TAP output and transform it in some way. Check out faucet or tap-pessimist.
An example tape test looks like so:
// getFoo.test.jsimporttestfrom'tape';importgetFoofrom'./getFoo';test('getFoo',({equal,end})=>{constactual=getFoo();constexpected="foo";equal(actual,expected);end();});
To run the test, fire off the following in your terminal (assuming you have tape and babel-register installed):
$ tape --require babel-register getFoo.test.js
You will get the following output:
TAP version 13
# getFoo
ok 1 should be equivalent

1..1
# tests 1
# pass  1

# ok
If getFoo() incorrectly returns "bar" instead of "foo", you will get the following error report:
TAP version 13
# getFoo
not ok 1 should be equal
  ---
    operator: equal
    expected: 'foo'
    actual:   'bar'
  ...

1..1
# tests 1
# pass  0
# fail  1
Find out more about Tape here: https://github.com/substack/tape.
React
React and Redux are common partners. The declarative nature of React fits perfectly to Redux’s state model, so it’s no wonder that people love using these two libraries together. We will be using the official react-redux library, which provides bindings between the two libraries.
Find out more about React here: https://facebook.github.io/react/.
Express
Express is a minimalist framework for Node.js. Even though we are building a single page app, it is still a good idea to have a small server actually running in the background to serve the static HTML file and, eventually, our API.
In this chapter, the Express server will perform the following tasks:
- Serve any file from the
publicdirectory (this is where our app.js file will live). - For any other GET request, just serve the index.html file.
- Listen on port 3000.
constpath=require('path');constexpress=require('express');constapp=express();app.use(express.static('public'));app.get('*',(req,res)=>{res.sendFile(path.resolve(__dirname,'public/index.html'));});app.listen(3000,()=>{console.log('`Developing a Redux Edge` notes app listening on port 3000!');});
Find out more about Express here: http://expressjs.com/.
Getting started
Now let’s move to the next steps.
Implementation
We will now implement each part of our application step-by-step, writing tests along the way. All of this code can be found in the book’s Github repository.
Action creators
In our spec we defined which actions we would need for our application to have an acceptable level of interactivity. Let’s implement action creators for these actions now.
Adding
The ability to add a new note is our most essential feature, so let’s create the action for it first. As we are following the TDD methodology, we will first write up a test for our action creator:
importtestfrom'tape';import*asactionsfrom'./actions';test('action creator | addNote :: Create correct action',({deepEqual,end})=>{constactualAction=actions.addNote('Hi','id-123',1);constexpectedAction={type:'app/addNote',payload:{id:'id-123',content:'Hi',timestamp:1,},};deepEqual(actualAction,expectedAction);end();});
We want our action to have the proper id, content, and timestamp payload keys and the correct app/addNote type. If we run this right now it will obviously fail, as we haven’t created our action yet. Luckily the action creator is straight forward:
import{v4}from'uuid';exportconstaddNote=(content='',id=v4(),timestamp=Date.now())=>({type:'app/addNote',payload:{id,content,timestamp,},});
Now our tests pass just fine. One down, four to go!
Updating
Since we can create notes now, we should also be able to update them with new content. Here is our test code:
test('action creator | updateNote :: Create correct action',({deepEqual,end})=>{constactualAction=actions.updateNote('Hello','id-123',2);constexpectedAction={type:'app/updateNote',payload:{id:'id-123',content:'Hello',timestamp:2,},};deepEqual(actualAction,expectedAction);end();});
You will notice that this code is identical to our addNote test code, except for the action type. It is fine for tests to contain duplicate logic. We could now write a generic testing method that tests both actions and allows us to pass in a custom type, but that would severely hinder our refactoring ability later on if we chose to modify one of the actions. Keeping tests isolated, even if they are more verbose and contain duplicated code, helps us to make sure that each of them can be refactored without much trouble.
Since our test is failing, let’s make it pass:
exportconstupdateNote=(content,id,timestamp=Date.now())=>({type:'app/updateNote',payload:{id,content,timestamp,},});
And that’s it! Another action creator done. Now we are able to tell our store that we want to modify an existing note.
Removing
If a note is not needed anymore we should be able to remove it from our store. All that we need for that is a proper type and the id of the note in question:
test('action creator | removeNote :: Create correct action',({deepEqual,end})=>{constactualAction=actions.removeNote('id-123');constexpectedAction={type:'app/removeNote',payload:{id:'id-123',},};deepEqual(actualAction,expectedAction);end();});
The action creator to make this test pass is very simple:
exportconstremoveNote=(id)=>({type:'app/removeNote',payload:{id},});
And with this we have ticked off adding, updating and removing of a note. Now we have two actions left that do not modify a note’s data, but that do modify our application’s UI state.
Opening a note
What good is a notes app if you cannot view your notes? There’s nothing easier than that, so all we need is another action creator:
test('action creator | openNote :: Create correct action',({deepEqual,end})=>{constactualAction=actions.openNote('id-123');constexpectedAction={type:'app/openNote',payload:{id:'id-123',},};deepEqual(actualAction,expectedAction);end();});
Just like earlier in this chapter, you will notice that the code is very similar to the previous test code. You can see two actions with a similar shape, but a different intent. Because of that, our action creator also looks similar, yet the type property differs:
exportconstopenNote=(id)=>({type:'app/openNote',payload:{id},});
This action is going to help show a note when you select one from our list. If we open a note, though, we should also be able to close it.
Closing a note
This is the last action we have to implement for now, and it is the simplest of all:
test('action creator | closeNote :: Create correct action',({deepEqual,end})=>{constactualAction=actions.closeNote();constexpectedAction={type:'app/closeNote',};deepEqual(actualAction,expectedAction);end();});
This does not require any additional information except the correct type. This type is enough to convey the action’s intent, so let’s make the tests pass once more:
exportconstcloseNote=()=>({type:'app/closeNote',});
We now have all of the action creators, so we need to bring some interactivity to our application. If we were to dispatch these actions now, nothing would happen, since we have no reducer set up to handle them. We are going to rectify that now!
Reducers
Without reducers we have no place to store our data and that’s a shame for a data-driven application. We are going to model the application’s state using three distinct reducers: byId, ids, and openNoteId. It might seem unnecessary at first to create a reducer for a tiny part like openNoteId, but it will help keep our reducers small and focused on a single responsibility.
Test setup
All of our reducers will be tested in the same file, which will contain the following imports at the top:
importtestfrom'tape';import*asreducersfrom'./reducers';import*asactionsfrom'./actions';import{getMockState}from'./testUtils';
These will not be repeated throughout the code examples below.
In order to not clutter our tests too much, we are using a tiny getMockState helper. It is a simple object with methods on it, which each return a specific state object to be used as a reducer’s initial state.
// source/store/testUtils.jsexportconstgetMockState={withNoNotes:()=>({byId:{},ids:[],openNoteId:null,}),withOneNote:()=>({byId:{'id-123':{id:'id-123',content:'Hello world',timestamp:1,},},ids:['id-123'],openNoteId:'id-123',}),// Etc... for all state shapes we need for our tests.};
The reason we are using methods to return a new state objects every time — instead of simply having a large static object — is because we want to protect ourselves from making it possible for tests to affect one another. If a test was to accidentally mutate part of the state inside the helper (and the helper was just a plain mutable JS object), it would result in the following tests working with modified data, probably making those tests fail without a good reason — a debugging nightmare! Using a method to return a new state object each time makes sure our tests are truly isolated from one another.
byId reducer
The responsibility of this reducer is to store each created note in an object keyed by its id, so we can easily lookup and modify it. It will have to handle three actions: addNote, updateNote, and removeNote. We will test and implement each action individually.
addNote
When adding a new note, we want the state to contain a new key, which is the note’s id and the note itself as its value:
test('reducer | byId :: Handle "addNote" action',({deepEqual,end})=>{conststate=getMockState.withNoNotes();constactualNextState=reducers.byId(state.byId,actions.addNote('Hello world','id-123',1));constexpectedNextState={'id-123':{id:'id-123',content:'Hello world',timestamp:1,},};deepEqual(actualNextState,expectedNextState);end();});
The test is straight forward: we compare two states and assert that they are equal.
Handling our addNote action now couldn’t be easier, and all we have to do is to add the new note to our state:
import{merge}from'ramda';exportconstbyId=(state={},{type,payload})=>{switch(type){case'app/addNote':returnmerge(state,{[payload.id]:payload});default:returnstate;}};
Note: We are using the ramda library here to perform our state mutations. It is a functional programming library that is immutable by default, meaning it will never modify its arguments, but always return new objects. At the end of this chapter we will show some examples how state updates could be done with pure ES6/7 and give a short explanation why a library is useful.
merge takes two objects and returns the merged result. The passed in objects will be merged left-to-right, so keys from the second object will overwrite keys from the first object. Our test will pass now as we fulfilled the requirements.
updateNote
When a note changes, we want our state to update itself accordingly, replacing the previous version of the note with a new one:
test('reducer | byId :: Handle "updateNote" action',({deepEqual,end})=>{conststate=getMockState.withOneNote();constactualNextState=reducers.byId(state.byId,actions.updateNote('Hi there','id-123',2));constexpectedNextState={'id-123':{id:'id-123',content:'Hi there',timestamp:2,},};deepEqual(actualNextState,expectedNextState);end();});
You may have noticed that our requirements are pretty much the same as for adding a new note: all we need is for our reducer to replace the value of the property specified by payload.id with the new payload. Because of this we can reuse the logic for adding a note and just tell our reducers to handle both actions in the same way:
import{merge}from'ramda';exportconstbyId=(state={},{type,payload})=>{switch(type){case'app/addNote':case'app/updateNote':returnmerge(state,{[payload.id]:payload});default:returnstate;}};
Just one more action and our byId reducer is ready for prime-time!
removeNote
When removing a note we want our reducer to delete the property specified by payload.id from its state:
test('reducer | byId :: Handle "removeNote" action',({deepEqual,end})=>{conststate=getMockState.withOneNote();constactualNextState=reducers.byId(state.byId,actions.removeNote('id-123'));constexpectedNextState={};deepEqual(actualNextState,expectedNextState);end();});
Sadly we cannot reuse the logic from the previous two actions for this, but the solution is still very easy:
import{merge,dissoc}from'ramda';exportconstbyId=(state={},{type,payload})=>{switch(type){case'app/addNote':case'app/updateNote':returnmerge(state,{[payload.id]:payload});case'app/removeNote':returndissoc(payload.id,state);default:returnstate;}};
We can just use ramda’s dissoc function for this: it takes a prop and an object and returns a new object without the prop. Great, again this is just what we need! And we have now finished our byId reducer. It can now handle all three actions.
ids reducer
The ids reducer will be used to keep track of all our note ids in an array. We will use this array later when reading the notes from our state. The ids array will specify the order of our notes. As ids are not changing we do not need to handle any update action, since addNote and removeNote are the only two actions this reducer cares about.
addNote
Whenever a new note is added, we need to get its id and add it to the beginning of our ids array.
test('reducer | ids :: Handle "addNote" action',({deepEqual,end})=>{conststate=getMockState.withNoNotes();constactualNextState=reducers.ids(state.ids,actions.addNote("Hi","id-123"));constexpectedNextState=['id-123'];deepEqual(actualNextState,expectedNextState);end();});
The above test is very straight forward and so is our implementation that makes it pass:
import{prepend}from'ramda';exportconstids=(state=[],{type,payload})=>{switch(type){case'app/addNote':returnprepend(payload.id,state);default:returnstate;}};
prepend, as you might have already guessed, prepends payload.id to a copy of state. Great! Just one more action for this reducer:
removeNote
When a note gets removed, you need to make sure to remove its id from the ids array as well, so that you don’t accidentally try to read data for a non-existing id later on.
test('reducer | ids :: Handle "removeNote" action',({deepEqual,end})=>{conststate=getMockState.withOneNote();constactualNextState=reducers.ids(state.ids,actions.removeNote("id-123"));constexpectedNextState=[];deepEqual(actualNextState,expectedNextState);end();});
Our test case again is very easy to understand: When we have one id in our initial state and we remove a note with the same id, we want our new state to be an empty array. Our updated reducer that passes this test looks like this:
exportconstids=(state=[],{type,payload})=>{switch(type){case'app/addNote':returnprepend(payload.id,state);case'app/removeNote':returnwithout(payload.id,state);default:returnstate;}};
without takes in a value and an array and will return a new array that does not contain the value. This fits our use-case perfectly and with that we have finished our ids reducer.
openNoteId reducer
Our openNoteId reducer takes care of storing which note is currently being displayed. Because of this it has to only store a single value - an id. There are four actions that can cause a change to the reducer’s state:
openNotecloseNoteaddNoteremoveNote
Let’s add them one by one:
openNote
Whenever a user wants to look at a note, our application will have to dispatch an openNote action. When this action is dispatched, we expect that our openNoteId state will then contain that id:
test('reducer | openNoteId :: Handle "openNote" action',({equal,end})=>{conststate=getMockState.withNoOpenNotes();constactualNextState=reducers.openNoteId(state.openNoteId,actions.openNote("id-123"));constexpectedNextState='id-123';equal(actualNextState,expectedNextState);end();});
If the above sounded simple to you, you’re right! We have to do nothing else than to return the payload’s id property:
exportconstopenNoteId=(state=null,{type,payload})=>{switch(type){case'app/openNote':returnpayload.id;default:returnstate;}};
When splitting up reducers in a way that they only serve a single purpose, their internals can often become trivial, as can be seen with this example.
addNote
The way our application should work is that if a user adds a new note, it will instantly display that note, even if another note is open. Our test is similar to the one for openNote: we expect the id of the addNote action to become the new state:
test('reducer | openNoteId :: Handle "addNote" action',({equal,end})=>{conststate=getMockState.withNoOpenNotes();constactualNextState=reducers.openNoteId(state.openNoteId,actions.addNote("Hi","id-123"));constexpectedNextState='id-123';equal(actualNextState,expectedNextState);end();});
This again looks very familiar, doesn’t it? We can just reuse the simple logic we added for openNote:
exportconstopenNoteId=(state=null,{type,payload})=>{switch(type){case'app/addNote':case'app/openNote':returnpayload.id;default:returnstate;}};
Both actions will now trigger an update to the currently open note!
closeNote
When a user is done editing a note, they should be able to close it. We already added the closeNote action for this purpose, so let’s add it to our reducer now. We will write our test first again:
test('reducer | openNoteId :: Handle "closeNote" action',({equal,end})=>{conststate=getMockState.withOneNote();constactualNextState=reducers.openNoteId(state.openNoteId,actions.closeNote("id-123"));constexpectedNextState=null;equal(actualNextState,expectedNextState);end();});
Whenever we receive a closeNote action we just want our new state for openNoteId to become null. There’s nothing easier than that:
exportconstopenNoteId=(state=null,{type,payload})=>{switch(type){case'app/addNote':case'app/openNote':returnpayload.id;case'app/closeNote':returnnull;default:returnstate;}};
We don’t have to worry about the payload of the action for this one because we just want to reset our state. It in fact doesn’t have payload data, but even if it did - we wouldn’t care about it in this reducer.
removeNote
The last action we have to take care of is removeNote. When a user removes a note that is currently open, then the system has to take care of closing it automatically. We could be falling back to the next note in line, but for now we will only close the removed note and not do anything else. So we expect our state, just like for closeNote, to become null when the removeNote action is being dispatched:
test('reducer | openNoteId :: Handle "removeNote" action',({equal,end})=>{conststate=getMockState.withOneNote();constactualNextState=reducers.openNoteId(state.openNoteId,actions.removeNote("id-123"));constexpectedNextState=null;equal(actualNextState,expectedNextState);end();});
And just like with closeNote, we do not care about any of the action’s payload, we just want to reset our state. Because of this we just handle the action together with closeNote:
exportconstopenNoteId=(state=null,{type,payload})=>{switch(type){case'app/addNote':case'app/openNote':returnpayload.id;case'app/removeNote':case'app/closeNote':returnnull;default:returnstate;}};
That’s it! We have all of our reducers properly set up and tested. We have state in our reducers, but how do we get it out? In the next chapters we will focus on exactly that. But before we do so, here is some additional information about how to modify reducer state without a handy library.
Modifying state without a library
If we don’t want to use a library such as ramda or lodash, we could write the above code as pure ES6/7. Here are some examples:
// `byId` reducer// ramdareturnmerge(state,{[payload.id]:payload});// pure ES6returnObject.assign({},state,{[payload.id]:payload};// pure ES7return{...state,[payload.id]:payload};// ramdareturndissoc(payload.id,state);// pure ES6constnextState=Object.assign({},state);deletenextState[payload.id];returnnextState//pure ES7constnextState={...state};deletenextState[payload.id];returnnextState// `ids` reducer// ramdareturnprepend(payload.id,state);// pure ES6return[payload.id].concat(state);// pure ES7return[payload.id,...state];// ramdareturnwithout(payload.id,state);// pure ES6/7returnstate.filter(id=>id!==payload.id);
While the first example is even a little bit shorter in ES7, the second one instantly shows how a utility library can help make our code cleaner and more readable. Furthermore - as mentioned before - ramda is immutable by default, so we do not have to think about whether we accidentally are mutating an object - we get a fresh copy each time. In addition to that, using functions like merge, dissoc, prepend, without etc. make the intent of our code very clear and easy to understand. Ultimately it is up to you what you prefer. For the sake of readability and ease we chose to stick with ramda for the book.
Selectors
Ok, now that we have the state transformation logic done and dusted, it is time to create a way we can deliver slices of our state from Redux to React. In order to do that, we need to write selectors.
Looking back at our brief, we know that we have two component-views to worry about: Notes List and Note Detail.
Notes List selector (getNotes)
Starting with Notes List, this component will need to present a list of note thumbnails along with the beginning of each note’s content.
This means that what we need to get from the state is an array populated with individual notes. That way, once we get the state into our components, we can write something like: notes.map((note) => (<div> /* Note markup */ </div>)) to generate the Notes List view.
Ok, so we need a selector that will get all of the notes. Let’s call it getNotes, and describe it in test form:
// source/store/selectors.test.jsimporttestfrom'tape';import*asselectorsfrom'./selectors';import{getMockState}from'./testUtils';test('selector | getNotes :: Return empty array if state contains no notes',({deepEqual,end})=>{conststate=getMockState.withNoNotes();constactualSelection=selectors.getNotes(state);constexpectedSelection=[];deepEqual(actualSelection,expectedSelection);end();});test('selector | getNotes :: Return array of note objects if state contains any notes',({deepEqual,end})=>{conststate=getMockState.withOneNote();constexpectedSelection=[{id:'id-123',content:'Hello world',timestamp:1,},];constactualSelection=selectors.getNotes(state);deepEqual(actualSelection,expectedSelection);end();});
Now that we have our tests, how do we actually write the selector? First, let’s look at our current state shape:
// State shape representing two notes present, with note `id-456`// currently being open:{byId:{'id-123':{id:'id-123',content:'Hello world',timestamp:1,},'id-456':{id:'id-456',content:'Hi globe',timestamp:2,},},ids:['id-123','id-456'],openNoteId:'id-456',}
Looking at the above, it becomes clear that we can’t simply grab a part of the state tree directly — nowhere in our state do we actually have an array of notes. This means we have to derive the state.
Derived state is state that is extrapolated from the main store state. You will see this pattern used quite a bit.
In this case, what we have to do is map over the ids array and use it to generate a new, populated array from the byId state slice.
// source/store/selectors.jsexportconstgetNotes=(state)=>state.ids.map((id)=>state.byId[id]);
Great. This makes both our tests pass, because Array.map will simply return an empty array if the ids state slice doesn’t contain anything.
The Notes List view only requires the getNotes selector, which means we are free to start working on Note Detail.
Note Detail selectors (getNote, getOpenNoteId)
If you refer back to the mockups, you can see that you will need the full note object, including content, timestamp, and id. We know that this will have to be the note whose ID is currently stored inside the openNoteId state slice.
Now, this could be either written as a single more specific selector (getOpenNote) or two tiny selectors (getOpenNoteId, getNote) that will work in tandem to return the desired note.
For the sake of modularity and reuse, let’s go with the second option. That way, you are able to prepare generic selectors ahead of time, and compose them together just before you pass them to your components (remember, they are just functions!).
You’ll see how exactly that is done in the last section of this chapter. Now, let’s start implementing our two generic selectors.
// source/store/selectors.test.js// ...test('selector | getOpenNoteId :: Return null if state doesn't have open note set',({equal,end})=>{conststate=getMockState.withNoNotes();constactualSelection=selectors.getOpenNoteId(state);constexpectedSelection=null;equal(actualSelection,expectedSelection);end();});test('selector | getOpenNoteId :: Return note id if state has open note set',({equal,end})=>{conststate=getMockState.withOneNote();constactualSelection=selectors.getOpenNoteId(state);constexpectedSelection='id-123';equal(actualSelection,expectedSelection);end();});test('selector | getNote :: Return null if state doesn't contain a note with supplied id',({equal,end})=>{conststate=getMockState.withTwoNotes();constactualSelection=selectors.getNote(state,'id-999');constexpectedSelection=null;equal(actualSelection,expectedSelection);end();});test('selector | getNote :: Return note object if state contains note with passed id',({deepEqual,end})=>{conststate=getMockState.withTwoNotes();constactualSelection=selectors.getNote(state,'id-123');constexpectedSelection={id:'id-123',content:'Hello world',timestamp:1,};deepEqual(actualSelection,expectedSelection);end();});
We know the initial and empty states of the openNoteId state slice are null (as we want), and when a note is opened it simply contains the string. This means that getOpenNoteId just returns a piece of the state, which is simple enough.
// source/store/selectors.js// ...exportconstgetOpenNoteId=(state)=>state.openNoteId;
Our last selector, getNote is a little different, because it doesn’t just take the state, but also an id as a second argument. This makes it nicely generic and allows us to eventually reuse it with arbitrary notes, not just the currently open note.
// source/store/selectors.js// ...exportconstgetNote=(state,id)=>state.byId[id]||null;
The selectors are now completed. Let’s finish off the MVP by using them inside our components!
Connecting to UI
And now, for the last stretch — finally connecting React and Redux together!
We will start by building a static version of our view-components: NotesList and NoteDetail. These two will be joined together in a root component called App, which will in turn be passed to ReactDOM.render.
Once the static stuff is done, we will hook it all up to back to Redux and finally get the party started!
Note that as we are building the React components, we will omit propType validation and component testing. This is done to save you from reading a whole bunch of verbose code that doesn’t really add any additional insight. After all, this is a book about Redux, not React or any particular UI library. Additionally, we also won’t show the details of the style object. Just assume that in it contains the correct inline styles for each element.
If you’re interested in looking at the code without any omissions, the GitHub repo (https://github.com/arturmuller/developing-a-redux-edge) contains the app in its entirety.
Static components
Starting with NotesList, let’s see what we have:
// source/components/NotesList/index.jsximportReact,{PropTypes}from'react';import*asstylefrom'./style';constNotesList=({notes,openNoteId,addNote,openNote})=>(<divstyle={style.wrapper}><buttonstyle={style.addNoteButton}onClick={addNote}>AddNote</button>{(notes.length===0)?<divstyle={style.blankslate}>Nonotes</div>:notes.map((note)=>(<buttonkey={note.id}style={(note.id===openNoteId)?{...style.note,...style.selected}:style.note}onClick={()=>openNote(note.id)}>{note.content===''?<spanstyle={style.newNoteLabel}>Newnote...</span>:note.content}</button>))}</div>);exportdefaultNotesList;
This is pretty standard React stuff. Notice how the component is written in a pure functional style, instead of the more common classical approach (class NotesList extends React.Component) or by using the old-school React.createClass.
Functional components are beautifully compact and terse, but cannot have internal state or methods. This is juts fine by us; all of our state lives inside of Redux (as opposed to local component state), and our actions are defined separately as actionCreators (as opposed to methods on the component class)!
Now, let’s look at NoteDetail:
// source/components/NoteDetail/index.jsximportReact,{PropTypes}from'react';import*asstylefrom'./style';constNoteDetail=({note,removeNote,closeNote,updateNote})=>(<divstyle={style.wrapper}>{!note?<divstyle={style.blankslate}>Nonoteisopen</div>:<divstyle={style.note}><divstyle={style.date}>{newDate(note.timestamp).toLocaleString()}</div><textareaautoFocuskey={note.id}style={style.textarea}onChange={(event)=>updateNote(event.target.value,note.id)}placeholder="New note..."value={note.content}/><divstyle={style.row}><buttononClick={()=>removeNote(note.id)}style={{...style.button,...style.danger}}>Remove</button><buttononClick={closeNote}style={style.button}>Close</button></div></div>}</div>);exportdefaultNoteDetail;
And finally App:
// source/components/App/index.jsximportReactfrom'react';importNotesListfrom'../NotesList';importNoteDetailfrom'../NoteDetail';import*asstylefrom'./style';constApp=()=>(<divstyle={style.wrapper}><NotesList/><NoteDetail/></div>);exportdefaultApp;
There is nothing much different about the two components above. NoteDetail renders markup relevant to its use-case just as NoteDetail did, and App wraps the two together so that we have a ‘root’ component we can pass to ReactDOM.
Let’s do that now:
// source/index.jsximportReactfrom'react';importReactDOMfrom'react-dom';importAppfrom'./components/App';ReactDOM.render(<App/>,document.getElementById('app'));
Notice how this is the main index file. Finally, we have reached the end of the tunnel!
Unfortunately the app doesn’t really do much at the moment. If you try to run it now, you’d get a whole bunch of errors because no data is actually being passed from the store to the components. Let’s fix that!
Connected components
As we have learned in Chapter 2, to get everything joined up, we first need to make the store available to the component hierarchy through the Provider from react-redux.
Only one Provider is necessary, and ideally it should be as high-up in your component tree as possible. This is done to avoid trying to connect a component outside of Provider’s scope.
We will add the Provider directly in the main index.jsx file. This way, as long as we consider App the root of the app, we will always be able to connect any component.
// source/index.jsx// ...import{Provider}from'react-redux';importconfigureStorefrom'./store';ReactDOM.render(<Providerstore={configureStore()}><App/></Provider>,document.getElementById('app'));
Now, let’s return to our view-components.
If you look back at our component’s dependencies (as defined through destructuring the props parameter), we will see exactly what data we need to retrieve for the component.
Some of that data is state, so it will have to be retrieved through a selector. The other data are actions. These need to be wrapped in store.dispatch before being passed to the components to actually do anything. (Remember, action creators are just functions that return a descriptor object, since it is store.dispatch that actually makes stuff happen!)
The sate and actions above can be achieved with the connect higher order component. To quickly recap, connect accepts the mapStateToProps function as the first argument and mapDispatchToProps as the second argument.
mapStateToProps will be passed the entire Redux state, and its job is to select only the parts that are interesting for the component and returning them as an object that will be merged with props.
mapDispatchToProps can also be a function that receives dispatch as an argument, and its job is to return on an object of dispatch-ready actions. Again, this object will be merged into props.
Most of the time all you need to do with mapDispatchToProps is wrap dispatch around actions like so:
constmapDispatchToProps=(dispatch)=>({action:(...args)=>dispatch(actionCreator(...args)),})
Because this is such a common pattern, Redux offers a shorthand: just pass an object of action creators instead of a function and the above will be done for you.
(If you’re not sure what is happening above, Chapter 2 offers more detail about the connect function.)
// source/components/NotesList/index.jsx// ...import*asactionCreatorsfrom'../../store/actions';import*asselectorsfrom'../../store/selectors';constNotesList=({notes,openNoteId,addNote,openNote})=>(// ...);constmapStateToProps=(state)=>({notes:selectors.getNotes(state),openNoteId:selectors.getOpenNoteId(state),});exportdefaultconnect(mapStateToProps,actionCreators)(NotesList);
We have imported all selectors and action creators we have prepared in the previous chapters using the * notation. This essentially bundles all named exports of a given module into an object with the name you have assigned by as <name>.
For action creators this means we are ready — we simply pass the entire imported object to connect as the second argument and let the mapDispatchToProps shorthand take over wrapping everything in dispatch.
For the first argument, we will create a component-specific mapStateToProps function that will combine our generic selectors, and essentially just combine their input into a single object.
// source/components/NoteDetail/index.jsx// ...import*asactionCreatorsfrom'../../store/actions';import*asselectorsfrom'../../store/selectors';// ...constmapStateToProps=(state)=>({note:selectors.getNote(state,selectors.getOpenNoteId(state)),});exportdefaultconnect(mapStateToProps,actionCreators)(NoteDetail);
Notice how we’re composing our generic selectors slightly differently to NotesList here. Instead of assigning the results each to its individual key, we take the result of getOpenNoteId() and pass it as an argument to getNote().
Conclusion
Although these are still fairly simple use-cases, they do illustrate that because selectors are just functions, working with them is very versatile. You can compose and rearrange them as you see fit. Although these are still fairly simple use-cases, they do illustrate that because selectors are just functions, working with them is very versatile. You can compose and rearrange them as you see fit.
We now have a fully functional MVP version of our app! In the next chapter we will add server-side persistence to our application using asynchronous actions and the redux-thunk middleware.