
Equipped with tools for developing our own images, it quickly becomes important to be able to save and share the images we have written beyond our system. Docker Registries allow us to do just this. For your purposes, the public Docker Registry, Docker Hub, will be more than sufficient, though it is worth noting that other registries exist and that it is possible to create and host your own registry.
Overall, the Docker Registry consists of three technologies: the Index, the Registry, and the Repository. In this text, a cursory understanding of how these technologies interact is sufficient. The Index tracks meta-information associated with users, organizations, namespaces, and repositories. The Repository is similar to a git repository in that it tracks multiple versions of a project (that is, a Docker image). The Registry contains the images and the repository graph comprising a Repository.
Docker Hub
A Docker Registry is a server-side application that can be used to distribute Docker images. We are most interested in the free-to-use, public Docker Registry, Docker Hub.1 Docker Hub is to Docker somewhat as GitHub is to Git. It allows us to use existing Docker repositories and allows us to build and host our own images. It will serve for the vast majority of your work as your sole Docker Registry from which you will discover the images you will use, manage the development of your images, and automate the build process as you move toward production-ready images.
Alternatives to Docker Hub
Two of the most popular alternative public registries are Quay.io2 and the Google Container Registry.3 Quay.io is a public and private registry service run by CoreOS. CoreOS is the developer of the primary container engine alternative to Docker, rkt.4 In the past year, however, CoreOS and Docker seem to be working more as allies than competitors and Quay.io can serve as a registry for both Docker and rkt-defined images. Quay has tools for the maintenance of images by organizations and teams plus workflow automation tools, and it is an excellent alternative to Docker Hub.
Google was an early organizational adopter of containerization technology and is the origin of one of the community’s most beloved tools, the orchestration tool Kubernetes. It is no surprise that Google has its own container registry, the Google Container Registry. For our purposes, that is, for the purposes of data science, we might most be interested in using the GCR as the home of the in-house images for Google’s machine intelligence library, Tensorflow.5
Docker ID and Namespaces
In order to leverage the services offered by Docker Hub, you will create a Docker ID. A new Docker ID can be created via the Docker Cloud sign-up page.6 Creation of a Docker ID will require email verification.
Once created, your Docker ID also becomes your main namespace you will use for all of your images hosted on Docker Hub. My Docker ID is joshuacook. Were I to push the gsl image we created in Chapter 4 to Docker Hub, this image would be available at the namespace/tag combination of joshuacook/gsl. More generally, the namespace/tag of an image hosted on Docker Hub will appear as in Listing 6-1.
Listing 6-1. General Namespace/Tag for an Image on Docker Hub
<namespace>/<repository_name>:<tag>Were you to use an image not hosted on Docker Hub, such as the Tensorflow GPU image as in Listing 6-2, you would need to specify the full URI including the registry address, following the pattern outlined in Listing 6-3.
Listing 6-2. Full URI for the Latest Tensorflow GPU Image
gcr.io/tensorflow/tensorflow:latest-gpuListing 6-3. General URI for a Registry-Hosted Image
<registry_address>/<namespace>/<repository_name>:<tag>Image Repositories
A repository on Docker Hub is a collection of tagged, built Docker images sharing the same purpose. Visiting my user page, you can see all of the Docker repositories I am currently maintaining (Figure 6-1). Each repository contains one or more images that have been previously defined and built, either locally or via the Docker Hub Automated Build process.
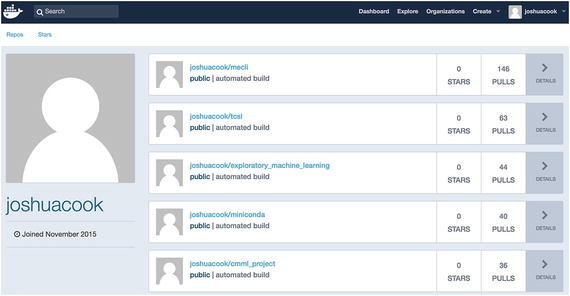
Figure 6-1. My Docker Hub user profile
Search for Existing Repositories
As previously noted, the Docker Hub registry is the default registry used by the Docker CLI. As such, it is a trivial process to search the Docker Hub for relevant images using the Docker CLI using the docker search command. A keyword search via the docker search command checks the keyword against image name, users, and organizations, as well as an image description. In Listing 6-4, you search Docker Hub for miniconda images.
Note
Images are returned in descending order based upon their number of stars.
Listing 6-4. Search Docker Hub for miniconda Images
$ docker search minicondaNAME DESCRIPTION STARS OFFICIAL AUTOMATEDcontinuumio/miniconda Powerful and flexible package ... 38[OK]alaindomissy/docker-miniconda docker-miniconda 2[OK]yamitzky/miniconda-neologd Dockernized mecab-ipadic-NEolo... 2[OK]show0k/alpine-miniconda An alpine based image with min... 1[OK]kentwait/miniconda-mpi Docker container for developin... 1[OK]pottava/miniconda Miniconda images based on Alpi... 1[OK]
The search returns results both where the search term miniconda appears in the name and in the description. Having identified the image you wish to use, you can pull the image as you did in Chapter 3 using docker pull (Listing 6-5).
Listing 6-5. Pull the continuumio/miniconda Image
$ docker pull continuumio/minicondaUsing default tag: latestlatest: Pulling from continuumio/miniconda8ad8b3f87b37: Pull complete090d0f0e845b: Pull complete3cc1bbd57a94: Pull completebd7b36ac12a3: Pull completeDigest: sha256:f7e0a8a86a6d194e748c5884f53ddbbde33b08a666bed5370e453f35bbc3ec57Status: Downloaded newer image for continuumio/miniconda:latest
Tagged Images
There is an active,7 well-known, and friendly split in the Python community between versions 2 and 3. The implications of this are that any Python technology must be capable of being run against two major versions of Python. On your personal computer, this is a significant task requiring package managers supporting both Python 2 and 3 and a virtual environment system such as virtualenv or that provided by conda. With Docker, this task is trivially managed with a Docker image tag.
Image tags define variations in the definition of an image under a single namespace and repository combination. Tags have no semantic meaning, nor does your Docker Id or the name of your repository. They serve solely to distinguish between subtle changes made to images.
An image can be given a tag in any of three ways:
An image can be tagged at build time simply by appending :<tag> to the end of the name given to the image (Listing 6-6). Using this method, a tagged image will be associated with a specific Dockerfile.
An image can be tagged afterward using the docker tag command (Listing 6-7). Using this method, a tagged image will be associated with a specific Dockerfile.
Ephemeral changes made to a container can be persisted as a new image using the docker commit command (Listing 6-8). Using this method, no Dockerfile will exist describing the ephemeral changes made to the image.
Listing 6-6. Tag an Image During a Build
$ docker build -t <namespace>/<repository_name>:<tag>Listing 6-7. Retag an Existing Local Image
$ docker tag <existing_image> <namespace>/<repository_name>:<tag>Listing 6-8. Commit Changes to a Container as a Tagged Image
$ docker commit <existing_container> <namespace>/<repository_name>:<tag>You will revisit this last as a best practice in maintaining semipersistent changes to images in the next chapter.
Tags on the Python Image
The python image can be found at the official repository page8 for Python. Visiting the Tags tab, you can see specific information about the dozens of tags associated with the Python repository. The Python repository uses image tags to not only manage the Python 2 and Python 3 split, but to manage four different versions of Python 3. From the official repository page, you can link to the Dockerfiles used to define the individually tagged images in the Python repository (see Figure 6-2).

Figure 6-2. The Python Official Repository page
Official Repositories
Docker maintains a set of curated Docker images for the major open-source technologies. These official repositories are designed using established best practices in writing Dockerfiles (and more likely than not are maintained by tianon 9 ). You saw your first official repository in the Official Repository for Python. With the exception of the jupyter image (which you shall treat as though it is an Official Repository), you will nearly always use Official Repositories as your base image.
Pushing to Docker Hub
To demonstrate the process of pushing to Docker Hub, you will create a new image, numpy-notebook. This image will use the jupyter/base-notebook image as its base and add numpy. Recall that the jupyter/base-notebook image includes only Python 3. You will only add numpy for Python 3.
Note
In Chapter 5, you configured your system for local development by setting up a project to be tracked via git and GitHub. This is a best practice. You will not go through this practice for the creation of an image in this chapter. This is not because it is not a good practice, but rather because I wish to emphasize that working with Docker Hub is independent from working with git.
In Listing 6-9, you create a new local directory to hold your project and a subdirectory to serve the context for your new image.
Listing 6-9. Create a New Local Directory and Context Subdirectory
$ mkdir ch_6_dockerfiles && cd ch_6_dockerfiles$ mkdir numpy
In Listing 6-10, you create a new Dockerfile (shown in Listing 6-11). The new image is defined using the jupyter/base-notebook image as a base. In order to install numpy you briefly switch the image’s USER to root. You use conda to install numpy and then switch back to USER jovyan.
Note
You switch to the user root to install the libraries and switch back to user jovyan upon completion. This is considered a best practice and ensures that you do not run the notebook server with too much system privilege. More on this in Chapter 7.
Listing 6-10. Create a New Dockerfile
$ vi numpy/DockerfileListing 6-11. The numpy Dockerfile
FROM jupyter/base-notebookUSER rootRUN conda install --yes numpyUSER jovyan
In Listing 6-12, you build the numpy image using the docker build command. Note that the term numpy shows up twice in the command. The first (-t numpy) refers to the tag or name that you are giving to the image. The second, the last word in the command, refers to the relatively referenced build context, in this case the subdirectory named numpy.
Listing 6-12. Build the numpy Image
$ docker build -t numpy numpySending build context to Docker daemon 2.048kBStep 1/4 : FROM jupyter/base-notebook...Step 2/4 : USER root...Step 3/4 : RUN conda install numpy...Step 4/4 : USER jovyan...Successfully built 2570ccf8069fSuccessfully tagged numpy:latest
In Listing 6-13, you run the ipython REPL using the numpy image you just built as a means of testing your installation. You use Ctrl+D to exit the containerized process after completing a trivial calculation.
Listing 6-13. Run ipython from the numpy Image
$ docker run -it numpy ipythonPython 3.6.1 | packaged by conda-forge | (default, May 23 2017, 14:16:20)Type 'copyright', 'credits' or 'license' for more informationIPython 6.1.0 -- An enhanced Interactive Python. Type '?' for help.In [1]: import numpy as npIn [2]: u = np.array((1,2))In [3]: np.linalg.norm(u)Out[3]: 2.2360679774997898In [4]:Do you really want to exit ([y]/n)?
Create a New Repository
Creating a new repository can be done via a Docker Hub user profile (see Figure 6-3). You will be prompted to give the repository a name, a short description, and a full description. You will also be asked whether the repository should be public or private. By default, new repositories will be public.
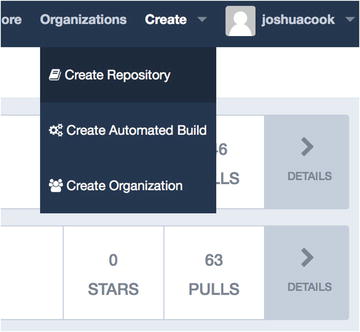
Figure 6-3. Create a new repository
Again, there is no semantic meaning to the name given to a repository. With regard to the description, you should recall that keywords entered in the description were found by the docker search function.
Note
You could also choose to create the repository in any organization where you have the proper privileges.
You create a new repository called numpy with the short description “Numerical Python” and the full description “Built on jupyter/base-notebook.” The new repository is shown in Figure 6-4.
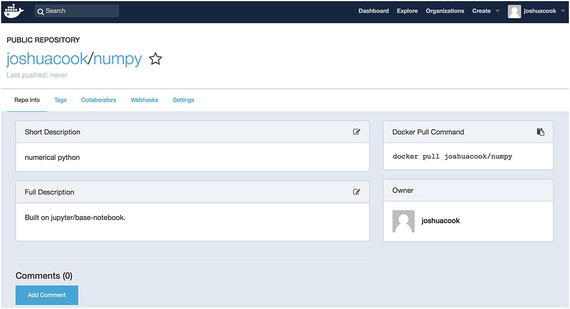
Figure 6-4. The new joshuacook/numpy repository
Push an Image
You might wish to push the work you did on your numpy image. Local images created in the manner discussed in Chapter 5 can be pushed to Docker Hub with little fuss, provided they are named in the <namespace>/<repository_name>:<tag> pattern. In order to push your work, you first revisit the state of the images on your system via the docker images command (Listing 6-14), especially to examine the numpy image you just created.
Listing 6-14. Display Local Images
$ docker imagesREPOSITORY TAG IMAGE ID CREATED SIZEnumpy latest 2570ccf8069f 33 minutes ago 925MBjupyter/ latest 161472bc6c75 2 weeks ago 657MB base-notebookdebian latest 47af6ca8a14a 2 weeks ago 125.1 MBminiconda3 latest 5865a6cfa8c2 2 weeks ago 1.64 GB
Note
None of your images have a namespace or a tag.
Again, there are three ways to give a tag to an image: 1) at build-time using docker build 2) after build-time using docker tag, and 3) by committing changes made to a container as an image using docker commit. In Listing 6-15, you give the numpy image a tag and a namespace using the docker tag command.
Listing 6-15. Tag an Image
$ docker tag numpy joshuacook/numpy:1.13.0In Listing 6-16, you once more display your local images.
Listing 6-16. Display Local Images
$ docker imagesREPOSITORY TAG IMAGE ID CREATED SIZEnumpy latest 2570ccf8069f 34 minutes ago 925MBjoshuacook/ 1.13.0 2570ccf8069f 34 minutes ago 925MBnumpyjupyter/ latest 161472bc6c75 2 weeks ago 657MBbase-notebookdebian latest 47af6ca8a14a 2 weeks ago 125.1MBminiconda3 latest 5865a6cfa8c2 2 weeks ago 1.64GB
You now have an image with the namespace/repository combination of joshuacook/numpy and the tag of 1.13.0. Note that it has an identical image id with the numpy image. Docker is not storing two identical images, but rather maintaining two references to the same image.
In order to push to Docker Hub, you must log in via the Docker CLI using docker login (Listing 6-17).
Listing 6-17. Log in to Docker Hub
$ docker loginLogin with your Docker ID to push and pull images from Docker Hub. If you don't have a Docker ID, head over to https://hub.docker.com to create one.Username (joshuacook):Password:Login Succeeded
Once you have properly tagged your image and logged in, you use the docker push command (Listing 6-18).
Listing 6-18. Push the ipython Image to Docker Hub
$ docker push joshuacook/numpy:1.13.0The push refers to a repository [docker.io/joshuacook/numpy]2bcb5be18c74: Pushed72c56d765cf2: Mounted from jupyter/base-notebook317e6c337ef3: Mounted from jupyter/base-notebook1a2fceb0b4da: Mounted from jupyter/base-notebookc65670cc3813: Mounted from jupyter/base-notebook52b6625b711f: Mounted from jupyter/base-notebook93329dd321d3: Mounted from jupyter/base-notebook7c10c4ddeab0: Mounted from jupyter/base-notebook290b555a5673: Mounted from jupyter/base-notebook6b538a724de5: Mounted from jupyter/base-notebookf02f8903fe33: Mounted from jupyter/base-notebook406306ca7a80: Mounted from jupyter/base-notebookcff5883220e6: Mounted from jupyter/base-notebookd17d48b2382a: Mounted from jupyter/base-notebook1.13.0: digest: sha256:ccd8f21923c7538ae7a4d0606e203dce072d601494e570cf4c3d1d08ca7a84e2 size: 3246
Pull the Image from Docker Hub
You can verify the success of your push by pulling the image from Docker Hub. Of course, if you have the image locally, the locally cached image will be used when the image is requested. In order to test the success, you first inspect the contents of your local image using the docker inspect command in order to use this for verification (Listing 6-19). You are interested in the "RootFS" key in the JSON returned by the inspect command, as it provides a sha256 description10 description of each layer associated with the image.
Listing 6-19. Inspect the ipython Image
$ docker inspect joshuacook/numpy:1.13.0..."RootFS": {"Type": "layers","Layers": ["sha256:d17d48b2382adda1fd94284c51d725f0226bf20b07f4d29ce09596788bed7e8e","sha256:cff5883220e61c711e6345366431e2eb28d8b408ae02c21c1356797932379f7f","sha256:406306ca7a8025fd3430c01289c18e5ed18f0a144e7b6f1bc592ad38817f52a3","sha256:f02f8903fe334cbe7184c6d57fc08e6b5d26b607fce64c090c079d2a996f14a3","sha256:6b538a724de5d6ecdbfa4583dc34a228a46c3ee0c4d309a481e9dfad675de380","sha256:290b555a56733ef2f2a005e6c7a3c38d894674239aed477729092687c414015d","sha256:7c10c4ddeab02a978638181a43ac67d43036fc6bf67e9888544debbd63aa11b3","sha256:93329dd321d38f8394e015b422cf3680be1de5568f7248a3b635df329b2fe47b","sha256:52b6625b711fbf05039b819e2d13161f5c36c1909ad61779efedae05a5fdc51c","sha256:c65670cc38137214111c9e1587cb200e32e74de13fc2957752d6354f75da6278","sha256:1a2fceb0b4daff636aa021a223b46c308a94e52f084c9feea395b68f672be6cb","sha256:317e6c337ef3c57618c38257236cc02e254f2f8d499249fbc040208f25c360d9","sha256:72c56d765cf2ae7ce7626b5a35bf0eba94f8c49b1a8d894b999949846b2ded71","sha256:2bcb5be18c742a706f4667ce18b59e45d777e01d2423aac3c035c0d2831e34fc"]}...
You will use these layer descriptions to verify against the image once you have pulled it from Docker Hub.
Next, you attempt to remove the joshuacook/ipython:3.6 image from your local cache (Listing 6-20).
Listing 6-20. Remove the Image from Local Cache
$ docker rmi numpyUntagged: numpy:latest$ docker rmi joshuacook/numpy:1.13.0Error response from daemon: conflict: unable to remove repository reference "joshuacook/numpy:1.13.0" (must force) - container 817ba39439d7 is using its referenced image 2570ccf8069f
In doing so, you see an error. This error signifies that a stopped container is using the image. You must first remove the stopped container in order to remove the image. You first display stopped containers via the -a flag (display all) and docker ps (Listing 6-21).
Listing 6-21. Display All Containers
$ docker ps -aCONTAINER ID IMAGE COMMAND CREATED STATUS NAMES817ba39439d7 "tini -- ipyth" 29 min... Exited (0) 28 min... gifted_clarke2570ccf8069ffd66407a5358 "tini -- ipyth" 38 min... Exited (0) 36 min... peaceful_ 2570ccf8069f ardinghelli...
Two stopped containers reference image f9a032f0a9a5, your local ipython image. You must remove all of them (Listing 6-22).
Listing 6-22. Remove All Stopped ipython Containers
$ docker rm 817ba39439d7 fd66407a5358fd66407a5358fd66407a5358
Now you are able to remove the locally cached image (Listing 5-23).
Listing 6-23. Remove the Image from Local Cache
$ docker rmi joshuacook/ipython:3.6Untagged: joshuacook/numpy:1.13.0Untagged: joshuacook/numpy@sha256:ccd8f21923c7538ae7a4d0606e203dce072d601494e570cf4c3d1d08ca7a84e2Deleted: sha256:2570ccf8069f2333fc3c52cdeca9890dd4cb6b7a27ee7752aa97d8a2bc4e1bf6Deleted: sha256:b66f2cee6b59bb573462448ee4766890737e74523fa3d14b99a418c57a1e67f1Deleted: sha256:fe5d8ad29a14a9f6405de89aa47ef8c511965aff9d8b20cbeeffe34ee6fe6f19Deleted: sha256:eddb59d7cee362460c5d62be665d004d008f724a3e65ad44ad1129cfb86f3f61
You now pull the image from Docker Hub to verify its contents (Listing 6-24).
Listing 6-24. Pull the ipython Image from Docker Hub
$ docker pull joshuacook/numpy:1.13.01.13.0: Pulling from joshuacook/numpy693502eb7dfb: Already exists490c0d36e714: Already existsb47c251cda4e: Already exists5f06af7aed8b: Already exists6486d270a020: Already exists825ae89ffbbc: Already exists0eb855700e1f: Already exists3ea165122423: Already exists57f4c53afea9: Already exists960ee91f3ec0: Already existsd685ecb69227: Already exists86a69e035999: Already exists166ce3ece426: Already exists9c7191cb9c0e: Pull completeDigest: sha256:ccd8f21923c7538ae7a4d0606e203dce072d601494e570cf4c3d1d08ca7a84e2Status: Downloaded newer image for joshuacook/numpy:1.13.0
Once more you run the docker inspect command (Listing 6-25).
Listing 6-25. Inspect the numpy Image After a Successful Pull
$ docker inspect joshuacook/numpy:1.13.0..."RootFS": {"Type": "layers","Layers": ["sha256:d17d48b2382adda1fd94284c51d725f0226bf20b07f4d29ce09596788bed7e8e","sha256:cff5883220e61c711e6345366431e2eb28d8b408ae02c21c1356797932379f7f","sha256:406306ca7a8025fd3430c01289c18e5ed18f0a144e7b6f1bc592ad38817f52a3","sha256:f02f8903fe334cbe7184c6d57fc08e6b5d26b607fce64c090c079d2a996f14a3","sha256:6b538a724de5d6ecdbfa4583dc34a228a46c3ee0c4d309a481e9dfad675de380","sha256:290b555a56733ef2f2a005e6c7a3c38d894674239aed477729092687c414015d","sha256:7c10c4ddeab02a978638181a43ac67d43036fc6bf67e9888544debbd63aa11b3","sha256:93329dd321d38f8394e015b422cf3680be1de5568f7248a3b635df329b2fe47b","sha256:52b6625b711fbf05039b819e2d13161f5c36c1909ad61779efedae05a5fdc51c","sha256:c65670cc38137214111c9e1587cb200e32e74de13fc2957752d6354f75da6278","sha256:1a2fceb0b4daff636aa021a223b46c308a94e52f084c9feea395b68f672be6cb","sha256:317e6c337ef3c57618c38257236cc02e254f2f8d499249fbc040208f25c360d9","sha256:72c56d765cf2ae7ce7626b5a35bf0eba94f8c49b1a8d894b999949846b2ded71","sha256:2bcb5be18c742a706f4667ce18b59e45d777e01d2423aac3c035c0d2831e34fc"]}...
Note that the sha256 description of the images layers after the pull matches the description of the layers prior to the pull. It is of note that the pull proves to be rather trivial, only needing to fetch a single layer from Docker Hub. This is because most of the layers associated with your numpy image exist as the jupyter/base-notebook image. You used the jupyter/base-notebook image as the base upon which you built your ipython image! This fact can be verified by inspecting the jupyter/base-notebook image (Listing 6-26).
Listing 6-26. Inspect the jupyter/base-notebook Image
$ docker inspect jupyter/base-notebook..."RootFS": {"Type": "layers","Layers": ["sha256:d17d48b2382adda1fd94284c51d725f0226bf20b07f4d29ce09596788bed7e8e","sha256:cff5883220e61c711e6345366431e2eb28d8b408ae02c21c1356797932379f7f","sha256:406306ca7a8025fd3430c01289c18e5ed18f0a144e7b6f1bc592ad38817f52a3","sha256:f02f8903fe334cbe7184c6d57fc08e6b5d26b607fce64c090c079d2a996f14a3","sha256:6b538a724de5d6ecdbfa4583dc34a228a46c3ee0c4d309a481e9dfad675de380","sha256:290b555a56733ef2f2a005e6c7a3c38d894674239aed477729092687c414015d","sha256:7c10c4ddeab02a978638181a43ac67d43036fc6bf67e9888544debbd63aa11b3","sha256:93329dd321d38f8394e015b422cf3680be1de5568f7248a3b635df329b2fe47b","sha256:52b6625b711fbf05039b819e2d13161f5c36c1909ad61779efedae05a5fdc51c","sha256:c65670cc38137214111c9e1587cb200e32e74de13fc2957752d6354f75da6278","sha256:1a2fceb0b4daff636aa021a223b46c308a94e52f084c9feea395b68f672be6cb","sha256:317e6c337ef3c57618c38257236cc02e254f2f8d499249fbc040208f25c360d9","sha256:72c56d765cf2ae7ce7626b5a35bf0eba94f8c49b1a8d894b999949846b2ded71"]}...
Note
The thirteen layers that comprise the jupyter/base-notebook image are exactly the thirteen layers of the numpy image.
Tagged Image on Docker Hub
Finally, let’s visit the Tags tab on the Docker Hub page associated with your numpy repository (Figure 6-5). Here, you can see that that tagged image you pushed is indeed available on Docker Hub.
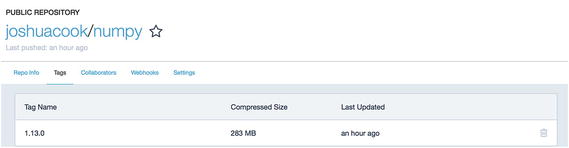
Figure 6-5. The joshuacook/numpy Docker Hub page
Summary
In this chapter, you looked at using Docker Hub as a cloud-based store for the images you have built. You learned about multiple versions of images, looking at how tags are used to track multiple versions of the Python community image. You created a new image for using the numpy library built using the jupyter/base-notebook image as a base, tagged it with the current version of numpy, and pushed it to your Docker Hub account. After this chapter, I hope that you are familiar with the process of creating a new image from a Dockerfile and know how to push an image that you create to Docker Hub.
Footnotes
7 The latest version of IPython, however, does not support Python 2 ( http://ipython.readthedocs.io/en/stable/ ).