Solutions in this chapter:
Web Publishing and Server Publishing Rules allow you to make servers and services on ISA firewall Protected Networks available to users on both protected and non-protected networks. Web and Server Publishing Rules allow you to make popular services, such as SMTP, HTTP, POP3, IMAP4, Exchange/OWA, NNTP, Terminal Services, and many more securely available to users on remote networks or on other Internal or Perimeter Networks.
Web Publishing Rules and Server Publishing Rules provide very different feature sets and are used for very different purposes. In general, Web Publishing Rules should be used to publish Web servers and services, and Server Publishing Rules should be used to publish non-Web servers and services. There are exceptions to these rules, and we will discuss these exceptions in this chapter.
We will begin the chapter with a discussion of the features and capabilities of Web and Server Publishing Rules. After this general overview of Web and Server Publishing Rules, we will go into the details of how to create and configure Web and Server Publishing Rules. We will then complete this chapter with several scenarios that demonstrate how Web and Server Publishing Rules are used on production networks.
Web Publishing Rules are used to publish Web sites and services. Web Publishing is sometimes referred to as “reverse proxying.” When you publish a Web site, the ISA firewall’s Web Proxy filter always intercepts the request and then proxies the request to the Web site published by the Web Publishing Rule.
Web Publishing Rules sport the following features:
Proxied access to Web sites protected by the ISA firewall
Deep application-layer inspection of connections made to published Web sites
Path redirection
URL Rewriting with ISA’s Link Translation
Ability to publish multiple Web sites with a single IP address
Pre-authentication of requests, and Authentication Delegation to the published Site
Single Sign-On (SSO) for Published Web Sites
Support for SecurID authentication
Support for RADIUS authentication
Support for (Secure) LDAP authentication
Reverse Caching of published Web sites
Support for forwarding either the ISA firewall’s IP address or the original client’s IP address to the Web site
Ability to schedule when connections are allowed to Published Web sites
Load-balancing of published websites performed by ISA itself
Let’s look at each of these features in more detail.
Web Publishing Rules provide proxied access to Web sites located on an ISA firewall Protected Network. Any Network that is not part of the default External Network is considered an ISA firewall Protected Network. A proxied connection is more secure than a routed and NATed connection because the entire communication is deconstructed and reconstructed by the ISA firewall. This allows the ISA firewall to perform very deep application-layer inspection of Web requests made to published Web sites that have been published using Web Publishing Rules.
The ISA firewall’s Web Proxy filter handles all incoming Web connections made through Web Publishing Rules. Even when you unbind the Web Proxy filter from the HTTP protocol definition, the Web Proxy filter is always enabled for Web Publishing Rules. This is a security decision made by the ISA firewall team. They determined that non-proxied incoming connections to Protected Network Web servers should always be proxied to allow for the highest degree of protection for published Web servers.
One of the major advantages of using Web Publishing Rules to publish Web sites on protected networks is the ISA firewall’s ability to perform very deep application-layer inspection on all connections made to published Web sites. This deep application-layer inspection provides a high degree of protection against attacks exploiting flaws in the inspected protocol, including malicious code and attacks targeting the published webserver. This allows the ISA firewall to stop attacks at the perimeter and prevents the attacker from ever reaching the published Web server itself.
Deep application-layer inspection for Web requests is the responsibility of the ISA firewall’s HTTP Filter. The ISA firewall’s HTTP filter allows you to control virtually any aspect of an HTTP communication and block or allow connections based on almost any component of an HTTP communication.
Examples of how you can control connections to published Web sites include:
Setting the maximum payload length, which guards against attacks involving large amounts of data submitted to databases or web servers in an HTTP POST request.
Blocking high-bit characters, which are often indicative of a Buffer overflow attack. Enabling this option will only allow standard ASCII characters, but will prevent URLs using some international character sets from working.
Verifying normalization, helping to protect against URL-encoding attacks by performing the decoding process on encoded characters such as %20 (whitespace) twice to detect, and block, attacks relying on double encoding. See http://www.owasp.org/index.php/Double_Encoding for more information on this attack class.
Setting the exact HTTP methods that you want to allow to the published Web site and block all others
Allowing only a specific list of file extensions
Allowing only a specific list of Request or Response headers
Creating fine-tuned signatures that can block connections based on Request URLs, Request headers, Request body, Response headers, or Response body
We will go into some of the details of the HTTP Security Filter (HTTP Filter) later in this chapter, and we will also go into the deep details of the HTTP Security Filter in Chapter 4 on the ISA firewall’s application-layer filtering feature set.
Web Publishing Rules allow you to redirect connections based on the path indicated by the external user. Path redirection allows you to redirect connections based on the user’s indicated path to an alternate directory on the same Web server, or to another Web server entirely.
For example, a user sends a request to http://www.example.com/kits. You want the request to be forwarded to a server named WEBSERVER1 and to a directory on the server named /deployment_ kits in order to allow a partner without access to the intranet server WEBSERVER1 to access information via the internet.
You can configure the Web Publishing Rule to direct the path in the request (which is /kits) to the path on the internal Web server, /deployment_kits.
You can also use path redirection to forward the request to another Web server entirely. For example, suppose users submit requests for the following sites:
You can create two Web Publishing Rules, one for incoming requests to www.example.com/scripts and one for www.example.com/deployment_kits. The request for www.example.com/script can be redirected to a Web server named WEBSERVER1, and the second can be redirected to WEBSERVER2. We can even redirect the request to alternate paths on each Web server.
We will go over some examples of path redirection in the scenarios section of this chapter.
The ISA firewall’s link translator can rewrite the responses that published Web servers send to users making requests. The link translator is useful when publishing Web sites that include hard-coded URLs or references to images and intranet servers in their responses, where those URLs are not accessible from remote locations, or are published using a path redirection rule.
For example, if – as in the preceding example – http://webserver1/kits were published via an ISA server as http://www.example.com/deployment_kits, but included hard-coded links (with absolute rather than relative paths) to http://webserver1/kits/documents/somefile.txt, any request from a visitor to www.example.com/deployment_kits for somefile.txt would fail.
The link translator solves this problem by rewriting the responses returned to the user accessing the Web site. The link http://webserver1/kits/documents/somefile.txt is rewritten http://www.example.com/deployment_kits/documents/somefile.txt, which is accessible from the Internet.
This is commonly a feature enabled where intranet servers are published to the internet, or anywhere where the URLs being returned reference host or DNS names which are not resolvable (or which cannot be connected to) from the network the ISA Server is publishing to.
Link translation is also useful in some SSL scenarios. For example, when you are not using SSL from the ISA firewall to the Web server, but you are using SSL between the Web client on the Internet and the ISA firewall, the link translator can change the HTTP response returned by the Web server to an SSL response in the links presented to the user. This prevents the users from encountering broken links on the published Web page.
We will discuss the usages and configuration options of the link translator in this chapter and in detail in Chapter 4 on application-layer filtering.
Link translation allows multiple applications such as Sharepoint instances or Live Communications Server’s Communicator Web Access to be exposed as paths stemming from the same site, with a similar FQDN and SSL Certificate. In addition to this, web Publishing Rules allow you to publish multiple Web sites using a single IP address on the external interface of the ISA firewall using HTTP Host Headers.
The ISA firewall can do this because of its ability to perform stateful application-layer inspection. Part of the ISA firewall’s stateful application-layer inspection feature set is its ability to examine the host header on the incoming request and make decisions on how to handle the incoming request based on that host header information.
For example, suppose you have a single IP address on the external interface of the ISA firewall. You want to publish two Web servers on an ISA firewall Protected Network. Users will access the Web sites using the URLs extranet.example.com and crm.example.com. All you need to do is create two Web Publishing Rules. One of the Web Publishing Rules will listen for incoming connections for extranet.example.com and forward those requests to the extranet.example.com server on the ISA firewall Protected Network, and the other Web Publishing Rule will listen for requests to crm.example.com and forward those requests to the Web site on the ISA firewall Protected Network responsible for the crm.example.com Web site.
The key to making this work, as we’ll discuss later in this chapter, is to make sure that the public DNS resolves the fully-qualified domain names to the IP address on the external interface of the ISA firewall. Once the DNS issue is addressed, publishing two or two hundred Web sites with a single IP address is very simple using the ISA firewall’s Web Publishing Rules.
Web Publishing Rules can be configured to authenticate users at the ISA firewall. ISA challenges clients to authenticate using a combination of three HTTP authentication methods (Basic, Digest, or Integrated), X.509 Client Certificate Authentication, or Forms-Based Authentication (FBA) (also referred to as HTML Form Authentication), also implementing Pre-Authentication.
This pre-authentication prevents unauthenticated connections from ever reaching the Web server. Pre-authentication blocks attackers and other malicious users from leveraging unauthenticated connections to exploit known and unknown weaknesses in Web servers and applications, significantly reducing the attack surface of the webserver.
One popular use of pre-authentication is for OWA Web sites. Instead of allowing unauthenticated connections from reaching the OWA Web site, the ISA firewall’s Web Publishing Rule for the OWA Web site can be configured to authenticate the user. If the user successfully authenticates with the ISA firewall, then the connection request is passed to the OWA site. If the user cannot authenticate successfully with the ISA firewall, then the connection attempt is dropped at the firewall and never reaches the published Web site.
ISA 2006 enables the use of FBA (Forms-Based Authentication) for any site published with ISA, so Sharepoint sites, intranet pages, and any other web content can be exposed by ISA using FBA.
Pre-authentication also allows you to control who can access Web sites. You can configure Web Publishing Rules to allow only certain user groups to access the published Web site. So even if users are able to authenticate successfully, they will only be able to access the published Web site if they have permission to do so. In this way, the ISA firewall’s Web Publishing Rules allow authentication and authorization for access to published Web sites.
The ISA firewall’s delegation of basic authentication option allows the ISA firewall to authenticate the user and then forward the user credentials to the published Web site when the Web site request credentials. This prevents the user from being subjected to double authentication prompts. Instead of the user answering the Web site’s request for authentication, the ISA firewall answers the request after successfully authenticating the user.
Increasingly, organizations are deploying multiple web-based applications such as Outlook Web Access and Sharepoint as applications for users. Whilst deploying intranet pages and processes via the web greatly increases the convenience of working remotely, exposing multiple web applications through one ISA Server can require users to authenticate to each web application in turn.
Single Sign-On with ISA Server allows the user to authenticate once to the ISA Server, allowing the ISA Server itself to handle authentication from this point on. Single Sign-on is only supported.
RSA’s SecurID is a two-factor authentication mechanism. Two-factor authentication increases security over simple password protection by requiring that the user use both something they know (their password) in addition to something they physically posses (the SecurID token) to authenticate.
The SecurID token itself is a small electronic device which generates a six-digit number based on a shared secret stored within the token itself, and on a backend server against which a firewall such as ISA authenticates the user. The ISA firewall comes with built-in support for SecurID authentication for Web servers and services published via Web Publishing Rules.
Some organizations will choose to put the ISA firewall in a location where making the firewall a member of the user domain is not the best option. For example, if you have a back-to-back firewall configuration where the front-end firewall is an ISA firewall, you should not make the front-end ISA firewall a member of the user domain. You can still take advantage of the domain user database for authentication and authorization by using RADIUS for Web Publishing Rule authentication.
The ISA firewall can be configured as a RADIUS client to a RADIUS server on the corporate network. The RADIUS server can then be configured to authenticate users against the Active Directory or any other RADIUS-compliant directory on the corporate network. RADIUS authentication can be used for both inbound and outbound connections through the ISA firewall’s Web Proxy filter. Setting up Web Publishing Rules using RADIUS is very easy and allows the ISA firewall support back-to-back firewall scenarios where the ISA firewall is the front-end firewall.
Radius can also be used to allow the ISA Firewall to authenticate against a directory services infrastructure or authentication provider not supported natively, or simply a third party radius solution.
The ISA firewall can cache responses from Web sites published via Web Publishing Rules. Once a user makes a request for content on the published Web site, that content can be cached (stored) on the ISA firewall. When subsequent users make requests for the same content on the published Web server, the content is served from the ISA firewall’s Web cache instead of being fetched from the Web server itself.
Caching responses from published Web sites reduces the load on the published Web server and on any network segments between the ISA firewall and the published Web server. Since the content is served from the ISA firewall’s Web cache, the published Web server isn’t exposed to the processing overhead required to service those Web requests. As content is served from the ISA firewall’s Web cache instead of the published Web site, network traffic between the ISA firewall and the published Web site is reduced, which increases overall network performance on the corporate network.
In the former case, an ageing webserver may have load reduced by caching. In the latter, an intranet page with largely static content may be accessed by clients in a branch office ostensibly over the local network, with ISA making efficient use of a slow WAN link.
You can also control the reverse caching on content. You may want users to always receive the freshest versions of content in some locations on your published Web server, while allowing the ISA firewall to cache other content on the published Web servers for a pre-defined time period. You can create cache rules on the ISA firewall in order to have fine-tuned control over what content is cached and how long that content is cached. Scheduled cache content download jobs also allow static content to be retrieved into the cache on a fixed schedule.
One of the limitations with Web Publishing Rules in ISA Server 2000 was that logs on the published Web server always showed the IP address for the internal network adapter of the ISA Server. When you published Web servers using Web Publishing Rules, the source IP address of the client connecting to the published Web server was replaced with the internal IP address of the ISA Server. This was a major barrier to adoption for many potential ISA Server administrators because they already had sunk significant costs into log analysis software installed on the published Web servers. In addition, publishing load-balanced clusters via ISA is complicated when published web servers see all traffic coming from the ISA firewalls, rather than original IP addresses. With ISA 2000, the only option was to use Server Publishing Rules, which isn’t a good option because Server Publishing Rules do not confer the same high level of security as Web Publishing Rules.
ISA 2004 and beyond give you the choice between forwarding the ISA firewall’s IP address to the published Web server or forwarding the actual remote Web client’s IP address to the published Web server. If you don’t need the actual client’s IP address in the Web server’s log files, then use the default option, which is to replace the client IP address with the ISA firewall’s network interface address. If you need to preserve the remote Web client’s IP address, then you can choose the option to preserve the IP address.
We’ll discuss the advantages and disadvantages of each approach when we cover the details of creating and configuring Web Publishing Rules later in this chapter.
ISA Firewall Web Publishing Rules allow you to control when users can access the published Web site. You may have some Web sites that you only want accessed during work hours, and other Web sites that have high bandwidth requirements that you only want accessed during off-hours. You can control when users access published Web sites by applying either built-in or custom schedules to your Web Publishing Rules.
Web Publishing Rules allow you to perform both protocol and port redirection. Port redirection allows the ISA firewall to accept a connection request on one port and then forward that request to an alternate port on the published Web server. For example, the ISA firewall can listen to incoming requests on its Web listener on TCP port 80 and then redirect that connection to TCP 8888 on the published Web server on the ISA firewall Protected Network.
You can also perform protocol redirection using Web Publishing Rules. In contrast to port redirection, where the only change is the destination port, the ISA firewall’s support for protocol redirection allows you to publish FTP sites using Web Publishing Rules. The incoming HTTP GET request made to the Web Publishing Rule’s Web listener is transformed to an FTP GET and forwarded to the published FTP site on a ISA firewall Protected Network. Web Publishing Rules support protocol redirection from HTTP to FTP.
Load-balancing of published websites performed by the ISA firewall itself
ISA 2006 introduces new functionality designed to publish web servers which serve the same content, commonly referred to as load-balanced, or clustered web servers. There are many third party software packages and hardware platforms which manage this, including Microsoft’s own Network Load Balancing (NLB) (formerly Windows Load Balancing Services, or WLBS), which is designed to run on Windows servers themselves, which collectively form a load-balanced cluster, and hardware solutions from third party vendors.
Like the appliances, load-balancing with ISA is undertaken by the ISA firewall (or cluster of ISA firewalls) publishing the web sites, and requires no special backend logic (unlike NLB). ISA Web Farm Load Balancing can be configured to determine ‘affinity’ (i.e. Which web server a given client should communicate with) either by IP address or cookie – in the latter case, the ISA firewall itself inserts a cookie in the client’s browser which is sent with each subsequent request. As with similar load balancing schemes, the ISA firewall includes configurable heart beating for determining the health of published web servers, and can be used to transparently remove and add servers from service without any visible disruption to clients.
Like Web Publishing Rules, you can use Server Publishing Rules to provide access to servers and services on ISA firewall Protected Networks. The following features and capabilities characterize Server Publishing Rules:
Server Publishing Rules are a form of reverse NAT, sometimes referred to as “Port Mapping” or “Port forwarding” and do not proxy the connection.
Almost all IP level and TCP/UDP protocols can be published using Server Publishing Rules.
Server Publishing Rules do not support authentication on the ISA Server.
Application-layer filtering can be applied to a defined subset of Server Published protocols.
You can configure port overrides to customize the listening ports and the port redirection. You can also lock down the source ports the requesting clients use to connect to the published server.
You can lock down who can access published resources using IP addresses.
The external client source IP address can be preserved or can be replaced with the ISA firewall’s IP address.
Restrict connections to specific days and times.
Support for “port redirection” (or PAT – Port address translation) where connections can be received on one port and redirected to another port, providing the same functionality as that seen in many “hardware” firewall solutions.
Let’s look at each of these in a bit more detail.
Server Publishing Rules are a form of either reverse NAT or port mapping, depending on whether you have a NAT or route relationship between the published server and the host that is connecting to the published server via the Server Publishing Rule. The Server Publishing Rule configures the ISA firewall to listen on a specific port and then forwards those connections to the published server on an ISA firewall Protected Network.
In contrast, Web Publishing Rules proxy the requests to the published Web server. Server Publishing Rules just change the source port and IP address before forwarding the connection to the published server. Proxied connections are completely deconstructed and reconstructed by the ISA firewall, and thus, confer a much higher level of application-layer inspection than Server Publishing Rules.
Web Publishing Rules only accept HTTP and HTTPS connections and forward them as HTTP, HTTPS, or FTP connections. In contrast, Server Publishing Rules can be used to publish almost any IP Level, TCP, or UDP protocol. This provides a great deal of flexibility in what services can be made available to hosts via Server Publishing Rules.
One of the major drawbacks of Web Publishing Rules compared to Server Publishing Rules is that Server Publishing Rules do not support pre-authentication at the ISA firewall. Authentication must be done by the server published by the Server Publishing Rule, and therefore unauthenticated clients have the ability to communicate with (and potentially compromise or attack) published servers.
Deep stateful application-layer inspection for connections made through Web Publishing Rules is performed by the ISA firewall’s HTTP filter. Server Publishing Rules also support application-layer inspection through the use of Application Filters. The ISA firewall comes out of the box with the following application filters:
DNS (security filter)
FTP Access Filter
H.323 Filter
MMS Filter
PNM Filter
POP Intrusion Detection Filter (security filter)
PPTP Filter
RPC Filter (security filter)
RTSP Filter
SMTP Filter (security filter)
SOCKS v4 Filter
Web Proxy Filter (security filter)
A number of these filters are used to mediate complex protocols in the same way that NAT editors allow the use of complex protocols through a NAT device. Examples of types of access filters are the H.323 Filter, the MMS Filter, and the RTSP filter. In contrast, there are several application filters whose main job is to secure connections made through the ISA firewall by performing compliance testing against the connection. Example of these security filters are the DNS filter, POP Intrusion Detection Filter, and the RPC Filter.
Some of the application-layer filters perform both duties. They mediate complex protocol management for SecureNAT clients, and they also secure the connections they mediate. Filters fitting into this category include the FTP Access Filter and the RPC Filter.
We will cover application-layer filters in detail in Chapter 4.
Within each Server Publishing Rule is the ability to control the listening port, the destination port, and the port that the requesting client can use as a source port to access the Server-Published server. This provides you very granular control over port redirection (port mapping) for any server you publish using Server Publishing Rules.
Although Server Publishing Rules do not allow you to pre-authenticate users at the ISA firewall, you can configure Server Publishing Rules to limit IP addresses that can connect to the published server via the Server Publishing Rule. This type of IP address-based access control is used for publishing servers that should have limited access. An example of such a server is a Terminal Server on the corporate network that only administrators located at pre-defined addresses can access.
In ISA Server 2000, Server Publishing Rules always preserved the original client IP address when it forwarded the connections to the published server on the internal network. ISA 2004 and 2006 allow you to choose to either preserve the original client IP address or replace the original client IP address with the IP address of the ISA firewall itself.
Like Web Publishing Rules, Server Publishing Rules can be put on a schedule so that connections can only be established to the published server during the times allowed by the schedule. You can use one of the built-in schedules (“Always”, “Weekends”, and “Work Hours”) or create your own custom schedules.
Like Web Publishing Rules, Server Publishing Rules allow you to customize how connections are forwarded to the published server and what ports are used to accept and forward the connection requests. For example, you might want to accept incoming connections for your private SMTP server on TCP port 26 and forward them to TCP port 27 on a published SMTP server. You can do this using the ISA firewall’s port redirection (PAT) feature.
You can create Web Publishing Rules by using the ISA firewall Web Publishing Rule Wizard. The Web Publishing Rule Wizard walks you through the steps of creating a Web Publishing rule that allows you to publish Web servers and services on any ISA firewall Protected Network. In this section, we will go through the Web Publishing Rule Wizard and discuss the options you’re presented with and the implications of those options.
In this section, we’ll focus on Web Publishing Rules that do not require SSL-secured connections. SSL security requires additional steps, and we’ll cover those steps in the next section where we focus on secure SSL Web Publishing Rules.
To start the Web Server Publishing Rule Wizard with ISA 2006 Standard Edition, open the Microsoft Internet Security and Acceleration Server 2006 management console, and expand the server name. Click the Firewall policy node.
To start the Web Server Publishing Rule Wizard with ISA 2006 Enterprise Edition, open the Microsoft Internet Security and Acceleration Server 2006 management console, and expand the ‘arrays’ node. Expand the array you wish to edit the firewall policy for, and click on the Firewall Policy node.
Within the Firewall Policy node, click the Tasks tab within the Tasks Pane. On the Tasks tab, click the Publish Web Sites link.
You’ll first encounter the Welcome to the New Web Publishing Rule Wizard page. On this page, you’ll enter a name for the rule in the Web publishing rule name text box. Click Next.
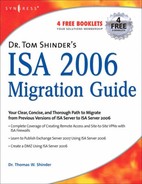
On the Select Rule Action page, you have the option to Allow or Deny connections to the published Web server. Note that the default option on the Select Rule Action page is Allow. This is in contrast to the default action on the Access Rule Wizard, where the default action is Deny. Most Web Publishing Rules will allow access to Web sites and specific paths within those Web sites. However, you can create Web Publishing Rules that deny access to fine-tune Web Publishing Rules that allow access. Choose the Allow option and click Next. Figure 5.1 below shows the default option on the Select Rule Action page.
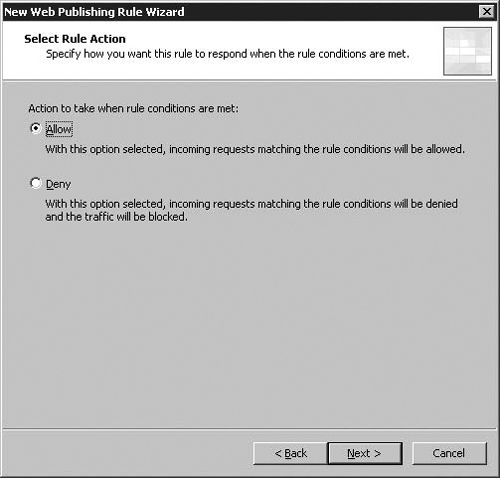
On the Publishing Type page, you configure which websites ISA exposes, and how it exposes them. As you can see in figure 5.2, there are three available options in this dialog:
Publish a single Web site or load balancer
Publish a server farm of load balanced Web Servers
Publish multiple web sites
The first option was the only option available under ISA 2004. The second option is new to ISA 2006, and allows you to publish multiple web servers serving external content, balancing load between the websites, and (for websites which establish sessions with specific clients) can ensure clients continue using the same website (“affinity”). The third option allows the configuration of host’s header-based publishing in ISA 2006 during the web publishing wizard itself.
We will first continue through the web publishing wizard assuming we are publishing one website (i.e. with the first option selected), before discussing the other two forms of web publishing.
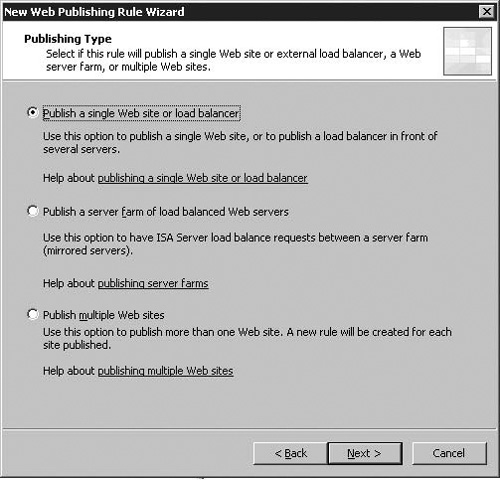
The Server Connection Security page is also new to ISA 2006, and provides an interface to existing functionality (the ability to publish an SSL or non_SSL website), but in a more prominent place. ISA 2006 provides us with entirely new options for specifying an SSL certificate while we create the rule itself.
The two options in this screen should be fairly self-explanatory, and are depicted in Figure 5.3.
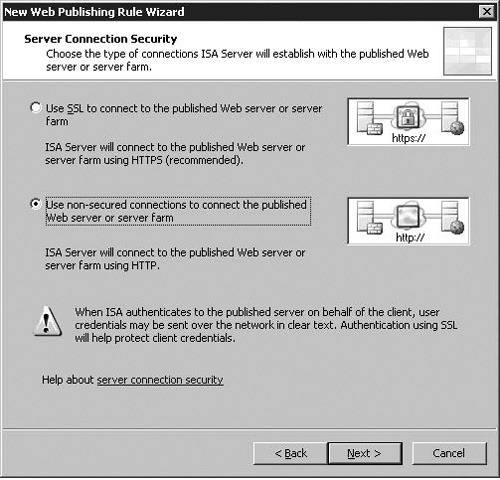
As we are publishing an HTTP site to begin with, we pick Use non-secured connections to connect the published Web server or server farm here. The ISA firewall will automatically pick the correct ports to use, but you may also go into properties for the publishing rule and edit which port it connects to under the Bridging tab after creating the rule. We will cover this later.
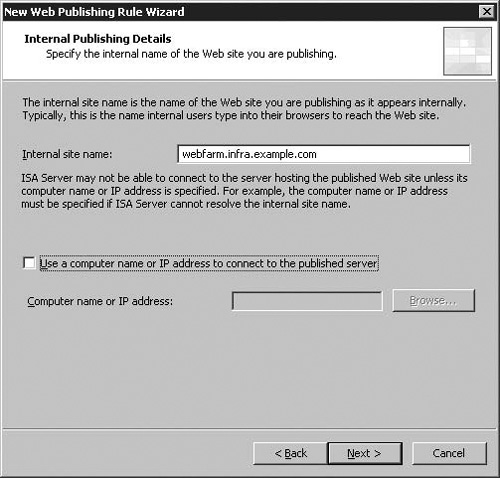
The two Internal Publishing Details pages replace the Define Website to Publish dialog in ISA 2004. On these pages you provide information about the Web site on the ISA firewall Protected Network. As you’ll see in Figure 5.4, you have the following options on the first page:
Internal Site Name
Computer name or IP address
Note
Many issues with ISA Web Publishing Rules are caused by poorly thought-out DNS and Certificate Configuration. Make sure you’re aware ahead of time which certificates you’re using where, and the Common Name of the certificates you’re using match the FQDNs used to access published sites, and the web servers being published by the ISA firewall. Keep this in mind when we get to publishing secure Web sites later in this chapter.
The Internal Site Name is the FQDN that clients on the ISA Protected Network use to connect to the website directly. In the example, we’re using the URL https://webfarm.infra.example.com, an internal intranet site used clients on a corporate LAN. We will be publishing this externally via the ISA firewall as https://extranet.example.com. In the example, we will be publishing an internal site to the internet using a different URL on the Internet to one the Protected Network, referred to as split DNS – we’ll discuss the virtues of this later.
In some instances, you may be publishing a site externally using the same URL on the internet as on the ISA firewall Protected Network. To work around this, you may enter the IP address or a host name for the web server you’re publishing in the Computer name or IP address text box. If you use a FQDN, make sure that the ISA firewall is able to resolve that name to the Web server’s IP address on the corporate network and not the IP address on the external interface of the ISA firewall. This is a very common error among ISA firewall administrators. You can ensure that the name is properly resolved to the private address of the Web server by creating a split DNS infrastructure or by using a HOSTS file entry on the ISA firewall.
One of the primary advantages of using a FQDN in the Computer name or IP address field is that the Web site name shows up in the URL field in the ISA firewall’s Web Proxy log. If you use an IP address, only the IP address of the published server will appear in this field and make log analysis more difficult to perform efficiently.
The second Internal Publishing Details page presents you with the following options, displayed in Figure 5.5:
Path Name
Forward the original host header instead of the actual one
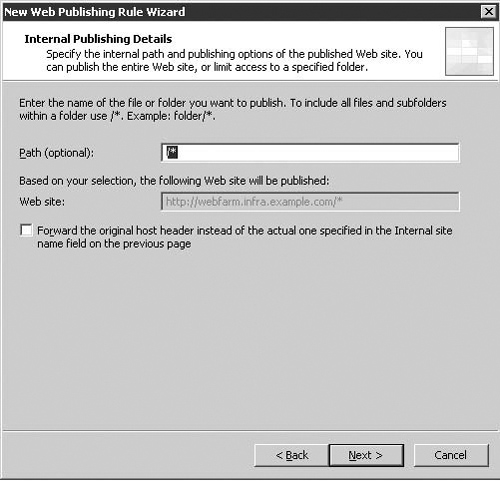
In the Path text box, you enter the paths you want accessible on the published Web server. If you simply want to make an entire web server available, then (as in the example) you can use the /* wildcard.
If, however, you want to make available only a specific subset of your internal web server available (for instance, /public/*, but not any other content at the root of the web server (/*), or the /private/* subdirectory), you can simply enter this path in the Path box. This option can work as a substitute for, or in addition to access controls on the Web Server itself.
Although this wizard page only allows you to enter a single path, we’ll see later that we can enter the Properties dialog box of the Web Publishing Rule and create additional paths and even path redirections.
The Web Site box isn’t a text box, so you can’t enter anything in it. Instead, it shows you the URL that will be accessible on the published Web site (the Internal Site Name textbox from the previous screen with the Path suffixed).
In this example, we entered webfarm.infra.example.com for the Internal Site Name textbox and chose to forward the host header as per the Internal Site Name field.
The Forward the original host header instead of the actual one specified in the Internal site name field on the previous page option is an interesting option which may be unclear without a detailed understanding of HTTP.
What means in practice is that instead of the host header value in the Computer name or IP address text box being sent to the published server, the actual host header in the request sent by the external user is forwarded to the published Web server. This is an important issue if you are hosting multiple Web sites on a single Web server and differentiate the Web sites by using different host headers for each one.
You can see the effects of forwarding, or not forwarding, the original host headers in Figures 5.6, 5.7, and 5.8. In Figure 5.6 below, you see the host headers as seen on the external interface of the ISA firewall from a client connection request for www.msfirewall.org. The HTTP: Host = www.msfirewall.org host header appears in the network monitor trace.

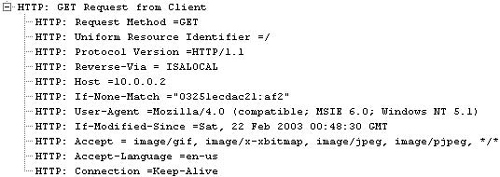
Figure 5.7. HTTP Headers Seen on the Published Web Server when Original Host Header is not Forwarded

When the Web Publishing Rule is configured to not forward the original Host header, and an IP address (or an alternate name) is used in the Computer name or IP address text box, you will see on the Network Monitor trace, in Figure 5.7, taken on the published Web server that the Host header entry is HTTP: Host =10.0.0.2, which isn’t the Host header contained in the original client address. It’s the entry we put in the Computer name or IP address text box. Figure 5.7 below shows an example of HTTP headers seen on the Published Web Server when the original Host header is not forwarded.
However, when we enable Forward the original host header instead of the actual one (specified above), Figure 5.8 shows what appears on the published Web server. In this case, the Network Monitor trace shows that the host header seen on the Web server is HTTP: Host = www.msfirewall.org. See Figure 5.8 below for headers seen on the published Web server when the original Host header is forwarded.
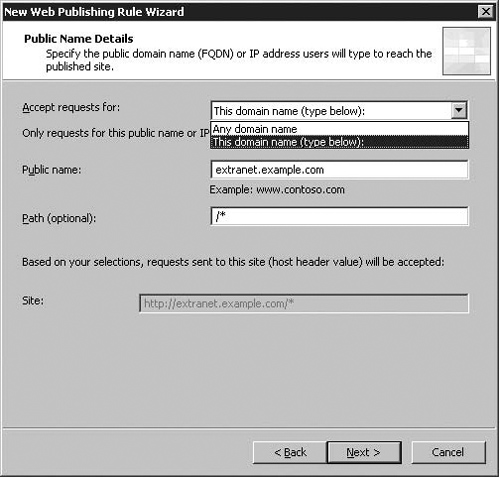
On the Public Name Details page, you enter information about what FQDNs or IP addresses users will use to connect to the published Web site via this Web Publishing Rule. You have the following options on this page:
Accept requests for
Public Name
Path (optional)
The Accept requests for drop-down list provides you with two choices: Any domain name and This domain name (type below). If you choose Any domain name, any requests for a domain name or IP address are accepted by the Web listener for this rule. This is strongly discouraged for security reasons, as not requiring an HTTP hosts header corresponding to the name of the site will allow requests to be made to the web listener by IP address alone, by users (or scripts) who do not have a legitimate request. This increases your exposure to automated worms or scans.
For example, some prevalent worms will send requests to the TCP port 80 or to bogus domain names (such as www.worm.com) to the IP address used by the Web listener for this rule. If you select Any domain name, then the Web listener will accept these as valid requests and continue processing them. This is in spite of the fact that you are not hosting any resources for the bogus domain name the worm or the malicious user uses to access the IP address the Web listener is using on the external interface of the ISA firewall.
A better option, and the one we recommend that you always use for your Web Publishing Rules, is This domain name (type below). When you choose this option, you enter the exact domain name that must be included in the users request to the Web listener. If you want to accept requests only for the www.msfirewall.org domain, then incoming requests for http://1.1.1.1 or http://www.worm.com will be dropped because they do not match the domain name you want this rule to apply to. The one minor disadvantage this configuration option carries is that in the event that you wish to connect to the site directly by IP address (if DNS is down, or has not yet been configured, for instance), you cannot do this straight from the browser, and will have to edit the hosts file on your workstation instead.
When you select This domain name (type below), you must enter the domain name you want this rule to accept in the Public name text box. In this example, we entered the FQDN extranet.example.com. The Public Name Details Wizard page allows you to enter only a single domain name, but you can add more domain names after the wizard is completed. However, we highly recommend that you use a single domain name per Web publishing rule.
The Path (optional) text box allows you to restrict the path(s) that users can access via this Web Publishing Rules. You might want to allow users access to only specific directories on your Web site and not to the entire site. Although you can only enter a single path on the Public Name Details page (Figure 5.9 below), you can enter additional paths after the wizard is completed, in the Properties dialog box for this rule.
You assign a Web listener to the Web Publishing Rule on the Select Web Listener page. A Web listener is a Network Object you use in Web Publishing Rules. The Web listener “listens” on an interface or IP address that you choose for incoming connections to the port you define. For example, for our Web publishing rule that allows HTTP public access to the extranet.example.com site, we will create a Web listener that listens on the external interface of the ISA firewall using the IP address that external users resolve extranet.example.com to.
Note
We assume in the above example that the external interface of the ISA firewall has a public address bound to it. The situation is slightly different if you have a firewall in front of the ISA firewall and have a NAT relationship between the front-end firewall and the ISA firewall. In that case, external clients would resolve the name extranet.example.com to the public address on the front-end firewall that is mapped to the IP address used on the Web listener on the back-end ISA firewall.
You have two options on the Select Web Listener page if there are listeners already configured on the ISA firewall:
Edit
New
Edit allows you to configure existing Web listeners, and New allows you to create a new Web listener. Figure 5.10 illustrates this dialog with a pre-existing listener in place. In the following section we will step through the process required to create the web listener pictured, and will start by clicking New.
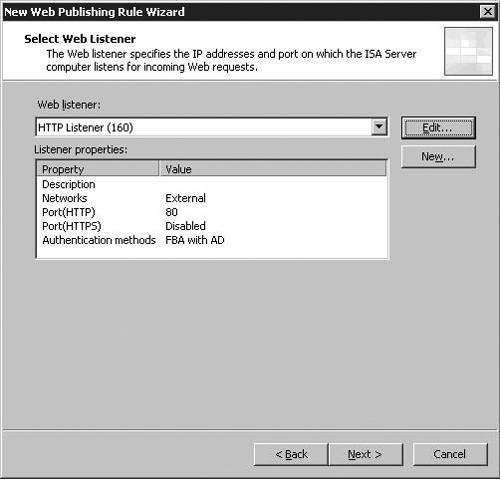
On the Welcome to the New Web Listener Wizard page, enter a name for the Web listener in the Web listener name text box. In this example, we’ll name the Web listener HTTP Listener (.160) (since we have multiple IP addresses bound to ISA’s external interface, this identifies the last octet in the IP address to help disambiguate between Web Listeners). Click Next.
On the Client Connection Security page, as with the connection from ISA to the Published Web Site, we have the option to choose whether our connection uses HTTP or HTTPS. In this instance, however, the choice affects how traffic from internet-based clients to the ISA Server are made. We pick Do not Require SSL secured connections with clients and hit Next.
The Web listener accepts incoming connections automatically on the default ports - TCP port 80 in the case of HTTP, and 443 in the case of HTTPS. You can change this port to any port you like, as long as it does not collide with a socket already in use on the ISA firewall. The wizard provides no means to do this, and you must change this after creating the Web Listener. We will cover this further on in the chapter.
On the Web Listener IP Addresses page, select the Networks and IP addresses on those Networks that you want the listener to listen on. In ISA 2006, we can also choose to enable compression for web listeners.
Recall that each interface on the ISA firewall represents a Network, and all IP addresses reachable from that interface are considered part of that Network. The Web listener can listen on any Network defined on the ISA firewall.
In this example, we want to accept incoming connections from Internet users, so we’ll select the External network by putting a checkmark in its checkbox. At this point, the Web listener will accept connection requests to all IP addresses bound to the external interface of the ISA firewall. We recommend that if you have multiple IP addresses bound to an interface that you configure the Web listener to use only one of those addresses. This provides you greater flexibility because you can customize the properties of each listener. If you allow the listener to listen on all IP addresses on the interface, then a single set of listener properties will be assigned to it.
In ISA 2006, we also gain the ability here to enable or disable http gzip compression for this web listener. Previously in versions of ISA 2004 pre-SP2, this could not be done without losing some of ISA’s application-layer inspection capabilities.
Click Select IP Addresses on the Web Listener IP Addresses page, as shown in Figure 5.11, to progress to the Network Listener IP Selection page. On this page (Figure 5.12) you have three options:
All IP addresses on the ISA Server computer that are in the selected network
The default IP address on the ISA Server computer in the selected network
Specified IP addresses on the ISA Server computer in the selected network

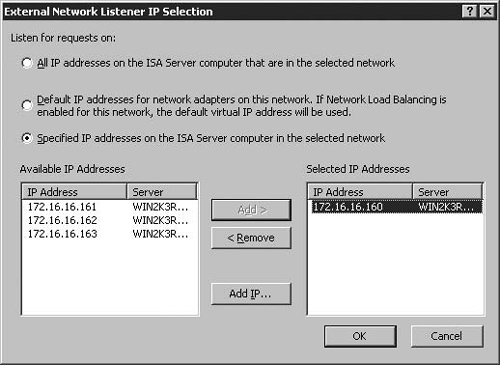
All IP addresses on the ISA Server computer that are in the selected network is the default and is the same as checking the checkbox on the previous page without making any customizations. This option allows the listener to listen on all addresses bound to the interface representing the Network(s) you select. When you select more than one Network, the Web listener will listen on IP addresses bound to each of the Networks you select.
Default IP Addresses for network adapters in this network allows the listener to accept connections to the primary IP address bound to the Network interface. The primary address is the first address on the list of addresses bound to the Network interface. This is also the interface that is used for connections leaving that interface.
Specified IP addresses on the ISA Server computer in the selected network allows you to select the specific IP addresses you want the listener to use. The available IP addresses for the Network appear in the Available IP addresses section. You select the IP address you want the Web listener to use, and click Add; it then appears in the Selected IP Addresses section.
The example in Figure 5.12 demonstrates the Network centric nature of the ISA firewall - the Available IP Addresses list will display all IP addresses that correspond to the selected network, irrespective of which network adapters they are bound to. The default External Network includes all IP addresses that are not defined as part of a Network, which may include DMZ addresses if they are not configured within ISA as a separate network.
We can see in Figure 5.12 that there are a number of contiguous IP addresses bound to the external interface of the ISA firewall – but we have only picked one of the addresses for this particular publishing rule. Click OK. Then click Next on the IP Addresses page.
The next screen within the Web Listener wizard ISA presents us with is the Authentication Settings page in Figure 5.13 is another new wizard page.
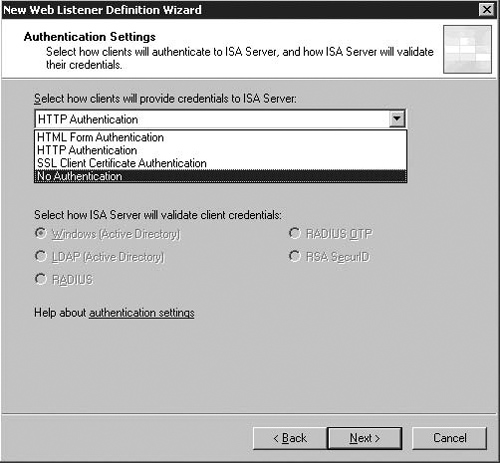
We will be enabling HTML Form Authentication, validated against Windows (Active Directory). HTML Form, or Forms-Based Authentication in ISA 2006 provides a large number of possible back-ends and authentication types, and from the client to the ISA firewall is implemented using HTML forms and cookies, which – unlike with HTTP authentication - allow the administrator to configure timeouts after which the user must authenticate.
ISA Firewall Alert
Here, we are configuring ISA to allow authentication over HTTP. By default, the ISA firewall does not allow this to happen, even though it appears to be a valid configuration in the User Interface – it must also be separately enabled in the Authentication – Advanced dialog discussed at the end of this section. If you do not have end-to-end encryption of client credentials, particularly over the internet, you should very carefully consider whether or not you should be allowing authentication to take place over HTTP.
Table 5.1 describes each of the authentication methods available for Web listeners and a short description of the important characteristics of each method.
Table 5.1. Web Listener Authentication Methods
Authentication Method | Details |
|---|---|
Basic |
|
Digest |
|
Integrated |
|
RADIUS |
|
RADIUS OTP |
|
SecurID |
|
OWA Forms-based |
|
Forms-Based |
|
Authentication |
|
SSL Certificate |
|
The authentication option you select applies only if you limit access to the Web Publishing Rule to a user or group. If you allow All Users access to the Web Publishing Rule, then the authentication option is ignored. These authentication options apply only to authentication performed by the ISA firewall itself, not to authentication that may be required by the published Web site. We will discuss authentication against the target webserver and Authentication Delegation later.
Some authentication methods (HTTP Digest and Integrated Authentication, and SSL Client Certificate Authentication) require that the ISA firewall be a member of a domain. This is not a significant issue unless you have a back-to-back firewall configuration where the front-end firewall is an ISA firewall (the back-end firewall can be any kind of firewall you like, including ISA firewalls). If the ISA firewall is on the front-end and you want to authenticate users at the front-end server, LDAP Authentication (or Radius Authentication) should be used. LDAP Authentication is a new feature in ISA 2006, and allows you to authenticate from the ISA firewall to one (or more than one) domain without being a member of that domain. Note that if you are using a back to back ISA Firewall configuration, no authentication should take place on the front-end ISA Firewall and the back-end ISA Firewall, which is a domain member, should do the authentication.
When the ISA firewall is on the back-end, we always recommend that you make the firewall a member of the Active Directory domain so that you can leverage the many security advantages inherent in domain membership. However, if there are political reasons why the back-end ISA firewall cannot be made a member of the domain, you can still leverage LDAP and RADIUS authentication in the scenario, too, although realize that by doing so, you reduce the overall security posture of the ISA Firewall.
In ISA 2006, the screens prompting for Radius/Radius OTP Server Settings and LDAP Server Settings (if you pick any of these options as the backend authentication provider) are prompted for after the Single Sign-On Settings, and these screens will be covered later.
If we hit Next on the Authentication Settings dialog, we come to the Single Sign on Settings dialog, pictured in Figure 5.18. Also new to ISA 2006, the Single Sign On feature allows ISA to sign on to multiple websites after the user has authenticated to one. This allows simple, one-login access to sites such as Outlook Web Access (OWA), Office Communications Server Communicator Web Access (CWA), Sharepoint Portal Server, or any number of other web applications. This greatly simplifies the user experience and increases efficiency & security.
The Single Sign on Settings dialog presents you with only one choice – the SSO Domain Name. This is an important option, as the Domain Name is used in the domain attribute of the cookie provided to the client when it logs into the published site via Forms-Based Authentication. In our case, we set this to .example.com
ISA Firewall Alert
The cookie created by ISA SSO can be read by any site within the domain specified in the SSO Domain Name field, and therefore providing a domain such as .com which is a superset of your domain name, whilst convenient, would allow any site with a domain name ending in .com to read the SSO cookie. It is highly important, then, to make the SSO Domain Name setting as specific as you can (and ideally, do not allow it to encompass any domain you do not have total control over).

As mentioned earlier, after the Single Sign On Settings page, if we have selected the LDAP, Radius, or Radius (OTP) backend authentication providers for our web listener authentication, we will now be prompted for further details of these settings if we have not previously configured LDAP authentication on other web listeners.
In the following section, we will explore the additional pages within the wizard having selected either of these options will present us with.
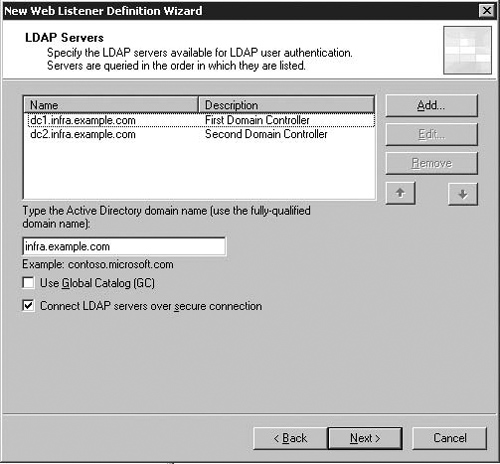
The LDAP Servers Page prompts you to enter details for your Infrastructure’s LDAP Servers as well as which Active Directory domain name should be used for authentication. The LDAP Servers configured when you setup your first LDAP-enabled web listener are referred to as the Default Set – if you require different LDAP servers for different web listeners, you can define many sets of LDAP servers, and change the name of the default set, in properties for your web listener.
By default, this dialog does not check the Connect LDAP servers over secure connection option – without this selected, the queries sent by the ISA firewall to your domain controllers will be unencrypted LDAP queries sent to TCP Port 389 on the target LDAP Server. This option must be enabled in order to enable the ‘Change Password’ function when publishing Outlook Web Access. When enabled, connections are encrypted LDAPS connections, made over TCP Port 636.
If you do enable the Connect LDAP servers over secure connection, you will need to ensure that you have a certificate installed in the Personal, Local Machine Certificate store for each domain controller. The simplest way to do this is using certificate auto enrolment with an Enterprise CA, but you could also do this with a Standalone (or third party) Certificate Authority (or even commercial certificates).
Without appropriately configured certificates installed, and the root certificate which issued those certificates stored in the ISA Server Local Computer Account’s Trusted Root Certificate Store, connections to the target LDAP Server will fail.
If the option Connect LDAP servers over secure connection is not checked, you should ensure that your LDAP traffic is encrypted by IPSec or otherwise protected.
The Use global catalog option is optional, and if your LDAP servers are Global Catalog servers nullifies the requirement to provide an Active Directory Domain Name. This option, however, will prevent Password Management from functioning properly. Without Connect LDAP servers over secure connection enabled, queries to LDAP Servers with the Use global catalog option enabled will be made to TCP Port 3268. With this option enabled, connections are made on TCP Port 3269.
In order to enable Password Management for OWA FBA, you will also need to specify a username and password that the ISA Firewall can use to bind to the LDAP server and access information inaccessible to an anonymous user. This setting does not appear in the wizard, and must be enabled in the main GUI. This topic will be covered later on in the chapter.
Finally, LDAP support is only for Microsoft Active Directory domain controller. The ISA Firewall does not support other types of LDAP servers.
If we enable RADIUS or RADIUS (OTP) authentication from ISA, we will be prompted when creating our web listener to specify the servers to which we want to authenticate. ISA will authenticate to any standard RADIUS Server, including Microsoft’s (confusingly abbreviated) IAS Radius Server.
As mentioned earlier, RADIUS enables you to pre-authenticate users at the ISA firewall before authenticating to the target web server, without requiring ISA to be a member of the same domain as the target web server (or indeed any domain).
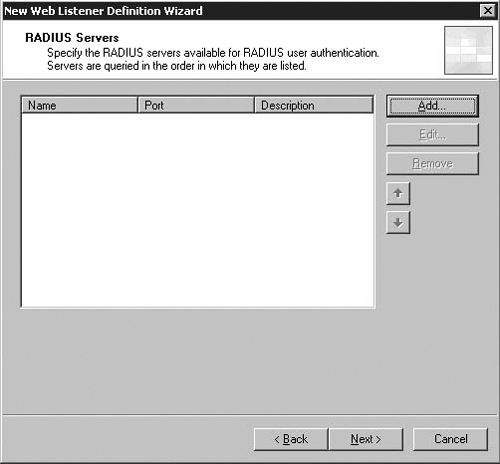
Hitting the Add button in this dialog presents us with Figure 5.17, the Add Radius Server dialog. This allows us to add the configuration settings for one Radius Server, and gives us the following options:
Server Name
Server Description
Shared Secret
Authentication Port
Time-out (seconds)
Always use message authenticator

The Server name field allows us to specify a DNS-resolvable name or IP address for the radius server we need to use. Unlike LDAP, Radius does not use certificates for authentication or encryption, and therefore there is no requirement for the Server name to be a FQDN matching the Computer Account Certificate, and IP addresses can be used.
ISA Firewall Alert
Although simpler than LDAP Authentication, RADIUS also has the disadvantage that it cannot inherently be encrypted using SSL. Although passwords are hashed when sent over RADIUS, you should still as a best practice protect your RADIUS traffic with IPSec if your Radius servers support this. At an absolute minimum, you should firewall connections to your RADIUS servers such that only authorized RADIUS clients such as ISA firewalls may connect, use strong shared secrets, enable the Message Authenticator option, and strictly control access to your DMZ/Protected network segments.
The Description field allows you to provide an annotation for your entry. The Shared Secret setting is used to hash passwords sent via RADIUS, and should be of adequate length and complexity to make brute force attacks impractical.
By default, RADIUS uses UDP port 1812 for authentication traffic, and the Authentication Port field allows you to specify the port that should be used. Microsoft IAS Server, in line with many other third party radius packages, uses the standard port. The Time-out setting allows you to control how long ISA will wait before moving to the next radius server in the set.
The Always use Message Authenticator option adds an extra layer of security to the RADIUS protocol, allowing the target RADIUS server to verify the source of the RADIUS traffic by including data encrypted using the shared secret specified earlier. This option should be enabled if your RADIUS Server supports it. Microsoft IAS Server on Windows 2003 supports this option, and then corresponding server-side option to be enabled in IAS is the Client must always send the signature attribute in the request option.
At this point, we hit the end of the Web Listener Wizard, and can click Next and Finish to proceed. At this point, we can see our new web listener listed in the Select Web Listener page illustrated in Figure 5.10. If we wish to edit advanced properties of the web listener before finishing the web publishing wizard, we can do this here by hitting the Edit button with the Web Listener selected. This will be covered later.
If you use SecurID to authenticate your website, you are not prompted for further settings during the completion of the Web Publishing Rule Wizard, and there are few options in the ISA GUI for RSA ACE server settings, or other details that are obviously required in order to configure the ISA Server to authenticate against the ACE Server.
In order to complete the setup of the ISA firewall, you will need to appropriately configure the RSA ACE Server, and install the sdconf.rec file provided by the ACE Server onto the ISA firewall, and place it in the %systemroot%system32 directory.
Full configuration of SecurID and ACE are outside our scope, as SecurID is a complex technology, but there is a useful RSA Test Authentication Utility which you can use to check your RSA Configuration and ensure that ISA is able to authenticate to your ACE Servers downloadable from http://www.microsoft.com/downloads/details.aspx?FamilyID=7b0ca409-55d0-4d33-bb3f-1ba4376d5737&DisplayLang=en.
The next page we are presented with is the Authentication Delegation page. This screen is also new to ISA, and controls how our ISA server authenticates to the server published to clients. The Authentication Delegation page is illustrated in Figure 5.18.
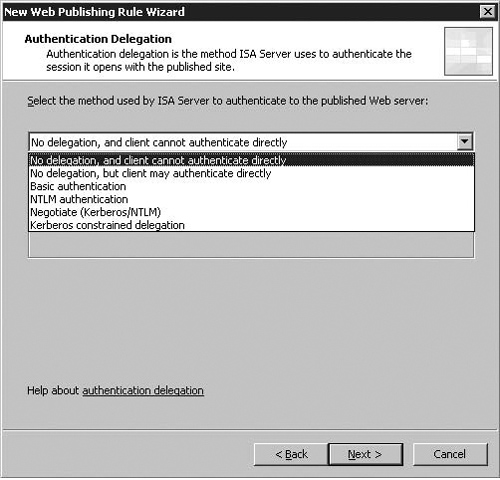
The Select the method ... dropdown in this dialog allows you to dictate how authentication to the target web server takes place, and ISA 2006 introduces a variety of options for Authentication Delegation to the published web server, including Kerberos Constrained Delegation, both as part of the Negotiate and Kerberos constrained delegation options.
The following methods can be used for this second stage of the login process, from the ISA Server to the published Web Server:
Table 5.2. Authentication Delegation Methods
Authentication Method | Details |
|---|---|
No delegation, and client cannot authenticate directly |
|
No delegation, but client may authenticate directly |
|
Basic Authentication using ISA 2004. |
|
NTLM Authentication |
|
Negotiate (Kerberos/NTLM) |
|
Kerberos Constrained Delegation |
|
We select Negotiate (Kerberos/NTLM), and then hit Next to proceed to the last page in the Web Publishing Wizard.
On the User Sets page (Figure 5.19), configure whether authentication is required to access the Web server published by this Web Publishing Rule. The default setting for http:// rules is All Users, which means that authentication is not required to access the Web server published by this Web Publishing Rule. Click Add if you want to require authentication. You will be presented with the Add Users dialog box where you can select the User Set representing the users you want the rule to apply to.
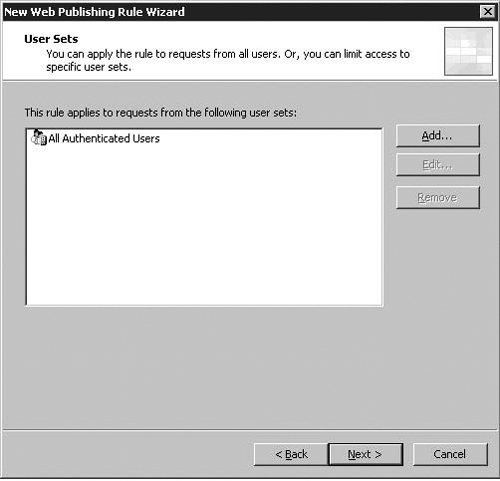
Note that the All Users option only means that authentication is not required when the Web listener is not configured to require authentication. To configure the Web Publishing Rule to allow the user of anonymous credentials, use the All Users user set. Figure 5.19 below shows the options for the User Sets page.
We will discuss User Sets, how to create them, and how to use them in Chapter 4. Click Next on the User Sets page, and then click Finish on the Completing the New Web Publishing Rule Wizard page.
You can publish secure Web servers using SSL Web Publishing Rules. Publishing Secure Web servers requires a bit more work up front because you need to obtain a Web site certificate for the published Web site, bind that certificate to the Web site on the published Web server and then bind a Web site certificate to the ISA firewall so that it can impersonate the Web server. This allows the ISA firewall to provide very high security for SSL Web sites published via Web Publishing Rules. Fortunately, ISA 2006 includes several improvements to the way SSL Web Publishing Rules are configured which simplifies their configuration and troubleshooting.
In this section we’ll discuss the following:
SSL Bridging
Importing Web site certificates into the ISA Firewall’s machine certificate store
Requesting a Web site certificate for the ISA Firewall to present to SSL Web sites
Creating SSL Web Publishing Rules
SSL Bridging is an ISA firewall feature that allows the ISA firewall to perform stateful application-layer inspection on SSL connections made to Web-published Web servers on an ISA firewall Protected Network. This unique feature allows the ISA firewall to provide a level of stateful application-layer inspection uncommon amongst other firewalls in its class.
SSL bridging prevents intruders from hiding exploits within an encrypted SSL tunnel. Conventional stateful-filtering firewalls (such as most “hardware” firewalls on the market today) cannot perform stateful application-layer inspection on SSL connections moving through them. These hardware stateful-filtering firewalls see an incoming SSL connection, check the firewall’s Access Control List, and if there is an ACL instructing the stateful packet filter-based firewall to forward the connection to a server on the corporate network, the connection is forwarded to the published server without any inspection for potential application-layer exploits.
The ISA firewall supports two methods of SSL bridging:
SSL-to-SSL bridging
SSL-to-HTTP bridging
SSL-to-SSL bridging provides a secure SSL connection from end to end. SSL-to-HTTP bridging ensures a secure connection between the Web client and the ISA firewall, and then allows a clear text connection between the ISA firewall and the published Web server.
In order to appreciate how the ISA firewall works with SSL in protecting your Web server, let’s look at the life cycle of a communication between the Web client on the Internet and the Web site on the ISA firewall Protected network:
The OWA client on the Internet sends a request to the ISA firewall’s external interface.
An SSL session is negotiated between the Web client on the Internet and the ISA firewall’s external interface.
After the SSL session is established, the Web client sends the username and password to the ISA firewall. The SSL tunnel that has already been established between the Web client and ISA firewall protects these credentials.
The request is decrypted before the request is forwarded by the ISA firewall to the published Web server. The decrypted packets received from the Web client are examined by the ISA firewall and subjected to stateful application-layer inspection via the ISA firewall’s HTTP security filter and any other application-layer inspection filters you’ve installed on the ISA firewall. If the ISA firewall finds a problem with the request, it is dropped.
If the request is acceptable, the ISA Server firewall re-encrypts the communication and sends it over a second SSL connection established between the ISA firewall and the published Web site on the ISA firewall Protected Network.
The published Web server decrypts the packet and replies to the ISA firewall. The Web server encrypts its response and sends it to the ISA firewall.
The ISA firewall decrypts the response received from the published Web server. It evaluates the response in the same way it did in step 4. If something is wrong with the response, the ISA firewall drops it. If the response passes stateful application-layer inspection, the ISA firewall re-encrypts the communication and forwards the response to the Web client on the Internet via the SSL session the Internet Web client has already established with the ISA firewall.
The ISA firewall actually participates in two different SSL sessions when SSL-to-SSL bridging is used:
An SSL session between the Web client and the external interface of the ISA firewall
A second SSL session between an internal interface of the ISA firewall and the published Web server
The typical stateful packet-filter firewall only forwards connections for published SSL sites. This is sometimes referred to as “SSL tunneling.” The conventional stateful filtering firewall accepts SSL communications on its external interface and forwards them to the published SSL server. Application-layer information in the communication is completely hidden inside the SSL tunnel because the packet filter-based firewall has no mechanism to decrypt, inspect, and re-encrypt the data stream. Because traditional stateful filtering firewalls are unable to make allow and deny decisions based on knowledge of the contents of the encrypted tunnel, it passes viruses, worms, buffer overflows and other exploits from the Web client to the published Web site.
The ISA firewall can also perform SSL-to-HTTP bridging. In the SSL-to-HTTP bridging scenario, the connection between the Web client and the external interface of the ISA firewall is protected in the SSL tunnel. The connection between the ISA firewall’s internal interface and the published Web server on the corporate network is sent “in the clear” and not encrypted. This helps performance because avoids the processor overhead incurred for the second SSL link.
However, you have to consider the implications of SSL-to-HTTP bridging. Steve Riley (http://www.microsoft.com/technet/treeview/default.asp?url=/technet/columns/security/askus/auaswho.asp), a Program Manager on the ISA Server team at Microsoft, has mentioned that the external user connecting to the published Web site using SSL has an implicit agreement and expectation that the entire transaction is protected. We agree with this assessment. The external Web client enters into what can arguably be considered a “social contract” with the published Web server, and part of that contract is that communications are protected from “end to end.”
SSL-to-SSL bridging protects the data with SSL and the ISA Server firewall services from end to end. SSL-to-HTTP bridging protects the data from the OWA client and while it’s on the ISA Server firewall, but it is not safe once it’s forwarded from the ISA Server firewall and the OWA site on the internal network.
The topic of Certificate Authorities (CAs) and PKI (Public Key Infrastructure) is usually enough to drive many administrators away from even considering SSL. There are a number of reasons for this:
The available documentation on certificate authorities and PKI, in general, is difficult to understand.
The subject has the potential to be extremely complex.
You need to learn an entirely new vocabulary to understand the CAs and PKI. Often the documentation on these subjects doesn’t define the new words, or they use equally arcane terms to define the arcane term for which you’re trying to get the definition.
There doesn’t seem to be any support for the network and firewall administrator who just wants to get a CA setup and running so that he can use certificates for SSL and L2TP/IPSec authentication and encryption.
We not going to do an entire course on PKI and the Microsoft CA, but we do want to help you understand some of the decisions you need to make when deciding what type of Certificate Authority to install and use.
PKI, or Public Key Infrastructure, refers to the system through which keys, which may be used for a range of purposes from securing an SSL website to logging onto a website, are issued to clients, verified, and protected. Central to any PKI, whether the public infrastructures run by authorities such as Verisign and Cacert or a private corporate infrastructure, is the role of the CA.
A CA, or Certificate Authority, is a piece of server infrastructure which contains a Root Certificate trusted by all users of the PKI, and which can be used to issue certificates to clients automatically, or on request. Most CAs will have some form of web enrolment interface to simplify this process.
There are many third-party PKI packages, such as those from Entrust and RSA. These packages are typically highly capable, although expensive. Microsoft’s implementation of PKI is referred to as Certificate Services, and ships with Server editions of Windows. Unless you have very complex requirements, chances are Certificate Services will probably do what you want, and it has several benefits if you have pre-existing Microsoft infrastructure (such as Active Directory) which you wish to integrate it with.
Certificate Services can be installed in one of four roles:
Enterprise Root CA
Enterprise Subordinate CA
Standalone Root CA
Standalone Subordinate CA
Enterprise Root and Enterprise Subordinate CAs can only be installed on Active Directory member servers. If you want to install a CA on a non-domain member (or wish to disassociate your PKI from Active Directory), then install a Standalone Root or Standalone Subordinate CA. If you install a single Certificate Server, you’ll install it as an Enterprise Root or Standalone Root. Subordinate CAs are used in organizations managing multiple CAs.
You can use the Certificates MMC standalone snap-in to obtain machine or user certificates – the snap-in is only available to domain member computers.
You can configure Group Policy to automatically issue machine and user certificates via autoenrollment – this feature is only available to domain member computers.
You can use the Web enrollment site to obtain certificates via a Web interface. (This can also be installed on a non-CA if you wish to split this role from that of the CA)
The Certificates MMC snap-in or autoenrollment can’t be used to obtain certificates from Standalone CAs. The only way to obtain a certificate from a Standalone CA is to request one from the Standalone CA’s Web enrollment site. You must fill out a form and then submit the request. The certificate is not immediately issued, because the only thing the CA knows about the requestor is what’s put in the form. Someone needs to “eyeball” the request and then manually approve the request. The requestor then needs to use the browser to return to the Web enrollment site and download the certificate.
The Enterprise CA is less hassle because it has information about the requestor. Since the request is for a computer or user in the domain, someone has already qualified the domain user or computer and deemed that member worthy of a certificate. The Enterprise CA assumes you have administrative control over all domain member users and computers and can evaluate the validity of the certificate requests against the information available to it in the Active Directory. With an Enterprise CA, Autoenrollment can be configured via Group Policy to configure groups of computers, or users, to automatically apply for (and install) certificates for purposes such as SSL and IPSec without any manual administrative work on individual machines.
For these reasons, we recommend you use enterprise CAs. We will assume that you’re using an enterprise CA for the remainder of this discussion.
For more information on Certificate Authorities and PKI, check out Microsoft’s PKI page at www.microsoft.com/windowsserver2003/technologies/pki/default.mspx
One of the most common reasons that ISA firewall admins give up on SSL, and SSL-to-SSL bridging is the problems they may experience in getting the SSL connections to work correctly. The most common reason for this is a configuration error that involves the relationship between the certificate configuration and the Web Publishing Rule used to publish the Web site.
Figure 5.20 provides details of the SSL-to-SSL bridged connection to a public Outlook Web Access Web site.
The Web client sends the request https://www.internal.net/exchange/ to the external interface of the ISA Server firewall publishing the OWA 2003 Web site
The ISA firewall checks its Web Publishing Rules to see if there is a Web Publishing Rule containing a Destination Set with the FQDN www.internal.net and the path /exchange. If there is a Web Publishing Rule matching this FQDN and path, the connection will be handled based on the forwarding instructions included in the Web Publishing Rule. However, before the ISA firewall can evaluate the URL, the SSL session must be established. The common name on the certificate the ISA firewall uses to impersonate the OWA Web site must be the same as the FQDN used by the Web client to connect to the site. In this example, the common name on the certificate the ISA firewall uses to impersonate the OWA Web site must be www.internal.net so that it matches the FQDN the external OWA client uses in its request.
The ISA firewall decrypts the packets, examines them, and then attempts to create a new SSL connection between itself and the internal OWA Web site. Just like when the external OWA client connects to the external interface of the ISA Server firewall, the ISA Server firewall’s Web Proxy service acts as a client to the OWA 2003 Web site on the internal network. The request the Web Proxy service sends to the OWA 2003 site on the internal network must match the common name on the certificate on the OWA Web site. That is why we must configure the request to be forwarded to www.internal.net when we configure the Web Publishing Rule. We’ll go over this important fact again when we discuss the configuration of the Web Publishing Rule.
The packets are forwarded to the Web site after the SSL session is established between the ISA firewall and the Web server on the internal network.
ISA Firewall Note
All machines participating in the SSL sessions (the Web client, the ISA firewall, and the Web site) must have the CA certificate of the root Certificate Authority in its Trusted Root Certification Authorities certificate store.
Things break when the common name on the server certificate doesn’t match the name used by the client request. There are two places where things can break in the SSL-to-SSL bridging scenario:
If the common name on the certificate used by the ISA Server firewall to impersonate the Web site doesn’t match the name (FQDN) used by the Web client on the Internet
If the common name on the certificate on the Web site doesn’t match the name (FQDN) used by the ISA firewall service to forward the request; the name in the ISA firewall’s request to the published Web server is determined by the entry on the To tab in the Web Publishing Rule.
Keep these facts in mind as we work through our SSL-to-SSL bridging Web Publishing Rule later.
The ISA firewall must be able to impersonate the published Web server so that it identifies itself to the remote Web client as the published Web server. The mechanism behind this impersonation is a common name on the Web site certificate. We must install the Web site certificate on the ISA firewall to accomplish this task.
The first step is to export the Web site certificate from the secure Web server’s Web site. The IIS console has an easy-to-use Certificate Wizard where you can export the Web site certificate. When you export the Web site certificate, make sure that you include the private key. One of the most common reasons for failure in secure Web Publishing Rules is that the Web site certificate was not exported with its private key.
The Web site certificate is then imported into the ISA firewall’s machine certificate store. Once the Web site certificate is imported into the ISA firewall’s machine certificate store, it will be available to bind to a Web listener. You’ll know that the certificate wasn’t properly imported if you’re unable to bind the certificate to a Web listener.
Perform the following steps to import the Web site certificate into the ISA firewall’s machine certificate store:
Copy the Web site certificate to the ISA firewall machine.
Click Start, and then click the Run command. In the Run dialog box, enter mmc in the Open text box, and click OK.
In the console, click File, and then click Add/Remove Snap-in.
In the Add/Remove Snap-in dialog box, click Add.
In the Add Standalone Snap-in dialog box, click Certificates in the list of Available Standalone Snap-ins, and click Add.
On the Certificates Snap-in page, select the Computer account option and click Next.
On the Select Computer page, select Local computer (the computer this console is running on) and click Finish.
Click Close in the Add Standalone Snap-in dialog box.
Click OK in the Add/Remove Snap-in dialog box.
Expand the Certificates (Local Computer) node in the left pane of the console.
Expand the Personal node in the left pane of the console.
Right-click the Certificates node, point to All Tasks and click Import.
Click Next on the Welcome to the Certificate Import Wizard page.
On the File to Import page, use the Browse button to find the certificate you copied to the ISA firewall. Click Next after the certificate appears in the File name text box.
Enter the password you assigned to the Web site certificate in the Password text box on the Password page. Do not mark the certificate as exportable. Click Next.
Accept the default setting, Place all certificates in the following store on the Certificate Store page. Click Next.
Click Finish on the Completing the Certificate Import Wizard page.
Click OK on the Certificate Import Wizard dialog box.
The Web site certificate and the CA certificate appear in the right pane of the console. The CA certificate has the same name as the entry in the Issued by column.
Right-click the CA certificate and click Cut.
Expand the Trusted Root Certification Authorities node in the left pane of the console.
Right-click the Certificates node and click Paste. If the Paste command does not appear, repeat step 20, and then try again.
Return to the PersonalCertificates node in the left pane of the console and double-click the Web site certificate.
In the Certificate dialog box, click the Certification Path tab. The CA certificate should not have a red “x” on it. If there is a red “x” on the CA certificate that indicates that the CA certificate was not successfully imported into the Trusted Root Certification Authorities node.
Close the Certificate dialog box.
Close the mmc console. Do not save the console.
Now that the Web site certificate is imported into the machine’s certificate store, it’ll be available to bind to the Web listener used in the SSL Web Publishing Rule.
The ISA firewall can be configured to present a user certificate to Web sites that require user certificates before connecting to the site. These user certificates are also referred to as client certificates. The published Web site can be configured to require that the client certificate be presented before a connection is allowed. Client certificates can be mapped to user accounts. This allows for user certificate authentication. However, you can require user certificates and then provide log on credentials via alternate authentication methods.
You can request a user certificate for the ISA firewall’s Firewall Service and then configure the Web Publishing Rule to present this certificate when Web sites request a client certificate. The first step is to request a certificate for the ISA firewall’s Firewall Service account.
In the following example we will use the certificates MMC to import a certificate for the ISA firewall’s Firewall service account. We cannot use the Certificates MMC to request a certificate for the account, but we can import a user certificate using the Web enrollment site.
In order to request a certificate for the ISA firewall from the Web enrollment site, we must first create a user account for the ISA firewall. Create a user account name isafirewall in the Active Directory prior to performing the following procedures.
Perform the following steps to request a certificate for the Firewall service account:
At the ISA firewall machine, open the Microsoft Internet Security and Acceleration Server 2006 management console, expand the server name, and click the Firewall Policy node.
Click the Tasks tab in the Task pane. On the Tasks tab, click the Show System Policy Rules link.
In the list of System Policy Rules, right-click Rule 2 Allow all HTTP traffic from ISA Server to all networks (for CRL downloads), and click Edit System Policy.
On the General tab of the System Policy Rule for CRL Download, check the Enable checkbox. Click OK.
Click Apply to save the changes and update the firewall policy.
Click OK in the Apply New Configuration dialog box.
Open Internet Explorer on the ISA firewall and enter the URL http://<certificateserver>/certsrv, where certificateserver is the name or IP address of the enterprise CA on the corporate network.
In the Connect to dialog box, enter the credentials of the isafirewall account and click OK.
Click Add in the Internet Explorer dialog box, creating the blocking of the site.
Click Add in the Trusted site dialog box. Click Close.
On the Welcome page, click the Request a certificate link.
On the Request a Certificate page, click the User Certificate link.
On the User Certificate – Identifying Information page, click Submit.
Click Yes in the Potential Scripting Violation dialog box.
Click Yes in the dialog box informing you that you’re sending information to the Web server.
On the Install this certificate page, click the Install this certificate link.
Click Yes in the Potential Scripting Violation dialog box.
Click the Tools menu in the browser, and click Internet Options.
In the Internet Options dialog box, click the Content tab.
On the Content tab, click Certificates.
In the Certificates dialog box, click isafirewall and click Export.
Click Next on the Welcome to the Certificate Export Wizard page.
On the Export Private Key page, select Yes, export the private key, and click Next.
On the Export File Format page, remove the checkmark from the Enable strong protection checkbox. Place a checkmark in the Include all certificates in the certification path if possible checkbox. Click Next.
On the Password page, enter a password and confirm the password for the certificate file. Click Next.
On the File to Export page, enter a path in the File name text box. In this example, we’ll enter the file name c:isafirewallcert. Click Next.
Click Finish on the Completing the Certificate Export Wizard page.
Click OK in the Certificate Export Wizard dialog box.
Click Close in the Certificates dialog box.
Click OK in the Internet Options dialog box.
Now we’ll import the certificate into the Firewall service account:
Click Start and then click Run. In the Run dialog box, enter mmc in the Open text box, and click OK.
In the console, click File, and then click Add/Remove Snap-in.
In the Add/Remove Snap-in dialog box, click Add.
In the Add Standalone Snap-in dialog box, click Certificates in the list of Available Standalone Snap-ins, and click Add.
On the Certificates snap-in page, select the Services account option, and click Next.
On the Select Computer page, select Local Computer (the computer this console is running on), and click Next.
On the Select a service account to manage on the local computer page, select Microsoft Firewall from the Service account list, and click Finish.
Click Close in the Add Standalone Snap-in dialog box.
Click OK in the Add/Remove Snap-in dialog box.
In the console, expand the Certificates – Service node and right-click fwsrvPersonal. Point to All Tasks and click on Import.
On the Welcome to the Certificate Import Wizard page, click Next.
On the File to Import page, click Browse to find the location of the user certificate file you exported from the browser. Click Next.
Enter the password you assigned the certificate in the Password text box. Do not put a checkmark in the Mark this key as exportable checkbox. You might also want to delete the certificate from the Web browser on the ISA firewall so that this certificate cannot be stolen by individuals who obtain physical access to the ISA firewall. Click Next.
On the Certificate Store page, use the default setting Place all certificates in the following store, and click Next.
Click Finish on the Completing the Certificate Import Wizard page.
Click OK in the Certificate Import Wizard dialog box.
The certificate is now associated with the Firewall service account. You might want to disable the System Policy Rule we created earlier so that you don’t inadvertently use the browser on the ISA firewall. Remember, you should avoid using the browser, and all other client applications, on the firewall.
Now that our certificates are in place, we can create the SSL secure Web Publishing Rule. There are two main differences between this process in ISA 2006, namely:
There is no choice regarding tunneled and bridged rules
The SSL and non-SSL publishing wizards have been merged
We will cover these differences, as well as re-exploring the Internal Publishing Details pages and Public name details pages, which have added implications for us when publishing SSL websites.
In ISA 2004, we had the choice as to whether to tunnel or bridge SSL Web Publishing Rules. ISA 2006 does not give you this choice, preferring instead to default to bridging SSL published websites.
This provides us with a wizard which has been tweaked to provide us only with the securer option - SSL Bridging provides a secure end-to-end encrypted SSL connection while at the same time allowing the ISA firewall to perform both stateful packet inspection (like any conventional “hardware” firewall) and stateful application-layer inspection.
SSL Tunneling with ISA 2004 bypassed the ISA firewall’s stateful application-layer inspection functionality and reduced the overall level of security for the publishing rule that is provided by a conventional stateful packet inspection “hardware” firewall. The omission of this form of publishing rule from the wizard should not prove a problem for many people, as there were very few reasons to use this option save for unusual situations such as those in which you publish applications that are not compliant with HTTP 1.1 Web Proxies. If you must publish an SSL website in tunneled mode, you must now do this via the Server Publishing Wizard.
One exception to this best practice is when you have a back to back ISA Firewall configuration. In this case, the front-end ISA Firewall should use SSL tunneling to the back-end ISA Firewall. The SSL connection is then terminated on the back-end ISA Firewall and SSL to SSL bridging can be done there.
Unlike ISA 2004, ISA 2006 does not give us separate SSL and non-SSL publishing wizards; instead, the same wizard presents us with choices as to whether to use SSL or not. We have choices regarding this in two main places:
The New Web Publishing Rule Wizard - Server Connection Security Page, in which we can choose how to connect to the published Web Server
The New Web Listener – Client Connection Security Page, in which we can choose how the Web Listener will service client connections
ISA 2004 presented these choices to us in a subtly different way, allowing us to pick one of three options on the Bridging Mode page of the SSL Publishing Wizard:
Secure connection to clients
Secure connection to Web server
Secure connection to clients and Web server
These three options are still possible in ISA 2006, but are the resultant effect of the combination of the Server Connection Security and Client Connection Security pages.
We’ll cover these two distinctions in the Web Publishing Rule Wizard for the differing types of rule, and then go over how to accomplish with ISA 2006 what could be accomplished on the Bridging Mode page.
In our original Web Publishing Rule, we published a site on the ISA Protected Network, http://webfarm.infra.example.com as http://extranet.example.com to clients on the internet. In this example, we’ll go over the changes to the process were we to decide, instead, to publish https://webfarm.infra.example.com as https://extranet.example.com, either instead of, or in addition to, the http:// rules. Recall our recommendation that additional Web Listeners be configured to publish the same sites as http:// and https://, rather than a single Web Listener configured to handle both.
On the Internal Publishing Details pages, you have the following options on the first and second pages respectively:
First:
Internal Site Name
Computer Name or IP Address
Second:
Path
Site
Forward the original host header instead of the actual one specified in the Internal Site name field on the previous page
The Computer name or IP address text box includes the IP address or name for the published Web server. This is a critical entry for SSL publishing because the name in this text box must match the common name on the Web site certificate on the Web server. If the name you enter in the Computer name or IP address text box doesn’t match the common name on the Web site certificate, the connection attempt will fail, and the user will see a 500 Internal Server error.
In our example, as the common name on the Web site certificate bound to the published Web site is webfarm.infra.example.com, then you must enter webfarm.infra.example.com in the Computer name or IP address text box. If you enter the IP address or NetBIOS name of the server, the connection will fail because the name doesn’t match the common name on the Web site certificate.
Forward the original host header instead of the actual one (specified above) works the same way as it does when you publish non-SSL sites. However, you must be careful with this option because if the remote user uses a FQDN that is different than the common name on the Web site certificate, the connection attempt will fail.
For example, if you have enabled this option, if the remote user enters https://extranet.example.com to access the published Web site through the ISA firewall, then the ISA firewall will use extranet.example.com instead of webfarm.infra.example.com when it proxies the connection to the published Web site, and the connection will fail with a 500 error. For this reason, we recommend that you use the same name from end to end for your Web Publishing Rules. However, this isn’t required because if you do not enable the Forward the original host header instead of the actual one specified in the Internal Site name field on the previous page option, and you use the same name from end to end, then the name the external user uses to access the Web site is the same as the common name on the Web site certificate.
The key to success is that the name in the Computer name or IP address text box matches the common name on the Web site certificate on the published Web site, and the ISA firewall resolves the name in the Computer name or IP address text box to the internal address, not the public address used by the Web listener, for that site. In this example, the name webfarm.infra.example.com must resolve to the internal or non-public address. That is to say, the actual address bound to the Web site on the corporate networks.
The Path text box is used in the same way it’s used for non-SSL connections. See the section in this chapter on publishing non-secure Web sites for details of this option. The Web Site box lists the URL of the site that will be published on the Internal network.
On the Public Name Details (Figure 5.9) page, you define what names users can use to access the published Web site via this Web Publishing Rule. The Public Name Details page includes the following options:
Accept requests for
Public name
Path (optional)
Site
The Accept requests for drop-down list allows you to choose either This domain name (type below) or Any domain name. As we mentioned in our earlier discussion on non-SSL publishing, the Any domain name option is a low security option and should be avoided, if at all possible. This option allows the Web Publishing Rule to accept incoming requests using any IP address or FQDN that can reach the IP address that the Web listener for the Web Publishing Rule uses. The preferred option is This domain name (type below). This option limits the name remote users can use when accessing the Web site published by this Web Publishing Rule.
You enter the name the remote user uses to access the published Web site in the Public name text box. This is a critical option. You must enter the name that the remote user uses to access the Web site, and the name must match the common name on the Web site certificate bound to the Web listener used by this rule.
We recommend that you export the Web site certificate bound to the published Web site and import that certificate into the ISA firewall’s machine certificate store. When you do this, you can bind the original Web site certificate to the Web listener used by this Web Publishing Rule. You would then use the same name from end to end.
For example, if the Web site certificate used on the published Web site has the common name crm.example.com, and you export that Web site certificate and bind it to the Web listener used by this Web Publishing Rule, you should use the same name, crm.example.com, in the Public name text box. Remote users must be able to resolve this name to the address on the ISA firewall that the Web listener used by this rule accepts incoming secure connections.
The Path text box allows you to set what paths are accessible on the published Web site. For more details on how to use the Path option, review our discussion of this subject in the non-SSL Web publishing section of this chapter.
On the Server Connection Security page (Figure 5.3), we can choose how to connect to the target web server. As mentioned earlier in the chapter, there is an implicit understanding when a user connects to an SSL-secured site that traffic from their computer to the site is protected against interlopers. If you publish a site via SSL which is sent over plaintext on your internal network, consider the security implications very carefully.
We choose Use SSL to connect to the published Web server or server farm to secure the connection between ISA and the target webserver. There is no additional configuration in the wizard that we are provided with as a result of this option.
The Client Connection Security page in the New Web Listener wizard allows us to choose which ports, and using which protocol the web listener listens on – HTTP on port 80, or HTTPS on port 443.
After selecting Require SSL Secured Connections with clients on this page, we proceed as with a non-SSL rule to the Web Listener IP Addresses page, to select which networks and IP addresses the web listener should accept requests from. The next page we are presented with, however, is an SSL rule-specific page, the Listener SSL Certificates wizard page, illustrated in Figure 5.21.

The Listener SSL Certificates dialog is new to ISA 2006, and provides simplified certificate management during the wizard itself. This wizard dialog allows you to specify either a single certificate for the web listener, or an individual certificate for each IP address selected in the publishing rule.
ISA Firewall Alert
You cannot configure SSL on the listener unless you have a machine certificate stored in the ISA firewall’s machine certificate store.
If we click the Select Certificate button, we open the Select Certificate dialog box, displayed in figure 5.22 which shows us which certificates are available for the listener, and in the lower Certificate Installation Details whether or not the selected certificate is valid for our purposes and correctly installed. The dialog defaults to displaying only valid certificates as shown in Figure 5.22.
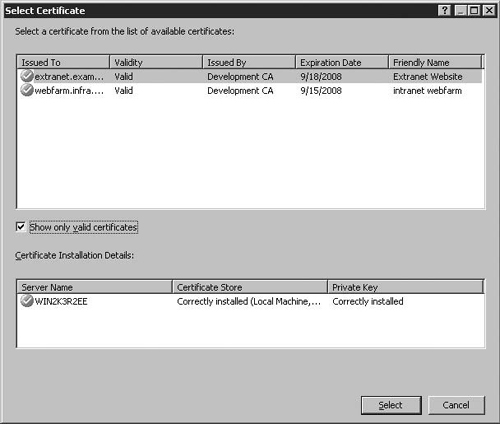
If we deselect the Show only valid certificates option and select an invalid certificate (in this instance, a root certificate with corresponding private key, since as this is not a production ISA Server, it is also functioning as a Standalone Certificate Authority)
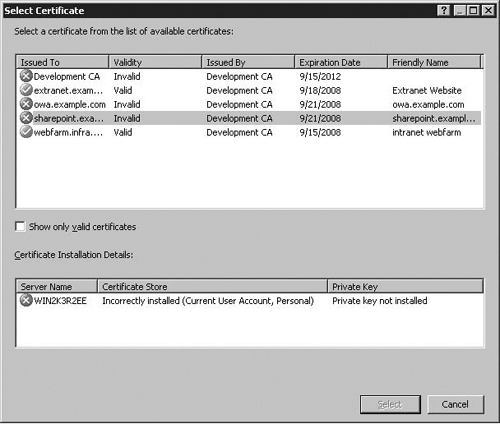
As you can see, the Certificate Installation Details pane clearly indicates that the selected certificate is Incorrectly installed, and does not have an installed Private key.
This dialog greatly simplifies the certificate assignment process by giving you a clear indication as to whether or not your certificate is installed in the correct location and is of the correct type – Figure 5.24 shows the Certificate Installation Details for a certificate which is correctly installed (and has a private key), but which is inappropriate for a web listener:

Hitting Select in the Select Certificate dialog once we have the correct certificate selected in the Certificate Installation Details pane, we can hit Next on the Listener SSL Certificates page, and proceed to the Authentication Settings Web Listener Wizard page which we have already covered.
The three options on the Bridging Mode page of the SSL Publishing Wizard can be configured as follows in ISA 2006:
Secure connection to clients
Secure connection to Web server
Secure connection to clients and Web server
The Secure connection to clients option in ISA 2004 can be configured in ISA 2006 by choosing Require SSL secured Connections with Clients in the Client Connection Security dialog, and the Use non-secured connections to connect the published Web server or farm option in the Server Connection Security dialog displayed in figure 5.3.
This combination of settings sets the connection up as SSL-to-HTTP bridging. This option secures the connection between the Web client and the ISA firewall, but allows the connection to travel in unsecured free text between the ISA firewall and the published Web server. We highly recommend against this practice, unless you use an alternate method of securing the connection between the ISA firewall and the published Web server (such as IPSec or a dedicated link between the ISA firewall and the Web server where the cable itself would need to be compromised in the fashion of a “vampire tap” such as cutting the cable and wiring each side of the twisted pairs to a listening device acting as a “man in the middle,” or by picking up the signal using a Time Domain Reflectometer).
We do realize that there is always a trade-off between security and performance and the implicit contract you have with users who assume their connection is secure from end to end. If you believe that you have a strong, defensible reason for not using an end-to-end connection, then SSL-to-HTTP bridging is possible with the ISA firewall. Depending on the Web application you publish, you may need to use the ISA firewall’s Link Translator feature to get things working properly. We’ll talk more about the Link Translator in Chapter 4.
The Secure connection to Web server option in ISA 2004 can be configured in ISA 2006 by choosing Do not require SSL secured Connections with Clients in the Client Connection Security dialog, and the Use SSL to connect to the published Web Server or server farm option in the Server Connection Security dialog.
This combination of settings allows you to perform HTTP-to-SSL bridging. The connection between the Web client is sent over HTTP, and the connection between the ISA firewall and the Web server is sent via SSL. This is a somewhat unusual scenario, where the client is on a more trusted network than the networks in the path between the ISA firewall and the published server. An example of this type of scenario is where a branch office has an ISA firewall connecting it to the main office using a dedicated WAN link. You can publish the main office Web server at the branch office ISA firewall and secure the connection over the WAN link to the main office and finally to the destination Web server.
The Secure connection to clients and Web server option in ISA 2004 can be configured in ISA 2006 by choosing Require SSL secured Connections with Clients in the Client Connection Security dialog, and the Use SSL to connect to the published Web Server or server farm option in the Server Connection Security dialog.
This option is the most secure and preferred option. This enables SSL-to-SSL bridging where the connection between the Web client and the ISA firewall is secured by SSL, and the connection between the ISA firewall and the published Web server is also secured by SSL. The ISA firewall is able to perform stateful application-layer inspection on the contents of the SSL connection when you use SSL bridging, while at the same time providing an end-to-end encrypted connection.
There are many configuration items which may be applied to Web Listeners which do not appear in the wizard used to create them. In this section we will explore these additional options
The following tabs and dialogs are present in the properties dialog for a web listener, and tabs/dialogs which allow us to change settings not in the wizard are italicized.
General
Networks
Connections
Connections – Advanced Dialog
Certificates
Certificates – Advanced Dialog
Authentication
Authentication – Advanced Dialog
Forms
Forms – Advanced Dialog
SSO
The General Tab allows us to change the Name and Description of the Web Listener. It is not pictured.
The Networks Tab allows us to change which networks the Web Listener is configured for, and which IP addresses within that network the Web Listener should use which are bound to the corresponding Interfaces in ISA Server.
By hitting the Address button, we can open the External Network Listener IP Selection dialog, pictured in Figure 5.12, allowing us to change the IP addresses to which the Web Listener binds.
The Connections tab of the Web Listener Properties dialog allows you to change which port the HTTP Listener is configured to accept connections on, as well as configure the same web listener to service HTTP and HTTPS requests. We recommend that you configure your HTTP and SSL listeners separately.
ISA Firewall Alert
A socket is a combination of a transport protocol (TCP or UDP), an IP address, and a port number. Only one process can bind itself to a socket. If another process on the ISA firewall is using the same socket that you want to use for your Web listener, then you will need to disable the other process using the socket, or choose another port number for the Web listener to use. This is a common problem for ISA firewall administrators who attempt to publish Web resources located on the ISA firewall itself. As mentioned many other times in this book, you should never run services on the ISA firewall other than the ISA firewall services, services that the ISA firewall depends upon, and add-on services that enhance the ISA firewall’s stateful application-layer inspection abilities.
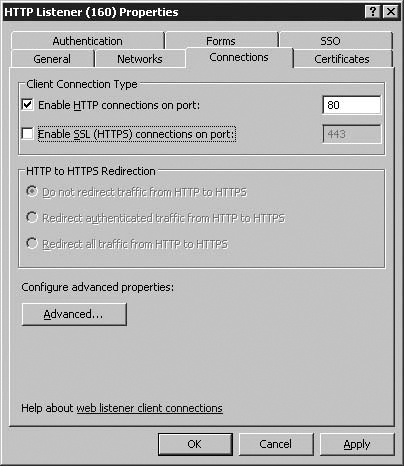
The HTTP to HTTPS Redirection allows you to force clients who browse to the URL of the web listener using http:// to be redirected to the https:// URL. This option requires that you enable both port 80 and 443 in the web listener under Client Connection Type.
When this option is enabled, the ISA Firewall will send an HTTP/1.x 302 Object Moved response back to clients who hit the http:// URL, causing the client browser to redirect to URL specified in the Location HTTP Header.
HTTP/1.x 302 Object Moved
Date: Fri, 21 Sep 2007 16:58:17 GMT
Connection: Keep-Alive
Content-Length: 0
Location: https://extranet.example.com/
If we click on the Advanced button, we reach the Connections – Advanced dialog, which allows us to configure the maximum number of clients which can be connected to the web listener at one time, and the connection timeout.
The Certificates Tab allows us to reconfigure the certificate options specified during the creation of the Web Listener, choosing either a Single certificate for this web listener or by choosing to Assign a certificate for each IP address.
By clicking the Advanced button on the Certificates Tab displayed in Figure 5.26, you can gain access to the one Advanced Certificate option, Certificate per server on all IP addresses.

If you use a hardware load balancer and require a separate certificate per server, even on addresses allocated to an NLB Interface, this option can be enabled to manage certificates on a server-by-server basis, rather than at the Array Level.
The Authentication Tab allows you to configure the form of Client Authentication Method used by the Web Listener, configure which Authentication Validation Method to use, and Configure Validation Servers if using an authentication method that utilizes hardcoded validation servers, such as LDAP or RADIUS authentication.
The Authentication – Advanced function can be reached by hitting the Advanced button on the Authentication tab.
With only HTTP enabled on the web listener, the Advanced Authentication Options dialog appears as in Figure 5.27, and has only one tab, the Authentication Preferences tab. With HTTPS also enabled, two additional tabs appear, the Client Certificate Trust list and Client Certificate Restrictions tabs, pictured in Figure 5.28 and 5.29.
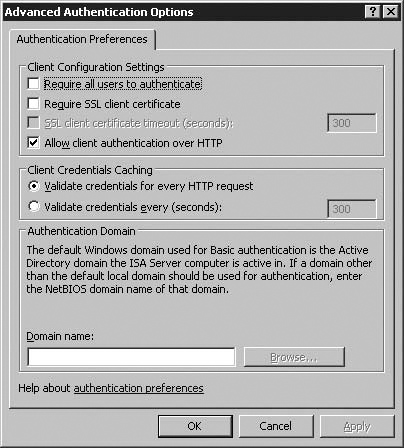
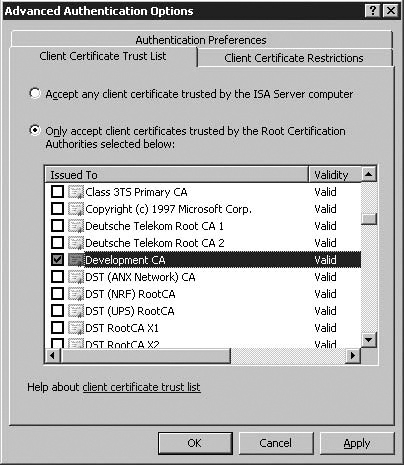
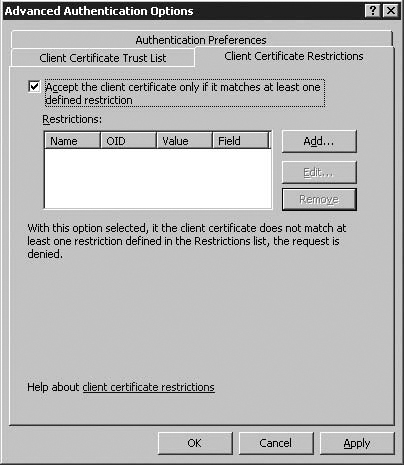
If you do not need to accept anonymous requests for this HTTP Listener, you can check the Require all users to authenticate option. As mentioned earlier in the chapter, ISA does not by default allow HTTP traffic to be used for authentication, and as such, the Allow client authentication over HTTP option comes disabled by default. In order to allow authentication over HTTP as we have earlier, this option should be enabled as displayed in Figure 5.26.
ISA Firewall Alert
Only enable this option if traffic is protected by other means, such as a load balancer or SSL terminator in front of the ISA Firewall.
Client Credentials Caching and Authentication Domain can be configured to meet your requirements, whilst other options on this screen will be explored in the SSL Web Publishing section.
The Client Certificate Trust List tab affects how ISA handles User (client) certificates presented if we have SSL enabled, and accept client certificate authentication. By default, ISA has this setting configured to Accept any client certificate trusted by the ISA Server computer.
The list of Certificate Authorities ISA comes pre-populated with come from the Local Machine Trusted Root Certificates Store, and are shipped with Windows (and updated periodically with optional Windows Updates). The list includes Certificate Authorities such as Verisign and Equifax who have applied to have their certificates included with Windows, and who have passed a third-party audit.
So long as they adhere to the processes and procedures of the CA, anyone can buy a User certificate from many of these Trusted CAs, so if we enable User Certificate authentication with ISA, we automatically open the floodgates to allow any users of any of these Trusted Root CAs to authenticate to our ISA firewall. This may or may not be what we want to happen – if it isn’t, and we run our own CA from which we would like users to have certificates issued, we can select the Only accept client certificates trusted by the Root Certification Authorities selected below option, and select our CA, as pictured in Figure 5.28.
The Client Certificate Restrictions tab allows you to supply a filter to be applied to certificates used to authenticate to the ISA Server Web Listener. This provides more granular control over certificates than the Client Certificate Trust List can provide.
The restrictions that can be specified apply to one of the following four fields within the certificate itself:
Issuer – ie. The CA which issued the certificate
Subject – ie. To whom the certificate is issued, including the CN.
Enhanced Key Usage
Extensions
The Issuer field in the certificate indicates the CA which issued the certificate, for instance the Issuer field for the certificate used for https://www.microsoft.com is:
CN = Microsoft Secure Server Authority
DC = Redmond
DC = corp
DC = Microsoft
DC = com
The Subject field in the certificate indicates to whom the certificate is issued. As with the Issuer field, this takes the form of a comma-separated Distinguished Name, and contains the CN, or Canonical Name of the certificate, which is identical to the FQDN of the site the certificate is used for, if the certificate is used for Web Publishing.
CN = www.microsoft.com
OU = mscom
O = Microsoft
L = Redmond
ST = washington
C = US
The Enhanced Key Usage (or Extended Key Usage) section of the certificate defines what purposes the certificate has. Within the context of a client certificate, this might, for instance, include the Smart Card Logon object identifier 1.3.6.1.4.1.311.20.2.2 – restricting the client certificates usable to authenticate to the ISA Server to those which are stored on smartcards.
The X.509 Certificate specification includes provision for extensions to the specification made using the Extensions field. In popular these include the Keyusage and AlternativeNames extensions.
As we have demonstrated, although the Client Certificate Restrictions dialog is well tucked-away and appears simple, due to the complex nature of certificates, the potential for restricting User Certificates is extremely powerful. We have not covered the full breadth of configuration options this dialog presents us with, but the documentation for your PKI implementation should supply more information on how certificates can be used, and how you may wish to begin to use this feature.
Although if all you wish to do is restrict the clients which can authenticate to domain or corporate clients, the Client Certificate Trust List may be perfectly adequate, if you wish to use Smartcard-enabled clients or specify more granular restrictions, Client Certificate Restrictions provides you with many options.
The Forms tab, which is pictured in Figure 5.30, allows configuration of Forms-Based Authentication, if this is in use on the Web Listener.
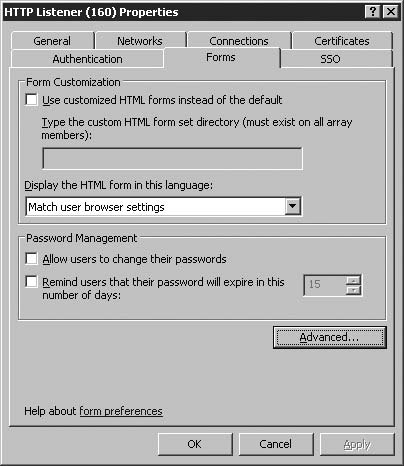
Form Customization allows users of Microsoft ISA Server to provide custom branding for the Forms-Based Authentication Interface, and configure language settings. The specifics of customizing the FBA Web Interface will not be covered here. Password Management can be enabled where authentication is performed against LDAP or integrated Active Directory back-ends, and when enabled, allows the user to pick an I want to change my password after logging on option whilst logging on via FBA.
The Advanced button on this tab allows us to open the Advanced Form Options dialog box, pictured in Figure 5.31. This dialog allows us to configure options pertaining to the cookies and timeouts used by Forms-Based Authentication.
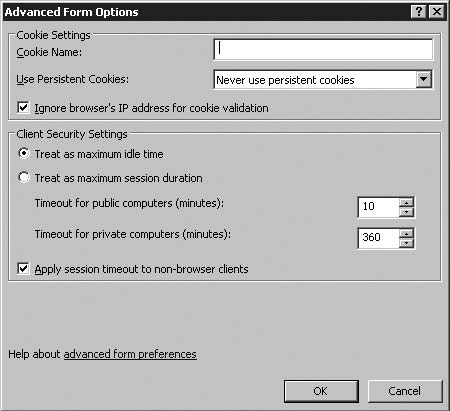
The Cookie Name settings allows you to configure your ISA firewall to provide specifically named cookies, as well as configuring whether or not Persistent cookies are used. Persistent cookies are cookies which remain in the user’s browser after the browser is closed; using the default settings, Never use persistent cookies, cookies for Forms-Based Authentication are cleared when the browser is closed.
The Ignore browser’s IP address for cookie validation option dictates whether or not the ISA firewall will allow users to authenticate using the same cookie using more than one IP address. If you have users who may use connections with IP addresses which change, such as mobile users or users behind proxy server arrays, it is recommended that you leave this option enabled, or users will be forced to re-authenticate.
The Client Security Settings pane allows you to configure timeout settings for FBA clients who select either public or private as their location, as well as how the Timeout is applied – as an idle time (ie. Time elapsing between actions performed by the user within the user interface) or session time (ie. Time elapsing after logon).
You may wish to pick maximum session duration to force users to re-authenticate after a fixed time period for increased security. This option should be considered carefully, as it may inconvenience users.
The non-browser clients option applies these timeout settings to non-browser clients, such as RPC-over-HTTP/Outlook Anywhere or Activesync clients.
The Single Sign-On tab allows you to change settings for SSO specified during the Listener Setup Process. Principally, this means the SSO Domains which dictate which domains the SSO cookie inserted by the Web Listener into the user’s browser post –authentication is valid for.
As mentioned earlier, this should be as specific as possible – ie. .example.com in our example, not.com. Note also that SSO works only within the context of a single web listener – not cross-web-listener.
The new Web Publishing Rule appears in the Firewall Policy list. Right-click the Web Publishing Rule, and click Properties. The Web Publishing Rules Properties dialog box has fourteen tabs, two of which are new to ISA 2006, and which are italicized:
General
Action
From
To
Traffic
Listener
Public Name
Paths
Bridging
Users
Schedule
Link Translation
Authentication Delegation
Application Settings
Let’s look at the options in each of these tabs. You’ll find that as with the Properties dialog box for the Web Listener, there are many options on these tabs that were not exposed in the Web Publishing Rule Wizard.
On this tab, you can change the name of the Web Publishing Rule by entering a name in the Name text box. You can also enter a description for the rule in the Description (optional) text box. You can enable or disable the Web Publishing Rule in the Enable checkbox, as shown in Figure 5.32.
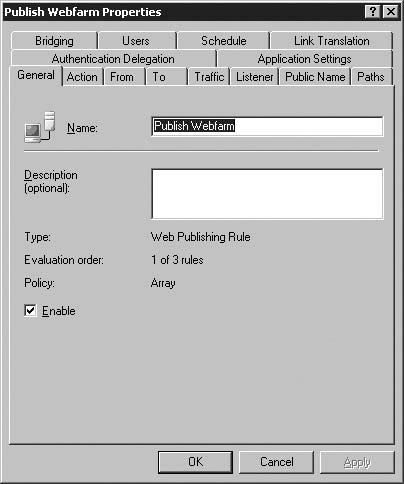
On the Action tab (Figure 5.33) you either Allow or Deny access to the site configured in the Web Publishing Rule.

If you choose to Deny requests, you can redirect denied requests to a URL of your choice. This can be used for, for instance, exempting particular parts of a published site from being accessible via untrusted networks, or as a quick workaround for a particular security hole at a higher level than the ISA firewall is able to protect against, such as a vulnerability in a web application.
This can be accomplished simply by creating an identical publishing rule above the pre-existing publishing rule, but with paths matching only the portions of the site which should be denied, with an Action of Deny, and with the Redirect HTTP Requests to this Web Page field populated with a target to redirect to. This might be the root of your site, or a ‘denied’ page. Include the full URL as displayed in the ‘Address’ bar of the browser.
ISA Firewall Alert
If you use an Action:Deny rule to exempt access to certain portions of a site, ensure that your Deny rule is above the existing rule to ensure that an allow rule does not match first – the ISA firewall will use the first matching rule to service a request, and not evaluate all rules. If you use rules for this purpose, you should ensure you name your rules in a logical manner and document your firewall ruleset to avoid confusion. Wherever possible, define publishing rules which allow specific paths, rather than defining /* rules and positioning deny rules above them.
You also have the option to Log requests matching this rule. If you find that your log files are getting too large and the site being accessed by the rule isn’t of any particular interest to you, then you might consider not logging requests handled by this rule. However, we do not recommend that you disable logging for any publishing rules because most of these rules represent connections from untrusted Networks.
Click Apply on the Action tab, shown in Figure 5.33, to save the changes you make on this tab.
On the From tab, configure locations where you want the Web Publishing Rule to accept connections for the Published Site. The default location is Anywhere, which means that any host that can reach the IP address or addresses used for the Web listener can access this Web Publishing Rule.
You can limit access to this Web Publishing Rule by clicking Anywhere and then clicking Remove. After removing the Anywhere entry, click Add. In the Add Network Entities dialog box, click the folder that contains the Network Object you want to allow access to the Web Publishing Rule.
There is also the option to fine-tune access to the rule by setting exceptions in the Exceptions frame. For example, you might want to allow access to the Web Publishing Rule to all Networks except for hosts on the Network where the published server is located. This is generally a good idea because you do not want corporate network hosts looping back through the ISA firewall to connect to resources located on the corporate network.
Click Apply on the From page, Figure 5.34 below, after making your changes.
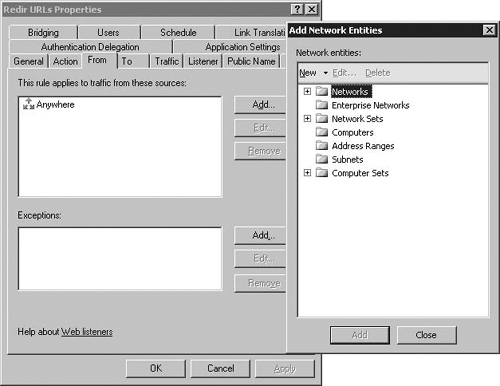
The To tab is one of the most important tabs in the Properties dialog box. The reason for this is that the entry you put in the Server text box defines the host name in the URL that Web Publishing Rule sends to the published Web site. The entry you put in the Server text box replaces the host header that was included in the original client request sent to the ISA firewall. If you don’t want the ISA firewall to replace the entry in the host header with the entry in the Server text box, then put a checkmark in the Forward the original host header instead of the actual one (specified above) checkbox.
Another important option on the To tab is the ability to specify how the ISA firewall proxies the requests to the server listed in the Server text box. You have two options:
Requests appear to come from the ISA Server computer
Requests appear to come from the original client
Requests appear to come from the ISA Server computer is useful when you don’t want to make the published Web server a SecureNAT client. One of the primary disadvantages of the SecureNAT client configuration is that the entire routing infrastructure must be aware that the ISA firewall should be the gateway to IP addresses clients of the web publishing rule come from. If this is an internet-facing publishing rule, this essentially requires making the ISA Firewall the default gateway, or configuring a very messy routing table on the published Web Servers.
Many organizations have an established routing infrastructure, and they don’t want to make the ISA firewall the route of last resort for all hosts on the network. You can get around this problem by allowing the ISA firewall to replace the remote host’s IP address with its own. When the published server returns its response, it only needs to know the route to the local interface on the ISA firewall. It doesn’t need a route to the Internet and doesn’t need to make the ISA firewall its default gateway.
Requests appear to come from the original client allows the ISA firewall to preserve the IP address of the remote host sending the request for published Web site resources. There are several advantages to this approach – in small environments, log-reporting software on the Web server itself frequently prompts this configuration, as you will be able to report on the actual IP addresses of the hosts connecting to the Web site. If you don’t select this option, it will appear in the Web site’s log files that all connections are coming from the ISA firewall’s IP address.
In larger environments, load balancing software such as Microsoft Network Load Balancing frequently handles ‘affinity’ (ie. Which webserver services which request) based on IP address – if all requests to webservers come from just one of the ISA firewall’s IP addresses (or a small number of addresses), all requests made through a particular publishing ISA firewall will bind to a particular web server. While it is possible to work around this problem (using ISA 2006’s own new-found understanding of load balancing of target web servers and cookie-based affinity, for instance), this is a problem which it is easier for many organizations to solve using the Requests appear to come from the original client option, with ISA in the routing chain.
One issue with this approach is that if you enable reverse proxy for the published Web site, you will notice a number of requests sourcing from the ISA firewall itself, and you might misinterpret this as the ISA firewall failing to preserve the IP address of the requesting host. This is not true, and there is no bug or problem with this ISA firewall software in this regard. The issue is that when performing reverse proxy, the ISA firewall serves the responses from its cache. However, the ISA firewall, in its role as reverse Proxy server, needs to check on the status of the objects on the Web site, and this status check generates requests from the ISA firewall’s address to the published Web site, which subsequently appears in the Web site’s logs.
For this reason and more, we prefer to perform Web site activity analysis on the ISA firewall’s Web Proxy service logs instead of the Web site logs themselves. There are exceptions to this rule, but for sites that are public sites only and not accessed by internal users, the Web Proxy logs on the ISA firewall provide the most rich and most accurate information.
Options for the To tab are shown in Figure 5.35 below.

On the Traffic tab, you’ll see a list of protocols allowed by this Web Publishing Rule. The protocols are not configurable on this tab. Instead, the allowed protocols are determined by the protocol support set on the Web listener configured for this publishing rule.
Notify HTTP users to use HTTPS instead will be disabled if you do not have HTTP and HTTPS enabled on the web listener. A similar, but separate, setting can be enabled on the Web Listener itself – using the HTTP to HTTPS Redirection option on the Connections tab, covered earlier in the chapter. If you enable this option on the Web Listener, the Notify HTTP users to use HTTPS instead option will also be disabled.
When the Notify HTTP users to use HTTPS instead option is available, it allows the ISA firewall to return an error page to the user accessing the Web site through the Web Publishing Rule showing that HTTPS, instead of HTTP, should be used – the error message seen by clients is depicted in Figure 5.36.
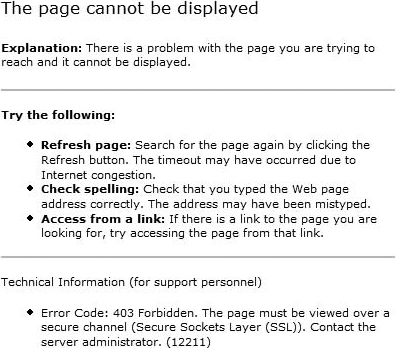
It’s a common error for users to enter HTTP, instead of HTTPS, when accessing secure Web sites. Fortunately, it takes less than three seconds to resubmit the request by adding an “s” to the protocol in the request. Forcing users to enter the correct protocol also encourages users to use correct Internet hygiene.
Whether you choose to redirect users from HTTP to HTTPS, or display an error and force them to alter the URL manually is up to you.
Require 128-bit encryption for HTTPS traffic allows you to control the level of encryption security for SSL connections to the published Web site. All modern Windows clients support 128-bit encryption right out of the box, but there are outdated Windows clients and non-Windows clients that do not support 128-bit encryption, and you might want to block connections from these relatively unsecure clients.
ISA Firewall Tip
Enabling the Require 128-bit encryption for HTTPS traffic option will not actually prevent connections from being made using sub-standard ciphers, but rather negotiates SSL using the cipher supported by the older client, and then delivers an error message to the client over the https channel before ending the connection.
If you wish to disable the ciphers altogether (causing older clients to fail to negotiate the SSL channel, the error being dictated by the error handling in the client itself, http://support.microsoft.com/kb/245030 will explain how to do this – but on a machine level; this cannot be done on a rule-by-rule basis.
See http://blogs.isaserver.org/pouseele/2007/03/25/require-128-bit-encryption-for-https-traffic-with-isa-server-2006-part2/ for further exploration of this issue.
The Require SSL Client Certificate option is only enabled if the Web Listener for the publishing rule is not set to either No authentication or SSL Client Certificate Authentication. You can use this option to configure SSL User Certificate authentication in addition to other authentication methods – but the rule is only processed after the client authenticates via HTTP Basic or Forms-Based Authentication.
If you want to ensure that users have SSL User Certificates in order to connect at all, you should enable the Require SSL Client Certificate option, which can be found in the Advanced Authentication Options dialog in the Web Listener Authentication Tab.
Click Apply to save the changes you made on the traffic tab, as before.

On the Listener tab, you can view the characteristics of the listener currently in use by the Web Publishing Rule, and you can change the properties of the listener here, as well, by clicking Properties. You can also create a new Web listener by clicking New and then applying the new listener to this Web Publishing Rule.
If you have already created multiple Web listeners on this ISA firewall, you can change the listener used by the Web Publishing Rule by clicking the down arrow on the This rule applies to requests received on the following listener drop-down box.
Click Apply after you make changes on the Listener tab.
The Public Name tab allows you to view and configure the names that can be used to access the Web server published via this Web Publishing Rule. In the Web Publishing Rule we created in this example, we chose the name extranet.example.com for the public name that can be used to access the Web server. If a request comes in on the Web listener used by this Web Publishing Rule for a FQDN that is different from this one, this rule will ignore the connection request. Note that if this Web listener is used by other Web Publishing Rules, the incoming request will be compared to the Public Name entries in those other Web Publishing Rules. If no Web Publishing Rule includes a Public Name that matches that in the Host header of the incoming Web request, the connection will be dropped.
Also, note that a single Web Publishing Rule can be used for multiple host names. The key to success is to make sure that each of these host names resolves to the IP address or addresses that the Web listener bound to this rule is listening on. However, this also means that the same Paths, Bridging, Users, Schedule, and other settings would be applied to the connections coming in to the Web site. This might not always be the case, and this is why we recommend that you create separate Web Publishing Rules for each site that you publish.
You can Add a new Public name to the list by clicking Add, and you can Remove or Edit a selected public name by clicking Edit and Remove.
Click Apply when you have made your desired changes to the Public Name tab, as shown in Figure 5.38.

The Paths tab allows you to control how requests to different paths included in the requests are handled by the Web Publishing Rule. You’ll notice in the path list that there are two columns: the External Path and the Internal Path column.
The External Path is the path in the request made by the user accessing the Web site through this Web Publishing Rule. For example, if a user enters the URL http://extranet.example.com/docs into the browser, then the external path is /docs. If a user enters the URL http://extranet.example.com/graphics into the browser, then the external path is /graphics.
The Internal path is the path that the ISA firewall will forward the request to based on the entry for the External path. For example, suppose we set the External Path as /docs and the Internal Path as /publicdocuments. When the user enters the URL http://extranet.example.com/docs into the browser, and the ISA firewall’s Web listener for this rule accepts the connection for the request, then the ISA firewall will forward the request to the site listed in the To tab to the path /publicdocuments. If the entry in the To tab is 10.0.0.2, then the ISA firewall forwards the request to the published Web server as http://10.0.0.2/publicdocuments.
ISA Firewall Tip
Carefully consider Web Publishing rules, particularly complex rules involving paths, to ensure that you leave yourself with the most simple, supportable combination of rules. When publishing rules contain path redirection rules, as is the case here, you need to ensure that you do not break links, hrefs, stylesheets, or other elements within web pages which use paths (relative links) in addition to those which are hard-coded (so-called absolute links).
Much dynamic web-content, such as Sharepoint sites, have expectations regarding how they’re accessed, and can be setup specifically for alternative / extranet access on a different paths. Where this is not possible, consider the use of ISA Link Translation. As always, ensure you document and carefully name your ISA rules (and make use of the description field, particularly to include initials of the rule’s creator, dates, or references to other sources, such as documentation and internal wiki pages.)
Path redirection provides you a lot of flexibility in your Web publishing rules and allows you to simplify the paths external users use to access published resources without requiring you to change directory names on the published Web server.
If you want access to all the folders and files under a particular directory, enter the path using the /path/* format. If you want to allow access to a single file in a path, enter the path in the /path format. For example, if you want to allow access to all the files in the documents directory on the Web server, enter for the Internal path /documents/*. If you want to allow access to only the names.htm file in the documents directory, then enter the path as /documents/names.htm. An example of the Paths tab is shown below in Figure 5.39.
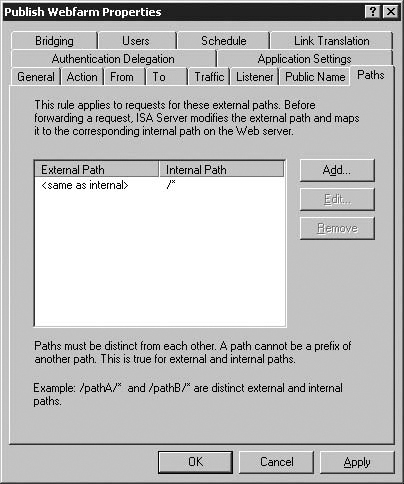
Click Add to add a new path. In the Path mapping dialog box, enter an internal path for Specify the folder on the Web site that you want to publish. To publish the entire Web site, leave this field blank text box. Next, select either the Same as published folder or The following folder option, as shown in Figure 5.40 below. If external users enter the same path, select the Same as published folder. If the users will enter a different path, select The following folder and enter the alternate path in the text box.
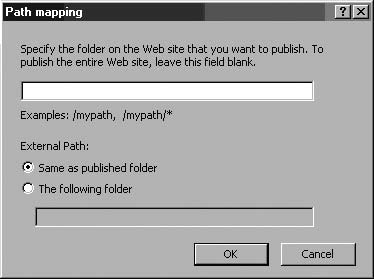
ISA Firewall Tip
Many ISA firewall administrators wish to redirect to the root of the Web site based on the path entered by the user. For example, if the user enters the URL http://extranet.example.com/firewalldocs, then the request should be forwarded to the root of the internal Web server. You can do this by entering the external path as /firewalldocs/* and the internal path as / as seen in Figure 5.41 below. All connections made to the firewalldocs directory are now redirected to the root of the server.
Note that configured this way, requests to the root of the published site (http://extranet.example.com/) will fail, as there is no rule with an ‘external path’ of /* - paths cannot overlap or have the same target. If you need to publish the root of a website (/*) and redirect a sub-path to the same target, you’ll need to use a ‘Deny’ rule as explained earlier, or redirect on the webserver itself.
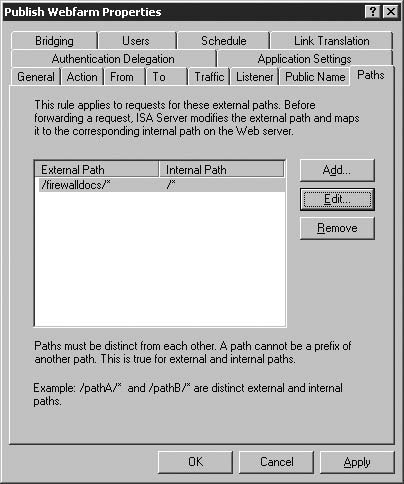
Another thing you can do with path statements is redirect to different servers. For example, take the following URLs:
All three URLs point to the same FQDN and only differ in the path. You can create three Web Publishing Rules, each one using the same Public Name and each one including a different path configuration and a different server on the To tab. When a user makes a request using one of these three URLs, the request will be forwarded to the appropriate server based on the settings on the Public Name, Paths, and To tabs.
ISA Firewall Tip
It’s very common for organizations to use different FQDNs, IP addresses and certificates to publish different applications such as OWA, Sharepoint, and other intranet applications such as Content Management and Human Resources web applications. Path rules provide a highly attractive alternative to publishing each application on a separate IP address. Costs for certificates, IP address ranges, and general management and administration costs will be greatly reduced.
ISA 2006 presents another significant benefit to this approach – the use of one web listener means that Single Sign On will work across all of your applications, so users will only have to login once.
The Bridging tab, as shown in Figure 5.42, allows you to configure port or protocol redirection for the Web Publishing Rule. You have the following options:
Web Server
Redirect requests to HTTP port
Redirect requests to SSL port
Use a certificate to authenticate to the SSL Web server
FTP server
Use this port when redirecting FTP requests
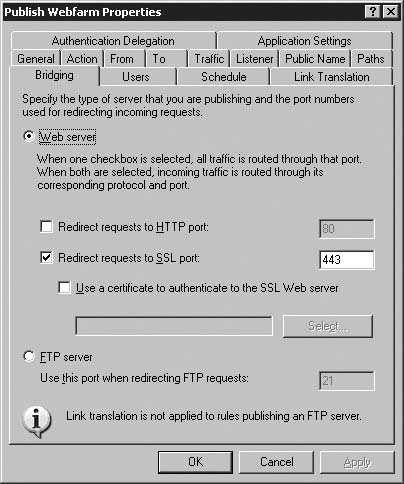
The Web Server option configures the Web Publishing Rule to forward HTTP or HTTPS requests. There is no protocol redirection with this option.
The Redirect requests to HTTP port option when checked allows you to redirect incoming HTTP requests for this Web Publishing Rule and Web listener to the published Web server using the port in the text box to the right of this option. The default port is TCP port 80. You can choose any other port you like for the redirect. This allows you to use alternate port numbers on the published Web sites while still accepting requests on the default HTTP port used by the Web listener (although you do not need to use the default HTTP port on the Web listener if you have configured the Web listener to listen on an alternate port).
Redirect requests to SSL port allows you to redirect requests to the specified SSL port. Note that you can select both the HTTP and SSL checkboxes. When this is the case, incoming traffic is routed through its corresponding protocol and port. For example, if the incoming request is HTTP, then the request is forwarded to the HTTP port. If the incoming request is SSL, the request is forwarded to the SSL port. You can change the SSL port the request is forwarded to, which is helpful if you have SSL sites published on alternate ports. Note that you will have to have certificates on the published Web Server configured appropriately for this scenario.
One of the most misunderstood options in the ISA firewall’s user interface is Use a certificate to authenticate to the SSL Web server. This option is not used by the ISA firewall to accept incoming SSL connections from users connecting to the published Web server. This option allows you to configure the ISA firewall to present a user certificate to the published Web site when the Web site requires user certificate authentication. The user certificate is bound to the Firewall service on the ISA firewall and enables the ISA firewall to present a user certificate for authentication to the Web site.
The FTP server option allows the Web Publishing Rule to perform protocol redirection. The incoming request can be either HTTP or HTTPS, and the connection is redirected as an FTP GET request to the published FTP site. Using SSL-to-FTP bridging is useful when providing remote access to FTP sites requiring authentication. Since FTP sites support only Basic authentication, you can protect user credentials by using an SSL link to the external interface of the ISA firewall. The Bridging tab is shown in Figure 5.43 below.
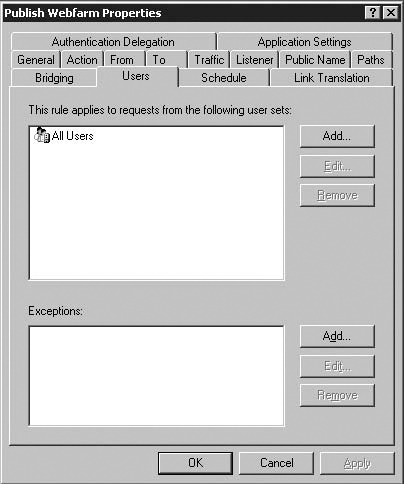
The Users tab allows you to configure which users can access the published Web site via the Web Publishing Rule. Anyone can access the Web site through the ISA firewall when All Users are allowed access. However, this means that all users can get through the ISA firewall and have the unauthenticated requests forwarded to the published Web site. The Web site itself may require authentication. The user will still need to successfully authenticate with the Web site if the Web site requires authentication.
You can require authentication at the ISA firewall by removing the All Users group and adding any other user group via the Add button. The default groups included with the ISA firewall are All Users, All Authenticated Users, and System and Network Service. You can add your own firewall groups and fine-tune your authentication scheme. We’ll talk more about firewall groups and how to use them in Chapter 4 on Creating and Configuring Firewall Policy for Outbound Access. See how to configure the Users tab in Figure 5.43.
The ability to authenticate users at the ISA firewall provides a significant security advantage. Authenticating at the ISA firewall prevents unauthenticated connections from ever reaching the published Web server. Attackers and other malicious users and code can potentially leverage the unauthenticated connection to attack the published server. Authenticating at the firewall first removes the potential security risk.
Note that you can also require authentication at the Web site, so that users are required to authenticate at both the ISA firewall and at the Web site. In some circumstances, users will be presented with two log-on dialog boxes: the first authentication request is made by the ISA firewall, and the second authentication request is made by the published Web site.
You can avoid a dual authentication prompt by taking advantage of ISA’s Authentication Delegation. Since ISA 2006 greatly increases the firewall’s capabilities for delegation of authentication details, the ‘Delegation of Basic authentication’ setting provided on this tab in ISA 2004 has been replaced by the Authentication Delegation tab.
On the Schedule tab (Figure 5.44) you can configure schedules that control when users can connect to the published Web site. There are three default schedules:
Always. The Web site is always available through the Web Publishing Rule.
Weekends. All day Saturday and Sunday
Work hours. Monday through Friday 9:00 A.M. to 5:00 P.M.
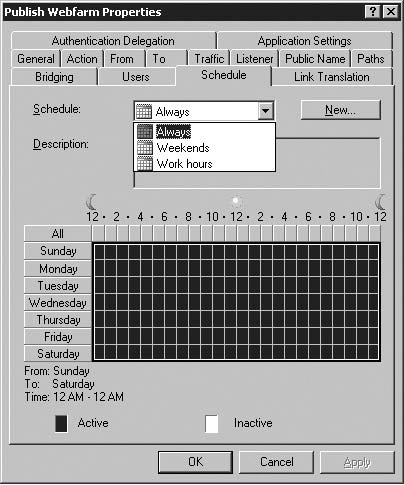
You can also create your own custom schedules. We cover this issue in Chapter 4 on outbound access policies.
The ISA firewall’s Link Translation feature allows you to rewrite the URLs returned by the published Web servers. URL rewriting is useful when you publish Web sites that hard code links in Web pages they return to users, and those links are not reachable from external locations.
For example, suppose we visit a Web site using the URL http://extranet.example.com. The http://extranet.example.com home page contains hard-coded links in the form of http://server1/users and http://server1/computers. When the Internet user clicks on one of these links, the connection fails because the Internet user isn’t able to correctly resolve the name server1 to the IP address on the external interface of the ISA firewall.
The ISA firewall’s Link Translation feature allows you to rewrite the links containing server1 to extranet.example.com. When the Web server returns the home page of the extranet.example.com site, the external user no longer sees the URLs with server1 in them because the ISA firewall rewrote those URLs to include extranet.example.com instead of server1. The external user is now able to click on the links and access the content on the Web server. See Figure 5.45.
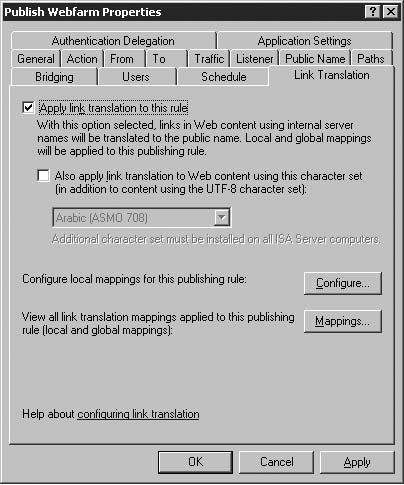
ISA 2006 introduces global and local mappings, allowing mappings to be applied at a higher level than the Web Publishing rule. Enterprise editions of ISA 2006 also include Cross array link translation. The newly introduced Mappings button allows us to view mappings defined at local and global level in the web browser.
We go into more detail in about the ISA firewall’s Link Translator in Chapter 4.
Authentication Delegation is entirely new to ISA 2006. As we discussed earlier, there are a range of options for authenticating to published Web Servers, whilst in ISA 2004, we only had delegation of basic authentication. To this end, ISA introduces a new tab for Authentication Delegation settings, pictured in Figure 5.46.
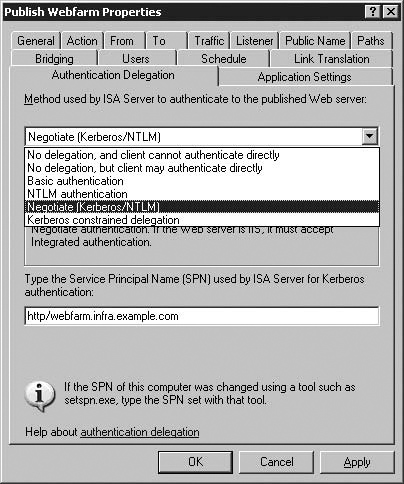
As we can see, if the Negotiate (Kerberos/NTLM) or Kerberos constrained delegation options are picked, we are asked for a Service Principal Name. As we discussed earlier, authenticating via Kerberos requires the registration of the SPN against which the ISA Server’s computer account should be able to authenticate as users within Active Directory.
A Service Principal Name, or SPN, is made up of four components – Service Type, Instance Name, Port Number, and Service Name. These are presented within the SPN like so:
ServiceType / InstanceName : PortNumber / ServiceName
By default, computers have SPNs registered for their hostname and FQDN within Active Directory. These can be modified and viewed using the Delegation tab in the properties for the computer account, or using the setspn command line tool:
> setspn -l Machine1
Registered ServicePrincipalNames for
CN=Machine1, CN=Computers, DC=infra, DC=example, DC=com:
HOST/Machine1
HOST/Machine1.infra.example.com
Machines with kerberized services, such as LDAP, ADAM, or Exchange, will have additional SPNs. In order to allow our ISA Server, with a hostname of ISA01, authenticate via Kerberos Constrained Delegation to https://webfarm.infra.example.com, we would need to issue an setspn command as follows:
setspn  -a http/webfarm.infra.example.com.com ISA01
Registering ServicePrincipalNames for
CN=ISA01, CN=Computers, DC=infra, DC=infra, DC=com
  http/webfarm.infra.example.com ISA01
Updated object
Full coverage of the use of SPNs and AD for Kerberos Constrained Delegation is outside the scope of this book; for further documentation on the use of SPNs and Constrained Delegation, and the full implications of registering SPNs against machine accounts, see Tom Shinder’s article on how to publish sites using Kerberos Constrained Delegation at http://www.isaserver.org/tutorials/Configuring-ISA-Firewalls-ISA-2006-RC-Support-User-Certificate-Authentication-using-Constrained-Delegation-Part2.html
The Application Settings tab allows you to configure several options pertaining to Forms-Based Authentication, as follows:
Use customized HTML forms instead of the default
Published server logoff URL
Logon type provided to the Exchange server
The Use customized HTML forms instead of the default option allows you to customize the FBA login prompt. FBA Forms can be customized in order to apply your own branding to the login page, and display pre-authentication messages or disclaimers. ISA ships with two sets of customized forms, the ISA set (which are the default for web publishing rules), and the Exchange set (which are the default for exchange publishing rules).
Customizations to HTML forms can range in complexity from simple textual changes to full branding and tailoring to suit your requirements, and the full scope of form modification is outwith our scope. If you need to learn more about this, the ISA Server 2006 Technet site is a good starting point: http://www.microsoft.com/technet/isa/2006/html_forms.mspx.
The Published server logoff URL is an interesting option. Although if you publish Sharepoint or Outlook Web Access you will see a Logoff button, many applications which you may wish to publish via Forms-Based Authentication will not allow you to logoff in the same way as either of these two applications. The ISA firewall inserts a cookie into the user’s browser during the FBA logon process which is used to determine whether or not the user is logged in, the login functions of published applications will not remove this cookie, even if it does remove an application-specific logon cookie.
When the user browses back to the site then, the ISA firewall’s cookie continues to persist in the user’s browser. The cookie can be used to re-authenticate to the published site until it is cleared by the browser or by the ISA firewall. In order to work around this issue, the ISA firewall allows you to specify a URL which causes the ISA firewall itself to effect the logoff process, and invalidate the cookie so that it cannot be used to re-authenticate to the site. If your application uses a custom logoff URL, such as /page.aspx?=logoff, you can populate the Published server logoff URL with this value, and cause ISA to logoff at the same time as the logoff function within your application is triggered.
The Logon type provided to the Exchange server option allows you to enable, or disable, the private login type, which effects different settings for maximum login time.
Creating Server Publishing Rules is simple compared to Web Publishing Rules. The only things you need to know when creating a Server Publishing Rule are:
The protocol or protocols you want to publish
The IP address where the ISA firewall accepts the incoming connections
The IP address of the Protected Network server you want to publish
A Server Publishing Rule uses protocols with the primary connection set as Inbound, Receive or Receive/Send. For example, if you want to publish an SMTP server, the Protocol Definition for that protocol must be for SMTP, TCP port 25 Inbound. Outbound Protocol Definitions are used for Access Rules.
The ISA firewall comes with a number of built-in Server Publishing Protocol Definitions. Table 5.3 lists these built-in Protocol Definitions.
Table 5.3. Server Publishing Protocol Definitions
Protocol Definition | Usage |
|---|---|
DNS Server | TCP 53 Inbound UDP 53 Receive/Send DNS Security Filter Enabled Domain Name System Protocol - Server. An inbound protocol used for server publishing. This Protocol Definition also allows for DNS zone transfer |
Exchange RPC Server | TCP 135 Inbound RPC Security Filter enabled Only Exchange RPC interfaces are exposed (Exchange RPC UUIDs) Used for publishing Exchange server for RPC access from External network. |
FTP Server | TCP 21 Inbound FTP Access Filter enabled File Transfer Protocol - Server. An inbound protocol used for server publishing. Both PASV and PORT modes are supported. |
HTTPS Server | TCP 443 Inbound Secure HyperText Transfer Protocol - Server. An inbound protocol used for server publishing. Used for publishing SSL sites when Web Publishing Rules and enhanced security is not required. |
IKE Server | UDP 500 Receive/Send Internet Key Exchange Protocol - Server. An inbound protocol used for server publishing. Used for IPSec passthrough. |
IMAP4 Server | TCP 143 Inbound Protocol (IMAP) - Server. An inbound protocol used for server publishing. |
IMAPS Server | TCP 993 Inbound Secure Interactive Mail Access Protocol (IMAP) - Server. An inbound protocol used for server publishing. |
IPSec ESP Server | IP Protocol 50 Receive/Send IPSec ESP Protocol - Server. An inbound protocol used for server publishing. Used for IPSec passthrough. |
IPSec NAT-T Server | UDP 4500 Receive/Send IPSec NAT-T Protocol - Server. An inbound protocol used for server publishing. Used for NAT Traversal for L2TP/IPSec and other RFC-compliant NAT traversal connections for IPSec. |
L2TP Server | UDP 1701 Receive/Send Layer 2 Tunneling Protocol - Server. An inbound protocol used for server publishing. Used to publish the L2TP/IPSec control channel. |
Microsoft SQL Server | TCP 1433 Inbound Microsoft SQL Server Protocol |
MMS Server | TCP 1755 Inbound UDP 1755 Receive MMS Filter enabled Microsoft Media Server Protocol - Server. An inbound protocol used for server publishing. |
MS Firewall Secure Storage Server | TCP 2172 Inbound Protocol used to publish the Configuration Storage servers over SSL. |
MS Firewall Storage Server | TCP 2171 Inbound TCP 2172 Inbound Protocol used to publish the Configuration Storage servers |
NNTP Server | TCP 119 Inbound Network News Transfer Protocol - Server. An inbound protocol used for server publishing. |
NNTPS Server | TCP 563 Inbound Secure Network News Transfer Protocol - Server. An inbound protocol used for server publishing. |
PNM Server | TCP 7070 Inbound PNM Filter enabled Progressive Networks Streaming Media Protocol - Server. An inbound protocol used for server publishing. |
POP3 Server | TCP 110 Inbound Post Office Protocol v.3 - Server. An inbound protocol used for server publishing. |
POP3S Server | TCP 995 Inbound Secure Post Office Protocol v.3 - Server. An inbound protocol used for server publishing. |
PPTP Server | TCP 1723 Inbound PPTP Filter enabled Point-to-Point Tunneling Protocol - Server. An inbound protocol used for server publishing. |
RDP (Terminal Services) Server | TCP 3389 Inbound Remote Desktop Protocol (Terminal Services) - Server |
RPC Server (all interfaces) | TCP 135 Inbound RPC Filter enabled Remote Procedure Call Protocol - Server. An inbound protocol used for server publishing (All RPC interfaces). Used primarily to intradomain communications through the ISA firewall. |
RTSP Server | TCP 554 Inbound Real Time Streaming Protocol - Server. An inbound protocol used for server publishing. Used by Windows Media Server services Windows Server 2003 |
SMTP Server | TCP 25 Inbound SMTP Security Filter enabled Simple Mail Transfer Protocol - Server. An inbound protocol used for server publishing. |
SMTPS Server | TCP 465 Inbound Secure Simple Mail Transfer Protocol - Server. An inbound protocol used for server publishing. |
Telnet Server | TCP 23 Inbound Telnet Protocol - Server. An inbound protocol used for server publishing. |
Any of the protocols in Table 5.3 can be used right out of the box for a Server Publishing Rule. In the following example, we’ll create a Server Publishing Rule for an RDP server on the default Internal Network. This could be a Windows XP client with Remote Desktop enabled, or it could be a Windows 2000 or 2003 Server with Terminal Services enabled.
Note that in production use, you should avoid publishing anything but a Windows 2003 SP1 or above Terminal Server since all other versions of RDP servers do not support server authentication. Only Windows 2003 SP1 and above support RDP over TLS and certificate based server authentication.
In the Microsoft Internet Security and Acceleration Server 2006 management console, expand the server name, and then click the Firewall Policy node. Click the Tasks tab in the Task pane, and click Publish Non-Web Server Protocols.
On the Welcome to the New Server Publishing Rule Wizard page, enter a name for the rule in the Server Publishing Rule name text box. In the example, we’ll name the rule SPR – Terminal Server. Click Next.
On the Select Server page, enter the IP address of the published server on the ISA firewall Protected Network in the Server IP address text box. In this example, we’ll enter 10.0.0.2. You can also click Browse to find the server, but the ISA firewall will need to be able to resolve the name of that server correctly. Click Next.
On the Select Protocol page (Figure 5.47 below), click the down-arrow for the Selected protocol list, and click the RDP (Terminal Services) Server protocol. You can see the details of the selected protocol in the Properties dialog box. You can also change the ports used to accept the incoming connections and the ports used to forward the connection to the published Web server. Click Ports.
The following options are available to you in the Ports dialog box.
Publish using the default port defined in the Protocol Definition. This option allows the ISA firewall to listen on the default port defined in the Protocol Definition for the selected protocol. In the current example, the RDP Protocol Definition listens on TCP port 3389. Using this option the ISA firewall listens on TCP port 3389 on the IP address you set for the listener for this Server Publishing Rule. This is the default setting.
Publish on this port instead of the default port. You can change the port number used to listen for incoming requests. This allows you to override the port number in the Protocol Definition. For example, we might want the ISA firewall to listen for incoming RDP connections on TCP port 8989. We could select Publish on this port instead of the default port, and then enter the alternate port, 8989, in the text box next to this option.
Send requests to the default port on the published server. This option configures the ISA firewall to forward the connection using the same port the ISA firewall received the request on. In this example, the RDP Server Publishing Rule accepts incoming RDP connections on TCP port 3389. The connection is then forwarded to port 3389 on the published server. This is the default setting.
Send requests to this port on the published server. This option allows you to perform port redirection. For example, if the ISA firewall accepts incoming requests for RDP connections on TCP port 3389, you can redirect the connection to an alternate port on the published RDP server, such as TCP port 89.
Allow traffic from any allowed source port. This allows the ISA firewall to accept incoming connections from clients that use any source port in their requests to the published server. This is the default setting, and most applications are designed to accept connections from any client source port.
Limit access to traffic from this range of source ports. You can limit the source port that the application connecting to the published server uses by selecting this option. If your application allows you to configure the source port, you can improve the security of your Server Publishing Rule by limiting connections from hosts using a specific source port and entering that port in the text box associated with this option. You can also list a range of allowed source ports if you want to allow multiple hosts to connect to the server.
Click OK after making any changes. In this example, we will not change the listener or forwarded port number.
On the Network Listener IP Addresses page, you can select the Network(s) where you want the ISA firewall to listen for incoming connections to the published Web site. The IP Addresses page for Server Publishing Rules works the same way as that used by Web Publishing Rules. For more information on how to use the options on this page, review the discussion about the IP Address page earlier in this chapter. In this example, we’ll select External by putting a checkmark in the External checkbox. Click Next.
Click Finish on the Completing the New Server Publishing Rule Wizard page.
Click Apply to save the changes and update the firewall policy.
Click OK in the Apply New Configuration dialog box.

You can fine-tune the Server Publishing Rule by opening the Server Publishing Rules Properties dialog box. Double-click the Server Publishing Rule to open the Properties dialog box. The first tab you’ll encounter is the General tab. Here you can change the name of the Server Publishing Rule and provide a description for the rule. You can also enable or disable the rule by changing the status of the Enable checkbox. The General tab is shown in Figure 5.48 below.

On the Action tab, set the rule for whether or not to log connections that apply to this rule. We recommend that you always log connections made via a Server Publishing Rule. However, if you have a reason why you do not want to log these connections (for example, privacy laws in your country do not allow logging this information), you can disable logging by removing the checkmark from the Log requests matching this rule checkbox shown in Figure 5.49 below.
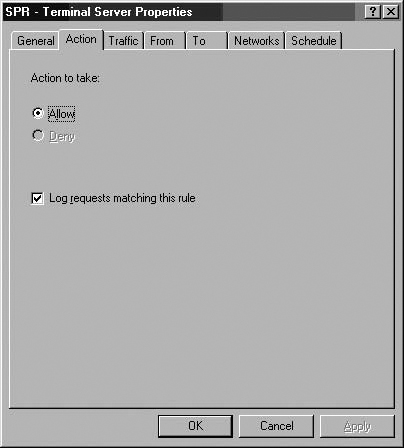
On the Traffic tab you can change the protocol used for the Server Publishing Rule by clicking the down arrow in the Allow network traffic using the following protocol drop-down list. You can create a new Protocol Definition for a Server Publishing Rule by clicking New, and you can view the details of the Protocol Definition used in the Server Publishing Rule by clicking Properties. You can also customize the source and destination ports allowed by the Server Publishing Rule using the Ports button. See options for the Traffic tab in Figure 5.50 below.

ISA Firewall Tip
As there is no “tunneled” option when creating Web Publishing Rules with ISA Server 2006, if you wish to publish SSL web servers in tunneled mode, you may do this using a Server Publishing Rule with the HTTPS protocol selected. We do not recommend that you do this unless absolutely necessary, as by doing so you lose a significant portion of the ISA firewall’s protective capabilities.
You can control what hosts can connect to the published server using settings on the From tab. The default location allows hosts from Anywhere to connect to the published server via this rule. However, connections will only be allowed from hosts that can connect via Networks configured on the Networks tab. So, while hosts from Anywhere can connect to the published server, connections are still limited to those hosts who can connect via the interface(s) responsible for the Networks listed on the Networks tab.
You can get more granular access control over who can connect to the published server by removing the Anywhere option and allowing a more limited group of machines access to the published server. Click Anywhere, and then click Remove. Then click Add, and select a Network Object defining the group of machines you want to allow access to the published server.
You can further fine-tune access control by setting exceptions to the list of allowed hosts and adding them to the Exceptions list. Click Add in the Exceptions section. See Figure 5.51 for options on the From tab.
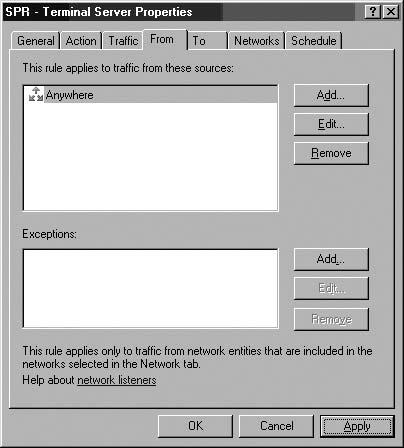
On the To tab, configure the IP address of the server published via this Server Publishing Rule. You can also control what client IP address is seen by the published server by your selection in the Request for the published server frame. You have two options:
Requests appear to come from the ISA Server computer
Requests appear to come from the original client
Requests appear to come from the ISA Server computer allows the published server to see the source IP address of the incoming connection to the IP address on the network interface on the ISA firewall that is on the same Network as the published server. For example, if the published server is on the Internal network, and the ISA firewall’s interface on the Internal Network is 10.0.0.1, then the published server will see the source IP address of the incoming connection as 10.0.0.1.
This option is useful when you do not want to make the published server a SecureNAT client. The SecureNAT client is one where the machine is configured with a default gateway address that routes all Internet-bound connections through the ISA firewall. If you do not want to change the default gateway address on the published server, then use Requests appear to come from the ISA Server computer. The only requirement is, if the published server is on a different subnet from the ISA firewall, the published server needs to be able route to the IP address that the ISA firewall uses when it forwards the connection to the published server.
If you want the published server to see the actual client IP address, select Requests appear to come from the original client. This option requires that the published server be configured as a SecureNAT client. The reason why the machine must be configured as a SecureNAT client is that since the client IP address is from a non-local network, the published server must be configured such that traffic destined to the client’s IP address be routed via the ISA firewall. In most networks, this will mean that the server is required to have a default gateway that routes Internet-bound communications through the ISA firewall. Figure 5.52 illustrates the options on the To tab.
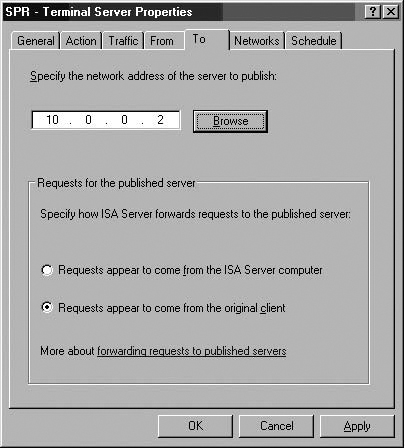
On the Networks tab, you can configure which Networks the ISA firewall can listen on to accept incoming connections to the published server. In this example, we set the Server Publishing Rule to accept incoming connections from hosts on the External Network (the default External Network includes all addresses that aren’t defined in any other Network on the ISA firewall).
You can configure the ISA firewall to listen on any Network. For example, you can configure the Server Publishing Rule to listen for connections on the VPN Clients Network. VPN clients can then connect to the published server via this Server Publishing Rule. The Networks tab is shown in Figure 5.53 below.
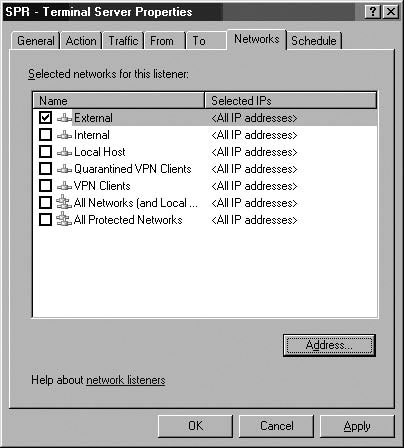
On the Schedule tab, you can set when connections can be made to the published server. There are three default schedules:
Always. Users can always connect to the published server.
Weekends. Users can connect to the published server from 12:00 A.M. to 12:00 A.M. Saturday and Sunday.
Work hours. Users can connect to the published server from 9:00 A.M. to 5:00 P.M. Monday through Friday.
You can also create your own schedule using the New button. We’ll talk more about creating schedules in Chapter 4. Note that schedules control when users can connect to the published server, but they do not drop existing connections. The reason for this is that users who connected to the published server connected when connections are allowed, and they may have ongoing work that would be disturbed if the connection where arbitrarily halted by the schedule.
ISA Firewall Alert
You can script a disconnect using Scheduled Tasks by stopping the Microsoft Firewall service and restarting it if you must stop all connections going through the ISA firewall at a specific time. Beware, however – this will stop all connections going through the ISA firewall.
The Schedule tab is shown in Figure 5.54 below.
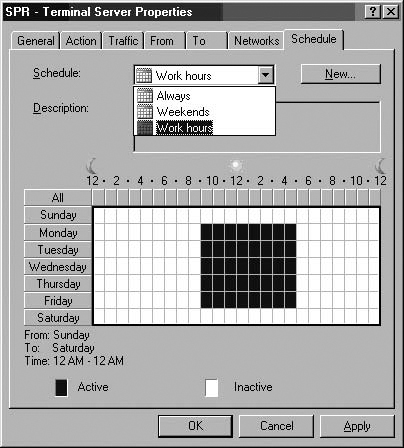
You might have noticed when going over the list of Protocol Definitions used for Server Publishing Rules that there wasn’t a Protocol Definition for HTTP Server. There is a Protocol Definition for HTTPS servers, but not for HTTP. If you want to create a Server Publishing Rule for HTTP server publishing, you will need to create your own HTTP Server Protocol Definition.
We recommend that you always use Web Publishing Rules to publish Web sites, but there may be times when you want to publish a Web site that isn’t compliant with Web Proxy servers. In this case, you will need to use a Server Publishing Rule instead of a Web Publishing Rule.
Perform the following steps to create the Protocol Definition for HTTP Server publishing: <<TODO – Check in 2006 VM>>
In the Microsoft Internet Security and Acceleration Server 2006 management console, expand the server name and click the Firewall Policy node. Click the Toolbox tab in the Task pane, and click the Protocols header.
Click the New menu and click Protocol.
On the Welcome to the New Protocol Definition Wizard page, enter HTTP Server in the Protocol Definition name text box, and click Next.
On the Primary Connection Information page, click New.
On the New/Edit Protocol Connection page (Figure 5.55), set the Protocol type to TCP and the Direction to Inbound. In the Port range frame, set the From and To values to 80. Click OK.
Click Next on the Primary Connection Information page.
On the Secondary Connections page, select No, and click Next.
Click Finish on the Completing the New Protocol Definition Wizard page.
Click Apply to save the changes and update the firewall policy.
Click OK in the Apply New Configuration dialog box.
The new HTTP Server Protocol Definition (Figure 5.56) appears in the list of User-Defined Protocol Definitions.
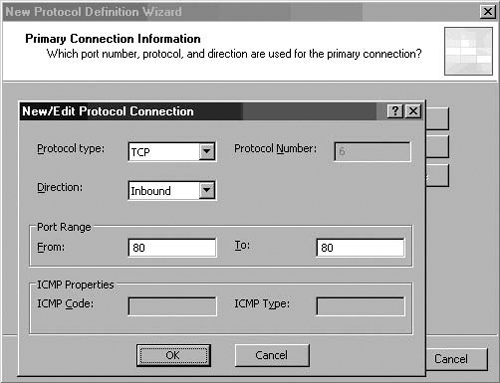
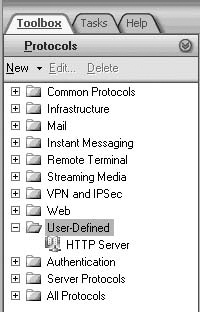
<<TODO – Entire Mail Publishing Section>>
The ISA firewall includes two wizards for publishing Mail Servers right out of the box. You can use the Mail Server Publishing Wizard to publish the following mail-related services:
Secure Exchange RPC
IMAP4 and Secure IMAP4
POP3 and Secure POP3
SMTP and Secure SMTP
The Mail Server Publishing Wizard creates the appropriate Web or Server Publishing Rules required to allow access to the published mail server through the ISA firewall. You can access the Mail Server Publishing Wizard by clicking on the Firewall Policy node in the left pane of the Microsoft Internet Security and Acceleration Server 2006 management console and clicking the Tasks tab in the Task pane. Click the Publish a Mail Server link.
On the Welcome to the New Mail Server Publishing Rule Wizard page, enter a name for the rule in the Mail Server Publishing Rule name text box. Give the rule a meaningful name so that you’ll be able to identify the purpose of the rule. You may create several Web or Server Publishing Rules based on your selections, so keep this in mind when naming the rule. You can always rename the rules after the Wizard is completed. Click Next.
On the Select Access Type page (Figure 5.57 below), you have the following options:
Client access: RPC, IMAP, POP3, SMTP
Server-to-server communication: SMTP, NNTP
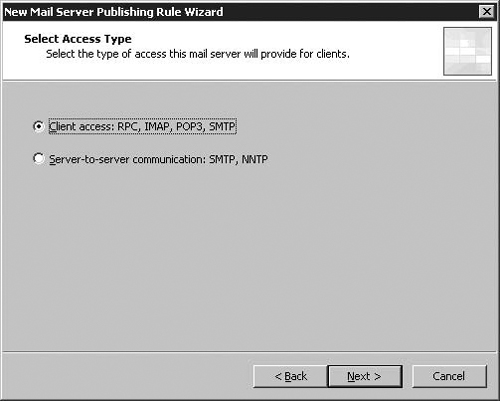
The Client access: RPC, IMAP, POP3, SMTP option publishes these protocols using Server Publishing Rules. You can publish one or more of these protocols when you select this option.
The Server-to-server communication: SMTP, NNTP option publishes these two protocols. You can select one or both.
Because the options available differ based on the selection you make on this page, we will cover each one separately in the following sections.
ISA Firewall Alert
Unless you enable SSL for these three protocols, SMTP, POP, and IMAP are not secure protocols for your users to access their mail with, and even with SSL enabled, you will provide a subset of exchange functionality to users. Combined with a well-designed DNS infrastructure, RPC-over-HTTP, now known as Outlook Anywhere, is the best way to allow Outlook clients to access an Exchange Server over the internet.
Not only does it offer a full range of exchange functionality, but as it’s HTTP based, you benefit from the full suite of ISA’s protection mechanisms for Web Traffic when published via the web, and gives your users a seamless experience in and out of the office.
Select this option and click Next. On the Select Services page you have the following options:
Outlook (RPC)
POP3: Standard ports and Secure ports
IMAP4: Standard ports and Secure ports
SMTP: Standard ports and Secure ports
The Outlook (RPC) option creates a Server Publishing Rule that allows inbound access for secure Exchange RPC connections. Secure Exchange RPC publishing allows Outlook 2000, 2002, and 2003 to “just work,” regardless of where the user is located. When combined with a well-designed split DNS infrastructure, users can roam between the corporate network and remote locations, open Outlook, and access their e-mail transparently without requiring reconfiguration of their e-mail application. Secure Exchange RPC is a very secure publishing protocol, and you can configure the Secure Exchange RPC Server Publishing Rule to force Outlook clients to encrypt their communications to the Exchange Server.
The POP3, IMAP4, and SMTP options allow you to publish both secure and non-secure versions of these protocols. Secure versions of these protocols use SSL to encrypt both user credentials and data. The ISA firewall will publish these protocols using Server Publishing Rules, but you must configure the Exchange Server with the appropriate Web site certificates to complete the configuration if you want to use the secure version of these protocols.
ISA Firewall Tip
The latest version of Exchange, Exchange 2007, includes a new role, the Edge Server role, specifically designed to act as a DMZ-based SMTP relay for exchange, capable of providing “message hygiene” services such as anti-virus and anti-spam, with the ability to reject mail not for legitimate recipients – but without being a member of your Domain Infrastructure. If considering a new deployment of exchange, or enhancing your existing messaging security infrastructure, this functionality is worth considering. The SMTP Message Screener is no longer included with the ISA Firewall. Microsoft expects you to use an Edge Exchange Server in its place.
On the Select Server page, enter the IP address of the published server on the corporate network in the Select Server text box. Click Next.
On the IP Addresses page, select the Network representing the Interface that should accept connection requests for the published server. You can limit the IP address used to accept the incoming connection if you have multiple addresses bound to any of these interfaces by clicking the Address button. For more information on how to configure the settings on the IP Addresses page, see the discussion on this subject in the Server Publishing Rules section of this chapter. Click Next.
Click Finish on the Completing the New Mail Server Publishing Rule Wizard page. Click Apply to save the changes and update the firewall policy. Click OK in the Apply New Configuration dialog box.
You can enhance the security for your secure Exchange RPC publishing rule by forcing the Outlook clients to use a secure connection. Right-click the Exchange RPC Server rule, and click Configure Exchange RPC. Put a checkmark in the Enforce Encryption checkbox, click Apply and then click OK. See Figure 5.58 below.
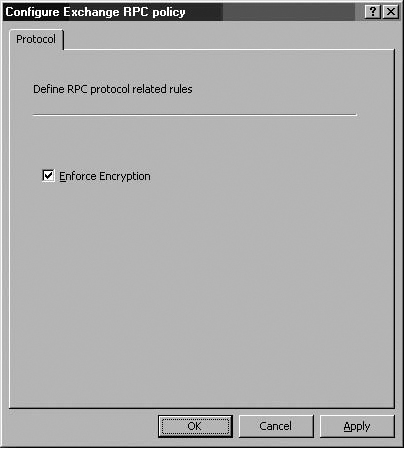
Whereas ISA 2004 handled publishing Exchange’s HTTP-based services via the Publish Mail Servers wizard, ISA 2006 has a separate wizard for this. The wizard not only lets you publish the four following services:
Outlook Web Access
Outlook Mobile Access
Outlook Anywhere (RPC-over-HTTP),
ActiveSync
ISA 2006 is also aware of four different versions of exchange, each of which gives you different permutations of these four options – Exchange 5.5, 2000, 2003, and 2007. The options you have for each version of exchange are as follows:
Exchange 5.5 –. Only Outlook Web Access
Exchange 2000 –. Only Outlook Web Access
Exchange 2003 –. OWA, OMA, RPC-over-HTTP, Activesync.
Exchange 2007 –. OWA, RPC-over-HTTP, Activesync.
While ISA 2006 will configure a Web Client Access for Exchange 2003 supporting all four services, Exchange 2007 requires that each be setup using a different rule (although these can use the same web listener).
Here, we will run through this process for OWA Publishing of Exchange 2007. You can access the Web Client Access Publishing Wizard by clicking on the Firewall Policy node in the left pane of the ISA firewall console and clicking the Tasks tab in the Task pane. Click the Publish Exchange Web Client Access link.
On the Welcome to the New Exchange Publishing Rule Wizard page, enter a name for the rule in the Exchange Publishing Rule name text box. Give the rule a meaningful name so that you’ll be able to identify the purpose of the rule. You may create several Web or Server Publishing Rules based on your selections, particularly if you publish multiple Exchange 2007 services, so keep this in mind when naming the rule. You can always rename the rules after the Wizard is completed. Click Next.
The Select Services page, pictured in Figure 5.59, lets you pick which version of Exchange you wish to publish, as well as which services you wish to publish. As we have already discussed, we can only pick one service if we choose to publish Exchange 2007. We pick Outlook Web Access, and Exchange 2007, and click next.

In the Publishing Type dialog, we pick which type of server we wish to publish, as with our earlier publishing rules – our choices here are Publish a single Web site or load balancer, or Publish a server farm of load balanced web servers. As we have only one Exchange Client Access Role Server here, we choose Publish a single Web Server or load balancer, and click Next.
In the Server Connection Security dialog, we have a choice of connection methods to the target Client Access Role Exchange 2007 server. We discussed this option earlier when dealing with SSL and non-SSL Web Publishing Rules. As we have SSL configured for our Exchange Server, we pick Use SSL to connect to the published Web server or server farm, and hit Next.
In the Internal Publishing Details dialog, we can specify the Internal Site Name and Computer name or IP address. We discussed these settings within the context of SSL web publishing rules earlier, and as we are publishing an SSL-enabled web service on the exchange server, we enter the full FQDN of the exchange server, matching the certificate installed on it. We enter exchangeCA01.infra.example.com into the Internal site name box pictured in Figure 5.60, and hit Next to continue.

In the Public Name Details page, we have the option to Accept requests for Any domain name, or for This domain name. As we have discussed earlier, This domain name is the more secure choice, as our ISA Server will only accept requests specifically for the domain name we wish to publish on the internet. We enter owa.example.com, and hit next.
In the Select Web Listener dialog, we have to configure a new SSL web listener; see the section on secure Web Publishing Rules in this chapter for more information on this subject. Once we have configured or chosen the Web Listener we wish to use, we hit Next.
In the Authentication Delegation dialog, we select Negotiate (Kerberos/NTLM), and hit next. If you use Kerberos Constrained Delegation, you will need to configure an appropriate SPN within Active Directory, as discussed in the SSL Web Publishing section earlier. We hit Next.
In the User sets dialog, we choose the default option of All Authenticated users, and hit next. Within Exchange itself, you must enable OWA (and other services, such as Outlook Anywhere) on a mailbox-by-mailbox basis, but if you wish to only allow specific security groups to access OWA through the ISA Server as an additional restriction, or in order to grant certain users access to OWA within the corporate network but not from the internet, you may pick an alternative group here. We hit Next.
Click Finish on the Completing the New Mail Server Publishing Rule Wizard page. Click Apply to save the changes and update the firewall policy. Click OK in the Apply New Configuration dialog box.
Our rule now appears within the ISA 2006 Firewall Policy, pictured in Figure 5.61. By repeating the process, we can publish all of the services supported by Exchange 2006 on the same Web Listener.

In this chapter we discussed methods you can use to provide secure access to servers and services protected by the ISA firewall. The two primary methods of providing secure remote access to corporate services are Web Publishing Rules and Server Publishing Rules. Web Publishing Rules can be used to publish HTTP, HTTPS, and FTP servers. Server Publishing Rules can publish almost any other protocol. We discussed the details of Web and Server Publishing and how to configure and create Web and Server Publishing Rules.