
Chapter 3. Phone Calls
The Droid X does so many nifty things that it’s easy to forget that it’s a phone as well. No matter how many amazing things this device can do, though, it’s still at heart a telephone. True, it’s a very, very smart one, but it’s still designed to do a good job at what phones are supposed to do—making phone calls. Of course, there’s a lot of Droid X magic to handling phone calls—including advanced features like Visual Voicemail and Call Waiting—and that’s what you’ll learn in this chapter.
Once you see by the bars in the Droid X’s upper-right corner that you’ve got cellular reception, you’re ready to make calls. You can place a call in any of five ways. Don’t be daunted by the variety—all methods are easy, including a “Look, Ma, no hands” approach to calls that lets you call someone by talking into the phone rather than by using your fingers to tap keys.
Placing a Phone Call
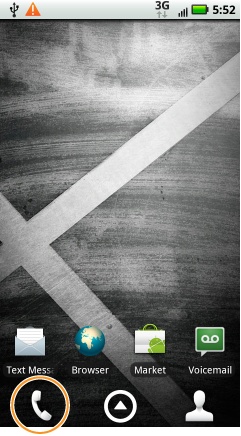
The Droid X’s Phone App is Command Central for making phone calls. On the Home screen, tap the phone icon (at lower-left). The Phone app opens, with four buttons at the top, representing the four ways you can make a call:
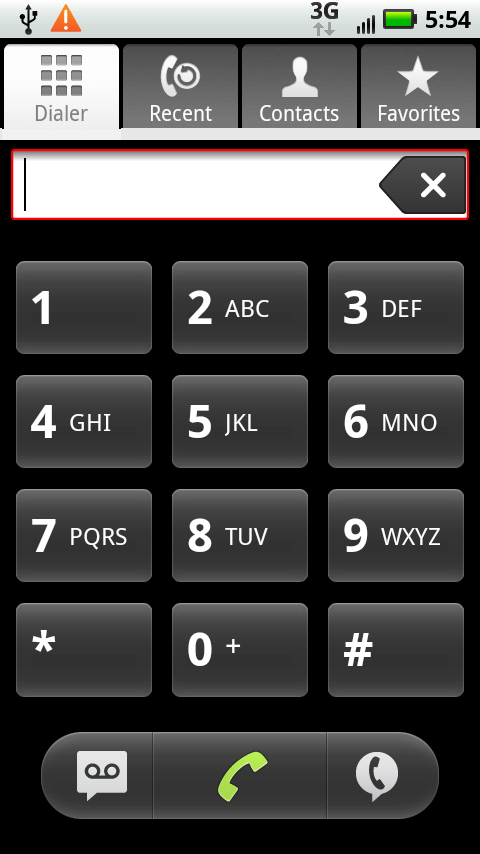
Dialer. As the name says, here’s where to go when you want to dial the phone. You’ll be pleased to see that the virtual buttons on the dialer are a whole lot bigger and easier to tap than the cramped real keypads on cellphones. Even if you have fat fingers or iffy coordination, tapping the right number is a breeze. Tap the number you want to call, and then tap the Call icon. That’s all it takes.
Recent. On this list of recent activity, icons indicate calls that you’ve made
 , received
  , or missed
  . You also see more information about the call, like the date, time, and duration. To call a related number, simply tap the green phone icon to the right of the call in the list.
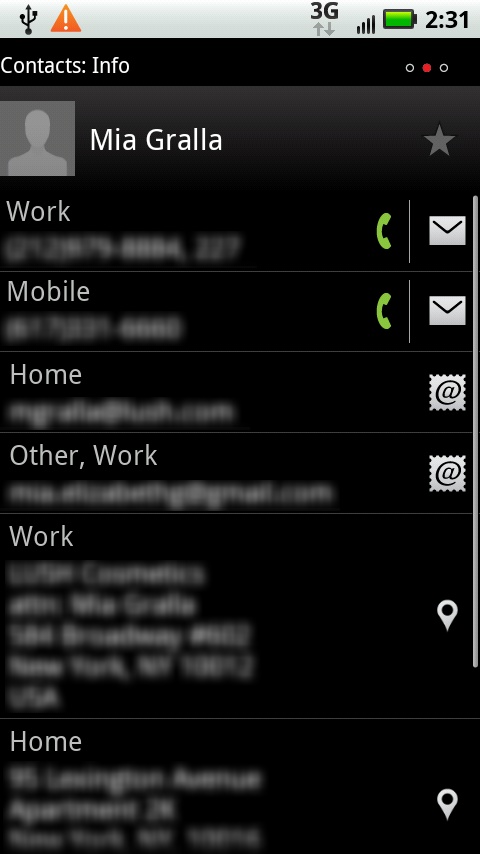
Contacts. Tap a contact, and you can choose among making a call, sending a text message, sending an email, or sending an instant message via Google Talk, among other options. (Those options will depend on the contact information—if you don’t have an email address for someone, that option won’t be available. You’ll find out more about those other options later in this chapter.)
You may see more contacts here than what you originally tapped into your phone. That’s because, if you have a Gmail account, Droid X imports those contacts into its Contacts list. It can also import contacts from other services, including Outlook. For details, see Corporate Calendar and Microsoft Exchange.
Favorites. Think of this as the Droid X’s speed dial. It lists the people whom the Droid X notices you call frequently. Tap the green phone icon next to a person’s name to make a call.
Dialing a Call
Making a call with the dialer is straightforward: Tap the virtual buttons, and then tap the green phone icon to place the call. You’ll find the dialpad easier to use than a normal cellphone keypad because its buttons are larger.

The dialer comes with three useful buttons across the bottom of the screen. Here they are, from left to right:
Voicemail. Tap this icon to see if you have any voicemail messages; if you do, you’ll be able to check them.
Dial. After you’ve tapped in the number, tap here to make your call.
Voice dial. Look, Ma, no fingers! Tap this button, and you can make a call by speaking into the Droid X. Say either the name of the person or the number you want to dial, and up pops the number and name, or a list of potential matches. Tap the one you want to call, or if there are multiple numbers for a single person, say which number you want to call—for example, “work” or “home.” If none of the numbers are what you intended to call, say the word “No,” and then speak again.
(For a faster way to voice dial, outside the Phone app, hold down the Home key, and a list of commonly used apps appears, including a Voice Dial button. Tap it, and then speak the name or number you want to call.)

Note
The Droid X’s voice dialing feature is only one small part of the Droid X’s Voice Commands app, which lets you perform many tasks, such as sending a text message, opening an email, looking up a contact, and more. To use it, tap Voice Commands on the Application Tray.
When you make a call, the useful Dialing screen pops up showing you the phone number you’re dialing, and a picture of the person you’re calling (if the person is in your Contact list and you have a photo there). A timer begins, showing you the elapsed time of the call. There are also buttons for putting the call on the Droid X’s built-in speaker, muting the call, and connecting to a Bluetooth headset. And, of course, to end the call, click the “End call” button.

Next to the “End call” button is another button whose purpose seems baffling at first—Dialpad. Why would you need a dialpad when you’re already on a call? For that most annoying means of modern communications, the phone tree. Press the Dialpad button, and you’ll be able to experience all the joys of having to “Press 1 for more options.”
You’ll also be able to use some Droid X phone magic from the Dialing screen, and create your own conference calls. For details, check out Ignoring the Call.
Choosing from the Recent List
The Recent list serves two purposes: to show you a history of every call you’ve made or that was made to you, and to let you make phone calls. Tap the Recent button, and you see a neat list, in chronological order, of your call history. It displays the name and phone number for each call (and if the call was that day, how long ago it was made). Icons next to each call provide further details:

Note
The Recent log doesn’t differentiate between calls that you made that were answered and calls that you made that weren’t answered.
You can also get more information about each call in the Call Log, by tapping anywhere in the log entry, except on the phone icon or on the contact’s picture, or if there’s no picture, the outline of a person. A screen then appears, with more details about the call, including the exact date and time it was made, and the length of the call. From here you’ll also be able to call the person (by tapping the green phone icon), send a text message, add the person to your Contacts list, or view an existing entry.
Back on the Call Log, if you tap the contact’s picture, a small toolbar appears. Tap any of the icons on it to contact the person in these ways:


Choosing from Your Contacts
The Phone app taps into your main Contacts list. The Droid X gets these contacts from multiple places. For example, if you use Gmail, the Droid X automatically imports these contacts into the list. And if you use Droid X along with Facebook, your Facebook friends are also included in the Contacts list. You can also add contacts directly to the Droid X, as you’ll see later in this section.
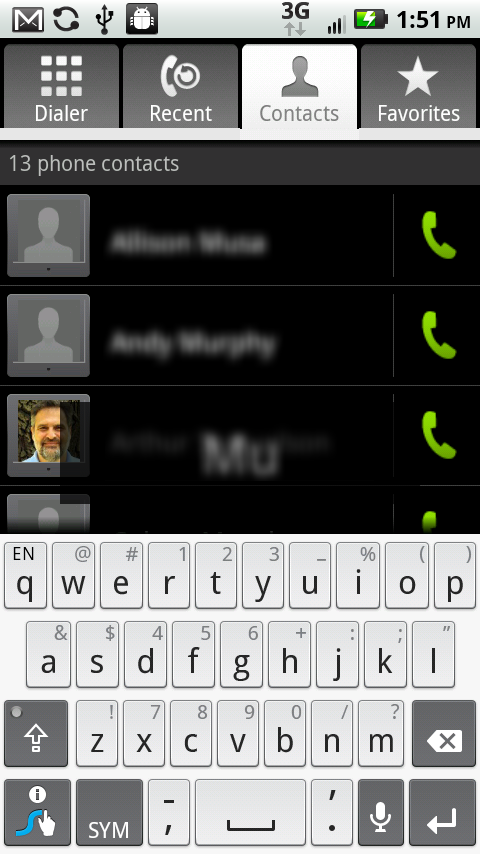
The Droid X’s Phone, Messaging, and IM apps all use the same master Contacts list. In fact, you can go directly to the list by tapping the Contacts icon on the Home screen or Application Tray. The contacts you see in the Phone app are only those for which you have a phone number.
Note
You may notice that on your Contacts list, many people have pictures next to their names, even though you never took their pictures. Is the Droid X pulling hidden camera tricks? Of course not. If you use Facebook on your Droid X, it pulls in pictures from Facebook for any of your contacts who have them.
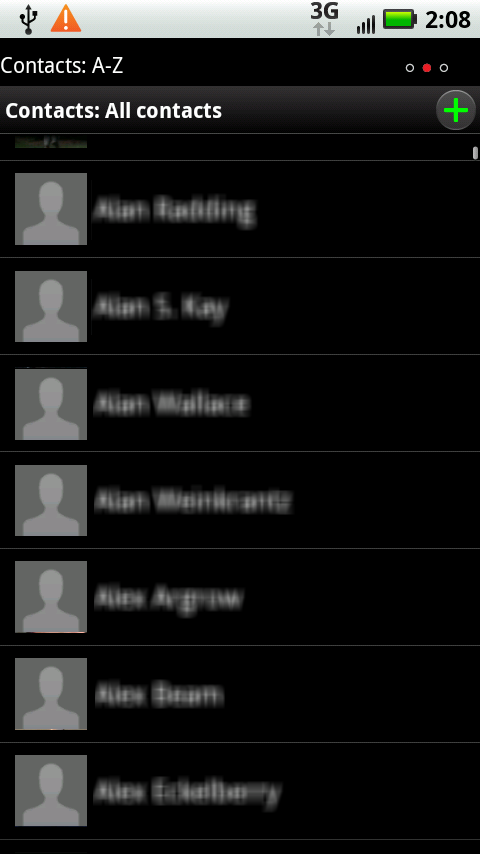
When you first load Contacts, you’ll notice something odd and potentially annoying—the Droid X arranges your contacts alphabetically by first name, not last name. So if you know a lot of Joes and Marys, you’re going to possibly spend a little more time than you’d like scrolling.
Note
Why does the Droid X alphabetize by first name, rather than by last name? It’s a Google thing. Google wrote the Android operating system that powers the Droid X, and Gmail also alphabetizes its contact list by first name. As Gmail does, so does the Droid X.
Most likely, you know more than a screenful of people, and you can navigate through the list in two ways:
First, you can flick through the list. In addition to the normal way you flick through lists, the Contacts list adds a little something extra. When you move your finger up or down the screen, a white icon of a Rolodex card ![]() appears on the right-hand side. Put your finger on that icon and drag it, and you can scroll through your Contacts list more precisely and at your own speed. As you drag it, a large letter appears, telling you at what letter you are in your Contacts list.
appears on the right-hand side. Put your finger on that icon and drag it, and you can scroll through your Contacts list more precisely and at your own speed. As you drag it, a large letter appears, telling you at what letter you are in your Contacts list.
Tip
Wonder how big your Contacts list is? Scroll up to the top of the list, and it will tell you your total number of contacts.
You can also search through the list. Press the Search key, and a Search box and the keyboard appear. As you type letters, the list gets pared down, hiding everyone whose first name, last name, company name, or title doesn’t match what you’ve typed. It’s a great timesaver for quickly paring down a big list. You also see the words you’re typing, just above the keyboard, so you can more easily track what you type. (In the Contacts app, the Droid X doesn’t display the words.)
Tip
How do you find a contact whose name you can’t recall? If you know someone’s place of work, type that in, and you’ll see a list of all of your contacts who work at that company.
When you’ve gotten to the person you want to call, tap the person’s contact listing. You’ll see all the information you have about the person—phone numbers, email addresses, home and work addresses, and any notes you’ve written about the person. Here’s what you can do from this screen:
Managing Contacts
If you use Gmail, the Droid X very thoughtfully grabs all your contacts from there, and imports them into your Contacts list. And it’s not just a one-time transfer of contacts, but for every time you add, edit, or delete a contact. Whenever you change or add a contact in Gmail, those changes are synced to your Droid X, and vice versa.
This means that you’re much better off creating all new contacts in Gmail on your computer, and then letting the Droid X import that new information when you sync up. It’s much easier to type on a keyboard than it is to tap away on your Droid X.
Adding a Contact
Of course, that’s not always possible. Sometimes you need to add a contact right on your Droid X. The way you add a new contact varies depending on whether you’re in the Phone app or the Contacts app. If you’re using the Phone app, you can’t simply create a new contact. Instead, you can only add people you’ve called, or who have called you. To add someone as a contact, tap the Recent icon at the top of the screen and scroll until you find the person you want to add. Tap the call. From the menu that appears, select “Add to Contacts”.
If you’re using the Contacts app, tap the green + button at the top of your Contacts list (the button stays there even when you scroll) and a screen pops up, where you enter contact information.
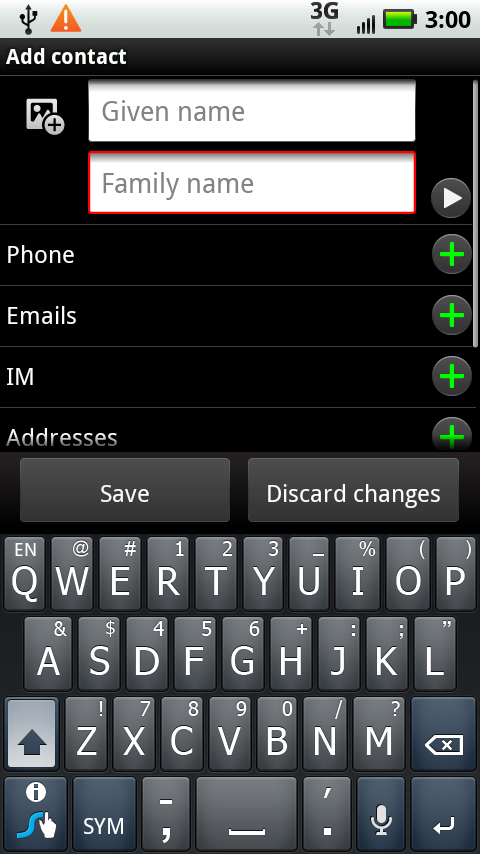
Type the person’s first name, last name, address information, and so on. If she has more than one email address, phone number, or address, then tap the + button next to the entry to add more.
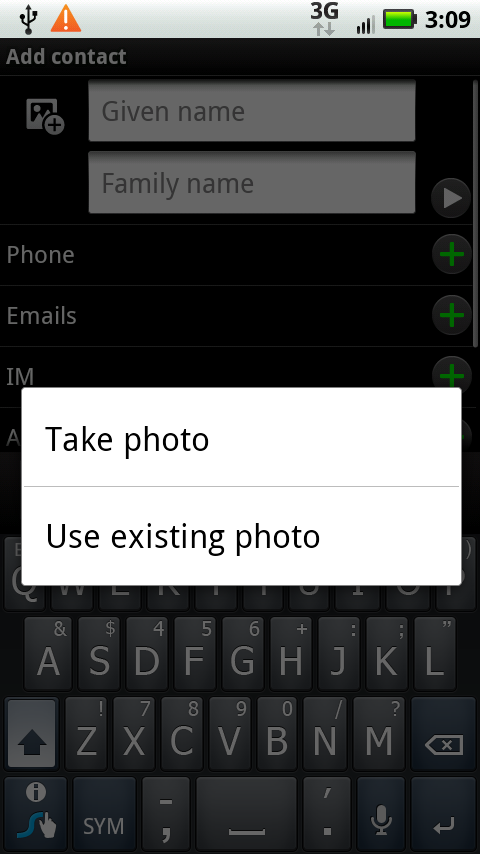
One more trick—you can add a photo to the contact information. Tap this icon ![]() at the top of the screen, and a screen appears that lets you add a photo. If you already have a photo, tap “Use existing photo”, and you can browse through the Gallery for the picture. If the person happens to be right there with you, tap “Take Photo”, and the Camera app launches. Use it to take a photo (see Taking Still Photos for details), which you can then use for the contact.
at the top of the screen, and a screen appears that lets you add a photo. If you already have a photo, tap “Use existing photo”, and you can browse through the Gallery for the picture. If the person happens to be right there with you, tap “Take Photo”, and the Camera app launches. Use it to take a photo (see Taking Still Photos for details), which you can then use for the contact.
Also, pay special attention to the “Additional info” toward the bottom of the screen. Tap the sideways pointing arrow, and you see a wealth of other information you can add about the contact, including birthday, anniversary, website, note, and so on. Make sure to scroll to the bottom, because that’s where you’ll find the best stuff. Tap Ringtone, and you can specify a particular ringtone to play whenever the person calls you. And if the contact is someone you’d prefer to avoid, turn on the “Send straight to voicemail?” checkbox.

Working with Groups
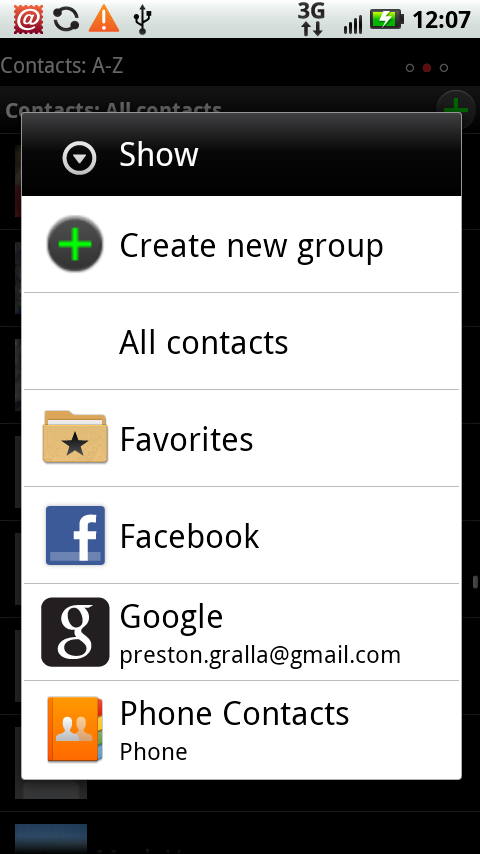
Your Contacts app likely contains a long list, and even though the Droid X lets you zip through them quickly by flicking, it can still be tricky to find the person you want. There’s a simpler way—Groups. The Droid X lets you put contacts in various groups—for example, Family, Work, and so on—making it easier to find the person you want. You can view just the group rather than the entire Contacts list.
The Droid X also automatically creates several groups for you. All your Gmail contacts are in one group, for example; all your Facebook contacts are in another group; your Favorites (Designating Favorites) are in another group; and so on.
To display all contacts in any group, when you’re in the Contacts list, press the Menu key, and then tap “Display group”. You see a list of all your existing groups. Tap any of them to see everyone in that group. If you want to create a new group, tap “Create new group”. A screen appears that lets you select members for the group. Add them, name the group, and you’ll have a new group you can use to find contacts more quickly.
Fancy Tricks with Contacts
The Droid X has a few more tricks up its sleeve when it comes to working with contacts. To see them, open a contact, and then press the Menu key. Here are the choices you’ll see, and what each does:
Note
If a contact is imported from Facebook, not all of these options will be available. You can’t use the “Share name card” option, and the “Invite to” option isn’t available, because the contact is already on Facebook.
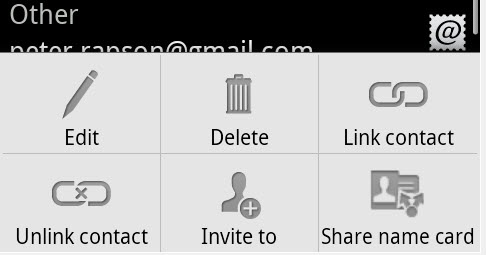
Edit. Lets you edit the contact’s name and other information.
Delete. Deletes the contact from your Droid X.
Link contact. If you get contacts from multiple sources, you may have duplicate contacts. You might have a contact imported from Gmail, for example, but then that same person sends you an email from another email service on your Droid X, and you add it there. Now you’ve got duplicate contacts, with potentially different information for each. Tap “Link contact”, and you can join them into one single contact. The second contact doesn’t actually disappear. It’s just hidden, and its information is imported into the first. That way, you can unlink the contacts whenever you want.
Unlink contact. Tap to separate duplicates that you previously linked.
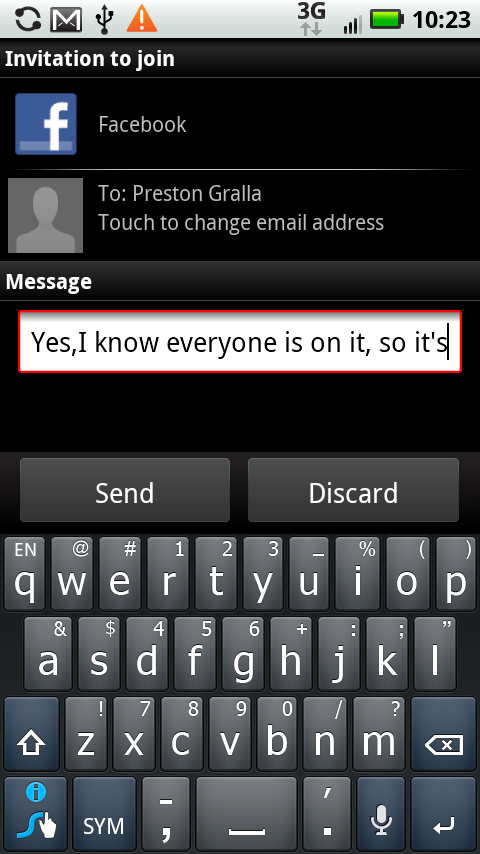
Invite to. If you use social networking services, like Facebook, then tap this button to send an invitation to the contact to join the service.
Share name card. Want to share contact information with someone else? Tap this option, and you can send a vCard, the standard file format for electronic business cards. The person receiving the vCard can import the information into any common email program like Outlook by double-clicking it. You can send the vCard via email, Bluetooth, or text messaging.
Designating Favorites
What if you want to quickly call your best friend, your spouse, your lawyer, one of your children, or your weekly tennis partner? Scrolling through hundreds of contacts to find their phone numbers can be unwieldy and a waste of your time.
That’s where the Favorites list comes in. Think of it as the Droid’s speed dial. The Droid puts people on the list based on how often you communicate with them.
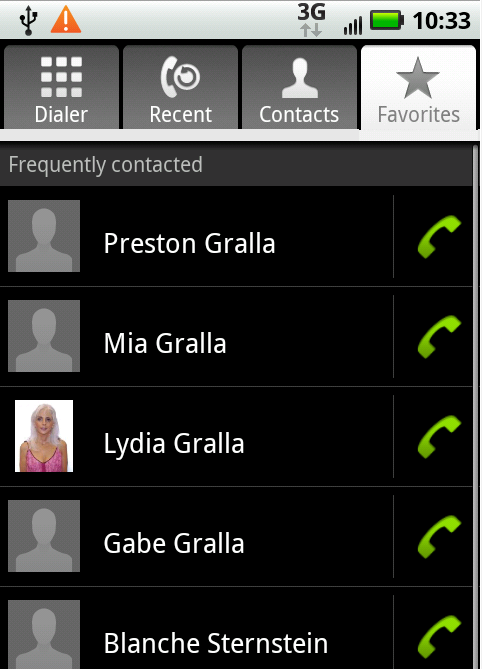
Tap the green phone icon to call the person. To contact her in other ways, like email, text messaging, and so on, tap her name, and the Contact screen gives you myriad ways to keep in touch.
To add someone as a Favorite, open the contact and tap the grayed-out star next to his name. The star turns red, and the person shows up in the top section of your Favorites list, above the “Frequently contacted” area.
Setting Up Speed Dial
There’s an even faster way to call someone than going to your Favorites—put her on speed dial. When you’re in the Phone app, at the Dialer, Recent, Contacts, or Favorites screens, tap the Menu key, and then tap “Speed dial setup”. From the screen that appears, tap “Add Speed dial”. Choose the person you want to put on speed dial, and they’re added to the list, with a number assigned (1 for the first person you add to speed dial, 2 for the second, and so on, up to a total of 9). Eventually, you’ll find yourself remembering the speed dial numbers for close friends and family members.
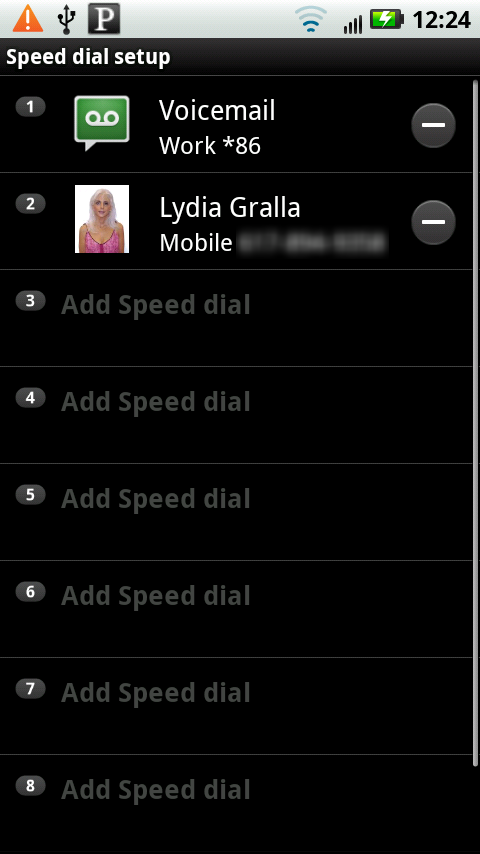
Using speed dial is exceptionally easy. On the Dialer, press and hold the key that corresponds to the number the person is on your speed dial list. The Droid X makes the call.
Answering Calls
One ringy dingy, two ringy dingy…when you get a call on your Droid X, you’ll know in no uncertain terms that someone’s trying to reach you. Depending on how you’ve set up your Droid X to handle incoming calls, you’ll hear a ring, feel a vibration, or see the caller’s name, photo, and phone number onscreen.
Note
For information about how to choose a ringtone, and whether to use Vibrate mode, see Sound.


The way you find out when a call is coming in, and the way you answer it, depends on what you’re doing when you get the call:
If you’re doing something else on the Droid X, tap the Answer button when you see it. When the call is over, tap “End call”.
If the Droid X is asleep or locked, slide the green lock icon to the right to answer the call.
If you’re wearing earbuds or listening to music on an external speaker, the music stops playing and the ringtone sounds in the earbuds or speaker. Press or slide the green Answer button. After the call ends, the music starts playing again.
Tip
If you need to do something else when you’re on a call—like check something on a website or pull up Google Maps—the Droid X doesn’t stop you. Just press the Home key and go about your business in the usual way. The Notification bar reminds you you’re on a call by flashing green. To return to the call, pull it down and tap the call’s notification.
Turning Off the Ring
If the Droid X starts to ring at an inopportune time, you can turn off the ringtone without turning off the phone or dropping the call. Just press the volume switch at the phone’s upper-right side. The ring goes away, but you can still answer the call in any of the usual ways.
Ignoring the Call
Suppose you’re just getting to the juicy part of a book you’re reading, or you simply don’t want to talk to the annoying person calling? You can ignore the call. After five rings, the call goes to voicemail. (It does so even if you’ve silenced the ring with the volume switch.)
If you prefer, you can send the call straight to voicemail, without further ado or further rings. The way you do it varies according to what you’re doing at the time:
If you’re doing something else on the Droid X, tap the big red Ignore button.
If the Droid X is asleep or locked, slide the red button to the left.
If you’re using earbuds, follow the onscreen instructions for declining a call.
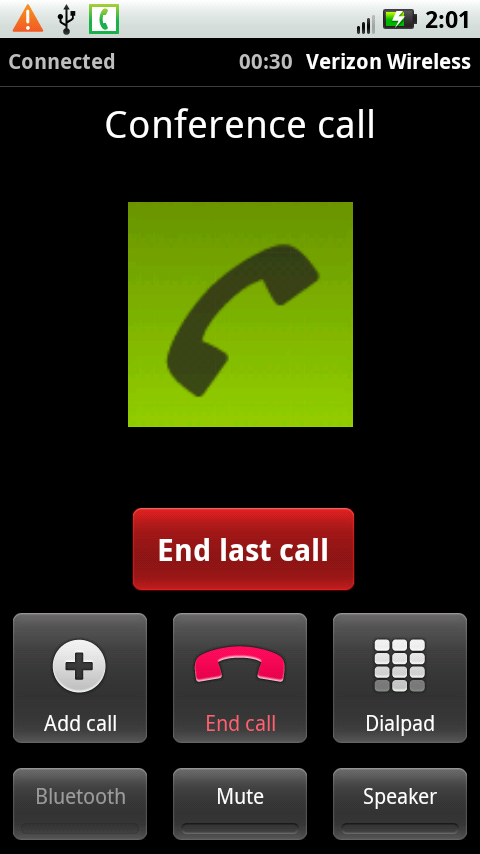
Conference Calling
Here’s a fancy phone trick that’s great for business as well as personal use—conference calls. Sitting at a Starbucks, but want people on the other end to think you’re in an office with a fancy phone system? The Droid X lets you conference in multiple people with no extra charges or software. And you can also use it for conferencing in friends when you’re all trying to decide whether to meet at 6 p.m. before the Red Sox game so you can catch Big Papi at batting practice.
To make a conference call, first make a call as you would normally. Then tap “Add call”. The Droid X places the second call and switches you to it. To conference both calls in, tap “Merge calls”. The words “Conference Call” appear at the top of the screen, and all three of you can hear one another. To end the last call that you made, tap “End last call”. To end the entire conference call and disconnect everyone, tap “End call”.
Note
There’s no way to end the first call you made on a conference call while keeping the second call alive. You can end the calls only in the reverse of the order that you made them.

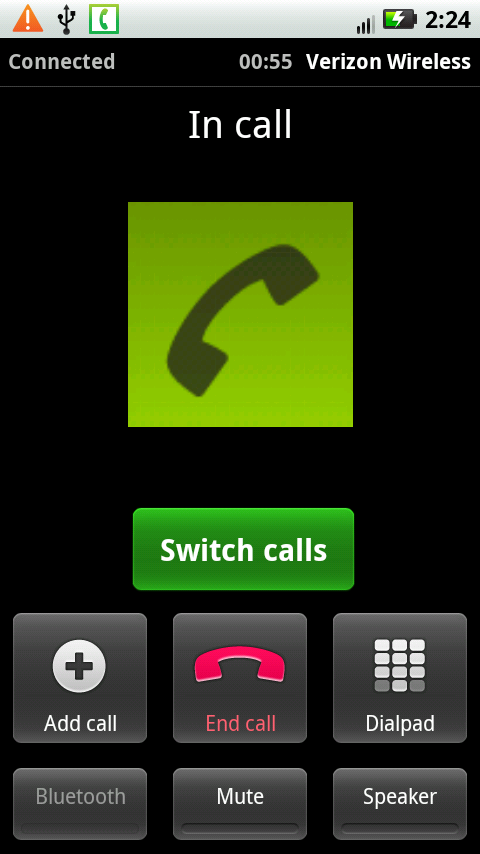
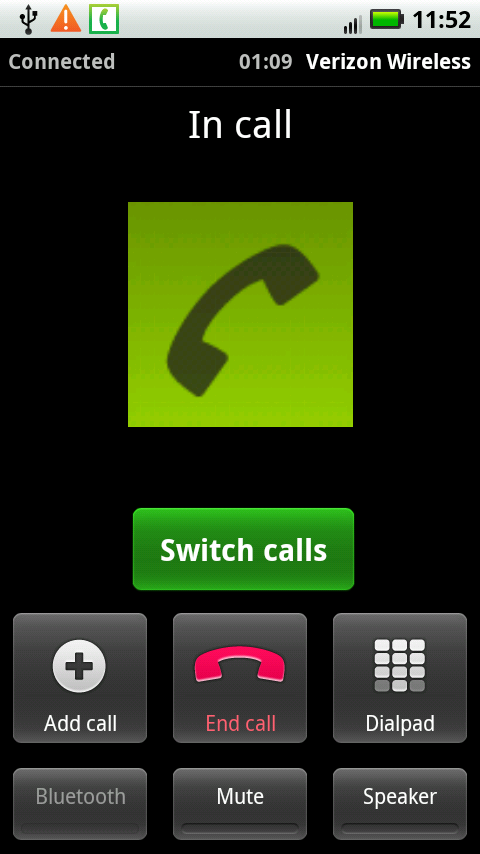
If you’re on the phone and someone calls you, you won’t be able to conference the person into your call. You’ll have to instead switch between the calls. Answer the call as you would normally, and a green “Switch calls” button appears. Tap it to switch to the other call. If you want to conference with the incoming call, you’ll have to tell the caller to hang up, and then make an outgoing call to put her on conference.
Visual Voicemail
The Droid X has built into it all the usual voicemail capabilities you’d expect. You know the drill: Dial in to your voicemail, enter a password, and listen to voice messages. To dial in to voicemail on the Droid X, tap the Voicemail icon on the Home screen, and you’re ready to go.
Looking for something niftier? The Droid X has it—for a price, that is. For $2.99 a month you can use visual voicemail, which lets you see all your voicemails in a simple, chronological list, listen to them in any order you want, delete them, and otherwise manage them. For example, if you’ve got 17 messages, and you want to listen to number 17, you don’t need to listen to the other 16 first. Just tap message 17.
Setting Up Visual Voicemail
You can turn on Visual Voicemail either directly from the Droid X itself or from your Verizon Wireless account on the Web. If you do it on the Web, log into your account, click Change Features, and then turn on the Visual Voice Mail checkbox. Click Continue.
To save yourself a trip to the Web, on the Droid X’s Home screen or Application Tray, tap the Voicemail app, and then tap the “Subscribe to Visual Voice Mail” button. After reading through the incomprehensible license agreement gobbledygook, tap Accept.
The next screen tells you that your voicemail inbox isn’t yet set up and asks if you want to go ahead. Tap OK. You get one more screen telling you that you’ll be charged $2.99 per month; tap Subscribe. And then, yes, you’re faced with yet more license agreement gobbledygook. Tap Accept.
Verizon Wireless goes about setting up visual voicemail for you. It should take about 5 minutes. After enough time has elapsed, tap the Voicemail icon. A screen asks you to type your voicemail password. (It’s the same one you use for normal voicemail.) Once you do that, you see a list of your voicemails, in all their visual glory.

Checking Your Visual Voicemail
The voicemail list shows all your calls in chronological order, including the phone number, date, duration, and time of the call, and a name if it’s available. A blue dot appears next to any call that you haven’t yet played. You use the usual controls to play the message, pause it, and rewind it. It also lets you delete the call or immediately call back.
However, the most important button of all may be the Speaker button. Tap that before you play the call. After all, you’re not holding the phone up to your ear at that point; you’re looking at the phone’s screen. So you’ll need the speaker turned on if you want to be able to hear the call.

There’s more you can do, though. When you’re at the screen playing back a call, press the Menu button to do one of the following:
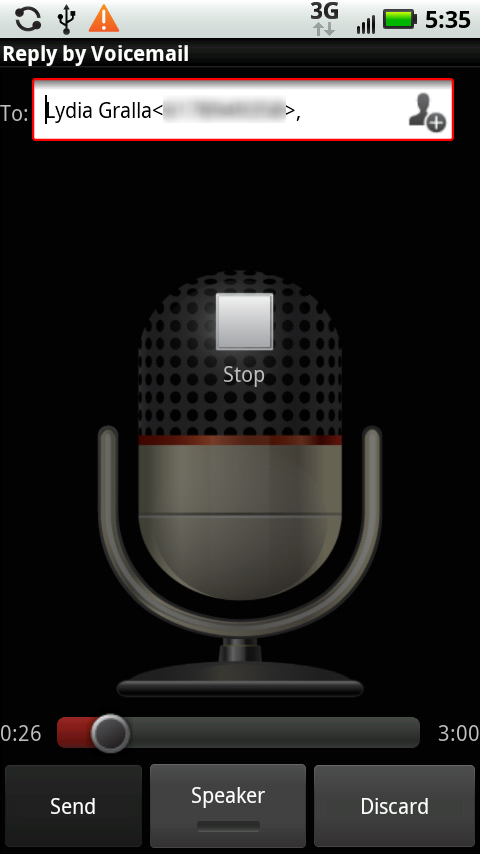
Reply. You get the choice of replying to the message via text messaging, email, or recording a message and sending it directly to the person’s voicemail.
Forward. As with Reply, you can forward the message via text messaging, email, or recorded message.
Archive. You can save the message as an audio file, which is saved on your Droid X’s SD card, in the /sdcard/Voicemails folder. Make sure to name the file, because if you don’t, the Droid X will create a cryptic file name consisting of more than 20 numbers, the first being the phone number of the person who left you the voicemail.
Managing Visual Voicemail
If you’re a Mr. or Ms. Popularity who gets tons of voicemails, good on you. But dealing with that long list of voicemails can be daunting. Luckily, the Droid X gives you some nice tools for managing them all. Press the Menu key on your voicemail list, and you get these options:
Sort by. You can sort your list in a number of ways, including by date, whether you’ve heard the messages or not, their priority, and so on. Just choose the way you want to sort from the list, and your calls will be reordered.
Compose. Lets you record a message and then send it by phone to someone’s voicemail.
Refresh. Checks for new voicemail.
Select Multiple. Tap this button to select multiple messages and then delete or archive them in one fell swoop.
Settings. Customize your use of visual voicemail in more ways than you can imagine.
More. From here, you can delete all your voicemails at once, log out of voicemail, or unsubscribe from the service.
Dialing for Messages
There may come a time, believe it or not, when you and your Droid X are briefly parted. That doesn’t mean, though, that you can’t check your voicemail. You won’t be able to check it visually, of course, but you will be able to do it the old-fashioned way—by voice.
From any phone, dial your Droid X’s phone number, and then press the # key. Then enter your password followed the # key, and the friendly voice gives you the rundown of the things you can do with your voicemail:
Press 1 to hear your messages.
Press 2 to send a message.
Press 4 to change your voicemail options.
Press * to disconnect.
At the end of a message, or while you’re still listening to it, you can do the following:
Press 7 to delete the message.
Press 9 to save the message.
For even more options, press 0. You can get detailed information about the call, such as the time and date it was sent, and its duration. You can also replay the message, and send a copy of it to someone else, including remarks you record about it.
Tip
If you like to check voicemail the old-fashioned way, you can do so from your Droid X. On the dialer (Dialing a Call) press and hold the 1 key. You then dial into voicemail, and get the same options as if you were calling your voicemail from another phone.
Call Waiting
Most phones these days offer call waiting, and the Droid X is no exception. When you’re on one call, you’ll get a notification that another call is coming in. You can then choose to either answer the call, putting your first caller on hold, or to ignore the incoming call. And if you’re a real multitasker, you can stay on both calls simultaneously, hopping back and forth between them. Do that, though, and you risk making both callers feel slighted.
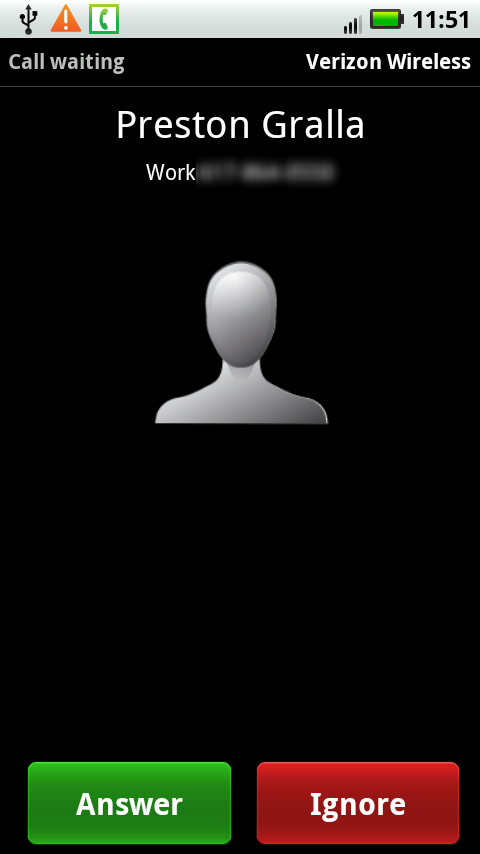
When you’re on a call and another call comes in, your screen shows you the phone number of the second caller. The phone won’t ring or vibrate, and at that point, you’re still on the call with your first caller. You have two choices:
Answer. Tap this button, and you immediately switch to the second call. The first is put on hold. Make sure to tell the first caller you’re putting her on hold, or else you’ll lose a friend. When you answer the second call, a green button labeled “Switch Calls” appears onscreen. Tap it to switch between the two calls.
There’s one annoying oversight with the way that the Droid X handles call waiting: You can’t end one call and then talk on another. When you tap “End call”, you terminate both calls. However, there’s one saving factor—if you’re on one call and tap “End call”, the other call is also terminated, but that person’s phone will immediately call you right back.
Ignore. Tap this, and the incoming caller will be sent into voicemail.
Call Forwarding
Call Forwarding lets you have your Droid X calls rerouted to a different number. That way, when you’re at home, you can have your cellphone calls ring on your landline and only have to deal with one phone. Even if the Droid X is out of commission, you can still forward its calls to another phone and never miss a call. And since the Droid X doesn’t work overseas, you can use Call Forwarding to get your Droid X calls on whatever phone you’re using while traveling.
Note
GSM (Global System for Mobile Communications) is a wireless standard used by many networks around the world. It’s particularly popular outside the United States. Verizon uses a different wireless standard, CDMA, but AT&T and T-Mobile both use GSM. In order to work on a GSM network, a phone needs to be built to use that standard. GSM phones use SIM cards to store information, such as the device’s phone number.
If you haven’t used call forwarding before, first make sure that the service is activated. Log into your Verizon Wireless account on the Web, and then click Change Features. If it shows you have the service, you’re all set. If it doesn’t, follow onscreen instructions for turning it on, or call Verizon Wireless.
Note
If you have multiple lines on a Verizon Wireless account, make sure that you’ve turning call forwarding on and off for the line that uses the Droid X. When you log in, look on the screen and make sure that your Droid X’s phone number is listed there. If it shows a different line, choose your Droid X number from the drop-down list.
Once you’ve done that, turning on call forwarding is a breeze. On your Droid X, dial *72, and then, using the dialpad, enter the number where you want your calls to be forwarded. Press Send, and then wait to hear a confirmation tone or message. Press “End call”.
To turn off call forwarding, dial *73, press Send, and then wait to hear a confirmation tone or message. Press “End call”.
Caller ID
Caller ID is built into the very guts of the Droid X. That’s why you see the phone number and at times the caller’s name every time you get a call. And when you call someone, he sees your phone number as well. There’s a way to block your number from being displayed, although as with call forwarding, you can’t do it on the phone, but have to go through Verizon. Check your Verizon Wireless account to make sure you have the capability. Then when you want to block your phone number from being displayed when you make a call, tap *67, and then make the call. Your number won’t be displayed on the receiving end. Instead, the person will see “Private” or “Anonymous” or something to that effect. When the call ends, Caller ID is deactivated; you’ll have to tap *67 to enable it on your next call.
To turn off outgoing Caller ID for all your calls, log into your Verizon Wireless account, and in the “Add/Change features” section, turn on the checkbox for Caller ID Blocking.
Bluetooth Earpieces
Your Droid X bristles with antennas: for Wi-Fi, GPS, cellular networks, and Bluetooth. Bluetooth is a short-range wireless technology designed to let all kinds of devices connect with one another, to exchange or sync files and photos, for example, or to let a cellphone serve as a wireless modem for a computer.
With a little work (and some downloadable apps), you can get the Droid X to do all that. Mostly, though, the Droid X’s Bluetooth capabilities come in handy for hands-free talking with Bluetooth earpieces.
If you’ve ever seen someone walking down the street, apparently talking to an invisible friend, you’ve seen Bluetooth in action (unless he really was talking to an invisible friend). The small device clips to your ear, and you talk into its microphone and listen in the tiny speaker stuck in your ear.
Note
The earpiece you use for making phone calls is typically monaural, and not designed for listening to music. If you’re a music lover, invest in a stereo Bluetooth headset.
Pairing with a Bluetooth Earpiece
To use a Bluetooth earpiece with your phone, you’ll need to pair them—that is, get the two of them talking to each other. The process is a bit geeky, but not hard. The exact steps may vary a bit depending on the earpiece you’re using. But generally, these are the steps you’ll take:
Turn Bluetooth on in the earpiece and make it discoverable.
In other words, set the earpiece so your Droid X can find it. Check the earpiece’s documentation on how to do it.
Turn on Bluetooth on your Droid X.
There are several ways to do this—go to the Settings pane and tap the Bluetooth icon on the Power Control widget, if Bluetooth isn’t already turned on. You can also press the Menu key from the Home screen or a pane, and select Settings→“Wireless & networks” and then tap Bluetooth. When Bluetooth turns on, your Droid X will start scanning for any nearby Bluetooth equipment. Your earpiece should show up on the list.
Tap the name of the earpiece and type a passcode.
The earpiece’s manual will give you the passcode. The passcode is for security purposes, so that no one else can pair with the device. The number is usually between four and six digits, and you’ll need to type it within a minute or so. You only need to enter the passcode once. After that, the pairing will happen automatically.
You should now be connected. You’ll still dial using the Droid X, but you’ll be able to talk through the earpiece. Check the earpiece’s documentation on how to answer calls, control the volume, and so on.
Bluetooth Car Kits
There are plenty of Bluetooth car kits out there, and some cars even come with Bluetooth capabilities. You generally pair your Droid X with a Bluetooth car kit in the same way you pair it with a Bluetooth earpiece. How you use the car kit varies, of course. In some instances, you can dial a number on the car’s touchscreen, or answer the phone by pressing a button on the steering wheel.