Chapter 2. Typing and Texting
For most people, the whole point of a smartphone like the Droid X instead of a 10-key cellphone is the keyboard. Once you get past voice calls and move on to text messaging, email, and web surfing, you need an easy way to enter text, and once again the Droid X comes through with flying colors. It gives you two onscreen keyboards—one that you can tap to type the usual way, and one that lets you swiftly swipe your way through words without even lifting your fingertip from the screen.
This chapter is about all the things the Droid X lets you do with text. From basic typing, you move on to editing, searching, text messaging, and chatting. Warm up those fingers and read on.
The Keyboards
It’s true, an onscreen keyboard just isn’t the same as a real one. The familiar feel of clicking away on nice big keys is nowhere to be found on the Droid X. To enter text, you tap on the virtual keyboard (or speak into the phone, as you’ll see later in this chapter). Even if you’re a hardcore keyboarder, though, you’ll likely find that the Droid X’s two keyboard styles make it surprisingly easy to enter text.
Whichever keyboard you use, it automatically appears when you tap somewhere you can enter text, like an email message, a text message, in the address bar of a web browser, and so on.
The Droid X’s two keyboards are:
Multi-touch keyboard. This keyboard is typically the one you see when you first turn on your Droid X. It works as you would expect: Tap a key to enter it.
Swype. With this keyboard, you don’t tap individual keys when you want to enter text. Instead, you tap a key, and then drag your finger over each letter in the word you want to input. Swype enters all the letters in the word, using built-in intelligence to figure out what you’re entering. It’s much faster than tapping individual letters. Yes, it takes some getting used to, but you can master it in a few minutes. Once you get used to the Swype, you may never go back to the standard keyboard.
Switching Between the Two Keyboards
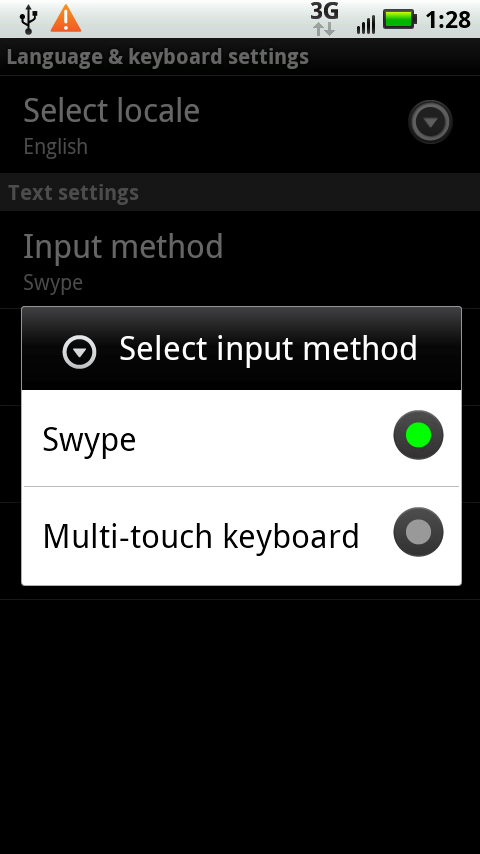
To switch between the two keyboards, press the Menu key (when you’re on the Home screen or a pane), and then select Settings→“Language & keyboard”. Tap “Input method”, and then tap the name of the keyboard you want to use.
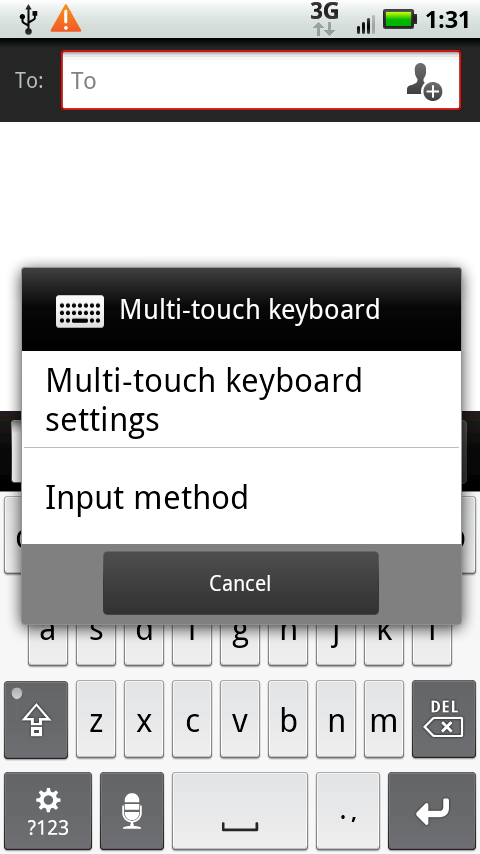
If you’re using the multi-touch keyboard and want to switch to Swype, there’s a shortcut you can use. Tap and hold the ?123 key ![]() and on the screen that appears, select “Input method”. On the next screen, tap Swype.
and on the screen that appears, select “Input method”. On the next screen, tap Swype.
Using the Multi-Touch Keyboard
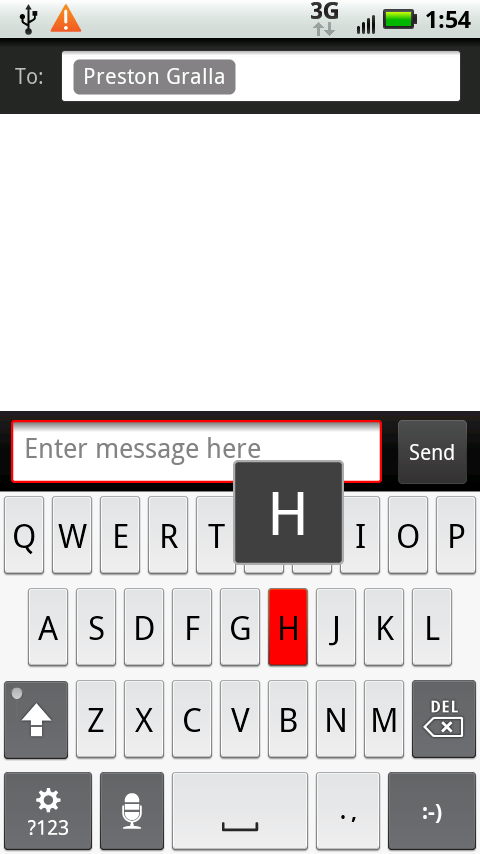
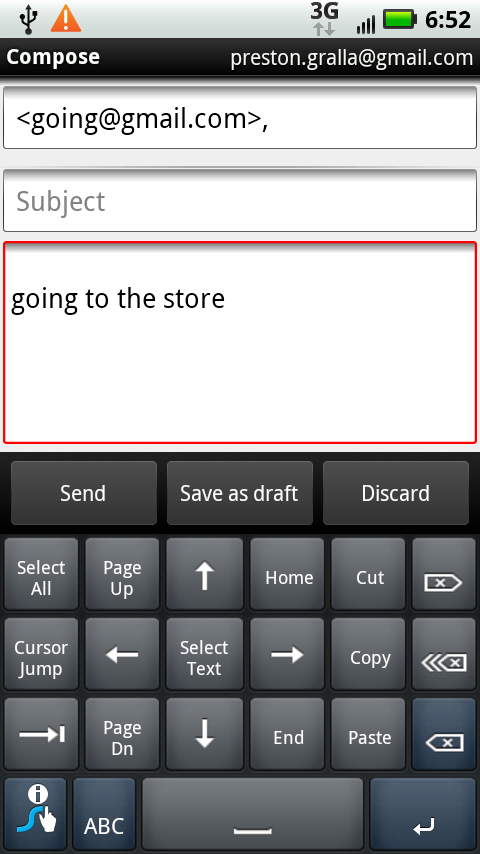
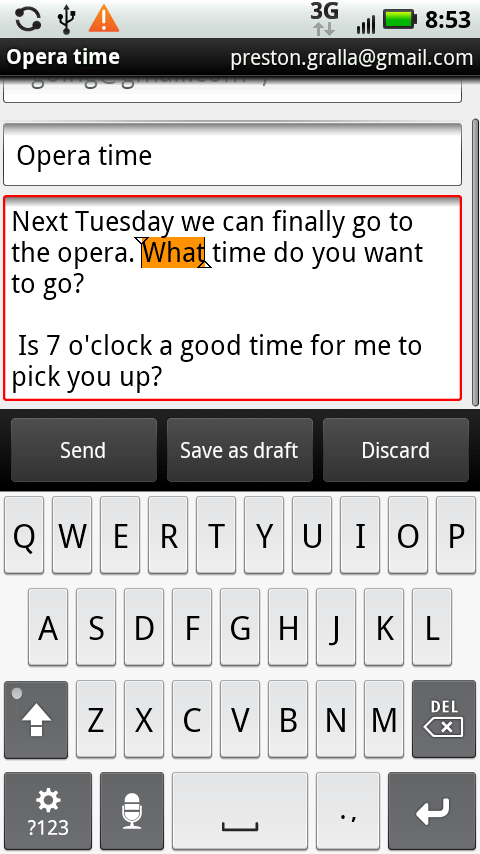
Tap wherever you can enter text, and the multi-touch keyboard appears. When you first tap in the text-entry box, a red circle appears, indicating that you can start typing text. When you tap a key, a kind of “speech balloon” pops up just above your finger, showing you a larger version of the letter you’ve just tapped.
Surrounding the letters, in dark gray, are five special keys:
Shift
 . Tap this key, and the letters all change to uppercase on the keyboard. Tap any key, and it gets entered in uppercase. After you type the key, though, the keyboard changes back to lowercase. There’s a way to lock the Shift key so you can type multiple capital letters in a row, though. When the keyboard is displaying uppercase letters, tap the Shift key. The little dot on the upper left of the Shift key turns green to show that the keyboard is now locked in Shift mode. Press the Shift key again, and the dot turns gray, and you’re back to the lowercase keyboard.
Del
 . This is the Delete key. Mac fans will feel right at home with it, since it deletes letters to the left of the insertion point, like a Backspace key. If you use a PC, where the Delete key is a forward delete key, you may find this behavior confusing at first. Just use the direction of the arrow icon on the key as a guide: think backspace.
Tap the Del key once, and it deletes the letter to the left of the insertion point. Hold it down, and it keeps deleting letters to the left, until you let it go. Hold the key down long enough, and it deletes entire words at a time, not just letters.
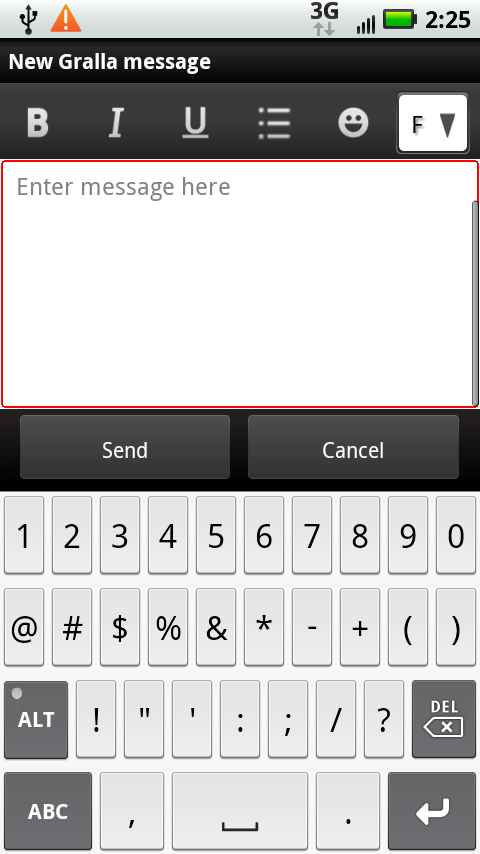
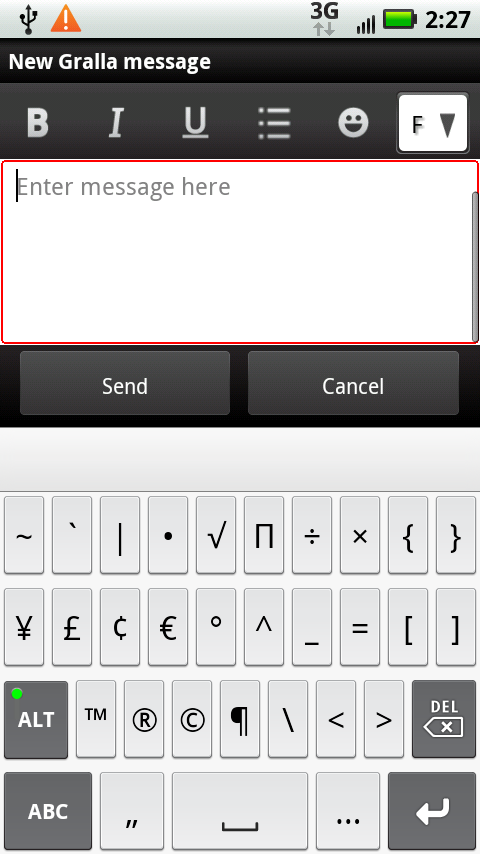
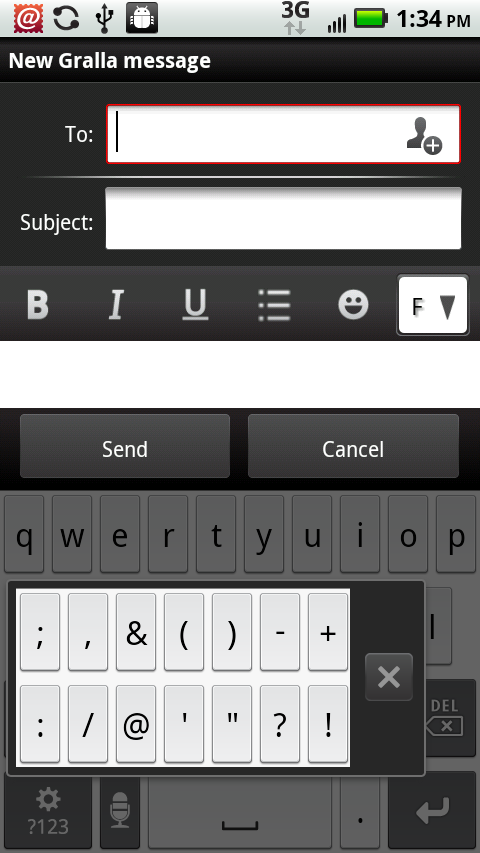
?123
 . As the label implies, this key reveals punctuation marks and numbers. When you tap it, you see a whole keyboard full of them, and the same key now reads ABC. Tap it to return to alphabetic typing.
When you switch to the numbers and punctuation keyboard, you can then display yet one more keyboard—one with special characters and symbols. Tap the Alt key, and the keyboard shows you all the special characters and symbols you can type, such as the trademark symbol, several types of brackets, the symbol for euros, and so on. When you’re in this mode, the little dot on the Alt key turns green. Tap the Alt key to get back to the numbers and punctuation keyboard.
Note
There’s another dark gray key you may see sometimes: the smiley face key. It appears instead of the Return key at relevant times, such as when you’re typing a text message. When you’re texting, you don’t need a Return key, so this key types smileys for you—text-drawn symbols meant to convey emotions, also called emoticons. Press the key and it types a smiling face. Hold it down, and you get a choice of 15 different emoticons from which to choose.
Return
 . This key works exactly as you would expect: Tap it, and you’ll move on to the next line, just as on a computer.
Microphone
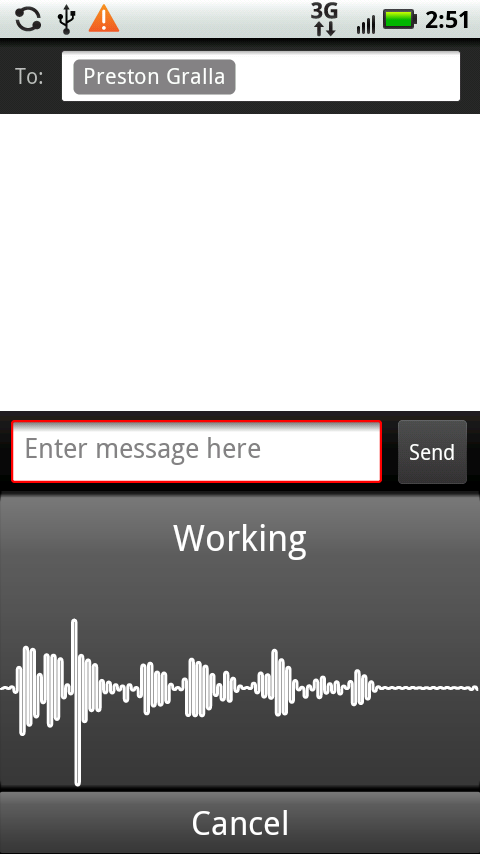
 . Don’t want your fingers to do all the work? No problem. Press this key, wait for the words “Speak Now” to appear, and then speak into the Droid X. The Droid X thinks for a few seconds, and then shows you a screen that tells you it’s working, and finally types in your text. Speak clearly and distinctly. This feature works well for words and short phrases, but not so well for long sentences. You can, however, speak part of a sentence, let it input the text, and then speak the next part.
Tip
There’s no comma on the keyboard, so you may often find yourself switching to the number and symbol keyboard in order to enter it. Switch no more! To type a comma, tap the period key twice in quick succession.
Auto-Suggestions and the Dictionary
As you enter text, the Droid X helpfully suggests words that might match what you plan to type. As you type, the Droid X changes its suggestions based on the letters you enter. The suggestions appear just above the keyboard. Tap any one of the choices to enter it.
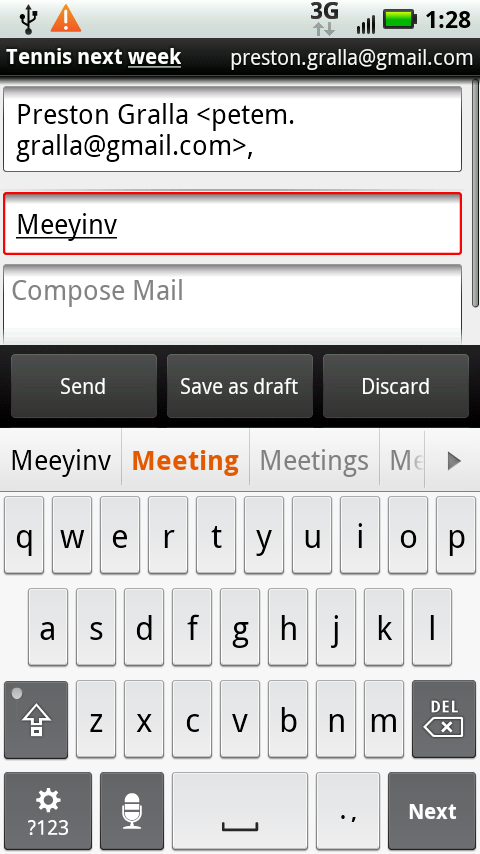
The Droid X even makes suggestions if the text you’ve entered is obviously misspelled—great if you’re ham-handed. So, for example, type meeyinv, and auto-suggest offers a variety of options, including meeting.
Tip
You can save yourself some time by not entering the apostrophe in common words, such as don’t. The Droid X automatically adds the apostrophe in many common words after you type the letters and hit the space key.
The Droid X makes these suggestions based on its built-in dictionary. It can get rather pushy about its suggestions, so pay attention as you enter text, especially if you’re entering words that may not be in the dictionary, but are similar to common words. If you’ve not careful, the Droid X will change your word to the word it thinks you want to type, and you may not notice it.
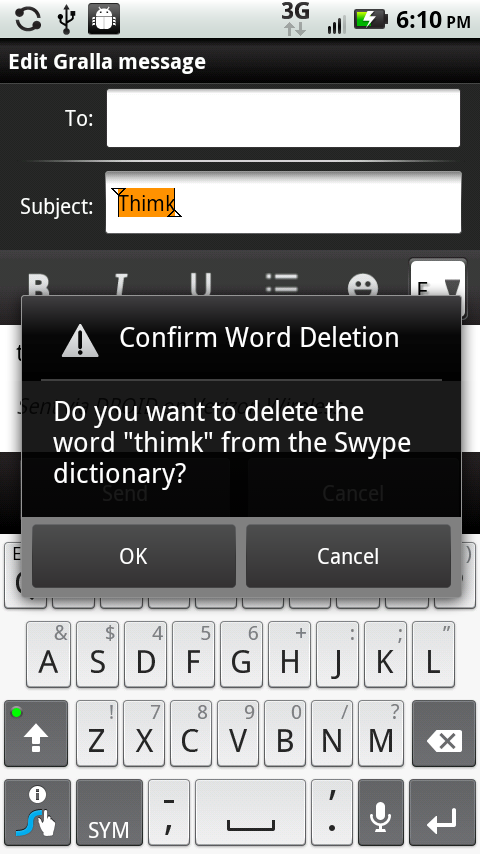
Here’s how it can happen. You’re happily tapping away, and you want to type the letters thimk as part of a joke you’re emailing to a friend. You’re not watching the keyboard and the suggestions above it, so you press the space key after you’ve typed thimk. You look later, and notice that the Droid X, trying to be helpful, changed thimk to plain old think.
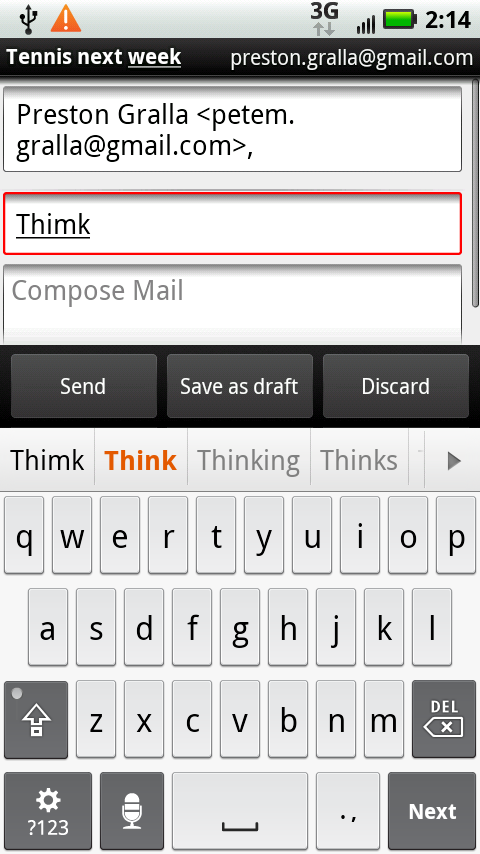
What gives?
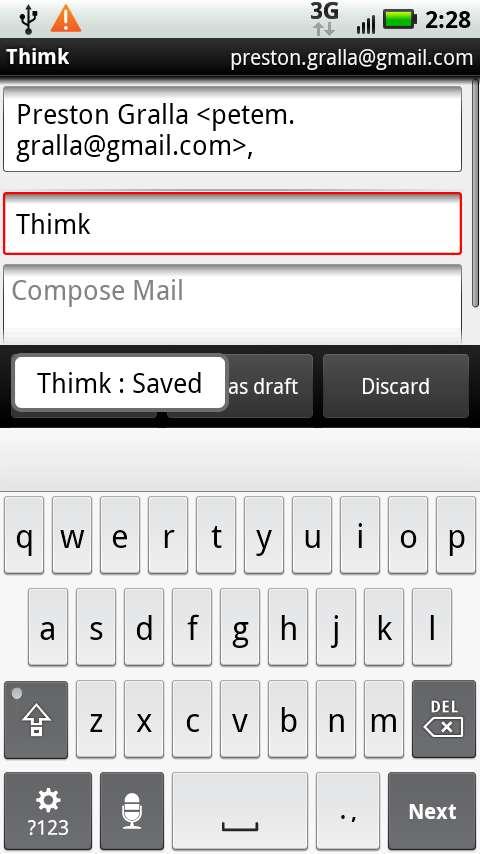
When the Droid X is fairly certain that you’re typing in a word that contains a typographical error, it lists its suggestions for words it thinks you’re going to type, as usual, but colors one of them brown. When you press the space bar after a word, the brown-colored word takes the place of the one you tapped in. It’s much like the autocorrect feature of a word processor. Generally, you want the Droid X to correct words for you, after all. But if you want the original word to appear, not the corrected one—thimk instead of think for example—you must pay attention to the list of auto-suggested words. The Droid X always includes whatever you’ve typed in its suggestion list, so sure enough, thimk is one of the choices. Tap it, and two things happen. First, the word is entered as text. Second, it’s added to the dictionary, so that it will appear in auto-suggestions from now on, and you can also enter the word without the Droid X changing it. You’ll know it’s been added because “Saved” appears next to it, like this: “Thimk : Saved”.
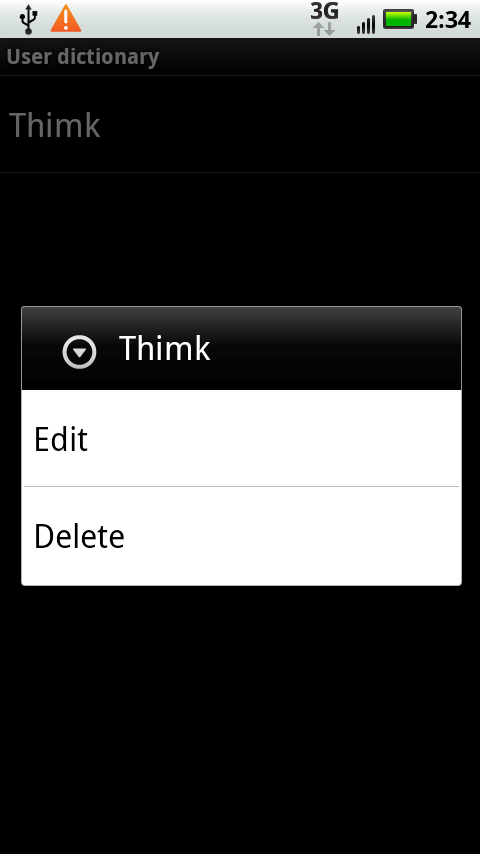
You can easily add and delete words from the Droid X dictionary. From the Home screen or a pane, press the Menu key and then select Settings→“Language & keyboard”→“User dictionary”. You see a list of words you’ve added. Tap a word to edit or delete it. To add a word to the dictionary, press the Menu key, tap Add, and then type in the word and tap OK.
Moving the Insertion Point
Once you get the hang of entering text, you’ll come across another challenge—how to move the insertion point if you want to go back and edit, delete, or add words or letters. You can tap where you want to place the insertion point, but that’s not always effective. Even if you have tiny fingers and fine-tuned hand-eye coordination, you’ll rarely be able to tap in the precise spot where you want the insertion point.
You can also move the insertion point by dragging your finger along the screen until it reaches the point where you want it to be. This sounds easy, but in practice, it’s hard to do, because as you drag your finger, the insertion point disappears, so you won’t be able to see where you’re placing it.
There’s a better way: Tap anywhere in the text, and a red circle appears. Tap the circle and hold your finger on it, and a magnification balloon appears. Move your finger, and you’ll move the insertion point along with the magnification balloon. You’ll see the insertion point move and be able to place it very precisely. When you have the insertion point where you want it to be, remove your finger.
Accented and Special Characters
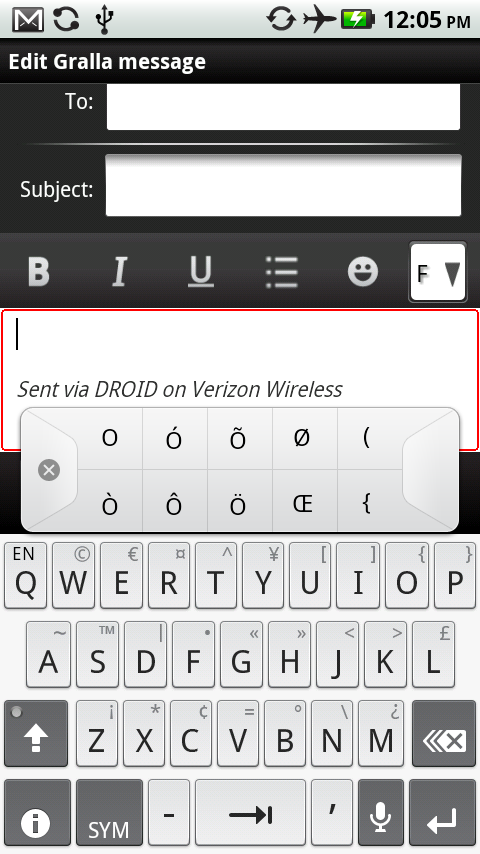
You can easily type in accented characters (such as é, Ö, Ü, and so on) with the Droid X keyboard. Press any one of a number of keys and keep your finger on it for a second or so. A palette of accented characters appears. Tap the one you want to use, or tap the X to make the palette of characters vamoose. The following chart shows which keys let you enter special characters.

The Express Lane to Punctuation Marks
The Droid X letter keyboard doesn’t have many punctuation marks on it, which can make for much annoyance as you have to constantly switch back and forth between the letter and number keyboards. There’s a simpler way, though: Press and hold the period key. All the most common punctuation marks and other common symbols, such as the @ sign, appear on the pop-up palette—14 of them. Tap the mark you want to use, and it is placed in the text box.
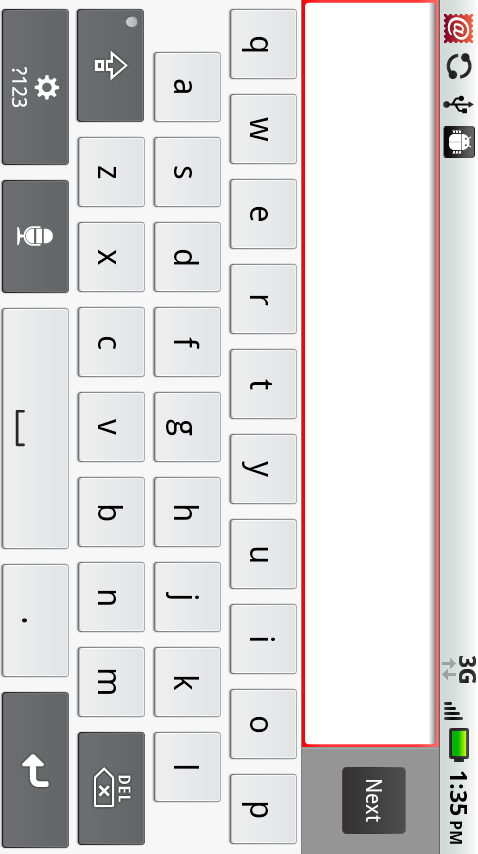
The Widescreen Keyboard
Because the Droid X is a large smartphone, it has a good-sized keyboard compared with a typical smartphone. But let’s face it: It’s still rather small. There’s a way to get a whole lot more keyboard real estate, though, so that your fingers can tap faster and more accurately: Simply turn the Droid X 90 degrees. When you do that, the keyboard stretches all the way along the side of the Droid X, so each key gets bigger.
Tip
If you want the keyboard—as well as all your menus, button labels, and so on—to use Spanish rather than English, it’s easy. From the Home screen or a pane, press the Menu key and then select “Language & keyboard”→“Select locale”, and then select Español. In the United States, the Droid X doesn’t include keyboards for any languages other than English and Spanish.
Using the Swype Keyboard
The Swype keyboard takes a few minutes to get used to, but once you do, you’ll be amazed at how much faster you can enter text with it than the traditional keyboard. So put aside your trepidations and give it a try. Switch to it by pressing the Menu key when you’re at the Home screen or a pane, selecting “Language & keyboard”→“Input method”, and then tapping Swype.
The Swype keyboard looks similar to the multi-touch keyboard, although with some changes. The real difference, though, isn’t in the keyboard—it’s in the way you input text. Rather than tap each letter individually, you put your finger on the first letter of the word, and then with a single motion, move your finger from letter to letter of the word you want to input. As you do so, you’ll see the path that you’ve traced. Don’t worry too much about accuracy, because Swype does an exceptional job of interpreting the word you want to input, using its dictionary (Auto-Suggestions and the Dictionary). Just try to get near each letter; it’s okay if you’re off a little bit. When you’ve finished tracing the word, lift your finger.
There are times when Swype might not know precisely what you’re trying to trace, and the trace might match multiple words. If that happens, Swype pops up a Word Choice window.
Tap the word you want. Press the arrow key at the bottom of the pop-up to see more choices. If you want to go with the first word on the list (the most likely choice), simply press the space key. If none of the words match, tap the X and start over. And remember, you can always tap the Swype keyboard, in the same way that you can tap the multi-touch keyboard, if you simply can’t get Swype to recognize a word.
Swype Keyboard Layout
The Swype’s keyboard is laid out a bit differently than the multi-touch keyboard. The basic keyboard is the same, although some special keys are in different locations (such as the microphone key). The real difference, though is in three keys:
Shift. As with the multi-touch keyboard, tap this key and the letters all change to uppercase on the keyboard. And as with the multi-touch keyboard, after you tap a key, the keyboard changes back to lowercase. To turn on Caps Lock, tap the Shift key twice. Instead of a green button appearing, the Shift key glows.
SYM. This key is the equivalent of the ?123 key on the multi-touch keyboard. Tap it when you want to type numbers or punctuation marks. To display a keyboard with still more special characters and symbols, tap the Shift key when the number and punctuation keyboard is displayed.
Swype. This key does double-duty. Tap and hold it, and a screen appears with a tip about Swype on it. If you just tap the key, it highlights the word directly to the left of the insertion point, and brings up the Word Choice menu, so you can correct the word if you want. If you tap the key in an empty input box, it brings up a tip.
Autocorrect, Word Choice, and the Swype Dictionary
Swype uses its own dictionary for recognizing words and presenting them in the Word Choice pop-up screen. You can’t add words to this dictionary or delete them in the same way you can with the multi-touch keyboard. The two dictionaries don’t share information.
Swype takes a much more aggressive approach to correcting your tapping than does the multi-touch keyboard. As you drag your fingers across keys, it either enters a word from the dictionary—the closest match to what it thinks you want to type—or pops up Word Choice and presents a list of words from the dictionary. So if you carefully drag your finger across the letters t-h-i-m-k, Swype doesn’t enter thimk.
But what if you really do want to enter thimk? Simply tap the letters individually. Do that, and two things happen. The word is entered onscreen, and the word is added to the dictionary. Next time you drag your fingers across t-h-i-m-k Swype dutifully enters thimk into the text box. And thimk also starts appearing in the Word Choice balloon.
If you don’t particularly think that having thimk in the dictionary is a good idea, you can remove it. Highlight the word onscreen by tapping it twice. The word turns brown, bracketed by two triangles. Tap the Help key, and you’re asked if you want to delete the word from the dictionary. Tap OK.
Tips for Using Swype
Swype is a surprisingly full-featured little app. But here are some useful tips for getting the most out of it.
Don’t use the space key. After you enter a word using Swype, lift your finger and enter another word. Swype automatically puts a space between the two words.
Swype usually recognizes when you want to add accented characters. Slide your finger across the letters, and the proper accent generally appears, as in the word café. However, you can still add accented characters if Swype doesn’t automatically recognize them. To add an Ö, for example, hold down the O key, and a menu of accented characters appears above the keyboard. Choose the character you want to use.
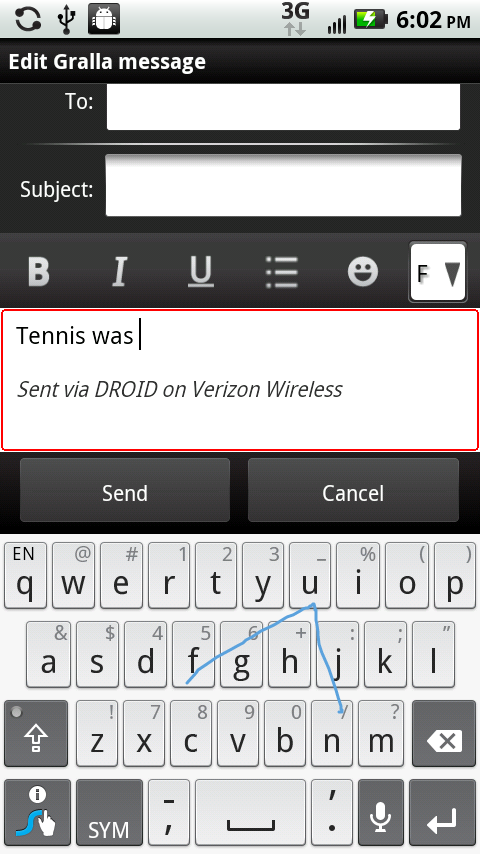
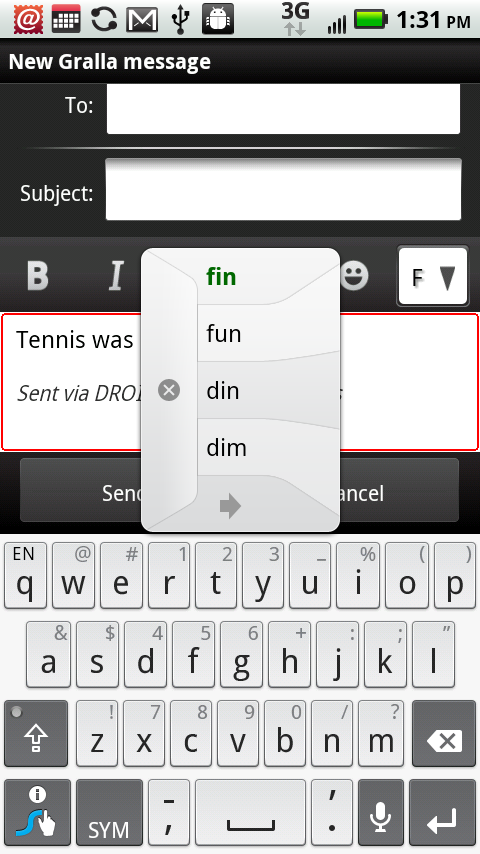
Circle or scribble for double letters. If you want to enter the word tennis, then when you get to the “n”, make a circle on the key with your finger, or scribble back and forth across the key. Then glide with your finger to the next letter.
Tip
Swype offers an exceptional number of ways to customize how it works—for example, how long to display the Swype trace path onscreen, how to balance speed of word recognition versus accuracy, and so on. To customize Swype, from the Home screen or any pane, press the Menu key and then select “Language & keyboard”→“Swype settings”. Then customize to your heart’s content.
Use the editing keyboard. Swype includes a very helpful editing keyboard that makes it easy to move the insertion point; cut, copy, and paste; move up and down a page at a time; and more. To access these editing tools, put your finger on the Swype key and drag it to the SYM key. To make it go away, press the ABC key or the Swype key.
Work quickly. Don’t slow down in an attempt to be more precise. Swype is built for speed. Move your finger quickly; you’ll be surprised at how well Swype recognizes words.
Copying and Pasting Text
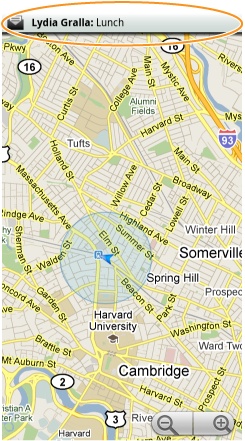
What’s a computer without the ability to cut, copy, and paste? A computer at heart, the Droid X lets you do all that, even though it has no mouse. For example, you can copy directions from Google Maps into an email to send to a friend, paste contact information into a note to yourself, and so on.
Note
This technique works only in areas where you enter or edit text, such as in email messages you’re composing, text messages you’re creating, contact information, and similar locations. You can’t copy and paste text from an incoming email. You can, however, copy and paste text from a web page, although using a different technique. See Copying Text from a Web Page for how to do it.
You copy and paste text using the same basic techniques you use on a PC or a Mac. You select it, and then copy, cut, or paste it.
There are several ways to select text in an input box, depending on how much text you want to cut or copy:
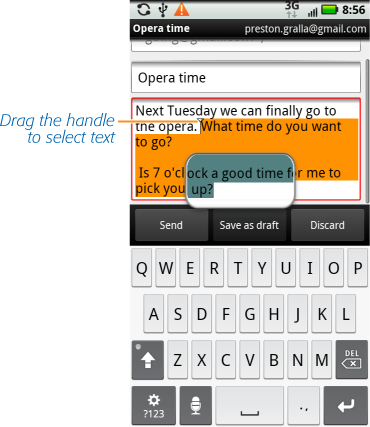
Double-tap. Double-tap the first or last word in a selection of text that you want to cut or copy. The word is highlighted and bracketed by two triangles—one right side up, and the other upside down—those are the handles. Drag each to include all the text you want to select, and then release. The magnifier appears and helps you highlight the text at exactly the point you want.
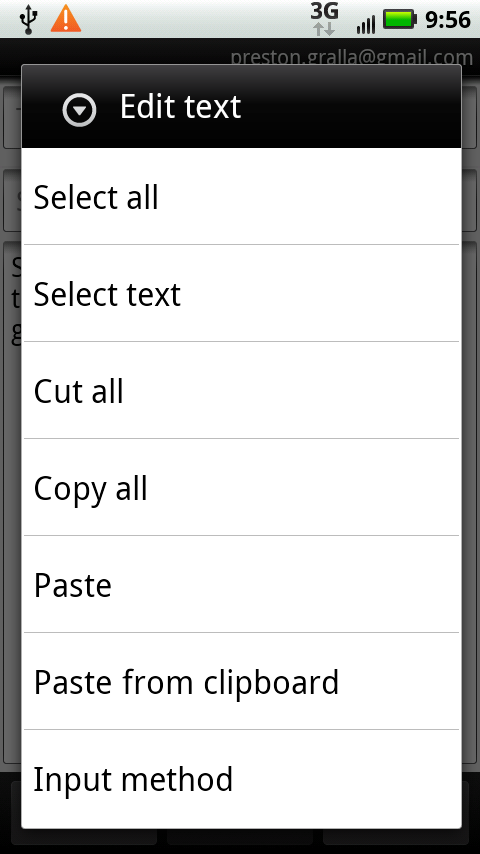
Tap and hold. Press your finger in the text box and hold it there. The entire box turns red, and the “Edit text” screen appears. What to do next? Glad you asked. That’s what the next section is all about.
Once you’ve selected text, it’s time to do something with it. Press and hold your finger on the text you’ve selected (or simply hold it in the text box without selecting text, to select all the text in the text box). The “Edit text” screen appears, and gives you these options:
Tip
Sometimes if you select a single word using the double-tap technique and then press on the word to open the “Edit text” screen…it doesn’t. Instead, the Magnifier appears. That’s because you’re pressing on the wrong spot in the word. If you press on the left-hand part of the word, near the left handle, you bring up the Magnifier. To get the “Edit text” screen, press near the right handle.
Select all. Selects all the text in the text box. It overrides you if you’ve selected only some of the text in the text box. You still need to do something with that text, though, so having this choice here is a bit pointless.
Select text. Selects the text you’ve already selected. Why have this option on this menu? Your guess is as good as anybody’s.
Cut. Cuts the text you’ve selected, and puts it into the Droid X’s clipboard, so you can later paste it somewhere if you want. The clipboard works just like the one on your PC or Mac—it holds things you’ve copied to it until you want to later paste them. Unlike the PC or Mac, though, this clipboard holds multiple clips, not just a single one.
Copy. Copies the last piece of text you’ve put into the clipboard, so that you can paste it somewhere.
Paste. Pastes the last piece of text you’ve put on the clipboard and replaces whatever text you’ve selected. So if you’ve selected all text in the text box, Paste deletes all that text, and replaces it with the last thing you put on the clipboard. If you’ve selected only a word or a few words, it deletes them and replaces them with the latest from the clipboard.
Paste from clipboard. Pulls up the Droid X clipboard and lists all the clips there. Tap any clip to paste it.
Input method. Lets you switch between the multi-touch keyboard and Swype.
Note
If the word you select isn’t in your dictionary, there’s also a selection asking if you would like to add it.
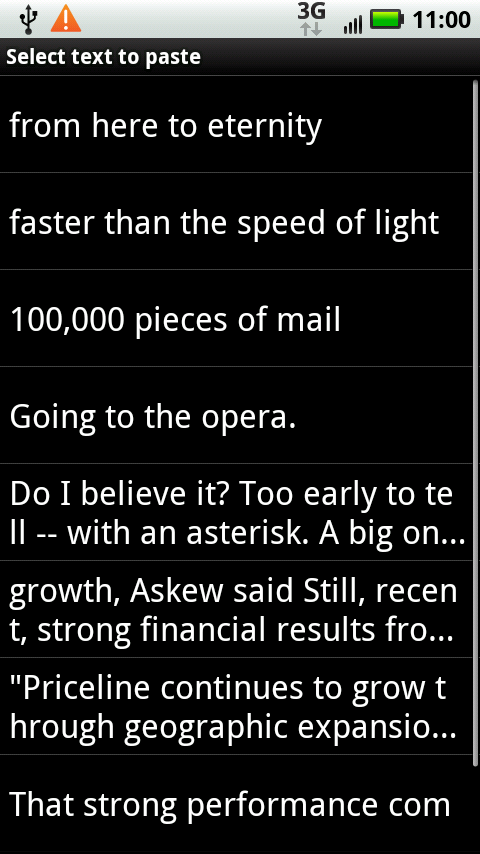
Copying Text from a Web Page
Chances are when you’re browsing the Web, you’ll eventually come across some text that you want to save for later use. The Droid X makes it simple to copy text from a web page to the clipboard:
Press the Menu key and then tap More from the screen that appears.
From the menu that pops up, tap “Select text”.
With your finger, trace the text you want to copy. The text turns pink.
Release your finger. The text is now on your clipboard, and a message tells you so.

Searching Your Droid X
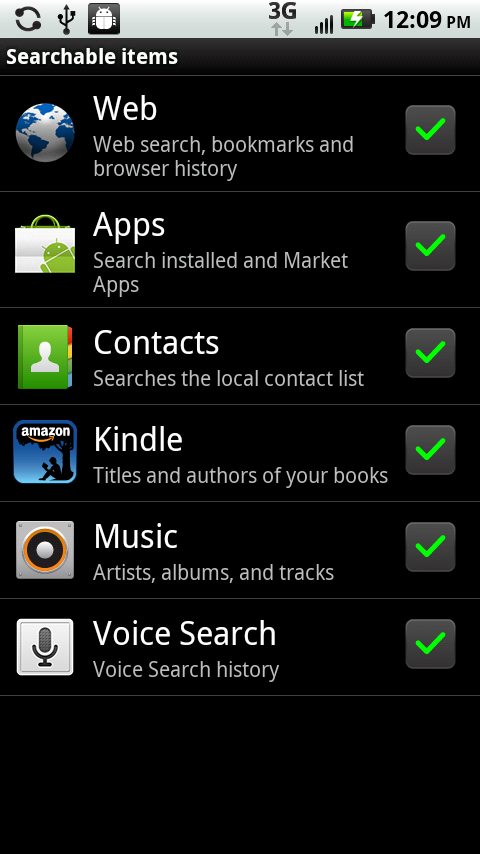
Looking to find the proverbial needle in a haystack on your Droid X? It can seem like an insurmountable problem. After all, the Droid X’s haystack is rather large, including contacts, maps, social networking sites like Facebook, and the entire Web.
It could take you quite a long time to find a needle in all that hay if you didn’t have the Droid X’s universal search, which searches all of the above in one fell swoop. Here’s what universal search scans to find matches for you:
Contacts. Search through first and last names, and also company names. It lists names as well as phone numbers in the results.
Browser. Looks through your bookmarks and web history.
Music. Searches artist names, album names, and track names.
Kindle. If you have the Android Kindle book-reading app from Amazon on your Droid X, universal search looks through the titles and authors of the books you’ve downloaded.
Note
When you first unpacked and used your Droid X, it may not have had the Kindle app on it, and you may never have downloaded it. Yet the app is most likely on your Droid X all the same. That’s because Motorola regularly installs software updates on your phone wirelessly. (It’s called an over the air update, or OTA.) During one of those updates—update 1.13.604 to be very precise—the Kindle was installed.
Google search. Lists popular Google searches that include your search term. It also includes search terms you’ve already used on Google, even those that you’ve used on a computer, not on your phone.
Titles of installed apps. It searches through the names of apps you’ve downloaded. Tap a name to launch the app.
Contacts on social media sites. Universal search doesn’t just search through the contacts on your phone—it also searches through contacts on social networking sites whose apps you’ve installed, such as Facebook.
Note
Universal search isn’t quite universal. It doesn’t search through your email or calendar. You’ll have to search them individually.
Performing a Search
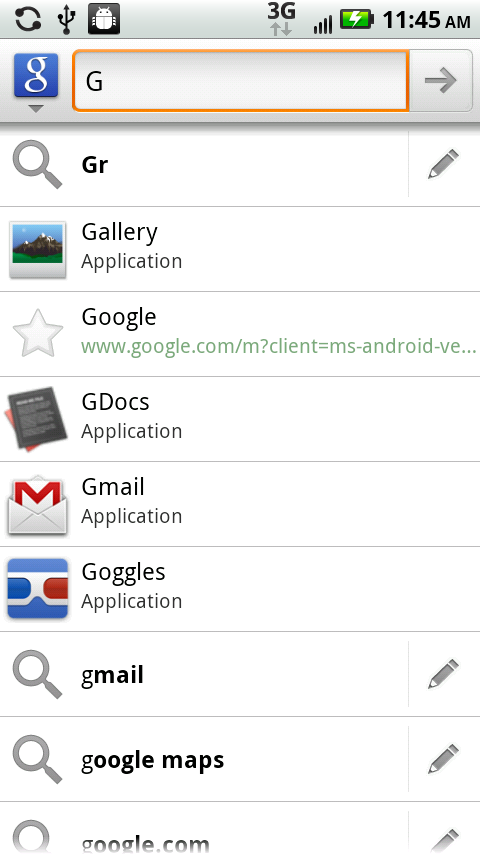
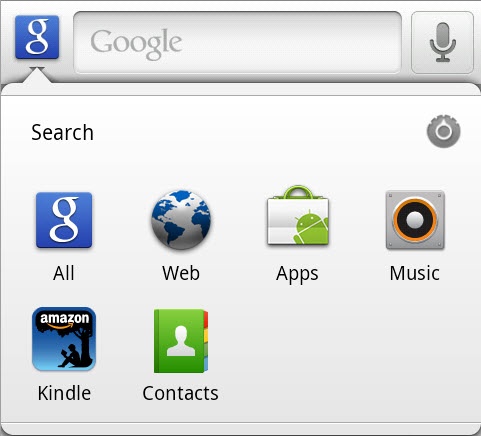
Launching a search across your entire Droid X is about as simple as it gets: Press the Search button. A search box appears at the top of the page, and the keyboard appears. Tap in your text, and the Droid X does its magic. As you tap, universal search displays its results, narrowing the results as you type and your search term gets more specific. Eight search results show up on your screen. Tap any result to open it—to open a contact, to visit a web page, to launch an app, and so on.
You may notice something odd and somewhat annoying about the results. Most of the time the results are solely or primarily web searches, with some results from your apps mixed in. You may not see a contact showing, even if you know you’re searching for someone’s name in your Contacts list.
There are two potential issues here. The first is that the Droid X search lists only eight results on its screen, and it lists what it thinks the most important eight results are. It weights those results toward web searches, and toward searching apps on your Droid X. So if it determines that the contact is of less importance than those web searches and app searches, you’re out of luck.
The second issue is that Universal search might not be configured to even search through your Contacts. You customize what to search for when you press the Search key, and there’s a chance that your Droid X is configured to search the Web and your apps, but nothing else.
What to do? First, check how your search is configured. Tap the Google logo ![]() to the left of the search box, and a toolbar drops down that shows you what your Droid X has been set up to search. To add more categories to search, such as Contacts and Music (or to remove categories from the search), tap the gear icon
to the left of the search box, and a toolbar drops down that shows you what your Droid X has been set up to search. To add more categories to search, such as Contacts and Music (or to remove categories from the search), tap the gear icon ![]() on the upper right of the toolbar.
on the upper right of the toolbar.
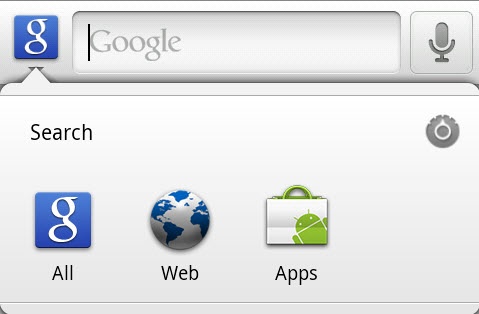
A list appears that shows all the categories the Droid X will search. Turn on the checkboxes next to any that you want searched, and turn off those you don’t want searched. When you’re back on the Search screen, tap the Google logo. You see that you’re now searching the new categories you added, and not searching any that you’ve removed.
Tip
You can also get to the screen for configuring which categories to search by pressing the Menu key and tapping Search Settings→“Searchable items”.
That won’t necessarily solve the problem of the Droid X not showing results from Contacts (or Music, say), because it still shows only the first eight results, and a contact or piece of music may not be in the top eight. But there’s an easy fix. Type your search term, tap the Google logo, and then tap the category you want to search, for example, Contacts. You then search only Contacts, and the top eight results will appear.
Controlling Searches
You’re given some control—not a lot, but some—over how universal search works. To tweak it, when you’re in Search, press the Menu key and then select Search Settings. On the screen that appears, you’ll find three ways to tweak your search. (For more details about these settings, see Search.)
Tip
You can also get to this screen when you’re at the Home screen or on a pane. Press the Menu key and select Settings→Search.
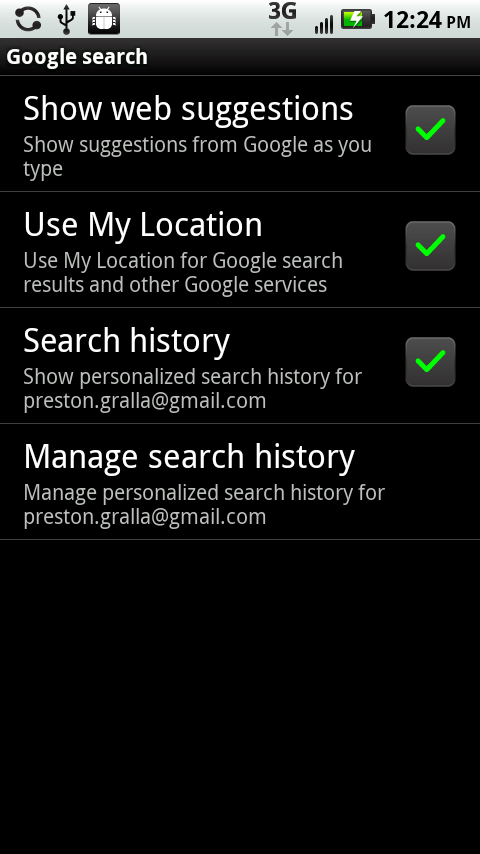
Google search. From here, you can customize the way Droid X’s universal search integrates with Google search. Out of the box, the Droid X’s universal search shows suggestions from Google and results from your search history as you tap. It also uses your location to deliver searches most relevant to where you currently are. You can turn those features off if you want. You can also manage the way your Google account handles search, just as if you were managing it on the Web.
Searchable items. As detailed earlier in this chapter, you can customize which categories you search.
Clear shortcuts. The Droid X keeps track of search results that you’ve recently chosen and then displays shortcuts to those results when you do a relevant search. Clear those shortcuts by tapping this selection.
Voice Search
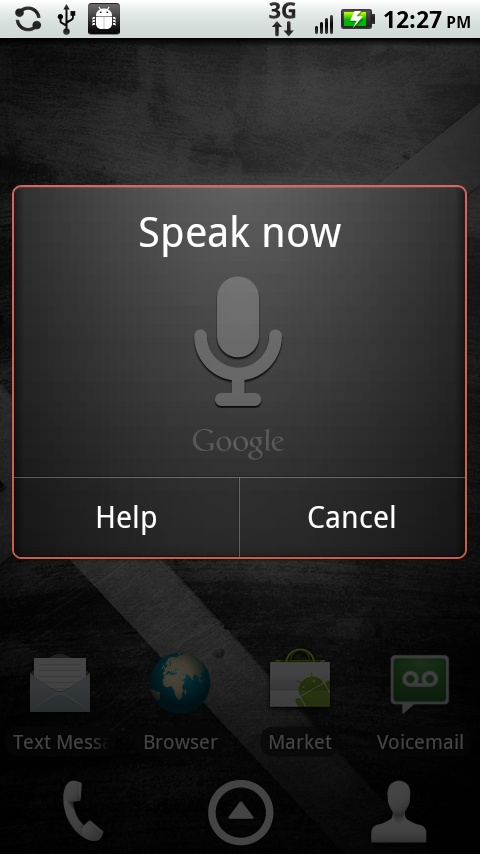
Want to save wear and tear on your fingers? Use voice search. It works like regular search, with one very important difference: Rather than typing your search, you speak it. Other than that, everything is the same.
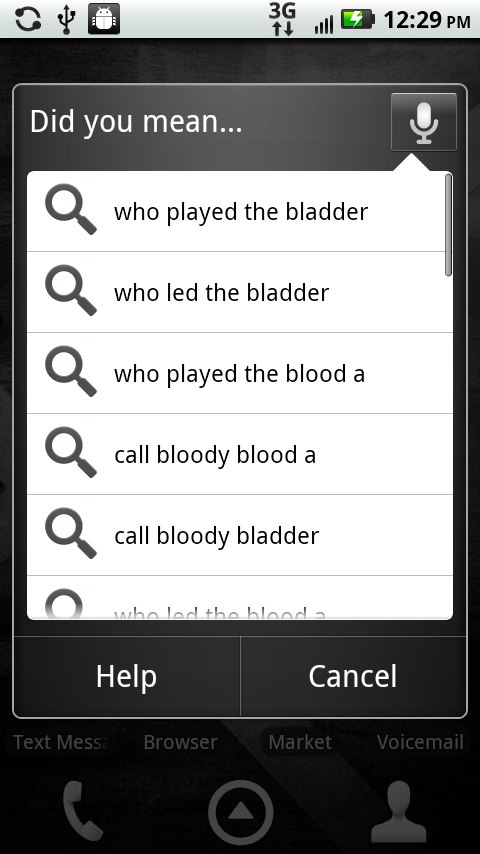
To perform a voice search, press the Search button and hold it down until the Droid X makes a little trilling sound and a screen appears telling you to speak. Talk into the phone clearly. After you do, the Droid X shows you a little diagram of the words you just spoke, and then tries to interpret them. If it can’t understand your words, it tells you so; try again. If it does understand you, it does a search in exactly the same way as if you had typed in your search.

If the Droid X can’t understand what you said, it will pop up a list of suggestions. Tap any to perform the search. It does its best to find matches, but if you’re looking for something esoteric, it’s probably best to stick to tapping rather than talking. Check out the suggestions when asked to do a search for the Beatles song “Ob-La-Di, Ob-La-Da.”
Text Messaging
What! You say you use your Droid X to talk on? That’s so early twenty-first century! By 2008, as reported by the Nielsen Mobile research group, the average mobile phone user sent and received more text messages than phone calls—357 text messages a month compared with 204 calls. Fittingly, the Droid X is a messaging monster. Not only can you send and receive plain old text messages, but you can send and receive pictures and videos along with them as well.
When you send text messages, you use the SMS (Short Message Service), which limits you to 160 characters (including spaces and punctuation), which comes out to a sentence or two. That may sound short, but in a world where Twitter limits you to messages of 140 characters, 160 characters can suddenly seem like a lot of space.
Text messaging doesn’t come free. With Verizon, you have a choice of paying per message (typically 20 cents per text message and 25 cents per video or picture message), or from among a variety of monthly plans that range from $5 per month for 250 text, picture, and video messages, up to $20 per month for unlimited messaging.
Receiving a Text Message
When you get a text message, the Droid X plays the familiar robot-like “Droid!” notification sound. What happens next depends upon whether the phone is active or asleep.
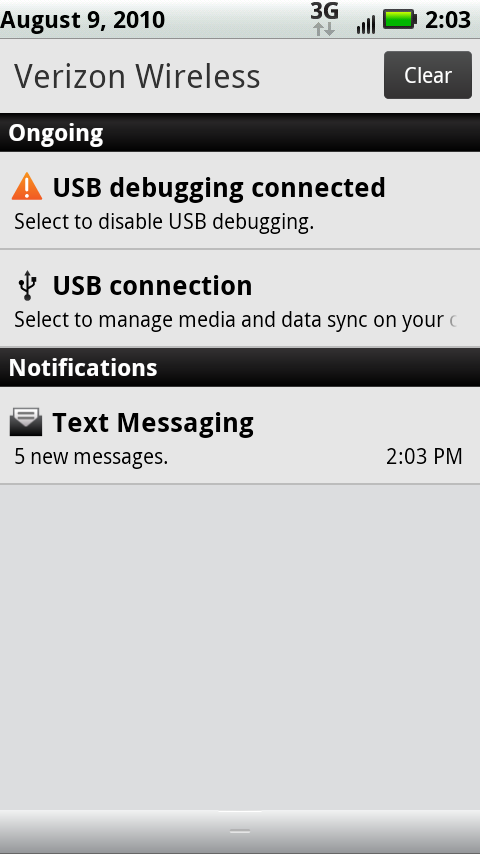
If you’re using the phone, a text message icon appears in the Notification area, along with the name of the person sending the text message and the message itself.
If the phone is asleep, after you unlock it, you’ll see a text message icon in the Notification area, but not the name of the person sending it or the message itself.
Tip
When someone sends you text message with links in it, the links are live. Tap a web address to visit it in your browser, or tap a phone number to dial the number for a voice call.
In either case, pull down the Notification bar and tap the notice. If you’ve got more than one text message, the notice tells you so.
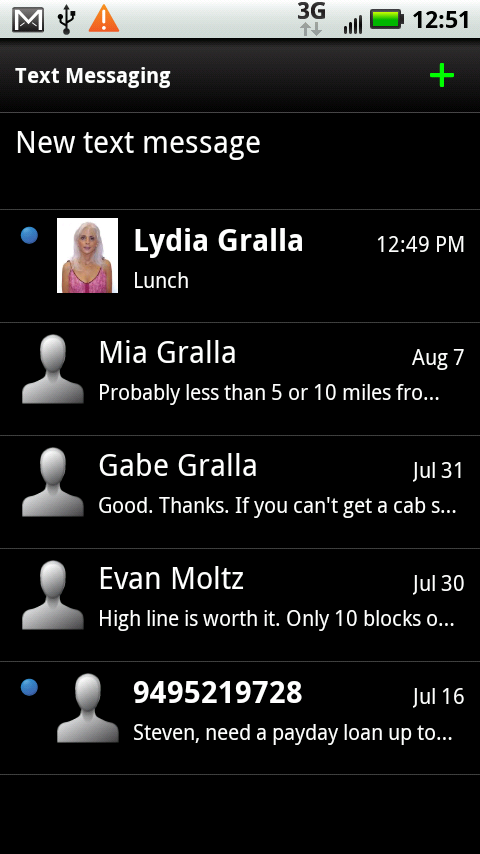
You go straight to a list of your most recent text messages, those you’ve sent as well as those that have been sent to you. The messages with blue dots next to them are those sent to you; all others are ones you’ve sent. Each message shows the date it was sent or received; any sent or received on that day show only the time. You see only the last text message in a conversation. So if you exchanged four text messages with someone three days ago, you see only the last message listed here.
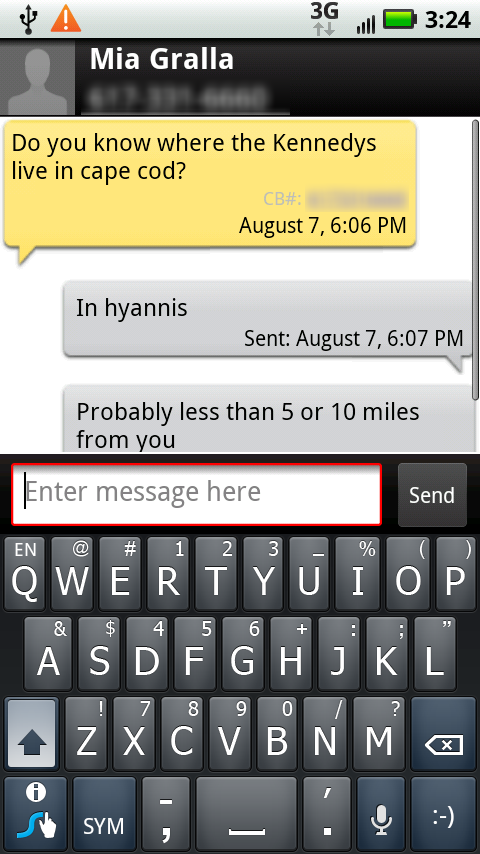
To read the message you were just sent, tap it. You see the message in a text balloon, and if it’s part of an ongoing conversation of messages, you see each message.
Note
Text messagers are having to get used to an unpleasant fact of life texting life: spam. It’s not nearly as prevalent as email spam, but you’ll most likely get some at some point in your messaging life.
To respond, tap in your message using the keyboard, and then press Send. Off your message goes, instantly. You see the record of your message appear in a text balloon. If your friend texts back, you see it in a text balloon…and so on.
Sending a Text Message
To send a text message if you haven’t received one, tap the Text Messaging icon on the Home screen or the Application Tray. The list of all your messages appears. Tap the + button, and a screen appears that lets you create a text message. There are several ways to tell the Droid X where to send your text message, both accessible from the To field:
Tap a name into the field. The Droid X will look through your contacts and display any matches. Tap the contact to whose cellphone you want to send a text message.
Tap a phone number in the field.
Tap the Add icon
 . Your Contacts list appears. Choose the contact to whom you want to send the text message.

After that, tap your message in the message field and tap Send, and your message goes on its merry way.
Tip
If you prefer to talk rather than type, press the microphone key, and then speak your message. Yes, it’s odd to send a text message that starts out as the spoken word, but welcome to the twenty-first century.
There are plenty of other places on the Droid X where you can send text messages:
When you’re viewing a contact. Tap the Message icon next to a phone number to address a text message to that number. When you’re in the Contacts list, Recent, Favorites, or anywhere else that lists your contacts, you’re only a tap or two away from sending a text message.
When you’re viewing pictures or video. You can share these things via text messaging the same way you can share them via email. When viewing the picture or video, tap the Menu key, tap Share, and then select Text Messaging.
From the Messaging widget in the Productivity pane. The Productivity pane (Productivity Pane) includes a Messaging widget that displays the last text message or update you’ve received from a social networking site. If it shows a text message, tap it, and you can send and receive messages from there.
Adding Pictures, Audio, and Video
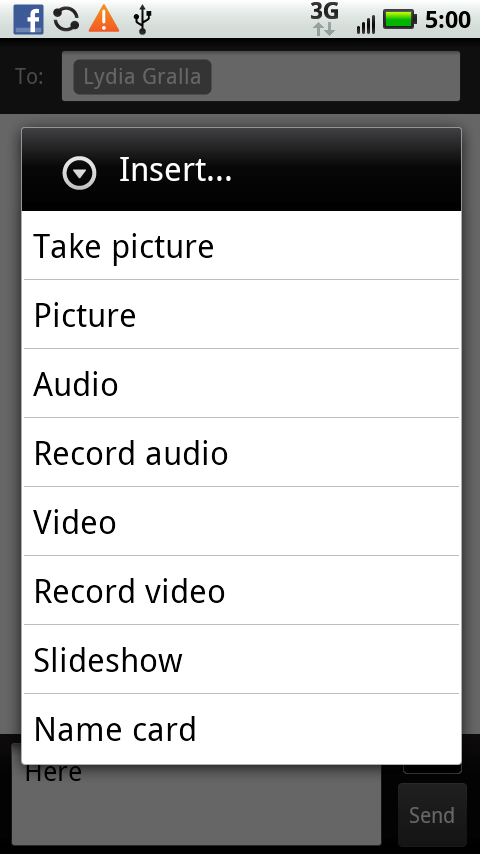
On the Droid X, the term “text message” is an understatement, because you can send a whole lot more than text using the SMS service. It’s a breeze to send a photo, an audio snippet, a video, an entire slide show, or a “name card” with contact information on it. (For details about name cards, see Fancy Tricks with Contacts.) When you’re composing your text message, press the Menu key and then tap Insert to choose any of these items from a menu. You can also take a picture, or record audio or video, which you can then send.
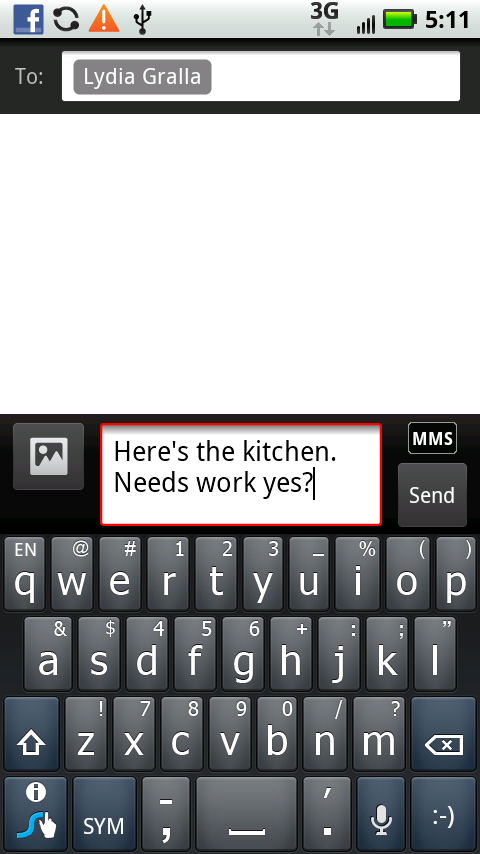
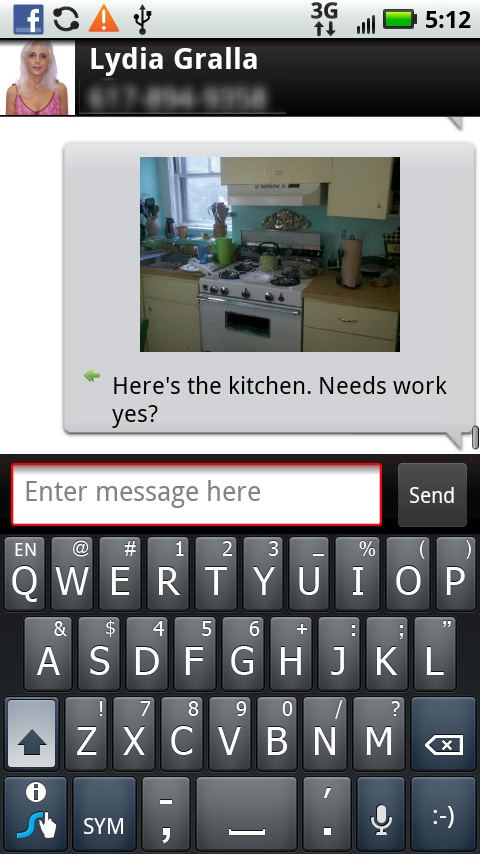
If you take a picture or video, the Droid X will let you know whether it’s too large and offer to resize it. Click Resize to resize it and send it. You end up back on the text messaging screen, where you see an attachment icon on the left side of the screen. And on the right side of the screen, the letters “MMS” tell you that you’ll be sending the file via the Multimedia Messaging Service, which is used to send media files via text messaging.
Tap Send, and the Droid X sends your picture. After a moment or two, you’ll see the message you just sent, including the picture, audio, or video.
More Messaging Options
When you’re composing a text message and you press the Menu key, you have more options than just inserting a picture, audio, or video:
Add subject. As the name says, you can add a subject line to your text message.
Set priority. You’ve got two options, Normal and Urgent. Whenever you compose a message, it’s sent via the Normal option. If you want the recipient to know it’s urgent, tap this, and then select Urgent.
Delete. Think maybe it’s not such a great idea to send that message? Then bail out and delete it here.
Text Messaging Tricks
When you get a text message, there’s a lot more you can do with it than just read it. Hold your finger on the message, and you get a variety of other options:
Open message. Opens the message, just as it says.
View picture. If the text message contains a picture, tap this option to view the picture (or video, if it contains a video). Of course, this option appears only if you’ve been sent a picture or a video.
Save picture. Lets you save the picture to your Droid X.
Share picture. Share the picture with others via email, text messaging, the Droid X’s photo sharing capabilities, or an online album, if you’ve set one up.
Forward message. Lets you share the message via the text messaging service.
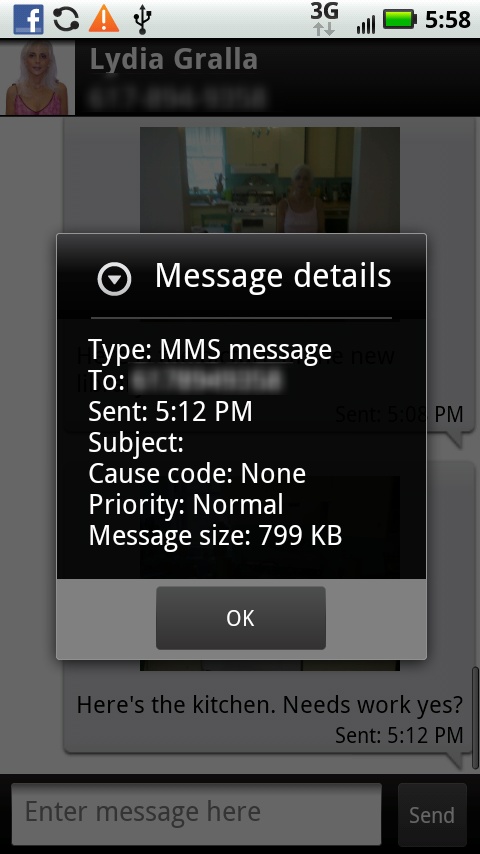
View message details. Displays information about the message—when it was sent, to whom it was sent, priority level, message size, and so on.
Tip
There’s a single location on your Droid X where you can see and access all your communications—text messages and all your email and social networking accounts—in one place. Go to the Application Tray and tap the Messaging app. You’ll see icons for text messaging, and all your email and social networking accounts. Tap any one to use it. There’s also a Universal Inbox that lists all those messages in a single location, mixing text messages, emails, and social networking updates.
Delete message. As the name says, it deletes the message. (You can’t undo the deletion.)
Copy message text. Copies the text of the message to the Droid X’s clipboard. You can then paste it anywhere you want.
Emoticons and Your Keyboard
Take a look at the keyboard when you type a text message. Notice something unusual? In the lower-right part of the keyboard, you’ll notice a key with the infamous smiley emoticon on it: :-). It appears whenever you text message. Tap that key, and the emoticon gets placed into your text message. Hold down the key, and you’ll find a whole host of other emoticons you can add. (But do civilization a favor and use them in moderation.)
Google Talk
Texting is fine for fast and simple communications. But what if you want a program that lets you do real chatting, without the 160-character limit, and lots of other features thrown in? And what if you don’t want to have to pay for the rights to communicate via the keyboard?
Then you want Google Talk, a chat program built right into the Droid X. Run it by tapping Talk in the Application Tray.
One of the niftier things about Google Talk is that it integrates with the computer-based version of Google Talk. When people contact you via Google Talk, they don’t need to know whether you’re seated in front of your computer or on the Droid X—it’s all the same difference. And it’s the same to you as well. So if you’re already a Google Talk user, the Android version automatically imports your existing friends and settings.
Note
There are two different ways to run Google Talk on your computer. If you have a Google account, when you sign into your account, say to use Gmail, Google Talk is available right on the Web. You can also download and install Google Talk software for your PC (sorry, Mac fans, there’s no downloadable version for the Mac). To get it, head to www.google.com/talk/.
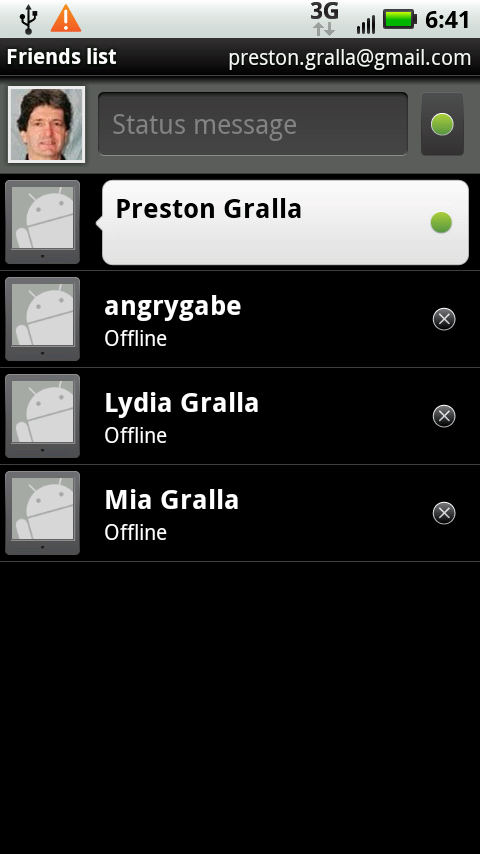
Google Talk works like other chat programs. Invite people to be your friends, and then once they accept your invitation, you’ll be able to see when they’re online. Tap the person’s name, type a message, tap Send, and you send a message. As with other chat programs, you can see the entire conversation between the two of you as it proceeds.
Even if a friend is not online, you can still send a message. Whenever the friend logs into Google Talk, he’ll immediately get the message.
Tip
Google Talk has the same drawback as other chat programs have—you can chat only with other Google Talk fans, and not with those who use a different chat program, such as AIM. However, the IMEasy chat program for Android lets you chat with people on many different networks, including AIM, Google Talk, Yahoo! Messenger, and others. Search for it on the Android Market (Using Market).
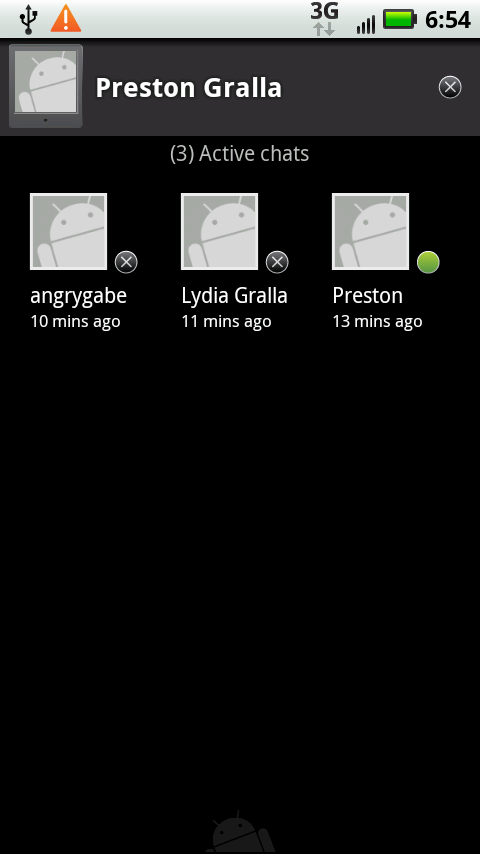
Google Talk’s basic chat feature is straightforward, but take a look at these not-so-obvious features:
Search. When you’re on Google Talk’s main screen, press the Menu key and then press Search. You’ll be able to search through the text of all your chats. When Search finds results, it sends you right to the chat so you can read it.
Chat “off the record.” Google Talk normally keeps a record of every one of your chats, including whom you chatted with, and the entire conversation between the two of you. But if you want (for reasons you don’t have to share), you can go off the record, so no information about the chat is saved. To go off the record, when you’ve finished chatting with someone, press the Menu key and then tap “Chat off record”.
Switch between chats. Are you a Chatty Cathy? Google Chat lets you carry on multiple conversations simultaneously. In any chat, press the Menu key, select Switch chats, and you see a list of all your active chats. Tap any to go to it.