
We'll now define this process in jBPM. It is shown in the following figure. Try to remember this figure, because we'll be referring back to it throughout this chapter:

Figure 2: Loan approval process – the loanApproval.bpmn file
You can use the BPMN2 process editor that comes with the Drools Eclipse plugin to create this process. The rest of the chapter will walk you through this process, explaining each node in more detail. The screenshot shown has been taken using the Default skin. This skin has been chosen because it shows the node names (the other skins don't), which makes the explanation a lot easier. Normally, you'd use the BPMN2 process skin. You can change the process skin in Eclipse when you go to Window | Preferences | Drools, then select from the Preferred process skin drop-down list.
The process starts with the Validate Loan rule task (also called rule flow group). The rules in this group will check the loan for missing required values and do other more complex validation. Similar to what we've done before, each validation rule simply inserts a message into the knowledge session. The next node called Validated? is a XOR type split node. The flow will continue through the no errors branch if there are no errors or warning messages in the knowledge session; the split node constraint for this branch says:
not Message()
Code listing 1: The Validated? split node's no errors branch constraint (the loanApproval.bpmn file)
For this to work we need to import the Message type into the process. This can be done from the constraint editor; just click on the Imports... button. The import statements are common for the whole process. Whenever we use a new type in the process (inside constraints), it needs to be imported.
The Otherwise branch is a "catch all" type branch (it is set to Always true). It has a higher priority number, which means that it will be checked after the No errors branch.
Note
Note that Business Process Model and Notation (BPMN) is a standard that is managed by the Object Management Group (OMG). jBPM implements the latest Version 2.0 of this standard. This means that in theory we could choose any editor that supports this standard and even change the process engine that executes the process.
The .bpmn files are pure XML files that conform with a well-formed XSD schema. They can be also edited with any XML editor.
If the validation didn't pass, an e-mail is sent to the customer and the loan approval process finishes as Not valid. This can be seen in the Otherwise branch. There are two nodes: Email and Not Valid. Email is a special process node called work item.
Work item is a node that encapsulates some piece of work. This can be an interaction with another system or some logic that is easier to write using standard Java. Each work item represents a piece of logic that can be reused in many systems. We can also look at work items as a process alternative to DSLs.
By default, jBPM comes with various generic work items. For example:
- Email: This is used for sending e-mails
- Log: This is used for logging messages
- Finder: This is used for finding files on a filesystem
- Archive: This is used for archiving files
- Exec: This is used for executing programs/system commands and several others
Each work item can take multiple parameters. In the case of e-mail these are From, To, Subject, Text, and others. Values for these parameters can be specified at process creation time or at runtime. By double-clicking on the Email node in the process, a custom work editor is opened (see the following figure). Please note that not all work items have a custom editor.

Figure 3: Custom e-mail work item editor (editing the loanApproval.bpmn file)
In the first tab (not visible), we can specify recipients and the source e-mail address. In the second (visible) tab, we can specify the e-mail's subject and body. If you look closer at the body of the e-mail, you'll notice two placeholders. They have the following syntax: #{variable}. A placeholder can contain any mvel code and has access to all process variables (we'll learn more about process variables later on in this chapter). This allows us to customize the work item parameters based on runtime conditions. As can be seen from the screenshot we use two placeholders: customer.firstName and errorList. The customer and the errorList are process variables. The first one represents the current Customer object and the second one is the ValidationReport object. When the process execution reaches this e-mail work item, these placeholders are evaluated and replaced with the actual values (by calling the toString method on the result).
The second node in the Otherwise branch in the process from Figure 2 is an error event node. This node is similar to an end node. It accepts one incoming connection and has no outgoing connections. When the execution reaches this node, a fault is thrown with a given name (it is a similar concept to Java exceptions). We could, for example, register a fault handler that will generate a record in our reporting database. However, we won't register a fault handler, and in that case, it will simply indicate that this process is finished with an error.
We'll now write a test for the Otherwise branch. First, let's set up the test environment.
jBPM comes with an abstract test case such as JbpmBpmn2TestCase that we can extend when unit testing processes . It provides some helper assertion methods. This test case can be found in the jbpm-bpmn2 test module (jbpm-bpmn2-5.4.0.Final-tests.jar).
This is similar to what was done in the jBPM section of Chapter 5, Creating Human-readable Rules. A knowledge base needs to be created from multiple files. For now they are loanApproval.drl and loanApproval.bpmn, and later on we'll add two more: ratingCalculation.drl and ratingCalculation.bpmn.
Then in the setup method a new session is created together with some test data. A valid Customer object with one Account object that is requesting a Loan object. The setup method will create a valid loan configuration and the individual tests can then change this configuration in order to test various exceptional cases:
  @Before
  public void setUp() {
    session = createKnowledgeSession(knowledgeBase);

    trackingProcessEventListener =
      new TrackingProcessEventListener();
    session.addEventListener(trackingProcessEventListener);
    session.getWorkItemManager().registerWorkItemHandler(
        "Email", new SystemOutWorkItemHandler());

    loanSourceAccount = new Account();

    customer = new Customer();
    customer.setFirstName("Bob");
    customer.setLastName("Green");
    customer.setEmail("[email protected]");
    Account account = new Account();
    account.setNumber(123456789l);
    customer.addAccount(account);
    account.setOwner(customer);

    loan = new Loan();
    loan.setDestinationAccount(account);
    loan.setAmount(BigDecimal.valueOf(4000.0));
    loan.setDurationYears(2);
Code listing 2: Test setup method called before every test execution (the DefaulLoanApprovalServiceTest.java file)
A tracking process event listener is created and added to the knowledge session. Similarly to TrackingAgendaEventListener that was used in the previous chapter. This event listener will record the execution path of the process, that is, it will store all executed process nodes in a list. The TrackingProcessEventListener method overrides the beforeNodeTriggered method and gets the node to be executed by calling event.getNodeInstance().
The loanSourceAccount method represents the bank's account for sourcing loans.
The setup method also registers an e-mail work item handler. A work item handler is responsible for the execution of the work item (in this case connecting to the mail server and sending out e-mails). However, the SystemOutWorkItemHandler implementation we've used is only a dummy implementation that writes some information to the console. It is useful for our testing purposes.
We'll now test the otherwise branch, which sends an e-mail informing the applicant about the missing data and ends with a fault. Our following test will set up a loan request that will fail the validation. It will then verify that the fault node was executed and that the process has been aborted:
  @Test
  public void notValid() {
    session.insert(new DefaultMessage());
    startProcess();

    assertNodeTriggered(processInstance.getId(), "Not Valid");
    assertProcessInstanceAborted(processInstance.getId(),
        session);
  }
Code listing 3: Test method for testing the Validated? node's otherwise branch (the DefaultLoanApprovalServiceTest.java file)
By inserting a message into the session, we're simulating a validation error. The process should end up in the otherwise branch.
Next, the previous test calls the startProcess method whose implementation is as follows:
  private void startProcess() {
    Map<String, Object> parameterMap =
        new HashMap<String, Object>();
    parameterMap.put("loanSourceAccount", loanSourceAccount);
    parameterMap.put("customer", customer);
    parameterMap.put("loan", loan);
    processInstance = session.startProcess(
        PROCESS_LOAN_APPROVAL, parameterMap);
    session.insert(processInstance);
    session.fireAllRules();
  }
Code listing 4: Utility method for starting the process (the DefaultLoanApprovalServiceTest.java file)
The startProcess method starts the loan approval process. It also sets loan and customer as process variables to the loanSourceAccount method. The resulting process instance (which is a test class property) is in turn inserted into the knowledge session. This will enable our rules to make more sophisticated decisions based on the state of the current process instance. Finally, all rules are fired.
We're already supplying three variables to the process; however, we haven't declared them yet. Let's do it. The process variables can be added through the Eclipse properties editor as can be seen in the following figure (just click anywhere on the process canvas, as this should give the focus to the process itself). Each variable needs a name, type, and optionally a value.
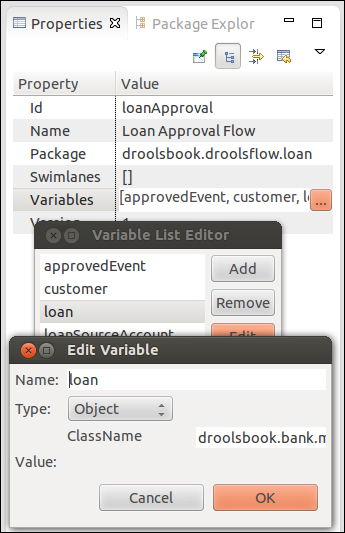
Figure 4: Setting process variables (the loanApproval.bpmn file)
The figure shows how to set the loan process variable. Its Type is set to Object and ClassName set to the full type name droolsbook.bank.model.Loan. The other two variables are set similarly.
Now gets back to the test from Code listing 3. It verifies that the Not Valid node has been triggered and that the process ended in an aborted state.
Tip
Note about process unit testing:
jBPM support for unit testing is improving, but it is not ideal. With every test we have to run the full process from start to the end. We'll make it easier with some helper methods that will set up a state that will utilize different parts of the flow. For example, a loan with a high amount to borrow or a customer with a low rating.
Ideally, we should be able to test each node in isolation. Simply start the process in a particular node. Just set the necessary parameters needed for a particular test and then verify that the node is executed as expected.
Drools support for snapshots may resolve some of these issues; however, we'd have to first create all snapshots that we need before executing the individual test methods. Another alternative is to dig deeper into Drools' internal API, but this is not recommended. The internal API can change in the next release without any notice.
All valid loans continue through the no errors branch to the Amount to borrow? split node. It is again a XOR type split node. It works based on the amount property of the Loan object. If it is less than 5,000, it continues through the low branch, otherwise it takes the otherwise branch. The otherwise branch is again a "catch all" type branch. Put the following constraint into the split node:
Loan( amount <= 5000 )
Code listing 5: The Amount to borrow? split node's low branch constraint (the loanApproval.bpmn file)
For all loans that are bigger, a customer rating needs to be calculated.
The following method runs a loan with a small amount to borrow through our process. As can be seen in the following code listing, the first line of this test sets up a loan with a low amount. Next, the process is started and the test verifies that the flow continued through the correct branch:
  @Test
  public void amountToBorrowLow() {
    setUpLowAmount();
    startProcess();

    assertNodeTriggered(processInstance.getId(),
        "Join Rating");
    assertFalse(trackingProcessEventListener
        .isNodeTriggered(PROCESS_LOAN_APPROVAL,
            NODE_SUBFLOW_RATING_CALCULATION));
  }
Code listing 6: Test for the Amount to borrow? node's low branch (the DefaultLoanApprovalServiceTest.java file)
The setupLowAmount method inserts a loan with a low amount to borrow into the knowledge session. You could argue that loan could be a global variable instead of a fact. The advantage of having loan as a fact makes it possible to update it later on. Do you remember that global variables shouldn't change when we want to reason over them?
The test expects the next XOR node called "Join Rating" on the low branch to be executed, and it also expects the next node to be on the otherwise branch; Rating Calculation isn't executed. To assert that the node has not been executed, we're using trackingProcessEventListener, since JbpmBpmn2TestCase has no support for this.
The isNodeTriggered method takes the process ID, which is stored in a constant called PROCESS_LOAN_APPROVAL. The method also takes the node ID as second argument. This node ID can be found in the properties view after clicking on the fault node. The node ID NODE_SUBFLOW_RATING_CALCULATION is a constant of type long defined as a property of this test class:
  final long NODE_SUBFLOW_RATING_CALCULATION = 7;
  final long NODE_WORK_ITEM_TRANSFER = 26;
Code listing 7: Constants that hold rating calculation and transfer work item node's IDs (the DefaultLoanApprovalServiceTest.java file)
By using the node ID we can change the node's name and other properties without breaking this test (node ID is least likely to change). Also, if we're doing bigger refactorings involving node ID changes, we have only one place to update, that is, the test's constants.
The first node in the Amount to borrow (otherwise) branch is a reusable subprocess node called Rating Calculation. This node will calculate the rating of this customer. It will then be used to decide if a loan should be granted or not.
First, some general information about subprocesses. Subprocess is a normal process that can be called from another process. It is effectively a process inside another process. These are the benefits of doing this:
- A complex process can be logically separated into multiple simple processes. The problem can be decomposed into subproblems, as the basic principle says: divide and conquer.
- The new process can be also reused in different contexts. For example, this rating calculation might be used in a mortgage loan approval process. With the help of the on-entry/on-exit actions and parameter mappings, the parent process can supply information to the subprocess and then possibly act on the result. The subprocess remains independent.
- This subprocess can be executed in parallel with the parent process. This means that after reaching the subprocess node, the execution continues in both the parent process and the subprocess (note that this doesn't mean multiple threads). However, this has the disadvantage that we won't be able to use any results from this subprocess in our parent process.
The subprocess is executed in the same knowledge session as the parent subprocess. This means that the subprocess can access facts just as its parent process. The StatefulKnowledgeSession.getProcessInstances() method can be used to return the collection of all active process instances associated with a knowledge session.
Furthermore, the subprocess (and also some other process nodes) can define in/out parameter mappings and on-entry/on-exit actions. The parent process will wait on a subprocess if the Wait For Completion flag is set to true. Only in this case it makes sense to use the out parameter mappings. Another flag that can be set is independent. With this flag set to true, the subprocess will continue executing even if the parent process finished executing (it is completed or aborted), otherwise it would be aborted.
The following subprocess represents the rating calculation flow. After it starts, the first thing we do is to insert the subprocess instance into the session, so that we can later write rules reacting to it. We can do this with a script task called Initialize with the following body: insert(context.processInstance);. Now when this script task executes the subprocess, instance will be inserted into the session.
Next, looking at the diagram, the subprocess continues through a split node. This split node is of type AND, meaning that the execution will continue in all nodes' outgoing branches. On the left-hand side, there's the Calculate Incomes rule task and on the right-hand side, there are the Calculate Monthly Repayments and Calculate Expenses rule tasks. These rule tasks contain rules for accumulating knowledge about customer incomes like salaries of the customer and his/her spouse, type of occupation they have, how long they are employed, how long they were unemployed, how much funds they have in their accounts, information about their properties, or other asserts. The Calculate Monthly Repayments rule task calculates how much this loan will cost by month. The Calculate Expenses rule task takes into account expenses such as the size of the family, rent, other loans, mortgages, and obligations.
Finally, these two branches are joined together by an AND type join node. This means that the flow won't continue until all its incoming connections are triggered. The next node is a Calculate Rating rule task. This is where all the acquired information are translated by a set of rules into one number – rating. This process can be seen in this figure:
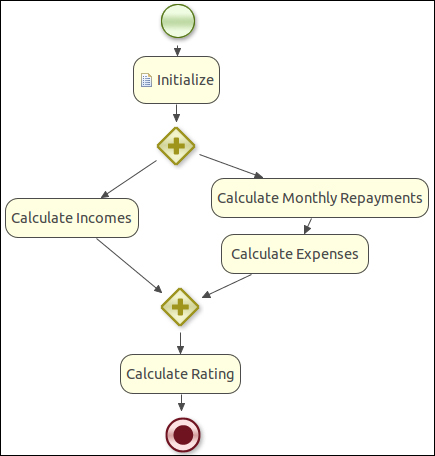
Figure 5: Rating calculation subprocess (the ratingCalculation.bpmn file)
Note that in this screenshot we're using the default BPMN2 skin. The AND type gateways are shown as a plus symbol. The other gateways, OR and XOR, have symbols of an "x" and "*" respectively. These symbols help as we no longer have to examine the node to see its type.
One important thing when designing the process is to make it simple. The process should describe the core business process. It shouldn't contain every little detail of the process. The rules are ideal for this. They can then fine-tune the business process.
Consider the process from the previous screenshot as an example. It nicely logically separates the individual calculations. By looking at this process diagram, you should immediately get a feeling of what is it trying to achieve.
Now, we know that the process uses rules to calculate a rating. This rating is a fact inside the knowledge session. Next, we'll set this fact as a subprocess variable so that it can be later easily propagated into the parent process. This can be easily achieved with a rule that will match on the Rating fact and the subprocess instance, and it will set the subprocess variable. The rule is as follows:
rule updateSubProcess
ruleflow-group "calculateRating"
salience -100
no-loop true
  when
    processInstance : WorkflowProcessInstance(
      processId == "ratingCalculation" )
    $rating : Rating( )
  then
    modify(processInstance) {
      setVariable("rating", $rating);
    }
end
Code listing 8: Rule that sets the rating fact as a subprocess variable (the ratingCalculation.drl file)
Next, we want to propagate the calculated rating from the subprocess into the parent process. We'll use Parameter Out Mapping as shown here:

Figure 6: Parameter Out Mapping on the Rating calculation node (the ratingCalculation.bpmn file)
We'll now write a test which verifies that our subprocess is being called and the variable is set.
  @Test
  public void amountToBorrowHighRatingCalculation() {
    setUpHighAmount();
    startProcess();
    assertNodeTriggered(processInstance.getId(),
        "Rating Calculation");
    assertTrue(trackingProcessEventListener.isNodeTriggered(
        PROCESS_RATING_CALCULATION,
        NODE_GROUP_CALCULATE_RATING));
    assertProcessVarExists(processInstance,
        "customerLoanRating");
    WorkflowProcessInstance process =
        (WorkflowProcessInstance) processInstance;
    assertEquals(1500,
        process.getVariable("customerLoanRating"));
  }
Code listing 9: Test for the subprocess node (the DefaultLoanApprovalServiceTest.java file)
The test sets up a loan request with a high amount by calling the setUpHighAmount method. This method inserts a loan, with the amount set to 19000, into the knowledge session. Next, the process is started with default parameters, which involve the customerLoanRating process variable set to 0. Next, the test verifies that the subprocess node has been executed together with one node from the subprocess itself – Calculate Rating. Finally, the test verifies that the customerLoanRating variable has been set to 1500; it is a customer loan rating calculated for our test loan. The last couple of lines of the test method also show us how to get variables from the process instance.
Note that the rules for calculating the rating have been left out. However, for testing purposes you could easily write a rule that inserts a Rating fact into the session with its rating property set to 1500.
Another test for the rating calculation subprocess may check that all its nodes are executed, since the flow contains only and type split and join nodes.
Another alternative of setting the customerLoanRating variable would be to use an on-exit action. The on entry/on exit actions can be defined on various process nodes: subprocess, work item, and human task. Similar to script tasks, which are standalone nodes, the on entry/on exit actions are simply a block of dialect-specific code. We can access RuleContext (visible under the kcontext variable). In addition to this, we can access a context variable, org.drools.runtime.process.ProcessContext.
Tip
org.drools.runtime.process.ProcessContext
ProcessContext has various methods for working with the current process context. The getProcessInstance() method returns the current process instance. If we're in a subprocess, this method will return the subprocess instance.
In general when a process is started, new ProcessInstance is created that represents the runtime state of a process. jBPM is based on the Process Virtual Machine (PVM) model (more information about this model can be found at http://docs.jboss.com/jbpm/pvm/article/).
The getNodeInstance() method of ProcessContext returns the runtime instance of a currently executing node. The process context can also be used for setting and getting process variables getVariable/setVariable. The getKnowledgeRuntime() method returns a KnowledgeRuntime object that can be used for interaction with the knowledge session.
We'll define an on exit action with the following body:
Rating rating = (Rating)kcontext.getKnowledgeRuntime().getObjects(new ClassObjectFilter(Rating.class)).iterator().next();
context.setVariable("customerLoanRating", rating.getRating());
kcontext.getKnowledgeRuntime().update(kcontext.getKnowledgeRuntime().getFactHandle(context.getProcessInstance()), context.getProcessInstance());
Code listing 10: Subprocess node's onExit action body (the loanApproval.bpmn file)
First of all, the action retrieves the calculated rating directly from the knowledge session. It simply iterates over all objects in the knowledge session and filters out all objects that are not of type Rating. The Rating type is a bean that has one property of type Integer called rating. The code is expecting to find just one Rating fact in the knowledge session as can be seen when we call the next method.
Next, we set the customerLoanRating variable using the context.setVariable method, which correctly sets it on the main process context. Finally, we shouldn't forget to update processInstance since we've modified it.
Using the on-exit action was not as neat as using the updateSubProcess rule together with the out parameter mapping. This was more to show how an on-exit action works.
After we've calculated the rating and set it as a process variable, the next process node Rating? checks if the customer's loan rating is high enough. It is an XOR type split node with the following accept branch constraint:
customerLoanRating >= 1000
Code listing 11: The Rating? node's accept branch constraint – code type (the loanApproval.bpmn file)
Set the type of this constraint to code and the dialect to mvel. Code constraints have access to all process variables. As can be seen we're directly referring to the customerLoanRating process variable and checking if it is greater or equal than 1,000. If it is, the loan application can continue to the next step of the loan approval process.
If we need to do more complex decisions, we could use a rule type constraint like we've done before:
processInstance : WorkflowProcessInstance(
  getVariable("customerLoanRating") >= 1000 )
Code listing 12: The Rating? node's accept branch constraint – rule type (the loanApproval.bpmn file)
The condition uses a special variable name called processInstance of type WorkflowProcessInstance. It is special because Drools will match only on the current executing process instance even if there were multiple instances in the knowledge session. Through the processInstance type we can access all the process variables. Note that we need to insert the process instance into the knowledge session as we've done in Code listing 4. Also, if we're using an out parameter mapping to modify process variables, we need to manually update the process instance (this might be a bug in jBPM) as was done in Code listing 10.
The test will create a loan request for a high amount and for a customer who has a high rating. It will then execute the process and verify that the flow went through the Rating? node through the accept branch to the XOR join node:
  @Test
  public void ratingSplitNodeAccept() {
    setUpHighAmount();
    setUpHighRating();
    startProcess();

    assertNodeTriggered(processInstance.getId(), "Rating?");
    assertNodeTriggered(processInstance.getId(),
        "Join Rating");
  }
Code listing 13: The Rating? node's accept branch constraint (the DefaultLoanApprovalServiceTest.java file)
We'll now jump almost to the end of our process. After a loan is approved, we need a way of transferring the specified sum of money to the customer's account. This can be done with rules or even better with pure Java, since this task is procedural in nature. We'll create a custom work item so that we can easily reuse this functionality in other processes. Note that if it was a one-off task, it would be probably better suited to a script task node.
The Transfer Funds node in Figure 2 is a custom work item. A new custom work item can be defined in the following four steps (later on we'll see how they are accomplished):
- Create a work item definition. This will be used by the Eclipse process editor and by the process engine to set and get parameters. For example, the following is an extract from the default
WorkDefinitions.conffile that comes with Drools. It describes the Email work definition. The configuration is written in MVEL. MVEL allows to construct complex object graphs in a very concise format. This file contains a list of maps:List<Map<String, Object>>. Each map defines the properties of one work definition. The properties, name and parameters, are the work items that work withdisplayName,icon, andcustomEditor, which are used when displaying the work item in the Eclipse process editor. A custom editor is opened after double-clicking on the process node.import org.drools.process.core.datatype.impl.type.StringDataType; [ [ "name" : "Email", "parameters" : [ "From" : new StringDataType(), "To" : new StringDataType(), "Subject" : new StringDataType(), "Body" : new StringDataType() ], "displayName" : "Email", "icon" : "icons/import_statement.gif", "customEditor" : "org.drools.eclipse.flow.common.editor.editpart.work.EmailCustomEditor" ] ]Code listing 14: Excerpt from the default WorkDefinitions.conf file that is part of the drools-core module
The work item's parameters property is a map of
parameterNamesand their value wrappers. The value wrapper must implement the interfaceorg.drools.process.core.datatype.DataType. - Register the work definitions with the knowledge base configuration (this will be shown in the next section).
- Create a work item handler. This handler represents the actual behavior of a work item. It will be invoked whenever the process execution reaches this work item node. All handlers must extend the
org.drools.runtime.process.WorkItemHandlerinterface. It defines two methods. One for executing the work item and another for aborting the work item. Drools comes with some default work item handler implementations, for example, a handler for sending e-mails:org.jbpm.process.workitem.email.EmailWorkItemHandler. This handler needs a working SMTP server. It must be set through thesetConnectionmethod before registering the work item handler with the work item manager (next step). Another default work item handler,SystemOutWorkItemHandler, was shown in Code listing 2. - Register the work item handler with the work item manager.
After reading this you may ask why doesn't the work item definition also specify the handler? It is because a work item can have one or more work item handlers that can be used interchangeably. For example, in a test case, we may want to use a different work item handler than in a production environment.
We'll now follow this four-step process and create the Transfer Funds custom work item.
Our transfer funds work item will have three input parameters: source account, destination account, and the amount to transfer. Its definition is as follows:
import org.drools.process.core.datatype.impl.type.ObjectDataType;
[
  [
    "name" : "Transfer Funds",
    "parameters" : [
        "Source Account" : new ObjectDataType("droolsbook.bank.model.Account"),
        "Destination Account" : new ObjectDataType("droolsbook.bank.model.Account"),
        "Amount" : new ObjectDataType("java.math.BigDecimal")
    ],
    "displayName" : "Transfer Funds",
    "icon" : "icons/transfer.gif"
  ]
]
Code listing 15: Work item definition from the BankingWorkDefinitions.conf file
The Transfer Funds work item definition we just saw declares the usual properties. It doesn't have a custom editor as was the case with the e-mail work item. All the parameters are of type ObjectDataType. This is a wrapper that can wrap any type. In our case we are wrapping the Account and BigDecimal types. We've also specified an icon that will be displayed in the process editor palette and in the process itself. The icon should be of size 16 x 16 pixels.
First, make sure that the BankingWorkDefinitions.conf file is on your classpath. We now have to tell Drools about our new work item. This can be done by creating a drools.rulebase.conf file with the following contents:
drools.workDefinitions = WorkDefinitions.conf BankingWorkDefinitions.conf
Code listing 16: Work item definition from the BankingWorkDefinitions.conf file (all in one one line)
When Drools starts up, it scans the classpath for configuration files. Configuration specified in the drools.rulebase.conf file will override the default configuration. In this case only the drools.workDefinitions setting is being overridden. We already know that the WorkDefinitions.conf file contains the default work items such as e-mail and log. We want to keep those and just add ours. As can be seen from Code listing 16, the drools.workDefinitions settings accept a list of configurations. They must be separated by a space. When we now open the process editor in Eclipse, the process palette should contain our new Transfer Funds work item.
If you want to know more about the file-based configuration resolution process, you can look into the org.drools.util.ChainedProperties class.
Next, we'll implement the work item handler. It must implement the org.drools.runtime.process.WorkItemHandler interface that defines two methods: executeWorkItem and abortWorkItem. The implementation is as follows:
/**
 * work item handler responsible for transferring amount from
 * one account to another using bankingService.transfer method
 * input parameters: 'Source Account', 'Destination Account'
 * and 'Amount'
 */
public class TransferWorkItemHandler implements
    WorkItemHandler {
  BankingService bankingService;

  public void executeWorkItem(WorkItem workItem,
      WorkItemManager manager) {
    Account sourceAccount = (Account) workItem
        .getParameter("Source Account");
    Account destinationAccount = (Account) workItem
        .getParameter("Destination Account");
    BigDecimal sum = (BigDecimal) workItem
        .getParameter("Amount");

    try {
      bankingService.transfer(sourceAccount,
          destinationAccount, sum);
      manager.completeWorkItem(workItem.getId(), null);
    } catch (Exception e) {
      e.printStackTrace();
      manager.abortWorkItem(workItem.getId());
    }
  }

  /**
   * does nothing as this work item cannot be aborted
   */
  public void abortWorkItem(WorkItem workItem,
      WorkItemManager manager) {
  }
Code listing 17: Work item handler (the TransferWorkItemHandler.java file)
The executeWorkItem method retrieves the three declared parameters and calls the bankingService.transfer method (the implementation of this method won't be shown). If all went okay, the work item manager is notified that this work item has been completed. It needs the ID of the work item and optionally a result parameter map. In our case it is set to null. If an exception happens during the transfer, the manager is told to abort this work item.
The abortWorkItem method on our handler doesn't do anything because this work item cannot be aborted.
Please note that the work item handler must be thread-safe. Many process instances may reuse the same work item instance.
The transfer work item handler can be registered with a WorkItemManager method as follows:
    TransferWorkItemHandler transferHandler =
        new TransferWorkItemHandler();
    transferHandler.setBankingService(bankingService);
    session.getWorkItemManager().registerWorkItemHandler(
        "Transfer Funds", transferHandler);
Code listing 18: The TransferWorkItemHandler registration (the DefaultLoanApprovalServiceTest.java file)
A new instance of this handler is created and the banking service is set. Then it is registered with the WorkItemManager method retrieved from a session.
Next, we need to connect this work item into our process; this means setting its parameters. We need to set the source/destination account and the amount to be transferred. We'll use the Transfer Funds in-parameter mappings to set these parameters:

Figure 7: The in–parameter mapping dialog of the Transfer Funds' work item (the loanApproval.bpmn file)
From the previous screenshot, we can see the Source Account parameter is mapped to the loanSourceAccount process variable. The Destination Account process variable is set to the destination account of the loan, and the Amount process variable is set to the amount of loan.
This test will verify that the Transfer Funds work item is correctly executed with all parameters set and that it calls the bankingService.transfer method with correct values. For this test the bankingService service will be mocked with the jMock library, which is a lightweight Mock object library for Java (more information can be found at http://www.jmock.org/). Firstly, we need to set up the banking service mock object:
mockery = new JUnit4Mockery();
bankingService = mockery.mock(BankingService.class);
Code listing 19: jMock setup of the bankingService mock object (the DefaultLoanApprovalServiceTest.java file)
Next, we can write our test. We are expecting one invocation of the transfer method with loanSourceAccount and loan's destination and amount properties. Then the test will set up the transfer work item as in Code listing 18, start the process, and approve the loan (more about this in the next section). The test also verifies that the Transfer Funds node has been executed. The test method's implementation is as follows:
  @Test
  public void transferFunds() {
    mockery.checking(new Expectations() {
      {
        one(bankingService).transfer(loanSourceAccount,
            loan.getDestinationAccount(), loan.getAmount());
      }
    });

    setUpTransferWorkItem();
    setUpLowAmount();
    startProcess();
    approveLoan();

    assertNodeTriggered(processInstance.getId(),
        "Transfer Funds");
  }
Code listing 20: Test for the Transfer Funds work item (the DefaultLoanApprovalServiceTest.java file)
Let's go back to the loan approval process. We finished after the 'Rating?' node. Our next step is to implement the Process Loan node. This is where human actors will be involved. We've done what we could with our automated process; now is the time for tasks that a computer can't or shouldn't perform.
jBPM supports human tasks such as the Web Services Human Task specification (WS-HumanTask is an OASIS specification and can be downloaded from http://download.boulder.ibm.com/ibmdl/pub/software/dw/specs/ws-bpel4people/WS-HumanTask_v1.pdf). With this specification, we can define human tasks that will be automatically created when the flow reaches this process node. After they are created, they will appear on the ask list screen of designated users who can claim these tasks and start working on them until they are completed. They can also suspend or abort these tasks. Once the task reaches the final state (complete/abort), the process continues execution. Please note that this is a very simplified view; the WS-HumanTask specification defines a more complex life cycle of a task.
From the process perspective, WS-HumanTask is just a special case of a work item. Once it is triggered, the process simply waits for the end result, be it success or failure. jBPM comes with several human task implementations. Some support centralized task management where the task service is accessed remotely; we'll use a more simple implementation that will run as part of our application (synchronously, sharing the same transaction). It should be noted that these implementations are not fully compliant with the WS-HumanTask specification; there may be some features missing.
The human task process node allow us to specify actorId, which is the ID of a person/group that will have the role of potentialOwner as defined by WS-HumanTask. Comment, which will become the subject and description of a human task. If priority and option task can be skipped, they can be also defined among other properties.
The core part of the WS-HumanTask specification is a service that manages the tasks. The human task work item handler is kept lightweight. It is a simple client of this service that creates a task based on properties set in the process and registers this task with the service. The process then waits until the task finishes, be it a success or a failure.
So far it was only theory a test will hopefully make it more clear. In order to write some tests for the Process Loan human task, we'll need a human task service that will be managing tasks. Other clients will then use this service to work on these tasks, and when they are completed our process will be able to continue.
Due to its size, the test will be divided into three parts: service setup part, client setup part, and client working on the task part.
We'll start with the service setup (see the following code listing). It will initialize the service, register a human task work item handler, and start the loan approval process:
  @Test
  public void processLoan() throws Exception {
    EntityManagerFactory emf = Persistence
        .createEntityManagerFactory("droolsbook.jbpm");

    TaskService taskService = new TaskService(emf,
        SystemEventListenerFactory.getSystemEventListener());
    LocalTaskService localTaskService = new LocalTaskService(
        taskService);

    MockUserInfo userInfo = new MockUserInfo();
    taskService.setUserinfo(userInfo);

    TaskServiceSession taskSession = taskService
        .createSession();
    taskSession.addUser(new User("Administrator"));
    taskSession.addUser(new User("123"));
    taskSession.addUser(new User("456"));
    taskSession.addUser(new User("789"));

    LocalHTWorkItemHandler htHandler =
        new LocalHTWorkItemHandler( localTaskService, session,
        OnErrorAction.RETHROW);
    htHandler.connect();
    session.getWorkItemManager().registerWorkItemHandler(
        "Human Task", htHandler);
    setUpLowAmount();
    startProcess();
Code listing 21: Test for the Process Loan node – set up of service and process startup (the DefaultLoanApprovalServiceTest.java file)
As part of the service setup, the test creates an EntityManagerFactory Java Persistence API (JPA). More information can be found at http://en.wikipedia.org/wiki/Java_Persistence_API). It is used for persisting human tasks that are not currently needed. There may be thousands of human task instances running concurrently and each can take minutes, hours, days, or even months to finish. Persisting them will save us resources, and it may also make the tasks survive a server crash. In the next chapter we'll also see how to persist the whole process. We'll use an in-memory database. The definition of the droolsbook.jbpm persistence unit is as follows:
<?xml version="1.0" encoding="UTF-8" standalone="yes"?>
<persistence xmlns="http://java.sun.com/xml/ns/persistence"
        xmlns:xsi="http://www.w3.org/2001/XMLSchema-instance"
        xsi:schemaLocation="http://java.sun.com/xml/ns/persistence http://java.sun.com/xml/ns/persistence/persistence_2_0.xsd"
        version="2.0">
  <persistence-unit name="droolsbook.jbpm"
      transaction-type="RESOURCE_LOCAL">
    <provider>org.hibernate.ejb.HibernatePersistence
    </provider>
    <mapping-file>META-INF/ProcessInstanceInfoMapping-JPA2.xml
    </mapping-file>
    <mapping-file>META-INF/JBPMorm-JPA2.xml</mapping-file>
    <mapping-file>META-INF/Taskorm.xml</mapping-file>
    <class>org.drools.persistence.info.SessionInfo</class>
    <class>org.jbpm.persistence.processinstance.ProcessInstanceInfo</class>
    <class>org.drools.persistence.info.WorkItemInfo</class>

    <class>org.jbpm.task.Attachment</class>
    <class>org.jbpm.task.Content</class>
    <class>org.jbpm.task.BooleanExpression</class>
    <class>org.jbpm.task.Comment</class>
    <class>org.jbpm.task.Deadline</class>
    <class>org.jbpm.task.Comment</class>
    <class>org.jbpm.task.Deadline</class>
    <class>org.jbpm.task.Delegation</class>
    <class>org.jbpm.task.Escalation</class>
    <class>org.jbpm.task.Group</class>
    <class>org.jbpm.task.I18NText</class>
    <class>org.jbpm.task.Notification</class>
    <class>org.jbpm.task.EmailNotification</class>
    <class>org.jbpm.task.EmailNotificationHeader</class>
    <class>org.jbpm.task.PeopleAssignments</class>
    <class>org.jbpm.task.Reassignment</class>
    <class>org.jbpm.task.Status</class>
    <class>org.jbpm.task.Task</class>
    <class>org.jbpm.task.TaskData</class>
    <class>org.jbpm.task.SubTasksStrategy</class>
    <class>org.jbpm.task.OnParentAbortAllSubTasksEndStrategy
    </class>
    <class>org.jbpm.task.OnAllSubTasksEndParentEndStrategy
    </class>
    <class>org.jbpm.task.User</class>

    <properties>
      <property name="hibernate.dialect"
        value="org.hibernate.dialect.H2Dialect"/>
      <property name="hibernate.max_fetch_depth" value="3"/>
      <property name="hibernate.hbm2ddl.auto"
        value="create-drop"/>
      <property name="hibernate.show_sql" value="true"/>

      <property name="hibernate.connection.driver_class"
        value="org.h2.jdbcx.JdbcDataSource"/>
      <property name="hibernate.connection.url"
        value="jdbc:h2:mem:test_droolsbook_jbpm"/>
      <property name="hibernate.connection.username"
        value="sa"/>
      <property name="hibernate.connection.password"
        value=""/>
      <property name="hibernate.connection.pool_size"
        value="3"/>
    </properties>
  </persistence-unit>
</persistence>
Code listing 22: Human task persistence unit definition (the META-INF/persistence.xml file)
Next, continuing the test setup, the TaskService object is created. A UserInfo object is set to the TaskService object. It has methods for retrieving various information about users and groups of users in our organization that the TaskService object needs (it is, for example, used when sending notifications). For testing purposes, we're using only a mock implementation – MockUserInfo.
The TaskService object can be accessed by multiple threads. Next, the TaskServiceSession object represents one session of this service. This session can be accessed by only one thread at a time. We use this session to create some test users. Our Process Loan task is initially assigned to actorIds: 123, 456, and 789. This is defined in the Process Loan process node's properties.
Then a default Drools LocalHTWorkItemHandler is registered, a new loan application with low amount is created and the process is started. The process will execute all the way down to Process Loan human task where LocalHTWorkItemHandler takes over. It creates a task from the information specified in the Process Loan node and registers this task with the server. It knows how to connect to the server. The process then waits for completion of this task.
The next part of this test represents a client (bank employee) who is viewing his/her task list and getting one task. The client calls service's getTasksAssignedAsPotentialOwner method and returns a list of tasks that the client can start working on. The test verifies that the list contains one task and that the status of this task is ready:
    List<TaskSummary> tasks = localTaskService
        .getTasksAssignedAsPotentialOwner("123", "en-UK");
    assertEquals(1, tasks.size());
    TaskSummary task = tasks.get(0);
    assertEquals("Process Loan", task.getName());
    assertEquals(3, task.getPriority());
    assertEquals(Status.Ready, task.getStatus());
Code listing 23: Test for the Process Loan node – set up of a client and task list retrieval (the DefaultLoanApprovalServiceTest.java file)
The final part of this test represents a client (bank employee) who claims one of the tasks from the task list, starts this task, and finally completes this task:
    localTaskService.claim(task.getId(), "123");
    localTaskService.start(task.getId(), "123");
    localTaskService.complete(task.getId(), "123", null);

    assertNodeTriggered(processInstance.getId(),
        "Join Process");
  }
Code listing 24: Test for the Process Loan node – client is claiming, starting, and completing a task (the DefaultLoanApprovalServiceTest.java file)
After the task is completed, the test verifies that the process continues execution through the next join node called Join Process.
As you may imagine, before any money is paid out to the loan requester, a final check is needed from a supervisor. This is represented in the flow by the Approve Event node. It is an event node from the process palette. It allows a process to respond to external events. This node has no incoming connection; in fact the events can be created/signaled through the process instance's signalEvent method. The method needs an event type and the event value itself.
The Parameters of the Event node include an event type and a variable name that holds this event. The variable must be itself declared as a process variable.
A test will show us how this all works. We'll set up a valid loan request. The dummy SystemOutWorkItemHandler will be used to get through the Transfer Funds and Process Loan work items. The execution should then wait for the approve event. Then we'll signal the event using the processInstance.signalEvent("LoanApprovedEvent", null) method and verify that the process finished successfully:
  @Test
  public void approveEventJoin() {
    setUpLowAmount();
    startProcess();
    assertProcessInstanceActive(processInstance.getId(),
        session);
    assertFalse(trackingProcessEventListener.isNodeTriggered(
        PROCESS_LOAN_APPROVAL, NODE_WORK_ITEM_TRANSFER));
    approveLoan();
    assertTrue(trackingProcessEventListener.isNodeTriggered(
        PROCESS_LOAN_APPROVAL, NODE_WORK_ITEM_TRANSFER));

    assertProcessInstanceCompleted(processInstance.getId(),
        session);
  }
Code listing 25: Test for the Approve Event node (the DefaultLoanApprovalServiceTest.java file)
Before sending the approved event, we've verified that the process is in active state and that the Transfer Funds work item haven't been called yet.
After sending the approved event, the test verifies that the Transfer Funds work item was actually executed and the process reached its final COMPLETED state.
The final step is to implement the approveLoan service that represents the interface to our loan approval process. It ties everything that we've done together. The approve loan method takes a Loan object and a Customer object, which is requesting the loan:
  KnowledgeBase knowledgeBase;
  Account loanSourceAccount;

  /**
   * runs the loan approval process for a specified
   * customer's loan
   */
  public void approveLoan(Loan loan, Customer customer) {
    StatefulKnowledgeSession session = knowledgeBase
        .newStatefulKnowledgeSession();
    try {
      registerWorkItemHandlers(session);
      Map<String, Object> parameterMap =
        new HashMap<String, Object>();
      parameterMap.put("loanSourceAccount",loanSourceAccount);
      parameterMap.put("customer", customer);
      parameterMap.put("loan", loan);
      session.insert(loan);
      session.insert(customer);
      ProcessInstance processInstance =
        session.startProcess("loanApproval", parameterMap);
      session.insert(processInstance);
      session.fireAllRules();
    } finally {
      session.dispose();
    }
  }
Code listing 26: BankingService's approveLoan service method (the DefaultLoanApprovalService.java file)
The service creates a new session and then registers all the work item handlers that we've implemented. This part is not shown. Normally, it would involve setting up configuration parameters such as the IP address of an SMTP server for the e-mail work item handler and so on.
Next, the loan and customer objects are inserted into the session; the process is started and the rules are fired. When the process completes, the session is disposed. Please be aware that with this solution, the knowledge session is held in memory from the time when the process starts up to the time when it finishes, which might be a long time. In the next chapter we'll see how to persist this process to avoid wasting memory.
A process implemented using jBPM may potentially do more work than it should do. This is a direct consequence of how the algorithm behind Drools works. All rule constraints are evaluated at fact insertion time. For example, if we have a process with many nodes and 80 percent of the time, the process finishes at the second node, and most of the computation is wasted. This will be more clear when we get to Chapter 12, Learning about Performance.
Another disadvantage is that the business logic is now spread across at least two places. The rules are still in the .drl file; however, the process is in the .bpmn file. The process file also contains split node conditions and actions. If somebody wants to get the full understanding of a process, he/she has to look back and forth between these files. This may be fixed in future by having better integration in the Eclipse plugin between the Drools' .drl file editor and the jBPM's .bpmn file editor (for example, it would be nice to see rules that belong to a selected ruleflow group).