Although working with the core search functionality in Drupal 8 can feel somewhat limited, it is not the only solution. There are alternatives to search that can be implemented to provide for more robust options. Two such alternatives are: Search API and Search API Solr Search. We will not be discussing Apache Solr as it is a little more complex to install and configure. However, the Search API will allow us to extend the default database search and is a perfect solution for our needs.
The Search API module at https://www.drupal.org/project/search_api provides a framework in order to extend core search. Multiple Search indexes can be created that then allow the use of Views to list search content. Each index can also can enhance the user interaction by creating a series of Facets that allow results to be filtered down to a granular level. Finally, each index based on the content type can be configured to let Drupal know exactly which fields should be included and the importance or weight of each field.
The advantage of using this great module is the flexibility it provides to display the search results. Instead of having to manage the display using a single Twig template as we did previously, we can use display modes for each content type. This, in turn, allows us to also have additional Twig templates for each result if needed.
Let's take a deeper look at enhancing our site's search functionality by installing and configuring the Search API module.
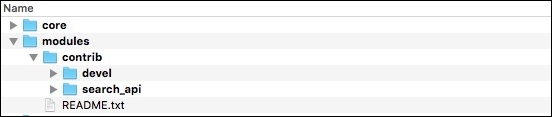
Begin by browsing the Search API project page located at https://www.drupal.org/project/search_api and extract the contents to our modules directory, as shown in the following image:
With the module in place, we can now navigate back to our Drupal instance and finish installing the Search API. Navigate to /admin/modules and locate the Database Search and Search API modules located in the SEARCH section.
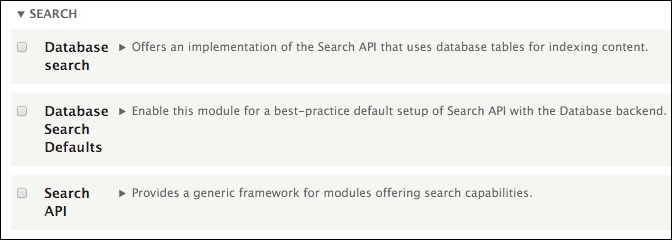
- Select the checkbox for Database Search.
- Select the checkbox for Search API.
- Click on the Install button.
One important thing to note is that we will also want to uninstall the default Drupal Search module because we are replacing it with the Search API. We can do this by following these steps:
- Select the Uninstall tab.
- Select the checkbox for Search.
- Click on the Uninstall button.
- Click on the Uninstall button again from the Confirm uninstall page.
Now that we have replaced the default Drupal search with the Search API module, it is time to do some simple configuration.
The first step in configuring the Search API is to add a server definition for our index to use. In our case, we will be pointing to the default Drupal database.
To get started, we will need to navigate to /admin/config/search/search-api, which will bring us to the Search API admin page.

From here, we can follow these steps to add our server:
- Click on the Add server button.
- Enter a value of database in the Server name field.
- Leave the remaining defaults, as shown in the following image:
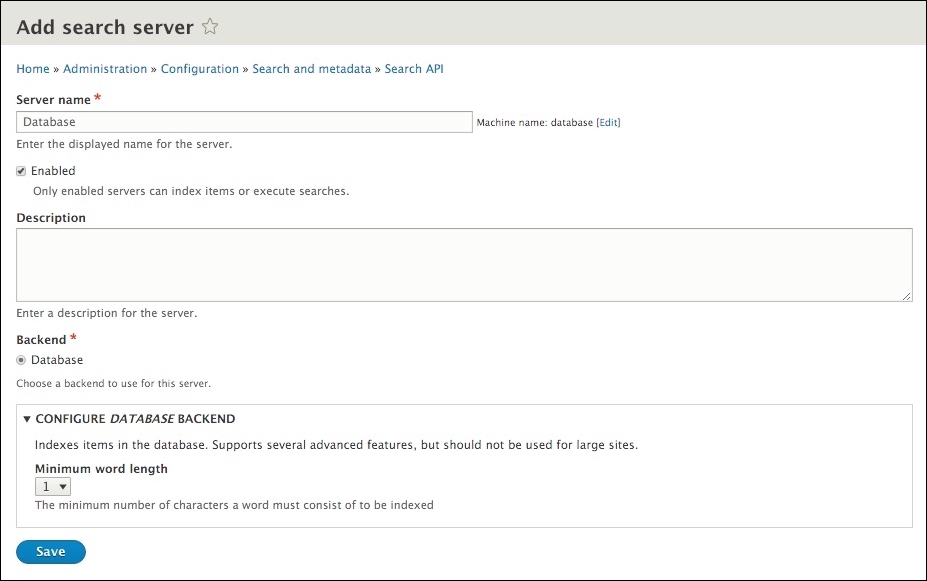
- Click on the Save button.
We have now successfully added a search server that uses our Drupal database. We will point to this search server in our next step when we create an index.
Adding a search index allows us to be more explicit with the type of content we want Drupal to use when someone searches for a keyword or term. Having an index available allows us to use Views to create our Search results page and utilize our content's various display modes.
From the Search API admin page, we can follow these steps to add our index:
- Click on the Add index button.
- Enter a value of Content in the Index name field.
- Choose Content from the Data sources field.
- Choose Database from the Server checkbox.
- Leave the remaining defaults, as shown in the following image:
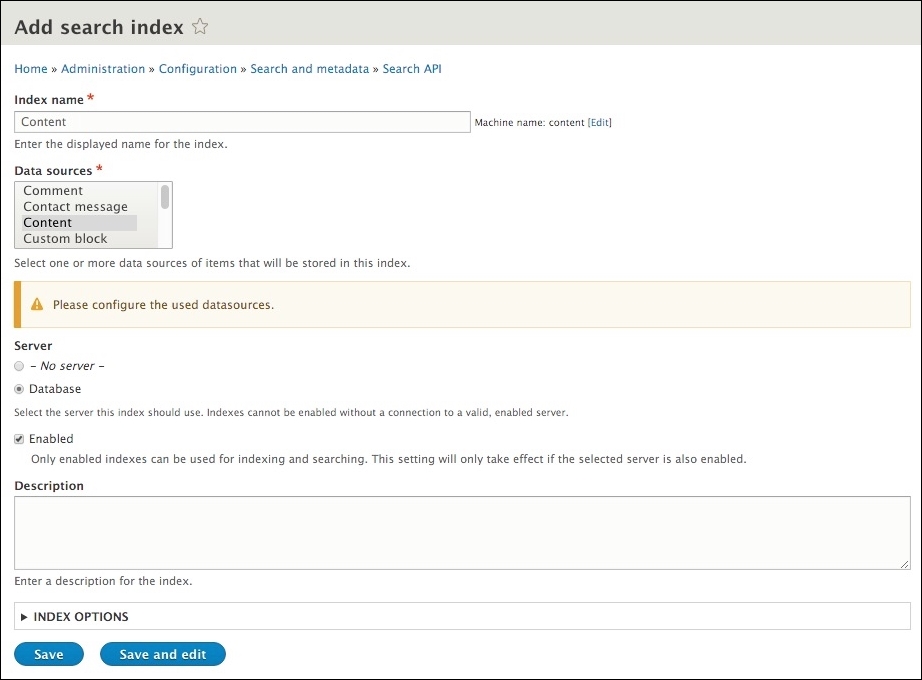
- Click on the Save button.
At this point, we have created an index but we have not defined which content types or fields our index will use. By default, all content types will be searched. While this may be okay in most cases, we only want our Post content to be searchable. Let's take a look at how to restrict which content types are indexed.
Content in Drupal is referred to as an entity, and the type of entity is called a bundle. We can configure which bundles are indexed by selecting them from our Edit page within the CONFIGURE THE CONTENT DATASOURCE section, as shown in the following image:
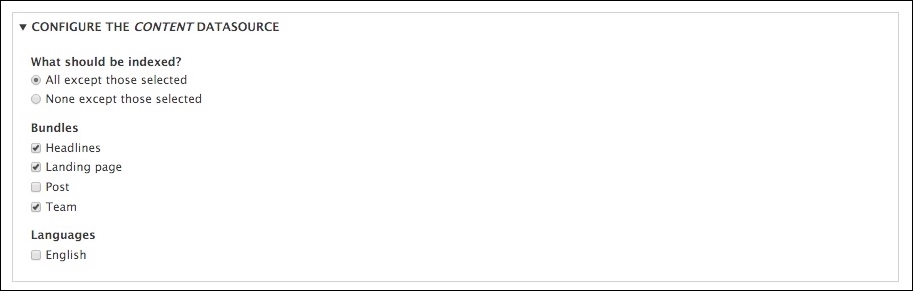
By default, all bundles will be indexed. However, we only want the post bundle to be searched, hence we make sure that we select the following:
- Select All except those selected under What should be indexed?
- Select Headlines, Landing page, and Team from Bundles.
- Click on the Save button.
Now that we have configured our bundles, we will move on to choosing which fields will be searched on within our Post content type.
The Search API module provides great flexibility when it comes to exactly what fields will be indexed. In the case of our Post content type, we only want to search on the Title and Teaser fields. We can start by selecting the Fields tab from our index and following these steps:
- Click on the Add fields button.
- Click on the plus sign next to Content to expand the field.
- Click on the Add button next to Title.
- Click on the Add button next to Teaser.
- Click on the Done button.
We should now have our two fields added to the CONTENT section.

Although we are still within the Fields tab, we will want to take a quick look at some additional settings we have available to us.
- The first setting is the TYPE dropdown, which allows us to specify how a field will be treated when searched. In the case of our Title field, which is currently set to String, we will want to be able to do a Fulltext search on this field. We can select Fulltext from the dropdown to change the value. This will ensure that when a user enters a keyword, it searches all characters within the Title. If we left the default set to String, we would not get results returned properly.
- The second setting is the BOOST field, which allows us to give a field a higher level of importance when searched on. We will want our Title field to be more important than our Teaser field, so we can increase the BOOST value so that it has a higher number.
Make sure to click on the Save changes button to finish configuring our fields. Because we have made changes to both our bundles and fields, we will need to reindex our content. If we select the View tab, we can then click on the Index now button.
Now that our index is ready to use, we can create our Search results view.
We should be very comfortable working with Views, but this will be the first time we have used a search index as the source. To get started, we will need to navigate to /admin/structure/views and click on the Add new view button.
From the Views admin screen, we will add the following information:
- VIEW BASIC INFORMATION:
- View name: Search.
- Check the Description box.
- Description: Search results.
- VIEW SETTINGS: Show: Index Content sorted by: Unsorted.
- PAGE SETTINGS:
- Check: Create a page.
- Page title: Search.
- Path: search.
- PAGE DISPLAY SETTINGS:
- Display format: Unformatted list of: Rendered entity.
- Items to display:
10. - Click on the Save and edit button.
From the Search (Index Content) admin, we will need to add some additional settings to our page. This includes selecting the display mode for our post to use, a filter criteria so that we can expose a form to replace our Global Search form, and a header to display the number of results.
We are familiar with using view modes to display content within a view. Our Search view will be using the Search index view mode, which we will need to add to our Post content type. Navigate to /admin/structure/types/manage/post/display and expand the CUSTOM DISPLAY SETTINGS field.
- Select Search index from the Use custom display settings for the following modes.
- Click on the Save button.
Next, we will want to enable only our Teaser field to display when the Search index view mode is used. We can accomplish this by selecting the Search index tab and adding our Teaser field, as shown in the following image:
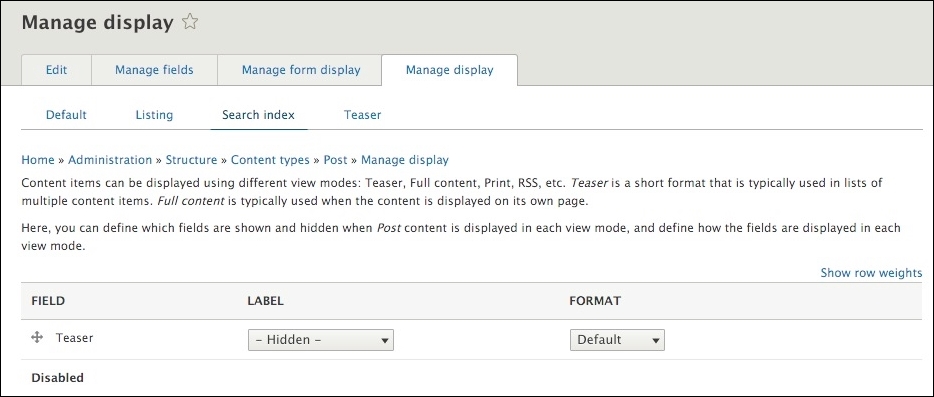
With the field now enabled, make sure to click on the Save button to complete our changes. We can now navigate back to our Search view and select our new view mode.
Begin by navigating to /admin/structure/views/view/search and follow these steps:
- Select the Settings link next to Rendered entity within the FORMAT section.
- Choose Search index from the View mode for datasource Content, bundle Post dropdown.
- Click on the Apply button.
- Click on the Save button to finalize our changes.
If we preview our results, we should see only the title and teaser fields being returned. Next, we need to add a Fulltext search filter that we can expose to our end users.
Within the FILTER CRITERIA section, we can add various filters and expose them for use within our page. The form we will be adding will also be replacing our Global search form within the header:
- Click on the Add button under FILTER CRITERIA.
- Choose Fulltext search.
- Click on the Apply (all displays) button.
- Enter a value of
3within the Minimum keyword length field. - Click on the Apply (all displays) button.
- Click on the Save button to finalize our changes.
We now have a Fulltext search field added to our view. However, we still need to expose the form to end users. We can enable this by selecting the Search: Fulltext search link and following these steps:
- Click on the Expose this filter to visitors, to allow them to change it checkbox.
- Delete the Label value.
- Replace the Filter identifier field value with the value term.
- Click on the Apply (all displays) button.
- Click on the Save button to finalize our changes.
Now that we have exposed our form, we will want to make it available within the Block layout page. We can do this by expanding the ADVANCED section of our view and following these steps:
- EXPOSED FORM:
- Select the link next to Expose form in block.
- Select Yes.
- Click on the Apply button.
- OTHER:
- Select the Machine Name link and change the value to search.
- Click on the Apply button.
- Select the CSS class link and change the value to search-index.
- Click on the Apply (all displays) button.
- Click on the Save button to finalize our changes.
With our exposed form now available to our Block layout, let's add it back to our Header region so that we can test our Search view.
If we navigate to /admin/structure/block, we will now be able to add our exposed form to the Header region. This new exposed form will replace the global search form.
- Click on the Place block button next to the Header region.
- Click on the Place block button next to Exposed form: search-search.
- Uncheck Display title.
- Add a value of search_form_block in the Machine-readable name field.
- Click on the Save block button.
If we navigate to our home page, we can now test our exposed search form by clicking on the search icon. At first glance, we may not notice any difference from our original search form. However, we are missing the placeholder that once prompted our users to enter their search terms. Let's remedy this by adding some custom JavaScript to our theme that will add back this attribute.

So far we have only worked with Twig templates to add additional attributes to our markup. However, there may be times where simple JavaScript makes more sense to add to our project to add functionality. In the case of our Search form input, we would like to prompt our users what to enter, but the input is currently empty. Using some simple jQuery, we can target the element and add our placeholder attribute.
If we open up octo.js, located in our themes/octo/js folder, we can add the following snippet directly after the last function to accomplish this:
JavaScript
// Add Placeholder attribute
$(".search-block-form #edit-term").attr("placeholder", "Enter your search terms");
Make sure to save the file, clear Drupal's cache and then refresh the homepage. If we now click on the search icon, we will see that we now have a placeholder prompting our users what to enter.

The JavaScript that we added uses jQuery to point to the element and then adds an attribute to the element with the specified value. This is an example of how easy it is to use custom script to add simple functionality.
Let's now add a search term to our input. We can enter the term Post and hit Enter, which will take us to the Search results page generated by our view.
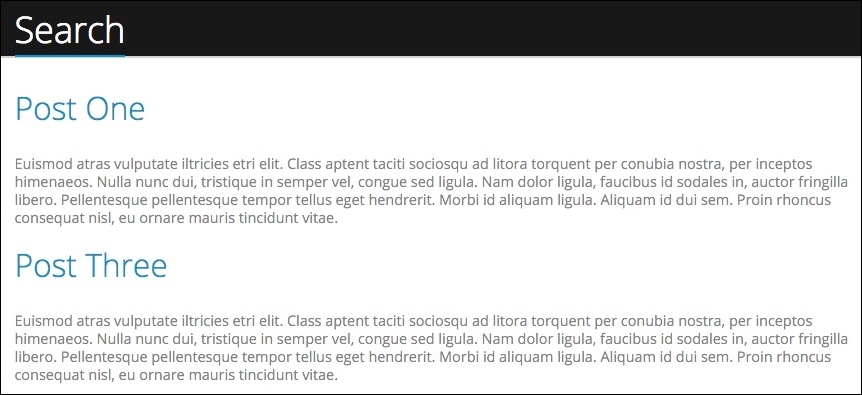
The search results are returning all content that we included in our search index. The term we entered is used to look at both the Title and Teaser fields for a match to the value of Post. One thing we are missing that would enhance our page is the number of search results being displayed.
Because our search results page is created by our view, we have the option to add additional information to our page using the Views header. We are familiar with this capability as we used it in earlier views. This time around, we will use it to display the number of records being returned by our view.
Begin by navigating to /admin/structure/views/view/search, which will allow us to modify our Search view. We will be adding Result summary to our page by following these steps:
- Click on the Add button next to the HEADER section.
- Select the checkbox next to Result summary within the Add header modal.
- Click on the Apply (all displays) button.
- Within the Display field, we will wrap the content with an
h3heading, as shown here: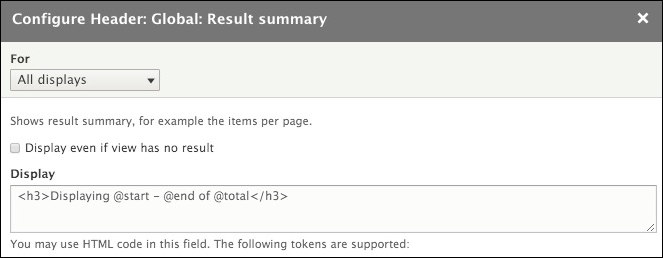
- Click on the Apply (all displays) button.
- Click on the Save button to finalize our Views configuration.
If we now navigate back to our Search results page by navigating to /search, we will see our newly added Result summary heading along with all results displayed.
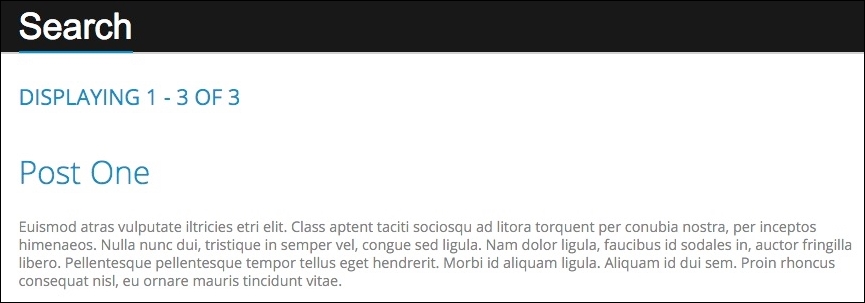
We can use the global search form to add different terms, and based on the term we enter, the Results summary will change to reflect the number of items in our results.
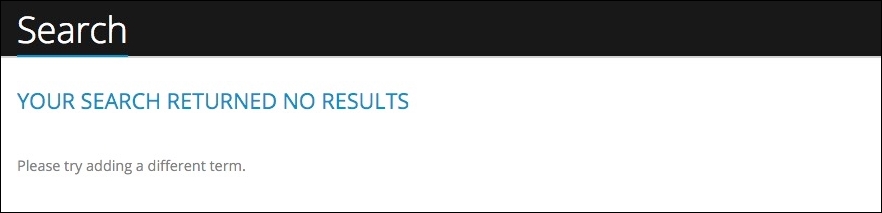
One last thing to test is what happens when we enter a term that has no results. Let's enter a term of Drupal and hit Enter. Our page returns no results, but we have not displayed that to the user. This can sometimes lead our user to believe that search is broken. It is always a best practice to alert the user that no results were found instead of just a blank page.
If we navigate back to our Search view located at /admin/structure/views/view/search, we can easily add a message to our page when the search index doesn't return results.
We will be adding a Text area field to our page by following these steps:
- Click on the Add button next to the NO RESULTS BEHAVIOR section.
- Select the checkbox next to Text area.
- Click on the Apply (all displays) button.
- Within the Content field, we will add the following markup as shown here:
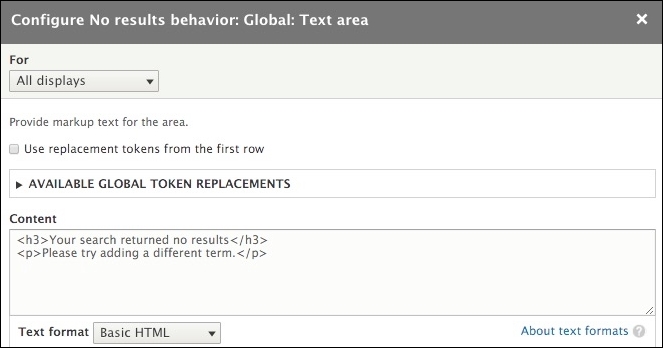
- Click on the Apply (all displays) button.
- Click on the Save button to finalize our Views configuration.
If we now navigate back to our Search results page and enter the term Drupal again, our page will now display the No Results Behavior section that we just added.