
The second item we will need to address is replacing the static content in our Header region. Referring back to the mockup, we have a logo, menu, and search form, each with their respective functionality. Tackling this next section will require quite a few more steps:
- First, we will address the logo that has been moved into the brand new site branding block. We will upload a new logo, assign the block to our header region, and work with block templates.
- Next, we will use Twig to print our Header region within our homepage to view any blocks assigned to it.
- Then, we will work with the search form block and create both the block template and the input template while introducing some new Twig techniques to work with variables. We will also add our first custom JavaScript to enable the toggle functionality.
- We will also take a look at our main menu and work with menu templates to modify the markup to match our design.
- Finally, we will add our custom script to make our header region sticky, so that as our user scrolls down the page, the header remains within our view.
Currently, our website is not displaying a site logo. This is in part due to the fact that we have yet to upload a logo for our theme. We can address this by navigating to /admin/appearance/settings in our browser, as shown in the following image:
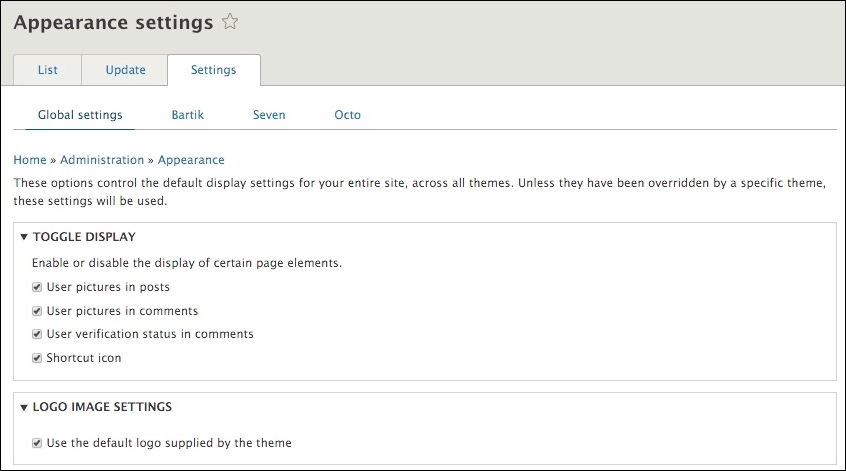
We can upload a new image by following these four steps:
- Uncheck Use the default logo supplied by the theme.
- Click on the Choose File button under the Upload logo image field.
- Select the
logo.pngfile located in theChapter06/start/themes/octo/imgfolder. - Click on the Save configuration.
We should now see that the path to custom logo displays as logo.png with the path to our file being public://logo.png or sites/default/files/logo.png, as shown in the following image:
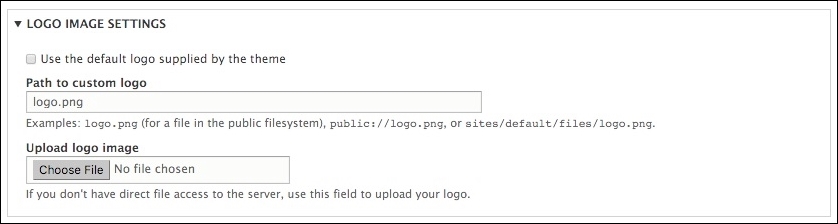
If for some reason the path to the image is different but the logo still displays properly, it may be due to us uploading a logo in the previous chapter.
In Drupal 8, the Site logo, Site name, and Site slogan have been moved into a brand new Site branding block. We will need to place this block into the Header region, so that it will display later once we add the region to our page--front-html.twig template.
Begin by navigating to /admin/structure/block and locate the Disabled region section. We will see the Site branding block currently disabled. We can place the Site branding block into the Header region by following these steps:
- Select Header from the Region dropdown.
- Click on the Save blocks button.
Now that the block is assigned to our Header region, we can continue with configuring it by clicking on the Configure button to the right of the Site branding block:
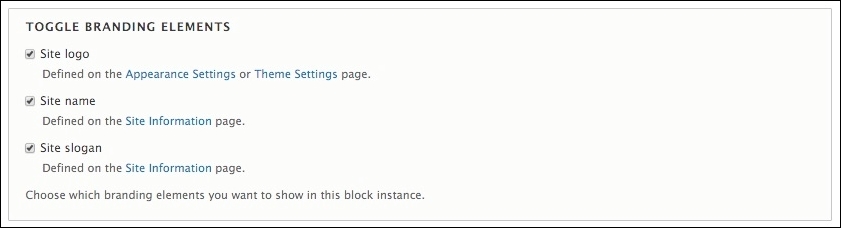
Located under the TOGGLE BRANDING ELEMENTS, we have the option of enabling or disabling specific page elements. In our case, we only want the Site logo to be displayed:
- Uncheck Site name.
- Uncheck Site slogan.
- Click the Save block button.
Now that we have our logo uploaded and our site branding block assigned to a region, we need to add the Header region to our homepage template.
Within our page--front.html.twig template, we want to be able to see any blocks of content that we assign to the Header region. In order to do this, we will need to add the {{ page.header }} variable.
- Open
page--front.html.twig. - Add the Twig variable
{{ page.header }}directly below theheader-navcontainer so that our markup looks like the following:<div class="header-nav container"> {{ page.header}} - Save
page--front.html.twig.
Make sure to save our changes, clear Drupal's cache, and then refresh the browser. Currently, we are displaying two logos, which we will address next by moving our static markup in a new block template.
In an attempt to clean up our page template, we will create a block template for our site branding block. However, we first need to know the location of the Twig template that Drupal is using to output our logo. When we inspect the page, we should see the following:
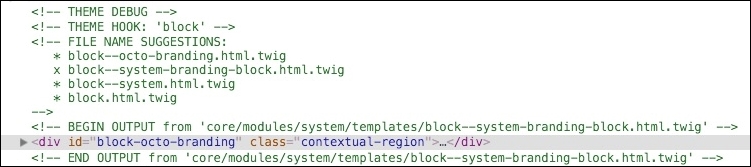
Now that we know the path to block--system-branding-block-html-twig, we can grab a copy and place it within our themes templates folder:
- Navigate to
core/modules/system/templatesand copy theblock--system-branding-block.html.twigtemplate to ourthemes/octo/templatesfolder. - Open
block--system-branding-block.html.twigand delete the current markup. - Replace the content with the following markup:
<div class="navbar-header"> <button type="button" class="navbar-toggle" data-toggle="collapse" data-target=".navbar-main"> <i class="fa fa-bars"></i> </button> {% if site_logo %} <h1 class="logo"> <a href="{{ url('<front>') }}" title="{{ 'Home'|t }}" rel="home" id="logo"> <img src="{{ site_logo }}" alt="{{ 'Home'|t }}" /> </a> </h1> {% endif %} </div> - Save
block--system-branding-block.html.twig. - Open
page--front.html.twig. - Delete the navbar-header section.
- Save
page--front.html.twig.
Make sure to save our changes, clear Drupal's cache, and then refresh the browser. Our header is coming along nicely, and should look like the following image:

There are a lot of different Twig variables, filters, and conditional logic happening with the markup for our block--system-branding-block.html.twig template, so let's take a moment to explain.
- First, we are using Twig conditional logic
{%...%}to test whether the site logo exists, and if so, print the markup between. - Second, we are replacing the
hrefvalue with{{ url('front') }}, which outputs the current URL path to our homepage. - Third, we are using a Twig translation filter
{{ 'value|t' }}to translate the values in thetitleandaltattributes. - Finally, we are using a Twig variable
{{ site_logo }}to grab the path to our logo.
If for some reason our header does not look like what we are expecting, we can always take a look at the Chapter06/end/themes/octo/templates folder and compare our Twig templates with the completed ones.
The next item we will move on to is replacing the search functionality within our page header. Referring back to the mockup, we have a hidden search form that can be toggled to display by the end user. Tackling this next section will require multiple theming techniques.
- First, we will need to assign Drupal's search for block to the Header region.
- Next, we will need to create a Twig template for the search block and move the markup out of our homepage and into the template.
- Finally, we will need to add the proper JS to enable the toggling of the search field.
Currently, we do not have a search form block available to us within our Block layout. We will need to locate the block and place it within our Header region.
- Navigate to
/admin/structure/block. - Locate the Header region.
- Click on the Place block button.
- Locate the Search form block from the Place block dialog.
- Click on the Place block button.
- Uncheck the Display title checkbox.
- Click on the Save block button from the Block layout page.
Our Header region should now contain two blocks: one for site branding and the other for our search form.

If we navigate back to our homepage, we should see our search form block displayed to the right of our logo. We will want to refactor our navbar-search markup by adding it to the search form block being output by Drupal.
If we inspect the search form block using Chrome's developer tools, we will identify that Drupal is using the general block.html.twig template. We want to be more specific with our naming convention as we will be modifying the markup in this block. Based on the FILE NAME SUGGESTIONS, we can create a new block named block--search-form-block.html.twig. Follow these steps:
- Navigate to
core/modules/block/templatesand copy theblock.html.twigtemplate to ourthemes/octo/templatesfolder. - Rename
block.html.twigtoblock--search-form-block.html.twig. - Replace the content with the following markup:
<div class="navbar-search"> <div class="search-icons"> <a class="open-form"><i class="fa fa-search"></i></a> <a class="close-form"><i class="fa fa-times"></i></a> </div> <div class="search-block-form"> {{ content }} </div> </div> - Save
block--search-form-block.html.twig.
Our search form block is now in place, but we still need to remove the navbar-search section from our page--front-html.twig template so that we don't have duplicate markup.
- Open
page--front.html.twig. - Delete the
navbar-sectionof the markup:<div class="navbar-search"> ...content... </div>
Make sure to save our changes, clear Drupal's cache and then refresh the browser. Our search form block is now in place and styled similarly to our mockup. However, if we click on the search icon, nothing will happen. We are currently missing the custom JavaScript to enable this functionality.
Initially, when we added our base styling to our octo.libraries.yml file, we also referenced a custom JavaScript file that is located in our themes/octo/js folder titled octo.js. If we open this file, we will see the shell to add jQuery that is initiated once the page has finished loading. We will be adding any custom script within this function:
! function($) {
    $(document).ready(function() {

    });
}(jQuery);
As this is not meant to be a JavaScript lesson, we will not be going into detail about any scripts we added to this function. We will, though briefly, discuss the intention of each script.
In order for our search form to be unhidden and hidden, it relies on the click event of the search icon being triggered. We can add the following script to our function to enable this interaction:
//-- Search icon
(function() {
  $(".open-form").click(function(){
    $(".open-form").hide();
    $(".close-form").css("display","block");
    $(".search-block-form").show();
    $(".search-block-form input").focus();
    return false;
  });
  $(".close-form").click(function(){
    $(".close-form").hide();
    $(".open-form").css("display","block");
    $(".search-block-form").hide();
    return false;
  });
})();
We can also find the completed octo.js file within the Chapter06/end/themes/octo/js folder to compare with our file. Make sure to save the file, clear Drupal's cache, and then refresh our homepage. If we click on the search icon, we should see our search form being displayed, as shown in the following image:

We are not quite done; the input element is not displaying over the menu. We can clearly see the outline of the input and the placeholder attribute, which prompts the user what to enter into our input, is missing. We can fix this by adding one additional Twig template for the input element.
If we inspect the markup for the search input, we can identify that the Twig template being used by Drupal is input.html.twig. As is the case with all input elements, we may find that this is not sufficient. Using the FILE NAME SUGGESTIONS, we can create a new input template titled input--search.html.twig:
- Navigate to
core/modules/system/templatesand copy theinput.html.twigtemplate to ourthemes/octo/templatesfolder. - Rename
input.html.twigtoinput--search.html.twig. - Replace the content with the following markup:
{% set classes = ['form-control',] %}

<input{{attributes.addClass(classes).setAttribute
   ('placeholder','Enter your search terms...') }} />
   {{ children }}
Make sure to save our changes, clear Drupal's cache, and then refresh the browser. Now if we click on the search icon, everything should look and function exactly like our mockup.

Therefore, we once again are introducing some new Twig functionality that should be explained in a little more detail.
First, we are using adding a new CSS class named form-control that is specific to Twitter Bootstrap. We are then setting a Twig variable named classes with that value, and then using the Twig function attributes.addClass() to pass the value to Drupal.
Second, we are using a second Twig function setAttribute(), which allows us to add the placeholder attribute with a value of Enter your search terms.
As we are starting to see, the new Twig functionality in Drupal is very powerful and allows us to achieve most theming requirements directly in a Twig template without the need to use the Theme layer.
When dealing with our main menu, we are using Drupal's Main navigation menu block. This block is already assigned to our Primary menu region, which makes it very easy to access within our page--front.html.twig template:
- Open
page--front.html.twig. - Add the
{{ page.primary_menu }}variable to our page directly below the{{ page.header }}variable. - Save
page--front.html.twig.
Make sure to save our changes, clear Drupal's cache, and refresh the browser. We will now see the Main navigation block being displayed to the right of our logo, as shown in the following image:

Taking a closer look, it's clear that the unordered list for our menu is missing the following classes, nav nav-pills nav-main, which is causing the menu items to not display inline or show with the Bootstrap pill formatting that our static menu is displaying.
If we inspect the markup for the main menu, we can identify the Twig template being used by Drupal is menu.html.twig. Using the FILE NAME SUGGESTIONS, we can create a more specific template titled menu--main.html.twig.
- Navigate to
core/modules/system/templateand copymenu.html.twigto thethemes/octo/templatesfolder. - Rename
menu.html.twigtomenu--main.html.twig. - Now we will need to open our new template, locate the first unordered list, and add the missing CSS classes by replacing the following markup:
Current markup
<ul{{ attributes }}>New markup
<ul{{ attributes.addClass('nav nav-pills nav-main') }}>
Make sure to save our changes, clear Drupal's cache, and refresh the browser. We will now see the Main navigation block displaying inline similar to our static menu.
Similar to how we handled the markup for our site branding, it would be much easier to manage the navbar-main wrapper within the block that outputs our menu. This will allow us to also remove the navbar-main markup completely from our homepage template.
If we inspect the markup for the main menu, we can identify the block template being used by Drupal is block--system-menu-block.html.twig. Knowing the fact that there will only ever be a single main menu, we can feel confident using this same template for our needs:
- Navigate to
core/modules/system/templateand copyblock--system-menu-block.html.twigto thethemes/octo/templatesfolder. - Replace the content with the following markup:
<div class="navbar-main navbar-collapse collapse"> {{ content }} </div> - Save
block--system-menu-block.html.twig. - Open
page--front.html.twig. - Modify the
header-navsection to look like the following:<div class="header-nav container"> {{ page.header}} {{ page.primary_menu }} </div> - Save
page--front.html.twig.
Make sure to clear Drupal's cache and then refresh the homepage. Our menu is now complete and functional. Finally, we need to add our custom script that will turn our header into a sticky header.
One of the more common UI improvements seen around the Web is the implementation of sticky headers. Our mockup implements this with a little bit of CSS and some custom JavaScript.
First, the markup for our header region contain a class of header that will be used to add an additional class of sticky once the user has scrolled down the page a certain number of pixels.
Second, we can use the Document Object Model (DOM) with JavaScript to determine how far the user has scrolled past a specific element in our markup. We can use the reverse to then remove the sticky class once they have scrolled back to the top of the page.
- Open
octo.jslocated in thethemes/octo/jsfolder. - Add the following script block:
   //-- Sticky Header
   (function() {
     var mainnav = $('.header'),
     if (mainnav.length) {
       var elmHeight = $('.header-top').outerHeight(true);
       $(window).scroll(function() {
         var scrolltop = $(window).scrollTop();
         if (scrolltop > elmHeight) {

           if (!mainnav.hasClass('sticky')) {
             mainnav.addClass('sticky'),
           }

         } else {
           mainnav.removeClass('sticky'),
         }
        })
       }
     })();
Make sure to save our changes, clear Drupal's cache and then refresh the browser. If we begin to scroll down the page, we will see the Header region stick to the top of our browser. Scrolling back up to the top, our Header region then returns to normal.
We have successfully completed the header of our homepage. Complete it with logo, dynamic main menu, and search functionality.