Chapter 8: The Database API
In the previous two chapters, we talked extensively about our options as Drupal module developers for modeling and storing data. We also saw some examples of how to use things such as the State, Configuration, and Entity APIs, going into greater detail about the latter by using it to build something useful. One of the key takeaways from those chapters is that the need for custom database tables and/or direct queries against them and the database has become minimal.
The Entity system is flexible and robust, the combination of configuration and content entities providing much of the needs for storing data. Moreover, the Entity query and loading mechanisms have also made finding them easy. Odds are, this is enough for most of your use cases.
Furthermore, storage subsystems such as the State API (key/value) and UserData have also removed much of the need to create custom tables to store that kind of "one-off" data. Also, the Configuration API provides a unified way to model exportable data, leaving no need for anything else.
However, apart from these features, Drupal also has a strong Database API that actually powers them under the hood. This API is made available to us in case we need it. For example, we can create our own database tables and then run queries against them however we want, all through a secure layer that can work on top of multiple types of databases.
Creating custom database tables is not something you will do very often—maybe never— but in this chapter, you will still learn how the API works in order to do so. There are contributed modules out there that have legitimate uses for them, and who knows, you might also. So, it is still important to understand this system. However, even more pertinent is the API for running queries (particularly select queries), because you may need to run these, even against entities. There are times in which the entity query does not provide all you need, so looking up entities based on complex queries can, in fact, be more common. Hence, we will cover how to do that in this chapter, as well.
More concretely, in this chapter, we will start by creating a couple of database tables so that we can see how the Schema API works in Drupal 9. Then, we will see the various ways we can perform queries against these tables by using the database abstraction layer. We can make two different types of select query, and we will practice both. For the others (INSERT, UPDATE, and DELETE), there is a standard way of doing it. Next, we will take a look at how queries can be altered and how we can tag them for better targeting. Finally, we will look at the database update hooks, the purpose of which is to make database updates once the tables have already been created. And if you remember, also to perform updates to the entity table schemas.
The topics we will cover in this chapter are the following:
- The Schema API
- Running and altering queries
- Database update hooks and post update hooks
The Schema API
The purpose of the Schema API is to allow the defining of database table structures in PHP and to have Drupal interact with the database engine and turn those definitions into a reality. Apart from the fact that we don't ever have to see things such as CREATE TABLE, we ensure that our table structures can be applied to multiple types of databases. If you remember in Chapter 1, Developing for Drupal 9, I mentioned that Drupal can work with MySQL, PostgreSQL, SQLite, and others, if they support PDO, so the Schema API ensures this cross-compatibility.
The central component of the Schema API is hook_schema(). This is used to provide the initial table definitions of a given module. Implementations of this hook belong in the *.install file of the module and are fired when the module is first installed. If alterations need to be made to existing database tables, there are a number of methods that can be used inside update hooks to make these changes.
In this section, we will create a new module called sports in which we want to define two tables: players and teams. The records in the former can reference records in the latter, as each player can be part of only one team at a time. This is a simple example, and one which could, and should, be implemented using entities. However, for the purpose of demonstrating the database API, we will stick with the manual setup.
So, in our sports.install file, we can implement hook_schema() as follows:
/**
* Implements hook_schema().
*/
function sports_schema() {
$schema = [];
$schema['teams'] = [
'description' => 'The table that holds team data.',
'fields' => [
'id' => [
'description' => 'The primary identifier.',
'type' => 'serial',
'unsigned' => TRUE,
'not null' => TRUE,
],
'name' => [
'description' => 'The team name.',
'type' => 'varchar',
'length' => 255,
'not null' => TRUE,
],
'description' => [
'description' => 'The team description.',
'type' => 'text',
'size' => 'normal',
],
],
'primary key' => ['id'],
];
$schema['players'] = [
'description' => 'The table that holds player data.',
'fields' => [
'id' => [
'description' => 'The primary identifier.',
'type' => 'serial',
'unsigned' => TRUE,
'not null' => TRUE,
],
'team_id' => [
'description' => 'The ID of the team it belongs to.',
'type' => 'int',
'unsigned' => TRUE,
],
'name' => [
'description' => 'The player name.',
'type' => 'varchar',
'length' => 255,
'not null' => TRUE,
],
'data' => [
'description' => 'Arbitrary data about the player.',
'type' => 'blob',
'size' => 'big',
],
],
'primary key' => ['id'],
];
return $schema;
}
Implementations of this hook need to return an associative array keyed by the table name whose values are an array that defines the respective table. The table definition consists of various types of information, particularly the individual column definitions (fields), and also things such as which fields represent the primary key, foreign keys (strictly for documentation purposes), unique keys, and indexes. For a full reference to all the available options, check out the Drupal.org (https://www.drupal.org/) documentation pages for the Schema API.
In our example, we defined the two tables we mentioned and defined their fields inside the fields array. The primary key indicates which of the fields will be used for that purpose, opting for the standard id field for both. Speaking of which, the latter is a field of the type serial, which means that it is an integer that has an auto-increment option to it. For number fields such as integer, float, and numeric, the unsigned option means that numbers cannot go below 0. Also, not null is pretty easy to understand—it prevents the column from ever being empty.
For the team and player name, we opted for a simple varchar field that takes a maximum of 255 characters (a pretty standard table column definition), and these, too, cannot be null. The description field, on the other hand, is of the text type with the normal size (as opposed to tiny, small, medium, or big). In here, we want to store strings that are longer than 255 characters. At the time of writing this book, there is no full documentation for the available data types (and their options) for Drupal 8 or 9; however, the D7 version (https://www.drupal.org/docs/7/api/schema-api/data-types) is a good indicator and will pretty much work exactly the same.
Lastly, for the player table, we also have a team_id, which is a simple integer field, and a data column, in which we want to store some arbitrary serialized data. This is a blob type, which can also be big or normal.
That is pretty much all for our schema definitions. Installing the sports module will create these tables for us automatically, according to these definitions. Also, just as important, uninstalling the module will delete these tables, so we don't need to do any kind of handling. However, if our module is already enabled and we add this implementation afterward, it won't get fired. Instead, we will need to implement an update hook and use the drupal_install_schema() function, which will trigger it, like this:
drupal_install_schema('sports');
We will see more about update hooks soon.
Running queries
Now that we have some tables to work with, let's take a look at how we can run queries against them. If you are following along, for testing purposes, feel free to add some dummy data into the tables via the database management tool of your choice. We will look at INSERT statements soon, but before that, we will need to talk about the most common types of query you'll run—SELECT.
Queries using the Drupal database abstraction layer are run using a central database connection service—database. Statically, this can be accessed via a shortcut:
$database = Drupal::database();
This service is a special one compared to the ones we saw before, because it is actually created using a factory. This is its definition to better help you understand what I mean:
database:
class: DrupalCoreDatabaseConnection
factory: DrupalCoreDatabaseDatabase::getConnection
arguments: [default]
This is a definition by which the responsibility for the instantiation is delegated to the factory mentioned, instead of the container as we've seen before. So, the resulting class does not necessarily need to match the one specified for the class key. However, in this case, the DrupalCoreDatabaseConnection is an abstract base class that the resulting service extends. Again, in this case, the arguments are responsible for specifying the type of connection that it has to create. The site-default type is used (MySQL, usually), which means that the resulting service will be an instance of DrupalCoreDatabaseDrivermysqlConnection.
From this connection service, we can then request the relevant object with which we can build queries. So, let's see how these work in practice.
Select queries
There are two ways we can run select queries in Drupal. One is by writing actual SQL query strings and the other is by using a query builder object to do so. The second option is the recommended approach as they can be deconstructed and altered by others before being executed.
The first type of select query is typically used for simpler queries, but if you are an SQL guru, it can actually be faster and easier to write a complex query using that method. Moreover, they rely on developers ensuring that the SQL statement is compatible with the underlying database. So, it is up to you which of the two types you choose, considering all of these factors.
Let's first take a look at how we can run a basic query against our tables using the first method. We'll then see how the same query can be run using the other way:
$database = Drupal::database();
$result = $database->query("SELECT * FROM {players} WHERE [id] = :id", [':id' => 1]);
This is a simple SQL statement. We passed the query string as the first argument to the query() method of the connection object. The second argument is an array of placeholder values for this query string. These are found throughout the SQL string proceeded by a colon (:id) and are later replaced with the value that maps to the same key in the placeholder values array. Another thing to note is that the table name in the query is surrounded by curly braces. This is because, in reality, table names can be prefixed when the site is installed, and our code should not concern itself with that prefix. Drupal will prepend it automatically.
Now, let's take a look at how we can run the same query using the query builder:
$result = $database->select('players', 'p')
->fields('p')
->condition('id', 1)
->execute();
This time, we will use the select() method on the connection object to get our hands on a SelectInterface instance with which we can build our query. We need to pass the table we want to query, as well as an alias for that table. This is particularly important when performing joins. Then, we use the fields() method to specify which of the table columns we want to retrieve. The first parameter is the table alias, whereas the second (optional) is an array of column names. All columns will be included in this case (*). Next, we have a single condition being applied to the query for the id column and the value 1. The third optional parameter is the operator that defaults to =. Lastly, we execute the query and get the same result as with the previous example.
You will immediately note, if you remember, that the structure of this query builder is very similar to the Entity Query, and the components are also chainable to a certain extent, as we will see.
Handling the result
Both of the previous queries return a StatementInterface, which is iterable. So, to access its data, we can do this:
foreach ($result as $record) {
$id = $record->id;
$team_id = $record->team_id;
$name = $record->name;
$data = $record->data;
}
Each item in the loop is a stdClass, and their property names are the actual names of the columns returned, while their values are the column values.
Alternatively, the StatementInterface also has some fetcher methods that can prepare the results for us in different ways. These mostly come from the parent PDOStatement class, which is native PHP. The simplest is fetchAll():
$records = $result->fetchAll();
This returns an array of stdClass objects, as we saw before, so it does all the looping to extract the records for us. If we want this array keyed by the value of a field in the record, we can perform the following:
$records = $result->fetchAllAssoc('id');
This will use the value in the id field to key the array.
If we're expecting single records, we can also use the fetch() method, which returns only one such object (the next one in the result set); fetchObject() does the same thing.
More complex select queries
Let's create a more complex query now, to join our team table and retrieve the team information in the same record as the player:
$result = $database->query("SELECT * FROM {players} p JOIN {teams} t ON t.[id] = p.[team_id] WHERE p.[id] = :id", [':id' => 1]);
This will return the same record as before, but inclusive of the values from the matching team record. Note that since we have a join, we had to use table aliases here as well. There is one problem with this query, though—since both tables have the name column, we cannot use * to include all of the fields, as they will get overridden. Instead, we need to include them manually:
$database->query("SELECT p.[id], p.[name] as player_name, t.[name] as team_name, t.[description] as team_description, p.[data] FROM {players} p JOIN {teams} t ON t.[id] = p.[team_id] WHERE p.[id] = :id", [':id' => 1])->fetchAll();
As you can see, we specified the fields from both tables we wanted to include, and we indicated different names as aliases where there was a name conflict. Now, let's write the same query using the query builder:
$query = $database->select('players', 'p');
$query->join('teams', 't');
$query->addField('p', 'name', 'player_name');
$query->addField('t', 'name', 'team_name');
$query->addField('t', 'description', 'team_description');
$result = $query
->fields('p', ['id', 'data'])
->condition('p.id', 1)
->execute();
$records = $result->fetchAll();
First of all, not all methods on the query builder are chainable. The join() method (and the other types of join methods, such as innerJoin(), leftJoin(), and rightJoin()), and the addField() method are prominent examples. The latter is a way we can add fields to the query by specifying an alias (we cannot do it via the fields() method). Moreover, the condition() field is also prefixed with the table alias it needs to be in (which was not necessary before when we didn't use a join).
For more information about all the other methods useful for building queries, check out the SelectInterface and ConditionInterface. They are typically well-documented in there.
Range queries
Since limiting queries to a certain range depends on the underlying database engine, we also have the queryRange() method on our database connection service, which we can use to write queries that include ranges:
$result = $database->queryRange("SELECT * FROM {players}", 0, 10);
In this example, we query for all the players and limit the result set to the first 10 records (from 0 to 10). So, with this method, the placeholder value array is the fourth parameter after $from and $count.
Alternatively, using the SELECT query builder, we have a method on the SelectInterface whereby we can specify a range. So, in that format, the previous query would look like this:
$result = $database->select('players', 'p')
->fields('p')
->range(0, 10)
->execute();
As you can see, we have the range() method, which takes those arguments and limits the query.
A note on running select queries on Entity tables:
If you can do so using the Entity Query, use that. If not, feel free to use the database API. And if you must, stick to using the query to figure out the IDs of the entities you need, but then use the entity storage handler to load those entities properly.
Pagers
Now that we have seen how to make SELECT queries of all kinds, let's take a look at how we can use Drupal's built-in pagination capabilities and how pagers work in Drupal 9. We will illustrate these by running some queries and rendering the results inside a table. Refer to Chapter 4, Theming, if you don't remember the theming aspects of outputting a table.
Our playground will be inside a new controller method (SportsController::players()) which maps to the route with the /players path. Refer to Chapter 2, Creating Your First Module, for a refresher on how to create routes if you don't remember.
The first thing we'll do is create a simple query that loads all the players and outputs them inside a table. We'll stick to only showing the player names for simplicity:
/**
* Renders a table of players.
*/
public function players() {
$query = $this->database->select('players', 'p')
->fields('p');
$result = $query->execute()->fetchAll();
$header = [$this->t('Name')];
$rows = [];
foreach ($result as $row) {
$rows[] = [
$row->name
];
}
$build = [];
$build[] = [
'#theme' => 'table',
'#header' => $header,
'#rows' => $rows,
];
return $build;
}
All of this should already be familiar to you. We are running the query and preparing the data for a table, using the table theme hook to render it. You'll note that we are creating a $build array so that we can include more things in the final output.
By navigating to /players, we should now already see a table with our player names. This will be our baseline from which to explore pagers.
Pagers work by storing some information regarding a query in the global state, namely the total number of items to be paged, the limit of items per page, and an identifier for the respective pager (so we can potentially have multiple pagers at once). All of this information is set using the following code (you don't have to add this anywhere now):
pager_default_initialize($total, $limit, $element = 0);
Moreover, the current page is determined by the query parameter in the URL, named page.
Once the pager is initialized, we have a pager render element we can use to easily render a themed pager that uses this information and builds all the necessary links to move between the pages. As query builders, we then have to read the current page and use that inside our query.
However, there is a much simpler way to work with pagers, and that is using select extenders. These are decorator classes for the SELECT query class we've seen before, and they allow us to decorate it with an extra piece of functionality, such as pagers or sorting; they encapsulate the necessary functionality for handling pagers in the query. So, let's see it in action.
Here is how our player query would look using the PagerSelectExtender:
$limit = 5; // The number of items per page.
$query = $this->database->select('players', 'p')
->fields('p')
->extend('DrupalCoreDatabaseQueryPagerSelectExtender')
->limit($limit);
$result = $query->execute()->fetchAll();
As you can see, we have an extend() method on the SELECT query builder which allows us to pass the name of the class that will decorate the resulting SELECT query class. This also provides us with a new method called limit(), through which we specify the number of records to load per page. Under the hood, it uses the range() method we saw earlier. Moreover, when running the query, it initializes the pager for us using pager_default_initialize(), and even determines the current page all on its own. So typically, you'll use the extender directly.
The Decorator Pattern
The Decorator Pattern is an object-oriented programming design pattern that allows us to statically or dynamically add behavior to an existing object without altering how it, or other objects of the same class, behaves inside. A decorator essentially wraps an existing object to provide extra functionality from the outside.
So, all we need to do now is render the following pager (below the table):
$build[] = [
'#type' => 'pager'
];
Positively rocket science, right? Not really. If we refresh the page, we should now see only five players in the table, and also a pager below it.
The Pager render element (https://api.drupal.org/api/drupal/core%21lib%21Drupal%21Core%21Render%21Element%21Pager.php/class/Pager/9.0.x) has some interesting properties we can use to customize it further. We can append query elements to the resulting links, or even specify another route for the links if we want to. We can, of course, control the label of the pager links, and even the number of links being output. Check out the documentation of this element for more information.
Moreover, for full customization, we also have the option of preprocessing these variables by implementing our own preprocessor for the pager theme hook (such as template_preprocess_page) and/or overriding the pager.twig.html template file. We learned how to do these things in Chapter 4, Theming.
Insert queries
In order to get data into our custom database tables, we have an INSERT query builder that we can use. And, you guessed it, via the insert() method on the connection service to build our query with the Insert object that gets returned. So, let's see how we can add a record to our players table:
$database->insert('players');
$fields = ['name' => 'Diego M', 'data' => serialize(['known for' => 'Hand of God'])];
$id = $database->insert('players')
->fields($fields)
->execute();
The main thing about an insert query is the fields() method. It expects an array of key/value pairs, where the keys are the column names and the values are the data that needs to be added to the respective columns. Alternatively, the first argument can be an array of the column names and the second an array of the values in the same order as the column names from the first array.
We can also run an INSERT query with multiple sets of values (records):
$values = [
['name' => 'Novak D.', 'data' => serialize(['sport' => 'tennis'])],
['name' => 'Michael P.', 'data' => serialize(['sport' => 'swimming'])]
];
$fields = ['name', 'data'];
$query = $database->insert('players')
->fields($fields);
foreach ($values as $value) {
$query->values($value);
}
$result = $query->execute();
In this example, the fields() method receives only an array of column names that need to be inserted, and we use values() method calls to add the individual values.
The execute() method typically returns the ID (primary key) of the last record to be inserted. This is handy, especially if you insert only one record. However, for multiple inserts, it can also be misleading. So, do experiment for yourself with different use cases.
Update queries
Now that we've seen INSERT queries, let's take a look at how we can update existing records. Say we wanted to update one of our player records; we will do so as follows:
$result = $database->update('players')
->fields(['data' => serialize([
'sport' => 'swimming',
'feature' => 'This guy can swim'
])])
->condition('name', 'Michael P.')
->execute();
UPDATE queries are like INSERT ones, except that they take a condition() to figure out which records to update (all that match the condition). Leaving this out will update all records, naturally. Using the fields() method, we will simply specify which columns are getting updated, and with what. If we leave out a column, it will stay untouched. Lastly, the result of this query is the total number of records affected.
Delete queries
Lastly, we can also get rid of our records using the DELETE query:
$result = $database->delete('players')
->condition('name', 'Michael P.')
->execute();
All records that match the condition will get removed. Be careful with this, because, as with update queries, leaving out a condition will basically truncate your table. The query will return the number of records affected, that is, deleted.
Note
Although you can write SELECT queries against entity and field tables to find the IDs of the entities you want to load, you should never perform INSERT, UPDATE, or DELETE queries against these tables. You run a very high risk of corrupting your data.
Transactions
The Drupal database API also provides a way to represent and handle database transactions (for database types that support them). Transactions are a way in which database operations can be wrapped and grouped together with a view to committing them in an "all or none" type of fashion. For example, if you have multiple records that are related, it's possible you will not want them written if one fails its INSERT operation for some reason. It could leave you with corrupt or incomplete data that could throw your application into a spin.
Performing multiple database-changing operations after a transaction has been opened only finalizes (commits) those changes to the database when that transaction closes. If something goes wrong, it can also be rolled back, which will prevent the data from being committed.
In Drupal, a transaction is represented by a Transaction object (a specific subclass for each database type). As soon as the object is destroyed (is no longer in scope), the operations get committed to the database. However, if we get an indication that something went wrong in our operations (usually via catching an exception), we can roll back the transaction, which will stop those operations from being committed. Moreover, transactions can be nested, so Drupal keeps track of transactions that have been opened within the scope of other transactions.
Let's see an example of how to use transactions:
$transaction = $database->startTransaction();
try {
$database->update('players')
->fields(['data' => serialize(['sport' => 'tennis', 'feature' => 'This guy can play tennis'])])
->condition('name', 'Novak D.')
->execute();
}
catch (Exception $e) {
$transaction->rollback();
watchdog_exception('my_type', $e);
}
The first thing we did was start a transaction using our connection service. Then, we wrapped our operation in a try/catch block to catch any exceptions that might be thrown in performing it. If one does get thrown, we roll back the transaction because we don't want to commit anything to the database, as we don't know what failed and what shape our data is in. Finally, we used the watchdog_exception() helper to log the exception to the database log. Do note that logging this before the rollback would prevent the exception from being written to the database as well.
If there is no exception, the operation gets committed as soon as the $transaction variable gets removed and is no longer in scope (usually at the end of the function). It is also interesting to note that if, within this transaction, we call another function in which we perform database operations, those operations will be part of this same transaction by default. So they also get rolled back if we roll back or get committed if we don't. This is why the database watchdog log will not be saved if called before the rollback.
Query alters
Lots of things in Drupal are alterable using various hooks; queries are no different. This means that if a module writes a query such as we've seen before, other modules can alter it by implementing hook_query_alter(). So let's consider an example of how this may work.
Assume the following query, which simply returns all player records:
$result = $database->select('players', 'p')
->fields('p')
->execute();
Imagine that another module wants to alter this query and limit the results to find only the players in a specific team. There is one problem. Our query has no markers that can indicate to another module that this is the one that needs to be altered. As you can imagine, there are a bunch of queries that are run in any given request, so identifying queries becomes impossible. Enter query tags.
The previous query would not be alterable because it's not recognizable, and therefore, hook_query_alter() is not even fired on it. In order to make it alterable, we will need to add a query tag and make it identifiable. There is a simple method on the query builder for doing just that: addTag():
$result = $database->select('players', 'p')
->fields('p')
->addTag('player_query')
->execute();
Query tags are simple strings that can be read from inside a hook_query_alter() implementation. So, we could alter the query like this:
/**
* Implements hook_query_alter().
*/
function module_name_query_alter(DrupalCoreDatabaseQueryAlterableInterface $query) {
if (!$query->hasTag('player_query')) {
return;
}
// Alter query
}
The only parameter of this hook is the query object onto which we can apply our changes. It also has methods for reading the tags, such as hasTag(), hasAnyTag(), or hasAllTags(). In the previous example, we took a defensive approach and simply exited if the query was not about our player_query tagged query. I'll come back to this later on.
Now, let's see how we can alter this query to achieve what we set out to do:
$query->join('teams', 't', 't.id = p.team_id');
$query->addField('t', 'name', 'team_name');
$query->condition('t.name', 'My Team');
As you can see, we are doing a similar thing to what we did before when we built our joined query. We join the team table, add its name field (as a bonus), and set a condition to only return the players in a certain team. Easy peasy.
Let's now return for a second to my remark about the defensive approach we took with this hook implementation. I personally prefer to keep methods short and return early, rather than have a bunch of unintelligible nested conditions. This is typically easy to do in an object-oriented setting. However, with procedural code, it becomes a bit more tedious as you need many private functions that are tricky to name, and even more so with hook implementations into which you might need to add more than one block of code. For example, in our hook_query_alter() implementation, we might need to add an alteration for another query later on. Also, since we return early, we need to add another condition for checking for two tags, and then some more conditions and if statements, and even more conditions (OK, rant over). From a PHP point of view, in this case you'd delegate the actual logic to another function based on the tag of the query, either using a simple switch block or if conditionals. This way, if a new tag comes, a new function can be created for it specifically and called from the switch block. However, we can do one better in this case.
There are a few hooks, particularly alter ones, that have general targeting but also a more specific one. In this example, we also have a hook_query_TAG_alter() hook, which is specific to a given tag. So, instead of us delegating to other functions, we could implement the more specific hook variation:
/**
* Implements hook_query_TAG_alter().
*/
function module_name_query_player_query_alter(DrupalCoreDatabaseQueryAlterableInterface $query) {
// Sure to alter only the "player_query" tagged queries.
}
So, essentially, the tag itself becomes part of the function name, and we don't need any extra functions.
Update hooks
At the beginning of this chapter, we defined two tables using hook_schema() which got installed together with the module. To reiterate, if the module had already been installed, we could have triggered the schema installation using the drupal_install_schema() function. However, what if we needed to add another column later on, say to the teams table? Our module is installed, and so is the schema; we cannot exactly uninstall it on production just to trigger the schema creation again, not to mention losing the data. Luckily, there is a system in place for this, namely update hooks—hook_update_N()—where N represents the schema version. These are sequentially named hook implementations that go inside the module *.install file and that are triggered when running the updates, either by going to /update.php or by using the drush updated command.
The main purpose of these update hooks is making schema alterations to existing database tables.
Note
If you remember when we were talking about entities, this was the update hook I mentioned that entity definition updates go into when staging them between environments. The principles are the same, except here we are updating our own table schemas rather than the Drupal core entity-specific ones.
As mentioned, these hook implementations go into the *.install file. Let's see an example:
/**
* Update hook for performing an update task.
*/
function my_module_update_9001(&$sandbox) {
// Do stuff
}
The DocBlock of this hook implementation should contain a description of what it does. It is displayed when running the updates (either via the UI or using Drush).
The name of the function is one of its most important aspects. It starts with the module name, followed by update, and finally, the module's schema version (the next one if we want this update hook to actually run); but what is a module's schema version?
When installed, Drupal sets each module a schema version: 9000. In Drupal 8, it was 8000, and in 7, it was 7000. You get the difference between the major versions of Drupal. When an update hook runs, Drupal sets that module's schema version to the number found in the update hook. So, in the previous example, it would be 9001. This is to keep track of all the update hooks and to not run them more than once.
Let's now see how we can alter our teams database table with an update hook and add a column to store a location string field. The first thing we want to do is update our hook_schema() implementation and add this information there as well. This won't do anything in our case; however, due to the way update hooks work, we need to add it there as well. What I mean by this is that if a module is first installed and it has update hooks in it already, those update hooks do not run, but the module's schema version gets set as the number of the last update hook found in it. So, if we do not add our new column inside hook_schema(), installing this module on another site (or even on the current one after an uninstall) will not get our new column in. So, we need to account for both situations.
In the field definition of our teams table schema, we can add the following column definition:
'location' => [
'description' => 'The team location.',
'type' => 'varchar',
'length' => 255,
],
It's as simple as that. Next, we can implement an update hook and add this field to the table:
/**
* Adds the "location" field to the teams table.
*/
function sports_update_9001(&$sandbox) {
$field = [
'description' => 'The team location.',
'type' => 'varchar',
'length' => 255,
];
$schema = Drupal::database()->schema();
$schema->addField('teams', 'location', $field);
}
Here, we used the same field definition, loaded the database connection service, and used its schema object to add that field to the table. The code itself is pretty self-explanatory, but it's also worth mentioning that this is an example in which we cannot inject the service, hence we have to use it statically. So, don't feel bad about situations like this.
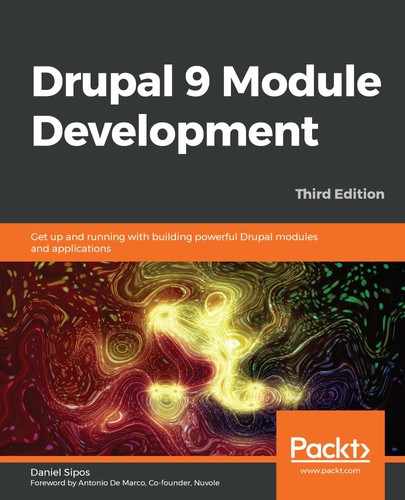
Next, we can use Drush to run the updates:
Figure 8.1: Using Drush to run the updates
Sure enough, the teams table now has a new column. If you try to run the updates again, you'll note that there are none to be run because Drupal has set the schema version of the sports module to 9001. So, the next one in line to be run has to have 9002 at the end.
In the previous example, we added a new field to an existing table. However, we might need to create a new table entirely, or even delete one. The schema object on the database connection service has the relevant methods to do so. The following are a few examples, but I recommend that you check out the base DrupalCoreDatabaseSchema class for the available methods:
$schema->createTable('new_table', $table_definition);
$schema->addField('teams', 'location', $field);
$schema->dropTable('table_name');
$schema->dropField('table_name', 'field_to_delete');
$schema->changeField('table_name', 'field_name_to_change', 'new_field_name', $new_field_definition);
There are a few cautionary aspects you need to consider when using update hooks. For example, you cannot be sure of the state of the environment before the hooks actually run, so ensure that you account for this. I recommend you check out the documentation (https://api.drupal.org/api/drupal/core%21lib%21Drupal%21Core%21Extension%21module.api.php/function/hook_update_N/9.0.x) about hook_update_N() and carefully read the section about the function body.
Post update hooks
Partly due to the weak configuration management system in versions of Drupal (7 and before), the update hooks we just talked about have evolved—through developer creativity—into a mechanism for updating various types of configuration or performing tasks (even content-related) upon a deployment to the next environment. Helping out with this is the $sandbox argument passed to the hook implementations, which can be used to batch these operations (to prevent an execution timeout). We will not cover the batching aspect here but rather as part of the standalone Batch API chapter.
Since Drupal 8, we no longer have to misuse the update hooks for performing tasks that are not strictly related to updating schemas: be that our own custom table schemas or content entity ones. Instead, we can use hook_post_update_NAME().
Post update hooks are fired after update hooks have run and we are sure all the database tables have been brought to their correct state. They need to go inside the *.post_update.php file of the module and they are fired in the order they are declared inside this file—likewise only once. And instead of consecutive numbers, they can have any string name we choose. Do check out the documentation for a quick example on how to use them.
Summary
In this chapter, we looked at the basics of interacting with the database API. Although it's something that has taken a significant step back in importance in day-to-day Drupal module development, it's important to understand it and be able work with it.
We started the chapter by creating our very own database tables to hold player and team information in a relational way. We did so using an API that transforms definitions into actual tables without us having to even understand much about MySQL. The SQL terminology and basic operations are, however, something that every developer should be familiar with, notwithstanding their actual day-to-day application in Drupal.
Then, we looked at some examples of how we can run SELECT, INSERT, UPDATE, and DELETE queries using both the more SQL-oriented way of writing statements and the query builder approach, which uses an OO representation of the queries. We've also seen how these queries can be wrapped into transactions (where supported) so that we can commit data changes while minimizing the potential for incomplete or corrupt data. Finally, we saw how these queries can be altered using query tags, allowing for yet another small extension point that other modules can contribute through. Regardless of how we build our queries, however, a key takeaway is that using this API is crucial for a secure interaction with the database. Moreover, it accounts for cross-compatibility with the different database types Drupal can work with.
Lastly, we looked at update hooks and how they can be used to perform changes to our database tables. And we also mentioned post update hooks that can be employed to perform some other tasks that might need to be coded and then deployed to the next environment to be run once.
In the next chapter, we will look at custom Drupal entity fields and see how we can define our own; yes, we'll be playing with some more plugins.