Configuration Files for Controlling the Management Domain
This section consolidates information about the configuration files NNM uses to define and control the management domain.
The seedfile is a simple list of devices that support SNMP. As an indirect result, the netmon daemon will use this list at startup time to define the subnets in the initial management domain. Well-connected devices such as routers are recommended, but sometimes other devices with rich ARP caches (such as servers) may be used. To inform netmon about the seedfile, insert the command line string “-s /path/seedfile” into the $OV_LRF/netmon.lrf file, execute $OV_BIN/ovaddobj $OV_LRF/netmon.lrf to register the change, stop netmon with $OV_BIN/ovstop netmon, and restart it again with $OV_BIN/ovstart netmon. A sample seedfile is given in Figure 3-2.
Figure 3-2. A sample seedfile.
|
This is a list of devices meant to define the initial management domain subnets. Well-connected devices such as routers with rich ARP caches make good seedfile entries. Server systems may also be entered since their ARP caches will be rich with the IP addresses of their client systems. routera.domain.com routerb.domain.com routerc.domain.com routerx.domain.com |
The filters file provides rules for the ovtopmd daemon to include or exclude devices based on their attributes. This is the core tool for controlling what devices are discovered and subsequently placed on the map. The filters listed inside this file are named, and one of these names is given to ovtopmd in the $OV_LRF/ovtopmd.lrf registration file by adding the parameter “-f filter_name”, registering the change using $OV_BIN/ovaddobj $OV_LRF/ovtopmd.lrf, and stopping and starting the ovtopmd daemon to effect the change. The filters file may be used to ensure certain devices are included, such as a list of servers, along with network devices such as routers, switches, and the like. The filters file is located in the directory $OV_CONF/C/. A sample file is given in Figure 3-3. Note that HP provides a template filters file, so back it up in case of human error. The precise filter definition syntax and object attributes available may be found in Appendix A of the document A Guide to Scalability and Distribution for HP OpenView Network Node Manager.
Figure 3-3. A sample filters file.
It is important to note that NNM uses filters in four different ways. All are defined in the file $OV_CONF/C/filters and all have the same syntax. These filters are called the Discovery Filter, Map Filter, Persistence Filter, and Topology Filter.
A Discovery Filter controls what NNM discovers. The filter is applied in a pulldown menu called Options:Network Polling Configuration:Discovery Filter Option. The precise location of the menu depends on the version of NNM and on any local menu customization.
A Map Filter determines what objects are displayed on the ovw map. It is applied using the pulldown menu Options:Map Configuration. Again, the location of the menu depends on the version of NNM and on any local menu customization.
A Persistence Filter places filtered objects into memory and immediately places discovered objects on the map if they pass the filter. This supports tightly integrated third-party applications that depend on objects being in memory. It is applied from the pulldown menu Options:Map Configuration:IP Map, and the exact menu location is NNM-version dependent.
A Topology Filter operates at the collection station to control what objects will be passed to the management station. The filter name is defined in the $OV_LRF/ovtopmd.lrf file.
SNMP community strings are stored with a host of other SNMP configuration information. This information is controlled with the $OV_BIN/xnmsnmpconf GUI. When a device is found to have a non-default read community string and no amount of arm twisting will convince the device administrator to change it (to “public”), then xnmsnmpconf is the tool for informing NNM. Otherwise, it won’t be possible for NNM to manage the device. A screenshot of xnmsnmpconf is given is Figure 3-4. Refer to the xnmsnmpconf online manpage for details.
Figure 3-4. A sample SNMP configuration screenshot.
This graphical user interface to NNM lets the network manager define SNMP community strings, several SNMP time-out values, and the status polling interval. Incorrect community strings will result in poor autodiscovery performance. For example, a router may be discovered as a simple non-SNMP device if the correct community string is not defined here.

Note that for large networks with many non-default SNMP community strings, it isn’t practical to use the GUI because it’s just too labor-intensive. Instead, use the command line interface for xnmsnmpconf, which allows configuration data to be read from a plain text file.
Imperfect SNMP agents are found in real networks. Occasionally, a badly behaving SNMP agent will confuse netmon, causing it to core dump, spin in an infinite loop, or simply waste a thread by polling the same device endlessly. If sufficient logging and tracing is enabled for netmon (netmon -M 63 is fully verbose), then the $OV_LOG/netmon.trace file will show the offending device. To prevent netmon from continually “stumbling” across these offending devices, place their IP addresses, one line each, in the $OV_CONF/ netmon.noDiscover file.
NNM’s polling parameters are stored in the $OV_CONF/polling file. They’re intended to be configured using the xnmpolling GUI (or appropriate command line options), as shown in Figure 3-5.
Figure 3-5. The polling GUI.
This is the graphical interface to all NNM polling functions. It is used to turn off polling, turn off autodiscovery, control autodiscovery’s aggressiveness, and define the interval for topology and configuration checking.
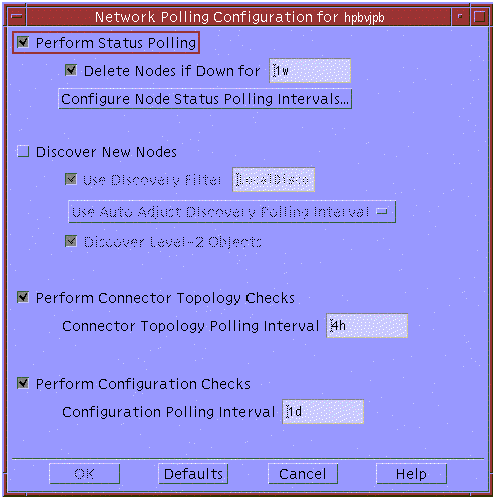
During initial discovery, it may be prudent to turn off the auto adjusting polling feature and instead adopt a fixed interval (of 5 to 15 minutes) to ensure NNM retains its aggressive discovery behavior. This may save considerable time during the initial discovery for the pilot, but it’s not necessary operationally after initial discovery of the production NNM systems. Note that it’s possible to turn discovery off with this GUI. Don’t do that unintentionally.